
![[New] Seamlessly Incorporating YT Clips in Slideshows via PPT](https://www.lifewire.com/thmb/ZOjx6qoOgacS0nkioW0MRpwFWw0=/400x300/filters:no_upscale():max_bytes(150000):strip_icc()/google-maps-traffic-tablet-1e4db031d7cc44cc9de00bd3bf3780a4.jpg)
[New] Seamlessly Incorporating YT Clips in Slideshows via PPT
Seamlessly Incorporating YT Clips in Slideshows via PPT
How to Embed a YouTube Video in PowerPoint

Richard Bennett
Mar 27, 2024• Proven solutions
There might be several instances where you want your audiences to watch a video so that you can elaborate your idea or explain your point more clearly. You may want to do this without leaving the presentation window in order to avoid losing focus from the agenda of the meeting. To make this happen, it is imperative to learn how to embed a YouTube video in PowerPoint.
When talking about PowerPoint, it is an efficient and powerful tool to prepare animated and static presentations, and embedding videos is yet another useful option that the app offers to its users.
That said, here you will learn a couple of methods to embed YouTube video in PowerPoint.
How to Insert YouTube Video into PowerPoint? (4 Methods)
After understanding the benefits of have a video embedded to your presentation, it is now time to learn how to add YouTube video to PowerPoint.
The four most used methods of getting this done are discussed in detailed in the following sections:
Method 1: Using YouTube Video’s URL
Because every YouTube video has a URL (Uniform Resource Locator) that is unique for that particular clip, PowerPoint allows you to use it to embed the footage to any of its slides. The process is simple, and you can follow the steps given below to get this done:
Step 1: Copy the URL
Open your default web browser, go to the YouTube video you want to embed to PowerPoint, and copy its URL from the address bar at the top.
Step 2: Add URL to PowerPoint

Launch PowerPoint if it is not already open, go to the slide you want to embed the YouTube video to, click Insert from menu bar present above the Ribbon, click Video from the Media section at the right end of the Ribbon, click Online Video from the list that appears, in the Enter the URL for the online video field on the Online Video box, paste the URL that you copied earlier, and click Insert to insert YouTube video into PowerPoint.

Step 3: Position the Player
Once the video is added to the PowerPoint slide, drag its frame and reposition it to a suitable location.
Method 2: Embed a YouTube Video with Embed Code (For Microsoft PowerPoint 2016)
Unlike PowerPoint 2019 that accepts URLs and embed codes in a single URL field, MS PowerPoint 2016 lets you choose how you want to insert a video. The step-by-step instructions given below explain how this can be done:
Step 1: Obtain Embed Code
Go to the YouTube video you want to embed to your PowerPoint slide, click the SHARE icon from the left area under the video player, click the Embed icon in the Share box, and click COPY from the bottom-right corner of the Embed Video box that appears next.

Step 2: Get to the PowerPoint’s Insert Video Box
Launch MS PowerPoint 2016, click Insert from the menu bar at the top, from the Media section in the right of the Ribbon, click Video, and then click Online Video to open the Insert Video box.
Step 3: Embed the Video
Paste the embed code you copied earlier in the Paste embed code here field present next to the From a Video Embed Code option, and press Enter to embed YouTube video in PowerPoint.
Method 3: Insert YouTube Video into PowerPoint by Searching Names (For Microsoft PowerPoint 2016)
Microsoft Office 2016 has another lucrative feature that allows users to embed YouTube video in PowerPoint by searching its name. You can follow the steps given below to find the videos published on YouTube, and insert them to your presentation:
Step 1: Get to the Insert Video Box
Use the process explained in Step 2 of Method 2 to get to the Insert Video box after selecting the slide you want to add a video to.
Step 2: Search and Embed a Video
In the Search YouTube field next to the YouTube option, type the name of the video you want to search on YouTube, press Enter, select the video you want to embed, and click Insert to insert YouTube video into PowerPoint.
Method 4: Insert Video from PC
Another method to embed YouTube video in PowerPoint is by downloading the clip to your PC, and then inserting the footage from there. You can use any free YouTube downloader to obtain a video that is available on YouTube.
Once the file is on your computer, the following steps explain how it can be embedded to your PowerPoint slide:
WARNING: YouTube videos may be subject to copyright. Therefore, before downloading and embedding a video to your PowerPoint slide, make sure that you have proper rights to do so, or that the video can be used for the purpose without any written permission from its creator.
Step 1: Get to the Insert Ribbon
Open PowerPoint and select the slide you want to embed a YouTube video to. Go to Insert from the menu bar at the top.
Step 2: Insert the Video
Click the Video icon from the Media section of the Ribbon, click Video on My PC from the list, and use the Insert Video box that appears to select and insert the video to your PowerPoint slide.
Step 3: Resize and/or Modify the Video
Grab any of the six handles of the video you inserted, and drag it inward to decrease the size of the frame. It is advisable to use the corner handle and drag them diagonally to maintain proper aspect ratio of the player’s frame. Next, right-click anywhere inside the frame, click Format Video from the context menu, and use the options that appear in the right pane to make necessary adjustments to the clip like color correction, manage brightness and contrast, etc.
YouTube Embedding Supported PowerPoint Version Checklist
Depending on the version of Microsoft Office you are using, you may or may not be able to embed a YouTube video in PowerPoint. Also, if your version of PowerPoint allows you to do so, the interface and the options may vary from those you see on your friends’ computer or in some online tutorials.
That said, the following table gives a clear picture of which version of Microsoft Office has video embedding option, and/or what level of integration does it allow:
| MS Office Version | Insert YouTube Via URL | Insert an Online Video with an Embed Code | Insert by Searching for the YouTube Video | Play Embedded YouTube Video Offline |
|---|---|---|---|---|
| Microsoft 365 | Yes | No | No | No |
| PowerPoint 2019 | Yes | Yes | No | No |
| PowerPoint 2016 | No | Yes | Yes | No |
| PowerPoint 2013 | No | No | Yes | No |
| PowerPoint 2010 | No | No (Adobe Flash Player Support Discontinued) | No (Adobe Flash Player Support Discontinued) | No |
| PowerPoint 365/2019 for Mac | Yes | No | No | No |
Frequently Asked Questions About Embedding YouTube Videos in PowerPoint
1. Why Can’t I Embed a YouTube Video in PowerPoint 2010?
PowerPoint 2010 uses Adobe Flash Player to play YouTube videos. Since support for Flash Player is discontinued, PowerPoint 2010 isn’t able to play the videos anymore. To resolve this issue, you need to upgrade your version of Microsoft Office to 2013 or later.
2. Why Can’t I Embed YouTube Videos in PowerPoint for Mac?
You can insert YouTube videos only in Office 365 and Office 2019 versions for Mac. If you are using Office 2016 for Mac, you are required to install an add-in called Web Video Player that can be downloaded from the https://appsource.microsoft.com/en-us/product/office/WA104221182 link. However, if it is PowerPoint 2011 for Mac that you are using, you can’t insert YouTube video to it, and you need to upgrade your MS Office to a higher version for that purpose.
3. Why Can’t I Embed a YouTube Video in PowerPoint 2013?
The version of PowerPoint 2013 that was released initially didn’t allow YouTube video embedding. However, with an update 4018374 that Microsoft rolled out in August 2018, the feature got enabled. You can download and install the update from https://support.microsoft.com/en-us/help/4018374/august-7-2018-update-for-powerpoint-2013-kb4018374 link, and then try inserting a YouTube video to your version of PowerPoint.
4. How Do I Embed a YouTube Video in PowerPoint without Being Online?
YouTube videos that you embed to your PowerPoint presentations can’t be played in offline mode. However, there is a workaround to this. You can download the video from YouTube to your computer using any YouTube downloader, and then use the process explained in Method 4 to insert the clip from your PC.
Conclusion
Although the above sections explain how to embed a YouTube video in PowerPoint, the process to do so may vary in different versions of Microsoft Office. Also, depending on what edition of the program you are using, embedding YouTube videos may or may not be supported according to the availability of the add-ins or updates that Microsoft has rolled out for that particular built of the app.
Richard Bennett
Richard Bennett is a writer and a lover of all things video.
Follow @Richard Bennett
Richard Bennett
Mar 27, 2024• Proven solutions
There might be several instances where you want your audiences to watch a video so that you can elaborate your idea or explain your point more clearly. You may want to do this without leaving the presentation window in order to avoid losing focus from the agenda of the meeting. To make this happen, it is imperative to learn how to embed a YouTube video in PowerPoint.
When talking about PowerPoint, it is an efficient and powerful tool to prepare animated and static presentations, and embedding videos is yet another useful option that the app offers to its users.
That said, here you will learn a couple of methods to embed YouTube video in PowerPoint.
How to Insert YouTube Video into PowerPoint? (4 Methods)
After understanding the benefits of have a video embedded to your presentation, it is now time to learn how to add YouTube video to PowerPoint.
The four most used methods of getting this done are discussed in detailed in the following sections:
Method 1: Using YouTube Video’s URL
Because every YouTube video has a URL (Uniform Resource Locator) that is unique for that particular clip, PowerPoint allows you to use it to embed the footage to any of its slides. The process is simple, and you can follow the steps given below to get this done:
Step 1: Copy the URL
Open your default web browser, go to the YouTube video you want to embed to PowerPoint, and copy its URL from the address bar at the top.
Step 2: Add URL to PowerPoint
Launch PowerPoint if it is not already open, go to the slide you want to embed the YouTube video to, click Insert from menu bar present above the Ribbon, click Video from the Media section at the right end of the Ribbon, click Online Video from the list that appears, in the Enter the URL for the online video field on the Online Video box, paste the URL that you copied earlier, and click Insert to insert YouTube video into PowerPoint.
Step 3: Position the Player
Once the video is added to the PowerPoint slide, drag its frame and reposition it to a suitable location.
Method 2: Embed a YouTube Video with Embed Code (For Microsoft PowerPoint 2016)
Unlike PowerPoint 2019 that accepts URLs and embed codes in a single URL field, MS PowerPoint 2016 lets you choose how you want to insert a video. The step-by-step instructions given below explain how this can be done:
Step 1: Obtain Embed Code
Go to the YouTube video you want to embed to your PowerPoint slide, click the SHARE icon from the left area under the video player, click the Embed icon in the Share box, and click COPY from the bottom-right corner of the Embed Video box that appears next.
Step 2: Get to the PowerPoint’s Insert Video Box
Launch MS PowerPoint 2016, click Insert from the menu bar at the top, from the Media section in the right of the Ribbon, click Video, and then click Online Video to open the Insert Video box.
Step 3: Embed the Video
Paste the embed code you copied earlier in the Paste embed code here field present next to the From a Video Embed Code option, and press Enter to embed YouTube video in PowerPoint.
Method 3: Insert YouTube Video into PowerPoint by Searching Names (For Microsoft PowerPoint 2016)
Microsoft Office 2016 has another lucrative feature that allows users to embed YouTube video in PowerPoint by searching its name. You can follow the steps given below to find the videos published on YouTube, and insert them to your presentation:
Step 1: Get to the Insert Video Box
Use the process explained in Step 2 of Method 2 to get to the Insert Video box after selecting the slide you want to add a video to.
Step 2: Search and Embed a Video
In the Search YouTube field next to the YouTube option, type the name of the video you want to search on YouTube, press Enter, select the video you want to embed, and click Insert to insert YouTube video into PowerPoint.
Method 4: Insert Video from PC
Another method to embed YouTube video in PowerPoint is by downloading the clip to your PC, and then inserting the footage from there. You can use any free YouTube downloader to obtain a video that is available on YouTube.
Once the file is on your computer, the following steps explain how it can be embedded to your PowerPoint slide:
WARNING: YouTube videos may be subject to copyright. Therefore, before downloading and embedding a video to your PowerPoint slide, make sure that you have proper rights to do so, or that the video can be used for the purpose without any written permission from its creator.
Step 1: Get to the Insert Ribbon
Open PowerPoint and select the slide you want to embed a YouTube video to. Go to Insert from the menu bar at the top.
Step 2: Insert the Video
Click the Video icon from the Media section of the Ribbon, click Video on My PC from the list, and use the Insert Video box that appears to select and insert the video to your PowerPoint slide.
Step 3: Resize and/or Modify the Video
Grab any of the six handles of the video you inserted, and drag it inward to decrease the size of the frame. It is advisable to use the corner handle and drag them diagonally to maintain proper aspect ratio of the player’s frame. Next, right-click anywhere inside the frame, click Format Video from the context menu, and use the options that appear in the right pane to make necessary adjustments to the clip like color correction, manage brightness and contrast, etc.
YouTube Embedding Supported PowerPoint Version Checklist
Depending on the version of Microsoft Office you are using, you may or may not be able to embed a YouTube video in PowerPoint. Also, if your version of PowerPoint allows you to do so, the interface and the options may vary from those you see on your friends’ computer or in some online tutorials.
That said, the following table gives a clear picture of which version of Microsoft Office has video embedding option, and/or what level of integration does it allow:
| MS Office Version | Insert YouTube Via URL | Insert an Online Video with an Embed Code | Insert by Searching for the YouTube Video | Play Embedded YouTube Video Offline |
|---|---|---|---|---|
| Microsoft 365 | Yes | No | No | No |
| PowerPoint 2019 | Yes | Yes | No | No |
| PowerPoint 2016 | No | Yes | Yes | No |
| PowerPoint 2013 | No | No | Yes | No |
| PowerPoint 2010 | No | No (Adobe Flash Player Support Discontinued) | No (Adobe Flash Player Support Discontinued) | No |
| PowerPoint 365/2019 for Mac | Yes | No | No | No |
Frequently Asked Questions About Embedding YouTube Videos in PowerPoint
1. Why Can’t I Embed a YouTube Video in PowerPoint 2010?
PowerPoint 2010 uses Adobe Flash Player to play YouTube videos. Since support for Flash Player is discontinued, PowerPoint 2010 isn’t able to play the videos anymore. To resolve this issue, you need to upgrade your version of Microsoft Office to 2013 or later.
2. Why Can’t I Embed YouTube Videos in PowerPoint for Mac?
You can insert YouTube videos only in Office 365 and Office 2019 versions for Mac. If you are using Office 2016 for Mac, you are required to install an add-in called Web Video Player that can be downloaded from the https://appsource.microsoft.com/en-us/product/office/WA104221182 link. However, if it is PowerPoint 2011 for Mac that you are using, you can’t insert YouTube video to it, and you need to upgrade your MS Office to a higher version for that purpose.
3. Why Can’t I Embed a YouTube Video in PowerPoint 2013?
The version of PowerPoint 2013 that was released initially didn’t allow YouTube video embedding. However, with an update 4018374 that Microsoft rolled out in August 2018, the feature got enabled. You can download and install the update from https://support.microsoft.com/en-us/help/4018374/august-7-2018-update-for-powerpoint-2013-kb4018374 link, and then try inserting a YouTube video to your version of PowerPoint.
4. How Do I Embed a YouTube Video in PowerPoint without Being Online?
YouTube videos that you embed to your PowerPoint presentations can’t be played in offline mode. However, there is a workaround to this. You can download the video from YouTube to your computer using any YouTube downloader, and then use the process explained in Method 4 to insert the clip from your PC.
Conclusion
Although the above sections explain how to embed a YouTube video in PowerPoint, the process to do so may vary in different versions of Microsoft Office. Also, depending on what edition of the program you are using, embedding YouTube videos may or may not be supported according to the availability of the add-ins or updates that Microsoft has rolled out for that particular built of the app.
Richard Bennett
Richard Bennett is a writer and a lover of all things video.
Follow @Richard Bennett
Unlisted YouTube Explained: Beyond the Main Channels
Complete Guide: What Does Unlisted Mean on YouTube
Richard Bennett
Mar 27, 2024• Proven solutions
Whether personal or professional purposes, YouTube is a great platform for sharing videos but, there are times, when you don’t wish to share it with each and everyone across the globe. The YouTube unlisted meaning is a video which can be viewed only by the users having the link to it. At the back of your mind, you may be wondering how safe an unlisted video is. Let’s learn in detail what does unlisted mean on YouTube.
- Part 1: What is Unlisted Video on YouTube
- Part 2: How to Make YouTube Videos Unlisted
- Part 3: How to Share Unlisted Video
Wondershare Filmora video editor is one of the most widely used video editing software for YouTubers, it makes the video editing simplified with the pre-programmed effects and templates. You can download the free trial version to check.


Part 1: What Does Unlisted Video Mean on YouTube
The YouTube unlisted meaning is that your video will neither come up in the search results nor on your channel. Only the users who have the link to the video can view it. The link can be shared with anyone and everyone, even with the users who do not have a YouTube account. Many people don’t know the difference between private and unlisted YouTube videos . In order to understand what does unlisted mean on YouTube in a detailed way, let’s dive deeper into it and know the difference between public videos, unlisted videos, and private videos.
1. What is Unlisted YouTube Video
Between private and public, you can find the unlisted videos. What does unlisted mean on YouTube? An unlisted video does not appear in the search results, suggestions or video tab. If you unlist a new video, your subscribers won’t receive any notification informing about it. You can share an unlisted video with the people you wish to share and the users having a link to the video can see it. It can also be viewed by the friend of friends if they share the link with their friends.
The unlisted videos are treated like public videos by YouTube. This means that you cannot use the copyright audio or video and it will be reviewed by the YouTube team if other users flag it as inappropriate content within a timeframe of 24-hours .
What Unlisted YouTube Videos Can Do
The unlisted videos can be shared with family and friends. If you are conducting a webinar and wish to share the video with only the registered users, an unlisted video can be used. You may also use the unlisted video for giving access to the people who embedded it while cleaning the YouTube page. For getting feedback from closed groups for market research or to share online resume link for job applications, the unlisted videos can be of great help.
Takeaway: Unlisted videos are a great way to share personal videos with just your family and friends, or to get feedback from people you trust on videos before you decide whether to make them public.
2. What is Private YouTube Video
The videos that do not appear in the recommendations, search options in YouTube or in your tab are the private videos. When you select the private setting for a video, the subscribers don’t get a notification. The private videos can be seen only by the uploader and the mentioned Google accounts. It is not available for friends of friends which mean if you share a private video with a friend, only that person can see it. If your friend shares it with someone, it won’t be visible to others. If anyone wishes to view a private video, the person has to request permission to view to the uploader.

What Private Youtube Videos Can Do
By using private YouTube videos, the internal company information can be kept confidential, the family videos can be shared safely with the people you wish to, and also store your personal data without worrying about being hacked by the strangers. By choosing the private setting, you may upload and schedule the date and time when a video can be made public on YouTube. It helps in saving storage space on your phone.
Takeaway: A private YouTube video is only available to YouTube users that you invite to view it.
3. What are Public Youtube Videos
The Public setting in the YouTube video is a default setting which allows everyone to see the video you post. When you want your video to appear in the search engine results and want more and more viewers and traffic on your video, you can keep the Public default setting on.
What Public YouTube Videos Can Do
Do you wish to grow your brand awareness? Select the Public default setting as it is the best way to do it. You may use the Public setting in any of these situations below:
- Having a video sharing business like explainer videos, product reviews, commercials, etc. with customers or prospective viewers
- Targeting at earning money through YouTube videos
- Looking forward to the growing personal brand by a YouTuber
- Looking for more and more subscribers on YouTube
But, you must remember that once you post the video, it will be available for everyone throughout the world on YouTube. Even if you decide to change the settings or delete the video, later on, you will be subjected to judgment, professionally and personally. While posting a video with Public setting, you must have an answer to questions like-
- Shall the senior or your boss see this video?
- Can your job prospect hamper with this video?
- Does the video contain harassing or offensive content?
- Can your friends ridicule you after seeing the video content?
If all the questions are answered in YES… then it is better to think hard and long before uploading the video content with Public setting on YouTube. You may upload the content with unlisted or private settings.
Takeaway: If you make a video public, anyone will be able to find and watch it. When uploading a video using default settings through YouTube, it will always default to being a public video.
Below is a brief comparison table about the differences among YouTube Unlisted, Private and Public video settings.
| Feature | Unlisted | Private | Public |
|---|---|---|---|
| Can I share video URL to friends? | Yes | No | Yes |
| Can I add video to YouTube channel? | Yes | No | Yes |
| Can I shows up video in YouTube platform? | No | No | Yes |
| Can I post video on my channel? | No | No | Yes |
| Can I leave a comment? | Yes | No | Yes |
| Can I see it in landing page? | Yes | No | Yes |
| Do People need an account to watch it? | No | No | Yes |
Part 2: How to Make an Unlisted YouTube Video
Follow the below-mentioned steps to make an unlisted YouTube video -
- Log in to your YouTube channel
- In the top right corner, click the add video button
- Find the drop-down menu and choose Upload Video
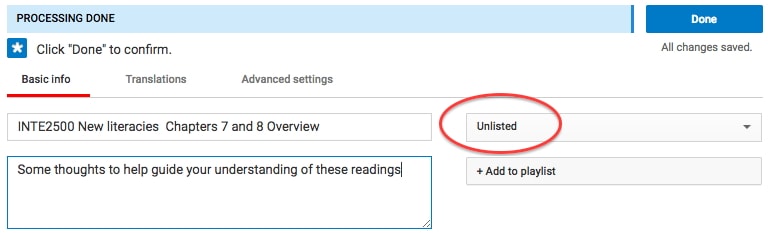
- Select the setting by clicking on Public and a drop-down menu appears to unlisted
- Search the instruction select files to upload your video
- When you start uploading your video, a message box appears, Click Public on the right side corner and select unlisted from the drop-down menu
- Once you have selected unlisted, click Done in the top right corner and your video is published
Part 3: How to Share Your Unlisted Video
If you wish to share the unlisted video , just share the published video link with anyone you wish to share. A Google account is not required to see the video. So, if the person you shared the link with is not logged in to his Google account, still the video can be viewed. The people who have the link to your video can also share and re-share the link in a number of ways. It can be shared on the social media or just forwarded amongst their friends. But, if you don’t want your friends to re-share it, change the settings to Private.
You can see a message showing “this video is unlisted” on YouTube when you want to share someone else’s unlisted video on social platforms. Think before you consider sharing an unlisted video.
Conclusion
Now, that you clearly know what does unlisted mean on YouTube, consider the option while uploading a video. It helps in retaining the privacy of your video.
Richard Bennett
Richard Bennett is a writer and a lover of all things video.
Follow @Richard Bennett
Richard Bennett
Mar 27, 2024• Proven solutions
Whether personal or professional purposes, YouTube is a great platform for sharing videos but, there are times, when you don’t wish to share it with each and everyone across the globe. The YouTube unlisted meaning is a video which can be viewed only by the users having the link to it. At the back of your mind, you may be wondering how safe an unlisted video is. Let’s learn in detail what does unlisted mean on YouTube.
- Part 1: What is Unlisted Video on YouTube
- Part 2: How to Make YouTube Videos Unlisted
- Part 3: How to Share Unlisted Video
Wondershare Filmora video editor is one of the most widely used video editing software for YouTubers, it makes the video editing simplified with the pre-programmed effects and templates. You can download the free trial version to check.
Part 1: What Does Unlisted Video Mean on YouTube
The YouTube unlisted meaning is that your video will neither come up in the search results nor on your channel. Only the users who have the link to the video can view it. The link can be shared with anyone and everyone, even with the users who do not have a YouTube account. Many people don’t know the difference between private and unlisted YouTube videos . In order to understand what does unlisted mean on YouTube in a detailed way, let’s dive deeper into it and know the difference between public videos, unlisted videos, and private videos.
1. What is Unlisted YouTube Video
Between private and public, you can find the unlisted videos. What does unlisted mean on YouTube? An unlisted video does not appear in the search results, suggestions or video tab. If you unlist a new video, your subscribers won’t receive any notification informing about it. You can share an unlisted video with the people you wish to share and the users having a link to the video can see it. It can also be viewed by the friend of friends if they share the link with their friends.
The unlisted videos are treated like public videos by YouTube. This means that you cannot use the copyright audio or video and it will be reviewed by the YouTube team if other users flag it as inappropriate content within a timeframe of 24-hours .
What Unlisted YouTube Videos Can Do
The unlisted videos can be shared with family and friends. If you are conducting a webinar and wish to share the video with only the registered users, an unlisted video can be used. You may also use the unlisted video for giving access to the people who embedded it while cleaning the YouTube page. For getting feedback from closed groups for market research or to share online resume link for job applications, the unlisted videos can be of great help.
Takeaway: Unlisted videos are a great way to share personal videos with just your family and friends, or to get feedback from people you trust on videos before you decide whether to make them public.
2. What is Private YouTube Video
The videos that do not appear in the recommendations, search options in YouTube or in your tab are the private videos. When you select the private setting for a video, the subscribers don’t get a notification. The private videos can be seen only by the uploader and the mentioned Google accounts. It is not available for friends of friends which mean if you share a private video with a friend, only that person can see it. If your friend shares it with someone, it won’t be visible to others. If anyone wishes to view a private video, the person has to request permission to view to the uploader.
What Private Youtube Videos Can Do
By using private YouTube videos, the internal company information can be kept confidential, the family videos can be shared safely with the people you wish to, and also store your personal data without worrying about being hacked by the strangers. By choosing the private setting, you may upload and schedule the date and time when a video can be made public on YouTube. It helps in saving storage space on your phone.
Takeaway: A private YouTube video is only available to YouTube users that you invite to view it.
3. What are Public Youtube Videos
The Public setting in the YouTube video is a default setting which allows everyone to see the video you post. When you want your video to appear in the search engine results and want more and more viewers and traffic on your video, you can keep the Public default setting on.
What Public YouTube Videos Can Do
Do you wish to grow your brand awareness? Select the Public default setting as it is the best way to do it. You may use the Public setting in any of these situations below:
- Having a video sharing business like explainer videos, product reviews, commercials, etc. with customers or prospective viewers
- Targeting at earning money through YouTube videos
- Looking forward to the growing personal brand by a YouTuber
- Looking for more and more subscribers on YouTube
But, you must remember that once you post the video, it will be available for everyone throughout the world on YouTube. Even if you decide to change the settings or delete the video, later on, you will be subjected to judgment, professionally and personally. While posting a video with Public setting, you must have an answer to questions like-
- Shall the senior or your boss see this video?
- Can your job prospect hamper with this video?
- Does the video contain harassing or offensive content?
- Can your friends ridicule you after seeing the video content?
If all the questions are answered in YES… then it is better to think hard and long before uploading the video content with Public setting on YouTube. You may upload the content with unlisted or private settings.
Takeaway: If you make a video public, anyone will be able to find and watch it. When uploading a video using default settings through YouTube, it will always default to being a public video.
Below is a brief comparison table about the differences among YouTube Unlisted, Private and Public video settings.
| Feature | Unlisted | Private | Public |
|---|---|---|---|
| Can I share video URL to friends? | Yes | No | Yes |
| Can I add video to YouTube channel? | Yes | No | Yes |
| Can I shows up video in YouTube platform? | No | No | Yes |
| Can I post video on my channel? | No | No | Yes |
| Can I leave a comment? | Yes | No | Yes |
| Can I see it in landing page? | Yes | No | Yes |
| Do People need an account to watch it? | No | No | Yes |
Part 2: How to Make an Unlisted YouTube Video
Follow the below-mentioned steps to make an unlisted YouTube video -
- Log in to your YouTube channel
- In the top right corner, click the add video button
- Find the drop-down menu and choose Upload Video
- Select the setting by clicking on Public and a drop-down menu appears to unlisted
- Search the instruction select files to upload your video
- When you start uploading your video, a message box appears, Click Public on the right side corner and select unlisted from the drop-down menu
- Once you have selected unlisted, click Done in the top right corner and your video is published
Part 3: How to Share Your Unlisted Video
If you wish to share the unlisted video , just share the published video link with anyone you wish to share. A Google account is not required to see the video. So, if the person you shared the link with is not logged in to his Google account, still the video can be viewed. The people who have the link to your video can also share and re-share the link in a number of ways. It can be shared on the social media or just forwarded amongst their friends. But, if you don’t want your friends to re-share it, change the settings to Private.
You can see a message showing “this video is unlisted” on YouTube when you want to share someone else’s unlisted video on social platforms. Think before you consider sharing an unlisted video.
Conclusion
Now, that you clearly know what does unlisted mean on YouTube, consider the option while uploading a video. It helps in retaining the privacy of your video.
Richard Bennett
Richard Bennett is a writer and a lover of all things video.
Follow @Richard Bennett
- Title: [New] Seamlessly Incorporating YT Clips in Slideshows via PPT
- Author: Joseph
- Created at : 2024-05-31 13:47:29
- Updated at : 2024-06-01 13:47:29
- Link: https://youtube-stream.techidaily.com/new-seamlessly-incorporating-yt-clips-in-slideshows-via-ppt/
- License: This work is licensed under CC BY-NC-SA 4.0.
