![[New] Seamless Navigation to Your Individual Playlist Library on YouTube](https://thmb.techidaily.com/68d72132debc55d7a219d5ad96f3f8ade10f55eb90774e1fcb8b0eea83e6c871.png)
[New] Seamless Navigation to Your Individual Playlist Library on YouTube
Seamless Navigation to Your Individual Playlist Library on YouTube
YouTube Music has become a popular go-to platform for music lovers to find new songs and artists to enjoy. The content is uploaded regularly, so there’s always something new to discover.
But with so much music content on YouTube Music, finding the right mix for you can take time and effort. That’s why we’ve put together this guide on how to find my playlists on YouTube.
We’ll also answer some frequently asked questions to help you find solutions regarding the YouTube Mix queries. So, without wasting time, let’s get on with the guide!
Basic Information of YouTube Mix
Before starting, let’s learn some basic information about the YouTube Music Mix playlists:
Three Ways Of YouTube Music Mix
YouTube has popularized three personalized mixes to keep you up-to-date on newly released music and introduce more artists to you:
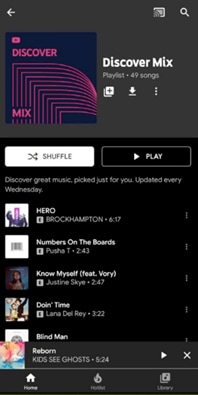
Discover Mix: Discover Mix introduces you to 50 new tracks every week, expanding your musical horizons and introducing you to contemporary artists. This playlist mix provides new updates every Wednesday, making it a go-to playlist for discovering new music to your taste.
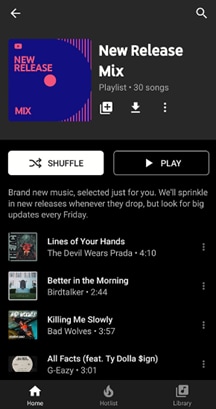
New Release Mix: In the New Release Mix playlist, you can find all the newest tracks from your favorite artists, and some music is recommended. New updates are provided every Friday (when most new releases come out), and mid-week releases the entire week to ensure you’re always up-to-date on the latest music.
Your Mix: Your Mix is a playlist full of songs by popular and well-known artists, as well as some new tunes and performers you’ve never discovered before, which are recommended based on your preferences, making it ideal for unwinding and listening to something you’re guaranteed to love. The playlist is updated regularly, so the music never gets dull, and there’s always something new to listen to.
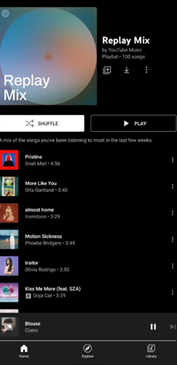
What Is YouTube Music Replay Mix?
YouTube Music Replay Mix is a feature of YouTube Music that is automatically generated via the YouTube algorithm and contains a personalized mix of tracks based on your listening history. The mix is updated daily and includes up to 100 songs.
You can access it by tapping the “Replay Mix” option on the YouTube app’s main screen or the YouTube Music website. This feature is perfect for those who want a continuously updated mix of their favorite songs.
So, if you’re always on the go and need more time to create your playlist, YouTube Music Replay Mix is a great option. Since it’s based on your listening history, you can be sure that you’ll always hear songs that you love.
The Things You Want To Know About YouTube Mix
Now that you’ve what YouTube Mix is, you might have some queries in mind. To help you resolve them, we’ve provided solutions to the most frequently asked questions:
1. How Do I Save My Mix Playlist On YouTube?
To save My Mix playlist on YouTube, launch the YouTube app, tap “More” on the app’s main interface, and tap “Add to Library.” You can also save the playlist by going to the Mix page and tapping “Save” below the description.

2. How Do I Find My Playlist On YouTube?
The YouTube Music Replay Mix playlist is located on the home screen of the YouTube Music app and website under the “Mixed for you” header. Here you can also find other playlists, including “Your likes,” “New Release Mix,” “My Supermix,” and “Discover Mix.”
3. How Do I Add Songs To The Replay Mix Playlist?
You can’t manually add songs to the Replay Mix because YouTube Music automatically adds tracks that you listen to more than once.
The more often you hear a soundtrack, the higher it will appear on the YouTube list. Conversely, songs you’ve only played once or twice will appear lower on the list.
4. How Do I Delete A Mix Playlist On YouTube?
To delete a saved YouTube playlist from the Music library:
- Launch YouTube Music app on your mobile device or head to its website on your computer.
- Tap “Library” on the home screen or homepage and tap the “Mix” you want to delete.
- Tap the**”More”** option on the playlist panel and tap “Remove Playlist From Library.”
5. How Do I Turn Off YouTube Mixes?
To turn off YouTube Mixes, you can use Google extensions or create one yourself if you are an expert in coding.
6. Are YouTube Mixes Endless?
YouTube Music offers an endless personalized music playlist called “My Mixes.” Every time you click or tap the playlist, a new queue of your most listened or favorite tracks is generated for you.
The playlist contains about 100 songs with an endless auto-play feature once you reach the end of the list.
A Bonus Tip: How To Make a Music Video?
Hopefully, you have got the information you need about YouTube Mixes. Supposing you are YouTube music lover, we wonder, do you want to create YouTube videos for your channel or add music to your clips? In that case, we prepared a video tutorial for you - How To Make a Music Video. If you have any interests, you can watch it and learn about how to use the user-friendly video editor to make it:
Here’s why Wondershare Filmora is an excellent option for making YouTube videos or adding music to them:
- Huge royalty-free music library
- Easy to use, even for novice users
- Record videos from your webcam and screen simultaneously
- Multiple advanced video editing features, such as green screen, background blur, keyframe, split screen, motion tracking, and preset templates
- Adds effects, filters, transitions, and animations to your video footage to make it more eye-catching
- Quick “export to YouTube” feature to help you instantly share your final project on your channel
Free Download For Win 7 or later(64-bit)
Free Download For macOS 10.14 or later
If you want additional guidance on adding YouTube Music to your videos using Filmora,click here to learn everything you need to know!
Conclusion
This comprehensive guide explored some basic information about YouTube Music Mix and discussed how to find My Playlist on YouTube Music quickly. We’ve also provided solutions to help you save, find, delete, or turn off YouTube Mix playlists.
In addition, we’ve provided a bonus tip to use Filmora to add music to your YouTube videos and discussed its key features.
Hopefully, you’ve found this article helpful and can now locate your YouTube Music Mix playlist without issues.
Revamping YouTube Videos with Smart Post-Upload Techniques
How to Edit Uploaded/ Published YouTube Videos

Richard Bennett
Mar 27, 2024• Proven solutions
YouTube Video Editor gives you the capacity to edit your video straight from the YouTube platform; these include videos that has already been published or shared. In the first part, we’re going to teach you how to edit your published YouTube videos without losing video ID and URL, in the second part, we offer an advanced video editing tips for edit published videos.
Note: From 20th September 2017 users will no longer be able to use the complimentary editing suite. Check the best YouTube video editor alternatives from this complete guide.
If you want to hide or remove some videos of your or other people’s YouTube channel, you can check this article.
Simply want to do all the stuff on your phone? check this out.
Advanced Tips to Edit Uploaded/ Published YouTube Videos
It is true that YouTube Editor provides us a handy platform that allows us to edit existing YouTube videos in an efficient ways. However, the tools they provide are too basic. If you want to perform a more complex editing, you will need an offline editor such as Windows Movie Maker, iMovei or Adobe Premiere. But if you are looking for an simple while powerful tool, we highly recommend Wondershare Filmora . It is highly compatible with different image, audio, and video format. It is just as simple as importing the video and editing them.
The downside, however, is that you will lose the original ID of the video. This may serve as a problem if you have already shared the video before since the views may disappear. A good solution to this problem is to place an annotation to the old video telling your followers that you have created a better quality of the video then direct them to the link.
Check how to engage your audience to stay tuned from this video below:


Edit Existing YouTube Videos
Let me walk you through a familiar situation, you spend all night trying to make your video perfect, uploaded it on your YouTube channel and shred it to your social media accounts. Then you noticed that you need to repair something. The normal approach back then is to delete the video, re-edit using offline tools and then re-upload it again. Clearly, this process takes too much time. Furthermore, it changes the ID of your video which means that the previous embed will no longer work.
Note: Under this situation, you can’t add more footage or effects to the existing videos.
1. Sigin in
The first thing you need to do to edit uploaded/published YouTube videos is to sign-in with your Google account.

2. Locate the video you want to edit
After signing-in, you now have the option to view all your uploaded videos. Go My Channel > Choose YouTube Studio (it’s a beta version right now).

Click the “Videos” button, and you will see all your uploaded videos here. Choose the one you want to edit

3. Edit YouTube videos
Click on the video you want to edit, and you can see all the info about this video, including title, description, visibility, etc. Choose “Editor” at the left side of the interface, and you will be led to the YouTube video editor’s interface, You can now trim the existing YouTube video by dragging the sliders on the timeline.

4. Save
After you are happy with your edited video, you can now click save.
Note: In case you are not happy with the video that you edited, you can always revert back to your original video. Videos with more than 1,000 views will be saved as a new video after the editing. You may also add notes and annotation to your Videos. This annotation may appear alongside with the video depending on the time that you want it to appear.
Related article: How to add annotation to your YouTube video
Richard Bennett
Richard Bennett is a writer and a lover of all things video.
Follow @Richard Bennett
Richard Bennett
Mar 27, 2024• Proven solutions
YouTube Video Editor gives you the capacity to edit your video straight from the YouTube platform; these include videos that has already been published or shared. In the first part, we’re going to teach you how to edit your published YouTube videos without losing video ID and URL, in the second part, we offer an advanced video editing tips for edit published videos.
Note: From 20th September 2017 users will no longer be able to use the complimentary editing suite. Check the best YouTube video editor alternatives from this complete guide.
If you want to hide or remove some videos of your or other people’s YouTube channel, you can check this article.
Simply want to do all the stuff on your phone? check this out.
Advanced Tips to Edit Uploaded/ Published YouTube Videos
It is true that YouTube Editor provides us a handy platform that allows us to edit existing YouTube videos in an efficient ways. However, the tools they provide are too basic. If you want to perform a more complex editing, you will need an offline editor such as Windows Movie Maker, iMovei or Adobe Premiere. But if you are looking for an simple while powerful tool, we highly recommend Wondershare Filmora . It is highly compatible with different image, audio, and video format. It is just as simple as importing the video and editing them.
The downside, however, is that you will lose the original ID of the video. This may serve as a problem if you have already shared the video before since the views may disappear. A good solution to this problem is to place an annotation to the old video telling your followers that you have created a better quality of the video then direct them to the link.
Check how to engage your audience to stay tuned from this video below:
Edit Existing YouTube Videos
Let me walk you through a familiar situation, you spend all night trying to make your video perfect, uploaded it on your YouTube channel and shred it to your social media accounts. Then you noticed that you need to repair something. The normal approach back then is to delete the video, re-edit using offline tools and then re-upload it again. Clearly, this process takes too much time. Furthermore, it changes the ID of your video which means that the previous embed will no longer work.
Note: Under this situation, you can’t add more footage or effects to the existing videos.
1. Sigin in
The first thing you need to do to edit uploaded/published YouTube videos is to sign-in with your Google account.
2. Locate the video you want to edit
After signing-in, you now have the option to view all your uploaded videos. Go My Channel > Choose YouTube Studio (it’s a beta version right now).
Click the “Videos” button, and you will see all your uploaded videos here. Choose the one you want to edit
3. Edit YouTube videos
Click on the video you want to edit, and you can see all the info about this video, including title, description, visibility, etc. Choose “Editor” at the left side of the interface, and you will be led to the YouTube video editor’s interface, You can now trim the existing YouTube video by dragging the sliders on the timeline.
4. Save
After you are happy with your edited video, you can now click save.
Note: In case you are not happy with the video that you edited, you can always revert back to your original video. Videos with more than 1,000 views will be saved as a new video after the editing. You may also add notes and annotation to your Videos. This annotation may appear alongside with the video depending on the time that you want it to appear.
Related article: How to add annotation to your YouTube video
Richard Bennett
Richard Bennett is a writer and a lover of all things video.
Follow @Richard Bennett
Also read:
- [New] 2024 Approved Elevating Video Previews A Compreayer Approach for YouTube
- [New] Expertly Remove Items From iPhone Photo with Top 6 Apps
- [Updated] A Step-by-Step Technique for Instagram Savings for 2024
- [Updated] Innovative Ways to Record and Preserve Streaming Sounds Online
- 2024 Approved How Big Should a Good Thumbnail Be? YouTube's Ultimate Guide
- 2024 Approved Social Blade's Role in Deciphering the Dynamics of YouTube Statistics
- 2024 Approved The Softer Side of Promotion Elevating Your Audience Count
- 2024 Approved Unveiling the Hidden Mastering the Mask of Background Blur
- Best Android Data Recovery - Retrieve Lost Pictures from Samsung Galaxy F54 5G.
- In 2024, Strategic Income Generation Through YouTube, As Per Sourav Joshi's Playbook
- In 2024, Synth Symphony Selecting Superior DJ Templates for Download
- In 2024, The Composer's Guide to Creating YouTube Music Cohorts
- In 2024, The Urban Ecosystem Fostering Resilience Through Green Policies
- Innovative Methods for Shuffling YT Playlists for 2024
- Metaverse Milestones: Six Intriguing Facebook Updates
- Multi-Format Video Converter: Effortlessly Transform MKV, AVI, MP4, DVD, VOB & M2TS Files
- What You Need To Know To Improve Your ZTE Nubia Z60 Ultra Hard Reset | Dr.fone
- Title: [New] Seamless Navigation to Your Individual Playlist Library on YouTube
- Author: Joseph
- Created at : 2024-09-24 20:21:15
- Updated at : 2024-10-01 20:03:25
- Link: https://youtube-stream.techidaily.com/new-seamless-navigation-to-your-individual-playlist-library-on-youtube/
- License: This work is licensed under CC BY-NC-SA 4.0.