![[New] Seamless Content Propagation Beyond YouTube and Facebook](https://thmb.techidaily.com/589975317cd54578e2464cf37ff9c3436a24bffda2b797c9a9ae1ed0b5abaff9.jpg)
"[New] Seamless Content Propagation Beyond YouTube and Facebook"
Seamless Content Propagation: Beyond YouTube and Facebook
How to Stream to YouTube, Facebook, Twitch and Over 30 Platforms

Richard Bennett
Mar 27, 2024• Proven solutions
- Part1.How to Stream to YouTube, Twitch, Hitbox and other Platforms at the same time?
- Part2.How to Stream to YouTube and Facebook at the same time Without Restream Platform?
- Part3.About Restream.io
How to Stream to YouTube, Twitch, Hitbox and other Platforms at the same time?
Step 1: To begin with the process, first of all you need to go to <https://restream.io/ >. Sign up here and login with your account.

Step 2: Now go to the dashboard and simply add your channel.
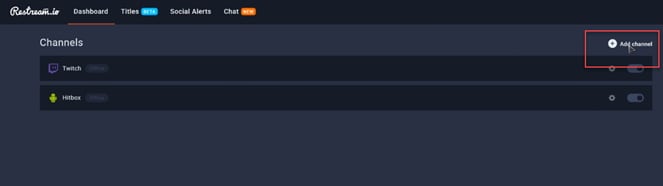
Step 3: Here you will find so many streaming platforms like YouTube, uStream, Dailymotion, HitBox etc.

Step 4: Select your desired platform out of this wide list and then sign in.

Step 5: The screen will proceed with simple to follow steps; go with specified instructions and sign in to your desired streaming platform.
Step 6: Now you can easily turn On-Off your channels for streaming.
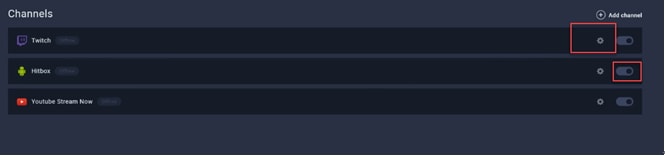
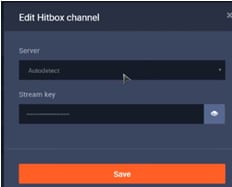
Step 7: It is time to edit your channel.
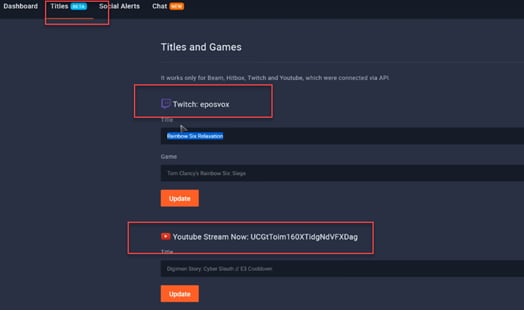
Step 8: Now put eye catching title for your live stream.
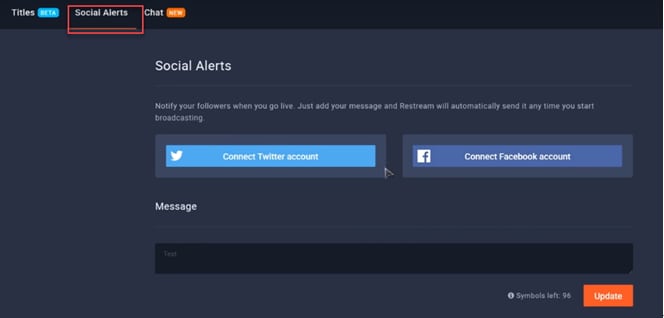
Step 9: This platform also allow users to get connected to their SNS account for the social alerts.
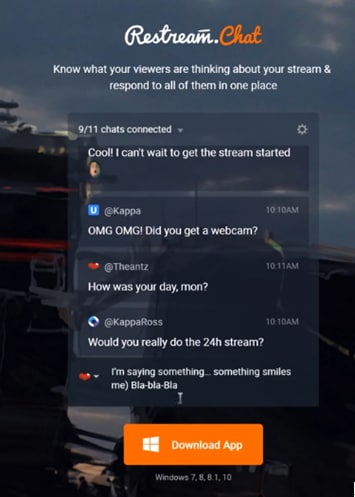
Step 10: Users can also manage their chats using interactive chat tools.
Step 11: Once you are done with all above settings on restream.io then it is time to start with streaming software. Professionals recommend using OBS, Wirecast or xSplit for best results and easy interface.

Step 12: Let us considered OBS for current restream.io services.
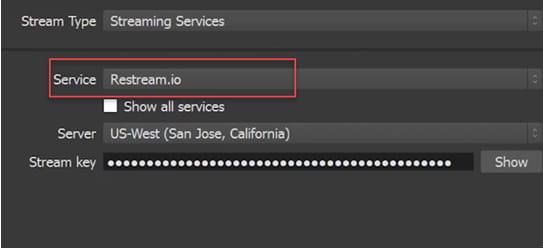
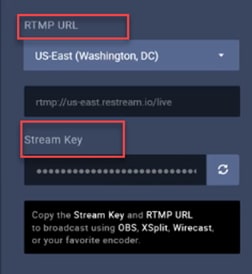
Step 13: Now simply copy your RTMP URL as well as the stream key from restream.io platform and paste it in the specified field on streaming software.
Step 14: As soon as you finished these settings then hit the Stream Button. Soon you will be able to find your videos on selected live stream platforms.


How to Stream to YouTube and Facebook at the same time Without Restream Platform?
Step 1: First of all you need to download Wirecast software tool on your device. Choose anyone from Wirecast Studio and Wirecast Pro as per your budget and needs. Get it installed.
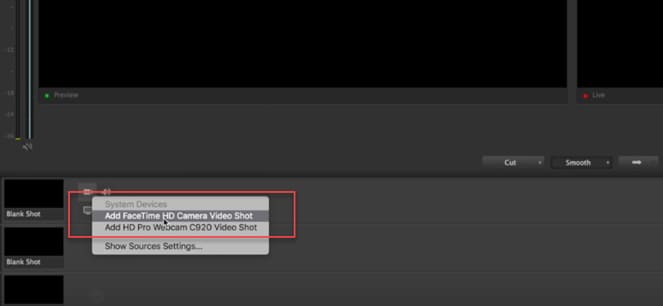
Step 2: Launch wirecast on your system and then add your camera.
Step 3: Once you have added your camera to this tool then simply hit the Go Live button.
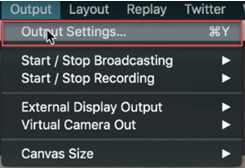
Step 4: Move to Output and adjust settings.
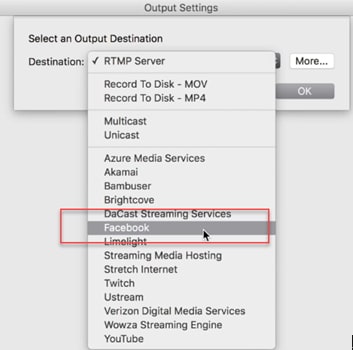
Step 5: From the drop down menu appearing on screen, choose Facebook as your destination.
Step 6: It is time to enter name and then click on Authenticate.
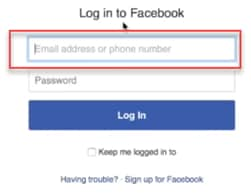
Step 7: You need to login to facebook now.

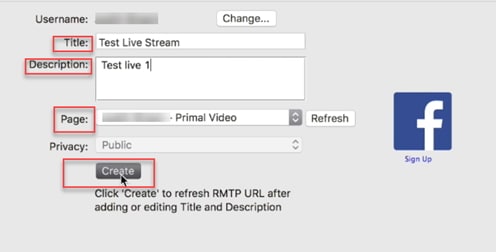
Step 8: Add your live stream title and an eye catching description.
Step 9: Select page for streaming and then hit the Create button.
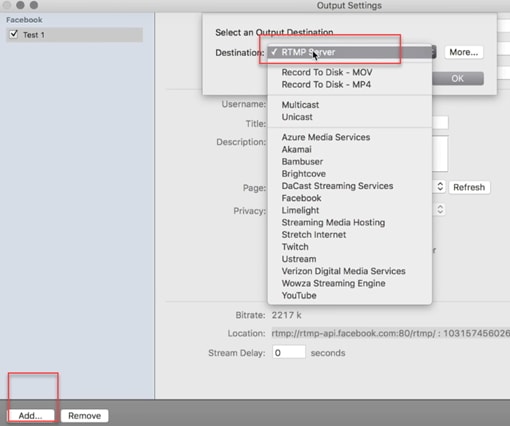
Step 10: As soon as your facebook stream is developed, then go to bottom left corner of your screen and then click add. Create another live stream but instead of choosing YouTube as your preferences, select RTMP.
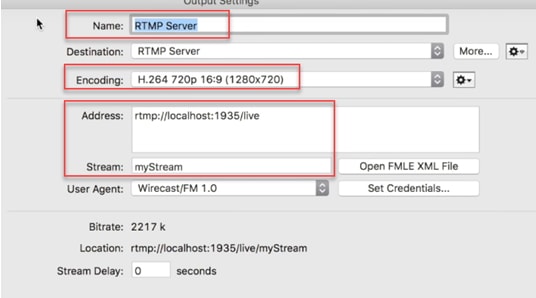
Step 11: Now add name for your YouTube stream and adjust the encoding quality to 720p. After this you need to move to YouTube and get your stream name as well as address from this platform.
Step 12: Move to YouTube creator studio and then select live streaming. Choose live stream now option and then find encoder setup.

Step 13: It is time to copy the server URL and paste it on Wirecast address. Also copy the stream name and paste it on Wirecast platform.
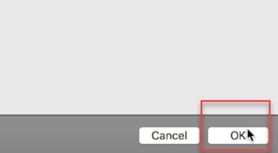
Step 14: Once all these settings are complete then hit OK.
Step 15: Now click Stream button on Wirecast platform.

About Restream.io
Restream.io allows streaming over 30 plus platforms with easy processing and intuitive interface. The best thing to know about this platform is that it never creates watermarks or pre-roll ads and there is no specific limit or restriction for stream duration. It not even forces users on specific bitrate limits. In simple words, here users can work with freedom and enjoy streaming with best results.
Restream Chats are highly interactive where users can add interesting imojies to grab more attention. It can be accessed on Window platform with all interactive features.
Richard Bennett
Richard Bennett is a writer and a lover of all things video.
Follow @Richard Bennett
Richard Bennett
Mar 27, 2024• Proven solutions
- Part1.How to Stream to YouTube, Twitch, Hitbox and other Platforms at the same time?
- Part2.How to Stream to YouTube and Facebook at the same time Without Restream Platform?
- Part3.About Restream.io
How to Stream to YouTube, Twitch, Hitbox and other Platforms at the same time?
Step 1: To begin with the process, first of all you need to go to <https://restream.io/ >. Sign up here and login with your account.
Step 2: Now go to the dashboard and simply add your channel.
Step 3: Here you will find so many streaming platforms like YouTube, uStream, Dailymotion, HitBox etc.
Step 4: Select your desired platform out of this wide list and then sign in.
Step 5: The screen will proceed with simple to follow steps; go with specified instructions and sign in to your desired streaming platform.
Step 6: Now you can easily turn On-Off your channels for streaming.
Step 7: It is time to edit your channel.
Step 8: Now put eye catching title for your live stream.
Step 9: This platform also allow users to get connected to their SNS account for the social alerts.
Step 10: Users can also manage their chats using interactive chat tools.
Step 11: Once you are done with all above settings on restream.io then it is time to start with streaming software. Professionals recommend using OBS, Wirecast or xSplit for best results and easy interface.
Step 12: Let us considered OBS for current restream.io services.
Step 13: Now simply copy your RTMP URL as well as the stream key from restream.io platform and paste it in the specified field on streaming software.
Step 14: As soon as you finished these settings then hit the Stream Button. Soon you will be able to find your videos on selected live stream platforms.
How to Stream to YouTube and Facebook at the same time Without Restream Platform?
Step 1: First of all you need to download Wirecast software tool on your device. Choose anyone from Wirecast Studio and Wirecast Pro as per your budget and needs. Get it installed.
Step 2: Launch wirecast on your system and then add your camera.
Step 3: Once you have added your camera to this tool then simply hit the Go Live button.
Step 4: Move to Output and adjust settings.
Step 5: From the drop down menu appearing on screen, choose Facebook as your destination.
Step 6: It is time to enter name and then click on Authenticate.
Step 7: You need to login to facebook now.
Step 8: Add your live stream title and an eye catching description.
Step 9: Select page for streaming and then hit the Create button.
Step 10: As soon as your facebook stream is developed, then go to bottom left corner of your screen and then click add. Create another live stream but instead of choosing YouTube as your preferences, select RTMP.
Step 11: Now add name for your YouTube stream and adjust the encoding quality to 720p. After this you need to move to YouTube and get your stream name as well as address from this platform.
Step 12: Move to YouTube creator studio and then select live streaming. Choose live stream now option and then find encoder setup.
Step 13: It is time to copy the server URL and paste it on Wirecast address. Also copy the stream name and paste it on Wirecast platform.
Step 14: Once all these settings are complete then hit OK.
Step 15: Now click Stream button on Wirecast platform.
About Restream.io
Restream.io allows streaming over 30 plus platforms with easy processing and intuitive interface. The best thing to know about this platform is that it never creates watermarks or pre-roll ads and there is no specific limit or restriction for stream duration. It not even forces users on specific bitrate limits. In simple words, here users can work with freedom and enjoy streaming with best results.
Restream Chats are highly interactive where users can add interesting imojies to grab more attention. It can be accessed on Window platform with all interactive features.
Richard Bennett
Richard Bennett is a writer and a lover of all things video.
Follow @Richard Bennett
10 Recording Tips to Record Audio in High Quality
10 Recording Tips for Recording Audio with High Quality
Richard Bennett
Oct 26, 2023• Proven solutions
Getting the best sound for your recording is not as simplistic as buying an expensive microphone. There are many different things you can do to record your audio more clearly. Here are 10 recording tips to record high-quality audio.
1. Silence everything you don’t want your microphone to record
2. Put your mobile phone in airplane mode
3. Minimize echo
4. Block wind from reaching your microphone
5. Upgrade your microphone
6. Adjust your levels
7. Start with a sound cue if you’re planning to do some syncing in post
8. Get close to the sound
9. ADR
10. Record Ambient Sound
Bonus Tip-Record Your Audio with Wondershare Filmora
Wondershare Filmora has great recording features that enable you to record screen , voiceover, and webcam. Just connect the recording device to your computer, and start the recording in Wondershare Filmora and you will get high-quality audio. And you can also easily pick a song from the royalty-free music library on Wondershare Filmora. These audio features on Filmora are rare and very simple to use, you only need to click a few times and your video will have a new sound and background song.


1. Silence everything you don’t want your microphone to record
When you’re recording audio, you have to be more aware of the subtle sounds that drone on in your background. These sounds may include humming from machines with fans, buzzing from lights, and jingling from your pet’s collar. Observe your recording space and find ways to silence everything that you don’t want in your audio recording.
2. Put your mobile phone in airplane mode
Although it may be quite obvious to turn your phone’s ring tone off when you’re recording, it may not be as obvious to put your phone in airplane mode. When phones receive calls or perform searches as part of their background processes, they emit signals that can get picked up by your recording system. Avoid ruining good takes with unwanted sounds of phone signals by putting your phones in airplane mode.
3. Minimize echo
If you are recording yourself talk or sing, make sure to set up your recording space in a way where the sound projected from your voice bounces minimally off the walls and back to your microphone. Bare walls and hardwood floors will cause a lot of bouncing. Make use of materials that will absorb your sound rather than bounce it, like a thick rug or a comforter. If you want your voice to echo, that’s something you should do in post-production.
4. Block wind from reaching your microphone
Although it might not sound so loud and distracting to the naked ear, wind sounds terribly loud through a microphone recording and can cause your audio to clip (distortion of waveform due to output of sound exceeding maximum capacity or 0 dB point). This includes the “wind” that comes out of your mouth when you pronounce words starting with the letter “p.” Use pop filters, windscreens, and deadcats to block wind from reaching your microphone.
5. Upgrade your microphone
As much as you try to control all the noise in your surroundings, your greatest recording limitation will come from the hardware that you use. Improve your recordings by plugging in an external microphone into your camera’s microphone jack or record audio completely separately with a professional microphone.
Need help with deciding on a microphone to buy? Check out our recommended list of microphones.
6. Adjust your levels
Before pressing the record button, see how loudly your microphone picks up the sound you wish to record. Adjust your levels (sensitivity of your microphone) until the sound sits in between -6 dBs and -12dBs. This range gives the source of your sound some room to get louder without the recorded audio getting clipped. When you first listen to audio recorded within this range, it may sound very quiet. No need to worry though because you can increase the volume later in editing.
7. Start with a sound cue if you’re planning to do some syncing in post
If you’re recording separate audio that you plan to sync to your video later in editing, start your recording with a short and loud sound cue like a clap or a high pitched “beep” tone. Later, when you’re editing, it’ll be much easier for you to find the section where your video and additional audio match.
8. Get close to the sound
Unless you’re aiming to record ambient sound, bring your microphone close to the source of sound you are wanting to record. The closer your microphone is to the source of sound, the lower your sensitivity setting can be on your microphone. As a result of lowering your levels, sounds you are not meaning to record will also sound fainter.
9. ADR
When you need to record a scene in a loud setting where you have very little control over the noise, record additional vocals later and replace the original vocals through a process called automated dialogue replacement.
10. Record Ambient Sound
Remember to record ambient sound or “room tone.” You can use these recordings to fill in the blanks if you run out of audio and also smooth out parts of your audio where you hear pops, clicks, and other unwanted noise.
Richard Bennett
Richard Bennett is a writer and a lover of all things video.
Follow @Richard Bennett
Richard Bennett
Oct 26, 2023• Proven solutions
Getting the best sound for your recording is not as simplistic as buying an expensive microphone. There are many different things you can do to record your audio more clearly. Here are 10 recording tips to record high-quality audio.
1. Silence everything you don’t want your microphone to record
2. Put your mobile phone in airplane mode
3. Minimize echo
4. Block wind from reaching your microphone
5. Upgrade your microphone
6. Adjust your levels
7. Start with a sound cue if you’re planning to do some syncing in post
8. Get close to the sound
9. ADR
10. Record Ambient Sound
Bonus Tip-Record Your Audio with Wondershare Filmora
Wondershare Filmora has great recording features that enable you to record screen , voiceover, and webcam. Just connect the recording device to your computer, and start the recording in Wondershare Filmora and you will get high-quality audio. And you can also easily pick a song from the royalty-free music library on Wondershare Filmora. These audio features on Filmora are rare and very simple to use, you only need to click a few times and your video will have a new sound and background song.
1. Silence everything you don’t want your microphone to record
When you’re recording audio, you have to be more aware of the subtle sounds that drone on in your background. These sounds may include humming from machines with fans, buzzing from lights, and jingling from your pet’s collar. Observe your recording space and find ways to silence everything that you don’t want in your audio recording.
2. Put your mobile phone in airplane mode
Although it may be quite obvious to turn your phone’s ring tone off when you’re recording, it may not be as obvious to put your phone in airplane mode. When phones receive calls or perform searches as part of their background processes, they emit signals that can get picked up by your recording system. Avoid ruining good takes with unwanted sounds of phone signals by putting your phones in airplane mode.
3. Minimize echo
If you are recording yourself talk or sing, make sure to set up your recording space in a way where the sound projected from your voice bounces minimally off the walls and back to your microphone. Bare walls and hardwood floors will cause a lot of bouncing. Make use of materials that will absorb your sound rather than bounce it, like a thick rug or a comforter. If you want your voice to echo, that’s something you should do in post-production.
4. Block wind from reaching your microphone
Although it might not sound so loud and distracting to the naked ear, wind sounds terribly loud through a microphone recording and can cause your audio to clip (distortion of waveform due to output of sound exceeding maximum capacity or 0 dB point). This includes the “wind” that comes out of your mouth when you pronounce words starting with the letter “p.” Use pop filters, windscreens, and deadcats to block wind from reaching your microphone.
5. Upgrade your microphone
As much as you try to control all the noise in your surroundings, your greatest recording limitation will come from the hardware that you use. Improve your recordings by plugging in an external microphone into your camera’s microphone jack or record audio completely separately with a professional microphone.
Need help with deciding on a microphone to buy? Check out our recommended list of microphones.
6. Adjust your levels
Before pressing the record button, see how loudly your microphone picks up the sound you wish to record. Adjust your levels (sensitivity of your microphone) until the sound sits in between -6 dBs and -12dBs. This range gives the source of your sound some room to get louder without the recorded audio getting clipped. When you first listen to audio recorded within this range, it may sound very quiet. No need to worry though because you can increase the volume later in editing.
7. Start with a sound cue if you’re planning to do some syncing in post
If you’re recording separate audio that you plan to sync to your video later in editing, start your recording with a short and loud sound cue like a clap or a high pitched “beep” tone. Later, when you’re editing, it’ll be much easier for you to find the section where your video and additional audio match.
8. Get close to the sound
Unless you’re aiming to record ambient sound, bring your microphone close to the source of sound you are wanting to record. The closer your microphone is to the source of sound, the lower your sensitivity setting can be on your microphone. As a result of lowering your levels, sounds you are not meaning to record will also sound fainter.
9. ADR
When you need to record a scene in a loud setting where you have very little control over the noise, record additional vocals later and replace the original vocals through a process called automated dialogue replacement.
10. Record Ambient Sound
Remember to record ambient sound or “room tone.” You can use these recordings to fill in the blanks if you run out of audio and also smooth out parts of your audio where you hear pops, clicks, and other unwanted noise.
Richard Bennett
Richard Bennett is a writer and a lover of all things video.
Follow @Richard Bennett
Also read:
- [New] Financial Insights for Vids How Much Do YouTubers Earn Per Sponsorship?
- [New] How to Apply a Classic Video Transition with Camtasia 9 for 2024
- [New] In 2024, Spectacular Video Connections Quest
- 2024 Approved Navigating the Spotlight How to Optimize Content Visibility on Youtube
- Comprehensive Guide to the Corsair Air A115 CPU Cooler: Powerful & Silent but Costly
- ImageCraft Tools for 2024
- In 2024, Get Ahead with These Best 7 Android Browsers Without Ads
- NTFS Errors Resolved: A Step-by-Step Repair Tutorial for Windows 10 Users
- Realtek AIoT Drivers Compatible with Windows 11 - Free & Fast Downloads!
- Streamline Social Syncing: Integrate Facebook Storage with Top Services
- Title: [New] Seamless Content Propagation Beyond YouTube and Facebook
- Author: Joseph
- Created at : 2024-10-12 20:28:04
- Updated at : 2024-10-18 18:34:18
- Link: https://youtube-stream.techidaily.com/new-seamless-content-propagation-beyond-youtube-and-facebook/
- License: This work is licensed under CC BY-NC-SA 4.0.