
![[New] Navigating the Mobile Journey to Launch a YouTube Channel](https://thmb.techidaily.com/1505d6f4180ef3234fcf66cf60e394c6b774b52749b9718fd3308deebd93e5f0.jpg)
[New] Navigating the Mobile Journey to Launch a YouTube Channel
Navigating the Mobile Journey to Launch a YouTube Channel
Versatile YouTube Video Editor - Filmora
An easy yet powerful editor
Numerous effects to choose from
Detailed tutorials provided by the official channel
The relevance of YouTube and the need to have a channel are visible with the rise in viewership. Having launched on February 14th, 2005, YouTube has become the 2nd most visited social media website according to Google statistics having a whopping over 2 billion users on the platform monthly.
As an entrepreneur or a company, one of the easiest and fastest ways of selling your brand or skill is via the YouTube platform. Thus, you must know how to make a YouTube channel on iPhone and how to make a YouTube channel on Android. Having overwhelming subscribers becomes an added advantage as not only will you and your business be known or recognized, YouTube has a way of appreciating and paying some of their influencers as well.
At this point, I know how hungry you are to kick-start your YouTube. This article will help guide you through creating a YouTube channel on your mobile, whether for personal or business purposes. Rather than scanning through, you should peruse through attentively.
In this article
01 How to Make a Personal YouTube Channel on Mobile
02 How to Create a Business YouTube on Mobile
03 Five Tips to Start a YouTube channel
Part 1: How to Make a Personal YouTube Channel on Mobile
Creating a YouTube channel on mobile is not a cumbersome one. It is as easy as ABC, and within split seconds you’ve created your own YouTube channel. The guideline entails the following steps:
- The first step to setting up your personal YouTube channel starts with creating a Google account for those who don’t have any yet.
- Whether you open your YouTube app or via the web browser of your phone, open the YouTube website.
- On the top right-hand side of your mobile, tap on your profile image
Source: howtogeek.com
- A drop-down menu will pop up. Click on your channel icon.
- An option to create a new channel comes up. (For those who have a channel already, an alternative to manage your channel or video will show.)
- An option to input your name pops up on the screen. Carefully insert your desired name and tap on Create.
- If you would love to halt and resume later in the setting up, you can scroll down to click on the ‘set up later.’
Part 2: How to Create a Business YouTube on Mobile
The clarity on the relevance of YouTube in this dispensation when it comes to branding or business-boosting is immense. Many savvy entrepreneurs and business companies have come to the known for their beautiful advantages. With over 2 billion people trooping into the site monthly, making your brand come to the limelight in this social media implies reaching one-tenth of the users,i.e., if you play by the rules of strategically planning your business growth, the top. However, this article may not reveal the different strategies to adopt so you can become an influencer in your line of business; instead, it will start from scratch on how to get your YouTube business page started. How then can one create his own business YouTube account?
1. Signing into a Google account
To successfully start using the YouTube app, there is a need to sign officially into Google. If you’ve it in mind to have a separate Google account for your business account, you kick-start it at this stage.
However, you can still use your name to open a Google account and create a business YouTube account for subsequent use. The truth is that YouTube gives room for you still to make a business account with a business name thus, eliminating the need to use a business name in creating your Google account.
2. Creating a business name
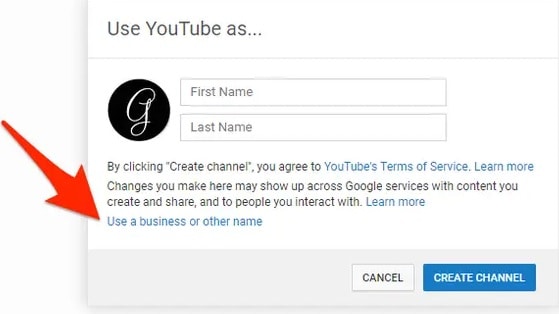
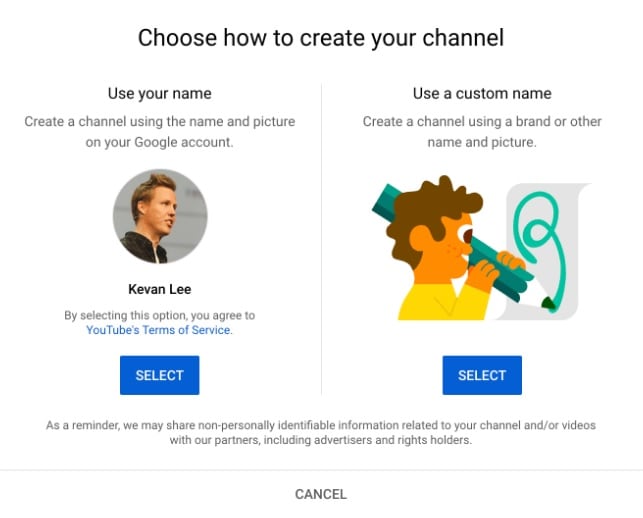
Once you create a Google account, the next step is to make your business a YouTube account. This you do by either signing into your YouTube app or via the YouTube website in your mobile browser. Once logged in to the app interface, you will see the profile photo you used in creating your Google account or the initial letter of the first name you used on the top right-hand side of your mobile. Tap on it, and a drop-down menu will come up, tap on the ‘create a channel’ icon, which will lead you to another interface where you have the option to select ‘Get started’ or ‘No thanks.’ A tap on the get started will reveal an option to either create your channel using the name and image of your Google account or use a customized name.
Source: buffer.com
Selecting the custom name gives you the autonomy to use the brand or business name of your choice, after which you tap on the create option.
3. Customize your business page
At this point, you can design the layout by utilizing the appealing icon and banner of your choice, just as provided by the likes of Facebook or Twitter. The customized templates in Canva are there for you to design your page to your state.
I know you would be wondering how to go about this; YouTube can directly upload your artwork with a preview option available. You can crop your artwork to fit your page, making it look more professional.
To be emphatic, creating a business account is still simple but with professionalism. Remember you are selling yourself and your brand, and it is expedient to give your best on your page. Do well to describe your page as excellent as you can, let your activity in terms of photo and video uploads be of the best. This way, subscribers will not hesitate to hit the like and subscribe button. Good luck as you kick-start your business page.
Part 3: Five Tips to Start a YouTube channel
Carefully observe how YouTube channels function and possibly how entrepreneurs and business owners make waves in the YouTube industry. Then, sit down and watch either your mobile phone or computer and think about making a YouTube Channel on iPhone or understand how to create a YouTube Channel on mobile and earn money, especially to beginners. This way, you can make it envy to all becomes a significant challenge—however, the crucial tips in starting your own YT channel.
Identify Goal of Channel
What are you trying to achieve? Customer education, testimonials or do you want people to subscribe? Be clear on what you want your YouTube channel to do for your brand and how it fits into your overall marketing strategy.
Gather Content Ideas
Gather content, even before you make a YouTube channel on mobile. You can start with a series of videos talking about your company, products, or industry and then launch the channel once they are all done. If you can’t think of any content on your own, try searching around online to see if others have already created videos of this sort and have posted them online. Then, use those videos as examples when you make your content.
Logo and Thumbnail Design
How to make a logo for YouTube on mobile?
Once you are up with content creation, you will have to create a thumbnail for your video. Attractive and catchy thumbnails that persuade searchers to click on your video are critical. Here we will see how to create a logo for a YouTube video on mobile. For this purpose, Canva.com can create attractive thumbnails and a Catchy logo. Using this tool, you can create, edit and customize graphics for your YouTube videos.
Quality of Video is Important
Don’t just put up videos willy-nilly. Think about what content would work for your brand and audience. The content needs to be engaging, relevant, and inspiring so people will keep coming back for more videos. You don’t have to have the latest video equipment either – think about the type of content that would work best.
Choose Video Editing Software
Wondershare Filmora
Get started easily with Filmora’s powerful performance, intuitive interface, and countless effects!
Try It Free Try It Free Try It Free Learn More >

Lastly, you must use high-quality producing software. So we recommend Filmora Video Editor that offers a wide range of effects, themes, and titles. It lets you create professional-looking videos with various presets for quick editing. It incorporates support for most common video formats. If you’re looking for a straightforward but potent video editor, Filmora is your best option.
Conclusion
I firmly believe that at this point, understanding how to create a YouTube channel in mobile will be an easy one. We discussed ways of not just developing your YT channel but also how to give your page the best of professional work. This article is truly an eye-opener and contains from scratch the step-wise order of growing and learning how to make a logo for YouTube Channel in mobile and creating personal and business accounts to earn some money.
The relevance of YouTube and the need to have a channel are visible with the rise in viewership. Having launched on February 14th, 2005, YouTube has become the 2nd most visited social media website according to Google statistics having a whopping over 2 billion users on the platform monthly.
As an entrepreneur or a company, one of the easiest and fastest ways of selling your brand or skill is via the YouTube platform. Thus, you must know how to make a YouTube channel on iPhone and how to make a YouTube channel on Android. Having overwhelming subscribers becomes an added advantage as not only will you and your business be known or recognized, YouTube has a way of appreciating and paying some of their influencers as well.
At this point, I know how hungry you are to kick-start your YouTube. This article will help guide you through creating a YouTube channel on your mobile, whether for personal or business purposes. Rather than scanning through, you should peruse through attentively.
In this article
01 How to Make a Personal YouTube Channel on Mobile
02 How to Create a Business YouTube on Mobile
03 Five Tips to Start a YouTube channel
Part 1: How to Make a Personal YouTube Channel on Mobile
Creating a YouTube channel on mobile is not a cumbersome one. It is as easy as ABC, and within split seconds you’ve created your own YouTube channel. The guideline entails the following steps:
- The first step to setting up your personal YouTube channel starts with creating a Google account for those who don’t have any yet.
- Whether you open your YouTube app or via the web browser of your phone, open the YouTube website.
- On the top right-hand side of your mobile, tap on your profile image
Source: howtogeek.com
- A drop-down menu will pop up. Click on your channel icon.
- An option to create a new channel comes up. (For those who have a channel already, an alternative to manage your channel or video will show.)
- An option to input your name pops up on the screen. Carefully insert your desired name and tap on Create.
- If you would love to halt and resume later in the setting up, you can scroll down to click on the ‘set up later.’
Part 2: How to Create a Business YouTube on Mobile
The clarity on the relevance of YouTube in this dispensation when it comes to branding or business-boosting is immense. Many savvy entrepreneurs and business companies have come to the known for their beautiful advantages. With over 2 billion people trooping into the site monthly, making your brand come to the limelight in this social media implies reaching one-tenth of the users,i.e., if you play by the rules of strategically planning your business growth, the top. However, this article may not reveal the different strategies to adopt so you can become an influencer in your line of business; instead, it will start from scratch on how to get your YouTube business page started. How then can one create his own business YouTube account?
1. Signing into a Google account
To successfully start using the YouTube app, there is a need to sign officially into Google. If you’ve it in mind to have a separate Google account for your business account, you kick-start it at this stage.
However, you can still use your name to open a Google account and create a business YouTube account for subsequent use. The truth is that YouTube gives room for you still to make a business account with a business name thus, eliminating the need to use a business name in creating your Google account.
2. Creating a business name
Once you create a Google account, the next step is to make your business a YouTube account. This you do by either signing into your YouTube app or via the YouTube website in your mobile browser. Once logged in to the app interface, you will see the profile photo you used in creating your Google account or the initial letter of the first name you used on the top right-hand side of your mobile. Tap on it, and a drop-down menu will come up, tap on the ‘create a channel’ icon, which will lead you to another interface where you have the option to select ‘Get started’ or ‘No thanks.’ A tap on the get started will reveal an option to either create your channel using the name and image of your Google account or use a customized name.
Source: buffer.com
Selecting the custom name gives you the autonomy to use the brand or business name of your choice, after which you tap on the create option.
3. Customize your business page
At this point, you can design the layout by utilizing the appealing icon and banner of your choice, just as provided by the likes of Facebook or Twitter. The customized templates in Canva are there for you to design your page to your state.
I know you would be wondering how to go about this; YouTube can directly upload your artwork with a preview option available. You can crop your artwork to fit your page, making it look more professional.
To be emphatic, creating a business account is still simple but with professionalism. Remember you are selling yourself and your brand, and it is expedient to give your best on your page. Do well to describe your page as excellent as you can, let your activity in terms of photo and video uploads be of the best. This way, subscribers will not hesitate to hit the like and subscribe button. Good luck as you kick-start your business page.
Part 3: Five Tips to Start a YouTube channel
Carefully observe how YouTube channels function and possibly how entrepreneurs and business owners make waves in the YouTube industry. Then, sit down and watch either your mobile phone or computer and think about making a YouTube Channel on iPhone or understand how to create a YouTube Channel on mobile and earn money, especially to beginners. This way, you can make it envy to all becomes a significant challenge—however, the crucial tips in starting your own YT channel.
Identify Goal of Channel
What are you trying to achieve? Customer education, testimonials or do you want people to subscribe? Be clear on what you want your YouTube channel to do for your brand and how it fits into your overall marketing strategy.
Gather Content Ideas
Gather content, even before you make a YouTube channel on mobile. You can start with a series of videos talking about your company, products, or industry and then launch the channel once they are all done. If you can’t think of any content on your own, try searching around online to see if others have already created videos of this sort and have posted them online. Then, use those videos as examples when you make your content.
Logo and Thumbnail Design
How to make a logo for YouTube on mobile?
Once you are up with content creation, you will have to create a thumbnail for your video. Attractive and catchy thumbnails that persuade searchers to click on your video are critical. Here we will see how to create a logo for a YouTube video on mobile. For this purpose, Canva.com can create attractive thumbnails and a Catchy logo. Using this tool, you can create, edit and customize graphics for your YouTube videos.
Quality of Video is Important
Don’t just put up videos willy-nilly. Think about what content would work for your brand and audience. The content needs to be engaging, relevant, and inspiring so people will keep coming back for more videos. You don’t have to have the latest video equipment either – think about the type of content that would work best.
Choose Video Editing Software
Wondershare Filmora
Get started easily with Filmora’s powerful performance, intuitive interface, and countless effects!
Try It Free Try It Free Try It Free Learn More >
Lastly, you must use high-quality producing software. So we recommend Filmora Video Editor that offers a wide range of effects, themes, and titles. It lets you create professional-looking videos with various presets for quick editing. It incorporates support for most common video formats. If you’re looking for a straightforward but potent video editor, Filmora is your best option.
Conclusion
I firmly believe that at this point, understanding how to create a YouTube channel in mobile will be an easy one. We discussed ways of not just developing your YT channel but also how to give your page the best of professional work. This article is truly an eye-opener and contains from scratch the step-wise order of growing and learning how to make a logo for YouTube Channel in mobile and creating personal and business accounts to earn some money.
Achieving Depth in Indoor Vlogging Lighting
Lighting Tips for Vlogging: How to Light

Richard Bennett
Mar 27, 2024• Proven solutions
One of the best things you can do for your video quality is to ensure you have great lighting. Viewers find poor lighting distracting and it’s hard for them to see how great your content is if they are busy thinking about why your video is so dark. By creating a great lighting set up you can ensure that the people watching your videos are only thinking about how much they’re enjoying them.
Going outside and using natural light is the cheapest way to get a lot of light for your videos. If your vlog is not suited to the great outdoors then you need to get more strategic. You can turn on all the lights in your living room and still end up with a dark, grainy, video.
Video Lighting Basics: Three Point Lighting

The most common technique of lighting a scene is called three-point lighting. It involves three different sources of light in the shot and is used by portrait photographers, which is also a great method for lighting your vlog.
The brightest source of light is also known as the key light which need to be high quality. A window will work, but if you do not have access to one where you are filming then consider an LED panel light or a softbox light like the ones used in portrait photography.
This first light will create a dramatic shadow across half of your face. You want to reduce this shadow, but not get rid of it completely.
Rather than setting up another light source on the opposite side of the camera, put up a reflector to bounce some light back onto your face. This reflector is called your ‘Fill Light’.
The fill light is less bright than the primary source of light and it is placed on the side opposite to the key light. Its purpose is to reduce shadows produced by the key light and the reflector will need to be mounted on a stand.
The final step to creating three point lighting is to set up another light behind you. This is your ‘Backlight’, and it will help you stand out from your background. Backlight or Hair light is always placed behind and above the subject to create separation between the subject in the shot and the background. This basic lighting technique can be applied in almost every scene you shoot, which is why it is important to keep an open mind and to continue experimenting with possible light setups.
Watch Video! Top Lighting Tips for Vlogging
Lightning Tips for Aspiring YouTube Videographers
Becoming the master of light will take some time and practice, so it is crucial to remain curious and anxious to learn new tricks throughout that process if you want to continually become better. These tips will help you make the first steps on that journey.
1. Focus Your Key Light
Try to focus your Key Light so that it lights only you and not your background. Do this by mounting anything that can cast a shadow onto your Key Light to control the area where the light hits. If you are using a window for your Key Light then you can use a curtain. If you use a softbox light then your light will already be somewhat focused.
2. Use Natural Lighting
The light provided by the Sun is still the best light source, you can have in your video. The trouble is that natural light changes quickly, which makes it highly unpredictable. The best way to deal with this challenge is to come prepared to the set and to get the shot you want as quickly as you can.
3. Try DIY Lightning
Literally, anything from candles to LED light bulbs can serve as a source of light in a shot. You just need to pay attention to the light temperature, because warmer light sources may highlight reds and yellows that can make your footage look less realistic.
4. Use Lightning Kits
This is by far the best option if you want to be in complete control of the light on your set. You can adjust the intensity of the lights, use filters, diffusers and all sorts of other accessories to create the light that flatters the subjects of your videos. The only downside is that you’ll have to spend a considerable amount of money if you want to have a professional lighting kit.
5. Set up reflectors
Sets of reflectors are often under $50, so they are fairly affordable. However, some vloggers choose to forgo purchasing reflectors and make their own out of tinfoil.

If your strong main light is too hard on your eyes then you can use a translucent ‘reflector’ to soften it. Set your translucent reflector, or other screen, up in front of your main light to diffuse it.
If you are hosting a beauty vlog then you might consider a slightly different set up. Instead of having your main light off to one side set it up directly in front of you so your entire face is lit evenly. It is still a good idea to use fill lights in this set up to give you some dimension, and a backlight is even more essential for helping you stand out from the background. The even light hitting your face will also make you look flat if you do not use a backlight.

If you are using all of the lighting options available to you and your video still looks too dark then you can try brightening it by opening up the aperture of your camera lens/setting a lower f-stop. Letting more light into your camera can help your footage look brighter, although you also run the risk of making things look overexposed/ washed out if you are not careful.
If you are stuck shooting in low light conditions it is best to use a lens with a wider aperture/lower f-stop. This will make the best of the light you do have.
Richard Bennett
Richard Bennett is a writer and a lover of all things video.
Follow @Richard Bennett
Richard Bennett
Mar 27, 2024• Proven solutions
One of the best things you can do for your video quality is to ensure you have great lighting. Viewers find poor lighting distracting and it’s hard for them to see how great your content is if they are busy thinking about why your video is so dark. By creating a great lighting set up you can ensure that the people watching your videos are only thinking about how much they’re enjoying them.
Going outside and using natural light is the cheapest way to get a lot of light for your videos. If your vlog is not suited to the great outdoors then you need to get more strategic. You can turn on all the lights in your living room and still end up with a dark, grainy, video.
Video Lighting Basics: Three Point Lighting
The most common technique of lighting a scene is called three-point lighting. It involves three different sources of light in the shot and is used by portrait photographers, which is also a great method for lighting your vlog.
The brightest source of light is also known as the key light which need to be high quality. A window will work, but if you do not have access to one where you are filming then consider an LED panel light or a softbox light like the ones used in portrait photography.
This first light will create a dramatic shadow across half of your face. You want to reduce this shadow, but not get rid of it completely.
Rather than setting up another light source on the opposite side of the camera, put up a reflector to bounce some light back onto your face. This reflector is called your ‘Fill Light’.
The fill light is less bright than the primary source of light and it is placed on the side opposite to the key light. Its purpose is to reduce shadows produced by the key light and the reflector will need to be mounted on a stand.
The final step to creating three point lighting is to set up another light behind you. This is your ‘Backlight’, and it will help you stand out from your background. Backlight or Hair light is always placed behind and above the subject to create separation between the subject in the shot and the background. This basic lighting technique can be applied in almost every scene you shoot, which is why it is important to keep an open mind and to continue experimenting with possible light setups.
Watch Video! Top Lighting Tips for Vlogging
Lightning Tips for Aspiring YouTube Videographers
Becoming the master of light will take some time and practice, so it is crucial to remain curious and anxious to learn new tricks throughout that process if you want to continually become better. These tips will help you make the first steps on that journey.
1. Focus Your Key Light
Try to focus your Key Light so that it lights only you and not your background. Do this by mounting anything that can cast a shadow onto your Key Light to control the area where the light hits. If you are using a window for your Key Light then you can use a curtain. If you use a softbox light then your light will already be somewhat focused.
2. Use Natural Lighting
The light provided by the Sun is still the best light source, you can have in your video. The trouble is that natural light changes quickly, which makes it highly unpredictable. The best way to deal with this challenge is to come prepared to the set and to get the shot you want as quickly as you can.
3. Try DIY Lightning
Literally, anything from candles to LED light bulbs can serve as a source of light in a shot. You just need to pay attention to the light temperature, because warmer light sources may highlight reds and yellows that can make your footage look less realistic.
4. Use Lightning Kits
This is by far the best option if you want to be in complete control of the light on your set. You can adjust the intensity of the lights, use filters, diffusers and all sorts of other accessories to create the light that flatters the subjects of your videos. The only downside is that you’ll have to spend a considerable amount of money if you want to have a professional lighting kit.
5. Set up reflectors
Sets of reflectors are often under $50, so they are fairly affordable. However, some vloggers choose to forgo purchasing reflectors and make their own out of tinfoil.
If your strong main light is too hard on your eyes then you can use a translucent ‘reflector’ to soften it. Set your translucent reflector, or other screen, up in front of your main light to diffuse it.
If you are hosting a beauty vlog then you might consider a slightly different set up. Instead of having your main light off to one side set it up directly in front of you so your entire face is lit evenly. It is still a good idea to use fill lights in this set up to give you some dimension, and a backlight is even more essential for helping you stand out from the background. The even light hitting your face will also make you look flat if you do not use a backlight.
If you are using all of the lighting options available to you and your video still looks too dark then you can try brightening it by opening up the aperture of your camera lens/setting a lower f-stop. Letting more light into your camera can help your footage look brighter, although you also run the risk of making things look overexposed/ washed out if you are not careful.
If you are stuck shooting in low light conditions it is best to use a lens with a wider aperture/lower f-stop. This will make the best of the light you do have.
Richard Bennett
Richard Bennett is a writer and a lover of all things video.
Follow @Richard Bennett
Also read:
- Gear Up for Greatness Choosing Webcams for YouTube Excellence for 2024
- [New] Novice Networking Affordable Channel Buy Options
- Integrating Playlist Videos From YouTube on Websites for 2024
- Mastering Deleted YT Content Two Simplified Approaches for 2024
- [New] Strategies for Full-Time Workers Who Create Videos
- 2024 Approved 6 Free Software to Convert YouTube to MP3 for iPhone
- Master YouTube Sound Playback Variations for 2024
- In 2024, Mastering the Download of YouTube's Default Thumbnails Effortlessly
- 2024 Approved Investigating Top Viewed Comments
- [Updated] Conveniently Remove Downloaded YouTube Media for Lightweight Devices for 2024
- 3 Ways to Track Apple iPhone XR without Them Knowing | Dr.fone
- In-Depth ASMR Video Insights for 2024
- [Updated] Inspiration in Every Frame Top TikTok Personalities for 2024
- Crafting Excellent Micro Photography Videos Step by Step
- 2024 Approved Masterpieces 14 Animated Textual Works
- [New] Steps to Sign-In with Google Meet (Laptop & Mobile)
- [Updated] Flight Finesse and Colorful Charm – Bebop 2’S Parrot Showcase
- Simple ways to get lost videos back from Pixel 7a
- 2024 Approved How to Select a YouTube Gaming Introduction Maker Free or Paid Edition
- Title: [New] Navigating the Mobile Journey to Launch a YouTube Channel
- Author: Joseph
- Created at : 2024-06-11 08:11:55
- Updated at : 2024-06-12 08:11:55
- Link: https://youtube-stream.techidaily.com/new-navigating-the-mobile-journey-to-launch-a-youtube-channel/
- License: This work is licensed under CC BY-NC-SA 4.0.
