
![[New] How to Upload Shorts Video on YouTube?](https://www.lifewire.com/thmb/MDGL2kMJllFexcxpsA_p345aX0g=/400x300/filters:no_upscale():max_bytes(150000):strip_icc()/The-Conjuring-3-3d34f5a-scaled-96b4939261ee4274a8be036e7e6aa405.jpeg)
[New] How to Upload Shorts Video on YouTube?
How to Upload Shorts Video on YouTube?
How to Upload Shorts Video on YouTube? [2024]

Richard Bennett
Mar 27, 2024• Proven solutions


Quite recently, YouTube launched Shorts to compete with Tik Tok. At the time of this writing, the users in India have access to the fully functional version of the app. Although YouTube Shorts is available for both Android and iOS platforms, its functions are limited as the application is still in its Beta phase for the remaining part of the globe.
With that said, the following sections explain the step-by-step process on how to upload a short video on YouTube Shorts both from your smartphone and a PC.
Part 1: How to Upload Short Video on YouTube from PC?
The fact is, if you are using a computer to upload short videos to YouTube, the process is identical to publishing your other, regular footage. However, there are a few guidelines that your clips must comply with so that the streaming platform could specifically identify them as YouTube Shorts. These norms include:
- Your videos must not be more than 60 seconds long in duration
- They must be shot in portrait orientation, ideally in the 9:16 aspect ratio
- The title or the description must contain ‘#Shorts’ (without quotes) in it
Once you have a video recorded using the first two guidelines from the above list, you can use the instructions given below to upload the media on YouTube:
Step 1: Select a Short Video to Upload
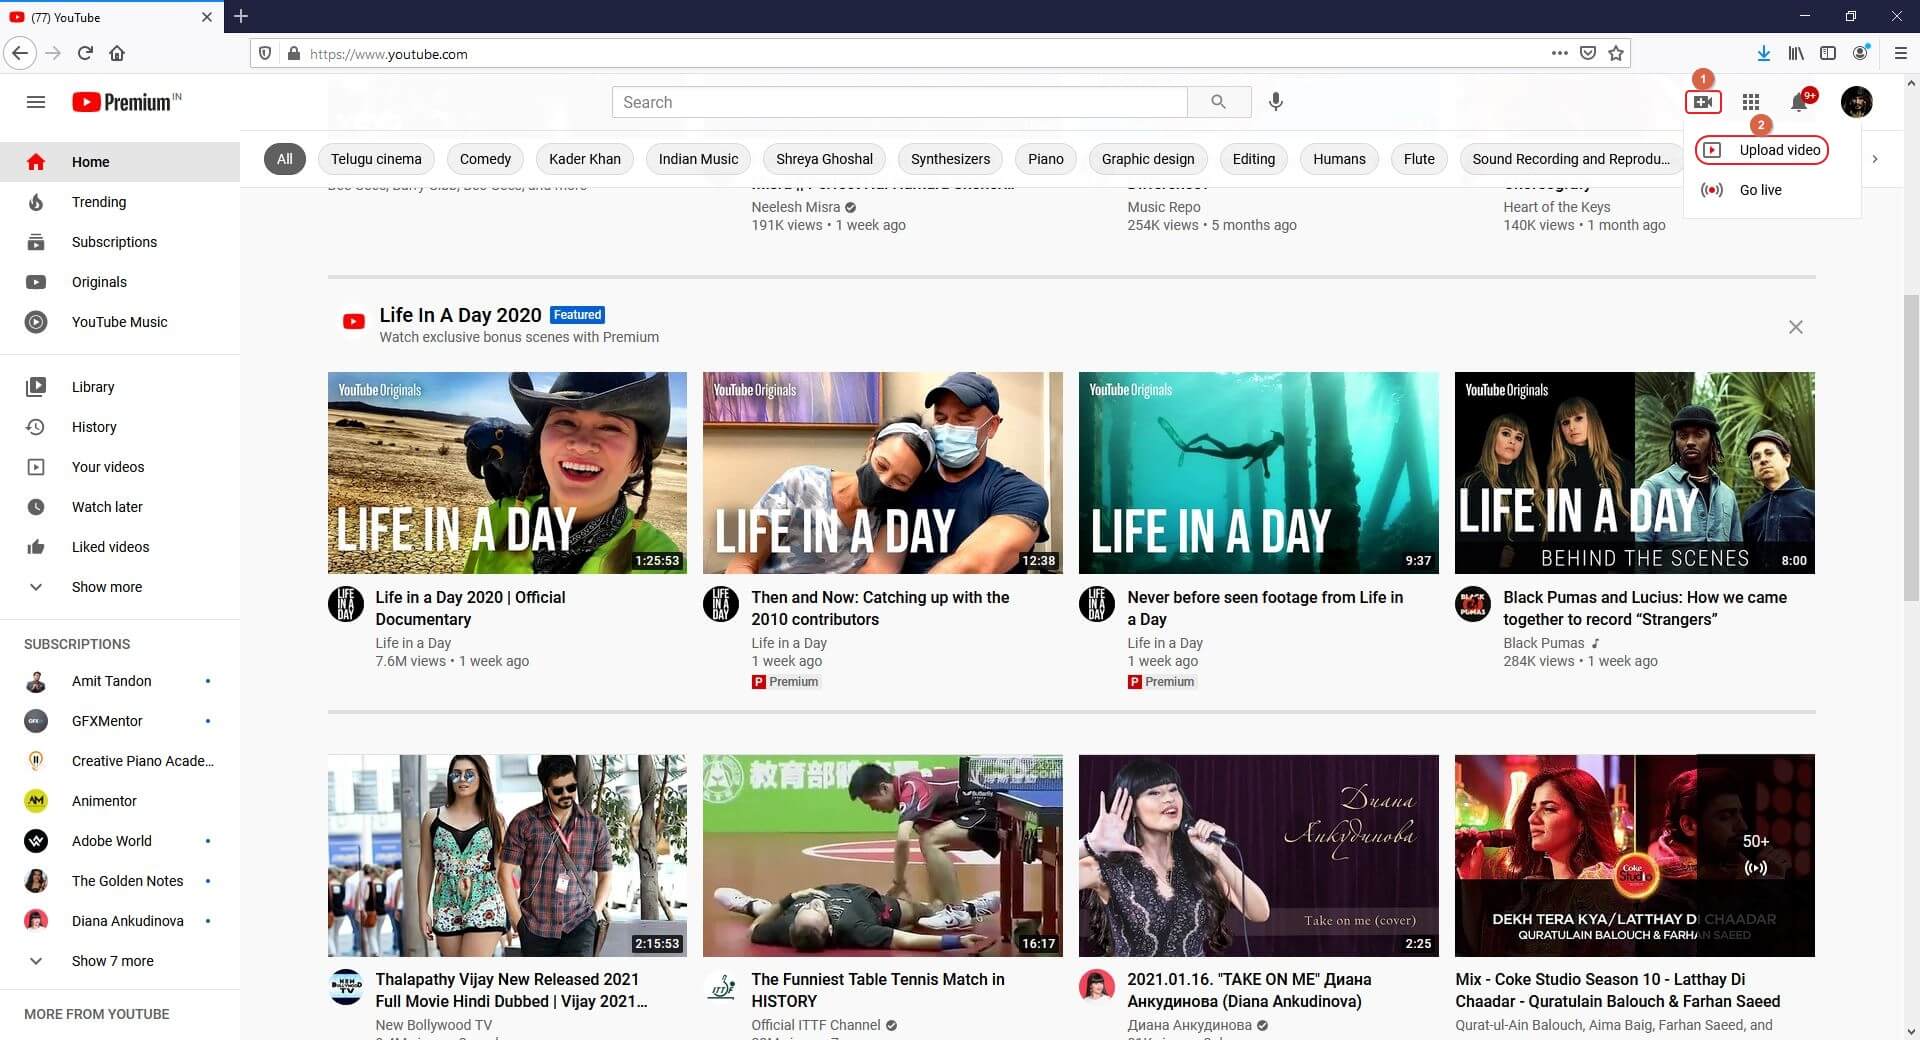
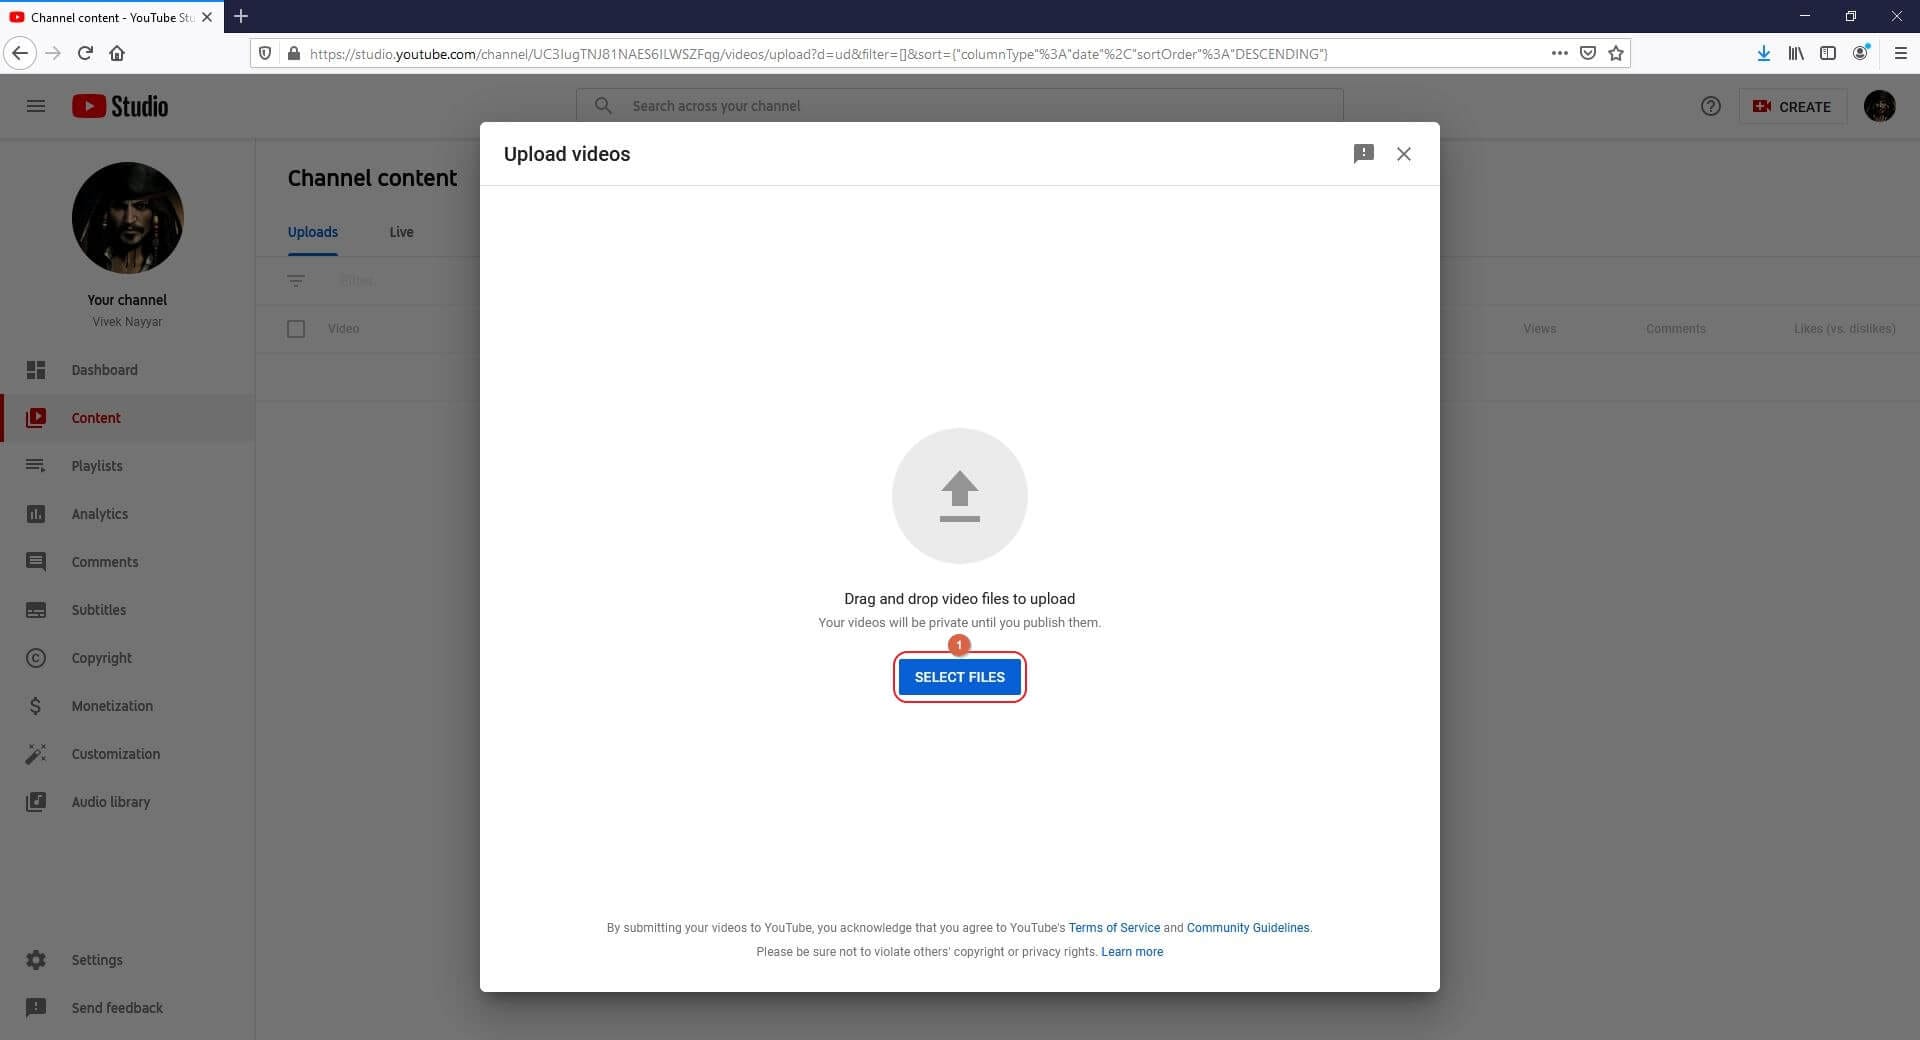
Launch your favorite web browser on your PC, go to YouTube, make sure to sign in to your YouTube account, click the Create (Camera) icon from the top-right corner of the web page, click SELECT FILES on the Upload videos window, and locate, select, and upload a short video from your PC to the portal.
Step 2: Mark the Video as Short
On the Details window that appears, add #Shorts in the Title or Description field, optionally pick a thumbnail from the suggested images present under the Thumbnail section (or upload a custom picture from your PC), select your preferred radio button from under the Audience section, make the other necessary changes if need be, and click NEXT. When the Video elements window comes up, choose your preferred options and elements, click NEXT.

Step 3: Publish the Short Video
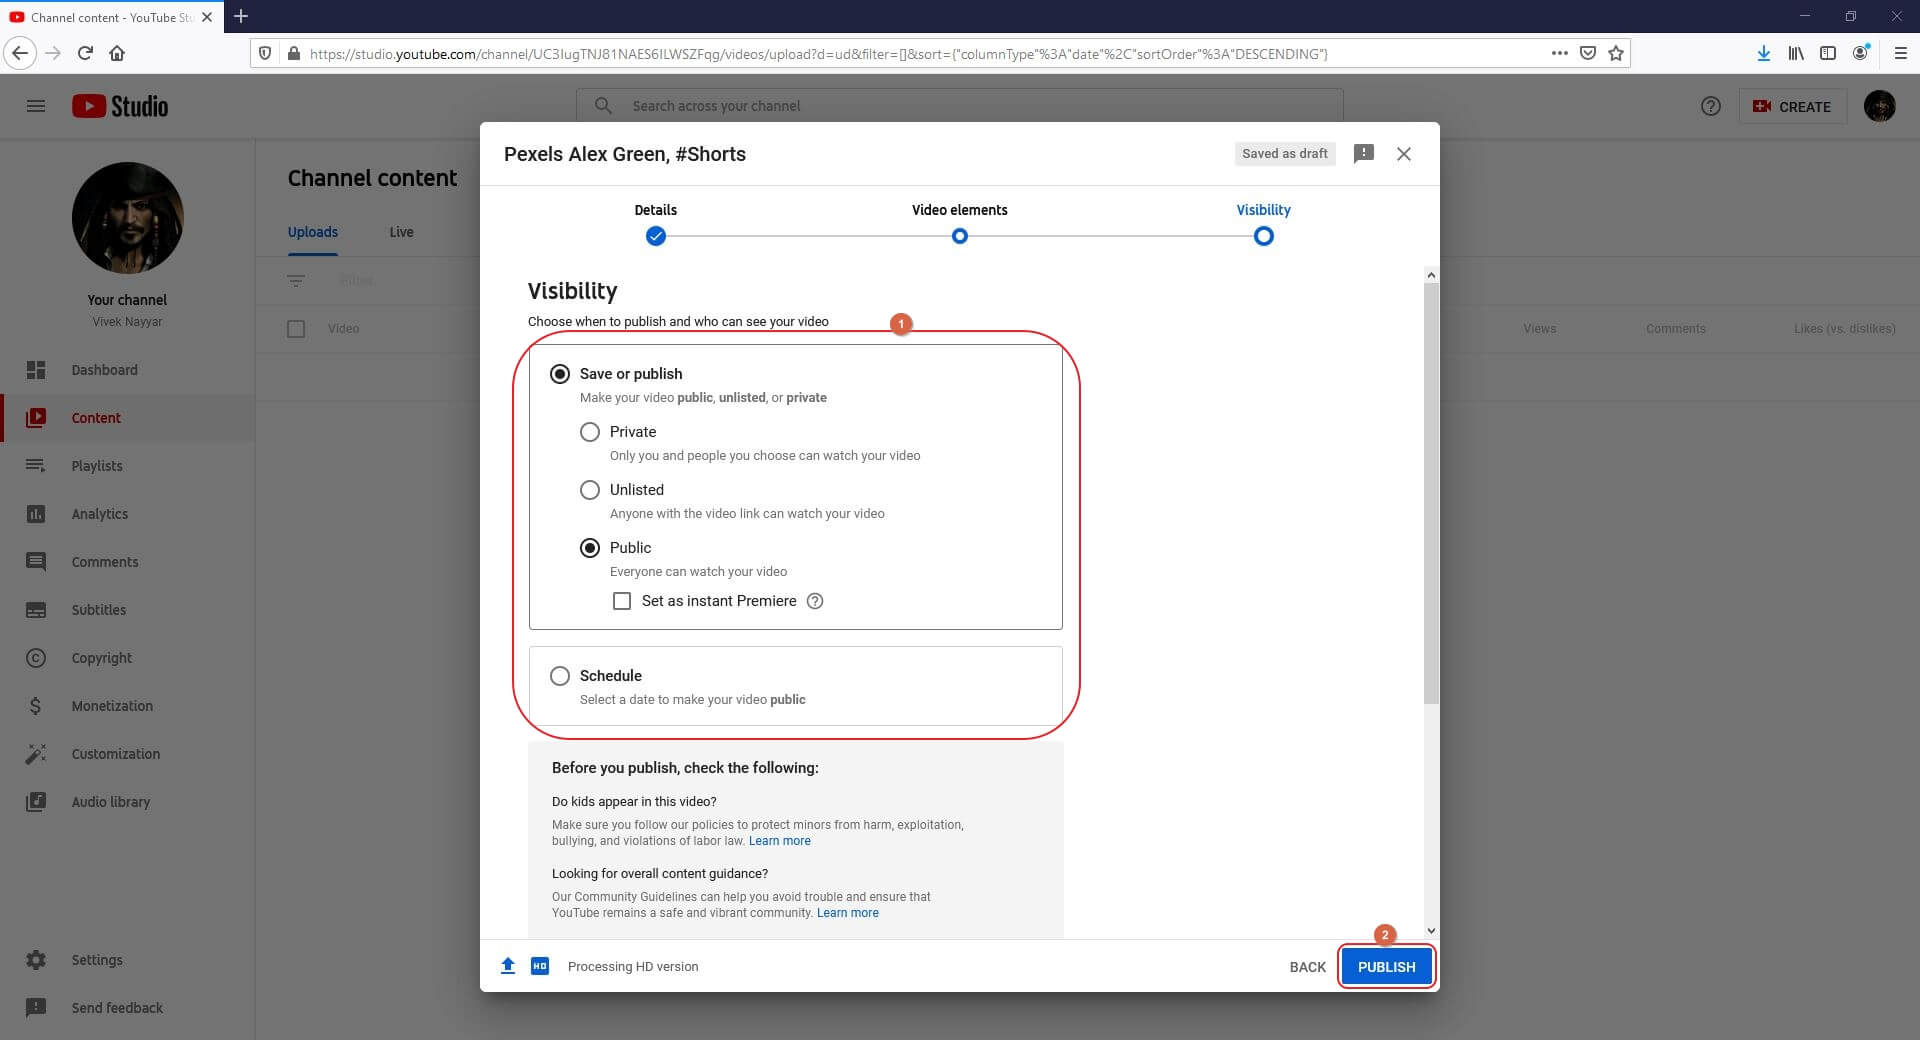
On the Visibility window, choose your preferred radio button from under the Save or publish section or select Schedule to set a different time when the short video should be published automatically. Finally, click SAVE to publish the clip as a short video on YouTube from your computer.
To sum up, uploading YouTube Shorts video from desktop has nothing different from uploading regular YouTube video besides the requirements listed at the beginning of this article. If you prefer to edit videos for YouTube Shortson a computer, I recommend you to try our video editor Filmora , which is an ideal solution for YouTubers. Download the free trial version below and get started.
For Win 7 or later (64-bit)
 Secure Download
For macOS 10.12 or later
Secure Download
Part 2: How to Upload Short Video on YouTube Mobile App?
The process of uploading YouTube Shorts from the mobile app is fairly simple compared to the method used on a computer. While using the app, you can either upload an existing video or shoot a new one from within the program itself then and there, add music and text, and upload it right away. Both these methods are explained below in detail:
Note: The guidelines for creating and uploading short videos to YouTube remain the same, regardless of the platform or device you use.
Method 1: Upload an Existing Short Video
Note: Make sure to have the target video on the smartphone and that you have downloaded, installed, and signed in to the YouTube app before proceeding.
Step 1: Select a Video to Upload

On your Android or iOS smartphone, launch the YouTube app, tap the + (Create) icon from the bottom, tap Create a Short from the Create box that pops up from the bottom, tap Upload from the bottom-right corner of the next screen, and select and upload a short, 60 seconds video recorded in portrait orientation from your device’s storage to the app.
Step 2: Add Details
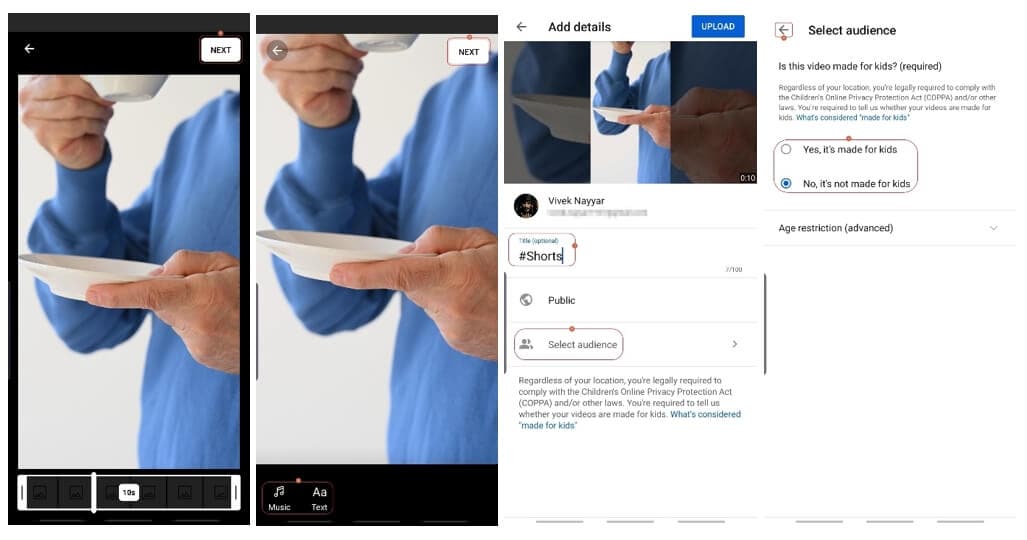
On the next screen, tap NEXT, user the Music and Text icons at the bottom-left corner to add a background music and caption to the video respectively, and tap NEXT from the top-right corner. On the next screen, enter a name for the video in the Title field along with the #Shorts tag, and tap Select audience to choose your preferred audience.
Step 3: Upload the Video
Finally tap UPLOAD from the top-right corner to upload the short video on YouTube.
Method 2: Record a Short Video and Upload
Step 1: Record Shorts Video
Previously, I have introduced how to record and upload YouTube Shorts videos , so I will keep the content concise here.
Please note you will not see the Create a Short option if you are outsides of India.

In the YouTube app, tap the + (Add) button and select Create a Short. Please note you will not see the Create a Short option if you are outsides of India.
Next, use the Speed and Timer icons to set the speed of the video and the countdown timer duration before the app starts recording the video when you press the Record button respectively.
Now tap the Record button from the bottom to start recording a video and stop to stop the recording. Make sure to shoot the footage in the portrait mode (ideally in the 9:16 aspect ratio). Tap NEXT from the bottom-right corner to proceed to the next step.
Step 2: Add Text and Music to the Short Video
On the next window, use the Music and Text buttons from the bottom-left corner to add a background music and caption to the video, and tap NEXT from the top-right corner.
Step 3: Upload and Post the Short Video
On the Add details window, enter a name for the video along with the #Shorts tag in the Create a title field, tap Select audience to select the target audience, and tap UPLOAD from the top-right corner to upload the short video on YouTube.
Conclusion
Learning the process of how to post short videos on YouTube is fairly simple as long as you have the video recorded in the portrait orientation, it is up to 60 seconds long, and contains the ‘#Shorts’ tag (without quotes) in the title or description. The good thing is, if you don’t have access to the YouTube app on your smartphone, the method for how to upload short video on YouTube explained in the first section can be followed while using your desktop computer.
Richard Bennett
Richard Bennett is a writer and a lover of all things video.
Follow @Richard Bennett
Richard Bennett
Mar 27, 2024• Proven solutions
Quite recently, YouTube launched Shorts to compete with Tik Tok. At the time of this writing, the users in India have access to the fully functional version of the app. Although YouTube Shorts is available for both Android and iOS platforms, its functions are limited as the application is still in its Beta phase for the remaining part of the globe.
With that said, the following sections explain the step-by-step process on how to upload a short video on YouTube Shorts both from your smartphone and a PC.
Part 1: How to Upload Short Video on YouTube from PC?
The fact is, if you are using a computer to upload short videos to YouTube, the process is identical to publishing your other, regular footage. However, there are a few guidelines that your clips must comply with so that the streaming platform could specifically identify them as YouTube Shorts. These norms include:
- Your videos must not be more than 60 seconds long in duration
- They must be shot in portrait orientation, ideally in the 9:16 aspect ratio
- The title or the description must contain ‘#Shorts’ (without quotes) in it
Once you have a video recorded using the first two guidelines from the above list, you can use the instructions given below to upload the media on YouTube:
Step 1: Select a Short Video to Upload
Launch your favorite web browser on your PC, go to YouTube, make sure to sign in to your YouTube account, click the Create (Camera) icon from the top-right corner of the web page, click SELECT FILES on the Upload videos window, and locate, select, and upload a short video from your PC to the portal.
Step 2: Mark the Video as Short
On the Details window that appears, add #Shorts in the Title or Description field, optionally pick a thumbnail from the suggested images present under the Thumbnail section (or upload a custom picture from your PC), select your preferred radio button from under the Audience section, make the other necessary changes if need be, and click NEXT. When the Video elements window comes up, choose your preferred options and elements, click NEXT.
Step 3: Publish the Short Video
On the Visibility window, choose your preferred radio button from under the Save or publish section or select Schedule to set a different time when the short video should be published automatically. Finally, click SAVE to publish the clip as a short video on YouTube from your computer.
To sum up, uploading YouTube Shorts video from desktop has nothing different from uploading regular YouTube video besides the requirements listed at the beginning of this article. If you prefer to edit videos for YouTube Shortson a computer, I recommend you to try our video editor Filmora , which is an ideal solution for YouTubers. Download the free trial version below and get started.
For Win 7 or later (64-bit)
Secure Download
For macOS 10.12 or later
Secure Download
Part 2: How to Upload Short Video on YouTube Mobile App?
The process of uploading YouTube Shorts from the mobile app is fairly simple compared to the method used on a computer. While using the app, you can either upload an existing video or shoot a new one from within the program itself then and there, add music and text, and upload it right away. Both these methods are explained below in detail:
Note: The guidelines for creating and uploading short videos to YouTube remain the same, regardless of the platform or device you use.
Method 1: Upload an Existing Short Video
Note: Make sure to have the target video on the smartphone and that you have downloaded, installed, and signed in to the YouTube app before proceeding.
Step 1: Select a Video to Upload
On your Android or iOS smartphone, launch the YouTube app, tap the + (Create) icon from the bottom, tap Create a Short from the Create box that pops up from the bottom, tap Upload from the bottom-right corner of the next screen, and select and upload a short, 60 seconds video recorded in portrait orientation from your device’s storage to the app.
Step 2: Add Details
On the next screen, tap NEXT, user the Music and Text icons at the bottom-left corner to add a background music and caption to the video respectively, and tap NEXT from the top-right corner. On the next screen, enter a name for the video in the Title field along with the #Shorts tag, and tap Select audience to choose your preferred audience.
Step 3: Upload the Video
Finally tap UPLOAD from the top-right corner to upload the short video on YouTube.
Method 2: Record a Short Video and Upload
Step 1: Record Shorts Video
Previously, I have introduced how to record and upload YouTube Shorts videos , so I will keep the content concise here.
Please note you will not see the Create a Short option if you are outsides of India.
In the YouTube app, tap the + (Add) button and select Create a Short. Please note you will not see the Create a Short option if you are outsides of India.
Next, use the Speed and Timer icons to set the speed of the video and the countdown timer duration before the app starts recording the video when you press the Record button respectively.
Now tap the Record button from the bottom to start recording a video and stop to stop the recording. Make sure to shoot the footage in the portrait mode (ideally in the 9:16 aspect ratio). Tap NEXT from the bottom-right corner to proceed to the next step.
Step 2: Add Text and Music to the Short Video
On the next window, use the Music and Text buttons from the bottom-left corner to add a background music and caption to the video, and tap NEXT from the top-right corner.
Step 3: Upload and Post the Short Video
On the Add details window, enter a name for the video along with the #Shorts tag in the Create a title field, tap Select audience to select the target audience, and tap UPLOAD from the top-right corner to upload the short video on YouTube.
Conclusion
Learning the process of how to post short videos on YouTube is fairly simple as long as you have the video recorded in the portrait orientation, it is up to 60 seconds long, and contains the ‘#Shorts’ tag (without quotes) in the title or description. The good thing is, if you don’t have access to the YouTube app on your smartphone, the method for how to upload short video on YouTube explained in the first section can be followed while using your desktop computer.
Richard Bennett
Richard Bennett is a writer and a lover of all things video.
Follow @Richard Bennett
Make Your Own YouTube Opening & Closing Graphics
How to Create YouTube Intros & End Cards - Free and Easy

Shanoon Cox
Oct 26, 2023• Proven solutions
Part1: Intros
Elements of an Intro
Intros should only last about five seconds, and that can be cut down to two or three if you have a larger following.
When your intro video is longer than five seconds viewers are more likely to click away. The first 15 seconds of a video is when viewers are most likely to decide to click on one of the recommended videos, or go back to their search results and choose something else. The odds of them leaving within these first 15 seconds are greater if you do not get right to the main point of your video. That is why long intro sequences are bad for your watch time.
Whether it is better to put your intro at the very beginning of your video, or after you introduce your topic, will depend on your viewers. You may want to try it both ways and then look at your retention report (found in your YouTube Creator Studio under Analytics) to see which works best for you.
Top Intro Sites
There are a few different sites where you can download animated intros, customized to include your username or logo. Here are two of the best:
FlixPress.com
This is probably the most popular intro site. There are a lot of great animated intros available for under $5, or even for free.
IntroMaker.net
This is another site with really professional looking intros for $5. They only have two free options, though.
Creating an Intro in Filmora
You can create a simple intro card in Filmora.
- Choose your background. You may want to use a short clip as your intro, or you may just want a colored background.
- Drag your clip or background into the video track of your timeline and trim it down to five seconds.
- If you have a logo, import it into Filmora and drag it into your picture-in-picture track.
- With your logo selected, click on the Green Screen icon. In the pop-up, select the background of your logo to make it transparent. For this to work your logo cannot be the same color as its background.
- Click on the editing icon with your logo selected and choose an animation.
- Go to the Text/Titles menu and choose an animated title that suits your channel. Drag it into your text track and edit it to include your name.
- The last piece of your intro is sound. You can choose a song from Filmora’s library and cut it down to five seconds, or import your sound effect.
- Export your video and save it for use in all of your other videos.
Part 2: End Cards
When your video ends, YouTube will recommend a selection of videos users may want to watch next. Often, these recommendations will not include more of your videos.
To keep viewers on your channel, you can create your End Card which recommends other content you have created.
Elements of an End Card
An end card includes clips from two or three of your videos, muted, and shrunk down to thumbnail-size. Using spotlight annotations you can make these thumbnails click-able.
It is also important that your end card includes multiple calls to action. A call to action is meant to spur a viewer to some kind of action. Writing ‘Check out this video’ above one of your thumbnails is a call to action.
You should also have a subscribe link somewhere in your end card, ideally a very noticeable button with a proven call to action like ‘Subscribe Now!’.
Some creators will leave their end cards at that and play music overtop, but it can be even more effective to include a voiceover where you ask viewers to subscribe and watch your other videos.
How To Make an End Card
- Choose a static background. You may want to download an end card template or create one in a drawing program. If you do, make sure to include calls to action like ‘Watch more!’ and ‘Subscribe’.
- Drag your background into your timeline at the end of your video.
- Import two or three of your previous videos and drag them into your picture in picture tracks. Each clip should be on its track.
- Trim the clips in your picture in picture track down to the same length as your end card.
- Shrink your clips down to thumbnail-size by dragging their corners in the preview window.
- Position your clips so they are spaced evenly by dragging them in the preview screen.
- Mute your clips.
- If your background does not include any calls to action, choose a title from the Text/Titles menu in Filmora and create at least two – one asking viewers to subscribe, and one asking them to watch your suggested videos.
- Export your video from Filmora and upload it to YouTube.
- Go to your Video Manager and select Annotations in the drop-down menu next to your video.
- Go to your end card in the previewer, as that is where you want to add your annotations.
- Click Add Annotation and add a spotlight annotation to your video. Stretch it over one of your thumbnails and then check the Link box under your Annotation’s timing. Insert a link to the video you are previewing.
- Repeat for any other thumbnails. For your subscribe button, change where it said ‘Video’ to ‘Subscribe’ and enter your channel URL.
- Click Apply Changes.
Shanoon Cox
Shanoon Cox is a writer and a lover of all things video.
Follow @Shanoon Cox
Shanoon Cox
Oct 26, 2023• Proven solutions
Part1: Intros
Elements of an Intro
Intros should only last about five seconds, and that can be cut down to two or three if you have a larger following.
When your intro video is longer than five seconds viewers are more likely to click away. The first 15 seconds of a video is when viewers are most likely to decide to click on one of the recommended videos, or go back to their search results and choose something else. The odds of them leaving within these first 15 seconds are greater if you do not get right to the main point of your video. That is why long intro sequences are bad for your watch time.
Whether it is better to put your intro at the very beginning of your video, or after you introduce your topic, will depend on your viewers. You may want to try it both ways and then look at your retention report (found in your YouTube Creator Studio under Analytics) to see which works best for you.
Top Intro Sites
There are a few different sites where you can download animated intros, customized to include your username or logo. Here are two of the best:
FlixPress.com
This is probably the most popular intro site. There are a lot of great animated intros available for under $5, or even for free.
IntroMaker.net
This is another site with really professional looking intros for $5. They only have two free options, though.
Creating an Intro in Filmora
You can create a simple intro card in Filmora.
- Choose your background. You may want to use a short clip as your intro, or you may just want a colored background.
- Drag your clip or background into the video track of your timeline and trim it down to five seconds.
- If you have a logo, import it into Filmora and drag it into your picture-in-picture track.
- With your logo selected, click on the Green Screen icon. In the pop-up, select the background of your logo to make it transparent. For this to work your logo cannot be the same color as its background.
- Click on the editing icon with your logo selected and choose an animation.
- Go to the Text/Titles menu and choose an animated title that suits your channel. Drag it into your text track and edit it to include your name.
- The last piece of your intro is sound. You can choose a song from Filmora’s library and cut it down to five seconds, or import your sound effect.
- Export your video and save it for use in all of your other videos.
Part 2: End Cards
When your video ends, YouTube will recommend a selection of videos users may want to watch next. Often, these recommendations will not include more of your videos.
To keep viewers on your channel, you can create your End Card which recommends other content you have created.
Elements of an End Card
An end card includes clips from two or three of your videos, muted, and shrunk down to thumbnail-size. Using spotlight annotations you can make these thumbnails click-able.
It is also important that your end card includes multiple calls to action. A call to action is meant to spur a viewer to some kind of action. Writing ‘Check out this video’ above one of your thumbnails is a call to action.
You should also have a subscribe link somewhere in your end card, ideally a very noticeable button with a proven call to action like ‘Subscribe Now!’.
Some creators will leave their end cards at that and play music overtop, but it can be even more effective to include a voiceover where you ask viewers to subscribe and watch your other videos.
How To Make an End Card
- Choose a static background. You may want to download an end card template or create one in a drawing program. If you do, make sure to include calls to action like ‘Watch more!’ and ‘Subscribe’.
- Drag your background into your timeline at the end of your video.
- Import two or three of your previous videos and drag them into your picture in picture tracks. Each clip should be on its track.
- Trim the clips in your picture in picture track down to the same length as your end card.
- Shrink your clips down to thumbnail-size by dragging their corners in the preview window.
- Position your clips so they are spaced evenly by dragging them in the preview screen.
- Mute your clips.
- If your background does not include any calls to action, choose a title from the Text/Titles menu in Filmora and create at least two – one asking viewers to subscribe, and one asking them to watch your suggested videos.
- Export your video from Filmora and upload it to YouTube.
- Go to your Video Manager and select Annotations in the drop-down menu next to your video.
- Go to your end card in the previewer, as that is where you want to add your annotations.
- Click Add Annotation and add a spotlight annotation to your video. Stretch it over one of your thumbnails and then check the Link box under your Annotation’s timing. Insert a link to the video you are previewing.
- Repeat for any other thumbnails. For your subscribe button, change where it said ‘Video’ to ‘Subscribe’ and enter your channel URL.
- Click Apply Changes.
Shanoon Cox
Shanoon Cox is a writer and a lover of all things video.
Follow @Shanoon Cox
- Title: [New] How to Upload Shorts Video on YouTube?
- Author: Joseph
- Created at : 2024-05-31 13:49:43
- Updated at : 2024-06-01 13:49:43
- Link: https://youtube-stream.techidaily.com/new-how-to-upload-shorts-video-on-youtube/
- License: This work is licensed under CC BY-NC-SA 4.0.
