![[New] From Editing to Sharing Using Premiere with YouTube](https://thmb.techidaily.com/c03221180f24d051697c535d192c12a06104e76b7456b6ffbc01667561900748.png)
"[New] From Editing to Sharing Using Premiere with YouTube"
From Editing to Sharing: Using Premiere with YouTube
How Do I Use Adobe Premiere To Upload YouTube Videos?

Benjamin Arango
Mar 27, 2024• Proven solutions
Whilst getting the editing and post work just right on any project is what we all aim for, the ultimate aim is for other people to see our creations, and the most popular way to achieve that is YouTube . Chances are, if you are producing video, you will be putting some of it on YouTube at some point, so let’s have a look at the most efficient way to get your work from Premiere to YouTube.
Check if your computer meet the Premiere System Requirements >>
This is a basic tutorial about Adobe Premiere, professional video editing software. However, if video editing is new to you, consider Wondershare Filmora , which is a powerful but easy-to-use tool for users just starting out. Download the free trial version below.
 Download Mac Version ](https://tools.techidaily.com/wondershare/filmora/download/ )
How Do I Use Adobe Premiere To Upload YouTube Videos
1. Master Copy
Before exporting your work, it is important to first create a master copy of your project that is ‘as is’, in that it reflects the settings and codecs used in the original footage.
To do this you simply select the sequence within the Timeline or in the Project Panel, and go through the menu tree via File > Export > Media to bring up the export dialogue.

To create your Master Copy, simply select the first option of ‘Match Sequence Settings’, this exports a file that is of the same quality as your original footage, essentially producing a digital copy of the work for archiving before anything else is done.
With you work safe and secure it is now time to look at ensuring the project is suitable for YouTube. With our sequence selected in the Timeline or Project Panel again, we go through the same File > Export > Media path to bring up the media export dialogue as before.
2. Container
The first option we have to consider is the file format that our finished video needs to be in. Here you should refer to YouTube for its guidelines, whilst they do accept a number of file formats, digging through the YouTube help system to find the settings for highest quality we find that they recommend MPEG4 as the container, using the codec.

We can also see further recommended settings in this screenshot that will be covered later.
The good news is that Premiere automatically selects the appropriate container for us when we select our codec, however it is worth knowing the file type YouTube is expecting just to check yourself.
3. Video Codec
So having established that YouTube recommends the MPEG4 container using the codec, the first option we need to look for in the media export dialogue is to select the appropriate Format.
This is the first drop down in the dialogue box, and in this case we simply select from the list.

Once you select you can check the ‘output name’ field and see that premiere is automatically set the output file to .mp4 which is exactly what we need.
4. Preset
The next field we come to is the ‘Preset’ dropdown menu. This is a major help to most people, as Adobe have very kindly included large numbers of presets to quickly adapt video settings to suit specific uses. They vary depending on the exact version of Premiere you are using, and each format type does have its own list of presets, as we can see has a large number for YouTube, but also has many presets for specific devices (presets for iPad, Kindle, Nook, various other tablets and phones, Vimeo and a host of others) to make getting the right settings that bit easier for us.

It is important here to select the correct preset from the various YouTube options. You want to select the resolution and frame rate that match your source file, for the best results. So, if your source file is 1080p with a frame rate of 29.97 fps then that is the YouTube setting you would select.
Once a preset is selected a summary of the settings is displayed below, normally these will be well suited to your project, however you can fine tune anything you wish by selecting the video or audio tabs at the bottom which give you the chance to adjust each parameter individually. If you do this, you can save these changes as a custom preset by clicking the button at the side of the Preset dropdown menu and simply use it on later projects by selecting it from the list the same as any other, a great time saving tool.

5. Rendering
Once you are satisfied with the settings, either from the Preset alone or if you have adjusted anything yourself, you are nearly ready to render the file and export it.
For YouTube it is recommended you select the ‘Use Maximum Render Quality’ option to maintain the best output you can, it does add time to the render process but if you value the quality of your work it is worthwhile.
Finally you can choose a suitable filename and the destination of the file by clicking on the ‘Output Name’ field.
I normally use a filename that includes the destination medium so I can differentiate between different versions of a project and know which one to upload where, in this case I include ‘youtube’, but if I were planning on uploading clips of the project to vimeo as well for instance there may be a cut of the project with ‘vimeo’ in the name too. The destination is personal preference, because I do use filenames to differentiate versions I can put the various iterations into a single project file, others have folder structures for each type of file , so all YouTube output goes into a single folder and so on, how you organize is entirely dependent on how you work.

Once those are selected clicking ‘Export’ starts the rendering process, and eventually (how long depends on the speed of your computer and the size and type of file involved), you will end up with your YouTube optimized video in the location you chose.
Here I created 4 key frames that let the ‘Animation’ object move around the ‘Demo Text’ Object and finally come to rest below it. Whilst this type of effect does look very effective on screen, such is the ease of use of After Effects it really is just a few minutes work to achieve.
Learn more details about How to add text in Premiere >>
6. Uploading
Now you have your file, the next step is to go to your YouTube account and log in if you need to.
On the top of your homepage on the right is the upload button, selecting that brings up the select file menu as below.

You can either drag your file into the window or click on it to open a standard file browser to locate the desired file, click and the upload will begin. The dropdown underneath allows you to set the video as Public, Unlisted or Private. You can change this at any time once the video is uploaded as well.
This opens the upload progress window, where you can add in a name, description and tags as well as add the video to a playlist or adjust the privacy settings as the video is uploading.

Once the upload as finished, you can do final adjustments to settings and choose a thumbnail for the video. The final step is to click the ‘Publish’ button and your video will be processed and go live.

Benjamin Arango
Benjamin Arango is a writer and a lover of all things video.
Follow @Benjamin Arango
Benjamin Arango
Mar 27, 2024• Proven solutions
Whilst getting the editing and post work just right on any project is what we all aim for, the ultimate aim is for other people to see our creations, and the most popular way to achieve that is YouTube . Chances are, if you are producing video, you will be putting some of it on YouTube at some point, so let’s have a look at the most efficient way to get your work from Premiere to YouTube.
Check if your computer meet the Premiere System Requirements >>
This is a basic tutorial about Adobe Premiere, professional video editing software. However, if video editing is new to you, consider Wondershare Filmora , which is a powerful but easy-to-use tool for users just starting out. Download the free trial version below.
Download Mac Version ](https://tools.techidaily.com/wondershare/filmora/download/ )
How Do I Use Adobe Premiere To Upload YouTube Videos
1. Master Copy
Before exporting your work, it is important to first create a master copy of your project that is ‘as is’, in that it reflects the settings and codecs used in the original footage.
To do this you simply select the sequence within the Timeline or in the Project Panel, and go through the menu tree via File > Export > Media to bring up the export dialogue.
To create your Master Copy, simply select the first option of ‘Match Sequence Settings’, this exports a file that is of the same quality as your original footage, essentially producing a digital copy of the work for archiving before anything else is done.
With you work safe and secure it is now time to look at ensuring the project is suitable for YouTube. With our sequence selected in the Timeline or Project Panel again, we go through the same File > Export > Media path to bring up the media export dialogue as before.
2. Container
The first option we have to consider is the file format that our finished video needs to be in. Here you should refer to YouTube for its guidelines, whilst they do accept a number of file formats, digging through the YouTube help system to find the settings for highest quality we find that they recommend MPEG4 as the container, using the codec.
We can also see further recommended settings in this screenshot that will be covered later.
The good news is that Premiere automatically selects the appropriate container for us when we select our codec, however it is worth knowing the file type YouTube is expecting just to check yourself.
3. Video Codec
So having established that YouTube recommends the MPEG4 container using the codec, the first option we need to look for in the media export dialogue is to select the appropriate Format.
This is the first drop down in the dialogue box, and in this case we simply select from the list.
Once you select you can check the ‘output name’ field and see that premiere is automatically set the output file to .mp4 which is exactly what we need.
4. Preset
The next field we come to is the ‘Preset’ dropdown menu. This is a major help to most people, as Adobe have very kindly included large numbers of presets to quickly adapt video settings to suit specific uses. They vary depending on the exact version of Premiere you are using, and each format type does have its own list of presets, as we can see has a large number for YouTube, but also has many presets for specific devices (presets for iPad, Kindle, Nook, various other tablets and phones, Vimeo and a host of others) to make getting the right settings that bit easier for us.
It is important here to select the correct preset from the various YouTube options. You want to select the resolution and frame rate that match your source file, for the best results. So, if your source file is 1080p with a frame rate of 29.97 fps then that is the YouTube setting you would select.
Once a preset is selected a summary of the settings is displayed below, normally these will be well suited to your project, however you can fine tune anything you wish by selecting the video or audio tabs at the bottom which give you the chance to adjust each parameter individually. If you do this, you can save these changes as a custom preset by clicking the button at the side of the Preset dropdown menu and simply use it on later projects by selecting it from the list the same as any other, a great time saving tool.
5. Rendering
Once you are satisfied with the settings, either from the Preset alone or if you have adjusted anything yourself, you are nearly ready to render the file and export it.
For YouTube it is recommended you select the ‘Use Maximum Render Quality’ option to maintain the best output you can, it does add time to the render process but if you value the quality of your work it is worthwhile.
Finally you can choose a suitable filename and the destination of the file by clicking on the ‘Output Name’ field.
I normally use a filename that includes the destination medium so I can differentiate between different versions of a project and know which one to upload where, in this case I include ‘youtube’, but if I were planning on uploading clips of the project to vimeo as well for instance there may be a cut of the project with ‘vimeo’ in the name too. The destination is personal preference, because I do use filenames to differentiate versions I can put the various iterations into a single project file, others have folder structures for each type of file , so all YouTube output goes into a single folder and so on, how you organize is entirely dependent on how you work.
Once those are selected clicking ‘Export’ starts the rendering process, and eventually (how long depends on the speed of your computer and the size and type of file involved), you will end up with your YouTube optimized video in the location you chose.
Here I created 4 key frames that let the ‘Animation’ object move around the ‘Demo Text’ Object and finally come to rest below it. Whilst this type of effect does look very effective on screen, such is the ease of use of After Effects it really is just a few minutes work to achieve.
Learn more details about How to add text in Premiere >>
6. Uploading
Now you have your file, the next step is to go to your YouTube account and log in if you need to.
On the top of your homepage on the right is the upload button, selecting that brings up the select file menu as below.
You can either drag your file into the window or click on it to open a standard file browser to locate the desired file, click and the upload will begin. The dropdown underneath allows you to set the video as Public, Unlisted or Private. You can change this at any time once the video is uploaded as well.
This opens the upload progress window, where you can add in a name, description and tags as well as add the video to a playlist or adjust the privacy settings as the video is uploading.
Once the upload as finished, you can do final adjustments to settings and choose a thumbnail for the video. The final step is to click the ‘Publish’ button and your video will be processed and go live.
Benjamin Arango
Benjamin Arango is a writer and a lover of all things video.
Follow @Benjamin Arango
Benjamin Arango
Mar 27, 2024• Proven solutions
Whilst getting the editing and post work just right on any project is what we all aim for, the ultimate aim is for other people to see our creations, and the most popular way to achieve that is YouTube . Chances are, if you are producing video, you will be putting some of it on YouTube at some point, so let’s have a look at the most efficient way to get your work from Premiere to YouTube.
Check if your computer meet the Premiere System Requirements >>
This is a basic tutorial about Adobe Premiere, professional video editing software. However, if video editing is new to you, consider Wondershare Filmora , which is a powerful but easy-to-use tool for users just starting out. Download the free trial version below.
Download Mac Version ](https://tools.techidaily.com/wondershare/filmora/download/ )
How Do I Use Adobe Premiere To Upload YouTube Videos
1. Master Copy
Before exporting your work, it is important to first create a master copy of your project that is ‘as is’, in that it reflects the settings and codecs used in the original footage.
To do this you simply select the sequence within the Timeline or in the Project Panel, and go through the menu tree via File > Export > Media to bring up the export dialogue.
To create your Master Copy, simply select the first option of ‘Match Sequence Settings’, this exports a file that is of the same quality as your original footage, essentially producing a digital copy of the work for archiving before anything else is done.
With you work safe and secure it is now time to look at ensuring the project is suitable for YouTube. With our sequence selected in the Timeline or Project Panel again, we go through the same File > Export > Media path to bring up the media export dialogue as before.
2. Container
The first option we have to consider is the file format that our finished video needs to be in. Here you should refer to YouTube for its guidelines, whilst they do accept a number of file formats, digging through the YouTube help system to find the settings for highest quality we find that they recommend MPEG4 as the container, using the codec.
We can also see further recommended settings in this screenshot that will be covered later.
The good news is that Premiere automatically selects the appropriate container for us when we select our codec, however it is worth knowing the file type YouTube is expecting just to check yourself.
3. Video Codec
So having established that YouTube recommends the MPEG4 container using the codec, the first option we need to look for in the media export dialogue is to select the appropriate Format.
This is the first drop down in the dialogue box, and in this case we simply select from the list.
Once you select you can check the ‘output name’ field and see that premiere is automatically set the output file to .mp4 which is exactly what we need.
4. Preset
The next field we come to is the ‘Preset’ dropdown menu. This is a major help to most people, as Adobe have very kindly included large numbers of presets to quickly adapt video settings to suit specific uses. They vary depending on the exact version of Premiere you are using, and each format type does have its own list of presets, as we can see has a large number for YouTube, but also has many presets for specific devices (presets for iPad, Kindle, Nook, various other tablets and phones, Vimeo and a host of others) to make getting the right settings that bit easier for us.
It is important here to select the correct preset from the various YouTube options. You want to select the resolution and frame rate that match your source file, for the best results. So, if your source file is 1080p with a frame rate of 29.97 fps then that is the YouTube setting you would select.
Once a preset is selected a summary of the settings is displayed below, normally these will be well suited to your project, however you can fine tune anything you wish by selecting the video or audio tabs at the bottom which give you the chance to adjust each parameter individually. If you do this, you can save these changes as a custom preset by clicking the button at the side of the Preset dropdown menu and simply use it on later projects by selecting it from the list the same as any other, a great time saving tool.
5. Rendering
Once you are satisfied with the settings, either from the Preset alone or if you have adjusted anything yourself, you are nearly ready to render the file and export it.
For YouTube it is recommended you select the ‘Use Maximum Render Quality’ option to maintain the best output you can, it does add time to the render process but if you value the quality of your work it is worthwhile.
Finally you can choose a suitable filename and the destination of the file by clicking on the ‘Output Name’ field.
I normally use a filename that includes the destination medium so I can differentiate between different versions of a project and know which one to upload where, in this case I include ‘youtube’, but if I were planning on uploading clips of the project to vimeo as well for instance there may be a cut of the project with ‘vimeo’ in the name too. The destination is personal preference, because I do use filenames to differentiate versions I can put the various iterations into a single project file, others have folder structures for each type of file , so all YouTube output goes into a single folder and so on, how you organize is entirely dependent on how you work.
Once those are selected clicking ‘Export’ starts the rendering process, and eventually (how long depends on the speed of your computer and the size and type of file involved), you will end up with your YouTube optimized video in the location you chose.
Here I created 4 key frames that let the ‘Animation’ object move around the ‘Demo Text’ Object and finally come to rest below it. Whilst this type of effect does look very effective on screen, such is the ease of use of After Effects it really is just a few minutes work to achieve.
Learn more details about How to add text in Premiere >>
6. Uploading
Now you have your file, the next step is to go to your YouTube account and log in if you need to.
On the top of your homepage on the right is the upload button, selecting that brings up the select file menu as below.
You can either drag your file into the window or click on it to open a standard file browser to locate the desired file, click and the upload will begin. The dropdown underneath allows you to set the video as Public, Unlisted or Private. You can change this at any time once the video is uploaded as well.
This opens the upload progress window, where you can add in a name, description and tags as well as add the video to a playlist or adjust the privacy settings as the video is uploading.
Once the upload as finished, you can do final adjustments to settings and choose a thumbnail for the video. The final step is to click the ‘Publish’ button and your video will be processed and go live.

Benjamin Arango
Benjamin Arango is a writer and a lover of all things video.
Follow @Benjamin Arango
Benjamin Arango
Mar 27, 2024• Proven solutions
Whilst getting the editing and post work just right on any project is what we all aim for, the ultimate aim is for other people to see our creations, and the most popular way to achieve that is YouTube . Chances are, if you are producing video, you will be putting some of it on YouTube at some point, so let’s have a look at the most efficient way to get your work from Premiere to YouTube.
Check if your computer meet the Premiere System Requirements >>
This is a basic tutorial about Adobe Premiere, professional video editing software. However, if video editing is new to you, consider Wondershare Filmora , which is a powerful but easy-to-use tool for users just starting out. Download the free trial version below.
Download Mac Version ](https://tools.techidaily.com/wondershare/filmora/download/ )
How Do I Use Adobe Premiere To Upload YouTube Videos
1. Master Copy
Before exporting your work, it is important to first create a master copy of your project that is ‘as is’, in that it reflects the settings and codecs used in the original footage.
To do this you simply select the sequence within the Timeline or in the Project Panel, and go through the menu tree via File > Export > Media to bring up the export dialogue.
To create your Master Copy, simply select the first option of ‘Match Sequence Settings’, this exports a file that is of the same quality as your original footage, essentially producing a digital copy of the work for archiving before anything else is done.
With you work safe and secure it is now time to look at ensuring the project is suitable for YouTube. With our sequence selected in the Timeline or Project Panel again, we go through the same File > Export > Media path to bring up the media export dialogue as before.
2. Container
The first option we have to consider is the file format that our finished video needs to be in. Here you should refer to YouTube for its guidelines, whilst they do accept a number of file formats, digging through the YouTube help system to find the settings for highest quality we find that they recommend MPEG4 as the container, using the codec.
We can also see further recommended settings in this screenshot that will be covered later.
The good news is that Premiere automatically selects the appropriate container for us when we select our codec, however it is worth knowing the file type YouTube is expecting just to check yourself.
3. Video Codec
So having established that YouTube recommends the MPEG4 container using the codec, the first option we need to look for in the media export dialogue is to select the appropriate Format.
This is the first drop down in the dialogue box, and in this case we simply select from the list.
Once you select you can check the ‘output name’ field and see that premiere is automatically set the output file to .mp4 which is exactly what we need.
4. Preset
The next field we come to is the ‘Preset’ dropdown menu. This is a major help to most people, as Adobe have very kindly included large numbers of presets to quickly adapt video settings to suit specific uses. They vary depending on the exact version of Premiere you are using, and each format type does have its own list of presets, as we can see has a large number for YouTube, but also has many presets for specific devices (presets for iPad, Kindle, Nook, various other tablets and phones, Vimeo and a host of others) to make getting the right settings that bit easier for us.
It is important here to select the correct preset from the various YouTube options. You want to select the resolution and frame rate that match your source file, for the best results. So, if your source file is 1080p with a frame rate of 29.97 fps then that is the YouTube setting you would select.
Once a preset is selected a summary of the settings is displayed below, normally these will be well suited to your project, however you can fine tune anything you wish by selecting the video or audio tabs at the bottom which give you the chance to adjust each parameter individually. If you do this, you can save these changes as a custom preset by clicking the button at the side of the Preset dropdown menu and simply use it on later projects by selecting it from the list the same as any other, a great time saving tool.
5. Rendering
Once you are satisfied with the settings, either from the Preset alone or if you have adjusted anything yourself, you are nearly ready to render the file and export it.
For YouTube it is recommended you select the ‘Use Maximum Render Quality’ option to maintain the best output you can, it does add time to the render process but if you value the quality of your work it is worthwhile.
Finally you can choose a suitable filename and the destination of the file by clicking on the ‘Output Name’ field.
I normally use a filename that includes the destination medium so I can differentiate between different versions of a project and know which one to upload where, in this case I include ‘youtube’, but if I were planning on uploading clips of the project to vimeo as well for instance there may be a cut of the project with ‘vimeo’ in the name too. The destination is personal preference, because I do use filenames to differentiate versions I can put the various iterations into a single project file, others have folder structures for each type of file , so all YouTube output goes into a single folder and so on, how you organize is entirely dependent on how you work.
Once those are selected clicking ‘Export’ starts the rendering process, and eventually (how long depends on the speed of your computer and the size and type of file involved), you will end up with your YouTube optimized video in the location you chose.
Here I created 4 key frames that let the ‘Animation’ object move around the ‘Demo Text’ Object and finally come to rest below it. Whilst this type of effect does look very effective on screen, such is the ease of use of After Effects it really is just a few minutes work to achieve.
Learn more details about How to add text in Premiere >>
6. Uploading
Now you have your file, the next step is to go to your YouTube account and log in if you need to.
On the top of your homepage on the right is the upload button, selecting that brings up the select file menu as below.
You can either drag your file into the window or click on it to open a standard file browser to locate the desired file, click and the upload will begin. The dropdown underneath allows you to set the video as Public, Unlisted or Private. You can change this at any time once the video is uploaded as well.
This opens the upload progress window, where you can add in a name, description and tags as well as add the video to a playlist or adjust the privacy settings as the video is uploading.
Once the upload as finished, you can do final adjustments to settings and choose a thumbnail for the video. The final step is to click the ‘Publish’ button and your video will be processed and go live.
Benjamin Arango
Benjamin Arango is a writer and a lover of all things video.
Follow @Benjamin Arango
Gamer’s Blueprint for Money-Making
Gone is when playing video games was strictly for entertainment. These days, you can record and share your gaming skills on YouTube and earn a fortune. A good example is Techno Gamerz. This YouTube channel has over 29 million subscribers, and it’s believed to be among the fastest-growing channels in India. In fact, the channel recently crossed the 1 billion views mark.

Now, this begs the query; what is the Techno Gamerz income on YouTube? This article discusses everything you need to know about the young YouTube gamer, from his monthly and yearly payments to his net worth.
Meta Description: This article discusses the brains behind the popular Techno Gamerz YouTube channel. You’ll learn about the Techno Gamerz income, age, gender, nationality, and more.
Part 1: Summary Box on Techno Gamerz
| Name | Ujjwal Chaurasia |
|---|---|
| Net worth in USD (2022) | $2 million |
| Monthly income and salary | RS.15 Lakh+ |
| Yearly income and salary | 1.5 Crore |
| Age | 20 years (born January 12, 2002) |
| Gender | Male |
| Nationality | Indian |
| Height | 5.5 inches |
| Profession | YouTuber |
| YouTube channel | Techno Gamerz |
| Awards and recognition | Diamond, Gold, and Silver play buttons |
Up to this point, you should have a brief overview of who Techno Gamerz is and what he does to earn such staggering figures on YouTube. So, the next section discusses his income in detail and what makes this YouTuber so famous. Keep reading!
Part 2: Techno Gamerz YouTube Earning and Stats
Ujjwal Chaurasia, alias Techno Gamerz, was born and grew up in New Delhi, India. The charismatic vlogger first joined YouTube on August 13, 2017, and uploaded his first gaming video on January 2018. Initially, Ujjwal used his elder brother’s phone to post gaming tutorial videos. This obviously limited his input on YouTube as he also had to set aside time for studying.

But after seeing potential in what Techno Gamerz was doing, his brother encouraged him to post more often. His first viral video was for Dragon Ball Z, a downloading tutorial. This video garnered a massive 250K views, boosting his channel’s profile. The young YouTube star has never looked back since then.
Meantime, you must be asking yourself how YouTube generates income in India. It’s simple; via AdSense! YouTube’s RPM (Revenue Per Mile) metric per 1,000 views varies between countries. In India, the video-sharing platform pays $0.50 per 1,000 views. This means that Indian YouTube teachers and influencers can earn $500 after garnering 1 million views.
But nothing is cast in stone on YouTube. Most Indian channels can earn between $800 and $2,500 after reaching 1 million views. However, this depends on where you get the most views from. For example, if at least half of your views are from the US, you’ll earn at least $1,500. Techno Gamerz YouTube income per 1,000 views is approximately $1.21.
Remember that there are some conditions to meet before you start earning money on YouTube. First, the channel must be active for at least a year and have a minimum of 1,000 subscribers. That’s not all; you’ll need nothing less than 4,000 watch hours to be on YouTube’s payroll.
With that said, below are some YouTube stats about the Techno Gamerz monthly income, number of views, and more:
| Estimated Monthly earnings in USD/Indian rupees | $167K |
|---|---|
| Estimated Yearly earnings in USD/Indian rupees | $8.6 million |
| Total video uploads | 858 |
| Type of videos | Gaming tutorials |
| Subscribers | 29 million |
| Video views | 7.5 billion |
| Last 30 days’ views | 7 million |
As expected, Ujjwal Chaurasia has a massive following on other social media platforms, especially on Instagram. Here, the 20-year-old has more than 2 million followers and over 250K likes on “ujjwalgamer.” He usually posts selfies, pictures, and a few gaming contents on Instagram. Ujjwal’s engagement rate on Instagram is around 12.5%.

He also has another Instagram account called “Techno_Gamerz ,” which has over 1M followers and over 120K likes. Ujjwal uses this account to keep his followers abreast of what’s happening on his YouTube channel and give hints of future releases. He also posts subscriber milestones. His Twitter account is “Ujjwal Chaurasia ,” with over 116K followers and around 290 posts.

Ujjwal is also venturing into music lately, specifically Hip Hop. He partnered with one of India’s most prominent producers, Sez on the Beat, to release Game On. This music tells a tale of how Chaurasia started from zero subscribers to more than 10 million. Currently, this single boasts over 62 million views.
Part 3: Why Is Techno Gamerz Trending on YouTube?
The Techno Gamerz earnings are certainly no fluke. Many YouTube careers come crashing down before they even start. You’ll even need to congratulate yourself for earning just $100 on YouTube. So, what makes Techno Gamers a darling to many YouTubers?
1. Engaging and interactive videos
YouTube is a very competitive video-sharing platform, and Techno Gamerz knows this fact quite well. Techno Gamerz adds funny and interactive commentary to his YouTube gaming videos to make them more interactive. Many YouTubers also love his confidence and composure in front of the camera.
2. Captivating story and continuity
One major thing you’ll see about all of Techno Gamerz’s videos is continuity. The YouTuber churns out new content every couple of days, keeping his fans entertained at all times. Also, Techno Gamerz always does a recap on his previous episodes to ensure that viewers can keep up with the pace. He even admitted in an interview that it’s critical for his audience to follow the storyline, making watching series like GTA V more interesting.
3. Single and multiplayer tutorials
Techno Gamerz’s tutorials consist of single and multiplayer games. He says that single-player games bring out his character’s awesomely powerful and superior side. He also admitted that he loves multiplayer games’ unpredictable and challenging nature.
Something about Techno Gamerz’s most loved videos
As said before, Dragon Ball Z was the YouTuber’s first upload on the platform. Then in January 2018, he went ahead to upload PUBG videos, but his breakthrough came when he switched to GTA. Up to now, he has posted 140+ GTA 5 episodes, which are famous for their unique storylines. Interestingly, each of his GTA videos has 5+ million views.
But to be one of the most popular YouTubers, you’ll need diversity. Techno Gamerz has this in abundance. His “Grandpa and Granny Two Hunters” video has 10+ million views. It’s a horror game where Techno Gamerz plays the scary granny with insane tricks.
His other videos, “BeamNG” and “Just Draw,” have more than 12 million and 13 million views, respectively. GTA V is the most loved by his audience, with over 30 million views.
Bonus Tip: How To Be a YouTuber and Make Videos Like Techno Gamerz
Evidently, you need to create compelling videos to increase your chances of getting over 1 million views and matching the Techno Gamerz salary. So, what makes a great YouTube video? The perfect YouTube videos should have a catchy intro, voice overlays, picture-in-picture effects, background audio, and more. You can also include elements like timers, subtitles, and effect overlays.
Thankfully, Wondershare Filmora comes with all these features and many more. It’s a macOS/iPadOS/Windows program that allows you to record Techno Gamerz-like videos with a live microphone commentary. After recording the video, add it to the editing timeline to customize it with stunning plugin effects, texts, transitions, subtitles, background music, and more. You also can explore features like motion tracking, key framing, speed ramping, and split screen if it’s a fast-paced video like GTA.
Let’s learn how to create and edit a YouTube video on Filmora 11:
Free Download For Win 7 or later(64-bit)
Free Download For macOS 10.14 or later
Step1 Start a new video project
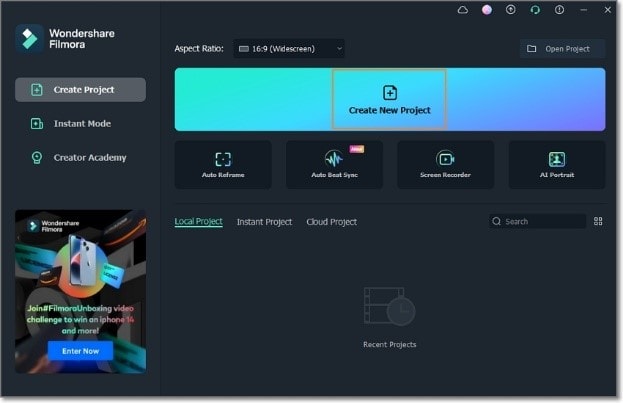
Install and run Filmora 11 on your computer and choose the 16:9 aspect ratio for YouTube videos. Then, start a New Project.
Step2 Import the YouTube video tutorial
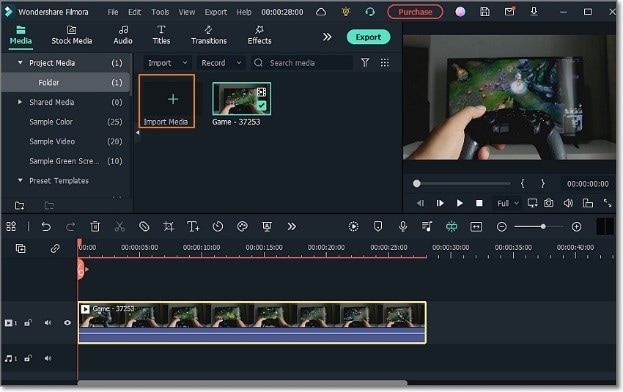
Now click the Import Media button to open a video file from your local storage. You can add multiple media files before moving them to the storyboard.
Step3 Edit your gaming video
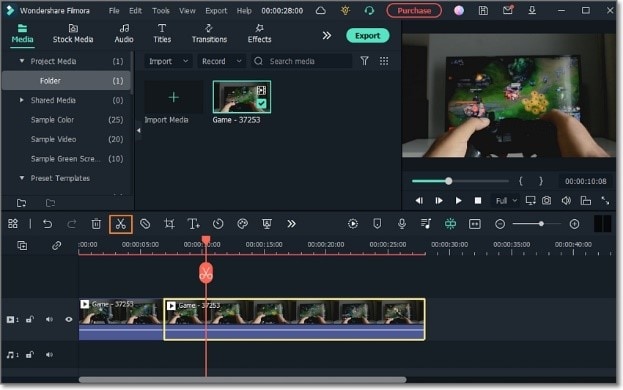
Start by trimming your video to remove the noisy or unwanted parts. To trim and split a video, place the playhead where you want to cut and press the Split button. Repeat the same procedure to cut out a clip and delete it.
Your YouTube gaming tutorial also needs subtitles to stand out from the crowd. Select the YouTube video clip and click the Speech-to-Text button. Once the Speech-to-Text feature is active, select the translation language to start creating subtitles. Remember, you can edit and download the subtitle tracks as a .txt or .srt file.
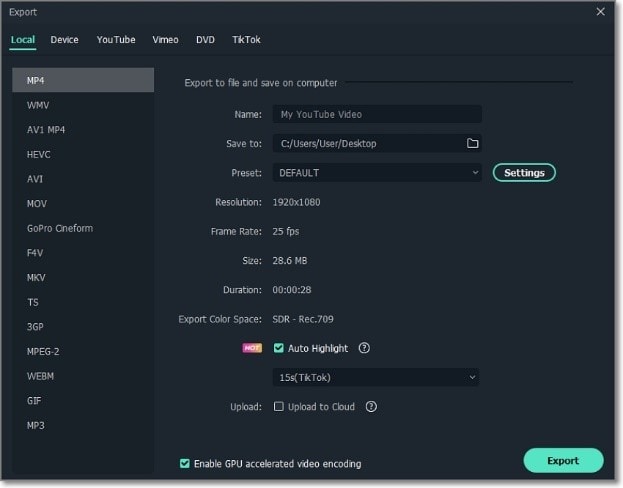
Step4 Convert the video and upload it on YouTube
If you’re satisfied with the edited video, click the Export button, then select MP4, WebM, or MP4 AV1 as the target format. Now name your video, choose a folder path, and export it. Remember that you can also directly upload videos on YouTube by clicking the YouTube tab.
Hot FAQs on Techno Gamerz
1. Who earns more between Techno Gamerz and Carry Minati?
Techno Gamerz is not alone in Indian YouTube vlogging. CarryMinati is another top YouTuber in India, with 36.90 million followers. This YouTuber earns more than 25 Lakhs per month with annual revenue of at least 3 Crore Rupees. According to reports, Carry Minati (Ajey Nagar) has over $5 million in net worth.
2. How much does Techno Gamerz earn from one video?
It depends on the number of views. According to reports, this popular Indian YouTuber earns over $1.21 per 1,000 views. He has over 7.5 billion views currently.
3. What does Techno Gamerz do for a living?
Techno Gamerz’s primary source of income is YouTubing. This is where the 20-year-old earns most of his dollars.
Final Words
YouTubing can pay top money as long as you do it professionally. But it may need a lot of hard work and patience to start earning on YouTube. Also, invest in a powerful, all-in-one video editor for vloggers like Filmora 11. So, are you ready to start making the Techno Gamerz monthly income from YouTube? Give it a try!
Free Download For Win 7 or later(64-bit)
Free Download For macOS 10.14 or later
Up to this point, you should have a brief overview of who Techno Gamerz is and what he does to earn such staggering figures on YouTube. So, the next section discusses his income in detail and what makes this YouTuber so famous. Keep reading!
Part 2: Techno Gamerz YouTube Earning and Stats
Ujjwal Chaurasia, alias Techno Gamerz, was born and grew up in New Delhi, India. The charismatic vlogger first joined YouTube on August 13, 2017, and uploaded his first gaming video on January 2018. Initially, Ujjwal used his elder brother’s phone to post gaming tutorial videos. This obviously limited his input on YouTube as he also had to set aside time for studying.
But after seeing potential in what Techno Gamerz was doing, his brother encouraged him to post more often. His first viral video was for Dragon Ball Z, a downloading tutorial. This video garnered a massive 250K views, boosting his channel’s profile. The young YouTube star has never looked back since then.
Meantime, you must be asking yourself how YouTube generates income in India. It’s simple; via AdSense! YouTube’s RPM (Revenue Per Mile) metric per 1,000 views varies between countries. In India, the video-sharing platform pays $0.50 per 1,000 views. This means that Indian YouTube teachers and influencers can earn $500 after garnering 1 million views.
But nothing is cast in stone on YouTube. Most Indian channels can earn between $800 and $2,500 after reaching 1 million views. However, this depends on where you get the most views from. For example, if at least half of your views are from the US, you’ll earn at least $1,500. Techno Gamerz YouTube income per 1,000 views is approximately $1.21.
Remember that there are some conditions to meet before you start earning money on YouTube. First, the channel must be active for at least a year and have a minimum of 1,000 subscribers. That’s not all; you’ll need nothing less than 4,000 watch hours to be on YouTube’s payroll.
With that said, below are some YouTube stats about the Techno Gamerz monthly income, number of views, and more:
| Estimated Monthly earnings in USD/Indian rupees | $167K |
|---|---|
| Estimated Yearly earnings in USD/Indian rupees | $8.6 million |
| Total video uploads | 858 |
| Type of videos | Gaming tutorials |
| Subscribers | 29 million |
| Video views | 7.5 billion |
| Last 30 days’ views | 7 million |
As expected, Ujjwal Chaurasia has a massive following on other social media platforms, especially on Instagram. Here, the 20-year-old has more than 2 million followers and over 250K likes on “ujjwalgamer.” He usually posts selfies, pictures, and a few gaming contents on Instagram. Ujjwal’s engagement rate on Instagram is around 12.5%.
He also has another Instagram account called “Techno_Gamerz ,” which has over 1M followers and over 120K likes. Ujjwal uses this account to keep his followers abreast of what’s happening on his YouTube channel and give hints of future releases. He also posts subscriber milestones. His Twitter account is “Ujjwal Chaurasia ,” with over 116K followers and around 290 posts.
Ujjwal is also venturing into music lately, specifically Hip Hop. He partnered with one of India’s most prominent producers, Sez on the Beat, to release Game On. This music tells a tale of how Chaurasia started from zero subscribers to more than 10 million. Currently, this single boasts over 62 million views.
Part 3: Why Is Techno Gamerz Trending on YouTube?
The Techno Gamerz earnings are certainly no fluke. Many YouTube careers come crashing down before they even start. You’ll even need to congratulate yourself for earning just $100 on YouTube. So, what makes Techno Gamers a darling to many YouTubers?
1. Engaging and interactive videos
YouTube is a very competitive video-sharing platform, and Techno Gamerz knows this fact quite well. Techno Gamerz adds funny and interactive commentary to his YouTube gaming videos to make them more interactive. Many YouTubers also love his confidence and composure in front of the camera.
2. Captivating story and continuity
One major thing you’ll see about all of Techno Gamerz’s videos is continuity. The YouTuber churns out new content every couple of days, keeping his fans entertained at all times. Also, Techno Gamerz always does a recap on his previous episodes to ensure that viewers can keep up with the pace. He even admitted in an interview that it’s critical for his audience to follow the storyline, making watching series like GTA V more interesting.
3. Single and multiplayer tutorials
Techno Gamerz’s tutorials consist of single and multiplayer games. He says that single-player games bring out his character’s awesomely powerful and superior side. He also admitted that he loves multiplayer games’ unpredictable and challenging nature.
Something about Techno Gamerz’s most loved videos
As said before, Dragon Ball Z was the YouTuber’s first upload on the platform. Then in January 2018, he went ahead to upload PUBG videos, but his breakthrough came when he switched to GTA. Up to now, he has posted 140+ GTA 5 episodes, which are famous for their unique storylines. Interestingly, each of his GTA videos has 5+ million views.
But to be one of the most popular YouTubers, you’ll need diversity. Techno Gamerz has this in abundance. His “Grandpa and Granny Two Hunters” video has 10+ million views. It’s a horror game where Techno Gamerz plays the scary granny with insane tricks.
His other videos, “BeamNG” and “Just Draw,” have more than 12 million and 13 million views, respectively. GTA V is the most loved by his audience, with over 30 million views.
Bonus Tip: How To Be a YouTuber and Make Videos Like Techno Gamerz
Evidently, you need to create compelling videos to increase your chances of getting over 1 million views and matching the Techno Gamerz salary. So, what makes a great YouTube video? The perfect YouTube videos should have a catchy intro, voice overlays, picture-in-picture effects, background audio, and more. You can also include elements like timers, subtitles, and effect overlays.
Thankfully, Wondershare Filmora comes with all these features and many more. It’s a macOS/iPadOS/Windows program that allows you to record Techno Gamerz-like videos with a live microphone commentary. After recording the video, add it to the editing timeline to customize it with stunning plugin effects, texts, transitions, subtitles, background music, and more. You also can explore features like motion tracking, key framing, speed ramping, and split screen if it’s a fast-paced video like GTA.
Let’s learn how to create and edit a YouTube video on Filmora 11:
Free Download For Win 7 or later(64-bit)
Free Download For macOS 10.14 or later
Step1 Start a new video project
Install and run Filmora 11 on your computer and choose the 16:9 aspect ratio for YouTube videos. Then, start a New Project.
Step2 Import the YouTube video tutorial
Now click the Import Media button to open a video file from your local storage. You can add multiple media files before moving them to the storyboard.
Step3 Edit your gaming video
Start by trimming your video to remove the noisy or unwanted parts. To trim and split a video, place the playhead where you want to cut and press the Split button. Repeat the same procedure to cut out a clip and delete it.
Your YouTube gaming tutorial also needs subtitles to stand out from the crowd. Select the YouTube video clip and click the Speech-to-Text button. Once the Speech-to-Text feature is active, select the translation language to start creating subtitles. Remember, you can edit and download the subtitle tracks as a .txt or .srt file.
Step4 Convert the video and upload it on YouTube
If you’re satisfied with the edited video, click the Export button, then select MP4, WebM, or MP4 AV1 as the target format. Now name your video, choose a folder path, and export it. Remember that you can also directly upload videos on YouTube by clicking the YouTube tab.
Hot FAQs on Techno Gamerz
1. Who earns more between Techno Gamerz and Carry Minati?
Techno Gamerz is not alone in Indian YouTube vlogging. CarryMinati is another top YouTuber in India, with 36.90 million followers. This YouTuber earns more than 25 Lakhs per month with annual revenue of at least 3 Crore Rupees. According to reports, Carry Minati (Ajey Nagar) has over $5 million in net worth.
2. How much does Techno Gamerz earn from one video?
It depends on the number of views. According to reports, this popular Indian YouTuber earns over $1.21 per 1,000 views. He has over 7.5 billion views currently.
3. What does Techno Gamerz do for a living?
Techno Gamerz’s primary source of income is YouTubing. This is where the 20-year-old earns most of his dollars.
Final Words
YouTubing can pay top money as long as you do it professionally. But it may need a lot of hard work and patience to start earning on YouTube. Also, invest in a powerful, all-in-one video editor for vloggers like Filmora 11. So, are you ready to start making the Techno Gamerz monthly income from YouTube? Give it a try!
Free Download For Win 7 or later(64-bit)
Free Download For macOS 10.14 or later
Also read:
- [New] Cutting Edge Cinema with Hero5 Black Professional Techniques
- [New] Secure Song Transfers to Youtube Channel
- [New] Solo Voices that Echo A Podcaster's Pathway
- [New] Step-by-Step Guide to Iconic YouTube Beginnings Method A & B
- [New] Streamline Your Thumbnail Design Journey Today
- 2024 Approved Google Meet Unlocked A Free, In-Depth User Manual
- In 2024, Forgot Pattern Lock? Heres How You Can Unlock Oppo Reno 11 Pro 5G Pattern Lock Screen
- In 2024, Social Media Showdown Comparing IGTV and YouTube's Unique Aspects
- In 2024, Tapping Income Through Thoughtful Product Examinations
- In 2024, The Beacon of Beauty Broadcasting Launching an Aesthetic Vlog
- Soundless Symphony? Fix Audio Hitches on Your Windows 11 Machine Today!
- Step-by-Step Tutorial on Installing the Latest Driver for Audio-Technica Headphones/Speakers
- The Ultimate Guide for Amateurs & Pros on Windows 11 Video Creation for 2024
- Title: [New] From Editing to Sharing Using Premiere with YouTube
- Author: Joseph
- Created at : 2024-11-02 21:13:15
- Updated at : 2024-11-05 04:33:09
- Link: https://youtube-stream.techidaily.com/new-from-editing-to-sharing-using-premiere-with-youtube/
- License: This work is licensed under CC BY-NC-SA 4.0.