
!["[New] From Beginners to Pros Choosing Webcams for YouTube Live"](https://www.lifewire.com/thmb/hTKYwh0v7qXo9k56663KdHBIHZ4=/400x300/filters:no_upscale():max_bytes(150000):strip_icc():format(webp)/how-to-fix-a-critical-process-dies-windows-11-error-952a1ad6325f455aaef36516fb3f7120.jpg)
"[New] From Beginners to Pros Choosing Webcams for YouTube Live"
From Beginners to Pros: Choosing Webcams for YouTube Live
Best Webcams for YouTube Livestreaming

Max Wales
Mar 27, 2024• Proven solutions
Broadcasting videos in real time on social media can be a great way to share some of the best moments of your life with your friends or to reach new customers for the products your company offers. YouTube is the world’s biggest video sharing platform that already allows its users to stream live videos through third-party applications such as Wirecast Play or OBS. Less than a month ago, YouTube has finally made possible live streaming directly from a computer’s webcam. The option is currently only available on Chrome browsers, but the company claims that more browsers will start offering this feature soon.
In this article, we are going to provide you with all the information you’ll need to create seamless live streams using a webcam and introduce you to some of the best webcam models in 2021.
Best webcams for YouTube Livestreaming in 2021
The quality of the video recording you intend to broadcast live is essential for the success of your live streams. Most built-in laptop webcams produce low-quality videos, and for that reason using an external webcam that captures high-resolution videos can help you create live streams that attract a lot of attention from YouTube’s community.
How to choose the right webcam for live streaming on YouTube?
Compatability: Even the best webcams on the market are completely useless if they are not compatible with your computer. Finding a webcam that works with a PC or a Mac shouldn’t be too difficult because both Windows and iOS platforms offer support for a wide range of models.
Video Resolution: YouTubers that just want to produce simple live streams don’t have to pay a lot of attention to the video resolution, because their videos don’t show too many details. Vloggers and gamers, on the other hand, should consider using webcams that produce 4K or HD footage since lower-priced options have a hard time realistically depicting colors. The quality of the video output a webcam produces can increase its price significantly, so there’s no reason investing in it if you don’t have the intention of utilizing its features to the fullest.
Sound Quality: Besides the video features, you should also look into the webcam’s audio options, because no one wants to watch a video with a terrible sound. Buying an external microphone is probably the best solution to this issue, but if you can’t afford one, then purchasing a webcam with decent audio recording features is the second best option.
Adjustable Location: Although the angle from which you are recording a stream may not seem important, poorly framed live streams are more likely to go unnoticed. A webcam that is easily adjustable can grant you the freedom of choosing your shots on every live stream you share online and it will enable you to control each and every detail in the video.
![]()

The All-in-One Screen Recorder & Video Editor
- Record desktop screen, voiceover, and webcam simultaneously
- Edit recorded clips quickly with a wide range of professional tools
- Built-in plentiful templates and effects
- Export to MP4, MOV, MKV, GIF and multiple formats
For Win 7 or later (64-bit)
For macOS 10.12 or later
 Secure Download
4 Best Webcams for YouTube Live streaming in 2021
There are thousands of different webcams you can use to record a live stream, but the models featured below are some of the very best currently available on the market.
1. Logitech 4K Pro webcam
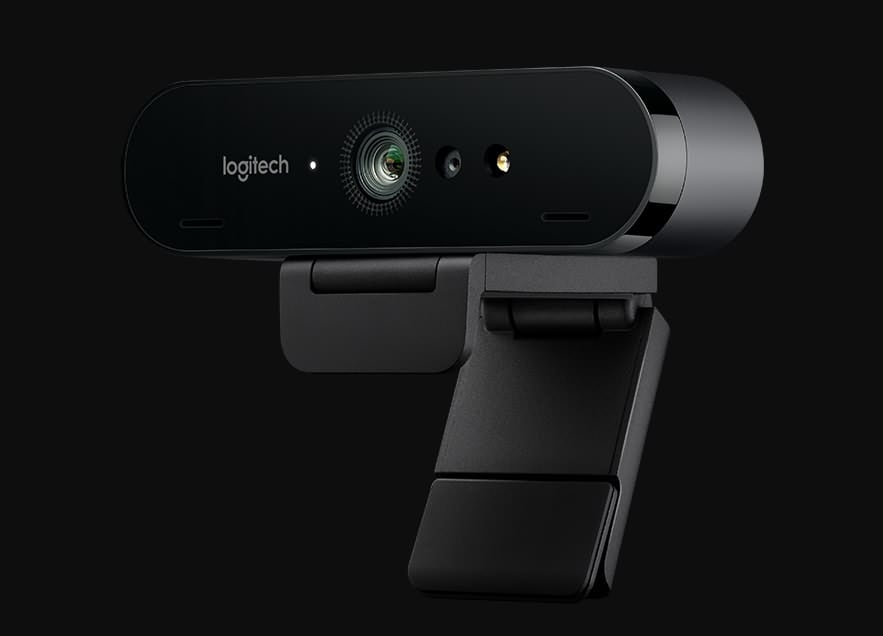
OS: Windows, macOS, Chrome OS
Price: $199
This is currently the only webcam on the market that supports 4K video recording, which makes it a forerunner of innovation and change. Besides the 4K option, the webcam’s features include a 5X digital zoom, infrared facial recognition and the amazing Right Light with HDR option that helps users record videos even under difficult light conditions.
The webcam can perform basic functions, like Skype calls, without the aid of third-party apps, which means that you can use it to create live streams on YouTube even if you don’t have a broadcasting software. The webcam’s stand is designed to fit almost any surface, so mounting the Logitech 4K Pro webcam to a laptop or monitor is quick and simple. The background replacement feature this Logitech’s webcam model offers can be quite useful if you want to use a different background in your YouTube live stream.
Pros:
- Produces incredibly clear and sharp images
- Superb background replacement options
- Expansive field of view
Cons:
- Poor audio recording options
- Internal software is basic
- A limited number of programs can capture 4K footage
2. Logitech HD Pro C920
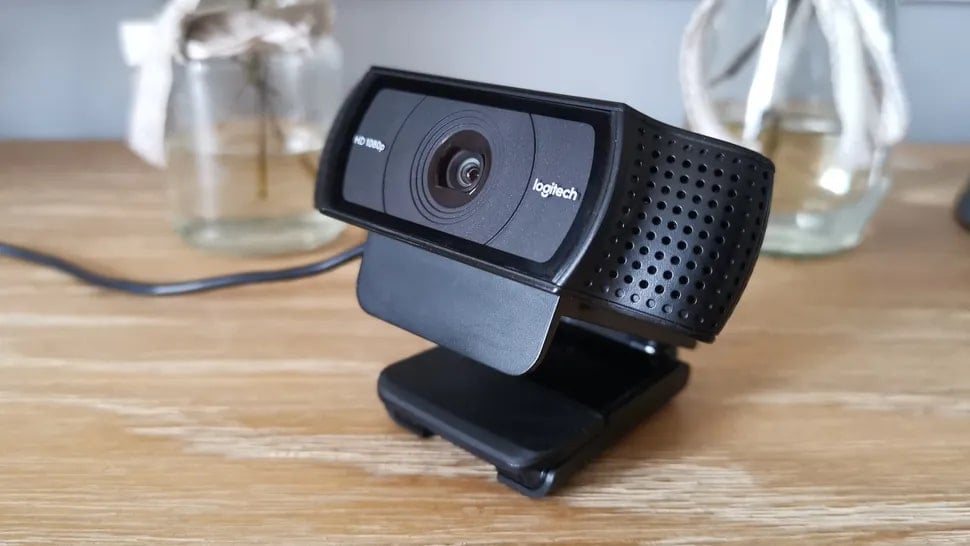
OS: macOS, Windows
Price: $99,99
Vloggers and all other YouTubers who care about video resolution will love using this webcam. Besides being capable of producing crystal clear videos in 1080p or HD 720 resolution at 30 or 60 fps, Logitech HD Pro C922 is also optimized for live streaming, which makes it a perfect webcam for live streaming on YouTube and all other video sharing platforms.
The webcam is equipped with two omnidirectional microphones that can record clear audio, but they pick up background noises easily, so using an external microphone for your live stream is still a much better option. The automatic low-light correction feature is designed to detect flickering lights in a video or increase visibility when streaming from a dimmed location. A foldable stand makes mounting the webcam easy, and you can also use a tripod if you want to record a live stream from an unusual perspective.
Pros:
- Produces 1080p and 720p resolution videos at 30 and 60 fps
- Allows users to integrate live images into their live streams
- Very easy to use
Cons
- Below average audio recording features
- Pricey
- Works only with OBS and XSplit broadcasting software
3. Logitech C922 Pro Stream webcam
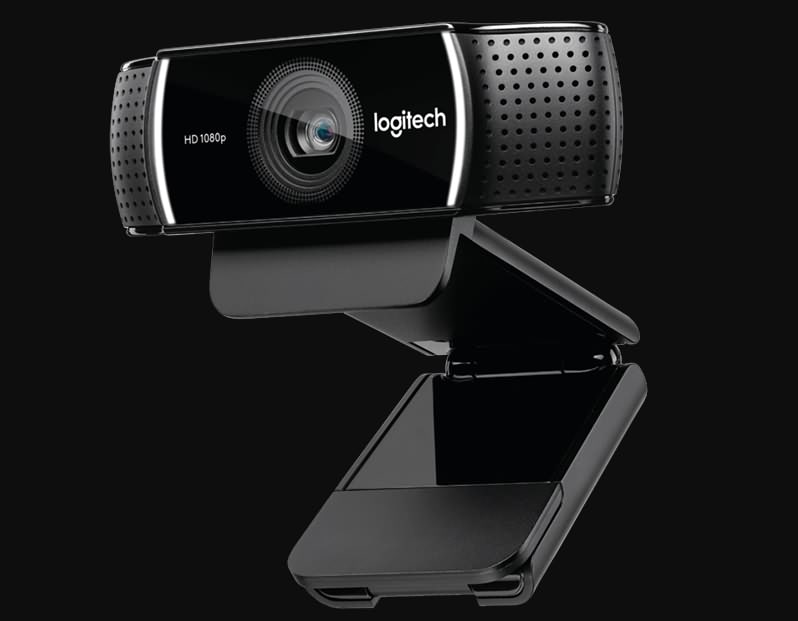
OS: Windows, macOS, Xbox, Chrome OS, Android 5.0 or above
Price: $99,99
Professional streamers, who want to capture impeccable live streams, should look no further. Logitech C922 Pro Stream webcam is the premier option for anyone who wants to be regarded as a professional streamer. This Logitech’s webcam lets you capture live streams in 1080p at 30 fps or 720p at 60 fps, while also providing the background removal feature for live streams on Twitch and YouTube. The video compression ensures that your live streams don’t take up too much of your network’s resources.
The webcam’s microphones enable users to record clear audio and reduce the need to use an external mic on every live stream you make. The Logitech C922 Pro Stream webcam delivers stunning performances in low light conditions, and it also has a 78-degree field of view lens. The webcam’s mounting options are somewhat limited, which can have a negative effect on the visual appeal of your YouTube live streams.
Pros:
- Offers a solid support for audio recording
- Delivers stunning picture quality
- Compatible with a wide range of operating systems
Cons:
- Limited mounting options
- Not plug-and-play friendly on Mac devices
- More expensive than webcams with similar capabilities
4. Microsoft LifeCam Studio
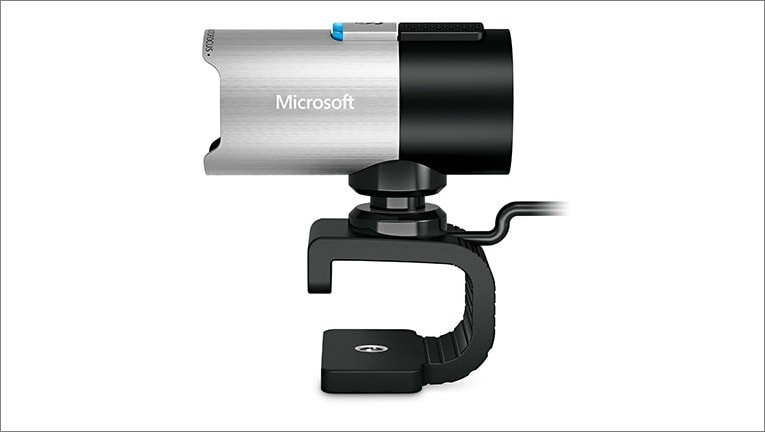
OS: Windows
Price: $99,95
The high-precision glass element lens this webcam features produces clear and sharp images. The Microsoft LifeCam Studio webcam has a 1080p HD sensor and it offers 720p HD video chat option. In addition to these remarkable features, the webcam is also equipped with TrueColor technology with face tracking that automatically adjusts the camera’s exposure to the environment and ensures that your live streams are always bright and colorful.
The Microsoft LifeCam Studio has a wide angle lens and an autofocus feature that guarantees that all live streams are always in focus. The webcam is Skype certified which means that it performs best when used with this software. Audio recording features exceed all expectations since the webcam can record natural audio recordings with no background noises. However, the limited compatibility narrows down the spectrum of its potential users.
Pros:
- Excellent video recording features.
- Crystal clear audio
- Great mounting options
Cons:
- Available only on Windows OS
- Demanding system requirements
- Not optimized for live streaming.
How to live stream from a webcam on YouTube in 2020
Although producing your own live stream on YouTube is easy, there are still a few steps you will have to take before you can start streaming from the webcam on your computer. If you don’t have a YouTube channel, you must make one, in order to be able to create your first live steam.
Step 1
Go to youtube.com/webcam , then complete the channel verification process and make sure that your channel doesn’t have any live streaming restrictions in the last 90 days. Head over to your channel, click on the Create a Video or Post icon in the upper right corner of the web page and select the GoLive option.
Afterward, you should give Chrome permission to access your webcam and the microphone you intend on using to record audio.
Step 2
Immediately after, the platform will ask you to give a title to your stream and it will let you choose whether or not you want the stream to be public or unlisted. It may be a good idea to create a few unlisted streams before you go public if you are still trying to figure out how this feature works.
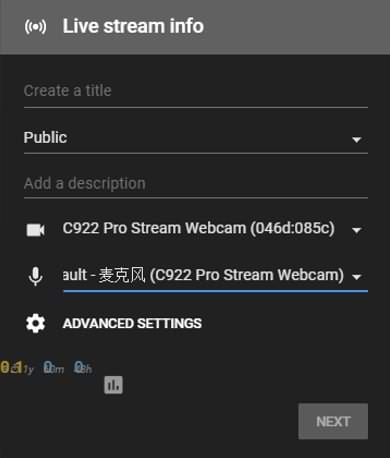
Proceed to select the camera and the microphone you intend to use to record the live stream, and you can also click on the Advanced Settings icon if you want to disable chat during the session or to specify that the live stream includes paid promotions.
Step 3
Once you’ve finished fine-tuning the advanced settings, you should click on the Next button. The platform will offer you to take or upload a thumbnail for your live stream.
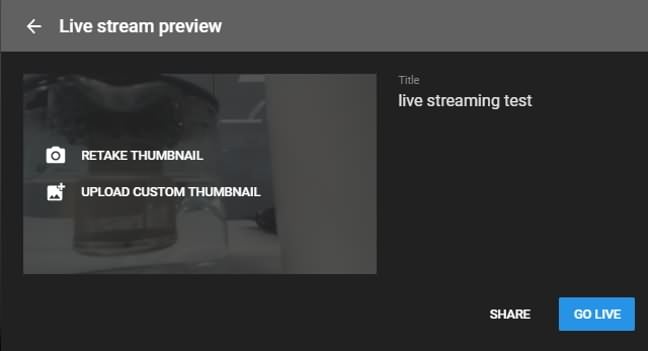
Clicking on the Share icon will enable you to share a live stream on social media, copy the link or access the embed code. Using the Share option is a great way to check if your live stream is functioning properly and to make sure that you are all set to begin the streaming session.
Step 4
Start your live stream by hitting the Go Live button. During the stream, you’ll be able to see and reply to comments people posted, the duration of the stream as well as the number of people following your live stream. If you haven’t shared your live stream before you started a new session you can do so while you are live. Click on the End Stream button to finish your webcam live stream on YouTube.
Step 5
After each live streaming session, YouTube will display some important statistics like the total and average watch time for the particular stream, the number of new subscribers or the number of playbacks of your live stream. The stream will be available for review in YouTube’s Creator Studio in the Events menu.
Max Wales
Max Wales is a writer and a lover of all things video.
Follow @Max Wales
Max Wales
Mar 27, 2024• Proven solutions
Broadcasting videos in real time on social media can be a great way to share some of the best moments of your life with your friends or to reach new customers for the products your company offers. YouTube is the world’s biggest video sharing platform that already allows its users to stream live videos through third-party applications such as Wirecast Play or OBS. Less than a month ago, YouTube has finally made possible live streaming directly from a computer’s webcam. The option is currently only available on Chrome browsers, but the company claims that more browsers will start offering this feature soon.
In this article, we are going to provide you with all the information you’ll need to create seamless live streams using a webcam and introduce you to some of the best webcam models in 2021.
Best webcams for YouTube Livestreaming in 2021
The quality of the video recording you intend to broadcast live is essential for the success of your live streams. Most built-in laptop webcams produce low-quality videos, and for that reason using an external webcam that captures high-resolution videos can help you create live streams that attract a lot of attention from YouTube’s community.
How to choose the right webcam for live streaming on YouTube?
Compatability: Even the best webcams on the market are completely useless if they are not compatible with your computer. Finding a webcam that works with a PC or a Mac shouldn’t be too difficult because both Windows and iOS platforms offer support for a wide range of models.
Video Resolution: YouTubers that just want to produce simple live streams don’t have to pay a lot of attention to the video resolution, because their videos don’t show too many details. Vloggers and gamers, on the other hand, should consider using webcams that produce 4K or HD footage since lower-priced options have a hard time realistically depicting colors. The quality of the video output a webcam produces can increase its price significantly, so there’s no reason investing in it if you don’t have the intention of utilizing its features to the fullest.
Sound Quality: Besides the video features, you should also look into the webcam’s audio options, because no one wants to watch a video with a terrible sound. Buying an external microphone is probably the best solution to this issue, but if you can’t afford one, then purchasing a webcam with decent audio recording features is the second best option.
Adjustable Location: Although the angle from which you are recording a stream may not seem important, poorly framed live streams are more likely to go unnoticed. A webcam that is easily adjustable can grant you the freedom of choosing your shots on every live stream you share online and it will enable you to control each and every detail in the video.
![]()
The All-in-One Screen Recorder & Video Editor
- Record desktop screen, voiceover, and webcam simultaneously
- Edit recorded clips quickly with a wide range of professional tools
- Built-in plentiful templates and effects
- Export to MP4, MOV, MKV, GIF and multiple formats
For Win 7 or later (64-bit)
For macOS 10.12 or later
Secure Download
4 Best Webcams for YouTube Live streaming in 2021
There are thousands of different webcams you can use to record a live stream, but the models featured below are some of the very best currently available on the market.
1. Logitech 4K Pro webcam
OS: Windows, macOS, Chrome OS
Price: $199
This is currently the only webcam on the market that supports 4K video recording, which makes it a forerunner of innovation and change. Besides the 4K option, the webcam’s features include a 5X digital zoom, infrared facial recognition and the amazing Right Light with HDR option that helps users record videos even under difficult light conditions.
The webcam can perform basic functions, like Skype calls, without the aid of third-party apps, which means that you can use it to create live streams on YouTube even if you don’t have a broadcasting software. The webcam’s stand is designed to fit almost any surface, so mounting the Logitech 4K Pro webcam to a laptop or monitor is quick and simple. The background replacement feature this Logitech’s webcam model offers can be quite useful if you want to use a different background in your YouTube live stream.
Pros:
- Produces incredibly clear and sharp images
- Superb background replacement options
- Expansive field of view
Cons:
- Poor audio recording options
- Internal software is basic
- A limited number of programs can capture 4K footage
2. Logitech HD Pro C920
OS: macOS, Windows
Price: $99,99
Vloggers and all other YouTubers who care about video resolution will love using this webcam. Besides being capable of producing crystal clear videos in 1080p or HD 720 resolution at 30 or 60 fps, Logitech HD Pro C922 is also optimized for live streaming, which makes it a perfect webcam for live streaming on YouTube and all other video sharing platforms.
The webcam is equipped with two omnidirectional microphones that can record clear audio, but they pick up background noises easily, so using an external microphone for your live stream is still a much better option. The automatic low-light correction feature is designed to detect flickering lights in a video or increase visibility when streaming from a dimmed location. A foldable stand makes mounting the webcam easy, and you can also use a tripod if you want to record a live stream from an unusual perspective.
Pros:
- Produces 1080p and 720p resolution videos at 30 and 60 fps
- Allows users to integrate live images into their live streams
- Very easy to use
Cons
- Below average audio recording features
- Pricey
- Works only with OBS and XSplit broadcasting software
3. Logitech C922 Pro Stream webcam
OS: Windows, macOS, Xbox, Chrome OS, Android 5.0 or above
Price: $99,99
Professional streamers, who want to capture impeccable live streams, should look no further. Logitech C922 Pro Stream webcam is the premier option for anyone who wants to be regarded as a professional streamer. This Logitech’s webcam lets you capture live streams in 1080p at 30 fps or 720p at 60 fps, while also providing the background removal feature for live streams on Twitch and YouTube. The video compression ensures that your live streams don’t take up too much of your network’s resources.
The webcam’s microphones enable users to record clear audio and reduce the need to use an external mic on every live stream you make. The Logitech C922 Pro Stream webcam delivers stunning performances in low light conditions, and it also has a 78-degree field of view lens. The webcam’s mounting options are somewhat limited, which can have a negative effect on the visual appeal of your YouTube live streams.
Pros:
- Offers a solid support for audio recording
- Delivers stunning picture quality
- Compatible with a wide range of operating systems
Cons:
- Limited mounting options
- Not plug-and-play friendly on Mac devices
- More expensive than webcams with similar capabilities
4. Microsoft LifeCam Studio
OS: Windows
Price: $99,95
The high-precision glass element lens this webcam features produces clear and sharp images. The Microsoft LifeCam Studio webcam has a 1080p HD sensor and it offers 720p HD video chat option. In addition to these remarkable features, the webcam is also equipped with TrueColor technology with face tracking that automatically adjusts the camera’s exposure to the environment and ensures that your live streams are always bright and colorful.
The Microsoft LifeCam Studio has a wide angle lens and an autofocus feature that guarantees that all live streams are always in focus. The webcam is Skype certified which means that it performs best when used with this software. Audio recording features exceed all expectations since the webcam can record natural audio recordings with no background noises. However, the limited compatibility narrows down the spectrum of its potential users.
Pros:
- Excellent video recording features.
- Crystal clear audio
- Great mounting options
Cons:
- Available only on Windows OS
- Demanding system requirements
- Not optimized for live streaming.
How to live stream from a webcam on YouTube in 2020
Although producing your own live stream on YouTube is easy, there are still a few steps you will have to take before you can start streaming from the webcam on your computer. If you don’t have a YouTube channel, you must make one, in order to be able to create your first live steam.
Step 1
Go to youtube.com/webcam , then complete the channel verification process and make sure that your channel doesn’t have any live streaming restrictions in the last 90 days. Head over to your channel, click on the Create a Video or Post icon in the upper right corner of the web page and select the GoLive option.
Afterward, you should give Chrome permission to access your webcam and the microphone you intend on using to record audio.
Step 2
Immediately after, the platform will ask you to give a title to your stream and it will let you choose whether or not you want the stream to be public or unlisted. It may be a good idea to create a few unlisted streams before you go public if you are still trying to figure out how this feature works.
Proceed to select the camera and the microphone you intend to use to record the live stream, and you can also click on the Advanced Settings icon if you want to disable chat during the session or to specify that the live stream includes paid promotions.
Step 3
Once you’ve finished fine-tuning the advanced settings, you should click on the Next button. The platform will offer you to take or upload a thumbnail for your live stream.
Clicking on the Share icon will enable you to share a live stream on social media, copy the link or access the embed code. Using the Share option is a great way to check if your live stream is functioning properly and to make sure that you are all set to begin the streaming session.
Step 4
Start your live stream by hitting the Go Live button. During the stream, you’ll be able to see and reply to comments people posted, the duration of the stream as well as the number of people following your live stream. If you haven’t shared your live stream before you started a new session you can do so while you are live. Click on the End Stream button to finish your webcam live stream on YouTube.
Step 5
After each live streaming session, YouTube will display some important statistics like the total and average watch time for the particular stream, the number of new subscribers or the number of playbacks of your live stream. The stream will be available for review in YouTube’s Creator Studio in the Events menu.
Max Wales
Max Wales is a writer and a lover of all things video.
Follow @Max Wales
The Blueprint for Producing High-Impact YouTube Videos
How to Make YouTube Video

Richard Bennett
Mar 27, 2024• Proven solutions
Finding the audience for short videos you create, sharing your knowledge of publicizing the music you create has become a much simpler and cheaper process in the last fourteen years. ‘Everyone deserves a voice’ is one of the core values that motivates the founders of YouTube to continue developing the world’s largest video sharing platform. So if you are looking for your own voice, but you’re not really sure where to start, you’ve come to the right place, because in this article we are going to show you how to make attention-grabbing YouTube videos that are going to attract a huge audience.
- Preparation Stage for Making YouTube Video [4 Aspects You Should Consider]
- Production Stage: Recording a YouTube Video [5 Tips and Tricks]
- YouTube Video Postproduction Stage: Editing the Footage You Recorded
- Uploading Videos to Your YouTube Channel
- How to Make YouTube Videos from a Mac or PC Computer? [Step Guide]
Preparation Stage: Getting Ready to Make a YouTube Video
Achieving success on YouTube may only seem easy before you realize how much time and effort it takes to run a successful YouTube channel. Making a YouTube video isn’t much different than making any other type of short or feature film as you have to go through the same stages of the video production process. Everything, including creating YouTube videos starts with an idea, so let’s take a look at the steps you’ll need to take before you actually start recording your first YouTube video.
1. Start a YouTube Channel
The journey towards success begins with seemingly small and insignificant steps. Creating a YouTube channel is exactly that, a step, without which you won’t be able to become a YouTuber. All you have to do in order to create a channel on YouTube is sign in to the platform using your Google account and then head over to the Settings menu. Click on the Create a new channel option and then pick a name for your Brand channel . Dedicate some extra time to the process of selecting a name for the channel, because that is the first thing your potential followers are going to notice. The platform lets you start as many as fifty channels with one Gmail ID, and as your channels grow, you can add multiple managers to each channel you’ve started. Click on the Create button when you’re done and that’s it you’re now a proud owner of a YouTube channel.
We have summarized some tips and tricks for creating a YouTube channel account , hope that will help you to create a channel more easily.
2. Choose a Niche and Craft a Video Content Strategy
Devising a plan before you start producing content you are going to share on YouTube is going to give you a sense of direction, since there are so many different types of videos that can attract a large audience. Try to imagine your ideal YouTube follower, and then think about what they are interested in or how you can generate value for them through the content you post on your channel. Attempting to cover a broad spectrum of topics usually doesn’t produce the best results, so instead, you should focus on a specific subject and do your best to offer a unique perspective to your viewers on that subject. More importantly, you need to choose the themes for your videos that are relevant to the audience you would like to reach. Gaming, tutorials, beauty or comedy videos are just a few of the most popular genres of videos on YouTube, although which niche you’re going to pick ultimately depends on your personal interests and reasons why you chose to become a YouTuber in the first place.
Additionally, you should follow the hottest trends on the Internet so that you can find out which topics are drawing the most attention at the moment. Don’t let all these questions trouble you, simply choose a niche in which you feel the most comfortable in and start shooting. Keep a watchful eye on how your followers respond to the videos you share on your channel as time goes on and remain open to new ideas or collaborations.
3. Secure a Fresh Supply of YouTube Video Ideas
Defining your niche is just a beginning because you have to keep producing your videos at a steady pace. Most YouTube experts say that sharing new content at least once a week is necessary if you want to gather a large group of followers on your channel. Consequently, you’ll need a constant supply of ideas for new videos that cover topics your audience is interested in. A simple search on YouTube can help you discover the videos on the platform that have the most views. This should give you a pretty good idea which types of videos are the most popular at the moment and what viewers want to see the most.
Reading the comments section below a YouTube video can be a great way to discover new ideas since viewers often ask questions or search for advice on very specific aspects of the topic that particular video is covering. Moreover, YouTube isn’t the only destination on the Internet where you can find inspiration for your next video since there are countless groups and communities where you can come across interesting topics for your next video.
4. Get the Right Video and Audio Recording Equipment
The list of audio and video recording gear you’re going to need to create a YouTube video depends on the type of video you’re trying to make. Gamers who want to record gameplay and post it on their YouTube channel only need a screen capturing software or a capture card and a microphone. The list of equipment is a bit longer for YouTubers interested in the production of vlogs, comedy or review videos since they are going to need a camera or a Smartphone capable of recording videos at high resolutions, lighting equipment, tripods, steady cams, microphones. If you would like to learn more about the pieces of equipment you are going to need while recording a YouTube video, check our picks of the YouTube Video Shooting Equipment List .
Production Stage: Recording a YouTube Video
After you’ve successfully completed the preparation stage it is time to start getting ready for the next step of the process of making a YouTube video. However, you can’t just pick up a camera and start randomly shooting unrelated scenes, instead, you should follow the steps below that make the production of a video much less complicated.
1. Write a Script and Make a Shooting Schedule
Write down all of your ideas for your next video prior to shooting the first shot of that video. A script can be particularly useful if the video you’re planning on making involves a lot of narration since you’ll always know what to say next. Furthermore, you don’t have to record the entire video on the same day, and you have the freedom to plan when and where you are going to record each scene you want to include in the video.
2. Set a Scene
You control what the viewers of your YouTube video are going to see. That’s why you have to choose your shooting locations carefully and to hand-pick each prop that is going to be visible in the shot. Avoid shooting in messy rooms, because the items in the background are going to distract the viewer and reduce the quality of your videos.
3. Pick the Best Camera Positions
Once you know where and when you are going to shoot your video, you should start planning your shots. Most YouTube videos are recorded from a single camera position, but you can also experiment with different shot angles if it helps you to tell the story of the video. Don’t put the actors near direct sources of light like windows or lamps because if you do so you can easily end up ruining the shot.
4. Make Sure that You Have Enough Light in The Shot
Natural sources of light are often not enough to light a scene properly, because the amount of available light you’ll have at your disposal can change in a few minutes. That’s why nearly all YouTubers use lighting kits that enable them to control the amount of light in the shot at any moment.
5. Bonus: Making YouTube Videos Without a Camera
In case using video and audio recording equipment is a bit too technical for you, there is a simple alternative solution since you can capture all activities on your computer’s screen with software products such as Filmora or OBS Studio. This is an excellent option for gamers who want to record gameplay of their favorite video games or skilled educators that would like to share their knowledge and show others how to use a piece of software or perform any other computer-based task.
Besides screencasting, you can also assemble existing footage from old TV shows, movies or cartoons to make a YouTube video. You don’t have to worry about copyright infringements, as long as the footage you’re using is within the public domain. However, if you accidentally end up using footage without permission it is highly unlikely that anyone is going to file a lawsuit, but your video may be removed from your YouTube channel if someone reports that you’ve used footage without the permission from its owners.
Postproduction Stage: Editing the Footage You Recorded
Before you can share the video clips you recorded with a camera, Smartphone or a screencasting software, you should edit them first. Choosing video editing software isn’t always easy since there are so many different options that enable you to perform both basic and advanced video editing tasks. You can check our recommendations about some of the best video editing software for YouTube videos, in case you are still looking for a video editor that is best suited for the price range you’ve had in mind or your skill level. You should choose a video editing app that you feel the most comfortable using since you are going to spend a lot of time editing videos with it.
The video editing techniques you will utilize during the process of piecing together a YouTube video depend on a number of factors that range from the genre of the video to its visual style. However, trimming or cutting the footage, creating opening titles and end credits are among the most common video editing actions you will have to perform on each new project. Mastering these basic video editing techniques is essential for the success of your videos on YouTube since it will enable you to quickly trim a video clip by dragging one of its ends in an inward or outward direction or remove a portion of a clip you don’t want to feature in the final cut of the video from the timeline.
Hard cuts can at times disrupt the flow of a video, but you can easily fix this by adding a transition between two clips. What’s more, nearly all video editing software products on the market come bundled with rich visual and audio effects libraries that make the color grading or audio editing process much faster. Adding opening titles, lower thirds or any other image overlay can help you introduce the characters in the video to the audience, inform the audience about important aspects of the topic you’re covering or summarize the key points of the video.
Creating a soundtrack is also a vital step of the video editing process that largely influences the quality of the final video. That’s why the narration or the dialogues must be recorded professionally since even the slightest background noise can distract the viewer. Whether or not you are going to add music to a video, depends on the type of project you’re working on. Video editing software products like Filmora have their own royalty free music libraries that offer songs from Rock or Electronic and numerous other genres.
When you complete the video editing process, you should export the video to a folder on your hard drive or directly to your YouTube channel if the video editing app you’ve chosen provides that option. How long the rendering of a video is going to take depends on your computer’s processing power, video’s length, and the output resolution.
Adding/Uploading Videos to Your YouTube Channel
As we already noted you can either upload a video to YouTube directly from a video editing software or from a hard drive after the rendering process is completed. You can upload videos with 16:9 or 4:3 aspect ratios to your channel, and the platform support videos in resolutions up to 8K. The minimum length of a YouTube video is 33 seconds while a video’s maximum length cannot exceed the twelve-hour limit. The file’s size can’t be larger than 128GB while the frame rates can go as high as 60fps. If you need to edit the uploaded and published YouTube videos, you can check our tips about editing existing YouTube videos , and you can check out our guide about how to make money on YouTube if you would like to learn more about account monetization.
Read More to Get : How to Loop a YouTube Video >>
1. Optimize Your Content for YouTube Searches
Every bit of information you add to the video increases its visibility on the platform. Even the name of the file you’re uploading to your channel should contain a keyword, and once the upload is completed you should add a title, description, and metadata if you would like to increase the video’s visibility on the platform. It is vital to select your YouTube SEO strategy before you actually start adding new videos to your strategy. In case you’re not familiar with the concept of search engine optimization for YouTube, you can find everything you need to know aboutYouTube SEO in our guide.
2. Create Visually Captivating Thumbnails and End Screen Elements
A thumbnail is usually a snapshot of a frame from a video, you’ve created during the video editing process or any other still image that suggests what the video is about. A small thing like adding a thumbnail to a YouTube video can increase both the number of views and the number of likes that video is getting. In addition, YouTube’s video editor enables you to add end screens that last anywhere between five and twenty seconds to your videos, but keep in mind that the video must be at least 25 seconds long to have an end screen. There are a number of fully customizable templates available that can be uses to promote your upcoming videos or to invite viewers to subscribe to your channel.
Wanna making YouTube thumbnail yourself? Check some of the best YouTube thumbnail makers list.
3. Publish, Interact and Share
YouTube lets you keep your videos private until you are ready to make them public. Once you decide to make a video available to all YouTube users, you should share it on social media like Twitter, Facebook or Tumblr. Furthermore, embedding a YouTube video on your blog or website can drastically increase the number of views it’s getting. The YouTube Analytics tool is designed to help you track the metrics that indicate how well your video is performing. Don’t know which analytics tools should use? Check our picks of some useful YouTube Analytics Tools to learn how to analyze your video.
How to Make YouTube Videos from a Mac or PC Computer?
Even though you can use almost any video editing software to edit a YouTube video, we recommend trying a versatile video editing app like Filmora to edit videos on Windows PC and Mac which offers both basic and advanced video editing features. Creating a video in Filmora doesn’t require a developed set of video editing skills, since all of the tools and options the editor offers are remarkably easy to use.
When you are ready to start a new project you should simply launch the software, and once the new project loads, you should head over to the File menu and select the Project Settings option that lets you set the resolution, aspect ratio and the frame rate of the video. Proceed to import the footage into the project by selecting one of the available options in the Import drop-down menu or by simply dragging the media assets from a folder on your hard drive and dropping them to the Filmora’s Media Panel. In case you don’t have your own audio and video footage you can download videos, music, visual and audio effects from a stock footage website like Filmstock effects store . Filmora also offers screen casting features, so you can easily record gameplay, show viewers how to use a software or capture any other type of activity on your computer’s screen.
Add each media asset you want to include in the final cut of the video to the timeline and then proceed to remove all unwanted parts of the video and audio clips from the timeline using the Cut or Trim options. Filmora offers rich transitions and visual effects libraries you can use to make the cuts between shot smoother or enhance the colors in the video clips you’re editing. Furthermore, the editor lets you take snapshots of any frame in video clips you’ve placed on the timeline in a single click which can be quite useful if you want to create a thumbnail for your YouTube video. Creating the opening titles, end credits or adding different image overlays to a video is a straight forward process since you just have to select the option that fits the style of the video you’re creating and add it to the timeline. Once you’ve completed the video editing process, you can click on the Export button and decide if you want to export a video directly to your YouTube channel or to a destination on your hard drive.
New to Filmora? Check our beginner guide about How to Edit Videos in Filmora in details or check the quick video tutorial below to find out more details.


Conclusion
Becoming a successful YouTuber requires a lot of dedication and hard work, so if at first, you don’t succeed, you should be patient and persistent. In time, as your channel grows, you will be able to monetize your videos, but only if you keep producing new content at a steady pace. Each step of the YouTube creation process is equally important, and you should dedicate an equal amount of attention to recording high-quality footage, editing, and promotion of the content you share on your YouTube channel. Was this article helpful? Leave a comment below and share your thoughts and experiences with us.
Richard Bennett
Richard Bennett is a writer and a lover of all things video.
Follow @Richard Bennett
Richard Bennett
Mar 27, 2024• Proven solutions
Finding the audience for short videos you create, sharing your knowledge of publicizing the music you create has become a much simpler and cheaper process in the last fourteen years. ‘Everyone deserves a voice’ is one of the core values that motivates the founders of YouTube to continue developing the world’s largest video sharing platform. So if you are looking for your own voice, but you’re not really sure where to start, you’ve come to the right place, because in this article we are going to show you how to make attention-grabbing YouTube videos that are going to attract a huge audience.
- Preparation Stage for Making YouTube Video [4 Aspects You Should Consider]
- Production Stage: Recording a YouTube Video [5 Tips and Tricks]
- YouTube Video Postproduction Stage: Editing the Footage You Recorded
- Uploading Videos to Your YouTube Channel
- How to Make YouTube Videos from a Mac or PC Computer? [Step Guide]
Preparation Stage: Getting Ready to Make a YouTube Video
Achieving success on YouTube may only seem easy before you realize how much time and effort it takes to run a successful YouTube channel. Making a YouTube video isn’t much different than making any other type of short or feature film as you have to go through the same stages of the video production process. Everything, including creating YouTube videos starts with an idea, so let’s take a look at the steps you’ll need to take before you actually start recording your first YouTube video.
1. Start a YouTube Channel
The journey towards success begins with seemingly small and insignificant steps. Creating a YouTube channel is exactly that, a step, without which you won’t be able to become a YouTuber. All you have to do in order to create a channel on YouTube is sign in to the platform using your Google account and then head over to the Settings menu. Click on the Create a new channel option and then pick a name for your Brand channel . Dedicate some extra time to the process of selecting a name for the channel, because that is the first thing your potential followers are going to notice. The platform lets you start as many as fifty channels with one Gmail ID, and as your channels grow, you can add multiple managers to each channel you’ve started. Click on the Create button when you’re done and that’s it you’re now a proud owner of a YouTube channel.
We have summarized some tips and tricks for creating a YouTube channel account , hope that will help you to create a channel more easily.
2. Choose a Niche and Craft a Video Content Strategy
Devising a plan before you start producing content you are going to share on YouTube is going to give you a sense of direction, since there are so many different types of videos that can attract a large audience. Try to imagine your ideal YouTube follower, and then think about what they are interested in or how you can generate value for them through the content you post on your channel. Attempting to cover a broad spectrum of topics usually doesn’t produce the best results, so instead, you should focus on a specific subject and do your best to offer a unique perspective to your viewers on that subject. More importantly, you need to choose the themes for your videos that are relevant to the audience you would like to reach. Gaming, tutorials, beauty or comedy videos are just a few of the most popular genres of videos on YouTube, although which niche you’re going to pick ultimately depends on your personal interests and reasons why you chose to become a YouTuber in the first place.
Additionally, you should follow the hottest trends on the Internet so that you can find out which topics are drawing the most attention at the moment. Don’t let all these questions trouble you, simply choose a niche in which you feel the most comfortable in and start shooting. Keep a watchful eye on how your followers respond to the videos you share on your channel as time goes on and remain open to new ideas or collaborations.
3. Secure a Fresh Supply of YouTube Video Ideas
Defining your niche is just a beginning because you have to keep producing your videos at a steady pace. Most YouTube experts say that sharing new content at least once a week is necessary if you want to gather a large group of followers on your channel. Consequently, you’ll need a constant supply of ideas for new videos that cover topics your audience is interested in. A simple search on YouTube can help you discover the videos on the platform that have the most views. This should give you a pretty good idea which types of videos are the most popular at the moment and what viewers want to see the most.
Reading the comments section below a YouTube video can be a great way to discover new ideas since viewers often ask questions or search for advice on very specific aspects of the topic that particular video is covering. Moreover, YouTube isn’t the only destination on the Internet where you can find inspiration for your next video since there are countless groups and communities where you can come across interesting topics for your next video.
4. Get the Right Video and Audio Recording Equipment
The list of audio and video recording gear you’re going to need to create a YouTube video depends on the type of video you’re trying to make. Gamers who want to record gameplay and post it on their YouTube channel only need a screen capturing software or a capture card and a microphone. The list of equipment is a bit longer for YouTubers interested in the production of vlogs, comedy or review videos since they are going to need a camera or a Smartphone capable of recording videos at high resolutions, lighting equipment, tripods, steady cams, microphones. If you would like to learn more about the pieces of equipment you are going to need while recording a YouTube video, check our picks of the YouTube Video Shooting Equipment List .
Production Stage: Recording a YouTube Video
After you’ve successfully completed the preparation stage it is time to start getting ready for the next step of the process of making a YouTube video. However, you can’t just pick up a camera and start randomly shooting unrelated scenes, instead, you should follow the steps below that make the production of a video much less complicated.
1. Write a Script and Make a Shooting Schedule
Write down all of your ideas for your next video prior to shooting the first shot of that video. A script can be particularly useful if the video you’re planning on making involves a lot of narration since you’ll always know what to say next. Furthermore, you don’t have to record the entire video on the same day, and you have the freedom to plan when and where you are going to record each scene you want to include in the video.
2. Set a Scene
You control what the viewers of your YouTube video are going to see. That’s why you have to choose your shooting locations carefully and to hand-pick each prop that is going to be visible in the shot. Avoid shooting in messy rooms, because the items in the background are going to distract the viewer and reduce the quality of your videos.
3. Pick the Best Camera Positions
Once you know where and when you are going to shoot your video, you should start planning your shots. Most YouTube videos are recorded from a single camera position, but you can also experiment with different shot angles if it helps you to tell the story of the video. Don’t put the actors near direct sources of light like windows or lamps because if you do so you can easily end up ruining the shot.
4. Make Sure that You Have Enough Light in The Shot
Natural sources of light are often not enough to light a scene properly, because the amount of available light you’ll have at your disposal can change in a few minutes. That’s why nearly all YouTubers use lighting kits that enable them to control the amount of light in the shot at any moment.
5. Bonus: Making YouTube Videos Without a Camera
In case using video and audio recording equipment is a bit too technical for you, there is a simple alternative solution since you can capture all activities on your computer’s screen with software products such as Filmora or OBS Studio. This is an excellent option for gamers who want to record gameplay of their favorite video games or skilled educators that would like to share their knowledge and show others how to use a piece of software or perform any other computer-based task.
Besides screencasting, you can also assemble existing footage from old TV shows, movies or cartoons to make a YouTube video. You don’t have to worry about copyright infringements, as long as the footage you’re using is within the public domain. However, if you accidentally end up using footage without permission it is highly unlikely that anyone is going to file a lawsuit, but your video may be removed from your YouTube channel if someone reports that you’ve used footage without the permission from its owners.
Postproduction Stage: Editing the Footage You Recorded
Before you can share the video clips you recorded with a camera, Smartphone or a screencasting software, you should edit them first. Choosing video editing software isn’t always easy since there are so many different options that enable you to perform both basic and advanced video editing tasks. You can check our recommendations about some of the best video editing software for YouTube videos, in case you are still looking for a video editor that is best suited for the price range you’ve had in mind or your skill level. You should choose a video editing app that you feel the most comfortable using since you are going to spend a lot of time editing videos with it.
The video editing techniques you will utilize during the process of piecing together a YouTube video depend on a number of factors that range from the genre of the video to its visual style. However, trimming or cutting the footage, creating opening titles and end credits are among the most common video editing actions you will have to perform on each new project. Mastering these basic video editing techniques is essential for the success of your videos on YouTube since it will enable you to quickly trim a video clip by dragging one of its ends in an inward or outward direction or remove a portion of a clip you don’t want to feature in the final cut of the video from the timeline.
Hard cuts can at times disrupt the flow of a video, but you can easily fix this by adding a transition between two clips. What’s more, nearly all video editing software products on the market come bundled with rich visual and audio effects libraries that make the color grading or audio editing process much faster. Adding opening titles, lower thirds or any other image overlay can help you introduce the characters in the video to the audience, inform the audience about important aspects of the topic you’re covering or summarize the key points of the video.
Creating a soundtrack is also a vital step of the video editing process that largely influences the quality of the final video. That’s why the narration or the dialogues must be recorded professionally since even the slightest background noise can distract the viewer. Whether or not you are going to add music to a video, depends on the type of project you’re working on. Video editing software products like Filmora have their own royalty free music libraries that offer songs from Rock or Electronic and numerous other genres.
When you complete the video editing process, you should export the video to a folder on your hard drive or directly to your YouTube channel if the video editing app you’ve chosen provides that option. How long the rendering of a video is going to take depends on your computer’s processing power, video’s length, and the output resolution.
Adding/Uploading Videos to Your YouTube Channel
As we already noted you can either upload a video to YouTube directly from a video editing software or from a hard drive after the rendering process is completed. You can upload videos with 16:9 or 4:3 aspect ratios to your channel, and the platform support videos in resolutions up to 8K. The minimum length of a YouTube video is 33 seconds while a video’s maximum length cannot exceed the twelve-hour limit. The file’s size can’t be larger than 128GB while the frame rates can go as high as 60fps. If you need to edit the uploaded and published YouTube videos, you can check our tips about editing existing YouTube videos , and you can check out our guide about how to make money on YouTube if you would like to learn more about account monetization.
Read More to Get : How to Loop a YouTube Video >>
1. Optimize Your Content for YouTube Searches
Every bit of information you add to the video increases its visibility on the platform. Even the name of the file you’re uploading to your channel should contain a keyword, and once the upload is completed you should add a title, description, and metadata if you would like to increase the video’s visibility on the platform. It is vital to select your YouTube SEO strategy before you actually start adding new videos to your strategy. In case you’re not familiar with the concept of search engine optimization for YouTube, you can find everything you need to know aboutYouTube SEO in our guide.
2. Create Visually Captivating Thumbnails and End Screen Elements
A thumbnail is usually a snapshot of a frame from a video, you’ve created during the video editing process or any other still image that suggests what the video is about. A small thing like adding a thumbnail to a YouTube video can increase both the number of views and the number of likes that video is getting. In addition, YouTube’s video editor enables you to add end screens that last anywhere between five and twenty seconds to your videos, but keep in mind that the video must be at least 25 seconds long to have an end screen. There are a number of fully customizable templates available that can be uses to promote your upcoming videos or to invite viewers to subscribe to your channel.
Wanna making YouTube thumbnail yourself? Check some of the best YouTube thumbnail makers list.
3. Publish, Interact and Share
YouTube lets you keep your videos private until you are ready to make them public. Once you decide to make a video available to all YouTube users, you should share it on social media like Twitter, Facebook or Tumblr. Furthermore, embedding a YouTube video on your blog or website can drastically increase the number of views it’s getting. The YouTube Analytics tool is designed to help you track the metrics that indicate how well your video is performing. Don’t know which analytics tools should use? Check our picks of some useful YouTube Analytics Tools to learn how to analyze your video.
How to Make YouTube Videos from a Mac or PC Computer?
Even though you can use almost any video editing software to edit a YouTube video, we recommend trying a versatile video editing app like Filmora to edit videos on Windows PC and Mac which offers both basic and advanced video editing features. Creating a video in Filmora doesn’t require a developed set of video editing skills, since all of the tools and options the editor offers are remarkably easy to use.
When you are ready to start a new project you should simply launch the software, and once the new project loads, you should head over to the File menu and select the Project Settings option that lets you set the resolution, aspect ratio and the frame rate of the video. Proceed to import the footage into the project by selecting one of the available options in the Import drop-down menu or by simply dragging the media assets from a folder on your hard drive and dropping them to the Filmora’s Media Panel. In case you don’t have your own audio and video footage you can download videos, music, visual and audio effects from a stock footage website like Filmstock effects store . Filmora also offers screen casting features, so you can easily record gameplay, show viewers how to use a software or capture any other type of activity on your computer’s screen.
Add each media asset you want to include in the final cut of the video to the timeline and then proceed to remove all unwanted parts of the video and audio clips from the timeline using the Cut or Trim options. Filmora offers rich transitions and visual effects libraries you can use to make the cuts between shot smoother or enhance the colors in the video clips you’re editing. Furthermore, the editor lets you take snapshots of any frame in video clips you’ve placed on the timeline in a single click which can be quite useful if you want to create a thumbnail for your YouTube video. Creating the opening titles, end credits or adding different image overlays to a video is a straight forward process since you just have to select the option that fits the style of the video you’re creating and add it to the timeline. Once you’ve completed the video editing process, you can click on the Export button and decide if you want to export a video directly to your YouTube channel or to a destination on your hard drive.
New to Filmora? Check our beginner guide about How to Edit Videos in Filmora in details or check the quick video tutorial below to find out more details.
Conclusion
Becoming a successful YouTuber requires a lot of dedication and hard work, so if at first, you don’t succeed, you should be patient and persistent. In time, as your channel grows, you will be able to monetize your videos, but only if you keep producing new content at a steady pace. Each step of the YouTube creation process is equally important, and you should dedicate an equal amount of attention to recording high-quality footage, editing, and promotion of the content you share on your YouTube channel. Was this article helpful? Leave a comment below and share your thoughts and experiences with us.
Richard Bennett
Richard Bennett is a writer and a lover of all things video.
Follow @Richard Bennett
- Title: "[New] From Beginners to Pros Choosing Webcams for YouTube Live"
- Author: Joseph
- Created at : 2024-05-31 13:50:05
- Updated at : 2024-06-01 13:50:05
- Link: https://youtube-stream.techidaily.com/new-from-beginners-to-pros-choosing-webcams-for-youtube-live/
- License: This work is licensed under CC BY-NC-SA 4.0.
