![[New] Exploring YouTube’s Functionality Following Uploaded Videos](https://thmb.techidaily.com/657c6ed7c4c5009fda7b9debb5d0440f9ba124b99f1e715f38abd38365f6151e.png)
[New] Exploring YouTube’s Functionality Following Uploaded Videos
Exploring YouTube’s Functionality Following Uploaded Videos
How Does YouTube Work After a Video Is Uploaded

Richard Bennett
Mar 27, 2024• Proven solutions
You use YouTube to watch videos, post your own content, and build up a following. That is how YouTube works for you. This article is about how YouTube works technically. There are a lot of steps which occur between you clicking ‘upload’ and a viewer clicking ‘play’. Understanding this process can be useful to YouTubers because it can help shed light on where problems may be occurring when you have issues uploading or watching videos. Generally when there is a problem it is on your end and there are multiple simple things you can do to fix it.
This article will explain what goes on behind the scenes when you upload a video, where that video really goes, and what happens when somebody clicks play.
How Does YouTube Work
1. What Happens When You Upload?
When you upload a video your computer or device packages it into IP packets. Packets are fragments of information containing both data from your video and the address you are sending it to, in this case YouTube. The packets are encoded into radio signals which are sent through a wifi or cellular network. Your video travels through switches and routers on the internet until they reach YouTube’s servers. Your video is then reassembled and stored.
If uploading takes a long time for you it probably has nothing to do with YouTube; there is a lot that needs to happen for your video to even get there. How long the upload process takes depends on a number of factors including how many devices share your internet connection, how strong your wifi signal is, and the age of your router. If your uploads are taking too long consider compressing your videos before you upload them. You can also try uploading from your college campus or public libraries as institutions like these tend to have fast internet speeds.
2. Where is Your Video Stored?

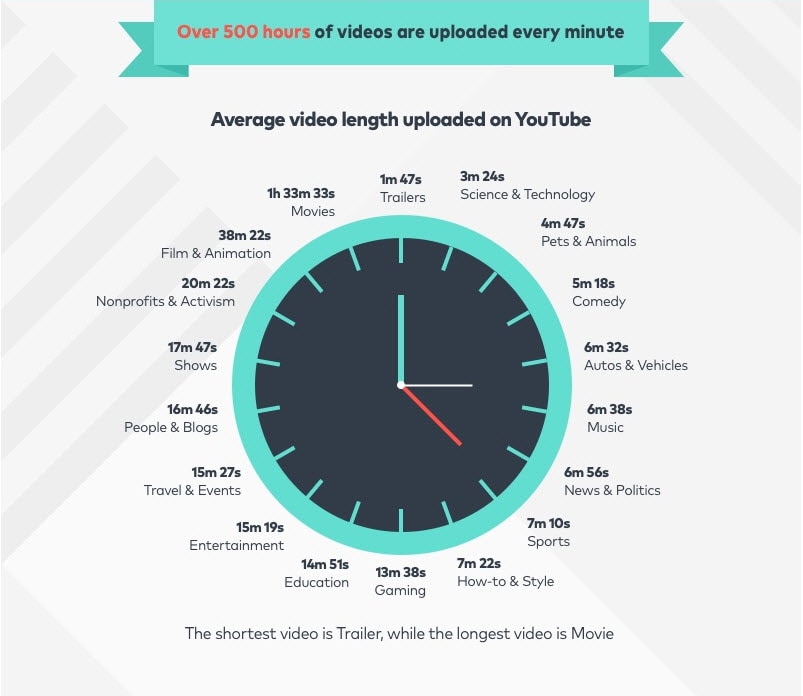
As it is owned by Google YouTube uses Google’s ‘Bigtable’, a compressed data storage system which allows it to store the 500+ hours of video uploaded to its servers every minute. Bigtable is software, though, not hardware. YouTube and Google both have massive amounts of data and it needs to be physically housed somewhere.
Google has Modular Data Centers all over the world where it keeps its servers. These centers could cost as much as $600 million dollars each and consume huge amounts of electricity. There are six of them in the United States, three in Europe, two in Asia, and one is South America.
3. What Happens When Someone Watches Your Video?
When a viewer clicks on your video their computer sends an encoded request through the internet to YouTube’s servers. After YouTube receives the play request it chooses which format to play the video in based on the viewer’s browser. Your video is again turned into packets, which are again sent as radio signals over the internet to your viewer. Your viewer’s computer or device reforms the packets into your video and their browser plays it.
If videos take a long time to load for you then there are a few things you can do to speed them up. First, consider changing the channel of your wifi router. Most people stay on the channel their router was set to when they first got it and so there is a good chance you and your neighbors are all on the same channel. This causes your networks to interfere with each other. You can also delete the temporary files on your computer. Besides helping you stream video faster this will free up storage space. Another thing you can do is make sure there are as few devices connected to your network as possible while you are watching videos. Besides mobile phones and laptops you may have appliances, like coffee machines and refrigerators, which are wifi enabled. Disconnect them temporarily and it will help your videos to load faster.
Richard Bennett
Richard Bennett is a writer and a lover of all things video.
Follow @Richard Bennett
Richard Bennett
Mar 27, 2024• Proven solutions
You use YouTube to watch videos, post your own content, and build up a following. That is how YouTube works for you. This article is about how YouTube works technically. There are a lot of steps which occur between you clicking ‘upload’ and a viewer clicking ‘play’. Understanding this process can be useful to YouTubers because it can help shed light on where problems may be occurring when you have issues uploading or watching videos. Generally when there is a problem it is on your end and there are multiple simple things you can do to fix it.
This article will explain what goes on behind the scenes when you upload a video, where that video really goes, and what happens when somebody clicks play.
How Does YouTube Work
1. What Happens When You Upload?
When you upload a video your computer or device packages it into IP packets. Packets are fragments of information containing both data from your video and the address you are sending it to, in this case YouTube. The packets are encoded into radio signals which are sent through a wifi or cellular network. Your video travels through switches and routers on the internet until they reach YouTube’s servers. Your video is then reassembled and stored.
If uploading takes a long time for you it probably has nothing to do with YouTube; there is a lot that needs to happen for your video to even get there. How long the upload process takes depends on a number of factors including how many devices share your internet connection, how strong your wifi signal is, and the age of your router. If your uploads are taking too long consider compressing your videos before you upload them. You can also try uploading from your college campus or public libraries as institutions like these tend to have fast internet speeds.
2. Where is Your Video Stored?
As it is owned by Google YouTube uses Google’s ‘Bigtable’, a compressed data storage system which allows it to store the 500+ hours of video uploaded to its servers every minute. Bigtable is software, though, not hardware. YouTube and Google both have massive amounts of data and it needs to be physically housed somewhere.
Google has Modular Data Centers all over the world where it keeps its servers. These centers could cost as much as $600 million dollars each and consume huge amounts of electricity. There are six of them in the United States, three in Europe, two in Asia, and one is South America.
3. What Happens When Someone Watches Your Video?
When a viewer clicks on your video their computer sends an encoded request through the internet to YouTube’s servers. After YouTube receives the play request it chooses which format to play the video in based on the viewer’s browser. Your video is again turned into packets, which are again sent as radio signals over the internet to your viewer. Your viewer’s computer or device reforms the packets into your video and their browser plays it.
If videos take a long time to load for you then there are a few things you can do to speed them up. First, consider changing the channel of your wifi router. Most people stay on the channel their router was set to when they first got it and so there is a good chance you and your neighbors are all on the same channel. This causes your networks to interfere with each other. You can also delete the temporary files on your computer. Besides helping you stream video faster this will free up storage space. Another thing you can do is make sure there are as few devices connected to your network as possible while you are watching videos. Besides mobile phones and laptops you may have appliances, like coffee machines and refrigerators, which are wifi enabled. Disconnect them temporarily and it will help your videos to load faster.
Richard Bennett
Richard Bennett is a writer and a lover of all things video.
Follow @Richard Bennett
Ignite Your Creativity: Making Dynamic Splitscreen Videos
How to Make a Creative Split-screen Video for YouTube?

Liza Brown
Oct 26, 2023• Proven solutions
If we talk about post-production techniques and visual effects, then Split Screen has to be one of the smartest picks. After all, it lets us narrate our story via two (or more) screens and gives our audience a superior viewing experience. Though, a lot of users find it hard to implement the split-screen effect on YouTube videos. Here, I will let you know how to come up with all kinds of YouTube split-screen videos by using a professional video editor.
Part 1: The Diverse Applications of Split-screen Videos
Before we discuss how to work on YouTube split-screen videos, let’s quickly consider some major applications of this video effect.
One of the most popular applications of split-screen videos is for comparing two or more instances or perspectives in the same frame. For example, you might wish to depict the lifestyle of two people from different parts of the world or simply compare the effect of various seasons in a single video.

Videos are the best visual storytelling tools and just like any story, they can also have different perspectives. Ideally, the split-screen effect would be one of the best ways to show your audience all kinds of perspectives that can take place in your story.
One of the best examples was depicted in the movie “500 Days of Summer” in which we got several Expectations vs. Reality shots. These split-screen shots depicted the two major perspectives of the story in a single frame.

Have you ever wondered how filmmakers create a clone of a person in movies? To do that, we make the protagonist record both the scenes in front of the same background. Later, we implement a split-screen effect in which both the clips are combined in such a way that it makes the audience believe as if the scene has both, the character and their clone placed flawlessly.

Watch Video! Use Split-Screen for Your YouTube Videos
Part 2: How to Make Creative YouTube Split-screen Videos with Wondershare Filmora ?
If you want to come up with professional YouTube split-screen videos, then consider using a resourceful tool like Wondershare Filmora. Recently, the company has launched Wondershare Filmora for Mac V10.2 with an upgraded set of newly-added split-screen templates . Therefore, you can simply use the wide range of split-screen templates in Filmora and drag-and-drop your videos to implement the effect.
- Wondershare Filmora has recently added an extensive range of split-screen templates that you can instantly use and customize to meet your requirements.
- Apart from YouTube split-screen templates, you can also find options for other social platforms such as Instagram, Facebook, TikTok, etc.
- Without undergoing any technical hassle, you can just drag and drop your videos to the split-screen template and further make the needed changes.
- There are also dedicated options to edit the split-screen video, apply color correction, and even implement different stunning animated effects.
- Besides that, you can use Filmora to access numerous other editing options like motion tracking, keyframing, audio ducking, auto reframing, action cam editing, and more.


Creating or editing YouTube split-screen videos in Wondershare Filmora is extremely easy and can be done in the following way:
Step 1: Import the Videos You Want to Edit to Wondershare Filmora
Before you edit your YouTube split-screen video, you need to import clips to the application. To do this, just launch Wondershare Filmora on your system and click on the “Import” button to load your videos. You can also go to its Menu > File > Import Media to do the same.

Step 2: Select the Split-screen Template and Add Your Videos
Great! Once you have loaded the interface of Filmora, you can locate a “Split Screen” section from the top. Just click on it to browse a wide range of split-screen video templates for YouTube to include two, three, or more clips. You can just double-click any template to get its preview and drag-and-drop it to the timeline to start working on it.

If you want, you can take the playhead and drag the pointer to adjust the length of the split-screen template on the timeline. To add your clips, just double-click on the split-screen template and click on the drop icon from the preview window. Now, click on the source clip to add it to the template and adjust its position to get the desired effects.

Step 3: Edit Your YouTube Split-screen Video
Following the same drill, you can include multiple clips to the YouTube split-screen template. You can further go to its editing features and explore the “Video” tab to scale, reposition, or rotate your clips. There are also options to add borders in the split-screen effect to separate the clips distinctively in the video.

Apart from that, you can also go to the “Color” section to access various color correction features. From here, you can adjust the brightness, temperature, saturation, tint, and other effects in the video.

If you want to make your YouTube split-screen video more appealing, then go to the “Motion” feature. Here, you can easily implement any existing animated template for transitions and other effects.

Besides that, you can also click on the edit icon from the bottom panel of the Preview section to edit your videos separately.

Step 4: Export the YouTube Split-screen Video
That’s it! Once you are done editing the split-screen video, you can export it from Filmora and save it on your Mac. Just click on the Export option and select a location to save the YouTube split-screen video. There are also additional features to save the video in different formats, video resolutions, and frame rates here that you can explore.

There you go! After following this guide, you would be able to come up with all kinds of YouTube split-screen videos on your Mac. Ideally, with the help of a resourceful tool like Wondershare Filmora, working on a split-screen video is an effortless task. Since the tool has numerous split-screen templates for YouTube, you can just select any template, and customize it to create a stunning YouTube split-screen video in minutes.
Liza Brown
Liza Brown is a writer and a lover of all things video.
Follow @Liza Brown
Liza Brown
Oct 26, 2023• Proven solutions
If we talk about post-production techniques and visual effects, then Split Screen has to be one of the smartest picks. After all, it lets us narrate our story via two (or more) screens and gives our audience a superior viewing experience. Though, a lot of users find it hard to implement the split-screen effect on YouTube videos. Here, I will let you know how to come up with all kinds of YouTube split-screen videos by using a professional video editor.
Part 1: The Diverse Applications of Split-screen Videos
Before we discuss how to work on YouTube split-screen videos, let’s quickly consider some major applications of this video effect.
One of the most popular applications of split-screen videos is for comparing two or more instances or perspectives in the same frame. For example, you might wish to depict the lifestyle of two people from different parts of the world or simply compare the effect of various seasons in a single video.
Videos are the best visual storytelling tools and just like any story, they can also have different perspectives. Ideally, the split-screen effect would be one of the best ways to show your audience all kinds of perspectives that can take place in your story.
One of the best examples was depicted in the movie “500 Days of Summer” in which we got several Expectations vs. Reality shots. These split-screen shots depicted the two major perspectives of the story in a single frame.
Have you ever wondered how filmmakers create a clone of a person in movies? To do that, we make the protagonist record both the scenes in front of the same background. Later, we implement a split-screen effect in which both the clips are combined in such a way that it makes the audience believe as if the scene has both, the character and their clone placed flawlessly.
Watch Video! Use Split-Screen for Your YouTube Videos
Part 2: How to Make Creative YouTube Split-screen Videos with Wondershare Filmora ?
If you want to come up with professional YouTube split-screen videos, then consider using a resourceful tool like Wondershare Filmora. Recently, the company has launched Wondershare Filmora for Mac V10.2 with an upgraded set of newly-added split-screen templates . Therefore, you can simply use the wide range of split-screen templates in Filmora and drag-and-drop your videos to implement the effect.
- Wondershare Filmora has recently added an extensive range of split-screen templates that you can instantly use and customize to meet your requirements.
- Apart from YouTube split-screen templates, you can also find options for other social platforms such as Instagram, Facebook, TikTok, etc.
- Without undergoing any technical hassle, you can just drag and drop your videos to the split-screen template and further make the needed changes.
- There are also dedicated options to edit the split-screen video, apply color correction, and even implement different stunning animated effects.
- Besides that, you can use Filmora to access numerous other editing options like motion tracking, keyframing, audio ducking, auto reframing, action cam editing, and more.
Creating or editing YouTube split-screen videos in Wondershare Filmora is extremely easy and can be done in the following way:
Step 1: Import the Videos You Want to Edit to Wondershare Filmora
Before you edit your YouTube split-screen video, you need to import clips to the application. To do this, just launch Wondershare Filmora on your system and click on the “Import” button to load your videos. You can also go to its Menu > File > Import Media to do the same.
Step 2: Select the Split-screen Template and Add Your Videos
Great! Once you have loaded the interface of Filmora, you can locate a “Split Screen” section from the top. Just click on it to browse a wide range of split-screen video templates for YouTube to include two, three, or more clips. You can just double-click any template to get its preview and drag-and-drop it to the timeline to start working on it.
If you want, you can take the playhead and drag the pointer to adjust the length of the split-screen template on the timeline. To add your clips, just double-click on the split-screen template and click on the drop icon from the preview window. Now, click on the source clip to add it to the template and adjust its position to get the desired effects.
Step 3: Edit Your YouTube Split-screen Video
Following the same drill, you can include multiple clips to the YouTube split-screen template. You can further go to its editing features and explore the “Video” tab to scale, reposition, or rotate your clips. There are also options to add borders in the split-screen effect to separate the clips distinctively in the video.
Apart from that, you can also go to the “Color” section to access various color correction features. From here, you can adjust the brightness, temperature, saturation, tint, and other effects in the video.
If you want to make your YouTube split-screen video more appealing, then go to the “Motion” feature. Here, you can easily implement any existing animated template for transitions and other effects.
Besides that, you can also click on the edit icon from the bottom panel of the Preview section to edit your videos separately.
Step 4: Export the YouTube Split-screen Video
That’s it! Once you are done editing the split-screen video, you can export it from Filmora and save it on your Mac. Just click on the Export option and select a location to save the YouTube split-screen video. There are also additional features to save the video in different formats, video resolutions, and frame rates here that you can explore.
There you go! After following this guide, you would be able to come up with all kinds of YouTube split-screen videos on your Mac. Ideally, with the help of a resourceful tool like Wondershare Filmora, working on a split-screen video is an effortless task. Since the tool has numerous split-screen templates for YouTube, you can just select any template, and customize it to create a stunning YouTube split-screen video in minutes.
Liza Brown
Liza Brown is a writer and a lover of all things video.
Follow @Liza Brown
Also read:
- [New] A Detailed Guidance How To Change Or Customize Your Ringtone On An iPhone
- [New] Device Diversity Met With Editing Brilliance
- [New] Finding the Perfect DJ Template Video Download for Your Events
- [New] Strategic Use of Creative Commons Copyright Law
- [Updated] Unlocking Viral Potential in Instagram Videos for 2024
- 2024 Approved Rapid-Fire Success Strategies The Essential List of 20 Video Tips
- 2024 Approved Tailored Sound Rate on YouTube (Desktop/Mobile)
- 2024 Approved The Faces to Watch Top Cosmetic Creatives
- 2024 Approved The Infographic Spectacle of YouTube's 2017 Data
- 2024 Approved Turn Your YouTube Tracks Into MP3 with MacOS
- Building an Intriguing Vlog Conversation Guide for 2024
- Evaluating the Accuracy of CGP in Medicine
- Explore the Best Anti-Malware Apps for Your Android Device : A Comprehensive Review
- In 2024, Frequent Monetization Is It Real on YouTube?
- In 2024, Proficient Use of OBS Studio on Your Android Phone
- In 2024, Ultimate guide to get the meltan box pokemon go For Lava Storm 5G | Dr.fone
- VDX QuickCapture Evaluation Complete Reviews for 2024
- Title: [New] Exploring YouTube’s Functionality Following Uploaded Videos
- Author: Joseph
- Created at : 2025-01-19 17:03:20
- Updated at : 2025-01-22 00:33:07
- Link: https://youtube-stream.techidaily.com/new-exploring-youtubes-functionality-following-uploaded-videos/
- License: This work is licensed under CC BY-NC-SA 4.0.