
"MP3 to YouTube Converter Upload MP3 to YouTube for 2024"
MP3 to YouTube Converter: Upload MP3 to YouTube [3 Steps]
MP3 to YouTube Converter: Upload MP3 to YouTube

Richard Bennett
Mar 27, 2024• Proven solutions
Latest survey shows that Google’s video streaming site Youtube has surpassed radio, as well as CDs to be the most popular way American adolescents listen to music. Almost 91% of the music fans would listen to the samples before they purchase a song on iTunes. “Watching” music is getting more and more popular with Youtube’s arising popularity among music fans.
However, here comes the dilemma if you are trying to share your favorite music list with your friends on Youtube since Youtube is not designed to host files that are purely audio. Only video files are allowed to be uploaded to its server. Despite all this, is there a safe and easy solution to this issue? The answer if absolutely Yes! Wondershare audio converter let you upload an MP3 to Youtube by converting them to videos files first without losing any of its quality, helping you remove the barrier of uploading audio files to Youtube.
With it, you can not only add pictures to your MP3 files but also retouch them with various fantastic effects. Now follow the steps below to check out how to achieve it.


1 Import Files to Audio Converter
Before upload MP3 to YouTube, you can collect the relevant image, album cover or band picture to your music. Then run this MP3 to YouTube converter and choose 16:9 or 4:3 ratio according to your needs. After that, click “Import” to add the MP3 file and the pictures to the program. Then all the imported files will be displayed as thumbnails in the Media library.
2 Add Pictures to MP3 Files
Drag and drop your MP3 file to the music layer, and the picture to the video layer. These will be located under the timeline bar. Then choose the picture and move your mouse to expand the picture exposure time frame exactly as long as your MP3 file. If less, the remaining part will be blacked out, while too long will create silence in the overextended portions of the video.
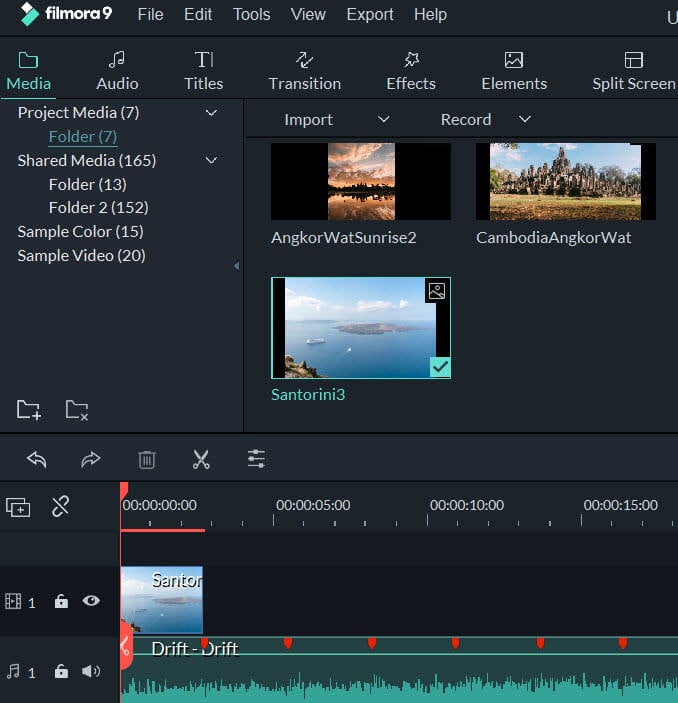
If you want to add and show multiple pictures at a time for a single MP3 file, drag-n-drop them to the PIP layers. This MP3 to YouTube converter supports up to 10 pictures for the same MP3 file. Then adjust the position and size of each picture. You can also do more touch up to your creation. For example, you can right click and choose edit to add motion, mask and more effects as you like.
3 Directly Upload MP3s to YouTube
Watch and check the audio quality of your video. When you are satisfied, click “Create” and switch to the YouTube tab. Enter your YouTube Account, Password and related MP3 information to directly upload your works to YouTube.

Tip:
Besides uploading to YouTube, you can also save your creation to various formats and play on different devices or burn to DVD.
See, it’s easy convert MP3 to YouTube using this powerful video editing tool. Download and have a try now!
Richard Bennett
Richard Bennett is a writer and a lover of all things video.
Follow @Richard Bennett
Richard Bennett
Mar 27, 2024• Proven solutions
Latest survey shows that Google’s video streaming site Youtube has surpassed radio, as well as CDs to be the most popular way American adolescents listen to music. Almost 91% of the music fans would listen to the samples before they purchase a song on iTunes. “Watching” music is getting more and more popular with Youtube’s arising popularity among music fans.
However, here comes the dilemma if you are trying to share your favorite music list with your friends on Youtube since Youtube is not designed to host files that are purely audio. Only video files are allowed to be uploaded to its server. Despite all this, is there a safe and easy solution to this issue? The answer if absolutely Yes! Wondershare audio converter let you upload an MP3 to Youtube by converting them to videos files first without losing any of its quality, helping you remove the barrier of uploading audio files to Youtube.
With it, you can not only add pictures to your MP3 files but also retouch them with various fantastic effects. Now follow the steps below to check out how to achieve it.
1 Import Files to Audio Converter
Before upload MP3 to YouTube, you can collect the relevant image, album cover or band picture to your music. Then run this MP3 to YouTube converter and choose 16:9 or 4:3 ratio according to your needs. After that, click “Import” to add the MP3 file and the pictures to the program. Then all the imported files will be displayed as thumbnails in the Media library.
2 Add Pictures to MP3 Files
Drag and drop your MP3 file to the music layer, and the picture to the video layer. These will be located under the timeline bar. Then choose the picture and move your mouse to expand the picture exposure time frame exactly as long as your MP3 file. If less, the remaining part will be blacked out, while too long will create silence in the overextended portions of the video.
If you want to add and show multiple pictures at a time for a single MP3 file, drag-n-drop them to the PIP layers. This MP3 to YouTube converter supports up to 10 pictures for the same MP3 file. Then adjust the position and size of each picture. You can also do more touch up to your creation. For example, you can right click and choose edit to add motion, mask and more effects as you like.
3 Directly Upload MP3s to YouTube
Watch and check the audio quality of your video. When you are satisfied, click “Create” and switch to the YouTube tab. Enter your YouTube Account, Password and related MP3 information to directly upload your works to YouTube.
Tip:
Besides uploading to YouTube, you can also save your creation to various formats and play on different devices or burn to DVD.
See, it’s easy convert MP3 to YouTube using this powerful video editing tool. Download and have a try now!
Richard Bennett
Richard Bennett is a writer and a lover of all things video.
Follow @Richard Bennett
Boost Your Video Impact: Expert Tips on Using WM Maker
How to Edit YouTube videos in Windows Movie Maker
Richard Bennett
Mar 27, 2024• Proven solutions
We all know YouTube is an important platform for sharing and watching videos. Are you a YouTuber looking for how to edit YouTube video with the best YouTube movie maker? You have come the right place if you wonder how to edit a video for YouTube on Windows. While, if you have free Windows Movie Maker already installed on your computer, you can edit YouTube videos in Windows Movie Maker and then upload to YouTube directly. In this article, I will show you all the information you need to know about how to edit a video for YouTube in Windows Movie Maker with step by step.
You may also like : The Ultimate Guide to YouTube Video Editing Tools
In case that you do not have free Windows Movie Maker in your computer, you may need to download it from other website since Microsoft has removed the downloading link after January 2017. Please pay attention when downloading the Movie Maker application from website and never download it from untrusted website.
A better way to edit YouTube Videos - Wondershare Filmora supports many formats including MP4, MOV, MKV, and FLV, which means that you will not need to convert the files before and after editing. Like Windows Movie Maker, Wondershare Filmora is easy to use but comes with many more features that allow for professional-grade videos. One of these features is the animated text. There are also built-in presets that you can use to quickly edit your videos. There is also the option to directly upload a video to YouTube from Filmora, so no time is wasted waiting for a video to process.
Download Mac Version ](https://tools.techidaily.com/wondershare/filmora/download/ )
It is hard to list all the information of how to use Filmora to edit YouTube videos here, but we have composed an article about how to edit videos, you can check How to Edit Video in Filmora: Beginners’ Guide .
Windows Movie Maker YouTube: How to Edit YouTube Videos?
Before editing the video in Windows Movie Maker , you have to make sure that the video format is supported by free Windows Movie Maker. As you may know that Window Movie Maker only accept the following file formats at importing: .WMV/.ASF, .MPG (MPEG-1), .AVI (DV-AVI), .WMA, .WAV, and .MP3. Importing formats such as MP4/3GP, FLV and MOV, are also supported you are running Windows 7 or later and you have installed the necessary codec as well.
If your videos are not supported at importing in Windows Movie Maker, you may need to converter it first or choose a video editor like Filmora video editor which supports the almost all popular formats.
Step 1: Import Video Files Into Windows Movie Maker

To import video or photo into Windows Movie Maker, you can click on the button Add Videos or Photos located at the top of the program. A file window will open, and you can select the videos from any area of your computer. Once you have the files selected, click OK to import the files to the storyboard in the right hand panel.
You can also choose to record a webcam on your windows 10 or windows 7 computer and use it as the material.


Step 2: Trim/Cut/Split/Combine videos in Windows Movie Maker
Preview the video clips in the preview box. You can always use the Previous Frame or Next Frame to preview video frame by frame. When editing a video for YouTube, you may need to trim to remove unwanted parts from the video , combine several clips into a new one or split the video into several smaller parts .
To remove any parts of the video that you do not want in the final version of the video, locate the start frame that you want to remove in the storyboard, and then click the Split button to get the starting point of the split segment, and then locate the end frame that you want to remove and click Split again. Right-click the split video clip you want to remove and select Remove from the context menu. This can be done as many times as you want.

Step 3: Apply Transitions and Visual Effects to YouTube Video
Once you have all the clips that you want in your video, you can then add transitions to the video. At the top of Windows Movie Maker, there is a button that says Animations. This will open a menu that has different options. You need to select the clip, and add the transition that you want. The program does the rest of the work. You can see how it looks by clicking play.

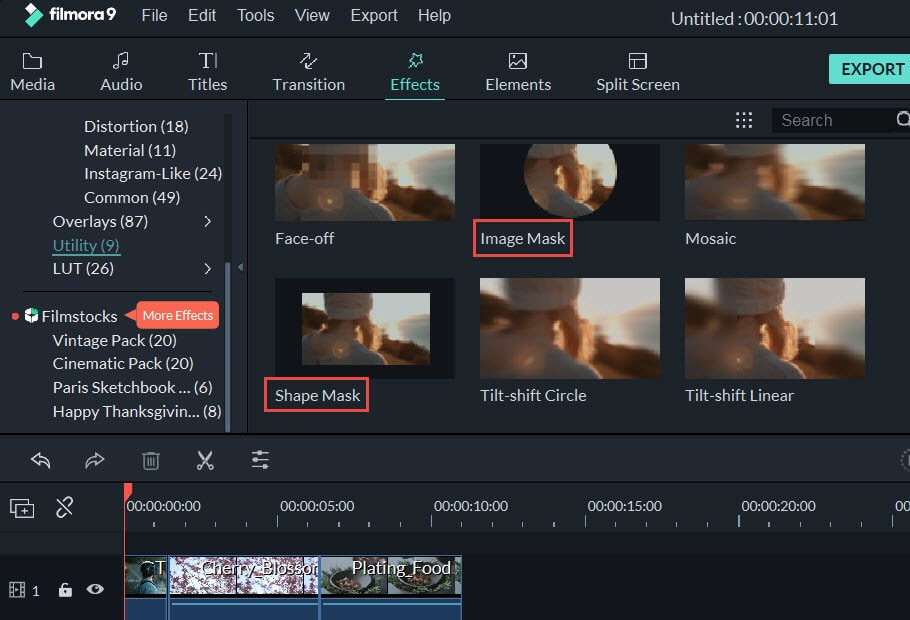
Applying visual effects, overlays and filters work in the same way, but you click on Visual Effects, which is located at the top of the window. You can apply effects to any clip as along as the clip is selected first.
Step 4: Edit/Mute Audio in Video or Add New Audio Sound
If you are planning on adding music to your video, you should think about muting the audio in video or decrease the audio volume in Video. Double click the video clip to enter the Edit panel, and then then click on Video Volume button. You can then mute the audio by drag the volume slider to the left end. Of course, you can adjust the video audio volume per your need. This will affect the all the sounds on that video clip. If you want to mute all the clips, you need to select all the clips, or you will end up with one clip with no sound, and the rest of the clips having sound.

Once the sound has been adjusted on the clips, you can add new audio sound to the video. You can record narrations for your YouTube video in Windows Movie Maker by clicking Record narration button in Home tab and add music to video by clicking Add music button and select the music to import it. You can add music from your computer or find new music sound from AudioMicro, Vimeo or Free Music Archive online.

After importing the new audio file for your YouTube video, you can now adjust the music volume. In the Music Tools tab, there is an Option tab, you can control the volume and other options about the music.

Step 5: Add Title and Text to Video for YouTube
Windows Movie Maker allows you to add different types of text freely. You will see 3 buttons that allow different types of text to video: stationary title, captions and rolling credits. Click on Title, you can add text before the video begins; select Caption, you will write text to the video frames; and click Credits will add end credits to the end of the video.

After selecting the type of text you want, you can enter your text and edit the text effects. You can change the text duration and apply text visual effects, and change the text outline size and more.

Check the detailed information of How to Add Text in Windows Movie Maker .
Step 6: Save and Publish
Once all the edits are done, you can save the video by clicking on File then clicking on Publish Movie. You will need to select where you want to save the file and the file type. Since we are editing videos for YouTube, choose YouTube to upload the edited video to YouTube. You can also save the video in computer with different formats, resolution or burn to DVD. Windows Movie Maker also allows you to save the Video for Email or for mobile devices.

Conclusion
That’s it. That’s how you can edit your YouTube video with Windows Movie Maker. It is a great YouTube video editor to make video with various features. However, you may consider other YouTube movie maker as it won’t updated. Why not try Filmora. It is one of the best movie editor for YouTube. Download it now to have a try!
Download Mac Version ](https://tools.techidaily.com/wondershare/filmora/download/ )
Richard Bennett
Richard Bennett is a writer and a lover of all things video.
Follow @Richard Bennett
Richard Bennett
Mar 27, 2024• Proven solutions
We all know YouTube is an important platform for sharing and watching videos. Are you a YouTuber looking for how to edit YouTube video with the best YouTube movie maker? You have come the right place if you wonder how to edit a video for YouTube on Windows. While, if you have free Windows Movie Maker already installed on your computer, you can edit YouTube videos in Windows Movie Maker and then upload to YouTube directly. In this article, I will show you all the information you need to know about how to edit a video for YouTube in Windows Movie Maker with step by step.
You may also like : The Ultimate Guide to YouTube Video Editing Tools
In case that you do not have free Windows Movie Maker in your computer, you may need to download it from other website since Microsoft has removed the downloading link after January 2017. Please pay attention when downloading the Movie Maker application from website and never download it from untrusted website.
A better way to edit YouTube Videos - Wondershare Filmora supports many formats including MP4, MOV, MKV, and FLV, which means that you will not need to convert the files before and after editing. Like Windows Movie Maker, Wondershare Filmora is easy to use but comes with many more features that allow for professional-grade videos. One of these features is the animated text. There are also built-in presets that you can use to quickly edit your videos. There is also the option to directly upload a video to YouTube from Filmora, so no time is wasted waiting for a video to process.
Download Mac Version ](https://tools.techidaily.com/wondershare/filmora/download/ )
It is hard to list all the information of how to use Filmora to edit YouTube videos here, but we have composed an article about how to edit videos, you can check How to Edit Video in Filmora: Beginners’ Guide .
Windows Movie Maker YouTube: How to Edit YouTube Videos?
Before editing the video in Windows Movie Maker , you have to make sure that the video format is supported by free Windows Movie Maker. As you may know that Window Movie Maker only accept the following file formats at importing: .WMV/.ASF, .MPG (MPEG-1), .AVI (DV-AVI), .WMA, .WAV, and .MP3. Importing formats such as MP4/3GP, FLV and MOV, are also supported you are running Windows 7 or later and you have installed the necessary codec as well.
If your videos are not supported at importing in Windows Movie Maker, you may need to converter it first or choose a video editor like Filmora video editor which supports the almost all popular formats.
Step 1: Import Video Files Into Windows Movie Maker
To import video or photo into Windows Movie Maker, you can click on the button Add Videos or Photos located at the top of the program. A file window will open, and you can select the videos from any area of your computer. Once you have the files selected, click OK to import the files to the storyboard in the right hand panel.
You can also choose to record a webcam on your windows 10 or windows 7 computer and use it as the material.
Step 2: Trim/Cut/Split/Combine videos in Windows Movie Maker
Preview the video clips in the preview box. You can always use the Previous Frame or Next Frame to preview video frame by frame. When editing a video for YouTube, you may need to trim to remove unwanted parts from the video , combine several clips into a new one or split the video into several smaller parts .
To remove any parts of the video that you do not want in the final version of the video, locate the start frame that you want to remove in the storyboard, and then click the Split button to get the starting point of the split segment, and then locate the end frame that you want to remove and click Split again. Right-click the split video clip you want to remove and select Remove from the context menu. This can be done as many times as you want.
Step 3: Apply Transitions and Visual Effects to YouTube Video
Once you have all the clips that you want in your video, you can then add transitions to the video. At the top of Windows Movie Maker, there is a button that says Animations. This will open a menu that has different options. You need to select the clip, and add the transition that you want. The program does the rest of the work. You can see how it looks by clicking play.
Applying visual effects, overlays and filters work in the same way, but you click on Visual Effects, which is located at the top of the window. You can apply effects to any clip as along as the clip is selected first.
Step 4: Edit/Mute Audio in Video or Add New Audio Sound
If you are planning on adding music to your video, you should think about muting the audio in video or decrease the audio volume in Video. Double click the video clip to enter the Edit panel, and then then click on Video Volume button. You can then mute the audio by drag the volume slider to the left end. Of course, you can adjust the video audio volume per your need. This will affect the all the sounds on that video clip. If you want to mute all the clips, you need to select all the clips, or you will end up with one clip with no sound, and the rest of the clips having sound.
Once the sound has been adjusted on the clips, you can add new audio sound to the video. You can record narrations for your YouTube video in Windows Movie Maker by clicking Record narration button in Home tab and add music to video by clicking Add music button and select the music to import it. You can add music from your computer or find new music sound from AudioMicro, Vimeo or Free Music Archive online.
After importing the new audio file for your YouTube video, you can now adjust the music volume. In the Music Tools tab, there is an Option tab, you can control the volume and other options about the music.
Step 5: Add Title and Text to Video for YouTube
Windows Movie Maker allows you to add different types of text freely. You will see 3 buttons that allow different types of text to video: stationary title, captions and rolling credits. Click on Title, you can add text before the video begins; select Caption, you will write text to the video frames; and click Credits will add end credits to the end of the video.
After selecting the type of text you want, you can enter your text and edit the text effects. You can change the text duration and apply text visual effects, and change the text outline size and more.
Check the detailed information of How to Add Text in Windows Movie Maker .
Step 6: Save and Publish
Once all the edits are done, you can save the video by clicking on File then clicking on Publish Movie. You will need to select where you want to save the file and the file type. Since we are editing videos for YouTube, choose YouTube to upload the edited video to YouTube. You can also save the video in computer with different formats, resolution or burn to DVD. Windows Movie Maker also allows you to save the Video for Email or for mobile devices.
Conclusion
That’s it. That’s how you can edit your YouTube video with Windows Movie Maker. It is a great YouTube video editor to make video with various features. However, you may consider other YouTube movie maker as it won’t updated. Why not try Filmora. It is one of the best movie editor for YouTube. Download it now to have a try!
Download Mac Version ](https://tools.techidaily.com/wondershare/filmora/download/ )
Richard Bennett
Richard Bennett is a writer and a lover of all things video.
Follow @Richard Bennett
Also read:
- [New] 2024 Approved Uncovering the Web's Leading Marketplaces for Ringtones
- [New] From Filming to Sharing A YouTube Video Edition
- [Updated] In 2024, Mastering Soft Image Effects in iPhone Photography (4 Tips!)
- 「ポルノハブ動画の安全な下落と保管手段」
- 2024 Approved The Expert's Approach to Inserting Subtitles/CC on YouTube Videos
- 2024 Approved The Insider's Guide to YouTube Editing Mastery Using Sony Vegas Software
- 2024 Approved TurboUpload The Ultimate Guide to Fast YouTube Video Rendering
- AMD Vega Driver Update Made Effortless for Gamers – Start Here!
- Factory Reset on Apple iPhone 6s | Dr.fone
- Free Canon Scan Software: Windows Installation Guide
- Guida Passo-Passo: Spostare I File Tra SSD E HDD in Qualsiasi Versione Di Windows
- In 2024, Harnessing iMovie's Potential for YouTube Broadcasting
- In 2024, Latest Guide How To Bypass Vivo S17e FRP Without Computer
- In 2024, Simplify Crafting Effective YouTube Subscription Buttons
- In 2024, Top-Notch Solutions for Disabled Apple ID On Apple iPhone 14 Making It Possible
- In 2024, Unlock Creator Studio Secrets A Step-by-Step Tutorial
- Maximize YouTube Views A Comprehensible Guide to Collaborative Videos for 2024
- Monetization Masterclass with Carminati (AJay) Crafting Content for Commerce for 2024
- The Day Without Likes and Messages
- Title: MP3 to YouTube Converter Upload MP3 to YouTube for 2024
- Author: Joseph
- Created at : 2024-10-21 16:04:02
- Updated at : 2024-10-24 16:00:41
- Link: https://youtube-stream.techidaily.com/mp3-to-youtube-converter-upload-mp3-to-youtube-for-2024/
- License: This work is licensed under CC BY-NC-SA 4.0.