
:max_bytes(150000):strip_icc()/elisa-ventur-bmJAXAz6ads-unsplash-66563177490249cd8a8c896e48ff4d8e.jpg)
Mastering YT Video Tweaks with Windows Movie Maker for 2024
Mastering YT Video Tweaks with Windows Movie Maker
How to Edit YouTube videos in Windows Movie Maker

Richard Bennett
Mar 27, 2024• Proven solutions
We all know YouTube is an important platform for sharing and watching videos. Are you a YouTuber looking for how to edit YouTube video with the best YouTube movie maker? You have come the right place if you wonder how to edit a video for YouTube on Windows. While, if you have free Windows Movie Maker already installed on your computer, you can edit YouTube videos in Windows Movie Maker and then upload to YouTube directly. In this article, I will show you all the information you need to know about how to edit a video for YouTube in Windows Movie Maker with step by step.
You may also like : The Ultimate Guide to YouTube Video Editing Tools
In case that you do not have free Windows Movie Maker in your computer, you may need to download it from other website since Microsoft has removed the downloading link after January 2017. Please pay attention when downloading the Movie Maker application from website and never download it from untrusted website.
A better way to edit YouTube Videos - Wondershare Filmora supports many formats including MP4, MOV, MKV, and FLV, which means that you will not need to convert the files before and after editing. Like Windows Movie Maker, Wondershare Filmora is easy to use but comes with many more features that allow for professional-grade videos. One of these features is the animated text. There are also built-in presets that you can use to quickly edit your videos. There is also the option to directly upload a video to YouTube from Filmora, so no time is wasted waiting for a video to process.
 Download Mac Version ](https://tools.techidaily.com/wondershare/filmora/download/ )
It is hard to list all the information of how to use Filmora to edit YouTube videos here, but we have composed an article about how to edit videos, you can check How to Edit Video in Filmora: Beginners’ Guide .
Windows Movie Maker YouTube: How to Edit YouTube Videos?
Before editing the video in Windows Movie Maker , you have to make sure that the video format is supported by free Windows Movie Maker. As you may know that Window Movie Maker only accept the following file formats at importing: .WMV/.ASF, .MPG (MPEG-1), .AVI (DV-AVI), .WMA, .WAV, and .MP3. Importing formats such as MP4/3GP, FLV and MOV, are also supported you are running Windows 7 or later and you have installed the necessary codec as well.
If your videos are not supported at importing in Windows Movie Maker, you may need to converter it first or choose a video editor like Filmora video editor which supports the almost all popular formats.
Step 1: Import Video Files Into Windows Movie Maker

To import video or photo into Windows Movie Maker, you can click on the button Add Videos or Photos located at the top of the program. A file window will open, and you can select the videos from any area of your computer. Once you have the files selected, click OK to import the files to the storyboard in the right hand panel.
You can also choose to record a webcam on your windows 10 or windows 7 computer and use it as the material.

Step 2: Trim/Cut/Split/Combine videos in Windows Movie Maker
Preview the video clips in the preview box. You can always use the Previous Frame or Next Frame to preview video frame by frame. When editing a video for YouTube, you may need to trim to remove unwanted parts from the video , combine several clips into a new one or split the video into several smaller parts .
To remove any parts of the video that you do not want in the final version of the video, locate the start frame that you want to remove in the storyboard, and then click the Split button to get the starting point of the split segment, and then locate the end frame that you want to remove and click Split again. Right-click the split video clip you want to remove and select Remove from the context menu. This can be done as many times as you want.

Step 3: Apply Transitions and Visual Effects to YouTube Video
Once you have all the clips that you want in your video, you can then add transitions to the video. At the top of Windows Movie Maker, there is a button that says Animations. This will open a menu that has different options. You need to select the clip, and add the transition that you want. The program does the rest of the work. You can see how it looks by clicking play.

Applying visual effects, overlays and filters work in the same way, but you click on Visual Effects, which is located at the top of the window. You can apply effects to any clip as along as the clip is selected first.
Step 4: Edit/Mute Audio in Video or Add New Audio Sound
If you are planning on adding music to your video, you should think about muting the audio in video or decrease the audio volume in Video. Double click the video clip to enter the Edit panel, and then then click on Video Volume button. You can then mute the audio by drag the volume slider to the left end. Of course, you can adjust the video audio volume per your need. This will affect the all the sounds on that video clip. If you want to mute all the clips, you need to select all the clips, or you will end up with one clip with no sound, and the rest of the clips having sound.

Once the sound has been adjusted on the clips, you can add new audio sound to the video. You can record narrations for your YouTube video in Windows Movie Maker by clicking Record narration button in Home tab and add music to video by clicking Add music button and select the music to import it. You can add music from your computer or find new music sound from AudioMicro, Vimeo or Free Music Archive online.

After importing the new audio file for your YouTube video, you can now adjust the music volume. In the Music Tools tab, there is an Option tab, you can control the volume and other options about the music.

Step 5: Add Title and Text to Video for YouTube
Windows Movie Maker allows you to add different types of text freely. You will see 3 buttons that allow different types of text to video: stationary title, captions and rolling credits. Click on Title, you can add text before the video begins; select Caption, you will write text to the video frames; and click Credits will add end credits to the end of the video.

After selecting the type of text you want, you can enter your text and edit the text effects. You can change the text duration and apply text visual effects, and change the text outline size and more.

Check the detailed information of How to Add Text in Windows Movie Maker .
Step 6: Save and Publish
Once all the edits are done, you can save the video by clicking on File then clicking on Publish Movie. You will need to select where you want to save the file and the file type. Since we are editing videos for YouTube, choose YouTube to upload the edited video to YouTube. You can also save the video in computer with different formats, resolution or burn to DVD. Windows Movie Maker also allows you to save the Video for Email or for mobile devices.

Conclusion
That’s it. That’s how you can edit your YouTube video with Windows Movie Maker. It is a great YouTube video editor to make video with various features. However, you may consider other YouTube movie maker as it won’t updated. Why not try Filmora. It is one of the best movie editor for YouTube. Download it now to have a try!
Download Mac Version ](https://tools.techidaily.com/wondershare/filmora/download/ )
Richard Bennett
Richard Bennett is a writer and a lover of all things video.
Follow @Richard Bennett
Richard Bennett
Mar 27, 2024• Proven solutions
We all know YouTube is an important platform for sharing and watching videos. Are you a YouTuber looking for how to edit YouTube video with the best YouTube movie maker? You have come the right place if you wonder how to edit a video for YouTube on Windows. While, if you have free Windows Movie Maker already installed on your computer, you can edit YouTube videos in Windows Movie Maker and then upload to YouTube directly. In this article, I will show you all the information you need to know about how to edit a video for YouTube in Windows Movie Maker with step by step.
You may also like : The Ultimate Guide to YouTube Video Editing Tools
In case that you do not have free Windows Movie Maker in your computer, you may need to download it from other website since Microsoft has removed the downloading link after January 2017. Please pay attention when downloading the Movie Maker application from website and never download it from untrusted website.
A better way to edit YouTube Videos - Wondershare Filmora supports many formats including MP4, MOV, MKV, and FLV, which means that you will not need to convert the files before and after editing. Like Windows Movie Maker, Wondershare Filmora is easy to use but comes with many more features that allow for professional-grade videos. One of these features is the animated text. There are also built-in presets that you can use to quickly edit your videos. There is also the option to directly upload a video to YouTube from Filmora, so no time is wasted waiting for a video to process.
Download Mac Version ](https://tools.techidaily.com/wondershare/filmora/download/ )
It is hard to list all the information of how to use Filmora to edit YouTube videos here, but we have composed an article about how to edit videos, you can check How to Edit Video in Filmora: Beginners’ Guide .
Windows Movie Maker YouTube: How to Edit YouTube Videos?
Before editing the video in Windows Movie Maker , you have to make sure that the video format is supported by free Windows Movie Maker. As you may know that Window Movie Maker only accept the following file formats at importing: .WMV/.ASF, .MPG (MPEG-1), .AVI (DV-AVI), .WMA, .WAV, and .MP3. Importing formats such as MP4/3GP, FLV and MOV, are also supported you are running Windows 7 or later and you have installed the necessary codec as well.
If your videos are not supported at importing in Windows Movie Maker, you may need to converter it first or choose a video editor like Filmora video editor which supports the almost all popular formats.
Step 1: Import Video Files Into Windows Movie Maker
To import video or photo into Windows Movie Maker, you can click on the button Add Videos or Photos located at the top of the program. A file window will open, and you can select the videos from any area of your computer. Once you have the files selected, click OK to import the files to the storyboard in the right hand panel.
You can also choose to record a webcam on your windows 10 or windows 7 computer and use it as the material.
Step 2: Trim/Cut/Split/Combine videos in Windows Movie Maker
Preview the video clips in the preview box. You can always use the Previous Frame or Next Frame to preview video frame by frame. When editing a video for YouTube, you may need to trim to remove unwanted parts from the video , combine several clips into a new one or split the video into several smaller parts .
To remove any parts of the video that you do not want in the final version of the video, locate the start frame that you want to remove in the storyboard, and then click the Split button to get the starting point of the split segment, and then locate the end frame that you want to remove and click Split again. Right-click the split video clip you want to remove and select Remove from the context menu. This can be done as many times as you want.
Step 3: Apply Transitions and Visual Effects to YouTube Video
Once you have all the clips that you want in your video, you can then add transitions to the video. At the top of Windows Movie Maker, there is a button that says Animations. This will open a menu that has different options. You need to select the clip, and add the transition that you want. The program does the rest of the work. You can see how it looks by clicking play.
Applying visual effects, overlays and filters work in the same way, but you click on Visual Effects, which is located at the top of the window. You can apply effects to any clip as along as the clip is selected first.
Step 4: Edit/Mute Audio in Video or Add New Audio Sound
If you are planning on adding music to your video, you should think about muting the audio in video or decrease the audio volume in Video. Double click the video clip to enter the Edit panel, and then then click on Video Volume button. You can then mute the audio by drag the volume slider to the left end. Of course, you can adjust the video audio volume per your need. This will affect the all the sounds on that video clip. If you want to mute all the clips, you need to select all the clips, or you will end up with one clip with no sound, and the rest of the clips having sound.
Once the sound has been adjusted on the clips, you can add new audio sound to the video. You can record narrations for your YouTube video in Windows Movie Maker by clicking Record narration button in Home tab and add music to video by clicking Add music button and select the music to import it. You can add music from your computer or find new music sound from AudioMicro, Vimeo or Free Music Archive online.
After importing the new audio file for your YouTube video, you can now adjust the music volume. In the Music Tools tab, there is an Option tab, you can control the volume and other options about the music.
Step 5: Add Title and Text to Video for YouTube
Windows Movie Maker allows you to add different types of text freely. You will see 3 buttons that allow different types of text to video: stationary title, captions and rolling credits. Click on Title, you can add text before the video begins; select Caption, you will write text to the video frames; and click Credits will add end credits to the end of the video.
After selecting the type of text you want, you can enter your text and edit the text effects. You can change the text duration and apply text visual effects, and change the text outline size and more.
Check the detailed information of How to Add Text in Windows Movie Maker .
Step 6: Save and Publish
Once all the edits are done, you can save the video by clicking on File then clicking on Publish Movie. You will need to select where you want to save the file and the file type. Since we are editing videos for YouTube, choose YouTube to upload the edited video to YouTube. You can also save the video in computer with different formats, resolution or burn to DVD. Windows Movie Maker also allows you to save the Video for Email or for mobile devices.
Conclusion
That’s it. That’s how you can edit your YouTube video with Windows Movie Maker. It is a great YouTube video editor to make video with various features. However, you may consider other YouTube movie maker as it won’t updated. Why not try Filmora. It is one of the best movie editor for YouTube. Download it now to have a try!
Download Mac Version ](https://tools.techidaily.com/wondershare/filmora/download/ )
Richard Bennett
Richard Bennett is a writer and a lover of all things video.
Follow @Richard Bennett
10 Top Zero-Charge Web Tools to Craft Videos
Free Online Video Editors for YouTube
Richard Bennett
Mar 27, 2024• Proven solutions
Most of you might be addicted to YouTube videos because those uploads are outstanding with content that contains information, entertainment stuff and many more. But some of you might be also thinking to get a solution for editing some of your favourite YouTube videos in order to create some customized results. There are so many options available online as well as with downloadable versions. Below are some of the basic details about top seven highly rated online YouTube video editors:
If you need more advanced features like PIP, Green Screen, or audio mixing, check this easy to use and powerful video editor-Wondershare Filmora , and ignite your video by clicks.
Download Mac Version ](https://tools.techidaily.com/wondershare/filmora/download/ )
8 Free YouTube Video Editor Online
Here is a comparison table. You will learn more information about 4K and price. Each of them has noticable features, so have a look.
| Price | Share to YouTube | Support 4K | Include templates | |
|---|---|---|---|---|
| video editor | Free | N | Y | Y |
| Wevideo | Free | Y | Y | Y |
| Loopster | Free | Y | N | N |
| Kizoa | Free | Y | Y | Y |
| Tubechop | Free | N | N | Y |
| Magisto | Free | Y | N | Y |
| Wideo | Free | Y | N | Y |
| Renderforest | Free | Y | N | Y |
| Powtoon | Free | Y | N | Y |
| YouTube Studio | Free | Y | Y | N |
2. Wevideo
This software tool makes online editing task much easier and fun oriented where you can easily make connections with other cloud services for exporting data. Users can access its paid as well as free version where later comes with watermarked editing feature. The editing experience with Wevideo is really outstanding and simple where interactive tools can be used for drag and drop, trimming and transitioning of files.
Pros:
Collaborative software feature where it is possible to call friends for uploading any footage to project created by you.
Cons:
Free version comes with a limitation of watermarked video type.
3.Loopster
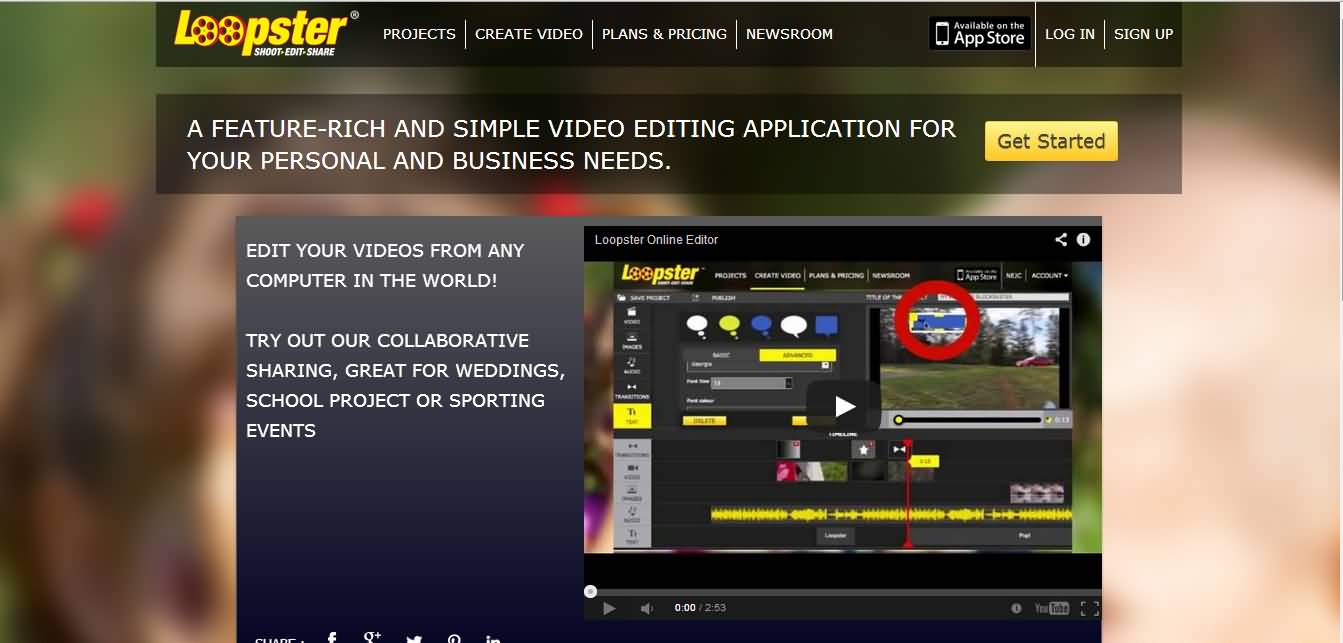
Loopster is one of the best options for educators, film makers, professionals as well as beginners due to its interactive interface. You can avail its free version along with other affordable packages as per need. The special features include splicing of features, adjustment of video angles, sound effect creations and addition of music from external sources.
Pros:
Easy to use interface with fast access to photo and video transfers; allows fast uploading to YouTube account along with other simple functions.
Cons:
Comes with very basic functions and transition feature is not that interactive; is not useful for animation needs.
4.Kizoa

Kizoa is a popular cloud based video editor that comes with user friendly interface where users can edit, share and store photos as per requirement as its storage capacity goes up to 1GB even with free account. It comes with cloud base and web base where you can also upload music from your personal computer.
Pros:
It comes with numerous templates and effects.
Cons:
Free account allows users to work only on a 10 second clip; and resolution is not much appreciable.
5.Tubechop
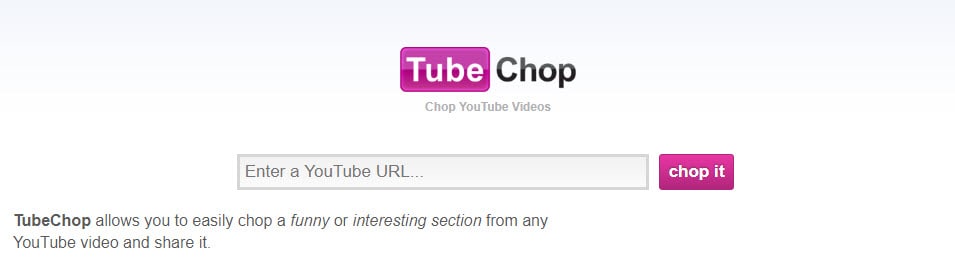
It is actually a website that allows easy chopping of YouTube videos; users need to copy and paste the URL of videos and select the desired part of video for chopping. This tool provides lots of options to for sharing chopped videos to other platforms.
Pros:
Trimming and sharing of videos is much easier as easy to use interface makes everything much easier.
Cons:
Not suitable for those who want to add background music to their video files.
6.Magisto

Magisto is a great app that is really popular for automatically turning what would otherwise be an everyday type video into a beautiful poignant movie. . Magisto allows users to derive a funny video from any random footage and the results are worth watching.
Pros:
This online video editing tool is well designed, engaging and offers highly automated video production feature.
Cons:
Less control over edits, restricted length of productions and pricey subscriptions.
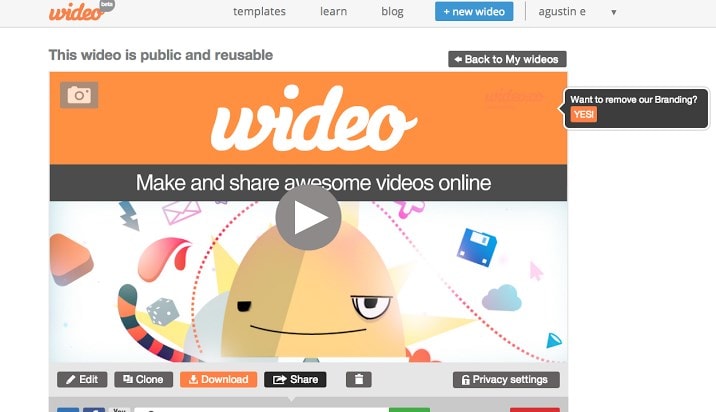
7.Wideo
It is one of the latest web based application tool that allows easy to use interface for creation of presentations and animations. This software window contains lots of stylish templates, objects, editing tools, and other interactive elements.
Pros:
Comes with free unbranded player and video hosting service, outstanding customer support, special discounts are added for educators and students.
Cons:
Possess limited editing tools for audios; users need faster internet connection for proper connectivity.
8.Renderforest
Renderforest is a cloud-based video maker platform. It offers a wide variety of branding and editing tools for YouTubers, including advanced video trimmer and voice-over options, logo animations, intros, and promotional video templates. Creators can share their videos on social media, publish them on Facebook or Youtube directly from the preview page.
Pros:
Intuitive and user-friendly interface, easy editing tools, and more than 800+ video templates available for free. The subscription plans come with other tools, including a website builder, logo maker, and mockup editor.
Cons:
With the free plan, users can create an unlimited number of 3-minute videos in 360p with watermarks.
9.Powtoon

Powtoon is an amazing online application that you don’t need to download on your system as it provides all facilities on your premium account. This tool contains so many tools for animation creation and acts like a professional studio for all users. Premium users can easily download their finished videos with high resolution here.
Pros:
Powtoon possesses numerous editing tools and supports many file types; this platform is more famous for animations and professional video editing needs.
Cons:
It is little difficult to use this software for beginners and demands very high speed internet connection.
10.YouTube Studio (Beta)
YouTube video editor was one of the most widely used free online video editing tool over the internet until 20th September, 2017, because after that time, users will no longer be able to use the complimentary editing suite. Check the best YouTube video editor alternatives from this complete guide.

However, the new YouTube Studio now allows you to trim, split video uploaded YouTube videos and add blur effects to faces or objects. Though this easy to use free online video editor doesn’t feature tools like combine several video clips, photos into one longer video, nor add Pan and Zoom effects like the previous version, you can still add audio tracks from its Audio Library to Video. Yeah, this is a video maker online with music and effects. So, it is in our best free online video editor list. Remember, if you’re looking for a free online video editor for YouTube for these simple editing features, then you can try the Editor under YouTube Studio.
Richard Bennett
Richard Bennett is a writer and a lover of all things video.
Follow @Richard Bennett
Richard Bennett
Mar 27, 2024• Proven solutions
Most of you might be addicted to YouTube videos because those uploads are outstanding with content that contains information, entertainment stuff and many more. But some of you might be also thinking to get a solution for editing some of your favourite YouTube videos in order to create some customized results. There are so many options available online as well as with downloadable versions. Below are some of the basic details about top seven highly rated online YouTube video editors:
If you need more advanced features like PIP, Green Screen, or audio mixing, check this easy to use and powerful video editor-Wondershare Filmora , and ignite your video by clicks.
Download Mac Version ](https://tools.techidaily.com/wondershare/filmora/download/ )
8 Free YouTube Video Editor Online
Here is a comparison table. You will learn more information about 4K and price. Each of them has noticable features, so have a look.
| Price | Share to YouTube | Support 4K | Include templates | |
|---|---|---|---|---|
| video editor | Free | N | Y | Y |
| Wevideo | Free | Y | Y | Y |
| Loopster | Free | Y | N | N |
| Kizoa | Free | Y | Y | Y |
| Tubechop | Free | N | N | Y |
| Magisto | Free | Y | N | Y |
| Wideo | Free | Y | N | Y |
| Renderforest | Free | Y | N | Y |
| Powtoon | Free | Y | N | Y |
| YouTube Studio | Free | Y | Y | N |
2. Wevideo
This software tool makes online editing task much easier and fun oriented where you can easily make connections with other cloud services for exporting data. Users can access its paid as well as free version where later comes with watermarked editing feature. The editing experience with Wevideo is really outstanding and simple where interactive tools can be used for drag and drop, trimming and transitioning of files.
Pros:
Collaborative software feature where it is possible to call friends for uploading any footage to project created by you.
Cons:
Free version comes with a limitation of watermarked video type.
3.Loopster
Loopster is one of the best options for educators, film makers, professionals as well as beginners due to its interactive interface. You can avail its free version along with other affordable packages as per need. The special features include splicing of features, adjustment of video angles, sound effect creations and addition of music from external sources.
Pros:
Easy to use interface with fast access to photo and video transfers; allows fast uploading to YouTube account along with other simple functions.
Cons:
Comes with very basic functions and transition feature is not that interactive; is not useful for animation needs.
4.Kizoa
Kizoa is a popular cloud based video editor that comes with user friendly interface where users can edit, share and store photos as per requirement as its storage capacity goes up to 1GB even with free account. It comes with cloud base and web base where you can also upload music from your personal computer.
Pros:
It comes with numerous templates and effects.
Cons:
Free account allows users to work only on a 10 second clip; and resolution is not much appreciable.
5.Tubechop
It is actually a website that allows easy chopping of YouTube videos; users need to copy and paste the URL of videos and select the desired part of video for chopping. This tool provides lots of options to for sharing chopped videos to other platforms.
Pros:
Trimming and sharing of videos is much easier as easy to use interface makes everything much easier.
Cons:
Not suitable for those who want to add background music to their video files.
6.Magisto
Magisto is a great app that is really popular for automatically turning what would otherwise be an everyday type video into a beautiful poignant movie. . Magisto allows users to derive a funny video from any random footage and the results are worth watching.
Pros:
This online video editing tool is well designed, engaging and offers highly automated video production feature.
Cons:
Less control over edits, restricted length of productions and pricey subscriptions.
7.Wideo
It is one of the latest web based application tool that allows easy to use interface for creation of presentations and animations. This software window contains lots of stylish templates, objects, editing tools, and other interactive elements.
Pros:
Comes with free unbranded player and video hosting service, outstanding customer support, special discounts are added for educators and students.
Cons:
Possess limited editing tools for audios; users need faster internet connection for proper connectivity.
8.Renderforest
Renderforest is a cloud-based video maker platform. It offers a wide variety of branding and editing tools for YouTubers, including advanced video trimmer and voice-over options, logo animations, intros, and promotional video templates. Creators can share their videos on social media, publish them on Facebook or Youtube directly from the preview page.
Pros:
Intuitive and user-friendly interface, easy editing tools, and more than 800+ video templates available for free. The subscription plans come with other tools, including a website builder, logo maker, and mockup editor.
Cons:
With the free plan, users can create an unlimited number of 3-minute videos in 360p with watermarks.
9.Powtoon
Powtoon is an amazing online application that you don’t need to download on your system as it provides all facilities on your premium account. This tool contains so many tools for animation creation and acts like a professional studio for all users. Premium users can easily download their finished videos with high resolution here.
Pros:
Powtoon possesses numerous editing tools and supports many file types; this platform is more famous for animations and professional video editing needs.
Cons:
It is little difficult to use this software for beginners and demands very high speed internet connection.
10.YouTube Studio (Beta)
YouTube video editor was one of the most widely used free online video editing tool over the internet until 20th September, 2017, because after that time, users will no longer be able to use the complimentary editing suite. Check the best YouTube video editor alternatives from this complete guide.
However, the new YouTube Studio now allows you to trim, split video uploaded YouTube videos and add blur effects to faces or objects. Though this easy to use free online video editor doesn’t feature tools like combine several video clips, photos into one longer video, nor add Pan and Zoom effects like the previous version, you can still add audio tracks from its Audio Library to Video. Yeah, this is a video maker online with music and effects. So, it is in our best free online video editor list. Remember, if you’re looking for a free online video editor for YouTube for these simple editing features, then you can try the Editor under YouTube Studio.
Richard Bennett
Richard Bennett is a writer and a lover of all things video.
Follow @Richard Bennett
- Title: Mastering YT Video Tweaks with Windows Movie Maker for 2024
- Author: Joseph
- Created at : 2024-05-31 13:46:23
- Updated at : 2024-06-01 13:46:23
- Link: https://youtube-stream.techidaily.com/mastering-yt-video-tweaks-with-windows-movie-maker-for-2024/
- License: This work is licensed under CC BY-NC-SA 4.0.
