
Mastering the Art of Discovering Elusive YouTube Videos for 2024
Mastering the Art of Discovering Elusive YouTube Videos
You may have noticed that some videos in your YouTube playlist are unavailable. This is because the platform allows content creators to categorize their videos into public, private, or unlisted based on their preferences.
To help you uncover the content that you otherwise wouldn’t have access to, we’ve compiled a detailed guide to show you how to find YouTube hidden videos. We’ve also explained why so many unlisted videos are now labeled as private.
So, let’s get started with our guide without any further delay!
4 Types of Videos on YouTube
Firstly, let’s learn about the background of the types of YouTube videos. YouTube videos fall into the following four broad categories:
Public Videos: YouTube contains videos on many themes and topics. It makes it impossible to watch all uploaded content under a specific category.
So, whenever you search for a video or theme, a list of content is displayed in the search result: “Public Videos.” It means that they are visible to everyone around the globe (depending on the terms and conditions). Moreover, you can share, like, unlike, download, or add these videos to your playlists for later watching.
Private Videos: Private videos on YouTube can only be seen by people invited by the person who uploaded the video. This means that only those with access to the video’s shareable link can watch it.
Private videos are not visible to the public or to people who are not logged into YouTube. Hence, it is a great way to share sensitive or personal information with a select group.
Unlisted Video Unlisted videos on YouTube are not publicly visible on the site. They can only be seen by people who have the URL. This category works as a bridge between private and public videos. It is accessible only through sharable links without appealing in any YouTube public playlist or search result.
You might upload an unlisted video to YouTube if you do not want everyone to see it. However, you still want to share it with specific people, like your friends or family. You might also use an unlisted video to test out a new idea before making it public on the video-sharing platform.
Age-Restricted Videos: Age-restricted videos on YouTube are not suitable for all audiences. It may contain content that includes violence, profanity, sexual content, and other inappropriate material. YouTube requires that users be at least 18 years old to view these types of videos.
If you search on YouTube and come across an age-restricted video, you will be asked to confirm your age before viewing its content.

How To Find Unlisted YouTube Videos
Now that we’ve learned about the four types of YouTube content, let’s discuss how you can find unlisted YouTube videos:
How To Find Other People’s Unlisted YouTube Videos?
Since unavailable videos in YouTube playlists are hidden from general public viewers, you cannot find them on YouTube or Google search results.
However, the following workaround can help you watch these YouTube videos without facing much trouble:
Step 1: First, open a browser on your PC and visit the Unlisted Videos website. This platform contains over 600,000 unlisted YouTube videos from 2016 and earlier. You can also submit your unlisted video on the site.

Step 2: Use the search bar at the top of your screen to search for other people’s YouTube playlists. You can also click the “All Video” or “Random Videos” option to find the hidden content of a user.
How To See Unlisted Videos on My YouTube Channel?
To see your unlisted videos on your YouTube channel, do the following steps in sequence:
Step 1: In the first step, install the YouTube Studio app on your mobile device or visit its website using a browser on your computer. Next, launch the app and sign in to your channel’s account using your email and password.
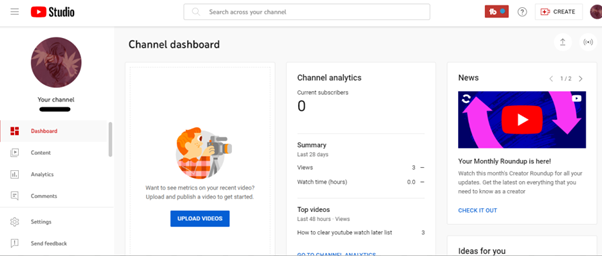
Step 2: In the next step, tap/ click the “Content” tab and tap/click the “Funnel” icon at the top of the video list to access the visibility options.
Step 3:
- Now, choose the “Visibility” option.
- Select “Unlisted” to change the visibility.
- Click the “Save” option to apply changes.
- See the hidden videos on your channel.

Since YouTube has marked the videos uploaded before 2017 as private as of July 2021, you can find your old unlisted videos under the “Private” list. To access it, choose “Private” as the visibility option.
How To Find Unlisted YouTube Videos with Google
Sometimes, unlisted YouTube videos appear on Google when someone shares the link to them on a public forum or website.
To confirm this, open a browser on your computer or a mobile device, head to the Google website, and search for your query. With some luck, you can find these unlisted YouTube videos in the search results.
You May Want to Know: Why Are So Many Unlisted Videos Now Private?
All unlisted videos uploaded to YouTube before January 2017 were switched to private. Therefore, if you have any older unlisted videos added to your Playlist or embedded on your website, you won’t be able to access them now.
However, the channel’s owner can restore access to the video by switching it back to unlisted or public. If now, the video will be labeled as “Private” indefinitely or until its settings are changed.
Conclusion
In this detailed guide, we’ve explored the four types of videos on YouTube and how to find YouTube hidden videos in three different ways. We’ve also explained why so many videos are now listed as “Private” and inaccessible.
Hopefully, you’ve found this article helpful and can now access the unlisted videos on YouTube without hassle.
You may have noticed that some videos in your YouTube playlist are unavailable. This is because the platform allows content creators to categorize their videos into public, private, or unlisted based on their preferences.
To help you uncover the content that you otherwise wouldn’t have access to, we’ve compiled a detailed guide to show you how to find YouTube hidden videos. We’ve also explained why so many unlisted videos are now labeled as private.
So, let’s get started with our guide without any further delay!
4 Types of Videos on YouTube
Firstly, let’s learn about the background of the types of YouTube videos. YouTube videos fall into the following four broad categories:
Public Videos: YouTube contains videos on many themes and topics. It makes it impossible to watch all uploaded content under a specific category.
So, whenever you search for a video or theme, a list of content is displayed in the search result: “Public Videos.” It means that they are visible to everyone around the globe (depending on the terms and conditions). Moreover, you can share, like, unlike, download, or add these videos to your playlists for later watching.
Private Videos: Private videos on YouTube can only be seen by people invited by the person who uploaded the video. This means that only those with access to the video’s shareable link can watch it.
Private videos are not visible to the public or to people who are not logged into YouTube. Hence, it is a great way to share sensitive or personal information with a select group.
Unlisted Video Unlisted videos on YouTube are not publicly visible on the site. They can only be seen by people who have the URL. This category works as a bridge between private and public videos. It is accessible only through sharable links without appealing in any YouTube public playlist or search result.
You might upload an unlisted video to YouTube if you do not want everyone to see it. However, you still want to share it with specific people, like your friends or family. You might also use an unlisted video to test out a new idea before making it public on the video-sharing platform.
Age-Restricted Videos: Age-restricted videos on YouTube are not suitable for all audiences. It may contain content that includes violence, profanity, sexual content, and other inappropriate material. YouTube requires that users be at least 18 years old to view these types of videos.
If you search on YouTube and come across an age-restricted video, you will be asked to confirm your age before viewing its content.
How To Find Unlisted YouTube Videos
Now that we’ve learned about the four types of YouTube content, let’s discuss how you can find unlisted YouTube videos:
How To Find Other People’s Unlisted YouTube Videos?
Since unavailable videos in YouTube playlists are hidden from general public viewers, you cannot find them on YouTube or Google search results.
However, the following workaround can help you watch these YouTube videos without facing much trouble:
Step 1: First, open a browser on your PC and visit the Unlisted Videos website. This platform contains over 600,000 unlisted YouTube videos from 2016 and earlier. You can also submit your unlisted video on the site.
Step 2: Use the search bar at the top of your screen to search for other people’s YouTube playlists. You can also click the “All Video” or “Random Videos” option to find the hidden content of a user.
How To See Unlisted Videos on My YouTube Channel?
To see your unlisted videos on your YouTube channel, do the following steps in sequence:
Step 1: In the first step, install the YouTube Studio app on your mobile device or visit its website using a browser on your computer. Next, launch the app and sign in to your channel’s account using your email and password.
Step 2: In the next step, tap/ click the “Content” tab and tap/click the “Funnel” icon at the top of the video list to access the visibility options.
Step 3:
- Now, choose the “Visibility” option.
- Select “Unlisted” to change the visibility.
- Click the “Save” option to apply changes.
- See the hidden videos on your channel.
Since YouTube has marked the videos uploaded before 2017 as private as of July 2021, you can find your old unlisted videos under the “Private” list. To access it, choose “Private” as the visibility option.
How To Find Unlisted YouTube Videos with Google
Sometimes, unlisted YouTube videos appear on Google when someone shares the link to them on a public forum or website.
To confirm this, open a browser on your computer or a mobile device, head to the Google website, and search for your query. With some luck, you can find these unlisted YouTube videos in the search results.
You May Want to Know: Why Are So Many Unlisted Videos Now Private?
All unlisted videos uploaded to YouTube before January 2017 were switched to private. Therefore, if you have any older unlisted videos added to your Playlist or embedded on your website, you won’t be able to access them now.
However, the channel’s owner can restore access to the video by switching it back to unlisted or public. If now, the video will be labeled as “Private” indefinitely or until its settings are changed.
Conclusion
In this detailed guide, we’ve explored the four types of videos on YouTube and how to find YouTube hidden videos in three different ways. We’ve also explained why so many videos are now listed as “Private” and inaccessible.
Hopefully, you’ve found this article helpful and can now access the unlisted videos on YouTube without hassle.
Cutting-Edge Techniques: Mastering YouTube Subtitle/CC Additions
How to Easily Add Subtitles and Closed Captions to YouTube Video

Richard Bennett
Mar 27, 2024• Proven solutions
In this article, we are going to show you how important it is to add subtitle and closed captions in your YouTube video, and how to add them.
The best video editor for YouTubers - Wondershare Filmora , not only allows you to cut, crop, rotate, reverse videos, but also offers your advanced features like PIP, Green Screen, or audio mixing. What’s more, you can find lots of effects for Fashion, gaming, education, tutorial, sports, etc. Check this article to know more.


Why subtitle and closed captions are important for YouTube videos?
- Forced closed captions and subtitles actually help the viewers to understand the content in your video if the audio quality of your video is bad, muffled or barely audible. Reading makes it easier for them to understand.
- This also helps people with hearing impairments. People with troubled ears can still watch and understand your content.
- It’s a great aid to such videos which have been recorded in other foreign languages that you don’t understand. Hence it will increase the number of viewers all around the world.
- They both are generally added for easy accessibility to the viewers who wish to watch in sound sensitive environments.
So, here we are going to show you two ways to add subtittles to video: directly or uploading caption or transcript files
Adding subtitles and closed captions manually
To add subtitles and closed captions to your YouTube video, fisrt, you should sign in to your YouTube account. On left right below ‘Home’ you will find ‘My Channel’. It will direct you to your personal YouTube page. On the top, right next to your subscribers lays the ‘Video manager’, giving you the list of your uploaded videos.
Select the video and click on edit to get a drop down menu. Click on subtitles and CC. This will take you to the subtitling interface. To the right of video select ‘add new subtitles’ and then ‘create new subtitles’. Select the subtitle language. Play the video to listen to the content and type down in the box. Click on ‘+’ button once you are done.
This will create a subtitle timeline right beneath the video. You can manage by dragging and expanding the subtitle duration according to the audio of the video. The subtitle will appear at the bottom of the video screen. Click ‘publish’ once done.
An interruption might occur with appearing of subtitles in accordance with video. Hence a lot precision is required while doing so.
Uploading Caption or Transcript Files automatically
To upload Caption or Transcript Files to YouTube Videos you first need to create a format on a text editor. For windows use Notepad and for Mac you may use TextEdit. Create a format of putting the number of subtitle first, time stamp and then text of the subtitle. For example
1\
00:02:34:12 using a format of (hour : minute : second : millisecond)
2. *text*
This is the sample text for first subtitle at zero hours, two minutes, thirty four seconds and twelve milliseconds. Once done with this. Go to file, select ‘save as’. Write the file name with an extension of .srt and select ‘All files’ for type of file. Click encoding menu and select UTF-8. Once saved, sign in to your YouTube account.
On left right below ‘Home’ you will find ‘My Channel’. It will direct you to your personal YouTube page. On the top, right next to your subscribers lays the ‘Video manager’, giving you the list of your uploaded videos.
Select the video and click on edit to get a drop down menu. Click on subtitles and CC. Go to ‘add subtitles’ and then ‘upload a file’. A pop-up menu will appear select ‘subtitles file’. Click upload. The file will send subtitles to your video.
This will create a subtitle timeline right beneath the video. You can manage by dragging and expanding the subtitle duration according to the audio of the video. The subtitle will appear at the bottom of the video screen. Click ‘publish’ once done.
3 Best Tools for add/managing video Subtitles/CC
1. Amara
Amara is a smart video editor which helps insert captions and subtitles to videos. It also helps in transcribing the videos. It takes help of crowd sourcing to subtitle any YouTube video. They take help from viewers to subtitle the videos. By making crowd subtitling available for any YouTube creator, they are allowing them to reach more viewers in more languages
2. DIY Captions
DIY captions help you to transcribe the YouTube videos, if not in most accurate manner, then in a little easier way. All you have to do is just paste the URL of the YouTube video and it will provide you all the subtitles. These may not be accurate but will provide you major base material which can be tweaked a bit here and there and is far better than making all the subtitles starting from scratch.
3 Subtitles for YouTube
Subtitles for YouTube is a Google Chrome extension which provides subtitles for YouTube videos. For this you will have to provide a subtitle file with .srt extension. The attractive feature of this is that you won’t have to download the video and still run the subtitles on it. This is very much helpful for people who work on YouTube or watch movies without subtitles.
Richard Bennett
Richard Bennett is a writer and a lover of all things video.
Follow @Richard Bennett
Richard Bennett
Mar 27, 2024• Proven solutions
In this article, we are going to show you how important it is to add subtitle and closed captions in your YouTube video, and how to add them.
The best video editor for YouTubers - Wondershare Filmora , not only allows you to cut, crop, rotate, reverse videos, but also offers your advanced features like PIP, Green Screen, or audio mixing. What’s more, you can find lots of effects for Fashion, gaming, education, tutorial, sports, etc. Check this article to know more.
Why subtitle and closed captions are important for YouTube videos?
- Forced closed captions and subtitles actually help the viewers to understand the content in your video if the audio quality of your video is bad, muffled or barely audible. Reading makes it easier for them to understand.
- This also helps people with hearing impairments. People with troubled ears can still watch and understand your content.
- It’s a great aid to such videos which have been recorded in other foreign languages that you don’t understand. Hence it will increase the number of viewers all around the world.
- They both are generally added for easy accessibility to the viewers who wish to watch in sound sensitive environments.
So, here we are going to show you two ways to add subtittles to video: directly or uploading caption or transcript files
Adding subtitles and closed captions manually
To add subtitles and closed captions to your YouTube video, fisrt, you should sign in to your YouTube account. On left right below ‘Home’ you will find ‘My Channel’. It will direct you to your personal YouTube page. On the top, right next to your subscribers lays the ‘Video manager’, giving you the list of your uploaded videos.
Select the video and click on edit to get a drop down menu. Click on subtitles and CC. This will take you to the subtitling interface. To the right of video select ‘add new subtitles’ and then ‘create new subtitles’. Select the subtitle language. Play the video to listen to the content and type down in the box. Click on ‘+’ button once you are done.
This will create a subtitle timeline right beneath the video. You can manage by dragging and expanding the subtitle duration according to the audio of the video. The subtitle will appear at the bottom of the video screen. Click ‘publish’ once done.
An interruption might occur with appearing of subtitles in accordance with video. Hence a lot precision is required while doing so.
Uploading Caption or Transcript Files automatically
To upload Caption or Transcript Files to YouTube Videos you first need to create a format on a text editor. For windows use Notepad and for Mac you may use TextEdit. Create a format of putting the number of subtitle first, time stamp and then text of the subtitle. For example
1\
00:02:34:12 using a format of (hour : minute : second : millisecond)
2. *text*
This is the sample text for first subtitle at zero hours, two minutes, thirty four seconds and twelve milliseconds. Once done with this. Go to file, select ‘save as’. Write the file name with an extension of .srt and select ‘All files’ for type of file. Click encoding menu and select UTF-8. Once saved, sign in to your YouTube account.
On left right below ‘Home’ you will find ‘My Channel’. It will direct you to your personal YouTube page. On the top, right next to your subscribers lays the ‘Video manager’, giving you the list of your uploaded videos.
Select the video and click on edit to get a drop down menu. Click on subtitles and CC. Go to ‘add subtitles’ and then ‘upload a file’. A pop-up menu will appear select ‘subtitles file’. Click upload. The file will send subtitles to your video.
This will create a subtitle timeline right beneath the video. You can manage by dragging and expanding the subtitle duration according to the audio of the video. The subtitle will appear at the bottom of the video screen. Click ‘publish’ once done.
3 Best Tools for add/managing video Subtitles/CC
1. Amara
Amara is a smart video editor which helps insert captions and subtitles to videos. It also helps in transcribing the videos. It takes help of crowd sourcing to subtitle any YouTube video. They take help from viewers to subtitle the videos. By making crowd subtitling available for any YouTube creator, they are allowing them to reach more viewers in more languages
2. DIY Captions
DIY captions help you to transcribe the YouTube videos, if not in most accurate manner, then in a little easier way. All you have to do is just paste the URL of the YouTube video and it will provide you all the subtitles. These may not be accurate but will provide you major base material which can be tweaked a bit here and there and is far better than making all the subtitles starting from scratch.
3 Subtitles for YouTube
Subtitles for YouTube is a Google Chrome extension which provides subtitles for YouTube videos. For this you will have to provide a subtitle file with .srt extension. The attractive feature of this is that you won’t have to download the video and still run the subtitles on it. This is very much helpful for people who work on YouTube or watch movies without subtitles.
Richard Bennett
Richard Bennett is a writer and a lover of all things video.
Follow @Richard Bennett
Also read:
- [New] Complete Screencast Process Methodical Instructional Video
- [New] Explore These Ten Booming YouTube Sources to Uplift Yourself
- [New] From Single Shots to Spectaculary Screenshots for 2024
- [New] How To Record Screencast From YouTube For Free
- [New] In 2024, Leveraging Viewership The Mechanics of Product-Sponsored YouTube Videos
- [New] The Essentials of High-Quality Audio Interfaces in Podcasting for 2024
- [Updated] Leading Live Game Networks Unveiled
- 2024 Approved Master Quick YouTube Video Rendering & Efficient Uploading
- 2024 Approved The Best Vocal Transformation Programs for Video Makers
- 2024 Approved Ultimate Selection of Video Capture Tools for Streaming
- 2024 Approved Upgrade Your Content Presentation with Top-Tier Templates
- Free Yourself From Fringe A YouTube Video Fix Guide for 2024
- In 2024, The Complete Guide to Xiaomi Redmi Note 12R FRP Bypass Everything You Need to Know
- In 2024, The Ultimate Guide 7 Steps for Stellar Cooking Films
- In 2024, Unleash Your Channels Premium, Cost-Free Intro Makers
- Uber vs Taxi: Which Is the More Economical Option?
- 원격에서 WebM, OGV 영상을 자유롭게 변환하기: Movavi 소비세 없는 방법
- Title: Mastering the Art of Discovering Elusive YouTube Videos for 2024
- Author: Joseph
- Created at : 2025-01-09 22:27:51
- Updated at : 2025-01-16 02:11:26
- Link: https://youtube-stream.techidaily.com/mastering-the-art-of-discovering-elusive-youtube-videos-for-2024/
- License: This work is licensed under CC BY-NC-SA 4.0.