Mastering Revenue Division on YouTube Shorts for 2024
Mastering Revenue Division on YouTube Shorts
YouTube Shorts have become a craze in the recent past as creators try to get the best out of them. These are short, vertical videos that are 60 seconds long. Originally a way of YouTube attempting to compete with TikTok, Shorts have become a household name. However, are YouTube shorts monetized? Can you get paid for YouTube shorts? The increasing interest in monetizing Shorts has inspired many creators working on their video creation. This article answers the question of can YouTube Shorts be monetized and explains how the revenue-sharing model works.
YouTube Shorts Editor A cross-platform helps creators edit the vertical videos quickly and easily!
Free Download Free Download Learn More

Part 1. Unveiling the Mystery of YouTube Shorts Revenue Sharing
YouTube launched the Shorts platform in 2021, which gained popularity within a short period. By the end of the first year, some videos had racked up more than half a billion views and counties. This begged the question: can you get paid from YouTube shorts?

Yes, YouTube updated its Partner Program, allowing the revenue-sharing model to benefit Shorts creators. The platform pools all the money it gets from advertisers every month from the Shorts feeds. It then shares that money with creators based on the number of views. Since the launch of this program in February 2023, the previous YouTube Shorts Fund became defunct.
The ad revenue-sharing model on YouTube Shorts may seem complex, but let’s break it down
- Every month YouTube pools all the revenue it generates from ads that appear in the Shorts feed.
- YouTube calculates that is going to the Creators Pool. A chuck of this money goes towards paying for songs used in YouTube Shorts. For instance, only a third of the ad revenue generated from a Shorts goes to the Creator Pool if it used two songs while the rest goes to paying for the music.
- YouTube divides the Creator pool depending on the number of views they contributed. If a creator generated 5% of the Shorts views during a period, they are assigned 5% of the Creator Pool.
- From that amount, YouTube keeps 55% of its share while you get paid the remaining 45%. If a creator’s 5% amounted to $800, then they will receive $360.
So, is YouTube shorts monetized? Yes, the ads-sharing model defines the amount of money a creator can earn from Shorts every month. Depending on the number of views generated, high-performing Shorts can bring in a huge amount of money.
Part 2. YouTube Shorts Monetization: Eligibility Criteria and Earnings Potential
YouTube Shorts provides creators with an exceptional way of making extra income. Let’s have a look at what it takes and what the numbers say:
Eligibility Criteria
If you are wondering, can I monetize YouTube shorts? To start earning ad revenue from Shorts, you need to be part of the YouTube Partner Program (YPP) This is the gateway to YouTube monetization opportunities. With the latest YouTube shorts monetization 2023 policy, the platform lowered the eligibility criteria.
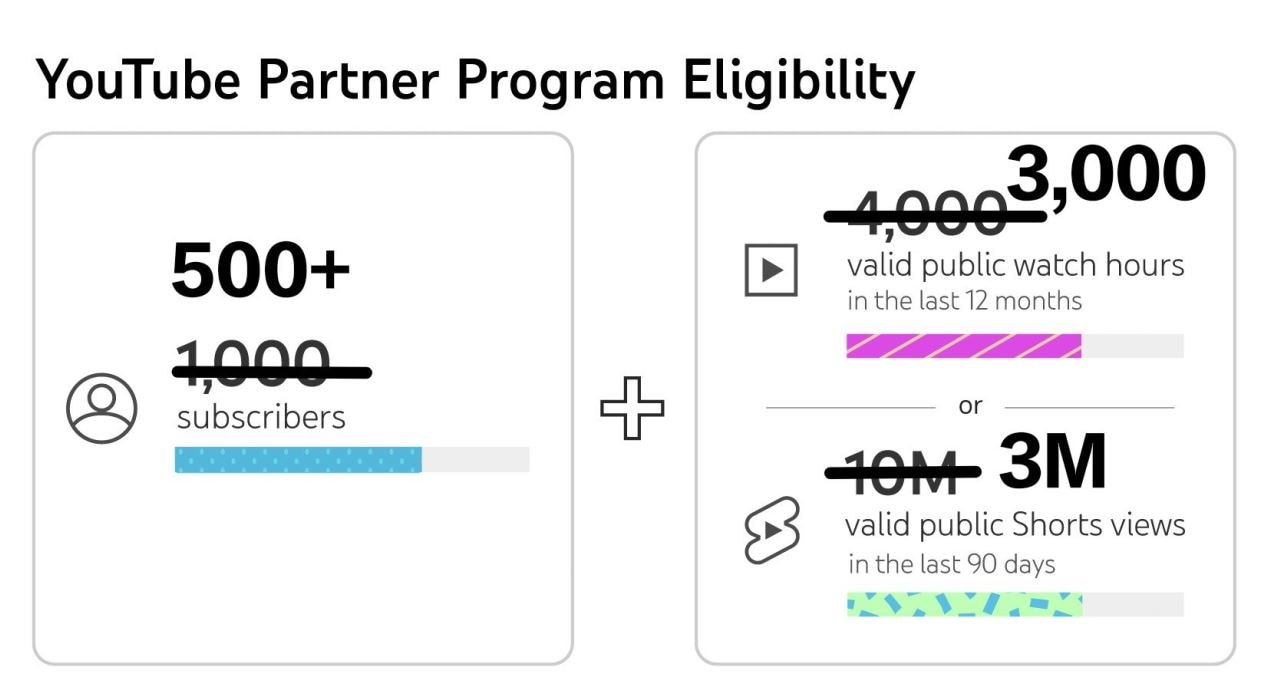
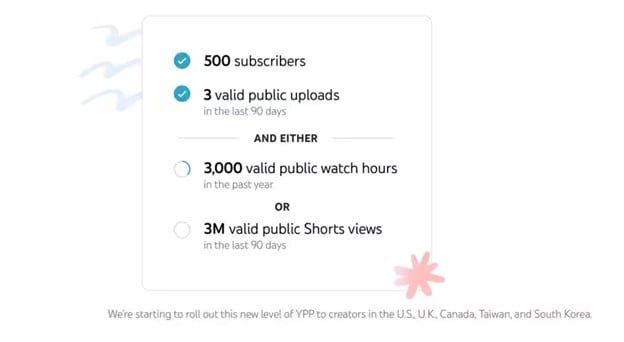
To be eligible to the YPP, you will need:
- At least 500 Subscribers
- At least 3,000 valid public hours in the last 12 months, or
- At least 3M valid public Shorts views in the last 90 days
This means that your YouTube channel must have gained some traction before monetizing your shorts. The following YouTube short monetization 2023 requirements are also needed:
- Live in a region where the YPP is available
- Comply with YouTube’s channel monetization policies
- Have no Community Guidelines strikes on your channel
- Have an active AdSense account
- Have 2-step verification turned on for your Google account
How Much Can You Earn With Shorts
YouTube Shorts have the potential to make a huge amount of money for creators. In fact, YouTube monetize Shorts in a quite generous way. Here are a few examples to give you an idea of the numbers:
- James Seo (573,000 subscribers) - Earned $445.09 from 10.3 million Shorts views
- Riley Lemon (84,000 subscribers) - Earned $76.23 from 1.9 million Shorts views
- Matthew King (212,000 subscribers) – Earned $163.73 from 4.2 million Shorts views
- Hassan Khadair (2.1 million subscribers) – Earned $872.14 from 22 million Shorts views
Part 3. How to Start Earning from YouTube Shorts
Eligible creators start earning from YouTube Shorts when they opt-in to the program. You need to make sure you are eligible and agree to start receiving revenue from your creations.
Are You Eligible for YouTube Shorts Earnings?
Shorts creators growing their channel and are yet to meet the minimum requirements can track their eligibility status by selecting “Notify me when I’m eligible” in YouTube Studio’s Earn section.

When you become eligible, follow these steps to apply for the YPP program:
- Sign in to YouTube on a computer or the YouTube Studio app on a mobile
- Click on your profile picture, and choose YouTube Studio
- Click Earn on the left menu, then select Apply
- Click Start to review your eligibility and accept the base terms
- Click Start to set up an AdSense account. You may also choose to link an existing active one.
- Your application will be in Progress in the Get Reviewed step.
Once you have completed these steps, your YouTube Channel will be reviewed. You can expect to hear a decision within a month of enrolling you in the program.
How to opt in for YouTube Shorts Monetization
After being approved and enrolled in the YPP program, you need to opt in to monetize your channel. Remember that you will not be automatically signed up for the ad revenue-sharing model. Here are a few more steps you need to take:
- Sign in to YouTube Studio
- Select Earn in the left menu
- Click Get Started for every module to review and accept their terms
- Accept the Base Terms and the Shorts Monetization Module to monetize Shorts
Once your Shorts are monetized, track the progress and amount of money earned through YouTube Analytics.
Other Ways to Monetize YouTube Shorts
The YPP program is the only ad-based monetization option for YouTube Shorts. However, there are other ways of earning:
- Selling Subscription Memberships: Turn your YouTube to membership and charge monthly payments in exchange for perks like badges and exclusive content.
- Monetize Livestreams: Features such as super stickers and super chat allow creators to make money when fans pay to send highlighted messages.
- Selling Merchandise and Products: Make additional income by selling branded merchandise like apparel or product lines in your content niche.
- Secure Paid Brand Partnerships: Interacting directly with brands and negotiating sponsorship deals.
- Join an Affiliate Program: An affiliate program will pay you revenue associated with clicks to links hosted on your channel.
Part 4. Edit Your YouTube Videos to Shorts with Wondershare Filmora
To earn more from your YouTube Shorts, you need quality content that keeps your viewers entertained. With Shorts having a limit of 60 seconds, you want to make sure that you cover the most essential footage. Wondershare Filmora is a versatile video editing software that helps creators edit their vertical videos quickly and easily. The mobile app is specifically great for editing shorts on the go:
Free Download For Win 7 or later(64-bit)
Free Download For macOS 10.14 or later
Editing your videos with Filmora is quite straightforward. One of the features that work well for YouTube shorts is the Auto Reframe.

Auto Reframe
The Auto Reframe feature allows creators to resize videos automatically with no editing skills needed. This is a great tool for converting your horizontal YouTube videos to Shorts format. It also boosts your potential audience while saving you precious time and effort you would have used editing. To use this feature, choose any of the following options:
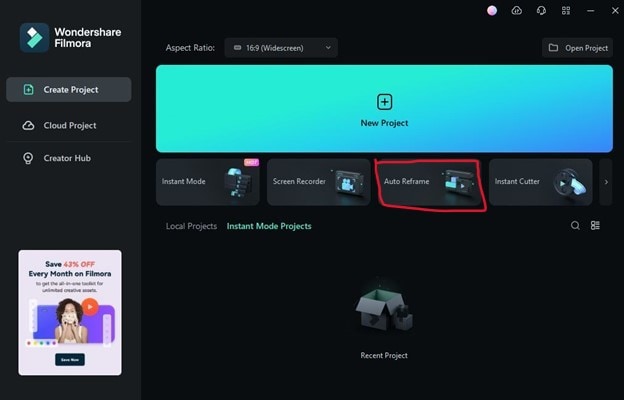
1. Open Filmora and Select Auto Reframe
After opening Filmora, head over to the main interface. You will find the Auto Reframe option on the right side. Click on it to open the reframing feature.
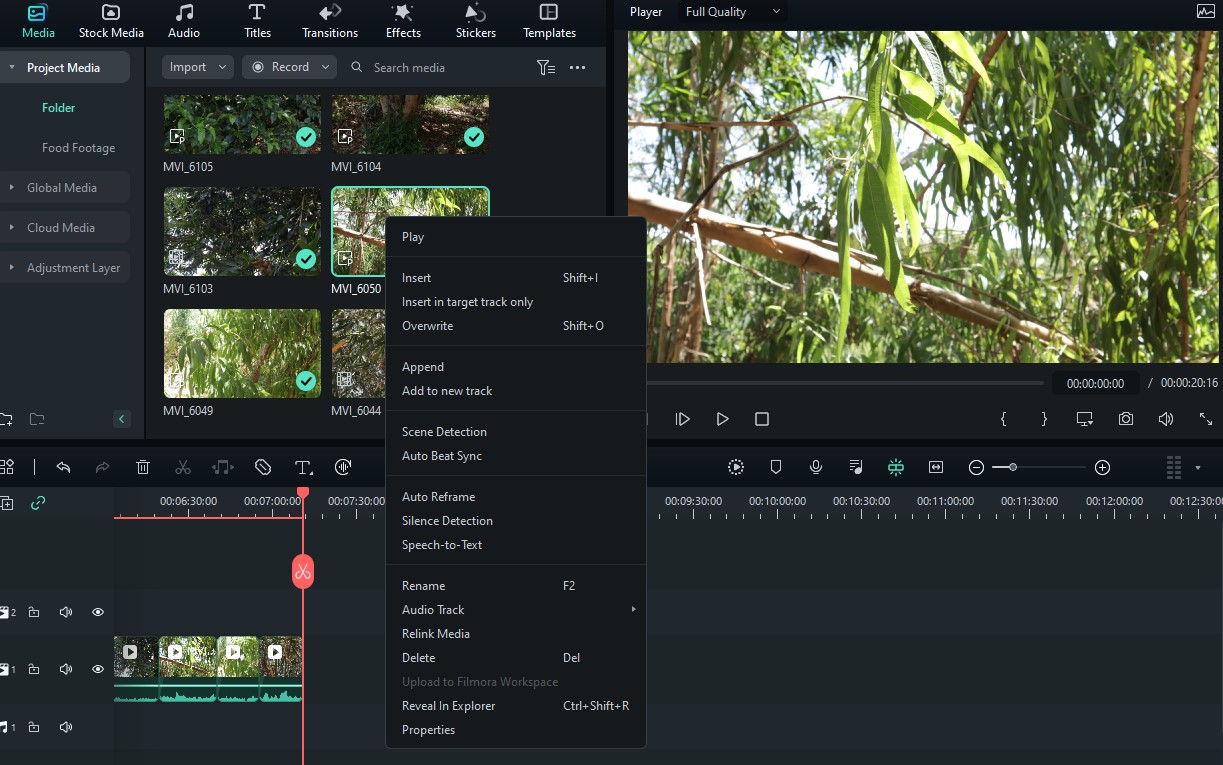
2. Launch Directly from the Video
Click File, followed by Import Media. Select the file that you gave imported in the timeline and right-click on it. Then select Auto Reframe.
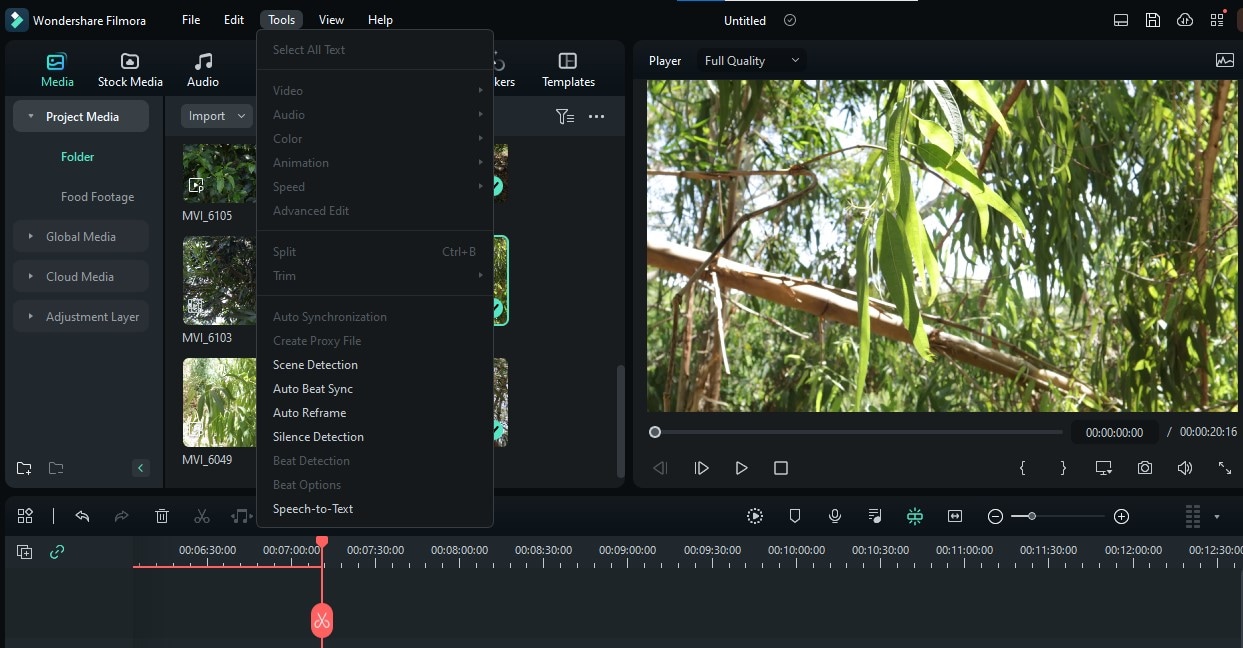
3. Use the Tools Option
You may also use the Auto Reframe feature by clicking on the Tools feature on the top menu bar. Then click on Auto Reframe.
 PCDJ DEX 3 for Windows & MAC is the total entertainment DJ software solution, offering audio, video, and karaoke mixing ability. Automatic beat-sync, smart looping, 4 decks, DJ MIDI controller support, Karaoke Streaming and much more.
Other Filmora Features for Editing Shorts
- Split Screen Video Editor – A choice of pre-made templates to create split-screen videos instantly.
- Add Text to Video – Directly add texts to your videos, including subtitles and captions.
- Text To Speech – Instantly convert your text files to voice and introduce more elements that will enrich your Shorts video.

Conclusion
YouTube Short’s revenue-sharing programs offer a great opportunity for creators specializing in short-form content to earn money on the platform. Once eligible for the YPP program, you can start earning a nice cash bonus monthly. However, you will need to create quality content that keeps your audience entertained and engaged. We recommend using Wondershare Filmora to edit your Shorts and make them more relatable to the audience,
Free Download Free Download Learn More
 Power Tools add-on for Google Sheets, Lifetime subscription
Part 1. Unveiling the Mystery of YouTube Shorts Revenue Sharing
YouTube launched the Shorts platform in 2021, which gained popularity within a short period. By the end of the first year, some videos had racked up more than half a billion views and counties. This begged the question: can you get paid from YouTube shorts?
Yes, YouTube updated its Partner Program, allowing the revenue-sharing model to benefit Shorts creators. The platform pools all the money it gets from advertisers every month from the Shorts feeds. It then shares that money with creators based on the number of views. Since the launch of this program in February 2023, the previous YouTube Shorts Fund became defunct.
The ad revenue-sharing model on YouTube Shorts may seem complex, but let’s break it down
- Every month YouTube pools all the revenue it generates from ads that appear in the Shorts feed.
- YouTube calculates that is going to the Creators Pool. A chuck of this money goes towards paying for songs used in YouTube Shorts. For instance, only a third of the ad revenue generated from a Shorts goes to the Creator Pool if it used two songs while the rest goes to paying for the music.
- YouTube divides the Creator pool depending on the number of views they contributed. If a creator generated 5% of the Shorts views during a period, they are assigned 5% of the Creator Pool.
- From that amount, YouTube keeps 55% of its share while you get paid the remaining 45%. If a creator’s 5% amounted to $800, then they will receive $360.
So, is YouTube shorts monetized? Yes, the ads-sharing model defines the amount of money a creator can earn from Shorts every month. Depending on the number of views generated, high-performing Shorts can bring in a huge amount of money.
 Simple and intuitive video editing
Part 2. YouTube Shorts Monetization: Eligibility Criteria and Earnings Potential
YouTube Shorts provides creators with an exceptional way of making extra income. Let’s have a look at what it takes and what the numbers say:
Eligibility Criteria
If you are wondering, can I monetize YouTube shorts? To start earning ad revenue from Shorts, you need to be part of the YouTube Partner Program (YPP) This is the gateway to YouTube monetization opportunities. With the latest YouTube shorts monetization 2023 policy, the platform lowered the eligibility criteria.

To be eligible to the YPP, you will need:
- At least 500 Subscribers
- At least 3,000 valid public hours in the last 12 months, or
- At least 3M valid public Shorts views in the last 90 days
This means that your YouTube channel must have gained some traction before monetizing your shorts. The following YouTube short monetization 2023 requirements are also needed:
- Live in a region where the YPP is available
- Comply with YouTube’s channel monetization policies
- Have no Community Guidelines strikes on your channel
- Have an active AdSense account
- Have 2-step verification turned on for your Google account
How Much Can You Earn With Shorts
YouTube Shorts have the potential to make a huge amount of money for creators. In fact, YouTube monetize Shorts in a quite generous way. Here are a few examples to give you an idea of the numbers:
- James Seo (573,000 subscribers) - Earned $445.09 from 10.3 million Shorts views
- Riley Lemon (84,000 subscribers) - Earned $76.23 from 1.9 million Shorts views
- Matthew King (212,000 subscribers) – Earned $163.73 from 4.2 million Shorts views
- Hassan Khadair (2.1 million subscribers) – Earned $872.14 from 22 million Shorts views
Eligible creators start earning from YouTube Shorts when they opt-in to the program. You need to make sure you are eligible and agree to start receiving revenue from your creations.
Are You Eligible for YouTube Shorts Earnings?
Shorts creators growing their channel and are yet to meet the minimum requirements can track their eligibility status by selecting “Notify me when I’m eligible” in YouTube Studio’s Earn section.

When you become eligible, follow these steps to apply for the YPP program:
- Sign in to YouTube on a computer or the YouTube Studio app on a mobile
- Click on your profile picture, and choose YouTube Studio
- Click Earn on the left menu, then select Apply
- Click Start to review your eligibility and accept the base terms
- Click Start to set up an AdSense account. You may also choose to link an existing active one.
- Your application will be in Progress in the Get Reviewed step.
Once you have completed these steps, your YouTube Channel will be reviewed. You can expect to hear a decision within a month of enrolling you in the program.
How to opt in for YouTube Shorts Monetization
After being approved and enrolled in the YPP program, you need to opt in to monetize your channel. Remember that you will not be automatically signed up for the ad revenue-sharing model. Here are a few more steps you need to take:
- Sign in to YouTube Studio
- Select Earn in the left menu
- Click Get Started for every module to review and accept their terms
- Accept the Base Terms and the Shorts Monetization Module to monetize Shorts
Once your Shorts are monetized, track the progress and amount of money earned through YouTube Analytics.
Other Ways to Monetize YouTube Shorts
The YPP program is the only ad-based monetization option for YouTube Shorts. However, there are other ways of earning:
- Selling Subscription Memberships: Turn your YouTube to membership and charge monthly payments in exchange for perks like badges and exclusive content.
- Monetize Livestreams: Features such as super stickers and super chat allow creators to make money when fans pay to send highlighted messages.
- Selling Merchandise and Products: Make additional income by selling branded merchandise like apparel or product lines in your content niche.
- Secure Paid Brand Partnerships: Interacting directly with brands and negotiating sponsorship deals.
- Join an Affiliate Program: An affiliate program will pay you revenue associated with clicks to links hosted on your channel.
Part 4. Edit Your YouTube Videos to Shorts with Wondershare Filmora
To earn more from your YouTube Shorts, you need quality content that keeps your viewers entertained. With Shorts having a limit of 60 seconds, you want to make sure that you cover the most essential footage. Wondershare Filmora is a versatile video editing software that helps creators edit their vertical videos quickly and easily. The mobile app is specifically great for editing shorts on the go:
Free Download For Win 7 or later(64-bit)
Free Download For macOS 10.14 or later
Editing your videos with Filmora is quite straightforward. One of the features that work well for YouTube shorts is the Auto Reframe.
Auto Reframe
The Auto Reframe feature allows creators to resize videos automatically with no editing skills needed. This is a great tool for converting your horizontal YouTube videos to Shorts format. It also boosts your potential audience while saving you precious time and effort you would have used editing. To use this feature, choose any of the following options:
1. Open Filmora and Select Auto Reframe
After opening Filmora, head over to the main interface. You will find the Auto Reframe option on the right side. Click on it to open the reframing feature.
 TubeDigger - online video downloader from mostly any site
2. Launch Directly from the Video
Click File, followed by Import Media. Select the file that you gave imported in the timeline and right-click on it. Then select Auto Reframe.
3. Use the Tools Option
You may also use the Auto Reframe feature by clicking on the Tools feature on the top menu bar. Then click on Auto Reframe.
Other Filmora Features for Editing Shorts
- Split Screen Video Editor – A choice of pre-made templates to create split-screen videos instantly.
- Add Text to Video – Directly add texts to your videos, including subtitles and captions.
- Text To Speech – Instantly convert your text files to voice and introduce more elements that will enrich your Shorts video.
Conclusion
YouTube Short’s revenue-sharing programs offer a great opportunity for creators specializing in short-form content to earn money on the platform. Once eligible for the YPP program, you can start earning a nice cash bonus monthly. However, you will need to create quality content that keeps your audience entertained and engaged. We recommend using Wondershare Filmora to edit your Shorts and make them more relatable to the audience,
 Any DRM Removal for Mac: Remove DRM from Adobe, Kindle, Sony eReader, Kobo, etc, read your ebooks anywhere.
Quick-Cut Technique: Making Your Vlog More Engaging
How To Use Jump Cuts in Your Vlog


Richard Bennett
Mar 27, 2024• Proven solutions
A common problem for new YouTubers and Vlogers is that they cannot get through a recording without feeling like they have messed up and need to restart. It can be extremely discouraging at first. More experienced vloggers know that mistakes happen and they are no reason to stop recording. Instead of trying to record a perfect clip it is common for vloggers to remove errors from their videos in editing using jump cuts.
How To Use Jump Cuts in Your Vlog
1. What is a Jump Cut?
A jump cut is when you jump from one part of your clip to a later part of that same clip, cutting out the section in-between.
In movies or tv shows jump cuts can be distracting. In vlogs it is the exact opposite; jump cuts are used to remove distractions. It is not strange for a YouTube video to contain a lot of jump cuts. If you go and re-watch a video by your favorite vlogger you will probably notice that every once in a while the vlogger is suddenly sitting differently or that something else has suddenly changed. That is a jump cut, and chances are you did not even think twice about it when you first watched the video.
2. When to use Jump Cuts in your Youtube Video
There are a lot of things you might want to take out of your clips using jump cuts. Here are some examples:
Repetition: You may have had to repeat yourself because you misspoke. Or, you might watch your clip back and realize that two sections you intended – perhaps even scripted – are very similar and you only need one.
Off-Topic Tangents: Once you get comfortable talking to the camera it is easy to find yourself getting off-topic while recording. These tangents might be funny or feel important, but you should still cut them out of your final video. Rather than scrapping them completely, though, consider giving your tangent its very own video. Successful vloggers post new videos frequently, after all.
Silence: Use jump cuts to take out any pauses in your video. Every period of silence is an opportunity for viewers to get distracted and decide to click on something else. Adding music to the background of your video can help with shorter pauses, but cutting out any silence is still a good way to go.
In the video tutorial below, we will share with you some practical and creative jump cuts tips that you can try in video editing. And most of the jump cuts are done with the cutting features in Filmora . You can download the free trial version below by clicking the Free Download button based on your system.
 Download Mac Version ](https://tools.techidaily.com/wondershare/filmora/download/ )
3. How to Make Jump Cuts in Vlog & YouTube Videos
You can make jump cuts in almost every editing program, from free software like Windows Movie Maker to professional programs like Adobe Premiere. Remember no matter which video editing software you are using to edit your videos with jump cut, you need to ensure that the software can scroll through your video clips and audio files frame-by-frame. And some video editors may only allow you to scroll video footage frame by frame. This tutorial is for Filmora Video Editor (Now upgraded to Filmora), but many of the same steps will apply to other software.
Download Mac Version ](https://tools.techidaily.com/wondershare/filmora/download/ )
You may also like: How to trim and cut videos in Windows Movie Maker for Free
Open up Filmora Video Editor and add a clip into the timeline. Watch it through, and then revisit sections where you think you might want to make cuts.
Find a place in your clip that has silence and use the scissors icon to cut your clip into two. Then start playing your clip and pause as soon as you hear sound.
Make sure your clip is selected, and then go back frame by frame until you hear nothing.
Use the scissors icon to make another cut. You will now have three clips; one before the silence, the silent pause, and the section where sound starts again. Delete the quiet middle clip.
4. Keep video shorter for more views
The videos that get the most views on YouTube are an average of three minutes long. People will use the length of a video as a reason not to click on it. Viewers are also more likely to get distracted and stop watching longer videos before they are over. That does not mean you should not take as long as you need to properly explain your ideas, just that you should be careful your video is not longer than it needs to be. It is common for youtubers to use only about a third of the clip they record. The rest is removed using jump cuts.
Filmora video editor will help you to be more creative in video editing and saving your time at the same time. Download and leave a comment below about how do you like it.


Richard Bennett
Richard Bennett is a writer and a lover of all things video.
Follow @Richard Bennett
Richard Bennett
Mar 27, 2024• Proven solutions
A common problem for new YouTubers and Vlogers is that they cannot get through a recording without feeling like they have messed up and need to restart. It can be extremely discouraging at first. More experienced vloggers know that mistakes happen and they are no reason to stop recording. Instead of trying to record a perfect clip it is common for vloggers to remove errors from their videos in editing using jump cuts.

Key features:
• Import from any devices and cams, including GoPro and drones. All formats supported. Сurrently the only free video editor that allows users to export in a new H265/HEVC codec, something essential for those working with 4K and HD.
• Everything for hassle-free basic editing: cut, crop and merge files, add titles and favorite music
• Visual effects, advanced color correction and trendy Instagram-like filters
• All multimedia processing done from one app: video editing capabilities reinforced by a video converter, a screen capture, a video capture, a disc burner and a YouTube uploader
• Non-linear editing: edit several files with simultaneously
• Easy export to social networks: special profiles for YouTube, Facebook, Vimeo, Twitter and Instagram
• High quality export – no conversion quality loss, double export speed even of HD files due to hardware acceleration
• Stabilization tool will turn shaky or jittery footage into a more stable video automatically.
• Essential toolset for professional video editing: blending modes, Mask tool, advanced multiple-color Chroma Key
How To Use Jump Cuts in Your Vlog
1. What is a Jump Cut?
A jump cut is when you jump from one part of your clip to a later part of that same clip, cutting out the section in-between.
In movies or tv shows jump cuts can be distracting. In vlogs it is the exact opposite; jump cuts are used to remove distractions. It is not strange for a YouTube video to contain a lot of jump cuts. If you go and re-watch a video by your favorite vlogger you will probably notice that every once in a while the vlogger is suddenly sitting differently or that something else has suddenly changed. That is a jump cut, and chances are you did not even think twice about it when you first watched the video.
2. When to use Jump Cuts in your Youtube Video
There are a lot of things you might want to take out of your clips using jump cuts. Here are some examples:
Repetition: You may have had to repeat yourself because you misspoke. Or, you might watch your clip back and realize that two sections you intended – perhaps even scripted – are very similar and you only need one.
Off-Topic Tangents: Once you get comfortable talking to the camera it is easy to find yourself getting off-topic while recording. These tangents might be funny or feel important, but you should still cut them out of your final video. Rather than scrapping them completely, though, consider giving your tangent its very own video. Successful vloggers post new videos frequently, after all.
Silence: Use jump cuts to take out any pauses in your video. Every period of silence is an opportunity for viewers to get distracted and decide to click on something else. Adding music to the background of your video can help with shorter pauses, but cutting out any silence is still a good way to go.
In the video tutorial below, we will share with you some practical and creative jump cuts tips that you can try in video editing. And most of the jump cuts are done with the cutting features in Filmora . You can download the free trial version below by clicking the Free Download button based on your system.
Download Mac Version ](https://tools.techidaily.com/wondershare/filmora/download/ )
3. How to Make Jump Cuts in Vlog & YouTube Videos
You can make jump cuts in almost every editing program, from free software like Windows Movie Maker to professional programs like Adobe Premiere. Remember no matter which video editing software you are using to edit your videos with jump cut, you need to ensure that the software can scroll through your video clips and audio files frame-by-frame. And some video editors may only allow you to scroll video footage frame by frame. This tutorial is for Filmora Video Editor (Now upgraded to Filmora), but many of the same steps will apply to other software.
Download Mac Version ](https://tools.techidaily.com/wondershare/filmora/download/ )
You may also like: How to trim and cut videos in Windows Movie Maker for Free
Open up Filmora Video Editor and add a clip into the timeline. Watch it through, and then revisit sections where you think you might want to make cuts.
Find a place in your clip that has silence and use the scissors icon to cut your clip into two. Then start playing your clip and pause as soon as you hear sound.
Make sure your clip is selected, and then go back frame by frame until you hear nothing.
Use the scissors icon to make another cut. You will now have three clips; one before the silence, the silent pause, and the section where sound starts again. Delete the quiet middle clip.
4. Keep video shorter for more views
The videos that get the most views on YouTube are an average of three minutes long. People will use the length of a video as a reason not to click on it. Viewers are also more likely to get distracted and stop watching longer videos before they are over. That does not mean you should not take as long as you need to properly explain your ideas, just that you should be careful your video is not longer than it needs to be. It is common for youtubers to use only about a third of the clip they record. The rest is removed using jump cuts.
Filmora video editor will help you to be more creative in video editing and saving your time at the same time. Download and leave a comment below about how do you like it.
Richard Bennett
Richard Bennett is a writer and a lover of all things video.
Follow @Richard Bennett
Richard Bennett
Mar 27, 2024• Proven solutions
A common problem for new YouTubers and Vlogers is that they cannot get through a recording without feeling like they have messed up and need to restart. It can be extremely discouraging at first. More experienced vloggers know that mistakes happen and they are no reason to stop recording. Instead of trying to record a perfect clip it is common for vloggers to remove errors from their videos in editing using jump cuts.
How To Use Jump Cuts in Your Vlog
1. What is a Jump Cut?
A jump cut is when you jump from one part of your clip to a later part of that same clip, cutting out the section in-between.
In movies or tv shows jump cuts can be distracting. In vlogs it is the exact opposite; jump cuts are used to remove distractions. It is not strange for a YouTube video to contain a lot of jump cuts. If you go and re-watch a video by your favorite vlogger you will probably notice that every once in a while the vlogger is suddenly sitting differently or that something else has suddenly changed. That is a jump cut, and chances are you did not even think twice about it when you first watched the video.
2. When to use Jump Cuts in your Youtube Video
There are a lot of things you might want to take out of your clips using jump cuts. Here are some examples:
Repetition: You may have had to repeat yourself because you misspoke. Or, you might watch your clip back and realize that two sections you intended – perhaps even scripted – are very similar and you only need one.
Off-Topic Tangents: Once you get comfortable talking to the camera it is easy to find yourself getting off-topic while recording. These tangents might be funny or feel important, but you should still cut them out of your final video. Rather than scrapping them completely, though, consider giving your tangent its very own video. Successful vloggers post new videos frequently, after all.
Silence: Use jump cuts to take out any pauses in your video. Every period of silence is an opportunity for viewers to get distracted and decide to click on something else. Adding music to the background of your video can help with shorter pauses, but cutting out any silence is still a good way to go.
In the video tutorial below, we will share with you some practical and creative jump cuts tips that you can try in video editing. And most of the jump cuts are done with the cutting features in Filmora . You can download the free trial version below by clicking the Free Download button based on your system.
Download Mac Version ](https://tools.techidaily.com/wondershare/filmora/download/ )
3. How to Make Jump Cuts in Vlog & YouTube Videos
You can make jump cuts in almost every editing program, from free software like Windows Movie Maker to professional programs like Adobe Premiere. Remember no matter which video editing software you are using to edit your videos with jump cut, you need to ensure that the software can scroll through your video clips and audio files frame-by-frame. And some video editors may only allow you to scroll video footage frame by frame. This tutorial is for Filmora Video Editor (Now upgraded to Filmora), but many of the same steps will apply to other software.
 Easy and Safe Partition Software & Hard Disk Manager
Download Mac Version ](https://tools.techidaily.com/wondershare/filmora/download/ )
You may also like: How to trim and cut videos in Windows Movie Maker for Free
Open up Filmora Video Editor and add a clip into the timeline. Watch it through, and then revisit sections where you think you might want to make cuts.
Find a place in your clip that has silence and use the scissors icon to cut your clip into two. Then start playing your clip and pause as soon as you hear sound.
Make sure your clip is selected, and then go back frame by frame until you hear nothing.
Use the scissors icon to make another cut. You will now have three clips; one before the silence, the silent pause, and the section where sound starts again. Delete the quiet middle clip.
4. Keep video shorter for more views
The videos that get the most views on YouTube are an average of three minutes long. People will use the length of a video as a reason not to click on it. Viewers are also more likely to get distracted and stop watching longer videos before they are over. That does not mean you should not take as long as you need to properly explain your ideas, just that you should be careful your video is not longer than it needs to be. It is common for youtubers to use only about a third of the clip they record. The rest is removed using jump cuts.
Filmora video editor will help you to be more creative in video editing and saving your time at the same time. Download and leave a comment below about how do you like it.
 DEX 3 RE is Easy-To-Use DJ Mixing Software for MAC and Windows Designed for Today’s Versatile DJ.
Mix from your own library of music, iTunes or use the Pulselocker subsciprtion service for in-app access to over 44 million songs. Use with over 85 supported DJ controllers or mix with a keyboard and mouse.
DEX 3 RE is everything you need without the clutter - the perfect 2-deck mixing software solution for mobile DJs or hard-core hobbiests.
PCDJ DEX 3 RE (DJ Software for Win & MAC - Product Activation For 3 Machines)
Richard Bennett
Richard Bennett is a writer and a lover of all things video.
Follow @Richard Bennett
- Title: Mastering Revenue Division on YouTube Shorts for 2024
- Author: Joseph
- Created at : 2024-07-29 20:48:02
- Updated at : 2024-07-30 20:48:02
- Link: https://youtube-stream.techidaily.com/mastering-revenue-division-on-youtube-shorts-for-2024/
- License: This work is licensed under CC BY-NC-SA 4.0.