
Live Speech to Text Converter for 2024
Live Speech to Text Converter
Captions, like subtitles, can be a great way to improve the engagement of your video by reaching more and more audiences. But adding captions to your video is not an easy thing to do and without the right video caption maker, it can seem like an impossible task.
But it is important to add captions to your video, not just so you can target people who don’t understand the language or those who prefer to read rather than watch the video, but also to improve SEO and visibility.
Here, we will be looking at some of the best tools that you can use to add captions to your video.
Filmora Audio Recorder
Record computer system audio
Capture microphone audio
Customize recording volume
Record screen and webcam as well
Best Video Caption Makers
The following are the top video caption makers that you can choose from;
YouTube Automatic Caption
If you already have your own YouTube channel, you can use the built-in speech recognition feature to generate accurate captions for your video. This feature can generate captions in a number of languages including English, Portuguese, German, Spanish, Korean, French, Italian, and Dutch which is more than some of the premium caption generators in the market.
The main reason most people choose this solution is that it is fairly simple to use. You don’t have to do much; just upload the video and the automatic caption generator will create the captions you need.
Key Features
- It is easy to use and freely accessible
- You can use it to generate captions in a number of different languages
- It is very accurate
- You can use it to generate transcripts for the video
Kapwing Auto-Subtitle Maker
Kapwing is an online solution that will generate subtitles and captions for most videos. But it does limit the size of the video that it can generate subtitles on to about 500 MB. There is a free version of the program that although limited in functionality will not add a watermark to the generated captions file. But free users can only get captions for up to 7 minutes of video, making it a less ideal solution when you have a longer video.
Key Features
- You can generate captions and subtitles for free
- It is accessible online and you don’t have to install software on your computer to get the captions
- It has a very simple user interface, making the caption generation process quick and easy
- In addition to generating subtitles and captions, you can edit existing files.
Adobe Premiere Pro CC
You may know Adobe Premiere as one of the most popular video editing programs on the market, but most people are unaware that it can also be used to generate captions for the video. This tool can be very useful in the creation of high-quality videos and you can generate an accurate caption or subtitle for the video as well.
But Adobe Premiere is not an easy solution to use for both video editing and adding captions, particularly for beginner users. But it is certainly one of the best ways to create and edit videos on your computer.
Key Features
- Even though the interface is not easy to use, it is clear and flexible
- You have numerous options to add the captions including font style and color
- The captions that you add using this tool will be very accurate
- It can also be used to edit existing subtitle and caption files
Amara Subtitle Editor
Amara subtitle editor will not be able to help you create or generate captions for your video, but it can be a good solution to edit a subtitle file that you already have. It can be very useful in syncing the subtitles with the video and you can use it to make minor changes to the subtitle.
While editing the subtitle file is easy, creating a caption file using Amara can be a lengthy process since you would have to type in the text.
Key Features
- It can be used to edit caption and subtitles files easily
- The user interface is pleasant and easy to use
- It is completely free
Aegisubs
Aegisubs is another tool that you can use to create subtitles for your video. But we must warn you right off the bat that this tool is not very user-friendly and you may find that you will spend a lot of time trying to generate subtitles for your video. But it is a free solution and widely accessible on most platforms.
Key Features
- It can be used to create subtitles and captions in different languages
- It supports numerous video and audio formats
- It has a simple user interface that is easy to navigate
- It doesn’t have speech recognition and you’ll have to enter all the text manually
AHD Subtitle Maker
AHD subtitle maker is a Windows program that can be used to create subtitles and captions for your video in a variety of formats such as SRT. It is a completely free solution that can also be used to edit subtitle files in numerous ways, even changing the format of the file.
Among other things, you can use AHD subtitle maker to translate, change, copy and delete selected text from a subtitle file and even replace the text with something else.
Key Features
- It is a free program that works on all versions of Windows
- It can generate subtitle and caption files in a variety of formats
- You can use it to generate subtitle files or edit existing files in various ways
- It can also be used to generate various types of content including ID3 tags for music files
Videocaptionmaker.com
To generate captions and subtitles on your Mac for free, the best option is Video Caption Maker. The full version of the program is available for free and it can be used to create a subtitle file or make changes to a subtitle file you already have.
Key Features
- You can use it to add text to a video in a simple and straightforward way
- It can also be used to make changes to existing subtitles by changing the fonts, styles, backgrounds, positions, and more
- It will also add a visual waveform to an audio file to identify the start and end time
- It supports numerous video formats including .mov, .mp4, .mpeg, .3gpp, .3gpp2
Jubler
Jubler is a program that can edit subtitles and captions for videos. It can also be used to create new subtitles although it doesn’t automatically generate the captions and you will have to type them in. But when it comes to editing subtitles, this tool is very effective, allowing you to change the font style, color, and even positioning of the subtitles.
Key Features
- It works on all platforms including Windows, Mac, and Linux
- It will graphically display the subtitles so you can easily move them to the desired location
- It supports all subtitle and caption file formats
- It allows you to edit the subtitles in many ways
- It can be used to translate the subtitles to various languages
Related FAQs
**How Do I Make a Caption for a Video?
Making a caption for your video can be easy depending on the type of program you choose to use. A good rule of thumb is to choose solutions that auto generates the captions as they save you a lot of time. If there are issues after the captions have been generated, you can then use a subtitled editor to fix them, more preferable to typing in the subtitles or captions yourself.
**How Do I Get Automatic Captions for my Video?
If you are uploading your video on YouTube, you can easily generate automatic captions from the YouTube studio. Just use these simple steps;
Step 1: Sign in to YouTube Studio and in the left menu, select “Subtitles.”
Step 2: Click on the video that you want to add subtitles
Step 3: Select “More” under Subtitles and then go through the captions to make sure they are correct. If not, you can edit them on this page.
If you are not using YouTube to share your video, you can use one of the solutions we have outlined in this article to generate automatic captions.
**How Long Does It Take to Caption a Video?
The amount of time that you spend creating a caption for your video is entirely dependent on the captioning tool that you use. Automatic caption generators can create captions in a few seconds but manual subtitle tools can lengthen the process, especially for a longer video.
Conclusion
Captions are a great way to get users to engage with your videos. Studies have shown that a captioned video is far more likely to get more engagements and shares on social media. And since it can be very easy to make caption for you video, why not utilize this little known resource and get your videos to stand out a little bit more.
How To Record Screencast From YouTube For Free
How To Record Screencast From YouTube For Free

Max Wales
Mar 27, 2024• Proven solutions
Screencasting is a simple task anyone can do it with ease. All that you need to do is download a software program, press the record button and soon all movements on your device screen video will be recorded. Crazy video gamers do the same thing to share their interesting game videos on YouTube channels.
There is a wide range of software tools that can assists you with screencasting needs. Even YouTube itself has the ability to capture device screens without the need for additional software tool. If you are interested to know how it can be done, simply go through the details below.
Note: We resolutely oppose all forms of copyright-infringing downloads. This tutorial is only for downloading YouTube videos/audio materials from your own channel.
![]()

The All-in-One Screen Recorder & Video Editor
- Record desktop screen, voiceover, and webcam simultaneously
- Edit recorded clips quickly with a wide range of professional tools
- Built-in plentiful templates and effects
- Export to MP4, MOV, MKV, GIF and multiple formats
For Win 7 or later (64-bit)
For macOS 10.12 or later
 Secure Download
Recording Screencast Video with YouTube
Step 1: Open YouTube on your computer and sign by using your Google Account. On the top left corner, you will find the Upload button, press it and go to live streaming section and choose events from the drop-down menu. When you are doing this for the very first time, YouTube will ask your phone number to verify the streaming process. You can also click here to get to the Livestreaming page directly.
Step 2: On the create an event page, add a title for your screencast video; set privacy terms and then hit “Go Live Now” option.

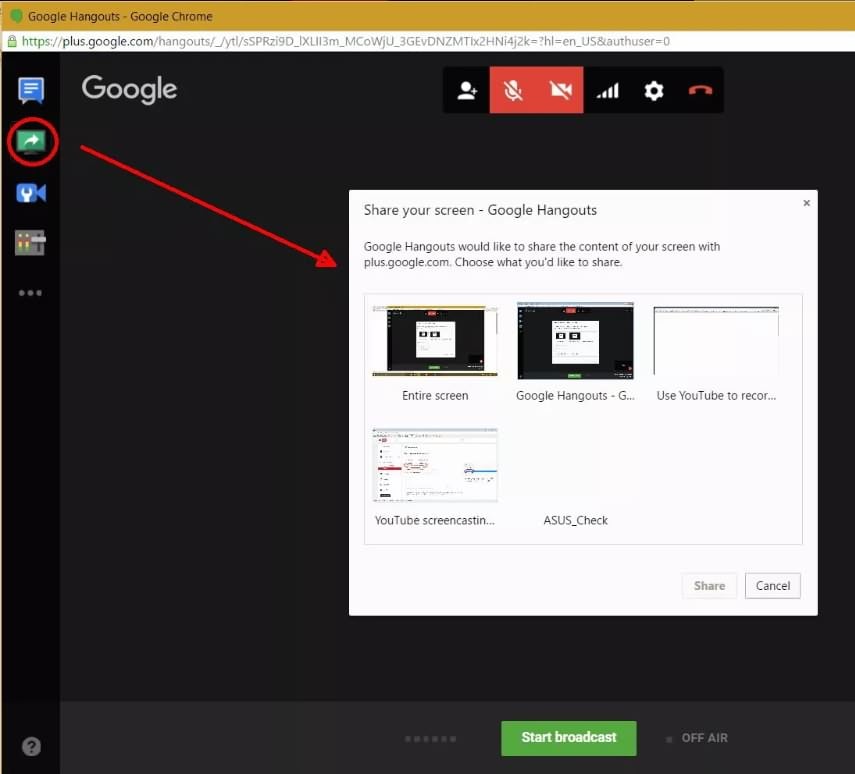
Step 3: The Hangout on Air page will get opened. It will allow you to select-deselect webcam recording as well as mic recording.
Step 4: Hit the screen share button from the left toolbox and choose the desktop window that you wish to record. Now press start the Broadcast button to start screen recording. Note that it is a private session that cannot be watched by anyone else.
Step 5: When your video is ready to go to YouTube video dashboard and choose your recent screencast video. Download it to Google Drive and share it with the world.
A better way to record Screencast and Upload to YouTube
For those who are interested in capturing screencast with high-quality videos and need an easy to use the built-in editor to customize these videos; it is good to look for some dedicated screencast tools. Experts recommend using Wondershare Filmora due to its advanced features and interactive software platform.


Top Features
- Filmora is one of the most interactive software tools that works perfectly on Windows and Mac platforms.
- It supports more than 50 media file formats.
- Filmora allows users to record with Webcam and PC simultaneously.
- It is possible to record audio from mic input and internal computer audio as well.
- With Filmora users can record high paced videos at 120fps.
- Add markers to important frames during recording.
There are so many benefits of using Filmora for YouTube screencast video recordings. The biggest trouble with YouTube based recording is that when you try it for the very first time, YouTube will take 24 hours to verify your account for the live streaming. But by using Filmora, you can do this task instantly at any hour of the day. Another great news is that Fillmore Scrn comes with a built-in video editor that allows users to customize videos with ease. Once your videos are ready, you can share them directly to social media platforms including YouTube, Facebook, Twitch, and Vimeo etc.
Let’s watch the video below to check how to record your screen with Filmora and upload the recorded video to YouTube.
Conclusion
With all impressive features, there is no doubt to say that Filmora can serve your screencasting needs in the best possible manner. Whether you are a crazy gamer interested to share your adventure videos with the world or want to create useful tutorials for your audience, Filmora is your best companion for all your needs.
Max Wales
Max Wales is a writer and a lover of all things video.
Follow @Max Wales
Max Wales
Mar 27, 2024• Proven solutions
Screencasting is a simple task anyone can do it with ease. All that you need to do is download a software program, press the record button and soon all movements on your device screen video will be recorded. Crazy video gamers do the same thing to share their interesting game videos on YouTube channels.
There is a wide range of software tools that can assists you with screencasting needs. Even YouTube itself has the ability to capture device screens without the need for additional software tool. If you are interested to know how it can be done, simply go through the details below.
Note: We resolutely oppose all forms of copyright-infringing downloads. This tutorial is only for downloading YouTube videos/audio materials from your own channel.
![]()
The All-in-One Screen Recorder & Video Editor
- Record desktop screen, voiceover, and webcam simultaneously
- Edit recorded clips quickly with a wide range of professional tools
- Built-in plentiful templates and effects
- Export to MP4, MOV, MKV, GIF and multiple formats
For Win 7 or later (64-bit)
For macOS 10.12 or later
Secure Download
Recording Screencast Video with YouTube
Step 1: Open YouTube on your computer and sign by using your Google Account. On the top left corner, you will find the Upload button, press it and go to live streaming section and choose events from the drop-down menu. When you are doing this for the very first time, YouTube will ask your phone number to verify the streaming process. You can also click here to get to the Livestreaming page directly.
Step 2: On the create an event page, add a title for your screencast video; set privacy terms and then hit “Go Live Now” option.
Step 3: The Hangout on Air page will get opened. It will allow you to select-deselect webcam recording as well as mic recording.
Step 4: Hit the screen share button from the left toolbox and choose the desktop window that you wish to record. Now press start the Broadcast button to start screen recording. Note that it is a private session that cannot be watched by anyone else.
Step 5: When your video is ready to go to YouTube video dashboard and choose your recent screencast video. Download it to Google Drive and share it with the world.
A better way to record Screencast and Upload to YouTube
For those who are interested in capturing screencast with high-quality videos and need an easy to use the built-in editor to customize these videos; it is good to look for some dedicated screencast tools. Experts recommend using Wondershare Filmora due to its advanced features and interactive software platform.
Top Features
- Filmora is one of the most interactive software tools that works perfectly on Windows and Mac platforms.
- It supports more than 50 media file formats.
- Filmora allows users to record with Webcam and PC simultaneously.
- It is possible to record audio from mic input and internal computer audio as well.
- With Filmora users can record high paced videos at 120fps.
- Add markers to important frames during recording.
There are so many benefits of using Filmora for YouTube screencast video recordings. The biggest trouble with YouTube based recording is that when you try it for the very first time, YouTube will take 24 hours to verify your account for the live streaming. But by using Filmora, you can do this task instantly at any hour of the day. Another great news is that Fillmore Scrn comes with a built-in video editor that allows users to customize videos with ease. Once your videos are ready, you can share them directly to social media platforms including YouTube, Facebook, Twitch, and Vimeo etc.
Let’s watch the video below to check how to record your screen with Filmora and upload the recorded video to YouTube.
Conclusion
With all impressive features, there is no doubt to say that Filmora can serve your screencasting needs in the best possible manner. Whether you are a crazy gamer interested to share your adventure videos with the world or want to create useful tutorials for your audience, Filmora is your best companion for all your needs.
Max Wales
Max Wales is a writer and a lover of all things video.
Follow @Max Wales
Also read:
- [New] Data Deluge Infographics on YouTube's Intriguing Insights
- [New] In 2024, Leapfrogging to Photo Editing Mastery with LunaPic
- 2024 Approved Premium Online Streams Convert YouTube to MP3 Instantly
- 2024 Approved The Ultimate Guide to Slowing YouTube Videos (37 Chars)
- Effective Strategies for Windows File Sharing: Expert Tips From YL Computing
- Global Easter Salutations in Various Tongues
- How Much Do You Earn When a Million Watch Youtube for 2024
- How to Sign Excel 2021 Online with DigiSigner
- In 2024, Getting Started on YouTube Broadcasts Using OBS
- In 2024, How to share/fake gps on Uber for Realme C67 5G | Dr.fone
- In 2024, Streamline Your YouTube Presence Using Premiere Pro
- In 2024, The Ultimate Guide to Get the Rare Candy on Pokemon Go Fire Red On Vivo S18 Pro | Dr.fone
- Minecraft Multiplayer Woes? Here's How to Get Your LAN Up and Running
- Troubleshooting and Fixes for Overcoming TFLA0002 Error on Windows
- Title: Live Speech to Text Converter for 2024
- Author: Joseph
- Created at : 2024-12-27 16:42:25
- Updated at : 2025-01-03 18:28:27
- Link: https://youtube-stream.techidaily.com/live-speech-to-text-converter-for-2024/
- License: This work is licensed under CC BY-NC-SA 4.0.