
"In 2024, Unleash Your YouTube Playlists A Comprehensive Guide"
Unleash Your YouTube Playlists: A Comprehensive Guide
How to Download YouTube Playlist-Step by Step

Richard Bennett
Mar 27, 2024• Proven solutions
As we all agree, YouTube is the most dominant content provider on the internet. And, most of us rely on YouTube for creating or streaming video content. However, streaming playlists on YouTube can drain your data, and sometimes the internet connection can mess up the whole experience. However, you can always download YouTube playlist to enjoy pause-free streaming. Such downloaded YouTube playlists can be streamed limitlessly anywhere without an internet connection.
Now, with the advent of the YouTube playlist downloader apps, saving your favorite playlists with a single click has been made easier.
This article will show you how to convert a YouTube playlist to MP3 or MP4.
- Part 1: How to Download YouTube Playlist for Free
- Part 2: Bonus Tip-How to Make Your Own YouTube Video
Note: We resolutely oppose all forms of copyright-infringing downloads. This tutorial is only for downloading YouTube videos/audio materials from your own channel.
Part 1: How to Download YouTube Playlist for Free
If you are looking for a powerful YouTube playlist downloader, ddownr is your best bet. With ddownr, you can easily and instantly batch download YouTube playlist. Moreover, you can customize the output format.
Here are the steps to use this easy-going YouTube playlist downloader.
1. Open ddownr.com on your web browser.

2. Copy the YouTube playlist’s link.

3. Paste the copied URL into the text box on ddownr and click on Download. Then, select the output format.

4. The selected playlist will start loading. Upon completion, click on Download, and you will be directed to another window. Note that you can download multiple playlists together.

5. In this window, tap on Download.

6. Finally, the process to convert YouTube to MP3 or any other format selected will start and save the playlist to your device upon completion.

Part 2: Bonus Tip-How to Make Your Own YouTube Video
An easy way to craft your own engaging YouTube videos is through the very powerful video editor, Wondershare Filmora. With an incredibly simple and user-friendly interface, Filmora offers a wide array of professional-grade tools. With a single click, you can add keyframe animations or motion graphics to your videos. Also, a variety of aesthetics filters and overlays further enhance and make the videos perfect.


1. First, download and install Wondershare Filmora on your PC and launch it. On the main interface, click on the File tab and tap on Import Media Files.

2. After importing, drag and drop the media file/s to the timeline. From the Audio tab, select a song to compliment your video or just import your own music.

3. In the Titles tab, there are a variety of animated text templates. Choose one and add it to the timeline above the video track. Double-click on the title in the timeline to customize the text, font, color, style, size, and much more.

4. From the Transition tab, add dynamic and cinematic transitions to your video.

5. You can select some striking Filters from the Effects You can also adjust the duration of the filter by dragging the filter in the timeline.

6. Choose a creative Overlay like frame, old film, or damaged film from the Effects.

7. From the Elements tab, you can add animation, stickers, or emojis or make your video more compelling.

8. Finally, click on Export. Customize the resolution and either save the file locally or export it to your social media account.

CONCLUSION
Finally, you can enjoy unlimited and hassle-free streaming anytime and anywhere. Thanks to the YouTube playlist downloader, all your favorites can be saved to your device and even shared to other devices.
The ddownr YouTube playlist downloader is sure to make your life easier and your streaming experiences seamless. No need to download every song separately or worry about unsafe sites. With ddownr, you can quickly download YouTube playlist, and that too for free. And no matter which device you are using, this YouTube playlist downloader works fine on a variety of commonly used devices. So, go ahead and start using the ultimate YouTube playlist downloader.
Richard Bennett
Richard Bennett is a writer and a lover of all things video.
Follow @Richard Bennett
Richard Bennett
Mar 27, 2024• Proven solutions
As we all agree, YouTube is the most dominant content provider on the internet. And, most of us rely on YouTube for creating or streaming video content. However, streaming playlists on YouTube can drain your data, and sometimes the internet connection can mess up the whole experience. However, you can always download YouTube playlist to enjoy pause-free streaming. Such downloaded YouTube playlists can be streamed limitlessly anywhere without an internet connection.
Now, with the advent of the YouTube playlist downloader apps, saving your favorite playlists with a single click has been made easier.
This article will show you how to convert a YouTube playlist to MP3 or MP4.
- Part 1: How to Download YouTube Playlist for Free
- Part 2: Bonus Tip-How to Make Your Own YouTube Video
Note: We resolutely oppose all forms of copyright-infringing downloads. This tutorial is only for downloading YouTube videos/audio materials from your own channel.
Part 1: How to Download YouTube Playlist for Free
If you are looking for a powerful YouTube playlist downloader, ddownr is your best bet. With ddownr, you can easily and instantly batch download YouTube playlist. Moreover, you can customize the output format.
Here are the steps to use this easy-going YouTube playlist downloader.
1. Open ddownr.com on your web browser.
2. Copy the YouTube playlist’s link.
3. Paste the copied URL into the text box on ddownr and click on Download. Then, select the output format.
4. The selected playlist will start loading. Upon completion, click on Download, and you will be directed to another window. Note that you can download multiple playlists together.
5. In this window, tap on Download.
6. Finally, the process to convert YouTube to MP3 or any other format selected will start and save the playlist to your device upon completion.
Part 2: Bonus Tip-How to Make Your Own YouTube Video
An easy way to craft your own engaging YouTube videos is through the very powerful video editor, Wondershare Filmora. With an incredibly simple and user-friendly interface, Filmora offers a wide array of professional-grade tools. With a single click, you can add keyframe animations or motion graphics to your videos. Also, a variety of aesthetics filters and overlays further enhance and make the videos perfect.
1. First, download and install Wondershare Filmora on your PC and launch it. On the main interface, click on the File tab and tap on Import Media Files.
2. After importing, drag and drop the media file/s to the timeline. From the Audio tab, select a song to compliment your video or just import your own music.
3. In the Titles tab, there are a variety of animated text templates. Choose one and add it to the timeline above the video track. Double-click on the title in the timeline to customize the text, font, color, style, size, and much more.

4. From the Transition tab, add dynamic and cinematic transitions to your video.
5. You can select some striking Filters from the Effects You can also adjust the duration of the filter by dragging the filter in the timeline.
6. Choose a creative Overlay like frame, old film, or damaged film from the Effects.
7. From the Elements tab, you can add animation, stickers, or emojis or make your video more compelling.
8. Finally, click on Export. Customize the resolution and either save the file locally or export it to your social media account.
CONCLUSION
Finally, you can enjoy unlimited and hassle-free streaming anytime and anywhere. Thanks to the YouTube playlist downloader, all your favorites can be saved to your device and even shared to other devices.
The ddownr YouTube playlist downloader is sure to make your life easier and your streaming experiences seamless. No need to download every song separately or worry about unsafe sites. With ddownr, you can quickly download YouTube playlist, and that too for free. And no matter which device you are using, this YouTube playlist downloader works fine on a variety of commonly used devices. So, go ahead and start using the ultimate YouTube playlist downloader.
Richard Bennett
Richard Bennett is a writer and a lover of all things video.
Follow @Richard Bennett
Richard Bennett
Mar 27, 2024• Proven solutions
As we all agree, YouTube is the most dominant content provider on the internet. And, most of us rely on YouTube for creating or streaming video content. However, streaming playlists on YouTube can drain your data, and sometimes the internet connection can mess up the whole experience. However, you can always download YouTube playlist to enjoy pause-free streaming. Such downloaded YouTube playlists can be streamed limitlessly anywhere without an internet connection.
Now, with the advent of the YouTube playlist downloader apps, saving your favorite playlists with a single click has been made easier.
This article will show you how to convert a YouTube playlist to MP3 or MP4.
- Part 1: How to Download YouTube Playlist for Free
- Part 2: Bonus Tip-How to Make Your Own YouTube Video
Note: We resolutely oppose all forms of copyright-infringing downloads. This tutorial is only for downloading YouTube videos/audio materials from your own channel.
Part 1: How to Download YouTube Playlist for Free
If you are looking for a powerful YouTube playlist downloader, ddownr is your best bet. With ddownr, you can easily and instantly batch download YouTube playlist. Moreover, you can customize the output format.
Here are the steps to use this easy-going YouTube playlist downloader.
1. Open ddownr.com on your web browser.
2. Copy the YouTube playlist’s link.
3. Paste the copied URL into the text box on ddownr and click on Download. Then, select the output format.
4. The selected playlist will start loading. Upon completion, click on Download, and you will be directed to another window. Note that you can download multiple playlists together.
5. In this window, tap on Download.
6. Finally, the process to convert YouTube to MP3 or any other format selected will start and save the playlist to your device upon completion.
Part 2: Bonus Tip-How to Make Your Own YouTube Video
An easy way to craft your own engaging YouTube videos is through the very powerful video editor, Wondershare Filmora. With an incredibly simple and user-friendly interface, Filmora offers a wide array of professional-grade tools. With a single click, you can add keyframe animations or motion graphics to your videos. Also, a variety of aesthetics filters and overlays further enhance and make the videos perfect.
1. First, download and install Wondershare Filmora on your PC and launch it. On the main interface, click on the File tab and tap on Import Media Files.
2. After importing, drag and drop the media file/s to the timeline. From the Audio tab, select a song to compliment your video or just import your own music.
3. In the Titles tab, there are a variety of animated text templates. Choose one and add it to the timeline above the video track. Double-click on the title in the timeline to customize the text, font, color, style, size, and much more.
4. From the Transition tab, add dynamic and cinematic transitions to your video.
5. You can select some striking Filters from the Effects You can also adjust the duration of the filter by dragging the filter in the timeline.
6. Choose a creative Overlay like frame, old film, or damaged film from the Effects.
7. From the Elements tab, you can add animation, stickers, or emojis or make your video more compelling.
8. Finally, click on Export. Customize the resolution and either save the file locally or export it to your social media account.
CONCLUSION
Finally, you can enjoy unlimited and hassle-free streaming anytime and anywhere. Thanks to the YouTube playlist downloader, all your favorites can be saved to your device and even shared to other devices.
The ddownr YouTube playlist downloader is sure to make your life easier and your streaming experiences seamless. No need to download every song separately or worry about unsafe sites. With ddownr, you can quickly download YouTube playlist, and that too for free. And no matter which device you are using, this YouTube playlist downloader works fine on a variety of commonly used devices. So, go ahead and start using the ultimate YouTube playlist downloader.
Richard Bennett
Richard Bennett is a writer and a lover of all things video.
Follow @Richard Bennett
Step-by-Step Tutorial: Broadcasting 360 Video on YouTube Live
How to live streaming 360 video to youtube
Richard Bennett
Mar 27, 2024• Proven solutions
- Part1.Stream 360 to Youtube via Ricoh Theta S and OBS on PC
- Part2.Live Stream from Allie 360 Camera to YouTube on Mobile
1. Stream 360 to Youtube via Ricoh Theta S and OBS on PC
Step 1: First of all you need to get ready with your Ricoh Theta S 360 camera unit.
Step 2: Now visit the official website of Theta 360 in order to download your dedicated live streaming application.
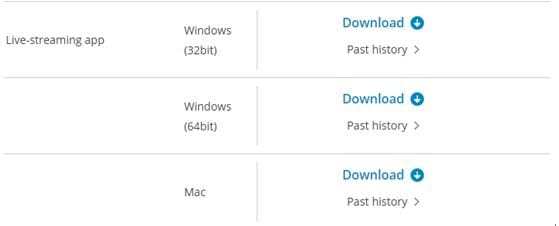
Step 3: Get your application and install it on your Mac or PC as per need.
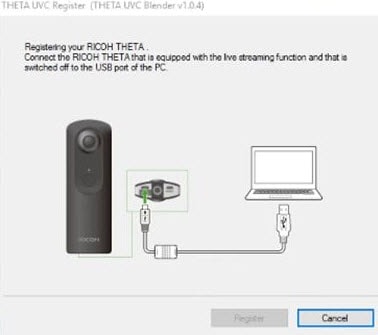
Step 4: It is time to plug in to your Ricoh Theta S 360 camera using your PC.
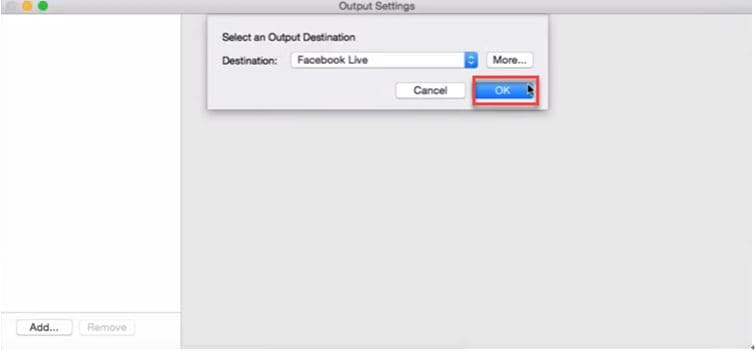
Step 5: Now select your device ‘Ricoh Theta S’ and then hit Okay.
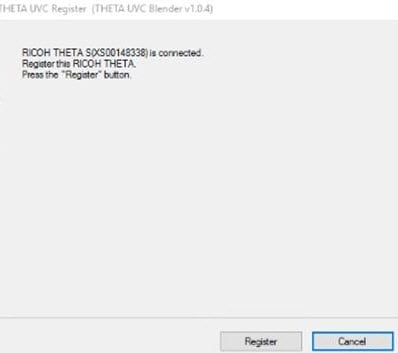
Step 6: You will find option to register to application with your respective device. Select and hit register.
Step 7: As soon as your registration process is complete then un-plug your USB cable.
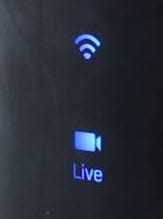
Step 8: It is time to turn the Ricoh Theta device to Live Mode; you simple need to press the top power and lower video button simultaneously to directly switch to the live mode.
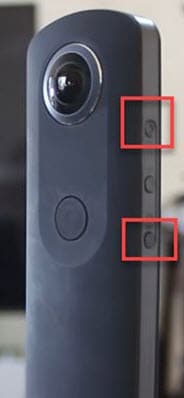
Step 9: Once your device enters into Live Stream mode then a Led will start blinking on your device that represents your device is live at this moment.
Step 10: Now you need to plug in the USB cable again with your computer.
Step 11: Visit the official site of OBS and download your software; install it on your system.
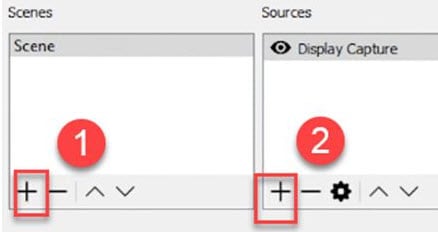
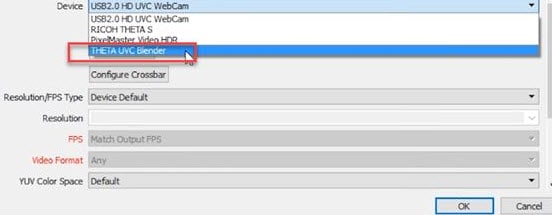
Step 12: Go to create scene option and then switch to create sources.
Step 13: Select video capture device as your source from drop down menu.
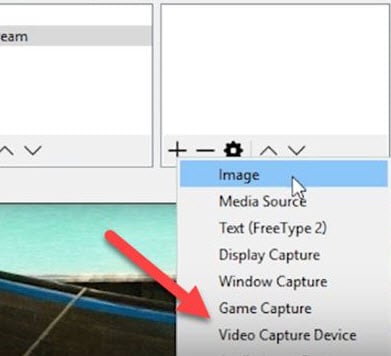
Step 14: Now from available list select Theta UVC as your active video capture source.
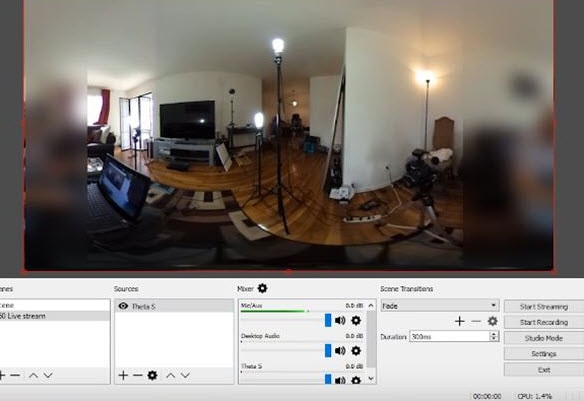
Step 15: You need to adjust screen as per your requirements.
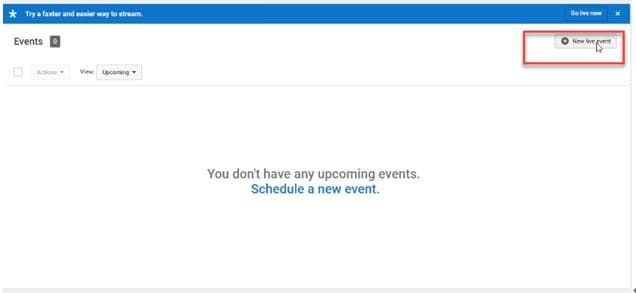
Step 16: Now move to YouTube and then hit New Live Events option.
Step 17: Complete the basic information.
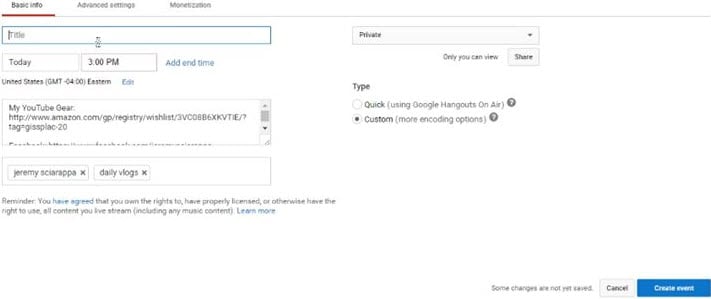
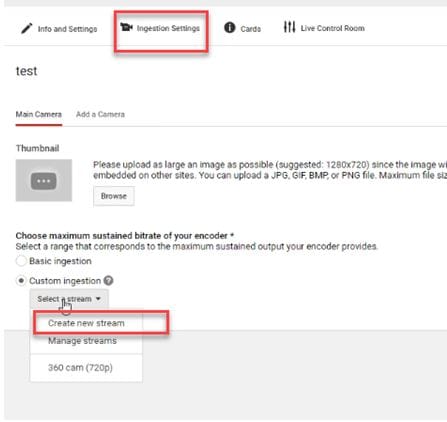
Step 18: You need to move to advanced settings now; select 360 live stream option and then create event.
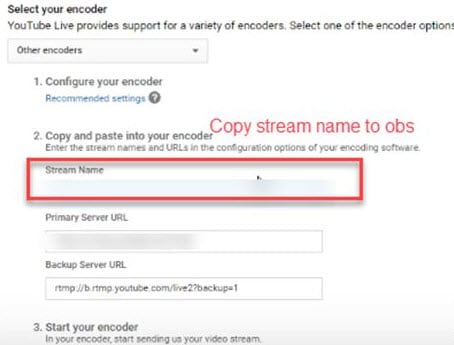
Step 19: Now complete the ingesting settings and finally select create new stream option.

Step 20: As soon as your event is created then you will be able to find your stream name on screen, copy it and simply paste it on OBS window.
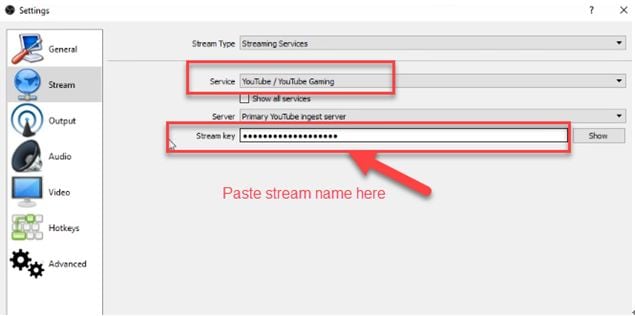
Step 21: It is time to return to OBS settings and then you need to paste that copied name on stream key option.
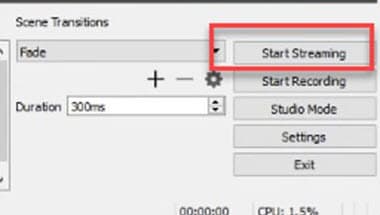
Step 22: Once all above settings are complete then click start stream option from your OBS window and you will soon be able to find your 360 live on YouTube.
2.Live Stream from Allie 360 Camera to YouTube on Mobile
Step 1: Get ready with your Allie 360 camera unit.
Step 2: Visit YouTube and then hit the option to create your live event.
Step 3: It is time to download your Allie Application and then get it installed on your device.
- Prefer to use this link if you are working on iOS: https://itunes.apple.com/app/allie-home/id1063986074
- Android users need to visit: https://play.google.com/store/apps/details?id=com.icrealtime.allie
Step 4: As soon as you have downloaded your app then simply turn on the Bluetooth, Wi-Fi and air plane mode on your device.
Step 5: Simply open your Allie application and then connect your camera.

Step 6: Now users need to hit stream icon on screen.
![]()
Step 7: You will be asked to fill the necessary information about your video. It is also possible to make adjustments regarding video quality. Once you are done with all required settings then hit Submit option.

Step 8: Soon your video will become live; note that you can also share your live video via SNS platform with other viewers.
Richard Bennett
Richard Bennett is a writer and a lover of all things video.
Follow @Richard Bennett
Richard Bennett
Mar 27, 2024• Proven solutions
- Part1.Stream 360 to Youtube via Ricoh Theta S and OBS on PC
- Part2.Live Stream from Allie 360 Camera to YouTube on Mobile
1. Stream 360 to Youtube via Ricoh Theta S and OBS on PC
Step 1: First of all you need to get ready with your Ricoh Theta S 360 camera unit.
Step 2: Now visit the official website of Theta 360 in order to download your dedicated live streaming application.
Step 3: Get your application and install it on your Mac or PC as per need.
Step 4: It is time to plug in to your Ricoh Theta S 360 camera using your PC.
Step 5: Now select your device ‘Ricoh Theta S’ and then hit Okay.
Step 6: You will find option to register to application with your respective device. Select and hit register.
Step 7: As soon as your registration process is complete then un-plug your USB cable.
Step 8: It is time to turn the Ricoh Theta device to Live Mode; you simple need to press the top power and lower video button simultaneously to directly switch to the live mode.
Step 9: Once your device enters into Live Stream mode then a Led will start blinking on your device that represents your device is live at this moment.
Step 10: Now you need to plug in the USB cable again with your computer.
Step 11: Visit the official site of OBS and download your software; install it on your system.
Step 12: Go to create scene option and then switch to create sources.
Step 13: Select video capture device as your source from drop down menu.
Step 14: Now from available list select Theta UVC as your active video capture source.
Step 15: You need to adjust screen as per your requirements.
Step 16: Now move to YouTube and then hit New Live Events option.
Step 17: Complete the basic information.
Step 18: You need to move to advanced settings now; select 360 live stream option and then create event.
Step 19: Now complete the ingesting settings and finally select create new stream option.
Step 20: As soon as your event is created then you will be able to find your stream name on screen, copy it and simply paste it on OBS window.
Step 21: It is time to return to OBS settings and then you need to paste that copied name on stream key option.
Step 22: Once all above settings are complete then click start stream option from your OBS window and you will soon be able to find your 360 live on YouTube.
2.Live Stream from Allie 360 Camera to YouTube on Mobile
Step 1: Get ready with your Allie 360 camera unit.
Step 2: Visit YouTube and then hit the option to create your live event.
Step 3: It is time to download your Allie Application and then get it installed on your device.
- Prefer to use this link if you are working on iOS: https://itunes.apple.com/app/allie-home/id1063986074
- Android users need to visit: https://play.google.com/store/apps/details?id=com.icrealtime.allie
Step 4: As soon as you have downloaded your app then simply turn on the Bluetooth, Wi-Fi and air plane mode on your device.
Step 5: Simply open your Allie application and then connect your camera.
Step 6: Now users need to hit stream icon on screen.
![]()
Step 7: You will be asked to fill the necessary information about your video. It is also possible to make adjustments regarding video quality. Once you are done with all required settings then hit Submit option.
Step 8: Soon your video will become live; note that you can also share your live video via SNS platform with other viewers.
Richard Bennett
Richard Bennett is a writer and a lover of all things video.
Follow @Richard Bennett
Richard Bennett
Mar 27, 2024• Proven solutions
- Part1.Stream 360 to Youtube via Ricoh Theta S and OBS on PC
- Part2.Live Stream from Allie 360 Camera to YouTube on Mobile
1. Stream 360 to Youtube via Ricoh Theta S and OBS on PC
Step 1: First of all you need to get ready with your Ricoh Theta S 360 camera unit.
Step 2: Now visit the official website of Theta 360 in order to download your dedicated live streaming application.
Step 3: Get your application and install it on your Mac or PC as per need.
Step 4: It is time to plug in to your Ricoh Theta S 360 camera using your PC.
Step 5: Now select your device ‘Ricoh Theta S’ and then hit Okay.
Step 6: You will find option to register to application with your respective device. Select and hit register.
Step 7: As soon as your registration process is complete then un-plug your USB cable.
Step 8: It is time to turn the Ricoh Theta device to Live Mode; you simple need to press the top power and lower video button simultaneously to directly switch to the live mode.
Step 9: Once your device enters into Live Stream mode then a Led will start blinking on your device that represents your device is live at this moment.
Step 10: Now you need to plug in the USB cable again with your computer.
Step 11: Visit the official site of OBS and download your software; install it on your system.
Step 12: Go to create scene option and then switch to create sources.
Step 13: Select video capture device as your source from drop down menu.
Step 14: Now from available list select Theta UVC as your active video capture source.
Step 15: You need to adjust screen as per your requirements.
Step 16: Now move to YouTube and then hit New Live Events option.
Step 17: Complete the basic information.
Step 18: You need to move to advanced settings now; select 360 live stream option and then create event.
Step 19: Now complete the ingesting settings and finally select create new stream option.
Step 20: As soon as your event is created then you will be able to find your stream name on screen, copy it and simply paste it on OBS window.
Step 21: It is time to return to OBS settings and then you need to paste that copied name on stream key option.
Step 22: Once all above settings are complete then click start stream option from your OBS window and you will soon be able to find your 360 live on YouTube.
2.Live Stream from Allie 360 Camera to YouTube on Mobile
Step 1: Get ready with your Allie 360 camera unit.
Step 2: Visit YouTube and then hit the option to create your live event.
Step 3: It is time to download your Allie Application and then get it installed on your device.
- Prefer to use this link if you are working on iOS: https://itunes.apple.com/app/allie-home/id1063986074
- Android users need to visit: https://play.google.com/store/apps/details?id=com.icrealtime.allie
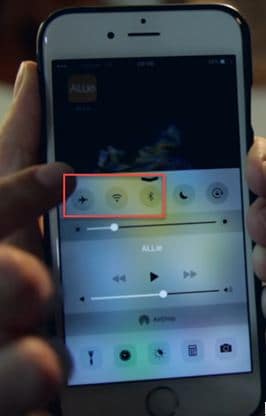
Step 4: As soon as you have downloaded your app then simply turn on the Bluetooth, Wi-Fi and air plane mode on your device.
Step 5: Simply open your Allie application and then connect your camera.
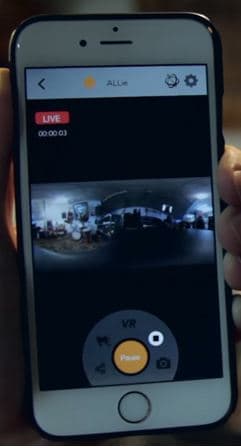
Step 6: Now users need to hit stream icon on screen.
![]()
Step 7: You will be asked to fill the necessary information about your video. It is also possible to make adjustments regarding video quality. Once you are done with all required settings then hit Submit option.
Step 8: Soon your video will become live; note that you can also share your live video via SNS platform with other viewers.
Richard Bennett
Richard Bennett is a writer and a lover of all things video.
Follow @Richard Bennett
Richard Bennett
Mar 27, 2024• Proven solutions
- Part1.Stream 360 to Youtube via Ricoh Theta S and OBS on PC
- Part2.Live Stream from Allie 360 Camera to YouTube on Mobile
1. Stream 360 to Youtube via Ricoh Theta S and OBS on PC
Step 1: First of all you need to get ready with your Ricoh Theta S 360 camera unit.
Step 2: Now visit the official website of Theta 360 in order to download your dedicated live streaming application.
Step 3: Get your application and install it on your Mac or PC as per need.
Step 4: It is time to plug in to your Ricoh Theta S 360 camera using your PC.
Step 5: Now select your device ‘Ricoh Theta S’ and then hit Okay.
Step 6: You will find option to register to application with your respective device. Select and hit register.
Step 7: As soon as your registration process is complete then un-plug your USB cable.
Step 8: It is time to turn the Ricoh Theta device to Live Mode; you simple need to press the top power and lower video button simultaneously to directly switch to the live mode.
Step 9: Once your device enters into Live Stream mode then a Led will start blinking on your device that represents your device is live at this moment.
Step 10: Now you need to plug in the USB cable again with your computer.
Step 11: Visit the official site of OBS and download your software; install it on your system.
Step 12: Go to create scene option and then switch to create sources.
Step 13: Select video capture device as your source from drop down menu.
Step 14: Now from available list select Theta UVC as your active video capture source.
Step 15: You need to adjust screen as per your requirements.
Step 16: Now move to YouTube and then hit New Live Events option.
Step 17: Complete the basic information.
Step 18: You need to move to advanced settings now; select 360 live stream option and then create event.
Step 19: Now complete the ingesting settings and finally select create new stream option.
Step 20: As soon as your event is created then you will be able to find your stream name on screen, copy it and simply paste it on OBS window.
Step 21: It is time to return to OBS settings and then you need to paste that copied name on stream key option.
Step 22: Once all above settings are complete then click start stream option from your OBS window and you will soon be able to find your 360 live on YouTube.
2.Live Stream from Allie 360 Camera to YouTube on Mobile
Step 1: Get ready with your Allie 360 camera unit.
Step 2: Visit YouTube and then hit the option to create your live event.
Step 3: It is time to download your Allie Application and then get it installed on your device.
- Prefer to use this link if you are working on iOS: https://itunes.apple.com/app/allie-home/id1063986074
- Android users need to visit: https://play.google.com/store/apps/details?id=com.icrealtime.allie
Step 4: As soon as you have downloaded your app then simply turn on the Bluetooth, Wi-Fi and air plane mode on your device.
Step 5: Simply open your Allie application and then connect your camera.
Step 6: Now users need to hit stream icon on screen.
![]()
Step 7: You will be asked to fill the necessary information about your video. It is also possible to make adjustments regarding video quality. Once you are done with all required settings then hit Submit option.
Step 8: Soon your video will become live; note that you can also share your live video via SNS platform with other viewers.
Richard Bennett
Richard Bennett is a writer and a lover of all things video.
Follow @Richard Bennett
Also read:
- [New] EasyRecorder Pro Free Gamers' Recording Aid
- [New] Expert Tips Migrating Twitch Videos to YouTube
- [New] Maximize Video Impact via Creator Studio Utilization
- 2024 Approved Hilarious YouTube Moments Top 10 Quirky Short Film Concepts
- 2024 Approved Top 7 Best Fmovie Alternatives[2023 Updates]
- Enhanced Personalization with Advanced Analytics: The Secret Behind Successful Websites
- In 2024, Finding the Perfect Recorders Outside Microsoft's Ecosystem
- In 2024, Masterclass Crafting Cinematic YouTube Videos with Adobe Premiere
- In 2024, Prevent Cross-Site Tracking on Apple iPhone 12 mini and Browser | Dr.fone
- In 2024, The Solo Creator’s Path to Dynamic Animation Art
- In 2024, Top 10 AirPlay Apps in Nokia C110 for Streaming | Dr.fone
- What is Fake GPS Location Pro and Is It Good On Realme Narzo N53? | Dr.fone
- Wireless Presentation: Projecting Windows Desktop Onto Television with Google's Chromecast
- Title: In 2024, Unleash Your YouTube Playlists A Comprehensive Guide
- Author: Joseph
- Created at : 2024-10-24 16:28:29
- Updated at : 2024-10-29 22:22:20
- Link: https://youtube-stream.techidaily.com/in-2024-unleash-your-youtube-playlists-a-comprehensive-guide/
- License: This work is licensed under CC BY-NC-SA 4.0.