
In 2024, Transform Your Games Into a Live Stream Spectacle
Transform Your Games Into a Live Stream Spectacle
How to Live Stream on YouTube Gaming?

Richard Bennett
Mar 27, 2024• Proven solutions
1. Live Stream on YouTube Gaming with OBS
You need to follow these simple Step s to use OBS for YouTube Live Streaming:
**Step 1:**First of all you need to login to your YouTube account. You might be aware of the fact that same YouTube account is used for YouTube gaming needs.
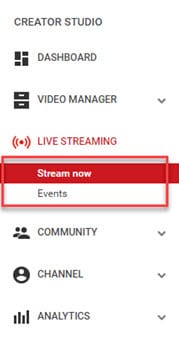
**Step 2:**Once entered inside your account then you need to visit the Go live streaming options and then from drop down menu simply choose Stream Now option.
**Step 3:**It is time to fill the details on screen; put impressive words for your live stream description so that it can grab attention of more viewers. Then select category as ‘Gaming’.

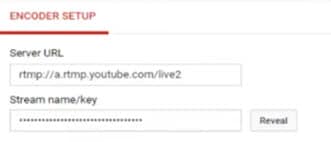
**Step 4:**Now you need to copy the stream key.
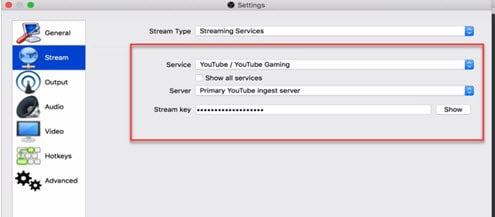
**Step 5:**Now open your OBS tool and then select YouTube as your active game streaming service. Users here need to paste that copied streaming key of Step 5 into the space provided on OBS settings page.
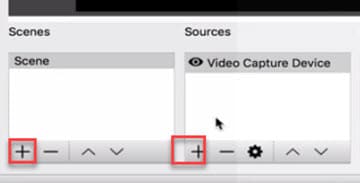
**Step 6:**It is time to make your desktop a video source.
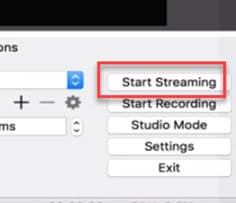
**Step 7:**Once all these settings are completed then you need to hit the start streaming option.
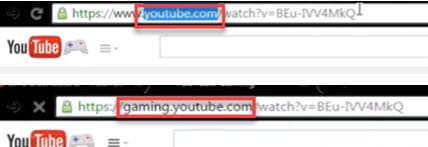
**Step 8:**The service may take few seconds to bring your live on YouTube and after this small duration you will be connected to your channel with your streamed content. Then change your url from youtube.com to gaming.youtube.com
**Step 9:**You are all set to be live on your YouTube gaming profile.
2. Live Stream on YouTube with Elgato Game Capture HD
A: Basic Settings for Elgato Game Capture HD
The Step s below will help you to get ready for streaming with all basic settings that are required by Elgato Game Capture HD tool.
**Step 1:**First of all, you need to open your browser, search for Elgato Game Capture HD software on its official website and then download it for your system. Get it installed.
**Step 2:**Once installation process is complete then launch your software.
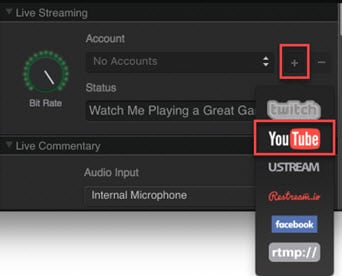
**Step 3:**Now you need to hit the add button on screen and select YouTube from drop down menu.
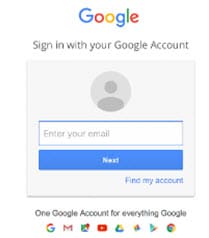
Step 4: It is time to sign in with your Google Account.
**Step 5:**After sign up process, allow the Elgato Game Capture tool to make connection with your YouTube account.

**Step 6:**Soon you will be able to access you account from Elgato platform.

**Step 7:**It is time to make adjustments for streaming settings.
B: Test your Bandwidth and make adjustments for Stream settings
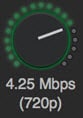
It is essential to check speed of your internet connection during live streaming because if it goes slow then your content will become annoying to viewers and it will decay the reputation of your channel. So prefer to use following Step s to complete the basic settings and to test your internet connection.
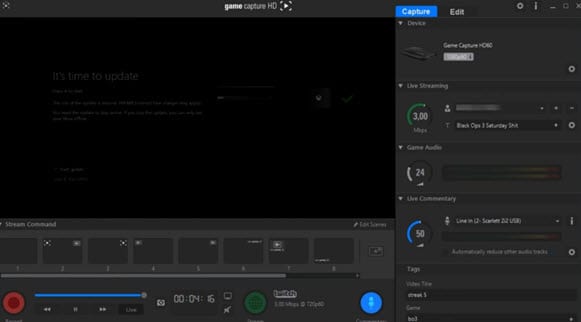
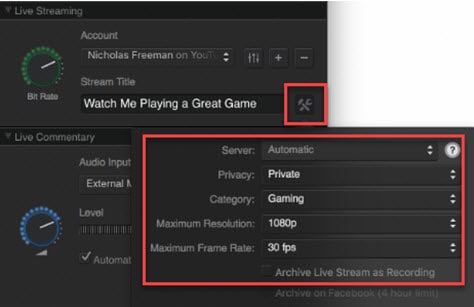
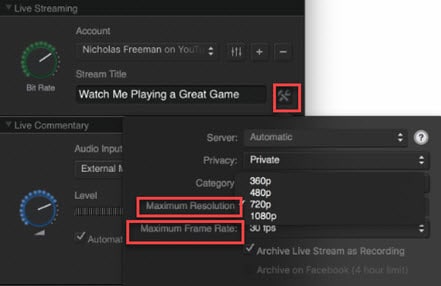
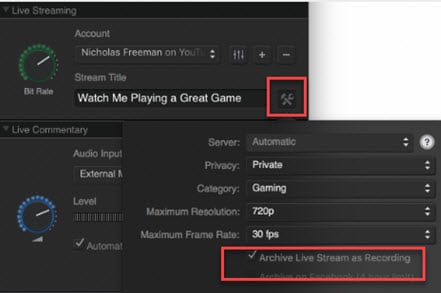
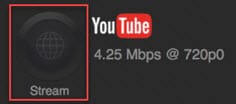
**Step 1:**Open your browser and then visit the speedtest.net platform. You can also use other similar kind of websites to ensure the speed of your internet. Note that you will find a Bit Rate dial in the live streaming section, here you can make adjustments for bit rates to bring it to desired level.
**Step 2:**It is also possible to make customized settings for frame rate and resolution as per need of your stream content.
**Step 3:**One can also prefer to archive his streaming.
**Step 4:**As soon as you have completed all above settings then you need to hit the stream button on screen.
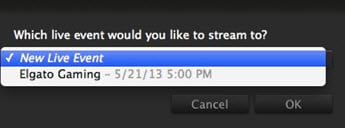
**Step 5:**Soon your software will ask you to select the event that you want to stream, choose your desired event and then press Ok. Soon you will be live on YouTube.
Richard Bennett
Richard Bennett is a writer and a lover of all things video.
Follow @Richard Bennett
Richard Bennett
Mar 27, 2024• Proven solutions
1. Live Stream on YouTube Gaming with OBS
You need to follow these simple Step s to use OBS for YouTube Live Streaming:
**Step 1:**First of all you need to login to your YouTube account. You might be aware of the fact that same YouTube account is used for YouTube gaming needs.
**Step 2:**Once entered inside your account then you need to visit the Go live streaming options and then from drop down menu simply choose Stream Now option.
**Step 3:**It is time to fill the details on screen; put impressive words for your live stream description so that it can grab attention of more viewers. Then select category as ‘Gaming’.
**Step 4:**Now you need to copy the stream key.

**Step 5:**Now open your OBS tool and then select YouTube as your active game streaming service. Users here need to paste that copied streaming key of Step 5 into the space provided on OBS settings page.
**Step 6:**It is time to make your desktop a video source.
**Step 7:**Once all these settings are completed then you need to hit the start streaming option.
**Step 8:**The service may take few seconds to bring your live on YouTube and after this small duration you will be connected to your channel with your streamed content. Then change your url from youtube.com to gaming.youtube.com
**Step 9:**You are all set to be live on your YouTube gaming profile.
2. Live Stream on YouTube with Elgato Game Capture HD
A: Basic Settings for Elgato Game Capture HD
The Step s below will help you to get ready for streaming with all basic settings that are required by Elgato Game Capture HD tool.
**Step 1:**First of all, you need to open your browser, search for Elgato Game Capture HD software on its official website and then download it for your system. Get it installed.
**Step 2:**Once installation process is complete then launch your software.
**Step 3:**Now you need to hit the add button on screen and select YouTube from drop down menu.
Step 4: It is time to sign in with your Google Account.
**Step 5:**After sign up process, allow the Elgato Game Capture tool to make connection with your YouTube account.
**Step 6:**Soon you will be able to access you account from Elgato platform.
**Step 7:**It is time to make adjustments for streaming settings.
B: Test your Bandwidth and make adjustments for Stream settings
It is essential to check speed of your internet connection during live streaming because if it goes slow then your content will become annoying to viewers and it will decay the reputation of your channel. So prefer to use following Step s to complete the basic settings and to test your internet connection.
**Step 1:**Open your browser and then visit the speedtest.net platform. You can also use other similar kind of websites to ensure the speed of your internet. Note that you will find a Bit Rate dial in the live streaming section, here you can make adjustments for bit rates to bring it to desired level.
**Step 2:**It is also possible to make customized settings for frame rate and resolution as per need of your stream content.
**Step 3:**One can also prefer to archive his streaming.
**Step 4:**As soon as you have completed all above settings then you need to hit the stream button on screen.
**Step 5:**Soon your software will ask you to select the event that you want to stream, choose your desired event and then press Ok. Soon you will be live on YouTube.
Richard Bennett
Richard Bennett is a writer and a lover of all things video.
Follow @Richard Bennett
Richard Bennett
Mar 27, 2024• Proven solutions
1. Live Stream on YouTube Gaming with OBS
You need to follow these simple Step s to use OBS for YouTube Live Streaming:
**Step 1:**First of all you need to login to your YouTube account. You might be aware of the fact that same YouTube account is used for YouTube gaming needs.
**Step 2:**Once entered inside your account then you need to visit the Go live streaming options and then from drop down menu simply choose Stream Now option.
**Step 3:**It is time to fill the details on screen; put impressive words for your live stream description so that it can grab attention of more viewers. Then select category as ‘Gaming’.
**Step 4:**Now you need to copy the stream key.
**Step 5:**Now open your OBS tool and then select YouTube as your active game streaming service. Users here need to paste that copied streaming key of Step 5 into the space provided on OBS settings page.
**Step 6:**It is time to make your desktop a video source.
**Step 7:**Once all these settings are completed then you need to hit the start streaming option.
**Step 8:**The service may take few seconds to bring your live on YouTube and after this small duration you will be connected to your channel with your streamed content. Then change your url from youtube.com to gaming.youtube.com
**Step 9:**You are all set to be live on your YouTube gaming profile.
2. Live Stream on YouTube with Elgato Game Capture HD
A: Basic Settings for Elgato Game Capture HD
The Step s below will help you to get ready for streaming with all basic settings that are required by Elgato Game Capture HD tool.
**Step 1:**First of all, you need to open your browser, search for Elgato Game Capture HD software on its official website and then download it for your system. Get it installed.
**Step 2:**Once installation process is complete then launch your software.
**Step 3:**Now you need to hit the add button on screen and select YouTube from drop down menu.
Step 4: It is time to sign in with your Google Account.
**Step 5:**After sign up process, allow the Elgato Game Capture tool to make connection with your YouTube account.
**Step 6:**Soon you will be able to access you account from Elgato platform.
**Step 7:**It is time to make adjustments for streaming settings.
B: Test your Bandwidth and make adjustments for Stream settings
It is essential to check speed of your internet connection during live streaming because if it goes slow then your content will become annoying to viewers and it will decay the reputation of your channel. So prefer to use following Step s to complete the basic settings and to test your internet connection.
**Step 1:**Open your browser and then visit the speedtest.net platform. You can also use other similar kind of websites to ensure the speed of your internet. Note that you will find a Bit Rate dial in the live streaming section, here you can make adjustments for bit rates to bring it to desired level.
**Step 2:**It is also possible to make customized settings for frame rate and resolution as per need of your stream content.
**Step 3:**One can also prefer to archive his streaming.
**Step 4:**As soon as you have completed all above settings then you need to hit the stream button on screen.
**Step 5:**Soon your software will ask you to select the event that you want to stream, choose your desired event and then press Ok. Soon you will be live on YouTube.
Richard Bennett
Richard Bennett is a writer and a lover of all things video.
Follow @Richard Bennett
Leveraging Libraries: Improving Efficiency in Your JavaScript Projects
How to Edit YouTube Videos in Final Cut Pro
Richard Bennett
Mar 27, 2024• Proven solutions
With its user friendly interface and versatile features, Fincal Cut Pro is definitely one of the best choices for making videos for Mac users. Using it isn’t that hard, but it’s definitely not a walk in the park, so we’ve taken the liberty to provide you with a comprehensive yet concise guide on how to edit YouTube videos with Final Cut Pro.
Even though FCP is good software, there’s no denying that it’s pretty pricy and a little bit complicated for most beginners. Wondershare Filmora for Mac is definitely better alternatives for Final Cut Pro. It’s a lot more user-friendly and requires no previous experience in video editing. With Wondershare Filmora, you can ignite your YouTube videos with over 300 effects like Fashion, Beauty, Block Buster, Travel, etc.


How to Edit YouTube Videos in Final Cut Pro
In this section, we are going to take a quick look at the steps that you need to take in order to properly edit YouTube videos in Final Cut Pro. Without any further ado, let’s take a look.
Step 1: Importing the video clip into FCP
This is, of course, the first thing that you need to do. Regardless of whether the original footage was taken by your smart phone, taken from the Internet or you’ve left it over from some past event that’s long overdue, you can easily import it into the FCP in order to edit it. FCP supports a variety of different formats, so it’s a good idea to try and import the video even if you are not quite sure about its extension. In order to do so, open the program, go to the File button, click on Import and select the file or the folder. This is going to get you to a regular finder window which would enable you to pick the clip that you want to do. If it’s not highlighted or you aren’t able to select it, the software doesn’t support it, and it’s not compatible.

Keep in mind that if you want to import videos which have been published already, you can download them directly from the channel as MP4 files. If you want to store videos from different channels, you can use the Wondershare Video Converter Ultimate in order to get them converted and stored on your computer in a format that is supported by FCP.
Step 2: Edit YouTube Videos in Final Cut Pro
That’s the fun part. There are a few things that you can do with Final Cut Pro, and they are all quite professional.
- First, you can sync an audio track with your video as the DSLR cameras usually have terrible quality of the sound. This is why you want to get the audio recorded separately. The only thing you need to do is select the audio clip and click on the Synchronize Clips, and you are good to go.

- Furthermore, you can do proper color balancing with the program quickly and incredibly easy. Go on Modify and then click on Balance Color and the software is going to take care of the rest on its own.

- You can also create previews when the video ends. In order to do so, you need to import your main clip, select a solid background color and place the preview video above it. You will then be able to trim and edit it conveniently. Adjust the scale and the position and you are good to go. Afterwards, you can also apply annotation on top of the preview.
Step 3: Upload to YouTube from the software directly

This one is rather easy. Here is the sequence that you need to do. Go to File -> Share -> Master File -> Setting -> File -> Share -> YouTube. That’s basically it. Then you need to sign in to your YouTube account and simply click on Next -> Publish and the entire thing is done. That’s all you need to do in order to quickly and conveniently upload your video to YouTube directly from the FCP.
Check this video tutorial to see how YouTube creators edit their YouTubes videos with Final Cut Pro
Richard Bennett
Richard Bennett is a writer and a lover of all things video.
Follow @Richard Bennett
Richard Bennett
Mar 27, 2024• Proven solutions
With its user friendly interface and versatile features, Fincal Cut Pro is definitely one of the best choices for making videos for Mac users. Using it isn’t that hard, but it’s definitely not a walk in the park, so we’ve taken the liberty to provide you with a comprehensive yet concise guide on how to edit YouTube videos with Final Cut Pro.
Even though FCP is good software, there’s no denying that it’s pretty pricy and a little bit complicated for most beginners. Wondershare Filmora for Mac is definitely better alternatives for Final Cut Pro. It’s a lot more user-friendly and requires no previous experience in video editing. With Wondershare Filmora, you can ignite your YouTube videos with over 300 effects like Fashion, Beauty, Block Buster, Travel, etc.
How to Edit YouTube Videos in Final Cut Pro
In this section, we are going to take a quick look at the steps that you need to take in order to properly edit YouTube videos in Final Cut Pro. Without any further ado, let’s take a look.
Step 1: Importing the video clip into FCP
This is, of course, the first thing that you need to do. Regardless of whether the original footage was taken by your smart phone, taken from the Internet or you’ve left it over from some past event that’s long overdue, you can easily import it into the FCP in order to edit it. FCP supports a variety of different formats, so it’s a good idea to try and import the video even if you are not quite sure about its extension. In order to do so, open the program, go to the File button, click on Import and select the file or the folder. This is going to get you to a regular finder window which would enable you to pick the clip that you want to do. If it’s not highlighted or you aren’t able to select it, the software doesn’t support it, and it’s not compatible.
Keep in mind that if you want to import videos which have been published already, you can download them directly from the channel as MP4 files. If you want to store videos from different channels, you can use the Wondershare Video Converter Ultimate in order to get them converted and stored on your computer in a format that is supported by FCP.
Step 2: Edit YouTube Videos in Final Cut Pro
That’s the fun part. There are a few things that you can do with Final Cut Pro, and they are all quite professional.
- First, you can sync an audio track with your video as the DSLR cameras usually have terrible quality of the sound. This is why you want to get the audio recorded separately. The only thing you need to do is select the audio clip and click on the Synchronize Clips, and you are good to go.
- Furthermore, you can do proper color balancing with the program quickly and incredibly easy. Go on Modify and then click on Balance Color and the software is going to take care of the rest on its own.
- You can also create previews when the video ends. In order to do so, you need to import your main clip, select a solid background color and place the preview video above it. You will then be able to trim and edit it conveniently. Adjust the scale and the position and you are good to go. Afterwards, you can also apply annotation on top of the preview.
Step 3: Upload to YouTube from the software directly
This one is rather easy. Here is the sequence that you need to do. Go to File -> Share -> Master File -> Setting -> File -> Share -> YouTube. That’s basically it. Then you need to sign in to your YouTube account and simply click on Next -> Publish and the entire thing is done. That’s all you need to do in order to quickly and conveniently upload your video to YouTube directly from the FCP.
Check this video tutorial to see how YouTube creators edit their YouTubes videos with Final Cut Pro
Richard Bennett
Richard Bennett is a writer and a lover of all things video.
Follow @Richard Bennett
Also read:
- [New] 2024 Approved Beyond TikTok Horizons The Essence of Triller
- [New] Maximizing Viewing Experience in Android
- [New] Mind Mavens Top 10 Educational YouTube Hubs
- [New] Quick Tips IOS Devices & YouTube Video Submission
- [Updated] Top Techniques to Preserve and Store Mov Files on Windows PCs
- [Updated] What Exactly Is Periscope? Free Access & Registration Details for 2024
- 2024 Approved Navigating YouTube's Revenue Tools for Mobile Creators
- 2024 Approved Unlocking the Art of Alluring YouTube Live Image Creation
- Experiencing Literature Like Never Before with the Kindle Oasis (2019): A Comprehensive Review
- In 2024, Pro Video Gear Expert Recommendations for YouTube Clips
- In 2024, Unlocking Potential Creating Your YouTube Identity
- Mastering the Impossible: Learn the Most Challenging Languages
- Sound Keeps Cutting Out on Windows 11 [Solved]
- The Journey of FaceTime Snaps: Discover Their Hidden Location
- Troubleshooting: Fixing the Non-Functional Right Click on Mouse Under Windows 10
- Title: In 2024, Transform Your Games Into a Live Stream Spectacle
- Author: Joseph
- Created at : 2024-11-10 10:15:24
- Updated at : 2024-11-14 16:21:22
- Link: https://youtube-stream.techidaily.com/in-2024-transform-your-games-into-a-live-stream-spectacle/
- License: This work is licensed under CC BY-NC-SA 4.0.