
:max_bytes(150000):strip_icc():format(webp)/how-to-view-instagram-without-an-account-5271416-505eeceaf0e142ed8674d2ce2244a8be.jpg)
In 2024, Top 20 YouTube Font Choices for Striking Thumbnails
Top 20 YouTube Font Choices for Striking Thumbnails
YouTube has grown in popularity since it was developed and launched. You can watch YouTube videos for educational purposes, entertainment, or catch up with your favorite content creators. Thumbnails are a massive element of what makes a YouTube video successful. You can incorporate numerous fonts into your thumbnails, leaving you feeling stuck on which is the best option.
This article will discuss the 20 best YouTube thumbnail fonts to make your videos amazing.

- Bebas Neue - Popular YouTube Thumbnail Font
- Impact - YouTube Thumbnail Font for Strong Sense
- Montserrat - Good Font for YouTube Thumbnail
- Alfa Slab - YouTube Thumbnail Text Font With a Futuristic Vibe
- Againts - Best Font for YouTube Thumbnail
- Dancing Script - YouTube Thumbnail Font With a Sweat Vibe
- Oswald
- Arial Negrata - Print Font for YouTube Thumbnails
- BlackOpsOne - Best YouTube Thumbnail Font for Gaming Videos
- Beauty and the Beast
- Chucklesome
- Caribold
- Bernhard - Serious YouTube Thumbnail Font
- Dustin Font Quartet
- The Tide - Chunky-Letter Font for YouTube Thumbnails
- Badaboom BB
- River Drive
- Traveler Note
- Free Love Script
- Config Rounded
20 Best Fonts for YouTube Thumbnails To Bring Traffic to Your Videos
Your thumbnail is the first thing your audience will see as they browse on YouTube. Since you only have a few seconds to make a good first impression, it would be wise to make the most out of it.
YouTube thumbnails capture the viewer’s attention and spark their interest. The more eye-catching your thumbnail is, the more likely they will click on your video. If you take your time to make good thumbnails for your YouTube videos, you will undoubtedly increase your channel’s traffic and expand your reach.
Recent research reveals that YouTube thumbnails with text and numbers get more clicks than thumbnails with plain images. Therefore, choosing a great font to accompany your thumbnail would be wise and make it more visually appealing. Stick around for the fun part of the article, where we discuss twenty best fonts for your YouTube thumbnails.
1. Bebas Neue - Popular YouTube Thumbnail Font
The first YouTube thumbnail font on our list is a popular one known as Bebas Neue. You can use this font for your videos and thumbnails regardless of what content you post. The elegant yet sublime design makes it a perfect choice for you if you are just starting out or have yet to explore other options.

2. Impact - YouTube Thumbnail Font for Strong Sense
If you want a straightforward font for your thumbnail, look no further than Impact. Its strong sense makes it the best font for YouTube thumbnails. Even though it is versatile for any content, it is most frequently used on reaction videos, pranks, or reviews.

3. Montserrat - Good Font for YouTube Thumbnail
The letters in the Montserrat video are very simple, with the slightest shadowing and outline. This font is pretty versatile, and you can use it to make thumbnails for laid-back content or more serious and factual videos.

4. Alfa Slab - YouTube Thumbnail Text Font With a Futuristic Vibe
The Alfa slab font has a futuristic vibe to it, making it the perfect choice for content about new innovations or the future of technology. The blocky yet simple letters are easy to read and don’t take away from the main message or the background.

5. Againts - Best Font for YouTube Thumbnail
Suppose you post lots of travel content, share videos of you lounging on the best, or sample a new restaurant. The Againts font has a unique outdoor vibe that makes your videos pop and makes your audience anticipate where you will travel next.
6. Dancing Script - YouTube Thumbnail Font With a Sweat Vibe
The Dancing Script font is a must-have in your arsenal if you wouldn’t want your videos to be too serious. The slanted letters also give your thumbnail a feminine touch, making it great for fashion vlogs or videos about life hacks for ladies.

7. Oswald
The letters in this Oswald font are encapsulated in a dark grey rectangle, making them stand out and easy to read. You could use this font with other backgrounds in your thumbnail to highlight keywords you wouldn’t want your audience to miss as they scroll through YouTube.

8. Arial Negrata - Print Font for YouTube Thumbnails
We couldn’t forget to mention Arial Negrata, which has a beautiful print font and complementary sub-fonts. You can easily vary the fonts’ sizes for emphasis and to capture the interest of your audience.

9. BlackOpsOne - Best YouTube Thumbnail Font for Gaming Videos
Are you tired of the boring print fonts and girly cursive text? If you answer yes, you should check out the BlackOpsOne font, which is unlike anything you have ever seen. This font is perfect for gaming videos or content that involves long streams.

10. Beauty and the Beast
If you are a streamer, gamer, or like to post life hack videos on YouTube, you are probably looking for some good fonts for YouTube thumbnails to make your video less serious. The Beauty and the Beast font is very whimsical, giving your thumbnail a playful feel.

11. Chucklesome
You will immediately recognize this font if you grew up watching many cartoons and reading comic books. Chucklesome is another font with the best font color for YouTube thumbnails, making it an excellent choice if your YouTube channel is about games, movies, or comic books. The artsy typeface, bold letters, and bright colors can capture your audience’s attention from a mile away.

12. Caribold
As the name suggests, the Caribold font for YouTube thumbnails is very bold, and the letters almost jump out of the screen at you. The borders, outline, and shadows emphasize the font, making it hard to miss. You can use this font to create thumbnails for “How To” videos.

13. Bernhard - Serious YouTube Thumbnail Font
Depending on the content you post, you might want to discard the whimsical feel and give your thumbnail a more serious vibe. The Bernhard font is technically an enlarged script font that makes your videos and thumbnails look fresh and elegant. You can use this font for historical or factual videos.

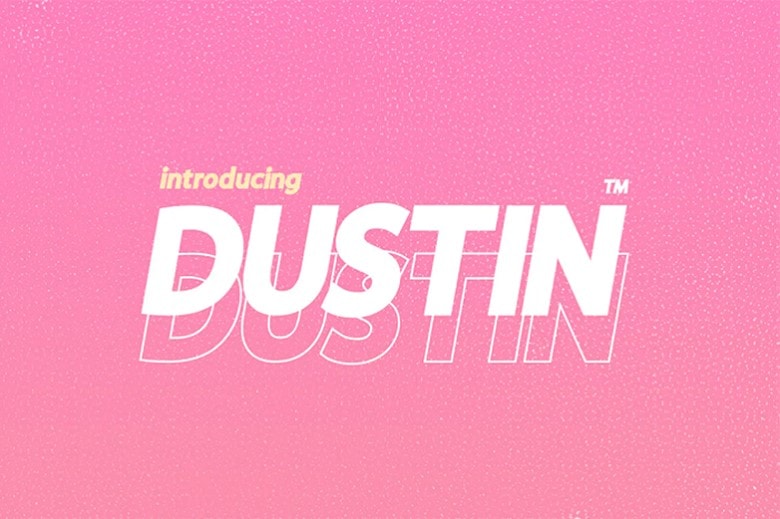
14. Dustin Font Quartet
It is not uncommon for thumbnails to draw inspiration from other brands. The Dustin font is an excellent example of such a font, which is similar to the Supreme brand logo. This font is pretty versatile as it comes in a pack of four fonts, making you spoilt for choice!
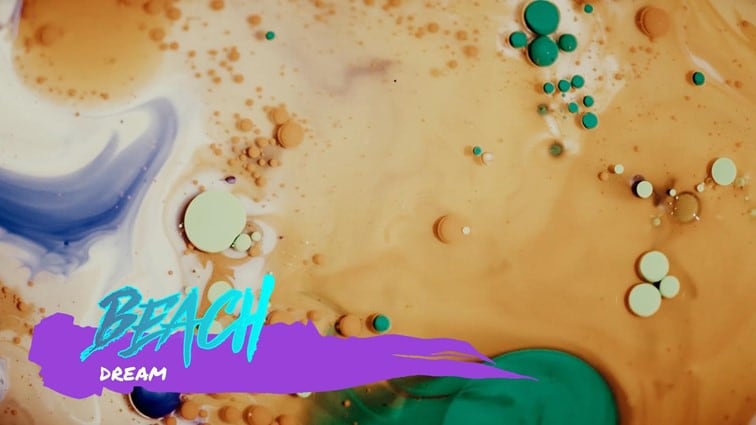
15. The Tide - Chunky-Letter Font for YouTube Thumbnails
The Tide thumbnail font gives a relaxing beach vibe that would be great if you love posting laid-back content. This font also comes with chunky letters, which are easy to read and grab the attention of anyone scrolling through the platform.

16. Badaboom BB
The best font for YouTube thumbnail is Badaboom BB font, which has vibrant colors and unique letters. The red and yellow colors are an absolute showstopper and a must-have if you want your audience to notice you. This font style is excellent for gaming and streaming YouTube videos, where you just want your audience to have a good time.

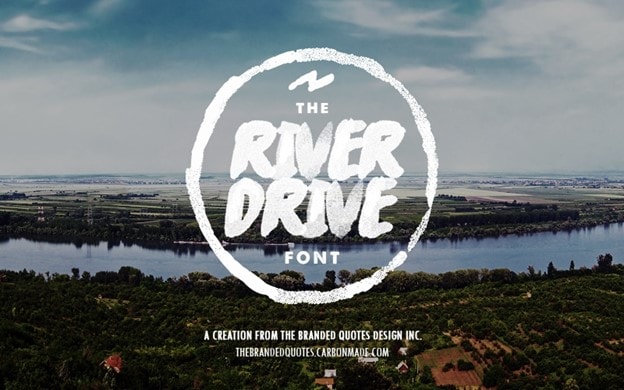
17. River Drive
When inserting text into a thumbnail, you must balance the visual elements to ensure the letters don’t overshadow the image. The River Drive font allows you to create bold yet legible text without removing the stunning photo in the background.
18. Traveler Note
Adventure and travel channels help us know what it’s like to visit a place, even though we haven’t left our couches. The Traveler Note font brings life and cheer to your travel vlogs as you continue introducing us to different parts of the world.

19. Free Love Script
Perhaps your YouTube is missing that feminine touch to tie everything together. The curvy lettering in the Free Love Script is perfect for lifestyle videos or fashion vlogs, which could use a bit of femininity to drive the message home.

20. Config Rounded
If your channel is professional or you post informative content about finances, business, and other important topics, the best YouTube thumbnail font for you is the Config rounded font. It looks pretty modern and works well with any background.

Generate Cool YouTube Thumbnail Texts With Wondershare Filmora
If you have been making YouTube videos for a while now, then you must be familiar with Wondershare Filmora , a top-tier video editing tool. If not, we will discuss some of the features that make it a great editing tool in a short while. You can also use this platform to create and design the perfect thumbnail for your YouTube video.
Free Download For Win 7 or later(64-bit)
Free Download For macOS 10.14 or later

The title editing feature on this platform allows you to add creative text to your video and customize it as you see fit. You can also use Wondershare Filmora to make a title with customizable parameters. For instance, you can edit the text titles using three different fill types: color fill, gradient fill, and image fill.
Wondershare Filmora is an excellent tool to help bring your thumbnails alive and reel the masses in to view more videos from your channel. You cannot possibly exhaust the 107 animation styles, 12 types of shadow effects, and more than ten borders that make your text stand out from the rest. If you are unhappy with your current font, you can choose from over 30 categories of titles till you find one that tickles your fancy.
We couldn’t forget to mention the 3D titles feature with Wondershare Filmora. Gone are the days when creators would use 2D titles to introduce their videos to their audience. Even though not many content creators use 3D titles, you can be among the few that do and gain a competitive advantage. Ensure you peruse through the various categories and find one that speaks to you and fits the kind of content you create.
Below is a step-by-step guide on how to edit YouTube thumbnail text fonts.
Step1 Launch Wondershare Filmora on your device and select “New Project.”

Step2 Click on the icon shown below to import media from your device.

Step3 Drag and drop your photos as shown below to create your YouTube Thumbnail on the platform.
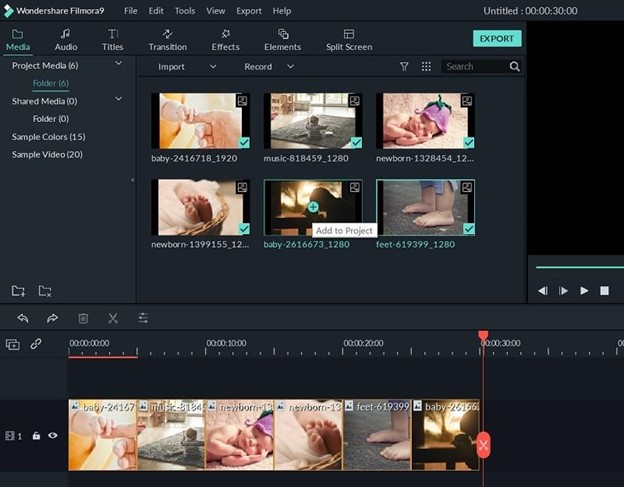
Step4 Add titles to customize the texts in your Thumbnail.

Step5 In the Titles panel, you can customize the font. Filmora offers hundreds of fonts for your choosing.

Step6 Select a still frame to be your thumbnail. Click the camera icon on the right side to take a snapshot.

Step7 The snapshot will appear on the Media panel. Right click the snapshot, and select “Reveal in Explorer” to locate it in your local drive. Then you can use it as your YouTube Thumbnail.

You don’t need to search for fonts on the Internet when Wondershare Filmora offers downloadable fonts. If you are interested in installing fonts in Filmora, watch this video to learn how.
Conclusion
As you generate thumbnails for your YouTube videos, it would be wise to ensure you make them full-sized. The ideal dimension for a YouTube thumbnail should be 1280*720. Since most of your viewers use their mobile phones to watch YouTube videos, it would help to ensure the thumbnail looks the same on your laptop and your mobile device.
A hazy or pixelated thumbnail could discourage the viewer from clicking on your video. We hope you have found a font you like and will incorporate it into your next YouTube video.
20 Best Fonts for YouTube Thumbnails To Bring Traffic to Your Videos
Your thumbnail is the first thing your audience will see as they browse on YouTube. Since you only have a few seconds to make a good first impression, it would be wise to make the most out of it.
YouTube thumbnails capture the viewer’s attention and spark their interest. The more eye-catching your thumbnail is, the more likely they will click on your video. If you take your time to make good thumbnails for your YouTube videos, you will undoubtedly increase your channel’s traffic and expand your reach.
Recent research reveals that YouTube thumbnails with text and numbers get more clicks than thumbnails with plain images. Therefore, choosing a great font to accompany your thumbnail would be wise and make it more visually appealing. Stick around for the fun part of the article, where we discuss twenty best fonts for your YouTube thumbnails.
1. Bebas Neue - Popular YouTube Thumbnail Font
The first YouTube thumbnail font on our list is a popular one known as Bebas Neue. You can use this font for your videos and thumbnails regardless of what content you post. The elegant yet sublime design makes it a perfect choice for you if you are just starting out or have yet to explore other options.
2. Impact - YouTube Thumbnail Font for Strong Sense
If you want a straightforward font for your thumbnail, look no further than Impact. Its strong sense makes it the best font for YouTube thumbnails. Even though it is versatile for any content, it is most frequently used on reaction videos, pranks, or reviews.
3. Montserrat - Good Font for YouTube Thumbnail
The letters in the Montserrat video are very simple, with the slightest shadowing and outline. This font is pretty versatile, and you can use it to make thumbnails for laid-back content or more serious and factual videos.
4. Alfa Slab - YouTube Thumbnail Text Font With a Futuristic Vibe
The Alfa slab font has a futuristic vibe to it, making it the perfect choice for content about new innovations or the future of technology. The blocky yet simple letters are easy to read and don’t take away from the main message or the background.
5. Againts - Best Font for YouTube Thumbnail
Suppose you post lots of travel content, share videos of you lounging on the best, or sample a new restaurant. The Againts font has a unique outdoor vibe that makes your videos pop and makes your audience anticipate where you will travel next.
6. Dancing Script - YouTube Thumbnail Font With a Sweat Vibe
The Dancing Script font is a must-have in your arsenal if you wouldn’t want your videos to be too serious. The slanted letters also give your thumbnail a feminine touch, making it great for fashion vlogs or videos about life hacks for ladies.
7. Oswald
The letters in this Oswald font are encapsulated in a dark grey rectangle, making them stand out and easy to read. You could use this font with other backgrounds in your thumbnail to highlight keywords you wouldn’t want your audience to miss as they scroll through YouTube.
8. Arial Negrata - Print Font for YouTube Thumbnails
We couldn’t forget to mention Arial Negrata, which has a beautiful print font and complementary sub-fonts. You can easily vary the fonts’ sizes for emphasis and to capture the interest of your audience.
9. BlackOpsOne - Best YouTube Thumbnail Font for Gaming Videos
Are you tired of the boring print fonts and girly cursive text? If you answer yes, you should check out the BlackOpsOne font, which is unlike anything you have ever seen. This font is perfect for gaming videos or content that involves long streams.
10. Beauty and the Beast
If you are a streamer, gamer, or like to post life hack videos on YouTube, you are probably looking for some good fonts for YouTube thumbnails to make your video less serious. The Beauty and the Beast font is very whimsical, giving your thumbnail a playful feel.
11. Chucklesome
You will immediately recognize this font if you grew up watching many cartoons and reading comic books. Chucklesome is another font with the best font color for YouTube thumbnails, making it an excellent choice if your YouTube channel is about games, movies, or comic books. The artsy typeface, bold letters, and bright colors can capture your audience’s attention from a mile away.
12. Caribold
As the name suggests, the Caribold font for YouTube thumbnails is very bold, and the letters almost jump out of the screen at you. The borders, outline, and shadows emphasize the font, making it hard to miss. You can use this font to create thumbnails for “How To” videos.
13. Bernhard - Serious YouTube Thumbnail Font
Depending on the content you post, you might want to discard the whimsical feel and give your thumbnail a more serious vibe. The Bernhard font is technically an enlarged script font that makes your videos and thumbnails look fresh and elegant. You can use this font for historical or factual videos.
14. Dustin Font Quartet
It is not uncommon for thumbnails to draw inspiration from other brands. The Dustin font is an excellent example of such a font, which is similar to the Supreme brand logo. This font is pretty versatile as it comes in a pack of four fonts, making you spoilt for choice!
15. The Tide - Chunky-Letter Font for YouTube Thumbnails
The Tide thumbnail font gives a relaxing beach vibe that would be great if you love posting laid-back content. This font also comes with chunky letters, which are easy to read and grab the attention of anyone scrolling through the platform.
16. Badaboom BB
The best font for YouTube thumbnail is Badaboom BB font, which has vibrant colors and unique letters. The red and yellow colors are an absolute showstopper and a must-have if you want your audience to notice you. This font style is excellent for gaming and streaming YouTube videos, where you just want your audience to have a good time.
17. River Drive
When inserting text into a thumbnail, you must balance the visual elements to ensure the letters don’t overshadow the image. The River Drive font allows you to create bold yet legible text without removing the stunning photo in the background.
18. Traveler Note
Adventure and travel channels help us know what it’s like to visit a place, even though we haven’t left our couches. The Traveler Note font brings life and cheer to your travel vlogs as you continue introducing us to different parts of the world.
19. Free Love Script
Perhaps your YouTube is missing that feminine touch to tie everything together. The curvy lettering in the Free Love Script is perfect for lifestyle videos or fashion vlogs, which could use a bit of femininity to drive the message home.
20. Config Rounded
If your channel is professional or you post informative content about finances, business, and other important topics, the best YouTube thumbnail font for you is the Config rounded font. It looks pretty modern and works well with any background.
Generate Cool YouTube Thumbnail Texts With Wondershare Filmora
If you have been making YouTube videos for a while now, then you must be familiar with Wondershare Filmora , a top-tier video editing tool. If not, we will discuss some of the features that make it a great editing tool in a short while. You can also use this platform to create and design the perfect thumbnail for your YouTube video.
Free Download For Win 7 or later(64-bit)
Free Download For macOS 10.14 or later
The title editing feature on this platform allows you to add creative text to your video and customize it as you see fit. You can also use Wondershare Filmora to make a title with customizable parameters. For instance, you can edit the text titles using three different fill types: color fill, gradient fill, and image fill.
Wondershare Filmora is an excellent tool to help bring your thumbnails alive and reel the masses in to view more videos from your channel. You cannot possibly exhaust the 107 animation styles, 12 types of shadow effects, and more than ten borders that make your text stand out from the rest. If you are unhappy with your current font, you can choose from over 30 categories of titles till you find one that tickles your fancy.
We couldn’t forget to mention the 3D titles feature with Wondershare Filmora. Gone are the days when creators would use 2D titles to introduce their videos to their audience. Even though not many content creators use 3D titles, you can be among the few that do and gain a competitive advantage. Ensure you peruse through the various categories and find one that speaks to you and fits the kind of content you create.
Below is a step-by-step guide on how to edit YouTube thumbnail text fonts.
Step1 Launch Wondershare Filmora on your device and select “New Project.”
Step2 Click on the icon shown below to import media from your device.
Step3 Drag and drop your photos as shown below to create your YouTube Thumbnail on the platform.
Step4 Add titles to customize the texts in your Thumbnail.
Step5 In the Titles panel, you can customize the font. Filmora offers hundreds of fonts for your choosing.
Step6 Select a still frame to be your thumbnail. Click the camera icon on the right side to take a snapshot.
Step7 The snapshot will appear on the Media panel. Right click the snapshot, and select “Reveal in Explorer” to locate it in your local drive. Then you can use it as your YouTube Thumbnail.
You don’t need to search for fonts on the Internet when Wondershare Filmora offers downloadable fonts. If you are interested in installing fonts in Filmora, watch this video to learn how.
Conclusion
As you generate thumbnails for your YouTube videos, it would be wise to ensure you make them full-sized. The ideal dimension for a YouTube thumbnail should be 1280*720. Since most of your viewers use their mobile phones to watch YouTube videos, it would help to ensure the thumbnail looks the same on your laptop and your mobile device.
A hazy or pixelated thumbnail could discourage the viewer from clicking on your video. We hope you have found a font you like and will incorporate it into your next YouTube video.
Epicurean Epiphanies: Filming Feast Creation
How to Make a Cooking Video in Steps - an Ultimate Guide

Richard Bennett
Mar 27, 2024• Proven solutions
Cooking and food-oriented videos are among the most outreaching and popular categories of content to publish online, notably, on YouTube, Facebook, or Instagram. So if you are a cooking aficionado, you have excellent potential to gain positive attention and a loyal audience. But to create engaging videos, you’d need a lot more than excellent culinary skills. This article aims to enlighten aspiring food and recipe vloggers about the essentials of video making straight out of the oven, to create enriched content that’s professional, neat, and viral-worthy.
- Part 1: What to Prepare Before Making a Recipe Video?
- Part 2: Make a Cooking Video with Filmora: a Step-by-Step Guide
- Part 3: Tips to Make Your Cooking Videos Stand Out
- Part 4: How to Promote Your Cooking Channel on YouTube?
What to Prepare Before Making a Recipe Video
While you would know best about the prep work needed for the recipes, the prep work for making a video starts with a plan. What goes into the plan?
Brainstorm this equation - Main Content + Duration + Light + Sound + Camera + Camera Angle, Shots & Transition.
The main content is how you picture the finished video. Ask yourself - Do you want an intro gig? Are you going to talk in the video or show only hands and the cooking with a piece of background music? How do you wish to present the ingredients? Would there be additional tips? At what platform are you going to publish your content? How long should be your clippings? Consider all these questions to chalk out a basic framework of your video
The camera is a pivotal element. Whether it is a smartphone or a hi-fidelity digital camera, it is worthwhile to familiarise the best positions and light orientations and the capacity of the device to produce the best quality picture.
How is your sound going to be like? If you are going to talk in the video, it is recommended that you use a microphone. Or else, you can also use background sound. But to mix sound with the video, you’d need an excellent sound editing tool.
Finally, comes the editing and finishing part. Eventually, you’ll need purposive video-editing software to help you work out the video transitions, sound, and visual effects.Choose a toolkit that is easy to learn and that you can get comfortable with so that the job of video editing doesn’t take the focus away from the main task of cooking.

Now, once you have all the essential ingredients to create your video, start practicing. Remember that it is the most natural thing for the first videos to appear amateurish or inept. And that is part of the plan. Don’t be disheartened and keep going.
Make a Cooking Video with Filmora: a Step-by-Step Guide
As one of the easiest-to-use video editing tools, the full-featured Filmora is the right choice considering it can fit most of your needs. Moreover, you’d be delighted to know that the software also has a series of features and functions and even tutorial videos dedicated to cooking videos.


Step 1: Filming the Video
Whether you are going to present a traditional cook-with-me style video or feature the contemporary “jump-cut” style focusing on speedy short videos, you need to prepare all the equipment and ingredients to suit the frame by frame shots. Consider spills, drops, overcooking, etc. as part of the process, so keep adequate substitutes to continue with your project unwaveringly. If you are using a phone, keep it fully charged up. And have a plan beforehand about what you should do when you get an urgent call while shooting. Also, consider doing a site investigation of the shooting spot for any fragile items, pointy corners, slippery areas, curious pets, etc. to avoid trips and falls in the middle of the filming, especially when working with a cameraman who’s following your movement. If you are using a tripod, and floor-standing lights, remember to secure the equipment with plenty of adhesive tapes, lest they bump into an expensive trip or fall.
Step 2: mport Your Video In Filmora
You need to sync the device that you used to film the video with the computer that has Filmora installed. It may be a phone or a camcorder. Once the devices are synced, you should launch the Filmora software and go the “Media” button at the top right toolbar. There you will find the “Import” button. You will get a pop-up message asking you to choose the type of device. Select the right one, and your video will be imported in the Filmora interface.
Step 3: Edit Video Pace: Time-Lapse, Jump Cut, Slow Motion
To create crisp, fast-paced videos, you don’t have to gobble up the content eyeing at the duration. Think smart when you have the resources of a tool like Filmora. Here are the three best features that help you create fast-paced yet well-defined recipes.
Time-Lapse: The time-lapse feature allows you to adjust the speed of the video from slow-motion to 10x faster. To use this, double click on a specific clip in your imported video and open the custom speed settings. Use the adjusting meter beside speed to make your clip as fast or slow as you want. You may use the same feature to introduce the slow-motion effects in certain areas of the video.
Now, when you are using either the fast-forward or slow-motion effects, it is best to have stable video footage with consistent lighting and a static background. There are also the options of Reverse Speed that can play the clip backward, as in flash-back. The Ripple edit feature allows you to cut short a long clip seamlessly.
Jump Cut: The Jump Cut is about snipping unwanted areas in the clip. It may sound like the Ripple edit mentioned above, but the ripple edit is more functional for cutting short a continuous video so that the viewer won’t realize the snip. For the Jump Cut, it doesn’t have to be a constant clip. You can get to the next frame or scene with an abracadabra move.
To use Jump Cut, place the cursor over the starting of the clip that you want to cut, and right-click on it and select “Split” (the “scissors” feature on the toolbar does the same thing). To make this look neat, preview the portion of the clip once again and delete the cuts between two clips with the same right-click.
Step 4: Understanding Transitions on Filmora
Transitions make your video more interactive and help you segregate the video from frame-to-frame with effects like dissolve, fade, flash, etc. there are numerous transition options available within the Filmora suit.
The best way to do this drag and drop the clips on the timeline is to trim parts of the clip to shorten it. Once you have all the clips in place, go to the “Transitions” options at the top toolbar to apply it on the end or start of each clip.
Step 5: Audio, Playback & Sound Edits
There are plenty of options that you can remove background noise, add voiceover, add music, and detach audio from video. Refer to the Audios section from your toolbar.
Step 6: Save to Drive/ Emport/ Publish
Once you are satisfied with your content, then go to Export. Choose the format of the video, MOV, MP4, MPG, etc. and whether you wish to publish directly or save to drive.
Tips to Make Your Cooking Videos Stand Out
- Lighting is your best friend. Invest in some quality spotlights or use the best of daylight.
- Mind your video duration. Short and Simple videos get the most views, but your content should not look incomplete. It is not a fact that long and elaborate videos do not get a place on the table; it is all about the relevance of your content. So don’t stop till you get enough.
- If you appear in the video, keep yourself always look good.
- Keep your video titles relevant and prominent, so that people looking for it can readily find it.
- Have a scrumptious custom thumbnail.
How to Promote Your Cooking Channel on YouTube
- Create an inventory before publishing videos. YouTube vlogging is valued for consistency. If you have a list of 10, 15, 20 videos, then you can have enough time in hand to film your next videos.
- Have a consistent style to create brand recognition. Do you think branding is not for Vlogs? Well, I suppose you might be wrong. Branding is for anyone who uses it.
- Share the link of your YouTube videos on other platforms like Twitter and Facebook.
- Encourage your viewers to comment on the video.
- Explore the different YouTube SEO strategies and use the accurate keywords in your video descriptions with hashtags.
With prior planning and practicing, you are bent on developing more confident moves and camera angles. Once you have that, follow this step by step guide to gain speed and prowess and also enjoy the whole adventure.
Richard Bennett
Richard Bennett is a writer and a lover of all things video.
Follow @Richard Bennett
Richard Bennett
Mar 27, 2024• Proven solutions
Cooking and food-oriented videos are among the most outreaching and popular categories of content to publish online, notably, on YouTube, Facebook, or Instagram. So if you are a cooking aficionado, you have excellent potential to gain positive attention and a loyal audience. But to create engaging videos, you’d need a lot more than excellent culinary skills. This article aims to enlighten aspiring food and recipe vloggers about the essentials of video making straight out of the oven, to create enriched content that’s professional, neat, and viral-worthy.
- Part 1: What to Prepare Before Making a Recipe Video?
- Part 2: Make a Cooking Video with Filmora: a Step-by-Step Guide
- Part 3: Tips to Make Your Cooking Videos Stand Out
- Part 4: How to Promote Your Cooking Channel on YouTube?
What to Prepare Before Making a Recipe Video
While you would know best about the prep work needed for the recipes, the prep work for making a video starts with a plan. What goes into the plan?
Brainstorm this equation - Main Content + Duration + Light + Sound + Camera + Camera Angle, Shots & Transition.
The main content is how you picture the finished video. Ask yourself - Do you want an intro gig? Are you going to talk in the video or show only hands and the cooking with a piece of background music? How do you wish to present the ingredients? Would there be additional tips? At what platform are you going to publish your content? How long should be your clippings? Consider all these questions to chalk out a basic framework of your video
The camera is a pivotal element. Whether it is a smartphone or a hi-fidelity digital camera, it is worthwhile to familiarise the best positions and light orientations and the capacity of the device to produce the best quality picture.
How is your sound going to be like? If you are going to talk in the video, it is recommended that you use a microphone. Or else, you can also use background sound. But to mix sound with the video, you’d need an excellent sound editing tool.
Finally, comes the editing and finishing part. Eventually, you’ll need purposive video-editing software to help you work out the video transitions, sound, and visual effects.Choose a toolkit that is easy to learn and that you can get comfortable with so that the job of video editing doesn’t take the focus away from the main task of cooking.
Now, once you have all the essential ingredients to create your video, start practicing. Remember that it is the most natural thing for the first videos to appear amateurish or inept. And that is part of the plan. Don’t be disheartened and keep going.
Make a Cooking Video with Filmora: a Step-by-Step Guide
As one of the easiest-to-use video editing tools, the full-featured Filmora is the right choice considering it can fit most of your needs. Moreover, you’d be delighted to know that the software also has a series of features and functions and even tutorial videos dedicated to cooking videos.
Step 1: Filming the Video
Whether you are going to present a traditional cook-with-me style video or feature the contemporary “jump-cut” style focusing on speedy short videos, you need to prepare all the equipment and ingredients to suit the frame by frame shots. Consider spills, drops, overcooking, etc. as part of the process, so keep adequate substitutes to continue with your project unwaveringly. If you are using a phone, keep it fully charged up. And have a plan beforehand about what you should do when you get an urgent call while shooting. Also, consider doing a site investigation of the shooting spot for any fragile items, pointy corners, slippery areas, curious pets, etc. to avoid trips and falls in the middle of the filming, especially when working with a cameraman who’s following your movement. If you are using a tripod, and floor-standing lights, remember to secure the equipment with plenty of adhesive tapes, lest they bump into an expensive trip or fall.
Step 2: mport Your Video In Filmora
You need to sync the device that you used to film the video with the computer that has Filmora installed. It may be a phone or a camcorder. Once the devices are synced, you should launch the Filmora software and go the “Media” button at the top right toolbar. There you will find the “Import” button. You will get a pop-up message asking you to choose the type of device. Select the right one, and your video will be imported in the Filmora interface.
Step 3: Edit Video Pace: Time-Lapse, Jump Cut, Slow Motion
To create crisp, fast-paced videos, you don’t have to gobble up the content eyeing at the duration. Think smart when you have the resources of a tool like Filmora. Here are the three best features that help you create fast-paced yet well-defined recipes.
Time-Lapse: The time-lapse feature allows you to adjust the speed of the video from slow-motion to 10x faster. To use this, double click on a specific clip in your imported video and open the custom speed settings. Use the adjusting meter beside speed to make your clip as fast or slow as you want. You may use the same feature to introduce the slow-motion effects in certain areas of the video.
Now, when you are using either the fast-forward or slow-motion effects, it is best to have stable video footage with consistent lighting and a static background. There are also the options of Reverse Speed that can play the clip backward, as in flash-back. The Ripple edit feature allows you to cut short a long clip seamlessly.
Jump Cut: The Jump Cut is about snipping unwanted areas in the clip. It may sound like the Ripple edit mentioned above, but the ripple edit is more functional for cutting short a continuous video so that the viewer won’t realize the snip. For the Jump Cut, it doesn’t have to be a constant clip. You can get to the next frame or scene with an abracadabra move.
To use Jump Cut, place the cursor over the starting of the clip that you want to cut, and right-click on it and select “Split” (the “scissors” feature on the toolbar does the same thing). To make this look neat, preview the portion of the clip once again and delete the cuts between two clips with the same right-click.
Step 4: Understanding Transitions on Filmora
Transitions make your video more interactive and help you segregate the video from frame-to-frame with effects like dissolve, fade, flash, etc. there are numerous transition options available within the Filmora suit.
The best way to do this drag and drop the clips on the timeline is to trim parts of the clip to shorten it. Once you have all the clips in place, go to the “Transitions” options at the top toolbar to apply it on the end or start of each clip.
Step 5: Audio, Playback & Sound Edits
There are plenty of options that you can remove background noise, add voiceover, add music, and detach audio from video. Refer to the Audios section from your toolbar.
Step 6: Save to Drive/ Emport/ Publish
Once you are satisfied with your content, then go to Export. Choose the format of the video, MOV, MP4, MPG, etc. and whether you wish to publish directly or save to drive.
Tips to Make Your Cooking Videos Stand Out
- Lighting is your best friend. Invest in some quality spotlights or use the best of daylight.
- Mind your video duration. Short and Simple videos get the most views, but your content should not look incomplete. It is not a fact that long and elaborate videos do not get a place on the table; it is all about the relevance of your content. So don’t stop till you get enough.
- If you appear in the video, keep yourself always look good.
- Keep your video titles relevant and prominent, so that people looking for it can readily find it.
- Have a scrumptious custom thumbnail.
How to Promote Your Cooking Channel on YouTube
- Create an inventory before publishing videos. YouTube vlogging is valued for consistency. If you have a list of 10, 15, 20 videos, then you can have enough time in hand to film your next videos.
- Have a consistent style to create brand recognition. Do you think branding is not for Vlogs? Well, I suppose you might be wrong. Branding is for anyone who uses it.
- Share the link of your YouTube videos on other platforms like Twitter and Facebook.
- Encourage your viewers to comment on the video.
- Explore the different YouTube SEO strategies and use the accurate keywords in your video descriptions with hashtags.
With prior planning and practicing, you are bent on developing more confident moves and camera angles. Once you have that, follow this step by step guide to gain speed and prowess and also enjoy the whole adventure.
Richard Bennett
Richard Bennett is a writer and a lover of all things video.
Follow @Richard Bennett
- Title: In 2024, Top 20 YouTube Font Choices for Striking Thumbnails
- Author: Joseph
- Created at : 2024-05-31 13:45:31
- Updated at : 2024-06-01 13:45:31
- Link: https://youtube-stream.techidaily.com/in-2024-top-20-youtube-font-choices-for-striking-thumbnails/
- License: This work is licensed under CC BY-NC-SA 4.0.
