
:max_bytes(150000):strip_icc()/ball-958950_1920-b2d63a2acf5d438cbb65e04cba952c7e.jpg)
In 2024, Tailoring Thumbnails for Maximum YouTube Impact
Tailoring Thumbnails for Maximum YouTube Impact
How To Add Custom Thumbnails to Your YouTube Videos

Richard Bennett
Mar 27, 2024• Proven solutions
YouTube custom thumbnails are a great way to get people’s attention to your YouTube video. It’s a pretty simple process but if you are wondering how to create a thumbnail and add the thumbnail to YouTube video and customize it with the correct size. You have come to the right place. While in this article, I will show you how to create and add a thumbnail to a YouTube video and how to customize the YouTube video thumbnail. Follow these easy steps below and add eyecatching customed thumbnails to your YouTube videos in no time.
- Part 1: Create and Add Custom Thumbnails to YouTube
- Part 2: Tools to Create Custom YouTube Video Thumbnails
- Part 3: How to Change A Thumbnail On YouTube
- Part 4: Things You Need to Know Before Making a YouTube Custom Thumbnail
- Part 5: Tips on How to Make Good YouTube Thumbnails to Get More Clicks
- Part 6: YouTube Thumbnail FAQs
How To Add Custom Thumbnails to Your YouTube Videos [Steps, Tools and Tips]
We have just made a video tutorial about how to make a YouTube video thumbnail, check it below to find out the tips and tricks of making customized YouTube thumbnail.


Part 1: How to Make a Thumbnail for YouTube and Add Custom Thumbnails to YouTube
After you’ve verified your account and made your thumbnail, it’s finally time to upload it to your video and make a custom thumbnail. To do this, go to Creator Studio and then Video Manager. You’ll see a button labeled “Edit” next to each video, and an arrow pointing down. Click Thumbnail Editor.
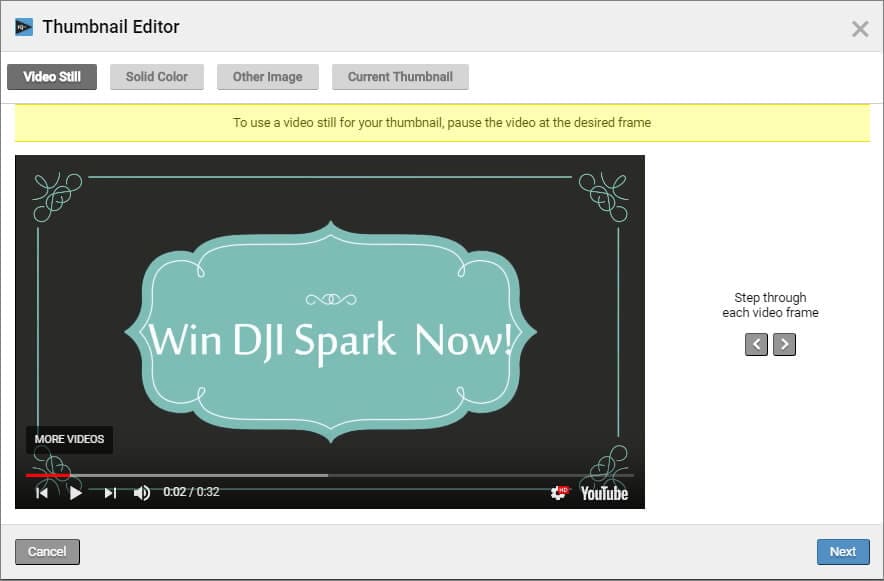
In Thumbnail Editor, you can use the still images in the video as a thumbnail, choose a solid background color for the thumbnail, or add other images from your computer. I will show you the steps of how to customize the video still as a video thumbnail.
1. Preview the video and choose the target video still. You can click the Playback button and check the video and pause it at the desired frame. Or, you can step through each frame by clicking the Preview Frame button and Next Frame icon. Click Next to continue.
2. And now, you can add text, image and shape overlays to the thumbnail. You can change the text font, size, opacity and more.
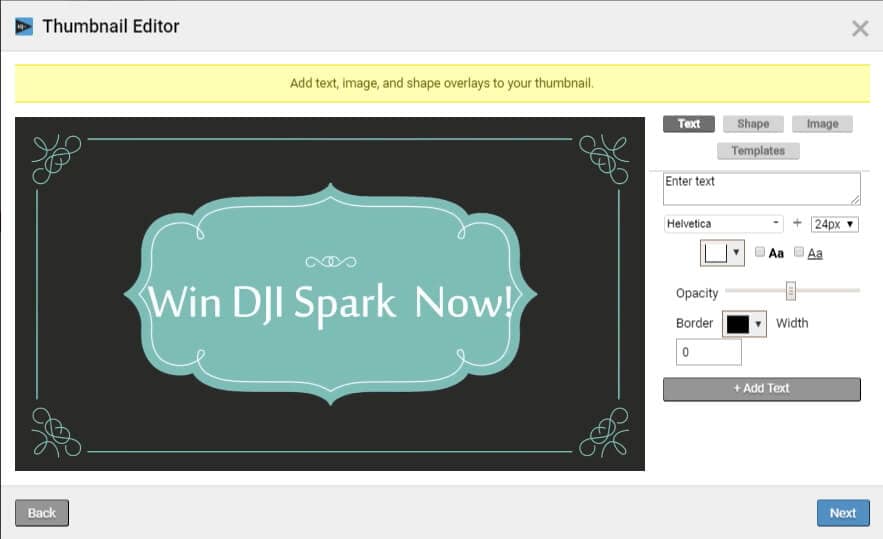
3. Click Next to save the thumbnail and you will see how the thumbnail displays on different platforms such as YouTube, Facebook and Twitter. Click Save to save the video thumbnail.
In this way, you can add a custom thumbnail to the new videos and change the video thumbnail of the previously uploaded videos.
Part 2: Thumbnail Makers to Create Custom YouTube Thumbnails
Of course, you can use some of the best tools to make a YouTube video thumbnail. In this part, we will show you some of the best tools to create custom YouTube thumbnails.
Download Mac Version ](https://tools.techidaily.com/wondershare/filmora/download/ )
1. Create YouTube Thumbnail with Online solution - Canva
Canva is a free, powerful online image editing program with tons of great templates to get you started. One of their templates just happens to be YouTube thumbnails. Open Canva and select the “YouTube Thumbnail” design type. Use your own photo or choose from a huge library, then add text and effects to really make it stand out. Save and share — easy as that.
Check this video tutorial to see how to Make a Youtube Thumbnail using Canva.
You may also like: Best online Photo Editor
2. Design YouTube thumbnail with a Desktop solution - Gimp
Gimp is one of the most popular image editing programs around for one very simple reason: it’s powerful and free! Where Canva uses a lot of templates, Gimp gives you absolute, full control over how you want your image to look. Make a 1280x720 image and start putting together your eye-catching thumbnail exactly how you want to.
Check this video tutorial to see how to make professional Thumbnails for YouTube Videos with Gimp:
Part 3: How to Change A Thumbnail On YouTube
Note: YouTube allows verified YouTube accounts (accounts that provided YouTube with a working phone number) to upload custom thumbnail images and change them accordingly.
In this part, we’ll be going over how to change a thumbnail image on YouTube. There are pictures to make it easy to follow along.
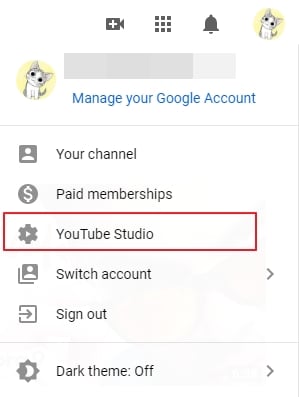
- After signing into YouTube with your Google account, click on your profile on the top right corner. Click on YouTube Studio from the drop-down menu.
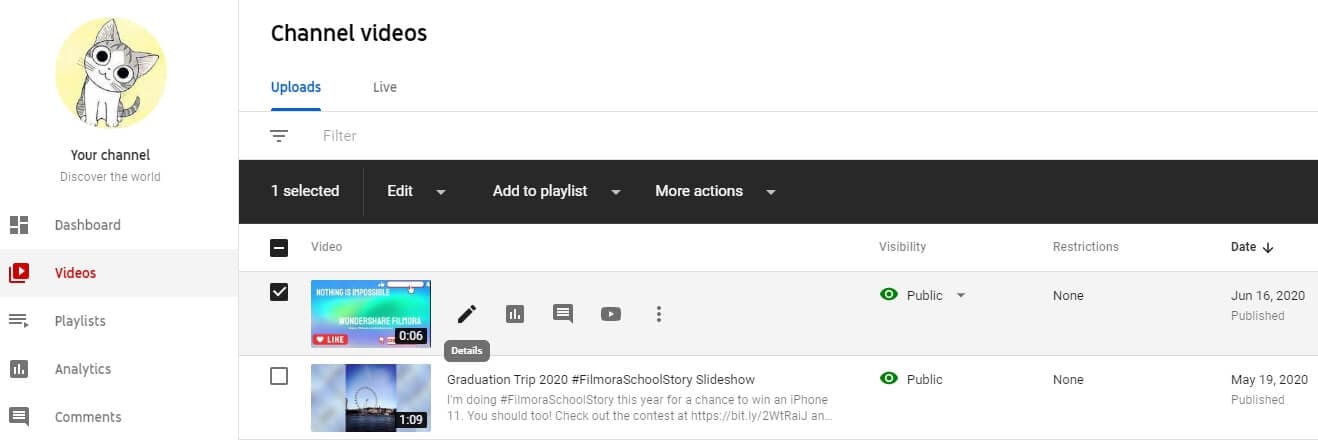
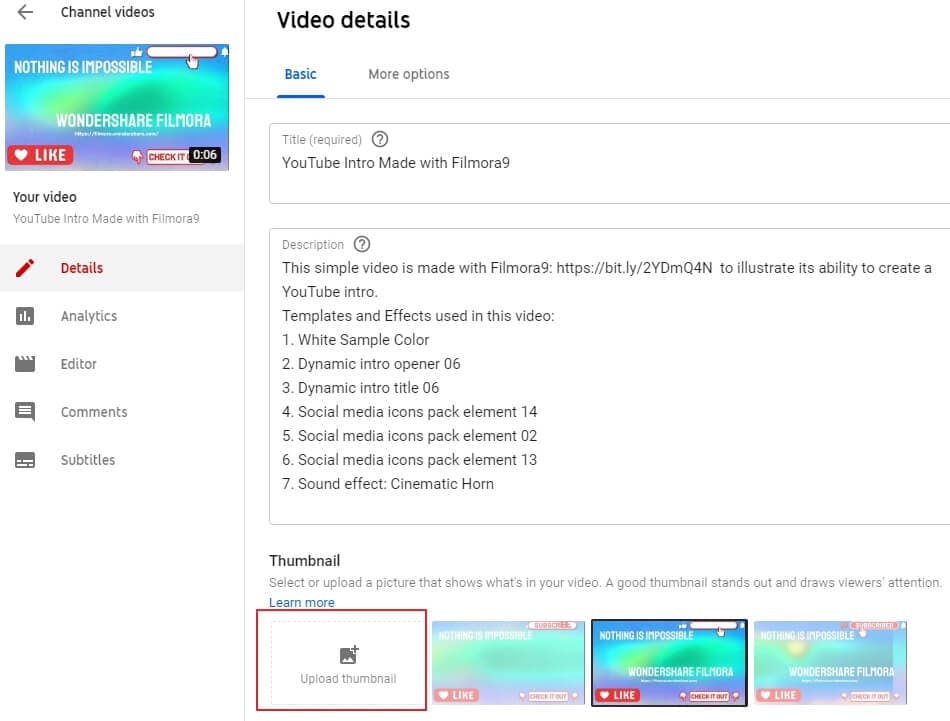
- On the left side of the page, click on Videos and then find your video and click on the details button.
- Find the Thumbnail section in the basic video details tab, and then click the Upload thumbnail to select the image that you want to upload.
- Finally, click on the Save button on the right upper corner. And just like that, in seven easy steps, we’re done changing the thumbnail of a YouTube video.
If you don’t have an image to upload but you want to check out some online resources to make your own, check out our Top YouTube Thumbnail Makers .
Part 4: Things You Need to Know Before Making a Custom Thumbnail
- About the proper YouTube video thumbnail size: Your thumbnail should be 1280x720 pixels in size and be less than 2MB. The minimum width of the image is 640 pixels.
- About the YouTube Image thumbnail format: Use .JPG, .PNG, .GIF or .BMP files for your thumbnail image.
- You’ll want your thumbnails to stand out. Bright colored text is a simple, easy way to draw people’s attention. Red, white, yellow, or orange are all popular choices.
- You can even do a little homework to see what colors others are using for similar videos to yours, and then choose different colors to stand out.
One word of warning: your thumbnail should be related to the content of your video. Misleading thumbnail images, if reported, will reflect poorly on your channel. You’ll get a negative rating in the community status part of your channel. This can actually remove your ability to use custom thumbnails, so keep it honest!
You may also like: How to Make YouTube Channel Art
To make a creative YouTube video, you may also need a powerful video editing software. Check how to edit a YouTube video in Filmora video editor and download it to try.
You may also like: Best video editing software for YouTube
Part 5: Tips on How to Make Good YouTube Thumbnails - Get More Clicks
The thumbnails of your videos play a huge role in convincing people to watch them; a good YouTube thumbnail will get you more views and more potential subscribers. This part will give you 6 tips on creating thumbnails that help grow your channel. Now let’s learn how to make thumbnails using Wondershare PixStudio.
1. Stay On Topic
Your thumbnail should tell a story; it should be clear from looking at it what viewers will get out of watching the video, be it knowledge or entertainment. If your thumbnail sets expectations that your video doesn’t deliver on, people will click away quickly. You may get views quickly, but you won’t get much watch time. That will tell YouTube’s search algorithm ‘people aren’t getting what they want from this, rank it lower’. That leads to fewer views over time, and gives the people who do manage to find your video a negative opinion of your channel.
Very few people intentionally use thumbnails that have nothing to do with the content of their videos – i.e, most people understand not to use a picture of a kitten in the thumbnail for their tech review, unless maybe their kitten is the one doing the review (which would be adorable, someone should do that). People who want serious advice won’t click, and people who click to see a kitten will click away fast.

This thumbnail had better be for a kitten’s iPhone review video or people will click away. Fast.
A mistake a lot of creators do make is creating a thumbnail that is meant to evoke an emotion which the video itself does not justify. For example, if you see a picture of a YouTuber looking nervous alongside text that reads ‘My Secret’, you will think they are going to share something deeply personal. You will be curious, and you may even be worried about them. You’ll probably click. Then, if their secret is that they don’t like pineapple on pizza, you’ll probably be angry. This technique gets clicks, but not a lot of watch time and it will lose you subs in the long run.
2. Don’t Be Mysterious
A good thumbnail doesn’t make people guess. Your thumbnail should tell people what’s in your video, not make them wonder about it. People want to know what they’re being asked to spend time watching.
Often, they will be looking for the answer to a specific question and will completely ignore anything that doesn’t show – in the thumbnail – that it has their answer.
Sometimes big channels can get away with stuff like this, because large portions of their audiences are interested in them as people and will already be curious about anything they post. This technique will not bring in new viewers, though.
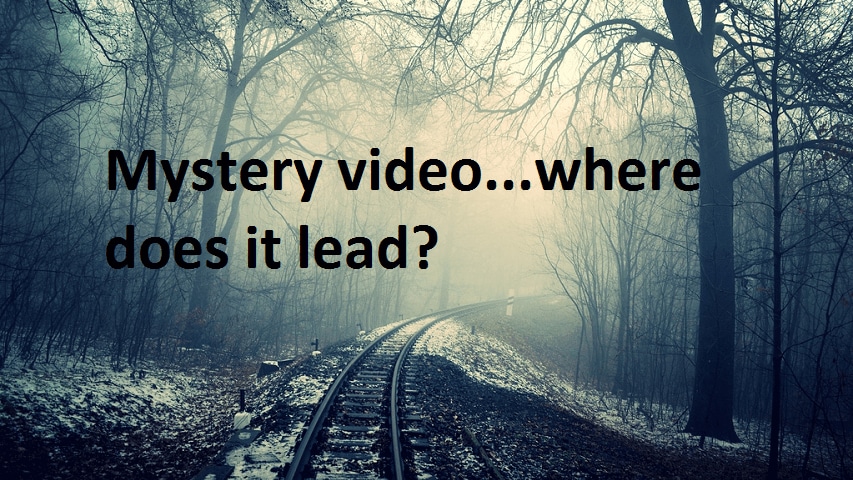
If this came up in a search for ‘smoky eye tutorial’, would you click it?
When people want answers, they want to feel confident that they video they click on will have those answers. If you have great content, then let people know it!
3. People Like People
Viewers are more likely to click on a thumbnail if they feel a connection when they look at it. One of the best ways to create a feeling of connection is through eye contact, and you can apply that principle to your YouTube thumbnails easily.
Just make sure you’re in them.
You can either compose a photo to use as your thumbnail, or use a screenshot from your video. Ideally, the image of you will convey the emotional tone of the video and tell potential viewers what it is about, besides you.
So, if you want to post a funny video that is also about making brownies, maybe a picture of you smiling while holding up a tray of brownies would be a better direction than just showing the brownies?
4. Check Out The Competition
Before you post your video, type your topic into YouTube’s search engine and see what comes up. This will give you insight into what kinds of thumbnails are performing well for other people, as well as what you can do to stand out in comparison.
Phil starts talking about thumbnails at 6:09, and he has great tips on checking out your competition!
For example, if all five of the top-ranked videos for the search ‘how to build a cabinet’ show images of the YouTuber smiling while holding a power tool, then your thumbnail for a video on the same topic should also be a picture of you smiling and holding a power tool. You know that works, so why not do it?
5. Use Color in Interesting Ways
You want to use colors that will help you stand out from the other search results. While checking out your competition if you notice that all the people in the other thumbnails are wearing black or navy blue, it will be a good idea for you to wear a brighter color for your shoot to grab a bit more attention.
Beyond simply using colors that are different from other people’s colors, you should consider the emotions different colors trigger.
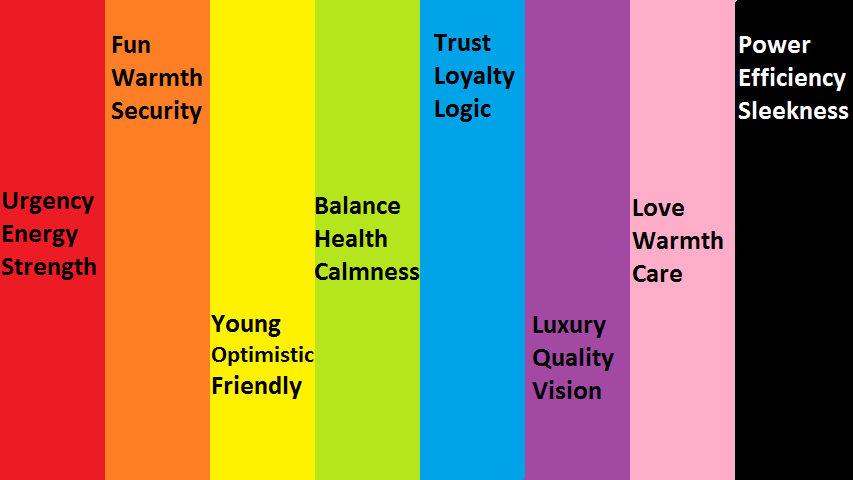
Maybe don’t use a lot of green and yellow in the thumbnail for your angry video rant?
6. Make Your Text Huge
Usually, you’ll want to use a bit of text in your thumbnail. It might be the full title of your video, or just a keyword or phrase. You don’t want to use a full sentence because you won’t have room for it if you’re using huge text.
The reason you should use huge text is so that people can read it. Remember that when people see your thumbnail in their search results, it will be much smaller than it will look while you are creating it. Text that looks big enough while you are creating your thumbnail will be much smaller when people are actually trying to read it, and that goes double for viewers watching on their small smartphone screens.
Frequently Asked Questions about YouTube Thumbnail
1. What is YouTube Thumbnail?
When you upload a video on YouTube, YouTube gives you three images to choose from in the selection of your video’s thumbnail image. These three images are just freeze-frame snapshots from different parts of your video, which may not tell your viewers what your video is really all about.
2. Can You Change YouTube Thumbnail After Publishing?
Yes, you can replace the auto-generated thumbnail with the customized thumbnail you like. But YouTube only allows verified YouTube accounts to upload custom thumbnail images.
3. How Long Does It Take for a Thumbnail to Change on YouTube?
Normally, if you have a good internet connection, you can see the thumbnail is changed within 10 seconds.
4. Why YouTube Thumbnail is Important?
When you get more people watching your video for longer, it increases your watch time and tells YouTube’s search algorithm ‘people like this, rank it higher’. Being ranked higher gets you more views, and even more watch time. It’s a wonderful cycle that all begins with a great thumbnail (paired with a good title and the right tags).
Richard Bennett
Richard Bennett is a writer and a lover of all things video.
Follow @Richard Bennett
Richard Bennett
Mar 27, 2024• Proven solutions
YouTube custom thumbnails are a great way to get people’s attention to your YouTube video. It’s a pretty simple process but if you are wondering how to create a thumbnail and add the thumbnail to YouTube video and customize it with the correct size. You have come to the right place. While in this article, I will show you how to create and add a thumbnail to a YouTube video and how to customize the YouTube video thumbnail. Follow these easy steps below and add eyecatching customed thumbnails to your YouTube videos in no time.
- Part 1: Create and Add Custom Thumbnails to YouTube
- Part 2: Tools to Create Custom YouTube Video Thumbnails
- Part 3: How to Change A Thumbnail On YouTube
- Part 4: Things You Need to Know Before Making a YouTube Custom Thumbnail
- Part 5: Tips on How to Make Good YouTube Thumbnails to Get More Clicks
- Part 6: YouTube Thumbnail FAQs
How To Add Custom Thumbnails to Your YouTube Videos [Steps, Tools and Tips]
We have just made a video tutorial about how to make a YouTube video thumbnail, check it below to find out the tips and tricks of making customized YouTube thumbnail.
Part 1: How to Make a Thumbnail for YouTube and Add Custom Thumbnails to YouTube
After you’ve verified your account and made your thumbnail, it’s finally time to upload it to your video and make a custom thumbnail. To do this, go to Creator Studio and then Video Manager. You’ll see a button labeled “Edit” next to each video, and an arrow pointing down. Click Thumbnail Editor.
In Thumbnail Editor, you can use the still images in the video as a thumbnail, choose a solid background color for the thumbnail, or add other images from your computer. I will show you the steps of how to customize the video still as a video thumbnail.
1. Preview the video and choose the target video still. You can click the Playback button and check the video and pause it at the desired frame. Or, you can step through each frame by clicking the Preview Frame button and Next Frame icon. Click Next to continue.
2. And now, you can add text, image and shape overlays to the thumbnail. You can change the text font, size, opacity and more.
3. Click Next to save the thumbnail and you will see how the thumbnail displays on different platforms such as YouTube, Facebook and Twitter. Click Save to save the video thumbnail.
In this way, you can add a custom thumbnail to the new videos and change the video thumbnail of the previously uploaded videos.
Part 2: Thumbnail Makers to Create Custom YouTube Thumbnails
Of course, you can use some of the best tools to make a YouTube video thumbnail. In this part, we will show you some of the best tools to create custom YouTube thumbnails.
Download Mac Version ](https://tools.techidaily.com/wondershare/filmora/download/ )
1. Create YouTube Thumbnail with Online solution - Canva
Canva is a free, powerful online image editing program with tons of great templates to get you started. One of their templates just happens to be YouTube thumbnails. Open Canva and select the “YouTube Thumbnail” design type. Use your own photo or choose from a huge library, then add text and effects to really make it stand out. Save and share — easy as that.
Check this video tutorial to see how to Make a Youtube Thumbnail using Canva.
You may also like: Best online Photo Editor
2. Design YouTube thumbnail with a Desktop solution - Gimp
Gimp is one of the most popular image editing programs around for one very simple reason: it’s powerful and free! Where Canva uses a lot of templates, Gimp gives you absolute, full control over how you want your image to look. Make a 1280x720 image and start putting together your eye-catching thumbnail exactly how you want to.
Check this video tutorial to see how to make professional Thumbnails for YouTube Videos with Gimp:
Part 3: How to Change A Thumbnail On YouTube
Note: YouTube allows verified YouTube accounts (accounts that provided YouTube with a working phone number) to upload custom thumbnail images and change them accordingly.
In this part, we’ll be going over how to change a thumbnail image on YouTube. There are pictures to make it easy to follow along.
- After signing into YouTube with your Google account, click on your profile on the top right corner. Click on YouTube Studio from the drop-down menu.
- On the left side of the page, click on Videos and then find your video and click on the details button.
- Find the Thumbnail section in the basic video details tab, and then click the Upload thumbnail to select the image that you want to upload.
- Finally, click on the Save button on the right upper corner. And just like that, in seven easy steps, we’re done changing the thumbnail of a YouTube video.
If you don’t have an image to upload but you want to check out some online resources to make your own, check out our Top YouTube Thumbnail Makers .
Part 4: Things You Need to Know Before Making a Custom Thumbnail
- About the proper YouTube video thumbnail size: Your thumbnail should be 1280x720 pixels in size and be less than 2MB. The minimum width of the image is 640 pixels.
- About the YouTube Image thumbnail format: Use .JPG, .PNG, .GIF or .BMP files for your thumbnail image.
- You’ll want your thumbnails to stand out. Bright colored text is a simple, easy way to draw people’s attention. Red, white, yellow, or orange are all popular choices.
- You can even do a little homework to see what colors others are using for similar videos to yours, and then choose different colors to stand out.
One word of warning: your thumbnail should be related to the content of your video. Misleading thumbnail images, if reported, will reflect poorly on your channel. You’ll get a negative rating in the community status part of your channel. This can actually remove your ability to use custom thumbnails, so keep it honest!
You may also like: How to Make YouTube Channel Art
To make a creative YouTube video, you may also need a powerful video editing software. Check how to edit a YouTube video in Filmora video editor and download it to try.
You may also like: Best video editing software for YouTube
Part 5: Tips on How to Make Good YouTube Thumbnails - Get More Clicks
The thumbnails of your videos play a huge role in convincing people to watch them; a good YouTube thumbnail will get you more views and more potential subscribers. This part will give you 6 tips on creating thumbnails that help grow your channel. Now let’s learn how to make thumbnails using Wondershare PixStudio.
1. Stay On Topic
Your thumbnail should tell a story; it should be clear from looking at it what viewers will get out of watching the video, be it knowledge or entertainment. If your thumbnail sets expectations that your video doesn’t deliver on, people will click away quickly. You may get views quickly, but you won’t get much watch time. That will tell YouTube’s search algorithm ‘people aren’t getting what they want from this, rank it lower’. That leads to fewer views over time, and gives the people who do manage to find your video a negative opinion of your channel.
Very few people intentionally use thumbnails that have nothing to do with the content of their videos – i.e, most people understand not to use a picture of a kitten in the thumbnail for their tech review, unless maybe their kitten is the one doing the review (which would be adorable, someone should do that). People who want serious advice won’t click, and people who click to see a kitten will click away fast.
This thumbnail had better be for a kitten’s iPhone review video or people will click away. Fast.
A mistake a lot of creators do make is creating a thumbnail that is meant to evoke an emotion which the video itself does not justify. For example, if you see a picture of a YouTuber looking nervous alongside text that reads ‘My Secret’, you will think they are going to share something deeply personal. You will be curious, and you may even be worried about them. You’ll probably click. Then, if their secret is that they don’t like pineapple on pizza, you’ll probably be angry. This technique gets clicks, but not a lot of watch time and it will lose you subs in the long run.
2. Don’t Be Mysterious
A good thumbnail doesn’t make people guess. Your thumbnail should tell people what’s in your video, not make them wonder about it. People want to know what they’re being asked to spend time watching.
Often, they will be looking for the answer to a specific question and will completely ignore anything that doesn’t show – in the thumbnail – that it has their answer.
Sometimes big channels can get away with stuff like this, because large portions of their audiences are interested in them as people and will already be curious about anything they post. This technique will not bring in new viewers, though.
If this came up in a search for ‘smoky eye tutorial’, would you click it?
When people want answers, they want to feel confident that they video they click on will have those answers. If you have great content, then let people know it!
3. People Like People
Viewers are more likely to click on a thumbnail if they feel a connection when they look at it. One of the best ways to create a feeling of connection is through eye contact, and you can apply that principle to your YouTube thumbnails easily.
Just make sure you’re in them.
You can either compose a photo to use as your thumbnail, or use a screenshot from your video. Ideally, the image of you will convey the emotional tone of the video and tell potential viewers what it is about, besides you.
So, if you want to post a funny video that is also about making brownies, maybe a picture of you smiling while holding up a tray of brownies would be a better direction than just showing the brownies?
4. Check Out The Competition
Before you post your video, type your topic into YouTube’s search engine and see what comes up. This will give you insight into what kinds of thumbnails are performing well for other people, as well as what you can do to stand out in comparison.
Phil starts talking about thumbnails at 6:09, and he has great tips on checking out your competition!
For example, if all five of the top-ranked videos for the search ‘how to build a cabinet’ show images of the YouTuber smiling while holding a power tool, then your thumbnail for a video on the same topic should also be a picture of you smiling and holding a power tool. You know that works, so why not do it?
5. Use Color in Interesting Ways
You want to use colors that will help you stand out from the other search results. While checking out your competition if you notice that all the people in the other thumbnails are wearing black or navy blue, it will be a good idea for you to wear a brighter color for your shoot to grab a bit more attention.
Beyond simply using colors that are different from other people’s colors, you should consider the emotions different colors trigger.
Maybe don’t use a lot of green and yellow in the thumbnail for your angry video rant?
6. Make Your Text Huge
Usually, you’ll want to use a bit of text in your thumbnail. It might be the full title of your video, or just a keyword or phrase. You don’t want to use a full sentence because you won’t have room for it if you’re using huge text.
The reason you should use huge text is so that people can read it. Remember that when people see your thumbnail in their search results, it will be much smaller than it will look while you are creating it. Text that looks big enough while you are creating your thumbnail will be much smaller when people are actually trying to read it, and that goes double for viewers watching on their small smartphone screens.
Frequently Asked Questions about YouTube Thumbnail
1. What is YouTube Thumbnail?
When you upload a video on YouTube, YouTube gives you three images to choose from in the selection of your video’s thumbnail image. These three images are just freeze-frame snapshots from different parts of your video, which may not tell your viewers what your video is really all about.
2. Can You Change YouTube Thumbnail After Publishing?
Yes, you can replace the auto-generated thumbnail with the customized thumbnail you like. But YouTube only allows verified YouTube accounts to upload custom thumbnail images.
3. How Long Does It Take for a Thumbnail to Change on YouTube?
Normally, if you have a good internet connection, you can see the thumbnail is changed within 10 seconds.
4. Why YouTube Thumbnail is Important?
When you get more people watching your video for longer, it increases your watch time and tells YouTube’s search algorithm ‘people like this, rank it higher’. Being ranked higher gets you more views, and even more watch time. It’s a wonderful cycle that all begins with a great thumbnail (paired with a good title and the right tags).
Richard Bennett
Richard Bennett is a writer and a lover of all things video.
Follow @Richard Bennett
Navigating YouTube’s Landscape: A Beginner’s Primer
How to Make YouTube Video
Richard Bennett
Mar 27, 2024• Proven solutions
Finding the audience for short videos you create, sharing your knowledge of publicizing the music you create has become a much simpler and cheaper process in the last fourteen years. ‘Everyone deserves a voice’ is one of the core values that motivates the founders of YouTube to continue developing the world’s largest video sharing platform. So if you are looking for your own voice, but you’re not really sure where to start, you’ve come to the right place, because in this article we are going to show you how to make attention-grabbing YouTube videos that are going to attract a huge audience.
- Preparation Stage for Making YouTube Video [4 Aspects You Should Consider]
- Production Stage: Recording a YouTube Video [5 Tips and Tricks]
- YouTube Video Postproduction Stage: Editing the Footage You Recorded
- Uploading Videos to Your YouTube Channel
- How to Make YouTube Videos from a Mac or PC Computer? [Step Guide]
Preparation Stage: Getting Ready to Make a YouTube Video
Achieving success on YouTube may only seem easy before you realize how much time and effort it takes to run a successful YouTube channel. Making a YouTube video isn’t much different than making any other type of short or feature film as you have to go through the same stages of the video production process. Everything, including creating YouTube videos starts with an idea, so let’s take a look at the steps you’ll need to take before you actually start recording your first YouTube video.
1. Start a YouTube Channel
The journey towards success begins with seemingly small and insignificant steps. Creating a YouTube channel is exactly that, a step, without which you won’t be able to become a YouTuber. All you have to do in order to create a channel on YouTube is sign in to the platform using your Google account and then head over to the Settings menu. Click on the Create a new channel option and then pick a name for your Brand channel . Dedicate some extra time to the process of selecting a name for the channel, because that is the first thing your potential followers are going to notice. The platform lets you start as many as fifty channels with one Gmail ID, and as your channels grow, you can add multiple managers to each channel you’ve started. Click on the Create button when you’re done and that’s it you’re now a proud owner of a YouTube channel.
We have summarized some tips and tricks for creating a YouTube channel account , hope that will help you to create a channel more easily.
2. Choose a Niche and Craft a Video Content Strategy
Devising a plan before you start producing content you are going to share on YouTube is going to give you a sense of direction, since there are so many different types of videos that can attract a large audience. Try to imagine your ideal YouTube follower, and then think about what they are interested in or how you can generate value for them through the content you post on your channel. Attempting to cover a broad spectrum of topics usually doesn’t produce the best results, so instead, you should focus on a specific subject and do your best to offer a unique perspective to your viewers on that subject. More importantly, you need to choose the themes for your videos that are relevant to the audience you would like to reach. Gaming, tutorials, beauty or comedy videos are just a few of the most popular genres of videos on YouTube, although which niche you’re going to pick ultimately depends on your personal interests and reasons why you chose to become a YouTuber in the first place.
Additionally, you should follow the hottest trends on the Internet so that you can find out which topics are drawing the most attention at the moment. Don’t let all these questions trouble you, simply choose a niche in which you feel the most comfortable in and start shooting. Keep a watchful eye on how your followers respond to the videos you share on your channel as time goes on and remain open to new ideas or collaborations.
3. Secure a Fresh Supply of YouTube Video Ideas
Defining your niche is just a beginning because you have to keep producing your videos at a steady pace. Most YouTube experts say that sharing new content at least once a week is necessary if you want to gather a large group of followers on your channel. Consequently, you’ll need a constant supply of ideas for new videos that cover topics your audience is interested in. A simple search on YouTube can help you discover the videos on the platform that have the most views. This should give you a pretty good idea which types of videos are the most popular at the moment and what viewers want to see the most.
Reading the comments section below a YouTube video can be a great way to discover new ideas since viewers often ask questions or search for advice on very specific aspects of the topic that particular video is covering. Moreover, YouTube isn’t the only destination on the Internet where you can find inspiration for your next video since there are countless groups and communities where you can come across interesting topics for your next video.
4. Get the Right Video and Audio Recording Equipment
The list of audio and video recording gear you’re going to need to create a YouTube video depends on the type of video you’re trying to make. Gamers who want to record gameplay and post it on their YouTube channel only need a screen capturing software or a capture card and a microphone. The list of equipment is a bit longer for YouTubers interested in the production of vlogs, comedy or review videos since they are going to need a camera or a Smartphone capable of recording videos at high resolutions, lighting equipment, tripods, steady cams, microphones. If you would like to learn more about the pieces of equipment you are going to need while recording a YouTube video, check our picks of the YouTube Video Shooting Equipment List .
Production Stage: Recording a YouTube Video
After you’ve successfully completed the preparation stage it is time to start getting ready for the next step of the process of making a YouTube video. However, you can’t just pick up a camera and start randomly shooting unrelated scenes, instead, you should follow the steps below that make the production of a video much less complicated.
1. Write a Script and Make a Shooting Schedule
Write down all of your ideas for your next video prior to shooting the first shot of that video. A script can be particularly useful if the video you’re planning on making involves a lot of narration since you’ll always know what to say next. Furthermore, you don’t have to record the entire video on the same day, and you have the freedom to plan when and where you are going to record each scene you want to include in the video.
2. Set a Scene
You control what the viewers of your YouTube video are going to see. That’s why you have to choose your shooting locations carefully and to hand-pick each prop that is going to be visible in the shot. Avoid shooting in messy rooms, because the items in the background are going to distract the viewer and reduce the quality of your videos.
3. Pick the Best Camera Positions
Once you know where and when you are going to shoot your video, you should start planning your shots. Most YouTube videos are recorded from a single camera position, but you can also experiment with different shot angles if it helps you to tell the story of the video. Don’t put the actors near direct sources of light like windows or lamps because if you do so you can easily end up ruining the shot.
4. Make Sure that You Have Enough Light in The Shot
Natural sources of light are often not enough to light a scene properly, because the amount of available light you’ll have at your disposal can change in a few minutes. That’s why nearly all YouTubers use lighting kits that enable them to control the amount of light in the shot at any moment.
5. Bonus: Making YouTube Videos Without a Camera
In case using video and audio recording equipment is a bit too technical for you, there is a simple alternative solution since you can capture all activities on your computer’s screen with software products such as Filmora or OBS Studio. This is an excellent option for gamers who want to record gameplay of their favorite video games or skilled educators that would like to share their knowledge and show others how to use a piece of software or perform any other computer-based task.
Besides screencasting, you can also assemble existing footage from old TV shows, movies or cartoons to make a YouTube video. You don’t have to worry about copyright infringements, as long as the footage you’re using is within the public domain. However, if you accidentally end up using footage without permission it is highly unlikely that anyone is going to file a lawsuit, but your video may be removed from your YouTube channel if someone reports that you’ve used footage without the permission from its owners.
Postproduction Stage: Editing the Footage You Recorded
Before you can share the video clips you recorded with a camera, Smartphone or a screencasting software, you should edit them first. Choosing video editing software isn’t always easy since there are so many different options that enable you to perform both basic and advanced video editing tasks. You can check our recommendations about some of the best video editing software for YouTube videos, in case you are still looking for a video editor that is best suited for the price range you’ve had in mind or your skill level. You should choose a video editing app that you feel the most comfortable using since you are going to spend a lot of time editing videos with it.
The video editing techniques you will utilize during the process of piecing together a YouTube video depend on a number of factors that range from the genre of the video to its visual style. However, trimming or cutting the footage, creating opening titles and end credits are among the most common video editing actions you will have to perform on each new project. Mastering these basic video editing techniques is essential for the success of your videos on YouTube since it will enable you to quickly trim a video clip by dragging one of its ends in an inward or outward direction or remove a portion of a clip you don’t want to feature in the final cut of the video from the timeline.
Hard cuts can at times disrupt the flow of a video, but you can easily fix this by adding a transition between two clips. What’s more, nearly all video editing software products on the market come bundled with rich visual and audio effects libraries that make the color grading or audio editing process much faster. Adding opening titles, lower thirds or any other image overlay can help you introduce the characters in the video to the audience, inform the audience about important aspects of the topic you’re covering or summarize the key points of the video.
Creating a soundtrack is also a vital step of the video editing process that largely influences the quality of the final video. That’s why the narration or the dialogues must be recorded professionally since even the slightest background noise can distract the viewer. Whether or not you are going to add music to a video, depends on the type of project you’re working on. Video editing software products like Filmora have their own royalty free music libraries that offer songs from Rock or Electronic and numerous other genres.
When you complete the video editing process, you should export the video to a folder on your hard drive or directly to your YouTube channel if the video editing app you’ve chosen provides that option. How long the rendering of a video is going to take depends on your computer’s processing power, video’s length, and the output resolution.
Adding/Uploading Videos to Your YouTube Channel
As we already noted you can either upload a video to YouTube directly from a video editing software or from a hard drive after the rendering process is completed. You can upload videos with 16:9 or 4:3 aspect ratios to your channel, and the platform support videos in resolutions up to 8K. The minimum length of a YouTube video is 33 seconds while a video’s maximum length cannot exceed the twelve-hour limit. The file’s size can’t be larger than 128GB while the frame rates can go as high as 60fps. If you need to edit the uploaded and published YouTube videos, you can check our tips about editing existing YouTube videos , and you can check out our guide about how to make money on YouTube if you would like to learn more about account monetization.
Read More to Get : How to Loop a YouTube Video >>
1. Optimize Your Content for YouTube Searches
Every bit of information you add to the video increases its visibility on the platform. Even the name of the file you’re uploading to your channel should contain a keyword, and once the upload is completed you should add a title, description, and metadata if you would like to increase the video’s visibility on the platform. It is vital to select your YouTube SEO strategy before you actually start adding new videos to your strategy. In case you’re not familiar with the concept of search engine optimization for YouTube, you can find everything you need to know aboutYouTube SEO in our guide.
2. Create Visually Captivating Thumbnails and End Screen Elements
A thumbnail is usually a snapshot of a frame from a video, you’ve created during the video editing process or any other still image that suggests what the video is about. A small thing like adding a thumbnail to a YouTube video can increase both the number of views and the number of likes that video is getting. In addition, YouTube’s video editor enables you to add end screens that last anywhere between five and twenty seconds to your videos, but keep in mind that the video must be at least 25 seconds long to have an end screen. There are a number of fully customizable templates available that can be uses to promote your upcoming videos or to invite viewers to subscribe to your channel.
Wanna making YouTube thumbnail yourself? Check some of the best YouTube thumbnail makers list.
3. Publish, Interact and Share
YouTube lets you keep your videos private until you are ready to make them public. Once you decide to make a video available to all YouTube users, you should share it on social media like Twitter, Facebook or Tumblr. Furthermore, embedding a YouTube video on your blog or website can drastically increase the number of views it’s getting. The YouTube Analytics tool is designed to help you track the metrics that indicate how well your video is performing. Don’t know which analytics tools should use? Check our picks of some useful YouTube Analytics Tools to learn how to analyze your video.
How to Make YouTube Videos from a Mac or PC Computer?
Even though you can use almost any video editing software to edit a YouTube video, we recommend trying a versatile video editing app like Filmora to edit videos on Windows PC and Mac which offers both basic and advanced video editing features. Creating a video in Filmora doesn’t require a developed set of video editing skills, since all of the tools and options the editor offers are remarkably easy to use.
When you are ready to start a new project you should simply launch the software, and once the new project loads, you should head over to the File menu and select the Project Settings option that lets you set the resolution, aspect ratio and the frame rate of the video. Proceed to import the footage into the project by selecting one of the available options in the Import drop-down menu or by simply dragging the media assets from a folder on your hard drive and dropping them to the Filmora’s Media Panel. In case you don’t have your own audio and video footage you can download videos, music, visual and audio effects from a stock footage website like Filmstock effects store . Filmora also offers screen casting features, so you can easily record gameplay, show viewers how to use a software or capture any other type of activity on your computer’s screen.
Add each media asset you want to include in the final cut of the video to the timeline and then proceed to remove all unwanted parts of the video and audio clips from the timeline using the Cut or Trim options. Filmora offers rich transitions and visual effects libraries you can use to make the cuts between shot smoother or enhance the colors in the video clips you’re editing. Furthermore, the editor lets you take snapshots of any frame in video clips you’ve placed on the timeline in a single click which can be quite useful if you want to create a thumbnail for your YouTube video. Creating the opening titles, end credits or adding different image overlays to a video is a straight forward process since you just have to select the option that fits the style of the video you’re creating and add it to the timeline. Once you’ve completed the video editing process, you can click on the Export button and decide if you want to export a video directly to your YouTube channel or to a destination on your hard drive.
New to Filmora? Check our beginner guide about How to Edit Videos in Filmora in details or check the quick video tutorial below to find out more details.
Conclusion
Becoming a successful YouTuber requires a lot of dedication and hard work, so if at first, you don’t succeed, you should be patient and persistent. In time, as your channel grows, you will be able to monetize your videos, but only if you keep producing new content at a steady pace. Each step of the YouTube creation process is equally important, and you should dedicate an equal amount of attention to recording high-quality footage, editing, and promotion of the content you share on your YouTube channel. Was this article helpful? Leave a comment below and share your thoughts and experiences with us.
Richard Bennett
Richard Bennett is a writer and a lover of all things video.
Follow @Richard Bennett
Richard Bennett
Mar 27, 2024• Proven solutions
Finding the audience for short videos you create, sharing your knowledge of publicizing the music you create has become a much simpler and cheaper process in the last fourteen years. ‘Everyone deserves a voice’ is one of the core values that motivates the founders of YouTube to continue developing the world’s largest video sharing platform. So if you are looking for your own voice, but you’re not really sure where to start, you’ve come to the right place, because in this article we are going to show you how to make attention-grabbing YouTube videos that are going to attract a huge audience.
- Preparation Stage for Making YouTube Video [4 Aspects You Should Consider]
- Production Stage: Recording a YouTube Video [5 Tips and Tricks]
- YouTube Video Postproduction Stage: Editing the Footage You Recorded
- Uploading Videos to Your YouTube Channel
- How to Make YouTube Videos from a Mac or PC Computer? [Step Guide]
Preparation Stage: Getting Ready to Make a YouTube Video
Achieving success on YouTube may only seem easy before you realize how much time and effort it takes to run a successful YouTube channel. Making a YouTube video isn’t much different than making any other type of short or feature film as you have to go through the same stages of the video production process. Everything, including creating YouTube videos starts with an idea, so let’s take a look at the steps you’ll need to take before you actually start recording your first YouTube video.
1. Start a YouTube Channel
The journey towards success begins with seemingly small and insignificant steps. Creating a YouTube channel is exactly that, a step, without which you won’t be able to become a YouTuber. All you have to do in order to create a channel on YouTube is sign in to the platform using your Google account and then head over to the Settings menu. Click on the Create a new channel option and then pick a name for your Brand channel . Dedicate some extra time to the process of selecting a name for the channel, because that is the first thing your potential followers are going to notice. The platform lets you start as many as fifty channels with one Gmail ID, and as your channels grow, you can add multiple managers to each channel you’ve started. Click on the Create button when you’re done and that’s it you’re now a proud owner of a YouTube channel.
We have summarized some tips and tricks for creating a YouTube channel account , hope that will help you to create a channel more easily.
2. Choose a Niche and Craft a Video Content Strategy
Devising a plan before you start producing content you are going to share on YouTube is going to give you a sense of direction, since there are so many different types of videos that can attract a large audience. Try to imagine your ideal YouTube follower, and then think about what they are interested in or how you can generate value for them through the content you post on your channel. Attempting to cover a broad spectrum of topics usually doesn’t produce the best results, so instead, you should focus on a specific subject and do your best to offer a unique perspective to your viewers on that subject. More importantly, you need to choose the themes for your videos that are relevant to the audience you would like to reach. Gaming, tutorials, beauty or comedy videos are just a few of the most popular genres of videos on YouTube, although which niche you’re going to pick ultimately depends on your personal interests and reasons why you chose to become a YouTuber in the first place.
Additionally, you should follow the hottest trends on the Internet so that you can find out which topics are drawing the most attention at the moment. Don’t let all these questions trouble you, simply choose a niche in which you feel the most comfortable in and start shooting. Keep a watchful eye on how your followers respond to the videos you share on your channel as time goes on and remain open to new ideas or collaborations.
3. Secure a Fresh Supply of YouTube Video Ideas
Defining your niche is just a beginning because you have to keep producing your videos at a steady pace. Most YouTube experts say that sharing new content at least once a week is necessary if you want to gather a large group of followers on your channel. Consequently, you’ll need a constant supply of ideas for new videos that cover topics your audience is interested in. A simple search on YouTube can help you discover the videos on the platform that have the most views. This should give you a pretty good idea which types of videos are the most popular at the moment and what viewers want to see the most.
Reading the comments section below a YouTube video can be a great way to discover new ideas since viewers often ask questions or search for advice on very specific aspects of the topic that particular video is covering. Moreover, YouTube isn’t the only destination on the Internet where you can find inspiration for your next video since there are countless groups and communities where you can come across interesting topics for your next video.
4. Get the Right Video and Audio Recording Equipment
The list of audio and video recording gear you’re going to need to create a YouTube video depends on the type of video you’re trying to make. Gamers who want to record gameplay and post it on their YouTube channel only need a screen capturing software or a capture card and a microphone. The list of equipment is a bit longer for YouTubers interested in the production of vlogs, comedy or review videos since they are going to need a camera or a Smartphone capable of recording videos at high resolutions, lighting equipment, tripods, steady cams, microphones. If you would like to learn more about the pieces of equipment you are going to need while recording a YouTube video, check our picks of the YouTube Video Shooting Equipment List .
Production Stage: Recording a YouTube Video
After you’ve successfully completed the preparation stage it is time to start getting ready for the next step of the process of making a YouTube video. However, you can’t just pick up a camera and start randomly shooting unrelated scenes, instead, you should follow the steps below that make the production of a video much less complicated.
1. Write a Script and Make a Shooting Schedule
Write down all of your ideas for your next video prior to shooting the first shot of that video. A script can be particularly useful if the video you’re planning on making involves a lot of narration since you’ll always know what to say next. Furthermore, you don’t have to record the entire video on the same day, and you have the freedom to plan when and where you are going to record each scene you want to include in the video.
2. Set a Scene
You control what the viewers of your YouTube video are going to see. That’s why you have to choose your shooting locations carefully and to hand-pick each prop that is going to be visible in the shot. Avoid shooting in messy rooms, because the items in the background are going to distract the viewer and reduce the quality of your videos.
3. Pick the Best Camera Positions
Once you know where and when you are going to shoot your video, you should start planning your shots. Most YouTube videos are recorded from a single camera position, but you can also experiment with different shot angles if it helps you to tell the story of the video. Don’t put the actors near direct sources of light like windows or lamps because if you do so you can easily end up ruining the shot.
4. Make Sure that You Have Enough Light in The Shot
Natural sources of light are often not enough to light a scene properly, because the amount of available light you’ll have at your disposal can change in a few minutes. That’s why nearly all YouTubers use lighting kits that enable them to control the amount of light in the shot at any moment.
5. Bonus: Making YouTube Videos Without a Camera
In case using video and audio recording equipment is a bit too technical for you, there is a simple alternative solution since you can capture all activities on your computer’s screen with software products such as Filmora or OBS Studio. This is an excellent option for gamers who want to record gameplay of their favorite video games or skilled educators that would like to share their knowledge and show others how to use a piece of software or perform any other computer-based task.
Besides screencasting, you can also assemble existing footage from old TV shows, movies or cartoons to make a YouTube video. You don’t have to worry about copyright infringements, as long as the footage you’re using is within the public domain. However, if you accidentally end up using footage without permission it is highly unlikely that anyone is going to file a lawsuit, but your video may be removed from your YouTube channel if someone reports that you’ve used footage without the permission from its owners.
Postproduction Stage: Editing the Footage You Recorded
Before you can share the video clips you recorded with a camera, Smartphone or a screencasting software, you should edit them first. Choosing video editing software isn’t always easy since there are so many different options that enable you to perform both basic and advanced video editing tasks. You can check our recommendations about some of the best video editing software for YouTube videos, in case you are still looking for a video editor that is best suited for the price range you’ve had in mind or your skill level. You should choose a video editing app that you feel the most comfortable using since you are going to spend a lot of time editing videos with it.
The video editing techniques you will utilize during the process of piecing together a YouTube video depend on a number of factors that range from the genre of the video to its visual style. However, trimming or cutting the footage, creating opening titles and end credits are among the most common video editing actions you will have to perform on each new project. Mastering these basic video editing techniques is essential for the success of your videos on YouTube since it will enable you to quickly trim a video clip by dragging one of its ends in an inward or outward direction or remove a portion of a clip you don’t want to feature in the final cut of the video from the timeline.
Hard cuts can at times disrupt the flow of a video, but you can easily fix this by adding a transition between two clips. What’s more, nearly all video editing software products on the market come bundled with rich visual and audio effects libraries that make the color grading or audio editing process much faster. Adding opening titles, lower thirds or any other image overlay can help you introduce the characters in the video to the audience, inform the audience about important aspects of the topic you’re covering or summarize the key points of the video.
Creating a soundtrack is also a vital step of the video editing process that largely influences the quality of the final video. That’s why the narration or the dialogues must be recorded professionally since even the slightest background noise can distract the viewer. Whether or not you are going to add music to a video, depends on the type of project you’re working on. Video editing software products like Filmora have their own royalty free music libraries that offer songs from Rock or Electronic and numerous other genres.
When you complete the video editing process, you should export the video to a folder on your hard drive or directly to your YouTube channel if the video editing app you’ve chosen provides that option. How long the rendering of a video is going to take depends on your computer’s processing power, video’s length, and the output resolution.
Adding/Uploading Videos to Your YouTube Channel
As we already noted you can either upload a video to YouTube directly from a video editing software or from a hard drive after the rendering process is completed. You can upload videos with 16:9 or 4:3 aspect ratios to your channel, and the platform support videos in resolutions up to 8K. The minimum length of a YouTube video is 33 seconds while a video’s maximum length cannot exceed the twelve-hour limit. The file’s size can’t be larger than 128GB while the frame rates can go as high as 60fps. If you need to edit the uploaded and published YouTube videos, you can check our tips about editing existing YouTube videos , and you can check out our guide about how to make money on YouTube if you would like to learn more about account monetization.
Read More to Get : How to Loop a YouTube Video >>
1. Optimize Your Content for YouTube Searches
Every bit of information you add to the video increases its visibility on the platform. Even the name of the file you’re uploading to your channel should contain a keyword, and once the upload is completed you should add a title, description, and metadata if you would like to increase the video’s visibility on the platform. It is vital to select your YouTube SEO strategy before you actually start adding new videos to your strategy. In case you’re not familiar with the concept of search engine optimization for YouTube, you can find everything you need to know aboutYouTube SEO in our guide.
2. Create Visually Captivating Thumbnails and End Screen Elements
A thumbnail is usually a snapshot of a frame from a video, you’ve created during the video editing process or any other still image that suggests what the video is about. A small thing like adding a thumbnail to a YouTube video can increase both the number of views and the number of likes that video is getting. In addition, YouTube’s video editor enables you to add end screens that last anywhere between five and twenty seconds to your videos, but keep in mind that the video must be at least 25 seconds long to have an end screen. There are a number of fully customizable templates available that can be uses to promote your upcoming videos or to invite viewers to subscribe to your channel.
Wanna making YouTube thumbnail yourself? Check some of the best YouTube thumbnail makers list.
3. Publish, Interact and Share
YouTube lets you keep your videos private until you are ready to make them public. Once you decide to make a video available to all YouTube users, you should share it on social media like Twitter, Facebook or Tumblr. Furthermore, embedding a YouTube video on your blog or website can drastically increase the number of views it’s getting. The YouTube Analytics tool is designed to help you track the metrics that indicate how well your video is performing. Don’t know which analytics tools should use? Check our picks of some useful YouTube Analytics Tools to learn how to analyze your video.
How to Make YouTube Videos from a Mac or PC Computer?
Even though you can use almost any video editing software to edit a YouTube video, we recommend trying a versatile video editing app like Filmora to edit videos on Windows PC and Mac which offers both basic and advanced video editing features. Creating a video in Filmora doesn’t require a developed set of video editing skills, since all of the tools and options the editor offers are remarkably easy to use.
When you are ready to start a new project you should simply launch the software, and once the new project loads, you should head over to the File menu and select the Project Settings option that lets you set the resolution, aspect ratio and the frame rate of the video. Proceed to import the footage into the project by selecting one of the available options in the Import drop-down menu or by simply dragging the media assets from a folder on your hard drive and dropping them to the Filmora’s Media Panel. In case you don’t have your own audio and video footage you can download videos, music, visual and audio effects from a stock footage website like Filmstock effects store . Filmora also offers screen casting features, so you can easily record gameplay, show viewers how to use a software or capture any other type of activity on your computer’s screen.
Add each media asset you want to include in the final cut of the video to the timeline and then proceed to remove all unwanted parts of the video and audio clips from the timeline using the Cut or Trim options. Filmora offers rich transitions and visual effects libraries you can use to make the cuts between shot smoother or enhance the colors in the video clips you’re editing. Furthermore, the editor lets you take snapshots of any frame in video clips you’ve placed on the timeline in a single click which can be quite useful if you want to create a thumbnail for your YouTube video. Creating the opening titles, end credits or adding different image overlays to a video is a straight forward process since you just have to select the option that fits the style of the video you’re creating and add it to the timeline. Once you’ve completed the video editing process, you can click on the Export button and decide if you want to export a video directly to your YouTube channel or to a destination on your hard drive.
New to Filmora? Check our beginner guide about How to Edit Videos in Filmora in details or check the quick video tutorial below to find out more details.
Conclusion
Becoming a successful YouTuber requires a lot of dedication and hard work, so if at first, you don’t succeed, you should be patient and persistent. In time, as your channel grows, you will be able to monetize your videos, but only if you keep producing new content at a steady pace. Each step of the YouTube creation process is equally important, and you should dedicate an equal amount of attention to recording high-quality footage, editing, and promotion of the content you share on your YouTube channel. Was this article helpful? Leave a comment below and share your thoughts and experiences with us.
Richard Bennett
Richard Bennett is a writer and a lover of all things video.
Follow @Richard Bennett
- Title: In 2024, Tailoring Thumbnails for Maximum YouTube Impact
- Author: Joseph
- Created at : 2024-05-31 13:44:11
- Updated at : 2024-06-01 13:44:11
- Link: https://youtube-stream.techidaily.com/in-2024-tailoring-thumbnails-for-maximum-youtube-impact/
- License: This work is licensed under CC BY-NC-SA 4.0.
