
"In 2024, Sony Vegas for the Aspiring YouTube Editor A Comprehensive Overview"
Sony Vegas for the Aspiring YouTube Editor: A Comprehensive Overview
How to Edit YouTube Videos in Sony Vegas

Richard Bennett
Mar 27, 2024• Proven solutions
Sony Vegas (Vegas Movie Studio) is renowned and particularly popular video editing software which is going to provide you with quite a lot of convenience. It is light, easy to work with and has comprehensive command tools which would provide you with prominent video editing capabilities. You can choose through a variety of exportation presets, including YouTube HD videos. In this article, we’are going to show you how to edit your YouTube Videos with Sony Vegas Pro.
Best Sony Vegas Alternative to Edit YouTube Videos - Even though Sony Vegas is quite comprehensive, it does require knowledge on behalf of the user. Unlike it, Wondershare Filmora is a perfect alternative which would provide you with all the necessary capabilities without presuming any kind of skills on your particular behalf. With this in mind, let’s take a look at some of the benefits:
 Download Mac Version ](https://tools.techidaily.com/wondershare/filmora/download/ )
Amongst these, there are tons of other benefits that you can take advantage of.
- It has over 200 unique styles you can take your pick from
- It has animated captions that you can add conveniently
- It has a wide range of different templates and credits that you can use
How to Edit YouTube Videos in Sony Vegas
Let’s walk through the process of editing.
Step 1: Import Videos
The first thing that you would need to do is import the video clip that you would want to re-shape and edit. In order to do so, you want to click on the File button and then go to Import. You will see a side menu on which you need to click Media and select the file that you want to upload. Keep in mind that you might have to wait for a short period of time while the videos are being uploaded.

Note: You can also import videos which have been published on your channel by downloading them and saving them as MP4 files. On the other hand, if you have the intention of editing videos published on other channels, you might want to use Wondershare Video Converter Ultimate in order to download and convert them to your Mac and get them imported on Sony Vegas.
Step 2: Edit the video and audio files on the Timeline

Sony Vegas introduces a Timeline with Video and Audio tracks. They contain the clips you’ve used in the entire editing process. You can edit them by aligning them as you see fit in order to come up with the best sequence. You can also add additional tracks. In order to do so, all you need to do is right click on the space which is empty and then go Add video track.
Step 3: Add special effects

Of course, what’s video editing software without powerful special effect capabilities? You will see the special effects tab located on the left side of your screen. You can easily browse throughout all of them in order to get a sense of what you can achieve with your video. There are quite a lot of different special effects that you can incorporate in your YouTube video and make it perfect.
Step 4: Export

This is the thing that you need to do once you are done with the process to edit YouTube videos with Sony Vegas. It’s a very easy task to handle and if you’ve come that far you are already on the finish line. Go to File -> Export and choose the specific extension that you want to use. The clip is going to be saved in the directory that you’ve selected, and it’s ready to watch and upload.
Richard Bennett
Richard Bennett is a writer and a lover of all things video.
Follow @Richard Bennett
Richard Bennett
Mar 27, 2024• Proven solutions
Sony Vegas (Vegas Movie Studio) is renowned and particularly popular video editing software which is going to provide you with quite a lot of convenience. It is light, easy to work with and has comprehensive command tools which would provide you with prominent video editing capabilities. You can choose through a variety of exportation presets, including YouTube HD videos. In this article, we’are going to show you how to edit your YouTube Videos with Sony Vegas Pro.
Best Sony Vegas Alternative to Edit YouTube Videos - Even though Sony Vegas is quite comprehensive, it does require knowledge on behalf of the user. Unlike it, Wondershare Filmora is a perfect alternative which would provide you with all the necessary capabilities without presuming any kind of skills on your particular behalf. With this in mind, let’s take a look at some of the benefits:
Download Mac Version ](https://tools.techidaily.com/wondershare/filmora/download/ )
Amongst these, there are tons of other benefits that you can take advantage of.
- It has over 200 unique styles you can take your pick from
- It has animated captions that you can add conveniently
- It has a wide range of different templates and credits that you can use
How to Edit YouTube Videos in Sony Vegas
Let’s walk through the process of editing.
Step 1: Import Videos
The first thing that you would need to do is import the video clip that you would want to re-shape and edit. In order to do so, you want to click on the File button and then go to Import. You will see a side menu on which you need to click Media and select the file that you want to upload. Keep in mind that you might have to wait for a short period of time while the videos are being uploaded.
Note: You can also import videos which have been published on your channel by downloading them and saving them as MP4 files. On the other hand, if you have the intention of editing videos published on other channels, you might want to use Wondershare Video Converter Ultimate in order to download and convert them to your Mac and get them imported on Sony Vegas.
Step 2: Edit the video and audio files on the Timeline
Sony Vegas introduces a Timeline with Video and Audio tracks. They contain the clips you’ve used in the entire editing process. You can edit them by aligning them as you see fit in order to come up with the best sequence. You can also add additional tracks. In order to do so, all you need to do is right click on the space which is empty and then go Add video track.
Step 3: Add special effects
Of course, what’s video editing software without powerful special effect capabilities? You will see the special effects tab located on the left side of your screen. You can easily browse throughout all of them in order to get a sense of what you can achieve with your video. There are quite a lot of different special effects that you can incorporate in your YouTube video and make it perfect.
Step 4: Export
This is the thing that you need to do once you are done with the process to edit YouTube videos with Sony Vegas. It’s a very easy task to handle and if you’ve come that far you are already on the finish line. Go to File -> Export and choose the specific extension that you want to use. The clip is going to be saved in the directory that you’ve selected, and it’s ready to watch and upload.
Richard Bennett
Richard Bennett is a writer and a lover of all things video.
Follow @Richard Bennett
The Game Plan for Thriving as a Livestreamer on YouTube
How to Live Stream on YouTube Gaming?
Richard Bennett
Mar 27, 2024• Proven solutions
1. Live Stream on YouTube Gaming with OBS
You need to follow these simple Step s to use OBS for YouTube Live Streaming:
**Step 1:**First of all you need to login to your YouTube account. You might be aware of the fact that same YouTube account is used for YouTube gaming needs.
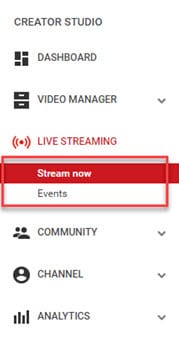
**Step 2:**Once entered inside your account then you need to visit the Go live streaming options and then from drop down menu simply choose Stream Now option.
**Step 3:**It is time to fill the details on screen; put impressive words for your live stream description so that it can grab attention of more viewers. Then select category as ‘Gaming’.

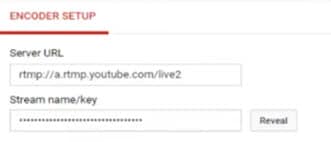
**Step 4:**Now you need to copy the stream key.
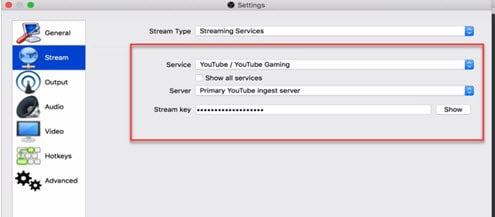
**Step 5:**Now open your OBS tool and then select YouTube as your active game streaming service. Users here need to paste that copied streaming key of Step 5 into the space provided on OBS settings page.
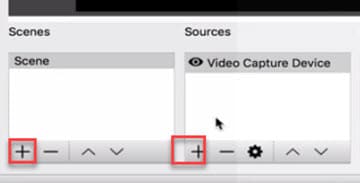
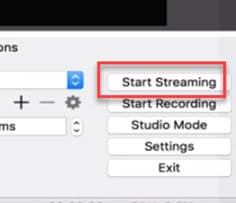
**Step 6:**It is time to make your desktop a video source.
**Step 7:**Once all these settings are completed then you need to hit the start streaming option.
**Step 8:**The service may take few seconds to bring your live on YouTube and after this small duration you will be connected to your channel with your streamed content. Then change your url from youtube.com to gaming.youtube.com
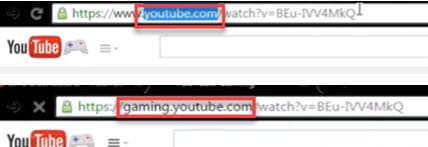
**Step 9:**You are all set to be live on your YouTube gaming profile.
2. Live Stream on YouTube with Elgato Game Capture HD
A: Basic Settings for Elgato Game Capture HD
The Step s below will help you to get ready for streaming with all basic settings that are required by Elgato Game Capture HD tool.
**Step 1:**First of all, you need to open your browser, search for Elgato Game Capture HD software on its official website and then download it for your system. Get it installed.
**Step 2:**Once installation process is complete then launch your software.
**Step 3:**Now you need to hit the add button on screen and select YouTube from drop down menu.
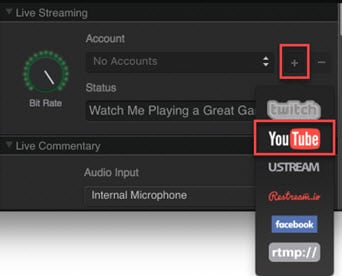
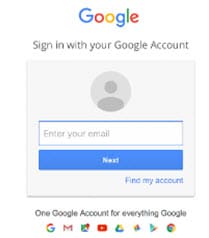
Step 4: It is time to sign in with your Google Account.
**Step 5:**After sign up process, allow the Elgato Game Capture tool to make connection with your YouTube account.

**Step 6:**Soon you will be able to access you account from Elgato platform.

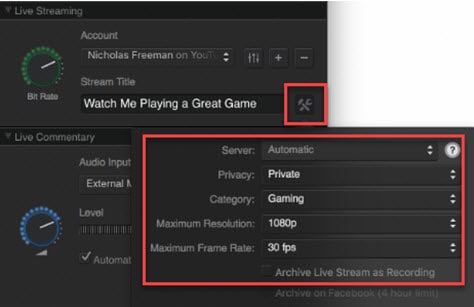
**Step 7:**It is time to make adjustments for streaming settings.
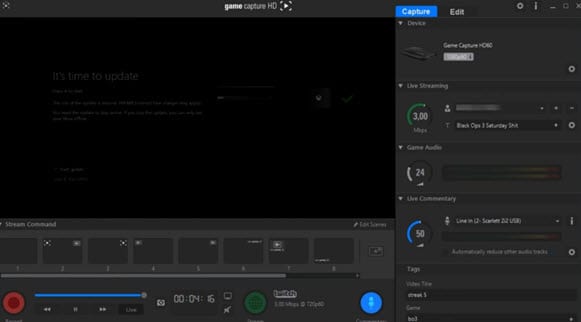
B: Test your Bandwidth and make adjustments for Stream settings
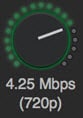
It is essential to check speed of your internet connection during live streaming because if it goes slow then your content will become annoying to viewers and it will decay the reputation of your channel. So prefer to use following Step s to complete the basic settings and to test your internet connection.
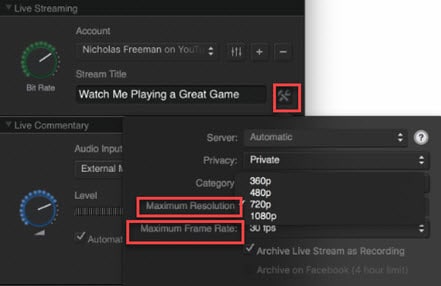
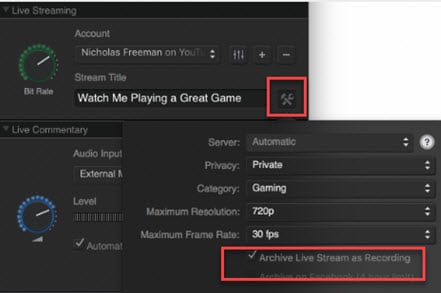
**Step 1:**Open your browser and then visit the speedtest.net platform. You can also use other similar kind of websites to ensure the speed of your internet. Note that you will find a Bit Rate dial in the live streaming section, here you can make adjustments for bit rates to bring it to desired level.
**Step 2:**It is also possible to make customized settings for frame rate and resolution as per need of your stream content.
**Step 3:**One can also prefer to archive his streaming.
**Step 4:**As soon as you have completed all above settings then you need to hit the stream button on screen.
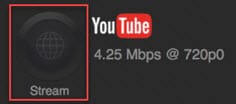
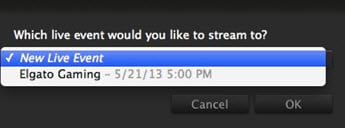
**Step 5:**Soon your software will ask you to select the event that you want to stream, choose your desired event and then press Ok. Soon you will be live on YouTube.
Richard Bennett
Richard Bennett is a writer and a lover of all things video.
Follow @Richard Bennett
Richard Bennett
Mar 27, 2024• Proven solutions
1. Live Stream on YouTube Gaming with OBS
You need to follow these simple Step s to use OBS for YouTube Live Streaming:
**Step 1:**First of all you need to login to your YouTube account. You might be aware of the fact that same YouTube account is used for YouTube gaming needs.
**Step 2:**Once entered inside your account then you need to visit the Go live streaming options and then from drop down menu simply choose Stream Now option.
**Step 3:**It is time to fill the details on screen; put impressive words for your live stream description so that it can grab attention of more viewers. Then select category as ‘Gaming’.
**Step 4:**Now you need to copy the stream key.
**Step 5:**Now open your OBS tool and then select YouTube as your active game streaming service. Users here need to paste that copied streaming key of Step 5 into the space provided on OBS settings page.
**Step 6:**It is time to make your desktop a video source.
**Step 7:**Once all these settings are completed then you need to hit the start streaming option.
**Step 8:**The service may take few seconds to bring your live on YouTube and after this small duration you will be connected to your channel with your streamed content. Then change your url from youtube.com to gaming.youtube.com
**Step 9:**You are all set to be live on your YouTube gaming profile.
2. Live Stream on YouTube with Elgato Game Capture HD
A: Basic Settings for Elgato Game Capture HD
The Step s below will help you to get ready for streaming with all basic settings that are required by Elgato Game Capture HD tool.
**Step 1:**First of all, you need to open your browser, search for Elgato Game Capture HD software on its official website and then download it for your system. Get it installed.
**Step 2:**Once installation process is complete then launch your software.
**Step 3:**Now you need to hit the add button on screen and select YouTube from drop down menu.
Step 4: It is time to sign in with your Google Account.
**Step 5:**After sign up process, allow the Elgato Game Capture tool to make connection with your YouTube account.
**Step 6:**Soon you will be able to access you account from Elgato platform.
**Step 7:**It is time to make adjustments for streaming settings.
B: Test your Bandwidth and make adjustments for Stream settings
It is essential to check speed of your internet connection during live streaming because if it goes slow then your content will become annoying to viewers and it will decay the reputation of your channel. So prefer to use following Step s to complete the basic settings and to test your internet connection.
**Step 1:**Open your browser and then visit the speedtest.net platform. You can also use other similar kind of websites to ensure the speed of your internet. Note that you will find a Bit Rate dial in the live streaming section, here you can make adjustments for bit rates to bring it to desired level.
**Step 2:**It is also possible to make customized settings for frame rate and resolution as per need of your stream content.
**Step 3:**One can also prefer to archive his streaming.
**Step 4:**As soon as you have completed all above settings then you need to hit the stream button on screen.
**Step 5:**Soon your software will ask you to select the event that you want to stream, choose your desired event and then press Ok. Soon you will be live on YouTube.
Richard Bennett
Richard Bennett is a writer and a lover of all things video.
Follow @Richard Bennett
Also read:
- [New] High-End Online Locations for Metallic 3D Lettering
- [New] In 2024, Exploring 8 YouTube Fitness Hacks That Energize Audiences
- [New] Short Film Producer YT
- [New] Top 6 YouTube Outro Makers-Lots of FREE Options
- [New] Ultimate Storage Enhancement for Sony Alpha 7S II
- [Updated] Accelerated Windows Review Strategies
- [Updated] Discover Top Affordable Video Editors of 2023 Today for 2024
- 2024 Approved Giggle Genesis Conceptualizing 7 Funny YouTube Sessions
- 2024 Approved Master the Transition Incorporating Effective Jump Cuts
- Complete Guide to Hard Reset Your Motorola Moto G34 5G | Dr.fone
- How to Turn a Minute Into Millions Maximizing Viewership for YouTubers for 2024
- In 2024, Maximize View Count Best YT Thumbnail Sizes
- In 2024, Proven Pathways to Profit with YouTube Short Videos
- In 2024, Unlock Your Xiaomi Redmi Note 12Rs Potential The Top 20 Lock Screen Apps You Need to Try
- Monthly Income Patterns for Content Creators for 2024
- The Pros and Cons of the LG K51 Phone - Eye-Catching Appearance vs Slow Performance Review
- Top IMEI Unlokers for Your Samsung Galaxy F15 5G Phone
- Title: In 2024, Sony Vegas for the Aspiring YouTube Editor A Comprehensive Overview
- Author: Joseph
- Created at : 2024-12-17 20:36:54
- Updated at : 2024-12-25 00:47:24
- Link: https://youtube-stream.techidaily.com/in-2024-sony-vegas-for-the-aspiring-youtube-editor-a-comprehensive-overview/
- License: This work is licensed under CC BY-NC-SA 4.0.