
:max_bytes(150000):strip_icc()/unnamed1-da6285c1120045d79e82ad7259c4240b.png)
"In 2024, Simple Screen-Capture Techniques to Grab YouTube Soundtracks"
Simple Screen-Capture Techniques to Grab YouTube Soundtracks
How to Record Audio from YouTube

Max Wales
Mar 27, 2024• Proven solutions
It happens several times when we are watching some videos on YouTube and the background music of the videos appeal us the most. We go online and start searching for that unknown but heart touching song. Unfortunately, the song is not available online. But it doesn’t mean that you cannot add that song to your playlist. The great news is that there are so many advanced audio recording software tools that allow users to record audios directly from YouTube videos.
Sometimes, we are interested to play our favorite music during a long hour journey, but the missing internet connectivity does not allow us to stream it online. In such a situation also, you can get your free music easily on your iPad, iPhone, or any handheld device and it can be later burnt into CD as well. Now you might be interested to know how all this can happen without the “Record Audio” button on YouTube. Don’t worry! Below we have highlighted three simple methods to do this task:
- Method 1: Capture Audio from YouTube with Online YouTube2MP3 Converter
- Method 2: Recording YouTube Audio with Audacity
- Method 3: Recording Sound with Streaming Audio Recorder
- Method 4: Record Audio with Filmora
Note: We resolutely oppose all forms of copyright-infringing downloads. This tutorial is only for downloading YouTube videos/audio materials from your own channel.
![]()

The All-in-One Screen Recorder & Video Editor
- Record desktop screen , voiceover, and webcam simultaneously
- Edit recorded clips quickly with a wide range of professional tools
- Built-in plentiful templates and effects
- Export to MP4, MOV, MKV, GIF and multiple formats
For Win 7 or later (64-bit)
For macOS 10.12 or later
 Secure Download
Method 1: Capture Audio from YouTube with Online YouTube2MP3 Converter
The simplest technique to record audio from YouTube videos is to use a trustworthy online application that can perform the conversion from video to MP3 file . In this article, I am going to show you how to capture audio from YouTube with the assist of a free online convert tool named YouTube to MP3. To do this, simply follow these simple steps:

- Visit the YouTube video page and copy the URL of the video whose audio you want to get in form of an MP3
- Go to the internet and open the online YouTube to MP3 converter tool.
- Paste your video URL in the text field available at the top of the website page.
- Choose your output file format as mp3.
- Hit the Convert conversion button.
- When the conversion is done, you will get a download button on the screen. Hit the Download button and soon your file will be saved to your device.
If you think using YouTube to MP3 Converter to capture audio from YouTube meets your needs, you can visit this online converter: youtubetomp3music.com . While, if you find need a better solution, then keep reading.
Method 2: Recording Sound from YouTube with Audacity
In case if you are interested to record yourself or want to capture just a small portion of the video’s sound, it is good to start with the Audacity program. Following simple steps will assist you to complete your recording process with this handy tool:
- First, download the Audacity program on your system. Note that it is available for free, so anyone can get it easily from the internet.
- Run the setup to begin the installation process and follow on-screen guidelines to finish the process.
- Open Audacity software on your system and from the top menu bar hit the Edit option and then go to Preferences.

- In the Device section of Preferences window, switch to the Recording section.
- Choose Stereo Mix option. In case if it is disabled by default, you may need to enable it first. To do this, go to the control panel of your computer, go to Hardware and Sound section and then switch to Sound section. Now go to Recording tab and right click with the mouse on the blank space of the screen. From the drop-down menu choose Show Disabled Devices option. You will find Stereo Mix Device option on the screen; right click on this device and hit Enable option.

- Hit Ok to save the new sound settings. After these settings, you will have to open the Audacity program again to work with Stereo Mix option.
- It is time to open your YouTube video and hit the record button. Make sure the connection is fast enough to play video without any interruption, otherwise keep it loaded in advance. Play the video and when done, hit the stop button on Audacity program.
- This file can be exported and saved to a device with the MP3 file format.
Method 3: Recording Sound with Streaming Audio Recorder
The third choice for recording YouTube audios is using Streaming Audio Recorder . The great news is that this software cannot only record audios for you rather at the same time it is loaded with advanced editor tool that allows easy cutting and splicing of sounds for the creation of customized videos. With Streaming Audio Recorder, you can also convert your videos into various file formats.
You will be happy to hear that this recorder is not just dedicated to YouTube platform only rather it can also work perfectly with Grooveshark, Jango, and Spotify. Below are few simple steps that you can use to complete the audio recording task with Streaming Audio Recorder:

- Go to the internet and download Streaming Audio Recorder. Install and open the program.
- Hit gear icon on the main interface and then move to settings. Set source of the audio input as System Sound.
- Start playing your desired YouTube video and on recorder, hit the record button instantly.
- As soon as the recording task is complete, hit the Stop button and your recorded audio will be soon saved to the targeted folder.
Recommended: Record Audio and Save to MP3 Format with Wondershare Filmora


You can also use Filmora to record your YouTube audio and then save the recorded audio or the video to MP3 format at exporting and then you can listen to the recorded audio and music even when there is no network connection.
With these advanced tools, the audio recording task becomes quite simple and easy. Even beginners can handle with without any trouble. If you are interested to capture your favorite tracks from online videos, it is right time to choose any of the above suitable methods and start recording your audio.
You can change the voice in audio , or add fade in and fade out effects, or edit the recorded audio file with more tools. The recorded media files can be further customized as well as shared on other social media platforms. It is a great idea for today’s creative young generation. These handy tools can make your audio recording task quite easier and resultant files can be saved in a variety of file formats for further sharing.
If you want to edit the record audio further, like adjust the audio pitch, remove background noise, mix the audio balance, equalize the audio, you can also try Filmora. It allows you to record the audio, webcam and desktop screen automatically . And it works on 64-bit Windows7/8/10, and Mac OS X 10.11 El Capitan and late.
Max Wales
Max Wales is a writer and a lover of all things video.
Follow @Max Wales
Max Wales
Mar 27, 2024• Proven solutions
It happens several times when we are watching some videos on YouTube and the background music of the videos appeal us the most. We go online and start searching for that unknown but heart touching song. Unfortunately, the song is not available online. But it doesn’t mean that you cannot add that song to your playlist. The great news is that there are so many advanced audio recording software tools that allow users to record audios directly from YouTube videos.
Sometimes, we are interested to play our favorite music during a long hour journey, but the missing internet connectivity does not allow us to stream it online. In such a situation also, you can get your free music easily on your iPad, iPhone, or any handheld device and it can be later burnt into CD as well. Now you might be interested to know how all this can happen without the “Record Audio” button on YouTube. Don’t worry! Below we have highlighted three simple methods to do this task:
- Method 1: Capture Audio from YouTube with Online YouTube2MP3 Converter
- Method 2: Recording YouTube Audio with Audacity
- Method 3: Recording Sound with Streaming Audio Recorder
- Method 4: Record Audio with Filmora
Note: We resolutely oppose all forms of copyright-infringing downloads. This tutorial is only for downloading YouTube videos/audio materials from your own channel.
![]()
The All-in-One Screen Recorder & Video Editor
- Record desktop screen , voiceover, and webcam simultaneously
- Edit recorded clips quickly with a wide range of professional tools
- Built-in plentiful templates and effects
- Export to MP4, MOV, MKV, GIF and multiple formats
For Win 7 or later (64-bit)
For macOS 10.12 or later
Secure Download
Method 1: Capture Audio from YouTube with Online YouTube2MP3 Converter
The simplest technique to record audio from YouTube videos is to use a trustworthy online application that can perform the conversion from video to MP3 file . In this article, I am going to show you how to capture audio from YouTube with the assist of a free online convert tool named YouTube to MP3. To do this, simply follow these simple steps:
- Visit the YouTube video page and copy the URL of the video whose audio you want to get in form of an MP3
- Go to the internet and open the online YouTube to MP3 converter tool.
- Paste your video URL in the text field available at the top of the website page.
- Choose your output file format as mp3.
- Hit the Convert conversion button.
- When the conversion is done, you will get a download button on the screen. Hit the Download button and soon your file will be saved to your device.
If you think using YouTube to MP3 Converter to capture audio from YouTube meets your needs, you can visit this online converter: youtubetomp3music.com . While, if you find need a better solution, then keep reading.
Method 2: Recording Sound from YouTube with Audacity
In case if you are interested to record yourself or want to capture just a small portion of the video’s sound, it is good to start with the Audacity program. Following simple steps will assist you to complete your recording process with this handy tool:
- First, download the Audacity program on your system. Note that it is available for free, so anyone can get it easily from the internet.
- Run the setup to begin the installation process and follow on-screen guidelines to finish the process.
- Open Audacity software on your system and from the top menu bar hit the Edit option and then go to Preferences.
- In the Device section of Preferences window, switch to the Recording section.
- Choose Stereo Mix option. In case if it is disabled by default, you may need to enable it first. To do this, go to the control panel of your computer, go to Hardware and Sound section and then switch to Sound section. Now go to Recording tab and right click with the mouse on the blank space of the screen. From the drop-down menu choose Show Disabled Devices option. You will find Stereo Mix Device option on the screen; right click on this device and hit Enable option.
- Hit Ok to save the new sound settings. After these settings, you will have to open the Audacity program again to work with Stereo Mix option.
- It is time to open your YouTube video and hit the record button. Make sure the connection is fast enough to play video without any interruption, otherwise keep it loaded in advance. Play the video and when done, hit the stop button on Audacity program.
- This file can be exported and saved to a device with the MP3 file format.
Method 3: Recording Sound with Streaming Audio Recorder
The third choice for recording YouTube audios is using Streaming Audio Recorder . The great news is that this software cannot only record audios for you rather at the same time it is loaded with advanced editor tool that allows easy cutting and splicing of sounds for the creation of customized videos. With Streaming Audio Recorder, you can also convert your videos into various file formats.
You will be happy to hear that this recorder is not just dedicated to YouTube platform only rather it can also work perfectly with Grooveshark, Jango, and Spotify. Below are few simple steps that you can use to complete the audio recording task with Streaming Audio Recorder:
- Go to the internet and download Streaming Audio Recorder. Install and open the program.
- Hit gear icon on the main interface and then move to settings. Set source of the audio input as System Sound.
- Start playing your desired YouTube video and on recorder, hit the record button instantly.
- As soon as the recording task is complete, hit the Stop button and your recorded audio will be soon saved to the targeted folder.
Recommended: Record Audio and Save to MP3 Format with Wondershare Filmora
You can also use Filmora to record your YouTube audio and then save the recorded audio or the video to MP3 format at exporting and then you can listen to the recorded audio and music even when there is no network connection.
With these advanced tools, the audio recording task becomes quite simple and easy. Even beginners can handle with without any trouble. If you are interested to capture your favorite tracks from online videos, it is right time to choose any of the above suitable methods and start recording your audio.
You can change the voice in audio , or add fade in and fade out effects, or edit the recorded audio file with more tools. The recorded media files can be further customized as well as shared on other social media platforms. It is a great idea for today’s creative young generation. These handy tools can make your audio recording task quite easier and resultant files can be saved in a variety of file formats for further sharing.
If you want to edit the record audio further, like adjust the audio pitch, remove background noise, mix the audio balance, equalize the audio, you can also try Filmora. It allows you to record the audio, webcam and desktop screen automatically . And it works on 64-bit Windows7/8/10, and Mac OS X 10.11 El Capitan and late.
Max Wales
Max Wales is a writer and a lover of all things video.
Follow @Max Wales
Audiovisual Experts’ Choices: The Ultimate Video Editing Gear
The Best Laptops for Video Editing

Richard Bennett
Oct 26, 2023• Proven solutions
This article lists the 3 best laptops for video editing in 2018.
Whether you’re an industry professional or an avid YouTuber, you know how important it is to produce quality videos consistently.
The quality of the videos you create will depend on your creativity, the editing software you use, and the hardware that software is installed on. And as you probably know, it can be tough to work fast and get good results when your hardware or laptop isn’t strong enough to power your software properly and allow you to work at the pace you want.
The best laptops for video editing in 2018 have three things in common. First, they have top-of-the-line display technology for color accuracy, color depth, and clarity. Next, they have discrete (dedicated) Graphic Processing Units (GPUs) with accompanying RAM to enable them to handle video processing fast without compromising other system functions. And finally, they have Intel core i7 CPU processors and Solid-State Drives (SSD) for faster overall performance.
THE TOP 3 LAPTOPS FOR EDITING VIDEO IN 2018
The top 3 laptops below are quite impressive. They have the right mix of power and function that video editing requires.
1.MACBOOK PRO WITH TOUCH BAR
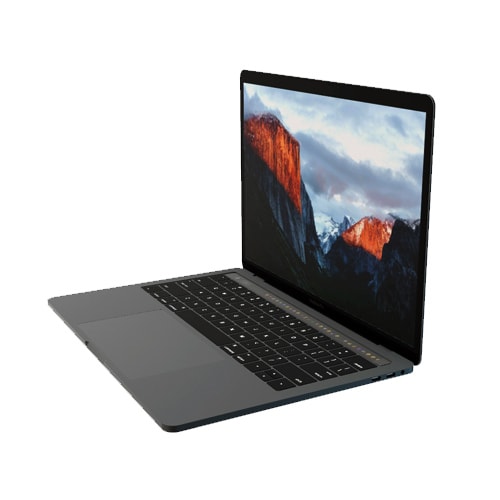
PRICE: $1500 - $1800
SYSTEM SPECS:
CPU: Intel Core i7 Processor
GRAPHICS: Radeon Pro 555 with 2GB memory – 560 with 4GB memory
RAM: 16GB
SCREEN: 15.4” Retina Display
RES: 2880 x 1800px
STORAGE: 128 – 256GB SSD
PROS
- OLED Touch Bar
- Thunderbolt 3 ports
- Large Trackpad
CONS:
- No other input ports available besides Thunderbolt 3
- Expensive
The MacBook Pro with Touch Bar is the best video editing laptop produced by Apple. It has a wide 15.4” screen with thin bezels, and its proprietary OLED Touch bar amps up its flexibility and functionality considerably. The Touch Bar is set-up to show different shortcuts for different apps. It works quite well with Photoshop and will show thumbnails, filter options, a color picker, and more while you’re editing videos or stills.
Working with large 4K video files is much easier with the MacBook Pro. It’s fitted with Thunderbolt 3 Ports which have the highest data and video bandwidth available for USB-C connections. With these Thunderbolt ports, you can also use high-speed and high-power peripherals without a hitch. This laptop also has an extra-wide touchpad or Trackpad (as Apple calls it) which expands your physical working surface while also making it easier to do detailed video editing.
Unfortunately, if you need a variety of ports like most videographers, working with the MacBook Pro could be a challenge as it only has Thunderbolt 3 ports. If this is the laptop you prefer, you’ll need to buy additional connection hardware to work with different input devices. And while this laptop impresses in many ways, it’s also quite expensive. There are certainly other laptops on the market which can give you similar performance at a lower cost.
2. DELL XPS 15
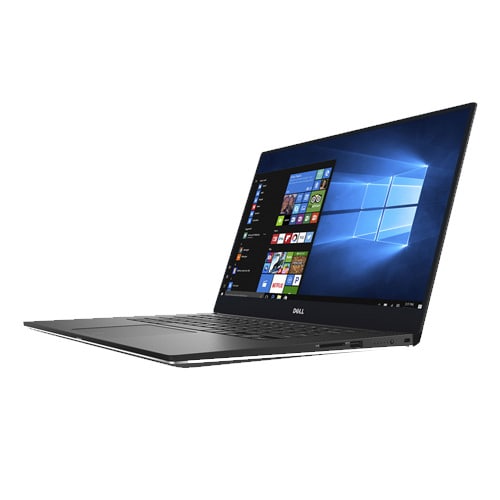
PRICE: $999 - $1300
SYSTEM SPECS:
CPU: Intel Core i7 Processor
GRAPHICS: NVIDIA GeForce GTX 1050
RAM: 8 - 16GB
SCREEN: 15.6”
RES: FHD - 4k UHD 3840 x 2160px
STORAGE: 256GB – 1TB SSD
PROS
- 4k InfinityEdge display
- Good battery life
- Has multiple input ports
CONS:
- Webcam is oddly positioned
The Dell XPS 15 is one laptop that hits the sweet spot for many videographers. It’s considered the closest competitor to the MacBook Pro reviewed above. In fact, many would argue that it tops the MacBook Pro when it comes to speed, color accuracy, and color depth. Its 15.6” screen has very thin bezels for minimal distraction and immersive work experience. At 4K resolution and displaying a wide range of the sRGB gamut, video editing with the Dell XPS 15 promises to be both smooth and enjoyable.
The Dell XPS 15 is certainly more affordable, while still delivering excellent graphics performance. It features an Intel i7 processor and the NVIDIA GeForce GTX 1050 graphics processor. This makes it remarkably fast for video editing, as well as energy-efficient. People who work with different input devices will also like that this laptop has legacy adapters (USB, HDMI, ethernet) alongside a USB type C port.
The biggest downside to the Dell XPS 15 laptop is its oddly positioned webcam. It feels awkward and can be an inconvenience to use since you’ll have to adjust your position significantly while making video calls or recording for your YouTube channel.
3. MICROSOFT SURFACE BOOK 2
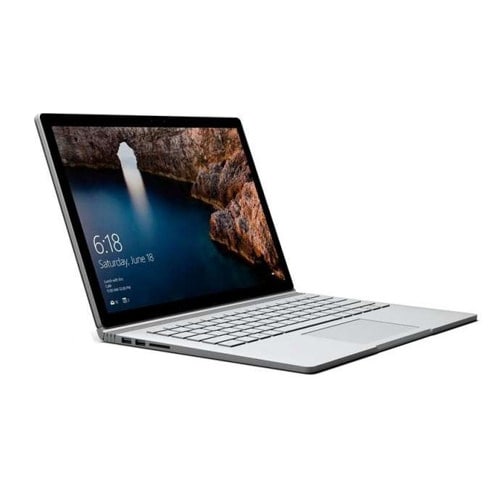
PRICE: $1499 - $2499
SYSTEM SPECS:
CPU: Intel Core i7 Processor
GRAPHICS: Intel HD 620 or Nvidia GTX 1050 / GTX 1060
RAM: 16GB
SCREEN: 15.0”
RES: 3240 x 2160px
STORAGE: 256GB, 512GB – 1TB SSD
PROS
- Detachable screen
- Has multiple input ports (USB Type-A, USB Type-C, SD card reader)
- Works with a Stylus
CONS:
- Expensive
- Fulcrum hinge
The Microsoft Surface Book 2 is a laptop and a tablet thanks to its detachable screen. At a resolution of 3240 x 2160px, its screen is nearly 4k and can handle Full HD and HD footage with ease. Add to this its capacity to show a considerable portion of the sRGB gamut and its easy-to-use stylus and you can see why this 2-in-1 combo from Microsoft is one of the top 3 laptops for video editing in 2018.
Surface Book 2 also has the right combination of power and storage capacity that video editing requires. It boasts a state-of-the-art NVIDIA graphics processor and an Intel i7 processor for a smooth workflow no matter the size or level of detail involved in your video editing project.
On the downside, this laptop is undoubtedly very expensive. Compared to the function and power you can get from the DELL XPS 15, it’s hard to justify paying nearly $2500 for the Surface Book 2. Its detachable screen, supported by a fulcrum hinge, also comes at a price. It makes the laptop a bit bulky at one end when it’s folded. This in turn can make day-to-day handling a bit more tricky than it has to be.
CONCLUSION
If you’re searching for a good laptop to help you improve the quality of your videos in 2018, look no further than these 3. They have all the power, function, and storage capacity you need to handle any project with ease. Just be mindful of your budget and consider which extras are worth the expense. Go for the MacBook Pro with Touch Bar if customizing your workflow is a priority. Opt for the Dell XPS 15 if you want the best combination of display quality and graphics processing. Finally, consider the Surface Book 2 if you need the flexibility of a 2-in-1 device.
What do you think is the best laptop for video editing?
Equip Your Laptop with the Best Video Editing Software
Richard Bennett
Richard Bennett is a writer and a lover of all things video.
Follow @Richard Bennett
Richard Bennett
Oct 26, 2023• Proven solutions
This article lists the 3 best laptops for video editing in 2018.
Whether you’re an industry professional or an avid YouTuber, you know how important it is to produce quality videos consistently.
The quality of the videos you create will depend on your creativity, the editing software you use, and the hardware that software is installed on. And as you probably know, it can be tough to work fast and get good results when your hardware or laptop isn’t strong enough to power your software properly and allow you to work at the pace you want.
The best laptops for video editing in 2018 have three things in common. First, they have top-of-the-line display technology for color accuracy, color depth, and clarity. Next, they have discrete (dedicated) Graphic Processing Units (GPUs) with accompanying RAM to enable them to handle video processing fast without compromising other system functions. And finally, they have Intel core i7 CPU processors and Solid-State Drives (SSD) for faster overall performance.
THE TOP 3 LAPTOPS FOR EDITING VIDEO IN 2018
The top 3 laptops below are quite impressive. They have the right mix of power and function that video editing requires.
1.MACBOOK PRO WITH TOUCH BAR
PRICE: $1500 - $1800
SYSTEM SPECS:
CPU: Intel Core i7 Processor
GRAPHICS: Radeon Pro 555 with 2GB memory – 560 with 4GB memory
RAM: 16GB
SCREEN: 15.4” Retina Display
RES: 2880 x 1800px
STORAGE: 128 – 256GB SSD
PROS
- OLED Touch Bar
- Thunderbolt 3 ports
- Large Trackpad
CONS:
- No other input ports available besides Thunderbolt 3
- Expensive
The MacBook Pro with Touch Bar is the best video editing laptop produced by Apple. It has a wide 15.4” screen with thin bezels, and its proprietary OLED Touch bar amps up its flexibility and functionality considerably. The Touch Bar is set-up to show different shortcuts for different apps. It works quite well with Photoshop and will show thumbnails, filter options, a color picker, and more while you’re editing videos or stills.
Working with large 4K video files is much easier with the MacBook Pro. It’s fitted with Thunderbolt 3 Ports which have the highest data and video bandwidth available for USB-C connections. With these Thunderbolt ports, you can also use high-speed and high-power peripherals without a hitch. This laptop also has an extra-wide touchpad or Trackpad (as Apple calls it) which expands your physical working surface while also making it easier to do detailed video editing.
Unfortunately, if you need a variety of ports like most videographers, working with the MacBook Pro could be a challenge as it only has Thunderbolt 3 ports. If this is the laptop you prefer, you’ll need to buy additional connection hardware to work with different input devices. And while this laptop impresses in many ways, it’s also quite expensive. There are certainly other laptops on the market which can give you similar performance at a lower cost.
2. DELL XPS 15
PRICE: $999 - $1300
SYSTEM SPECS:
CPU: Intel Core i7 Processor
GRAPHICS: NVIDIA GeForce GTX 1050
RAM: 8 - 16GB
SCREEN: 15.6”
RES: FHD - 4k UHD 3840 x 2160px
STORAGE: 256GB – 1TB SSD
PROS
- 4k InfinityEdge display
- Good battery life
- Has multiple input ports
CONS:
- Webcam is oddly positioned
The Dell XPS 15 is one laptop that hits the sweet spot for many videographers. It’s considered the closest competitor to the MacBook Pro reviewed above. In fact, many would argue that it tops the MacBook Pro when it comes to speed, color accuracy, and color depth. Its 15.6” screen has very thin bezels for minimal distraction and immersive work experience. At 4K resolution and displaying a wide range of the sRGB gamut, video editing with the Dell XPS 15 promises to be both smooth and enjoyable.
The Dell XPS 15 is certainly more affordable, while still delivering excellent graphics performance. It features an Intel i7 processor and the NVIDIA GeForce GTX 1050 graphics processor. This makes it remarkably fast for video editing, as well as energy-efficient. People who work with different input devices will also like that this laptop has legacy adapters (USB, HDMI, ethernet) alongside a USB type C port.
The biggest downside to the Dell XPS 15 laptop is its oddly positioned webcam. It feels awkward and can be an inconvenience to use since you’ll have to adjust your position significantly while making video calls or recording for your YouTube channel.
3. MICROSOFT SURFACE BOOK 2
PRICE: $1499 - $2499
SYSTEM SPECS:
CPU: Intel Core i7 Processor
GRAPHICS: Intel HD 620 or Nvidia GTX 1050 / GTX 1060
RAM: 16GB
SCREEN: 15.0”
RES: 3240 x 2160px
STORAGE: 256GB, 512GB – 1TB SSD
PROS
- Detachable screen
- Has multiple input ports (USB Type-A, USB Type-C, SD card reader)
- Works with a Stylus
CONS:
- Expensive
- Fulcrum hinge
The Microsoft Surface Book 2 is a laptop and a tablet thanks to its detachable screen. At a resolution of 3240 x 2160px, its screen is nearly 4k and can handle Full HD and HD footage with ease. Add to this its capacity to show a considerable portion of the sRGB gamut and its easy-to-use stylus and you can see why this 2-in-1 combo from Microsoft is one of the top 3 laptops for video editing in 2018.
Surface Book 2 also has the right combination of power and storage capacity that video editing requires. It boasts a state-of-the-art NVIDIA graphics processor and an Intel i7 processor for a smooth workflow no matter the size or level of detail involved in your video editing project.
On the downside, this laptop is undoubtedly very expensive. Compared to the function and power you can get from the DELL XPS 15, it’s hard to justify paying nearly $2500 for the Surface Book 2. Its detachable screen, supported by a fulcrum hinge, also comes at a price. It makes the laptop a bit bulky at one end when it’s folded. This in turn can make day-to-day handling a bit more tricky than it has to be.
CONCLUSION
If you’re searching for a good laptop to help you improve the quality of your videos in 2018, look no further than these 3. They have all the power, function, and storage capacity you need to handle any project with ease. Just be mindful of your budget and consider which extras are worth the expense. Go for the MacBook Pro with Touch Bar if customizing your workflow is a priority. Opt for the Dell XPS 15 if you want the best combination of display quality and graphics processing. Finally, consider the Surface Book 2 if you need the flexibility of a 2-in-1 device.
What do you think is the best laptop for video editing?
Equip Your Laptop with the Best Video Editing Software
Richard Bennett
Richard Bennett is a writer and a lover of all things video.
Follow @Richard Bennett
- Title: "In 2024, Simple Screen-Capture Techniques to Grab YouTube Soundtracks"
- Author: Joseph
- Created at : 2024-05-31 13:45:53
- Updated at : 2024-06-01 13:45:53
- Link: https://youtube-stream.techidaily.com/in-2024-simple-screen-capture-techniques-to-grab-youtube-soundtracks/
- License: This work is licensed under CC BY-NC-SA 4.0.
