
:max_bytes(150000):strip_icc()/how-to-sync-contacts-from-iphone-to-mac-5714752-2c82289fe1f84868909ac8a60960d240.jpg)
"In 2024, PowerPoint Mastery Integrating External Video URLs"
PowerPoint Mastery: Integrating External Video URLs
How to Embed a YouTube Video in PowerPoint

Richard Bennett
Mar 27, 2024• Proven solutions
There might be several instances where you want your audiences to watch a video so that you can elaborate your idea or explain your point more clearly. You may want to do this without leaving the presentation window in order to avoid losing focus from the agenda of the meeting. To make this happen, it is imperative to learn how to embed a YouTube video in PowerPoint.
When talking about PowerPoint, it is an efficient and powerful tool to prepare animated and static presentations, and embedding videos is yet another useful option that the app offers to its users.
That said, here you will learn a couple of methods to embed YouTube video in PowerPoint.
How to Insert YouTube Video into PowerPoint? (4 Methods)
After understanding the benefits of have a video embedded to your presentation, it is now time to learn how to add YouTube video to PowerPoint.
The four most used methods of getting this done are discussed in detailed in the following sections:
Method 1: Using YouTube Video’s URL
Because every YouTube video has a URL (Uniform Resource Locator) that is unique for that particular clip, PowerPoint allows you to use it to embed the footage to any of its slides. The process is simple, and you can follow the steps given below to get this done:
Step 1: Copy the URL
Open your default web browser, go to the YouTube video you want to embed to PowerPoint, and copy its URL from the address bar at the top.
Step 2: Add URL to PowerPoint

Launch PowerPoint if it is not already open, go to the slide you want to embed the YouTube video to, click Insert from menu bar present above the Ribbon, click Video from the Media section at the right end of the Ribbon, click Online Video from the list that appears, in the Enter the URL for the online video field on the Online Video box, paste the URL that you copied earlier, and click Insert to insert YouTube video into PowerPoint.

Step 3: Position the Player
Once the video is added to the PowerPoint slide, drag its frame and reposition it to a suitable location.
Method 2: Embed a YouTube Video with Embed Code (For Microsoft PowerPoint 2016)
Unlike PowerPoint 2019 that accepts URLs and embed codes in a single URL field, MS PowerPoint 2016 lets you choose how you want to insert a video. The step-by-step instructions given below explain how this can be done:
Step 1: Obtain Embed Code
Go to the YouTube video you want to embed to your PowerPoint slide, click the SHARE icon from the left area under the video player, click the Embed icon in the Share box, and click COPY from the bottom-right corner of the Embed Video box that appears next.

Step 2: Get to the PowerPoint’s Insert Video Box
Launch MS PowerPoint 2016, click Insert from the menu bar at the top, from the Media section in the right of the Ribbon, click Video, and then click Online Video to open the Insert Video box.
Step 3: Embed the Video
Paste the embed code you copied earlier in the Paste embed code here field present next to the From a Video Embed Code option, and press Enter to embed YouTube video in PowerPoint.
Method 3: Insert YouTube Video into PowerPoint by Searching Names (For Microsoft PowerPoint 2016)
Microsoft Office 2016 has another lucrative feature that allows users to embed YouTube video in PowerPoint by searching its name. You can follow the steps given below to find the videos published on YouTube, and insert them to your presentation:
Step 1: Get to the Insert Video Box
Use the process explained in Step 2 of Method 2 to get to the Insert Video box after selecting the slide you want to add a video to.
Step 2: Search and Embed a Video
In the Search YouTube field next to the YouTube option, type the name of the video you want to search on YouTube, press Enter, select the video you want to embed, and click Insert to insert YouTube video into PowerPoint.
Method 4: Insert Video from PC
Another method to embed YouTube video in PowerPoint is by downloading the clip to your PC, and then inserting the footage from there. You can use any free YouTube downloader to obtain a video that is available on YouTube.
Once the file is on your computer, the following steps explain how it can be embedded to your PowerPoint slide:
WARNING: YouTube videos may be subject to copyright. Therefore, before downloading and embedding a video to your PowerPoint slide, make sure that you have proper rights to do so, or that the video can be used for the purpose without any written permission from its creator.
Step 1: Get to the Insert Ribbon
Open PowerPoint and select the slide you want to embed a YouTube video to. Go to Insert from the menu bar at the top.
Step 2: Insert the Video
Click the Video icon from the Media section of the Ribbon, click Video on My PC from the list, and use the Insert Video box that appears to select and insert the video to your PowerPoint slide.
Step 3: Resize and/or Modify the Video
Grab any of the six handles of the video you inserted, and drag it inward to decrease the size of the frame. It is advisable to use the corner handle and drag them diagonally to maintain proper aspect ratio of the player’s frame. Next, right-click anywhere inside the frame, click Format Video from the context menu, and use the options that appear in the right pane to make necessary adjustments to the clip like color correction, manage brightness and contrast, etc.
YouTube Embedding Supported PowerPoint Version Checklist
Depending on the version of Microsoft Office you are using, you may or may not be able to embed a YouTube video in PowerPoint. Also, if your version of PowerPoint allows you to do so, the interface and the options may vary from those you see on your friends’ computer or in some online tutorials.
That said, the following table gives a clear picture of which version of Microsoft Office has video embedding option, and/or what level of integration does it allow:
| MS Office Version | Insert YouTube Via URL | Insert an Online Video with an Embed Code | Insert by Searching for the YouTube Video | Play Embedded YouTube Video Offline |
|---|---|---|---|---|
| Microsoft 365 | Yes | No | No | No |
| PowerPoint 2019 | Yes | Yes | No | No |
| PowerPoint 2016 | No | Yes | Yes | No |
| PowerPoint 2013 | No | No | Yes | No |
| PowerPoint 2010 | No | No (Adobe Flash Player Support Discontinued) | No (Adobe Flash Player Support Discontinued) | No |
| PowerPoint 365/2019 for Mac | Yes | No | No | No |
Frequently Asked Questions About Embedding YouTube Videos in PowerPoint
1. Why Can’t I Embed a YouTube Video in PowerPoint 2010?
PowerPoint 2010 uses Adobe Flash Player to play YouTube videos. Since support for Flash Player is discontinued, PowerPoint 2010 isn’t able to play the videos anymore. To resolve this issue, you need to upgrade your version of Microsoft Office to 2013 or later.
2. Why Can’t I Embed YouTube Videos in PowerPoint for Mac?
You can insert YouTube videos only in Office 365 and Office 2019 versions for Mac. If you are using Office 2016 for Mac, you are required to install an add-in called Web Video Player that can be downloaded from the https://appsource.microsoft.com/en-us/product/office/WA104221182 link. However, if it is PowerPoint 2011 for Mac that you are using, you can’t insert YouTube video to it, and you need to upgrade your MS Office to a higher version for that purpose.
3. Why Can’t I Embed a YouTube Video in PowerPoint 2013?
The version of PowerPoint 2013 that was released initially didn’t allow YouTube video embedding. However, with an update 4018374 that Microsoft rolled out in August 2018, the feature got enabled. You can download and install the update from https://support.microsoft.com/en-us/help/4018374/august-7-2018-update-for-powerpoint-2013-kb4018374 link, and then try inserting a YouTube video to your version of PowerPoint.
4. How Do I Embed a YouTube Video in PowerPoint without Being Online?
YouTube videos that you embed to your PowerPoint presentations can’t be played in offline mode. However, there is a workaround to this. You can download the video from YouTube to your computer using any YouTube downloader, and then use the process explained in Method 4 to insert the clip from your PC.
Conclusion
Although the above sections explain how to embed a YouTube video in PowerPoint, the process to do so may vary in different versions of Microsoft Office. Also, depending on what edition of the program you are using, embedding YouTube videos may or may not be supported according to the availability of the add-ins or updates that Microsoft has rolled out for that particular built of the app.
Richard Bennett
Richard Bennett is a writer and a lover of all things video.
Follow @Richard Bennett
Richard Bennett
Mar 27, 2024• Proven solutions
There might be several instances where you want your audiences to watch a video so that you can elaborate your idea or explain your point more clearly. You may want to do this without leaving the presentation window in order to avoid losing focus from the agenda of the meeting. To make this happen, it is imperative to learn how to embed a YouTube video in PowerPoint.
When talking about PowerPoint, it is an efficient and powerful tool to prepare animated and static presentations, and embedding videos is yet another useful option that the app offers to its users.
That said, here you will learn a couple of methods to embed YouTube video in PowerPoint.
How to Insert YouTube Video into PowerPoint? (4 Methods)
After understanding the benefits of have a video embedded to your presentation, it is now time to learn how to add YouTube video to PowerPoint.
The four most used methods of getting this done are discussed in detailed in the following sections:
Method 1: Using YouTube Video’s URL
Because every YouTube video has a URL (Uniform Resource Locator) that is unique for that particular clip, PowerPoint allows you to use it to embed the footage to any of its slides. The process is simple, and you can follow the steps given below to get this done:
Step 1: Copy the URL
Open your default web browser, go to the YouTube video you want to embed to PowerPoint, and copy its URL from the address bar at the top.
Step 2: Add URL to PowerPoint
Launch PowerPoint if it is not already open, go to the slide you want to embed the YouTube video to, click Insert from menu bar present above the Ribbon, click Video from the Media section at the right end of the Ribbon, click Online Video from the list that appears, in the Enter the URL for the online video field on the Online Video box, paste the URL that you copied earlier, and click Insert to insert YouTube video into PowerPoint.
Step 3: Position the Player
Once the video is added to the PowerPoint slide, drag its frame and reposition it to a suitable location.
Method 2: Embed a YouTube Video with Embed Code (For Microsoft PowerPoint 2016)
Unlike PowerPoint 2019 that accepts URLs and embed codes in a single URL field, MS PowerPoint 2016 lets you choose how you want to insert a video. The step-by-step instructions given below explain how this can be done:
Step 1: Obtain Embed Code
Go to the YouTube video you want to embed to your PowerPoint slide, click the SHARE icon from the left area under the video player, click the Embed icon in the Share box, and click COPY from the bottom-right corner of the Embed Video box that appears next.
Step 2: Get to the PowerPoint’s Insert Video Box
Launch MS PowerPoint 2016, click Insert from the menu bar at the top, from the Media section in the right of the Ribbon, click Video, and then click Online Video to open the Insert Video box.
Step 3: Embed the Video
Paste the embed code you copied earlier in the Paste embed code here field present next to the From a Video Embed Code option, and press Enter to embed YouTube video in PowerPoint.
Method 3: Insert YouTube Video into PowerPoint by Searching Names (For Microsoft PowerPoint 2016)
Microsoft Office 2016 has another lucrative feature that allows users to embed YouTube video in PowerPoint by searching its name. You can follow the steps given below to find the videos published on YouTube, and insert them to your presentation:
Step 1: Get to the Insert Video Box
Use the process explained in Step 2 of Method 2 to get to the Insert Video box after selecting the slide you want to add a video to.
Step 2: Search and Embed a Video
In the Search YouTube field next to the YouTube option, type the name of the video you want to search on YouTube, press Enter, select the video you want to embed, and click Insert to insert YouTube video into PowerPoint.
Method 4: Insert Video from PC
Another method to embed YouTube video in PowerPoint is by downloading the clip to your PC, and then inserting the footage from there. You can use any free YouTube downloader to obtain a video that is available on YouTube.
Once the file is on your computer, the following steps explain how it can be embedded to your PowerPoint slide:
WARNING: YouTube videos may be subject to copyright. Therefore, before downloading and embedding a video to your PowerPoint slide, make sure that you have proper rights to do so, or that the video can be used for the purpose without any written permission from its creator.
Step 1: Get to the Insert Ribbon
Open PowerPoint and select the slide you want to embed a YouTube video to. Go to Insert from the menu bar at the top.
Step 2: Insert the Video
Click the Video icon from the Media section of the Ribbon, click Video on My PC from the list, and use the Insert Video box that appears to select and insert the video to your PowerPoint slide.
Step 3: Resize and/or Modify the Video
Grab any of the six handles of the video you inserted, and drag it inward to decrease the size of the frame. It is advisable to use the corner handle and drag them diagonally to maintain proper aspect ratio of the player’s frame. Next, right-click anywhere inside the frame, click Format Video from the context menu, and use the options that appear in the right pane to make necessary adjustments to the clip like color correction, manage brightness and contrast, etc.
YouTube Embedding Supported PowerPoint Version Checklist
Depending on the version of Microsoft Office you are using, you may or may not be able to embed a YouTube video in PowerPoint. Also, if your version of PowerPoint allows you to do so, the interface and the options may vary from those you see on your friends’ computer or in some online tutorials.
That said, the following table gives a clear picture of which version of Microsoft Office has video embedding option, and/or what level of integration does it allow:
| MS Office Version | Insert YouTube Via URL | Insert an Online Video with an Embed Code | Insert by Searching for the YouTube Video | Play Embedded YouTube Video Offline |
|---|---|---|---|---|
| Microsoft 365 | Yes | No | No | No |
| PowerPoint 2019 | Yes | Yes | No | No |
| PowerPoint 2016 | No | Yes | Yes | No |
| PowerPoint 2013 | No | No | Yes | No |
| PowerPoint 2010 | No | No (Adobe Flash Player Support Discontinued) | No (Adobe Flash Player Support Discontinued) | No |
| PowerPoint 365/2019 for Mac | Yes | No | No | No |
Frequently Asked Questions About Embedding YouTube Videos in PowerPoint
1. Why Can’t I Embed a YouTube Video in PowerPoint 2010?
PowerPoint 2010 uses Adobe Flash Player to play YouTube videos. Since support for Flash Player is discontinued, PowerPoint 2010 isn’t able to play the videos anymore. To resolve this issue, you need to upgrade your version of Microsoft Office to 2013 or later.
2. Why Can’t I Embed YouTube Videos in PowerPoint for Mac?
You can insert YouTube videos only in Office 365 and Office 2019 versions for Mac. If you are using Office 2016 for Mac, you are required to install an add-in called Web Video Player that can be downloaded from the https://appsource.microsoft.com/en-us/product/office/WA104221182 link. However, if it is PowerPoint 2011 for Mac that you are using, you can’t insert YouTube video to it, and you need to upgrade your MS Office to a higher version for that purpose.
3. Why Can’t I Embed a YouTube Video in PowerPoint 2013?
The version of PowerPoint 2013 that was released initially didn’t allow YouTube video embedding. However, with an update 4018374 that Microsoft rolled out in August 2018, the feature got enabled. You can download and install the update from https://support.microsoft.com/en-us/help/4018374/august-7-2018-update-for-powerpoint-2013-kb4018374 link, and then try inserting a YouTube video to your version of PowerPoint.
4. How Do I Embed a YouTube Video in PowerPoint without Being Online?
YouTube videos that you embed to your PowerPoint presentations can’t be played in offline mode. However, there is a workaround to this. You can download the video from YouTube to your computer using any YouTube downloader, and then use the process explained in Method 4 to insert the clip from your PC.
Conclusion
Although the above sections explain how to embed a YouTube video in PowerPoint, the process to do so may vary in different versions of Microsoft Office. Also, depending on what edition of the program you are using, embedding YouTube videos may or may not be supported according to the availability of the add-ins or updates that Microsoft has rolled out for that particular built of the app.
Richard Bennett
Richard Bennett is a writer and a lover of all things video.
Follow @Richard Bennett
Premium 10 Volume Enhancers: Windows, Apple, Android
Best 10 YouTube Volume Boosters for Windows, macOS, Android, and iPhone

Shanoon Cox
Mar 27, 2024• Proven solutions
Have you ever listened to a YouTube video on max volume but still the sound wasn’t audible - even after turning up the YouTube volume as well as device audio? It is super annoying and inconvenient when you increase volume to max yet the video remains inaudible. YouTube volume issue could be due to various reasons such as poor audio quality of the built-in speakers or low original video sound. Well, there is a simple way to combat this problem i.e., sound booster. You can set different volume levels for the YouTube app on your PC or smartphone’s native volume controls. There are different YouTube volume boosters for Android, Windows, macOS, and iOS devices.
From listening to your favorite podcast to watching vlogs with your friends, you can use the best volume booster apps to increase the media sound volume and quality!
- Part 1: Best YouTube Volume Boosters for Windows and macOS
- Part 2: Best YouTube Volume Boosters for Android and iOS
- Part 3: Best YouTube Video Editing Software-Wondershare Filmora (Bonus Tip)
Part 1: Best YouTube Volume Boosters for Windows and macOS
Let’s introduce the best YouTube volume boosters for Windows and macOS:
1. FxSound (Windows and Mac)
FxSound is a very powerful tool that is made for Windows and macOS to enhance and boost the quality and volume of sound. This app comes with many features. For example, this audio software provides better sound quality, volume booster, and sound effects. Now you can listen to music, watch movies and play games without any distortion. Easily boost base, get customized effects and play with custom presets. You can download this app for your PC for free through the official website. People like this equalizer because it can make any audio format sound good even if it is 100 years old!

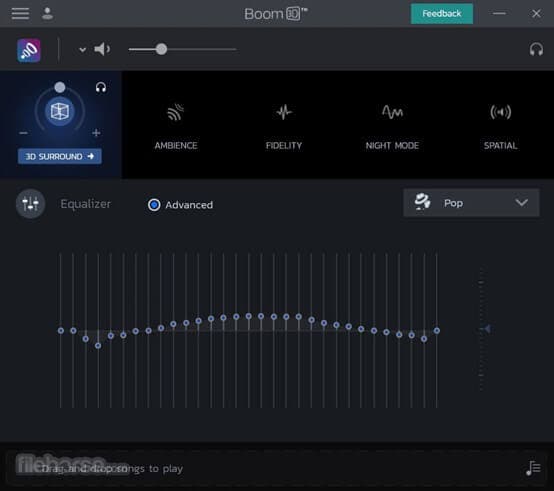
2. Boom 3D (Windows and macOS)
Boom 3D is a very popular app among many Windows and macOS users. This software is designed to help improve the audio on speakers or headphones that are connected to your computer. Boom 3D audio booster software also works with the Bluetooth devices that are connected to your PC. It can make any sound louder, clearer, and much better without buying any external devices. It provides us a 3D audio experience and works with any music player, video player, etc.!
3. Chrome Volume Booster Plugin (Windows)
This plugin has been rated 5 stars on the chrome web store as it is the best plugin for boosting up your volume on windows PC. This booster is so easy to download; you just have to go to the chrome web store and add the extension to your Google Chrome Browser. After adding it you can simply click on the icon and boost your volume up to 1000%! This plugin is free in the chrome store, just add it and choose how much louder you want your sound to be.

4. Letasoft Sound Booster (Windows)
Letasoft Sound Booster can only be used on windows. You can download it through the official website of Letasoft. It comes with a 14 days free trial period but after that, you have to buy their license to keep using it. This software is made to be used as an extra amplifier to boost up the volume of your audio or video if you think it is too low. The Letasoft Sound Booster app is very easy to use as you can control the volume from the slider. Moreover, it auto-starts and has no sound distortion.

5. Froyosoft Sound Booster (Mac)
Froyosoft Sound Booster is made for macOS users so they can boost video and audio file volumes. Individual application volumes can also be adjusted with the help of the Froyosoft Sound Booster. The good thing about this booster is that it is free for all users and it is 100% safe - you will not get any virus on your PC. You can download it from their website and increase the volume as high as you want to. So, get ready to get a clear and enhanced sound with the help of this app!

Part 2: Best YouTube Volume Boosters for Android and iOS
Following are the best YouTube sound boosters for Android and iOS devices:
1. AmpMe (Android and iOS)
With the help of AmpMe, you can start your little party through music apps. You don’t just get to listen to music but you can also chat with your friends - yup that’s right, it is a two-in-one app! The AmpMe app helps you to play the same music with your friends at the same time. It is one of the best volume booster apps that is available for both Android and iOS. It uses Bluetooth to connect with several devices, and the more the devices the higher the volume of the music. AmpMe offers a free trial and it costs $9.99 per week.

2. Super Volume Booster (Android)
To enjoy your music more than ever, you need a good volume enhancer. And, what can be better than an app that is free and boosts your audio? Android users are in luck because Super Volume Booster is a user-friendly app that allows you to increase the volume of YouTube and other apps. It gives you the best music experience. Moreover, it is clean, simple and has a one-touch operation. Not to forget that it has amazing reviews on Playstore. This app also increases the bass and also supports headphones and Bluetooth.

3. Volume Booster GOODEV (Android)
Volume Booster GOODEV is another app that boosts up the audio for you from 20 to 30% more! If you want to listen to an audiobook, watch a YouTube video or a movie on Netflix, volume Booster GOODEV can help you increase the volume of any media on any app! The volume can get so high that it might be dangerous for your ears so be careful. It offers a sound equalizer and is simple to use.

4. Volume Booster - Equalizer FX (iOS)
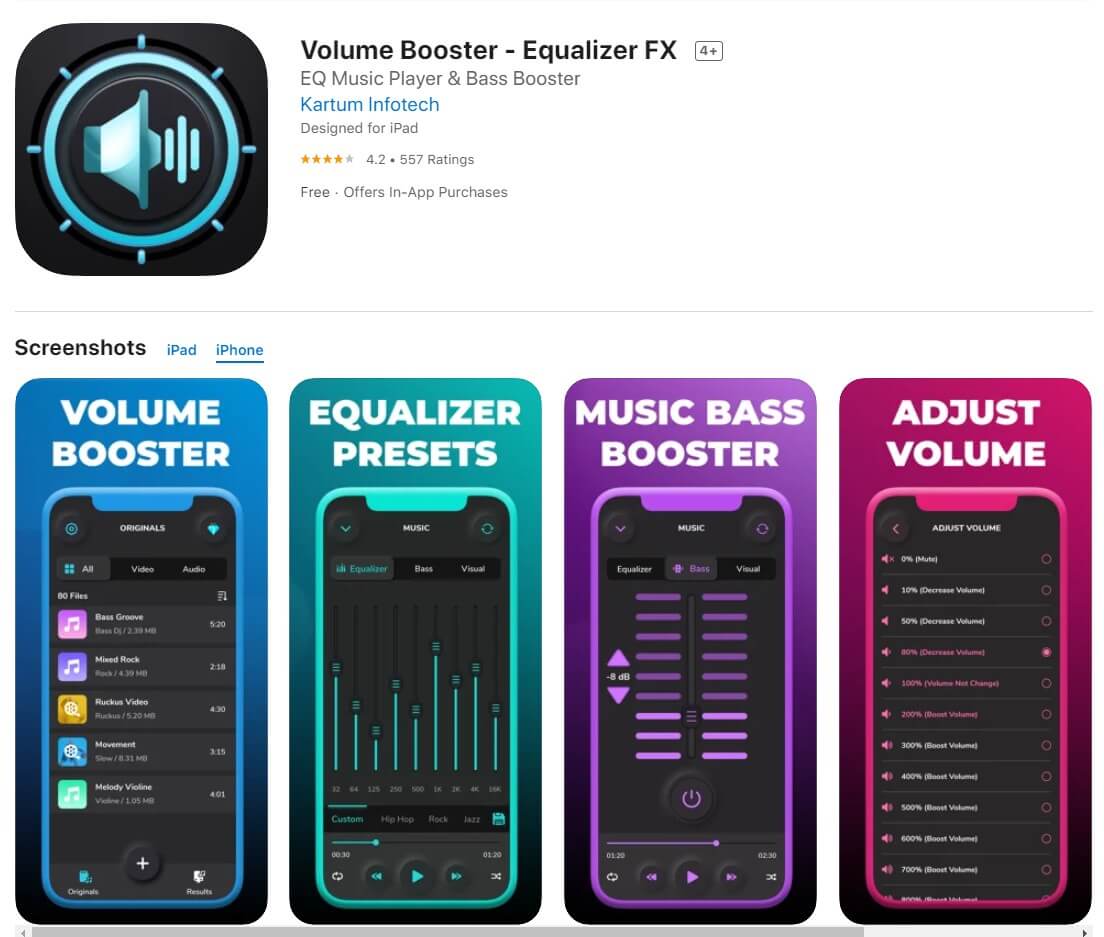
Volume Booster Equalizer FX can increase your volume higher than the default audio controller. With the help of this app, your device’s speaker will give the best result. You can adjust the sound effect levels according to your need. It makes the sound quality better and boosts up the volume with a single tap. You can get a weekly, monthly or yearly subscription. It is a great premium YouTube Volume booster for all iOS devices.
5. Max Volume Booster (iOS)
Max Volume Booster, as the name shows, boosts the volume to the maximum. You can find this app in the AppStore for free but it offers a premium version as well. With the help of the premium version, you can get an ad-free experience with no time limit. You can decrease or increase the volume based on your needs. Max Volume Booster gives you the experience and you will get addicted to it because it is a high-quality YouTube volume booster.

Part 3: Best YouTube Video Editing Software-Wondershare Filmora (Bonus Tip)
Wondershare Filmora is one of the most popular and user-friendly video editing software available. From beginners to pros, this app world for all. With Filmora you can create home videos, vlogs, Instagram reels, tutorials, guides, podcasts, and more! Wondershare Filmora is also the best YouTube video editor you will find! From editing to volume booster, you will find all the tools to create the perfect YouTube videos.


Here are some of the key features of Filmora that can help YouTubers make their YouTube videos:
- Offers multiple drawing video editing tools like speed control, volume booster, and color grading
- Offers special effects to enhance the appearance of your videos
- Allows you to custom create different animations
- Green Screen feature to help you change backgrounds and make the perfect videos
- Cross-platform accessibility as you can use it on both Windows and Mac
- Supports multiple file formats
- Ultra 4k HD support for the best quality of videos
- Free download and super easy to use with an intuitive interface
- Anyone can use it whether beginner or pro
- Online customer support available 24/7
Summing up
Stop worrying about low audio. Use one of the YouTube volume booster apps mentioned in this article. If you are making vlogs, tutorials, and other YouTube content, you can increase volume and create ideal videos with Wondershare video editor. So, to create the perfect videos with high-quality sound get Wondershare Filmora!
Shanoon Cox
Shanoon Cox is a writer and a lover of all things video.
Follow @Shanoon Cox
Shanoon Cox
Mar 27, 2024• Proven solutions
Have you ever listened to a YouTube video on max volume but still the sound wasn’t audible - even after turning up the YouTube volume as well as device audio? It is super annoying and inconvenient when you increase volume to max yet the video remains inaudible. YouTube volume issue could be due to various reasons such as poor audio quality of the built-in speakers or low original video sound. Well, there is a simple way to combat this problem i.e., sound booster. You can set different volume levels for the YouTube app on your PC or smartphone’s native volume controls. There are different YouTube volume boosters for Android, Windows, macOS, and iOS devices.
From listening to your favorite podcast to watching vlogs with your friends, you can use the best volume booster apps to increase the media sound volume and quality!
- Part 1: Best YouTube Volume Boosters for Windows and macOS
- Part 2: Best YouTube Volume Boosters for Android and iOS
- Part 3: Best YouTube Video Editing Software-Wondershare Filmora (Bonus Tip)
Part 1: Best YouTube Volume Boosters for Windows and macOS
Let’s introduce the best YouTube volume boosters for Windows and macOS:
1. FxSound (Windows and Mac)
FxSound is a very powerful tool that is made for Windows and macOS to enhance and boost the quality and volume of sound. This app comes with many features. For example, this audio software provides better sound quality, volume booster, and sound effects. Now you can listen to music, watch movies and play games without any distortion. Easily boost base, get customized effects and play with custom presets. You can download this app for your PC for free through the official website. People like this equalizer because it can make any audio format sound good even if it is 100 years old!
2. Boom 3D (Windows and macOS)
Boom 3D is a very popular app among many Windows and macOS users. This software is designed to help improve the audio on speakers or headphones that are connected to your computer. Boom 3D audio booster software also works with the Bluetooth devices that are connected to your PC. It can make any sound louder, clearer, and much better without buying any external devices. It provides us a 3D audio experience and works with any music player, video player, etc.!
3. Chrome Volume Booster Plugin (Windows)
This plugin has been rated 5 stars on the chrome web store as it is the best plugin for boosting up your volume on windows PC. This booster is so easy to download; you just have to go to the chrome web store and add the extension to your Google Chrome Browser. After adding it you can simply click on the icon and boost your volume up to 1000%! This plugin is free in the chrome store, just add it and choose how much louder you want your sound to be.
4. Letasoft Sound Booster (Windows)
Letasoft Sound Booster can only be used on windows. You can download it through the official website of Letasoft. It comes with a 14 days free trial period but after that, you have to buy their license to keep using it. This software is made to be used as an extra amplifier to boost up the volume of your audio or video if you think it is too low. The Letasoft Sound Booster app is very easy to use as you can control the volume from the slider. Moreover, it auto-starts and has no sound distortion.
5. Froyosoft Sound Booster (Mac)
Froyosoft Sound Booster is made for macOS users so they can boost video and audio file volumes. Individual application volumes can also be adjusted with the help of the Froyosoft Sound Booster. The good thing about this booster is that it is free for all users and it is 100% safe - you will not get any virus on your PC. You can download it from their website and increase the volume as high as you want to. So, get ready to get a clear and enhanced sound with the help of this app!
Part 2: Best YouTube Volume Boosters for Android and iOS
Following are the best YouTube sound boosters for Android and iOS devices:
1. AmpMe (Android and iOS)
With the help of AmpMe, you can start your little party through music apps. You don’t just get to listen to music but you can also chat with your friends - yup that’s right, it is a two-in-one app! The AmpMe app helps you to play the same music with your friends at the same time. It is one of the best volume booster apps that is available for both Android and iOS. It uses Bluetooth to connect with several devices, and the more the devices the higher the volume of the music. AmpMe offers a free trial and it costs $9.99 per week.
2. Super Volume Booster (Android)
To enjoy your music more than ever, you need a good volume enhancer. And, what can be better than an app that is free and boosts your audio? Android users are in luck because Super Volume Booster is a user-friendly app that allows you to increase the volume of YouTube and other apps. It gives you the best music experience. Moreover, it is clean, simple and has a one-touch operation. Not to forget that it has amazing reviews on Playstore. This app also increases the bass and also supports headphones and Bluetooth.
3. Volume Booster GOODEV (Android)
Volume Booster GOODEV is another app that boosts up the audio for you from 20 to 30% more! If you want to listen to an audiobook, watch a YouTube video or a movie on Netflix, volume Booster GOODEV can help you increase the volume of any media on any app! The volume can get so high that it might be dangerous for your ears so be careful. It offers a sound equalizer and is simple to use.
4. Volume Booster - Equalizer FX (iOS)
Volume Booster Equalizer FX can increase your volume higher than the default audio controller. With the help of this app, your device’s speaker will give the best result. You can adjust the sound effect levels according to your need. It makes the sound quality better and boosts up the volume with a single tap. You can get a weekly, monthly or yearly subscription. It is a great premium YouTube Volume booster for all iOS devices.
5. Max Volume Booster (iOS)
Max Volume Booster, as the name shows, boosts the volume to the maximum. You can find this app in the AppStore for free but it offers a premium version as well. With the help of the premium version, you can get an ad-free experience with no time limit. You can decrease or increase the volume based on your needs. Max Volume Booster gives you the experience and you will get addicted to it because it is a high-quality YouTube volume booster.
Part 3: Best YouTube Video Editing Software-Wondershare Filmora (Bonus Tip)
Wondershare Filmora is one of the most popular and user-friendly video editing software available. From beginners to pros, this app world for all. With Filmora you can create home videos, vlogs, Instagram reels, tutorials, guides, podcasts, and more! Wondershare Filmora is also the best YouTube video editor you will find! From editing to volume booster, you will find all the tools to create the perfect YouTube videos.
Here are some of the key features of Filmora that can help YouTubers make their YouTube videos:
- Offers multiple drawing video editing tools like speed control, volume booster, and color grading
- Offers special effects to enhance the appearance of your videos
- Allows you to custom create different animations
- Green Screen feature to help you change backgrounds and make the perfect videos
- Cross-platform accessibility as you can use it on both Windows and Mac
- Supports multiple file formats
- Ultra 4k HD support for the best quality of videos
- Free download and super easy to use with an intuitive interface
- Anyone can use it whether beginner or pro
- Online customer support available 24/7
Summing up
Stop worrying about low audio. Use one of the YouTube volume booster apps mentioned in this article. If you are making vlogs, tutorials, and other YouTube content, you can increase volume and create ideal videos with Wondershare video editor. So, to create the perfect videos with high-quality sound get Wondershare Filmora!
Shanoon Cox
Shanoon Cox is a writer and a lover of all things video.
Follow @Shanoon Cox
- Title: "In 2024, PowerPoint Mastery Integrating External Video URLs"
- Author: Joseph
- Created at : 2024-05-31 13:49:17
- Updated at : 2024-06-01 13:49:17
- Link: https://youtube-stream.techidaily.com/in-2024-powerpoint-mastery-integrating-external-video-urls/
- License: This work is licensed under CC BY-NC-SA 4.0.
