"In 2024, Personalize Your Tune List A Step-by-Step Guide to YouTube Playlist Creation"
Personalize Your Tune List: A Step-by-Step Guide to YouTube Playlist Creation
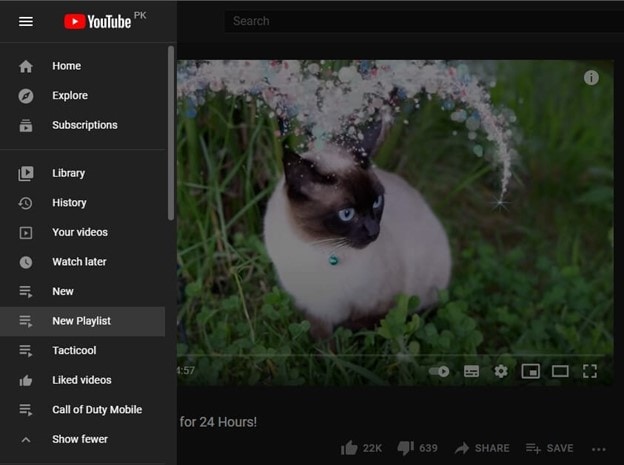
How to Make a Playlist on YouTube


Liza Brown
Mar 27, 2024• Proven solutions
Youtube is one of the largest video-sharing platforms used worldwide by different people and nations without any limitation or restriction of language, region, or interests. It contains billions of videos, and thousands of new videos are uploaded on Youtube daily. To make your channel or your brand stand out in this crowd, it is important to arrange your videos in the form of playlists. These playlists help you manage your videos and allow the viewers to find the required video easily and conveniently. In this article, we are going to show you how to make a playlist on Youtube.
Youtube playlists not only help in arranging the videos that you upload on Youtube. But you can also create a playlist of any video available on Youtube. Whether it is a song, recipe, movie, or something else, you add it into your playlist to arrange them according to your needs to access them easily when needed.
How to make a playlist on Youtube of your uploaded videos
If you are running a Youtube channel and upload videos very often, then it is important to arrange them so that the viewers can easily explore and find their relevant video in no time. The best way to do that is to make a separate playlist for each type of video you upload. To know how to make a playlist on Youtube, follow the below steps.
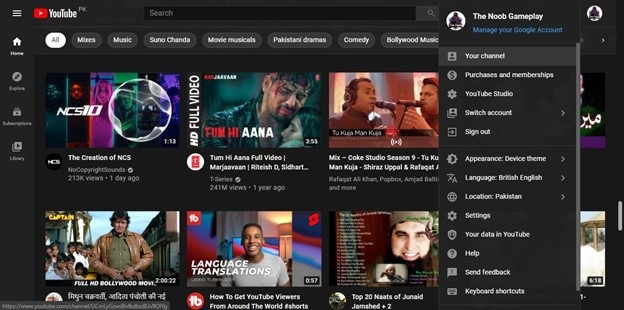
- Open Youtube. Click on your “Channel Icon” in the upper right corner, then click on “Your Channel”.
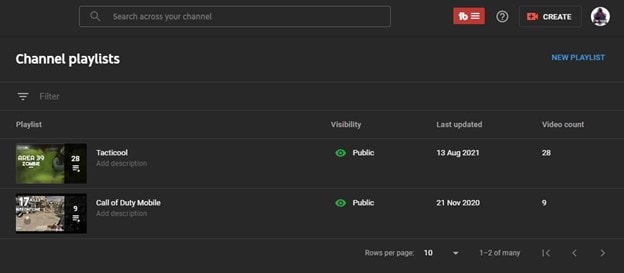
- Under Your Channel, click on the “Manage Videos” button. It will open the Youtube Studio of your Channel.


- In Youtube Studio, click on “Playlists” located on the left sidebar of the Studio.

- In this window, click on “New Playlist” located below your channel’s icon.
- Now it will ask you to enter “Playlist Title” and its “Visibility.” Name it accordingly and under Visibility, select an appropriate option according to your requirement and hit “Create.” Now your playlist is successfully created.

- Whenever you upload a new video on this channel, you can select the playlist you have created. While uploading the video, you can find a section named “Playlists” under the details tab.
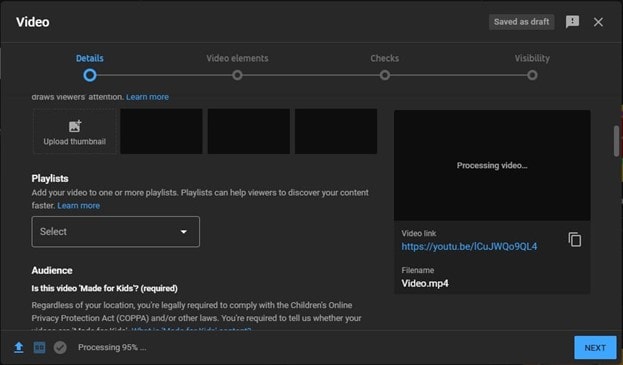
- Click on the drop-down menu to open select a playlist from the playlists that you have created. Select one and hit “Done.”
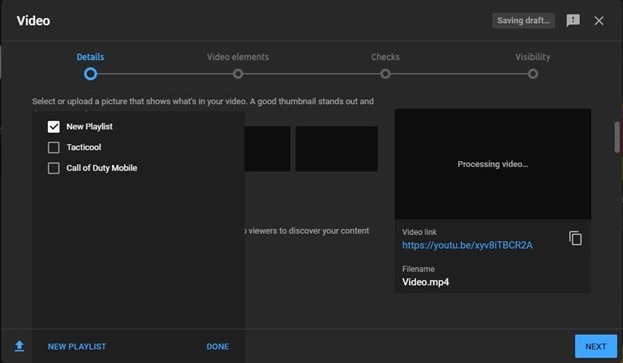
After uploading the video, it will be added to the playlist that you have selected. You can create as many playlists as you want. There is no restriction on that.
How to make a playlist on Youtube of others’ videos
Sometimes you like a video so much that you want to save it for future use or add it to your favorites. In such cases, creating a Youtube playlist is the best option. It will help you arrange the videos according to their type. To make a playlist on Youtube of others’ videos, follow the below steps.
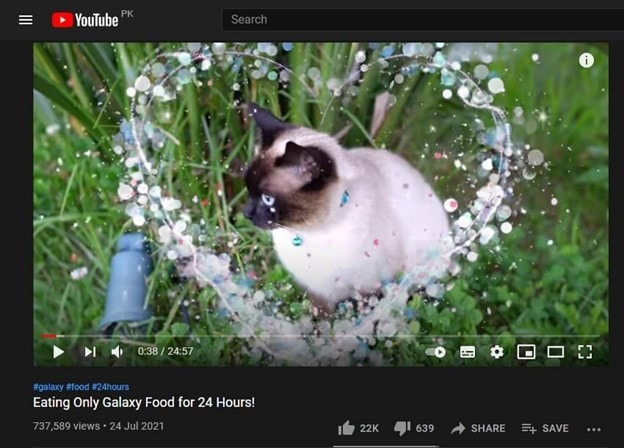
- Open Youtube. Play a video that you want to save to a Playlist.
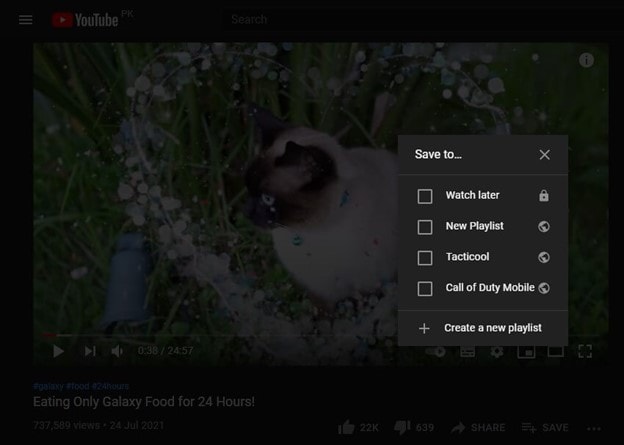
- Click on the “Save” on the right side below the video. It will open a new pop-up window that will ask you to select a playlist to add this video to it. But since you want to create a new playlist, click on the “Create a new Playlist.”
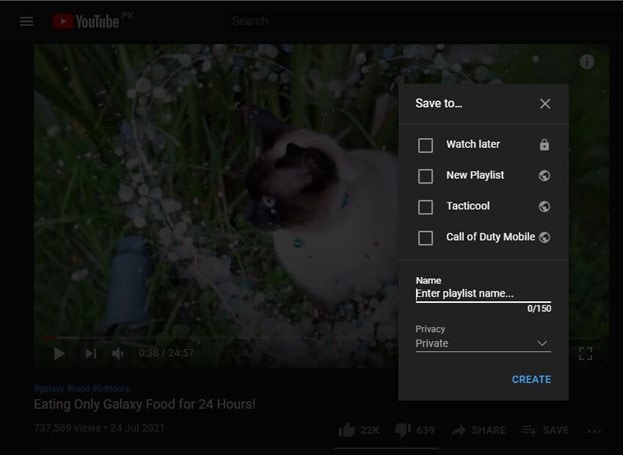
- It will ask you to enter the Name and select the privacy of the playlist. Name it and choose the privacy according to your preference and hit “Create.” Your video will be added to the new playlist.
- You can easily access these playlists by clicking the three lines in the upper left corner of Youtube. Here you can find all the Playlists that you will create. Click on the playlist to access all the videos that are included in it.
Conclusion
Both of these processes of how to make a playlist on Youtube will help you whether you are a content creator or a simple Youtube user. With such a huge video database, it is difficult for users to keep their favorite videos to access them whenever they need them. Making a Youtube playlist can be very beneficial in such cases.


Liza Brown
Liza Brown is a writer and a lover of all things video.
Follow @Liza Brown
Liza Brown
Mar 27, 2024• Proven solutions
Youtube is one of the largest video-sharing platforms used worldwide by different people and nations without any limitation or restriction of language, region, or interests. It contains billions of videos, and thousands of new videos are uploaded on Youtube daily. To make your channel or your brand stand out in this crowd, it is important to arrange your videos in the form of playlists. These playlists help you manage your videos and allow the viewers to find the required video easily and conveniently. In this article, we are going to show you how to make a playlist on Youtube.
Youtube playlists not only help in arranging the videos that you upload on Youtube. But you can also create a playlist of any video available on Youtube. Whether it is a song, recipe, movie, or something else, you add it into your playlist to arrange them according to your needs to access them easily when needed.
How to make a playlist on Youtube of your uploaded videos
If you are running a Youtube channel and upload videos very often, then it is important to arrange them so that the viewers can easily explore and find their relevant video in no time. The best way to do that is to make a separate playlist for each type of video you upload. To know how to make a playlist on Youtube, follow the below steps.
- Open Youtube. Click on your “Channel Icon” in the upper right corner, then click on “Your Channel”.
- Under Your Channel, click on the “Manage Videos” button. It will open the Youtube Studio of your Channel.
- In Youtube Studio, click on “Playlists” located on the left sidebar of the Studio.
- In this window, click on “New Playlist” located below your channel’s icon.
- Now it will ask you to enter “Playlist Title” and its “Visibility.” Name it accordingly and under Visibility, select an appropriate option according to your requirement and hit “Create.” Now your playlist is successfully created.
 KoolReport Pro is an advanced solution for creating data reports and dashboards in PHP. Equipped with all extended packages , KoolReport Pro is able to connect to various datasources, perform advanced data analysis, construct stunning charts and graphs and export your beautiful work to PDF, Excel, JPG or other formats. Plus, it includes powerful built-in reports such as pivot report and drill-down report which will save your time in building ones.
 It will help you to write dynamic data reports easily, to construct intuitive dashboards or to build a whole business intelligence cockpit.
KoolReport Pro package goes with Full Source Code, Royal Free, ONE (1) Year Priority Support, ONE (1) Year Free Upgrade and 30-Days Money Back Guarantee.
Developer License allows Single Developer to create Unlimited Reports, deploy on Unlimited Servers and able deliver the work to Unlimited Clients.
- Whenever you upload a new video on this channel, you can select the playlist you have created. While uploading the video, you can find a section named “Playlists” under the details tab.
- Click on the drop-down menu to open select a playlist from the playlists that you have created. Select one and hit “Done.”

After uploading the video, it will be added to the playlist that you have selected. You can create as many playlists as you want. There is no restriction on that.
How to make a playlist on Youtube of others’ videos
Sometimes you like a video so much that you want to save it for future use or add it to your favorites. In such cases, creating a Youtube playlist is the best option. It will help you arrange the videos according to their type. To make a playlist on Youtube of others’ videos, follow the below steps.
- Open Youtube. Play a video that you want to save to a Playlist.
- Click on the “Save” on the right side below the video. It will open a new pop-up window that will ask you to select a playlist to add this video to it. But since you want to create a new playlist, click on the “Create a new Playlist.”
- It will ask you to enter the Name and select the privacy of the playlist. Name it and choose the privacy according to your preference and hit “Create.” Your video will be added to the new playlist.
.png) Kanto Player Professional
Kanto Player Professional
- You can easily access these playlists by clicking the three lines in the upper left corner of Youtube. Here you can find all the Playlists that you will create. Click on the playlist to access all the videos that are included in it.
 CalendarBudget - Monthly subscription membership to CalendarBudget via web browser or mobile app. Support included.
Conclusion
Both of these processes of how to make a playlist on Youtube will help you whether you are a content creator or a simple Youtube user. With such a huge video database, it is difficult for users to keep their favorite videos to access them whenever they need them. Making a Youtube playlist can be very beneficial in such cases.
 SwifDoo PDF Perpetual (2-PC) Free upgrade. No monthly fees ever.
Liza Brown
Liza Brown is a writer and a lover of all things video.
Follow @Liza Brown
Liza Brown
Mar 27, 2024• Proven solutions
Youtube is one of the largest video-sharing platforms used worldwide by different people and nations without any limitation or restriction of language, region, or interests. It contains billions of videos, and thousands of new videos are uploaded on Youtube daily. To make your channel or your brand stand out in this crowd, it is important to arrange your videos in the form of playlists. These playlists help you manage your videos and allow the viewers to find the required video easily and conveniently. In this article, we are going to show you how to make a playlist on Youtube.
Youtube playlists not only help in arranging the videos that you upload on Youtube. But you can also create a playlist of any video available on Youtube. Whether it is a song, recipe, movie, or something else, you add it into your playlist to arrange them according to your needs to access them easily when needed.
How to make a playlist on Youtube of your uploaded videos
If you are running a Youtube channel and upload videos very often, then it is important to arrange them so that the viewers can easily explore and find their relevant video in no time. The best way to do that is to make a separate playlist for each type of video you upload. To know how to make a playlist on Youtube, follow the below steps.
- Open Youtube. Click on your “Channel Icon” in the upper right corner, then click on “Your Channel”.
 Epubor Audible Converter for Mac: Download and convert Audible AAXC/AA/AAX to MP3 with 100% original quality preserved.
- Under Your Channel, click on the “Manage Videos” button. It will open the Youtube Studio of your Channel.
- In Youtube Studio, click on “Playlists” located on the left sidebar of the Studio.
- In this window, click on “New Playlist” located below your channel’s icon.

- Now it will ask you to enter “Playlist Title” and its “Visibility.” Name it accordingly and under Visibility, select an appropriate option according to your requirement and hit “Create.” Now your playlist is successfully created.
- Whenever you upload a new video on this channel, you can select the playlist you have created. While uploading the video, you can find a section named “Playlists” under the details tab.
 Allavsoft Batch Download Online Videos, Music Offline to MP4, MP3, MOV, etc format
- Click on the drop-down menu to open select a playlist from the playlists that you have created. Select one and hit “Done.”
After uploading the video, it will be added to the playlist that you have selected. You can create as many playlists as you want. There is no restriction on that.
How to make a playlist on Youtube of others’ videos
Sometimes you like a video so much that you want to save it for future use or add it to your favorites. In such cases, creating a Youtube playlist is the best option. It will help you arrange the videos according to their type. To make a playlist on Youtube of others’ videos, follow the below steps.
- Open Youtube. Play a video that you want to save to a Playlist.

- Click on the “Save” on the right side below the video. It will open a new pop-up window that will ask you to select a playlist to add this video to it. But since you want to create a new playlist, click on the “Create a new Playlist.”
- It will ask you to enter the Name and select the privacy of the playlist. Name it and choose the privacy according to your preference and hit “Create.” Your video will be added to the new playlist.
- You can easily access these playlists by clicking the three lines in the upper left corner of Youtube. Here you can find all the Playlists that you will create. Click on the playlist to access all the videos that are included in it.
Conclusion
Both of these processes of how to make a playlist on Youtube will help you whether you are a content creator or a simple Youtube user. With such a huge video database, it is difficult for users to keep their favorite videos to access them whenever they need them. Making a Youtube playlist can be very beneficial in such cases.

 SwifDoo PDF Perpetual (1 PC) Free upgrade. No monthly fees ever.
Liza Brown
Liza Brown is a writer and a lover of all things video.
Follow @Liza Brown
Liza Brown
Mar 27, 2024• Proven solutions
Youtube is one of the largest video-sharing platforms used worldwide by different people and nations without any limitation or restriction of language, region, or interests. It contains billions of videos, and thousands of new videos are uploaded on Youtube daily. To make your channel or your brand stand out in this crowd, it is important to arrange your videos in the form of playlists. These playlists help you manage your videos and allow the viewers to find the required video easily and conveniently. In this article, we are going to show you how to make a playlist on Youtube.
Youtube playlists not only help in arranging the videos that you upload on Youtube. But you can also create a playlist of any video available on Youtube. Whether it is a song, recipe, movie, or something else, you add it into your playlist to arrange them according to your needs to access them easily when needed.
How to make a playlist on Youtube of your uploaded videos
If you are running a Youtube channel and upload videos very often, then it is important to arrange them so that the viewers can easily explore and find their relevant video in no time. The best way to do that is to make a separate playlist for each type of video you upload. To know how to make a playlist on Youtube, follow the below steps.
- Open Youtube. Click on your “Channel Icon” in the upper right corner, then click on “Your Channel”.
- Under Your Channel, click on the “Manage Videos” button. It will open the Youtube Studio of your Channel.
- In Youtube Studio, click on “Playlists” located on the left sidebar of the Studio.

- In this window, click on “New Playlist” located below your channel’s icon.
- Now it will ask you to enter “Playlist Title” and its “Visibility.” Name it accordingly and under Visibility, select an appropriate option according to your requirement and hit “Create.” Now your playlist is successfully created.
- Whenever you upload a new video on this channel, you can select the playlist you have created. While uploading the video, you can find a section named “Playlists” under the details tab.
- Click on the drop-down menu to open select a playlist from the playlists that you have created. Select one and hit “Done.”
After uploading the video, it will be added to the playlist that you have selected. You can create as many playlists as you want. There is no restriction on that.
How to make a playlist on Youtube of others’ videos
Sometimes you like a video so much that you want to save it for future use or add it to your favorites. In such cases, creating a Youtube playlist is the best option. It will help you arrange the videos according to their type. To make a playlist on Youtube of others’ videos, follow the below steps.
- Open Youtube. Play a video that you want to save to a Playlist.
- Click on the “Save” on the right side below the video. It will open a new pop-up window that will ask you to select a playlist to add this video to it. But since you want to create a new playlist, click on the “Create a new Playlist.”
- It will ask you to enter the Name and select the privacy of the playlist. Name it and choose the privacy according to your preference and hit “Create.” Your video will be added to the new playlist.

- You can easily access these playlists by clicking the three lines in the upper left corner of Youtube. Here you can find all the Playlists that you will create. Click on the playlist to access all the videos that are included in it.
Conclusion
Both of these processes of how to make a playlist on Youtube will help you whether you are a content creator or a simple Youtube user. With such a huge video database, it is difficult for users to keep their favorite videos to access them whenever they need them. Making a Youtube playlist can be very beneficial in such cases.
 OtsAV TV Webcaster
Liza Brown
Liza Brown is a writer and a lover of all things video.
Follow @Liza Brown
Elevate Your Video’s Auditory Experience on YouTube
How to Edit Audio on YouTube

Richard Bennett
Mar 27, 2024• Proven solutions
In this article, we are going to show you how to edit audio with YouTube Video Editor, and the tips on adding your own audio file to YouTube.
- Part 1: Add your Own Audio File to YouTube Video
- Part 2: How to Edit Audio with YouTube Video Editor
Part 1: Add your Own Audio File to YouTube Video
Tools You Are Going to Need
YouTube video editor is far from meeting the needs of people who want to have more control on their audio. On the bright side, if you are interested in learning how to edit audio on YouTube, there is a solution. There are many video editors in the market that allow you to add your own music or audio files to a video. Windows Movie Maker, iMovie, Adobe Premiere, and Magisto are some of the video editors available for you to choose from. In this guide, we recommend the Wondershare Filmora video editor. Below is a quick tutorial about how to edit audio in Filmora.

Download Mac Version ](https://tools.techidaily.com/wondershare/filmora/download/ )
Why Should You Choose Wondershare Filmora?
There are many advantages associated with the use of Wondershare Filmora. You will see that it allows you to fully edit any audio file and gain 100% control over your files. It is an integrated solution that lacks nothing in terms of efficiency and quality standards. To be more specific, Filmora offers the following unique features:
- Built-in audio editing tools that allow you to gain full control of your audio in an easy way
- Exclusive audio track that enables you to mute, detach or even de-noise the audio from video
- All audio effects can easily be adjusted with one click only
- The built-in Equalizer is capable enough to create amazing audio effects
- Directly upload your video to YouTube, Facebook or Vimeo from Wondershare Filmora
How to add audio files to YouTube video with Wondershare Filmora
Do you want to know more about audio editing? Please read this article: How to add audio to video.
Step 1 Import Video Clips into Filmora
Filmora supports a wide range of video formats, such as MKV, MOV, AVI, WebM and MP4, you can import the video clip shot with Camera, smartphone or camcorder easily to it.
Step 2 Detach Audio
If you want to edit the original audio of the video, you can choose to split the audio file from the video by using the Audio Detach option on Wondershare Filmora. Then, the audio file will be shown in the audio track, and you can cut or trim it.


Note: If you do not want to keep the original audio file in the video, you can delete it from the audio track directly.
Step 3Add Audio Files
Wondershare Filmora offers you multiple royalty free audio effects and music in its rich audio library. What is more, you can also import your own music or audio file from your computer or iTunes. Of course, you should know that the audio should be royalty free for you to make use of. In a different situation, you cannot upload it and benefit from its quality and nature.
Step 4Edit Audio
In this step, you can adjust the audio volume and pitch, etc. There are multiple options for you to benefit from, including the Audio Equalizer, Music, Mix Audio. In this way, you can make sure that the audio is exactly like you have wanted it to be. For further information as to how you can improve the sound quality of your recorded videos, you can check out: How to improve sound quality of recorded videos.
Step 5Save Your Work and Upload on YouTube
If you are satisfied with your work on the audio file and you wish to publish it, the process is quite simple. You just hit Export and select to upload the video to YouTube. After signing in to your YouTube account, you will be ready to start uploading the audio file.

WPS Office Premium ( File Recovery, Photo Scanning, Convert PDF)–Yearly

In case you wish to edit the audio from an already published video, you have to download the video first. Then, you can follow the steps above to edit the audio file in Filmora. As one of the widely used video editing software for YouTubers, Filmora is here to empower your imagination. Just download the free trial version and try it now.
Part 2: How to Edit Audio with YouTube Video Editor
Unfortunately, YouTube does not allow users to upload audio files such as MP3, WAV, etc. Instead, you can only upload audio files which are offered by YouTube in the first place. Since YouTube has got a plentiful audio library, you can find a lot of audio there. In this part, we will show you how to add and edit audio with YouTube Video Editor.
You may also like: How to Add Music to YouTube Videos >>
Note: From 20th September 2017 users will no longer be able to use the complimentary editing suite. Check the best YouTube video editor alternatives from this complete guide. In the following part, I will show you how to add audio track , replace the original audio and adjust the audio position and length as well.
- Step 1: Sign in to your YouTube account
- **Step 2:**Click your profile avatar and select Creator Studio option.
- Step 3: In the left pane, go to Video Manager and then click Videos. In the Videos list, choose the video that you want to add new audio track, and then select Audio from the Edit button.

- Step 4: Now you can add or replace the audio in your video. Here you will find that there are various songs and audio files you can choose from. Click ADD TO VIDEO and the audio track will be added to the video directly.

- Step 5: Now you will see the audio track appears at the bottom of the player. Here you can trim and drag the audio bar to adjust the audio positon and length. To Trim the audio, click the beginning or the end of the audio bar and then drag it to the left or right. After trimming, drag it to meet the target position.

Conclusion
Normally, it would be better to add and edit audio to video before updating to YouTube. In this case, Filmora is highly recommended as one of the best video editor for YouTubers , which provides some royalty free music sound in the Music Library to choose from and also the audio editing tools like remove background noise from the video, add fade in and fade out effects with ease or play the video backward or fast forward.
[](https://tools.techidaily.com/wondershare/filmora/download/)[](https://tools.techidaily.com/wondershare/filmora/download/)
Richard Bennett
Richard Bennett is a writer and a lover of all things video.
Follow @Richard Bennett
Richard Bennett
Mar 27, 2024• Proven solutions
In this article, we are going to show you how to edit audio with YouTube Video Editor, and the tips on adding your own audio file to YouTube.
- Part 1: Add your Own Audio File to YouTube Video
- Part 2: How to Edit Audio with YouTube Video Editor
Part 1: Add your Own Audio File to YouTube Video
Tools You Are Going to Need
YouTube video editor is far from meeting the needs of people who want to have more control on their audio. On the bright side, if you are interested in learning how to edit audio on YouTube, there is a solution. There are many video editors in the market that allow you to add your own music or audio files to a video. Windows Movie Maker, iMovie, Adobe Premiere, and Magisto are some of the video editors available for you to choose from. In this guide, we recommend the Wondershare Filmora video editor. Below is a quick tutorial about how to edit audio in Filmora.
Download Mac Version ](https://tools.techidaily.com/wondershare/filmora/download/ )
Why Should You Choose Wondershare Filmora?
There are many advantages associated with the use of Wondershare Filmora. You will see that it allows you to fully edit any audio file and gain 100% control over your files. It is an integrated solution that lacks nothing in terms of efficiency and quality standards. To be more specific, Filmora offers the following unique features:
- Built-in audio editing tools that allow you to gain full control of your audio in an easy way
- Exclusive audio track that enables you to mute, detach or even de-noise the audio from video
- All audio effects can easily be adjusted with one click only
- The built-in Equalizer is capable enough to create amazing audio effects
- Directly upload your video to YouTube, Facebook or Vimeo from Wondershare Filmora
How to add audio files to YouTube video with Wondershare Filmora
Do you want to know more about audio editing? Please read this article: How to add audio to video.
Step 1 Import Video Clips into Filmora
Filmora supports a wide range of video formats, such as MKV, MOV, AVI, WebM and MP4, you can import the video clip shot with Camera, smartphone or camcorder easily to it.
Step 2 Detach Audio
If you want to edit the original audio of the video, you can choose to split the audio file from the video by using the Audio Detach option on Wondershare Filmora. Then, the audio file will be shown in the audio track, and you can cut or trim it.
 CollageIt Pro
Note: If you do not want to keep the original audio file in the video, you can delete it from the audio track directly.
Step 3Add Audio Files
Wondershare Filmora offers you multiple royalty free audio effects and music in its rich audio library. What is more, you can also import your own music or audio file from your computer or iTunes. Of course, you should know that the audio should be royalty free for you to make use of. In a different situation, you cannot upload it and benefit from its quality and nature.
Step 4Edit Audio
In this step, you can adjust the audio volume and pitch, etc. There are multiple options for you to benefit from, including the Audio Equalizer, Music, Mix Audio. In this way, you can make sure that the audio is exactly like you have wanted it to be. For further information as to how you can improve the sound quality of your recorded videos, you can check out: How to improve sound quality of recorded videos.
Step 5Save Your Work and Upload on YouTube
If you are satisfied with your work on the audio file and you wish to publish it, the process is quite simple. You just hit Export and select to upload the video to YouTube. After signing in to your YouTube account, you will be ready to start uploading the audio file.

In case you wish to edit the audio from an already published video, you have to download the video first. Then, you can follow the steps above to edit the audio file in Filmora. As one of the widely used video editing software for YouTubers, Filmora is here to empower your imagination. Just download the free trial version and try it now.
Part 2: How to Edit Audio with YouTube Video Editor
Unfortunately, YouTube does not allow users to upload audio files such as MP3, WAV, etc. Instead, you can only upload audio files which are offered by YouTube in the first place. Since YouTube has got a plentiful audio library, you can find a lot of audio there. In this part, we will show you how to add and edit audio with YouTube Video Editor.
You may also like: How to Add Music to YouTube Videos >>
Note: From 20th September 2017 users will no longer be able to use the complimentary editing suite. Check the best YouTube video editor alternatives from this complete guide. In the following part, I will show you how to add audio track , replace the original audio and adjust the audio position and length as well.
- Step 1: Sign in to your YouTube account
- **Step 2:**Click your profile avatar and select Creator Studio option.
- Step 3: In the left pane, go to Video Manager and then click Videos. In the Videos list, choose the video that you want to add new audio track, and then select Audio from the Edit button.
- Step 4: Now you can add or replace the audio in your video. Here you will find that there are various songs and audio files you can choose from. Click ADD TO VIDEO and the audio track will be added to the video directly.
- Step 5: Now you will see the audio track appears at the bottom of the player. Here you can trim and drag the audio bar to adjust the audio positon and length. To Trim the audio, click the beginning or the end of the audio bar and then drag it to the left or right. After trimming, drag it to meet the target position.
Conclusion
Normally, it would be better to add and edit audio to video before updating to YouTube. In this case, Filmora is highly recommended as one of the best video editor for YouTubers , which provides some royalty free music sound in the Music Library to choose from and also the audio editing tools like remove background noise from the video, add fade in and fade out effects with ease or play the video backward or fast forward.
Richard Bennett
Richard Bennett is a writer and a lover of all things video.
Follow @Richard Bennett
Richard Bennett
Mar 27, 2024• Proven solutions
In this article, we are going to show you how to edit audio with YouTube Video Editor, and the tips on adding your own audio file to YouTube.
- Part 1: Add your Own Audio File to YouTube Video
- Part 2: How to Edit Audio with YouTube Video Editor
Part 1: Add your Own Audio File to YouTube Video
Tools You Are Going to Need
YouTube video editor is far from meeting the needs of people who want to have more control on their audio. On the bright side, if you are interested in learning how to edit audio on YouTube, there is a solution. There are many video editors in the market that allow you to add your own music or audio files to a video. Windows Movie Maker, iMovie, Adobe Premiere, and Magisto are some of the video editors available for you to choose from. In this guide, we recommend the Wondershare Filmora video editor. Below is a quick tutorial about how to edit audio in Filmora.
Download Mac Version ](https://tools.techidaily.com/wondershare/filmora/download/ )
Why Should You Choose Wondershare Filmora?
There are many advantages associated with the use of Wondershare Filmora. You will see that it allows you to fully edit any audio file and gain 100% control over your files. It is an integrated solution that lacks nothing in terms of efficiency and quality standards. To be more specific, Filmora offers the following unique features:
- Built-in audio editing tools that allow you to gain full control of your audio in an easy way
- Exclusive audio track that enables you to mute, detach or even de-noise the audio from video
- All audio effects can easily be adjusted with one click only
- The built-in Equalizer is capable enough to create amazing audio effects
- Directly upload your video to YouTube, Facebook or Vimeo from Wondershare Filmora
How to add audio files to YouTube video with Wondershare Filmora
Do you want to know more about audio editing? Please read this article: How to add audio to video.
Step 1 Import Video Clips into Filmora
Filmora supports a wide range of video formats, such as MKV, MOV, AVI, WebM and MP4, you can import the video clip shot with Camera, smartphone or camcorder easily to it.
Step 2 Detach Audio
If you want to edit the original audio of the video, you can choose to split the audio file from the video by using the Audio Detach option on Wondershare Filmora. Then, the audio file will be shown in the audio track, and you can cut or trim it.
Note: If you do not want to keep the original audio file in the video, you can delete it from the audio track directly.
Step 3Add Audio Files
Wondershare Filmora offers you multiple royalty free audio effects and music in its rich audio library. What is more, you can also import your own music or audio file from your computer or iTunes. Of course, you should know that the audio should be royalty free for you to make use of. In a different situation, you cannot upload it and benefit from its quality and nature.
Step 4Edit Audio
In this step, you can adjust the audio volume and pitch, etc. There are multiple options for you to benefit from, including the Audio Equalizer, Music, Mix Audio. In this way, you can make sure that the audio is exactly like you have wanted it to be. For further information as to how you can improve the sound quality of your recorded videos, you can check out: How to improve sound quality of recorded videos.
Step 5Save Your Work and Upload on YouTube
If you are satisfied with your work on the audio file and you wish to publish it, the process is quite simple. You just hit Export and select to upload the video to YouTube. After signing in to your YouTube account, you will be ready to start uploading the audio file.
In case you wish to edit the audio from an already published video, you have to download the video first. Then, you can follow the steps above to edit the audio file in Filmora. As one of the widely used video editing software for YouTubers, Filmora is here to empower your imagination. Just download the free trial version and try it now.
Part 2: How to Edit Audio with YouTube Video Editor
Unfortunately, YouTube does not allow users to upload audio files such as MP3, WAV, etc. Instead, you can only upload audio files which are offered by YouTube in the first place. Since YouTube has got a plentiful audio library, you can find a lot of audio there. In this part, we will show you how to add and edit audio with YouTube Video Editor.
You may also like: How to Add Music to YouTube Videos >>
Note: From 20th September 2017 users will no longer be able to use the complimentary editing suite. Check the best YouTube video editor alternatives from this complete guide. In the following part, I will show you how to add audio track , replace the original audio and adjust the audio position and length as well.
- Step 1: Sign in to your YouTube account
- **Step 2:**Click your profile avatar and select Creator Studio option.
- Step 3: In the left pane, go to Video Manager and then click Videos. In the Videos list, choose the video that you want to add new audio track, and then select Audio from the Edit button.
- Step 4: Now you can add or replace the audio in your video. Here you will find that there are various songs and audio files you can choose from. Click ADD TO VIDEO and the audio track will be added to the video directly.
- Step 5: Now you will see the audio track appears at the bottom of the player. Here you can trim and drag the audio bar to adjust the audio positon and length. To Trim the audio, click the beginning or the end of the audio bar and then drag it to the left or right. After trimming, drag it to meet the target position.
Conclusion
Normally, it would be better to add and edit audio to video before updating to YouTube. In this case, Filmora is highly recommended as one of the best video editor for YouTubers , which provides some royalty free music sound in the Music Library to choose from and also the audio editing tools like remove background noise from the video, add fade in and fade out effects with ease or play the video backward or fast forward.
Richard Bennett
Richard Bennett is a writer and a lover of all things video.
Follow @Richard Bennett
Richard Bennett
Mar 27, 2024• Proven solutions
In this article, we are going to show you how to edit audio with YouTube Video Editor, and the tips on adding your own audio file to YouTube.
- Part 1: Add your Own Audio File to YouTube Video
- Part 2: How to Edit Audio with YouTube Video Editor

Part 1: Add your Own Audio File to YouTube Video
Tools You Are Going to Need
YouTube video editor is far from meeting the needs of people who want to have more control on their audio. On the bright side, if you are interested in learning how to edit audio on YouTube, there is a solution. There are many video editors in the market that allow you to add your own music or audio files to a video. Windows Movie Maker, iMovie, Adobe Premiere, and Magisto are some of the video editors available for you to choose from. In this guide, we recommend the Wondershare Filmora video editor. Below is a quick tutorial about how to edit audio in Filmora.

Download Mac Version ](https://tools.techidaily.com/wondershare/filmora/download/ )
Why Should You Choose Wondershare Filmora?
There are many advantages associated with the use of Wondershare Filmora. You will see that it allows you to fully edit any audio file and gain 100% control over your files. It is an integrated solution that lacks nothing in terms of efficiency and quality standards. To be more specific, Filmora offers the following unique features:
- Built-in audio editing tools that allow you to gain full control of your audio in an easy way
- Exclusive audio track that enables you to mute, detach or even de-noise the audio from video
- All audio effects can easily be adjusted with one click only
- The built-in Equalizer is capable enough to create amazing audio effects
- Directly upload your video to YouTube, Facebook or Vimeo from Wondershare Filmora
How to add audio files to YouTube video with Wondershare Filmora
Do you want to know more about audio editing? Please read this article: How to add audio to video.
Step 1 Import Video Clips into Filmora
Filmora supports a wide range of video formats, such as MKV, MOV, AVI, WebM and MP4, you can import the video clip shot with Camera, smartphone or camcorder easily to it.
Step 2 Detach Audio
If you want to edit the original audio of the video, you can choose to split the audio file from the video by using the Audio Detach option on Wondershare Filmora. Then, the audio file will be shown in the audio track, and you can cut or trim it.
 Project Manager - Asset Browser for 3Ds Max
Note: If you do not want to keep the original audio file in the video, you can delete it from the audio track directly.
Step 3Add Audio Files
Wondershare Filmora offers you multiple royalty free audio effects and music in its rich audio library. What is more, you can also import your own music or audio file from your computer or iTunes. Of course, you should know that the audio should be royalty free for you to make use of. In a different situation, you cannot upload it and benefit from its quality and nature.
Step 4Edit Audio
In this step, you can adjust the audio volume and pitch, etc. There are multiple options for you to benefit from, including the Audio Equalizer, Music, Mix Audio. In this way, you can make sure that the audio is exactly like you have wanted it to be. For further information as to how you can improve the sound quality of your recorded videos, you can check out: How to improve sound quality of recorded videos.
Step 5Save Your Work and Upload on YouTube
If you are satisfied with your work on the audio file and you wish to publish it, the process is quite simple. You just hit Export and select to upload the video to YouTube. After signing in to your YouTube account, you will be ready to start uploading the audio file.
In case you wish to edit the audio from an already published video, you have to download the video first. Then, you can follow the steps above to edit the audio file in Filmora. As one of the widely used video editing software for YouTubers, Filmora is here to empower your imagination. Just download the free trial version and try it now.
 Any DRM Removal for Win:Remove DRM from Adobe, Kindle, Sony eReader, Kobo, etc, read your ebooks anywhere.
Part 2: How to Edit Audio with YouTube Video Editor
Unfortunately, YouTube does not allow users to upload audio files such as MP3, WAV, etc. Instead, you can only upload audio files which are offered by YouTube in the first place. Since YouTube has got a plentiful audio library, you can find a lot of audio there. In this part, we will show you how to add and edit audio with YouTube Video Editor.
You may also like: How to Add Music to YouTube Videos >>
Note: From 20th September 2017 users will no longer be able to use the complimentary editing suite. Check the best YouTube video editor alternatives from this complete guide. In the following part, I will show you how to add audio track , replace the original audio and adjust the audio position and length as well.
- Step 1: Sign in to your YouTube account
- **Step 2:**Click your profile avatar and select Creator Studio option.
- Step 3: In the left pane, go to Video Manager and then click Videos. In the Videos list, choose the video that you want to add new audio track, and then select Audio from the Edit button.
- Step 4: Now you can add or replace the audio in your video. Here you will find that there are various songs and audio files you can choose from. Click ADD TO VIDEO and the audio track will be added to the video directly.
- Step 5: Now you will see the audio track appears at the bottom of the player. Here you can trim and drag the audio bar to adjust the audio positon and length. To Trim the audio, click the beginning or the end of the audio bar and then drag it to the left or right. After trimming, drag it to meet the target position.

Conclusion
Normally, it would be better to add and edit audio to video before updating to YouTube. In this case, Filmora is highly recommended as one of the best video editor for YouTubers , which provides some royalty free music sound in the Music Library to choose from and also the audio editing tools like remove background noise from the video, add fade in and fade out effects with ease or play the video backward or fast forward.
 Forex Robotron Gold Package
Richard Bennett
Richard Bennett is a writer and a lover of all things video.
Follow @Richard Bennett
- Title: In 2024, Personalize Your Tune List A Step-by-Step Guide to YouTube Playlist Creation
- Author: Joseph
- Created at : 2024-07-29 20:49:21
- Updated at : 2024-07-30 20:49:21
- Link: https://youtube-stream.techidaily.com/in-2024-personalize-your-tune-list-a-step-by-step-guide-to-youtube-playlist-creation/
- License: This work is licensed under CC BY-NC-SA 4.0.