
"In 2024, Mastering YouTube Video Submission Your Detailed Walkthrough"
Mastering YouTube Video Submission: Your Detailed Walkthrough
How To Upload Videos to YouTube [a Step-by-Step Guide]

Richard Bennett
Mar 27, 2024• Proven solutions
Want to learn how to upload videos to YouTube? Millions of people watch YouTube every day. Creating and posting YouTube videos can be a lot of fun, and if you get a lot of views and become popular you can also make money. YouTube videos are a creative way to connect with people all around the world.
These simple steps can assist you in learning how to upload YouTube videos from a desktop computer. You are going to Learn:
Edit YouTube with Powerful Video Editor
As a YouTuber, it is necessary to have an easy-to-use video editor, especially for beginners. Download Filmora for free and start your editing journey happily.


Part 1: Basic Rules You Need to Know Before Uploading
Clicking the ‘upload’ button is easy, but during the upload process, there are things you can do to help your video get views and maintain its quality. You should also keep an eye on the length and file size limits. The more basic things you need to consider carefully when you upload are the title, description, and tags of your video. These are part of what determines if and where your video comes up in people’s search results. There are also slightly more advanced video specs, like your video’s resolution, which will be helpful for you to understand as somebody who will be producing video content frequently. These sorts of specs will affect how long it takes your videos to upload and how much of the quality they maintain.
1. How Long Can my Video Be?
By default, your YouTube videos can only be 15 minutes long. You can post longer videos by going to the upload page and clicking on ‘Increase your Limit’ at the bottom. After you have followed the steps to verify your account you will be able to post videos that are a maximum of 11 hours long.
2. How Big a File Can I Upload?
Your file size was capped at 20GB, initially. If you follow the same steps for posting videos longer than 15 minutes then you can also increase your maximum file size to 128GB.
3. Other Basics
After you click the ‘upload’ button on YouTube you are taken to a page where you choose a category for your video and add a title, description, and tags. These are all important for getting hits so you should put some thought into them.
Title: Keep your title under 70 characters so none of it disappears into a ‘…’. The best titles make people curious or elicit an emotional response. Terms like ‘video’, ‘how-to’, and ‘tutorial’ are often typed into people’s searches so if they apply to your video it can help to put them in the title.
Description: A short synopsis of your video which includes your most important keyword. You have about three lines before your text is hidden by a ‘show more’ tab. If you are including the URL of your channel or other videos then you should make sure they are above the ‘show more’.
Tags: Use a lot of them. These are the keywords and terms people will be searching for when they find your video. YouTube will suggest some after you start adding. A quick way to find good keywords to use is to search for videos similar to yours and check out their tags. A while ago YouTube started hiding video tags by default but you can download a free, YouTube-certified, extension for Google Chrome which will allow you to see them from vidIQ.com.
4. Digging Deeper
To get your viewers to subscribe to your channel you will need to make sure your videos are not losing quality when you upload them. Here are some things to be aware of if you want your videos to look great on YouTube.
Resolution: the number of pixels in your image. For example when a video has a resolution of 1080p that means it has a grid of pixels that is 1920 x 1080. The more pixels you have the sharper your image.
Bitrate: Bitrate is a measurement of how compressed your file is, and the less compressed it is the more information there is per frame. Higher bitrates mean larger file sizes.
Your resolution and bitrate should complement each other. If you have a higher bitrate than is needed for your video’s resolution your file will be unnecessarily large. If your bitrate is too low for your resolution then you will not see the quality you expect.
YouTube has a list of recommended resolutions and bitrates at support.google.com/youtube/answer/1722171.
Aspect Ratio: the dimensions of your video, in terms of width and height. YouTube’s aspect ratio is 16:9, so your videos should also be 16:9. If they are not then you will get black bars on either side of your video after you upload it. The most common way that people end up with the wrong aspect ratio is by creating videos on their smartphones and holding them up and down instead of sideways.
Part 2: Steps to Upload Videos to YouTube
Uploading YouTube Video on Desktop:
1. Sign in to your YouTube account
2. Hit the upload button
3. Select your video type (Public, Private, Unlisted)
4. Manage the upload
5. Choose your thumbnail
Step 1: Sign in to your YouTube account
In order to upload videos to YouTube, the very first thing you need to do is sign in. The sign-in button is located at the top right corner of the YouTube homepage. If you have multiple accounts registered to one device, you will be asked to choose one to log in to.

Step 2: Hit the upload button
It is a simple step that you will have to follow right after you log in to YouTube. As soon as you enter YouTube, after using your Google account and password for login, you will find the upload button in the top right corner of the screen. Click on this button and it will take you to the dedicated upload page.
Step 3: Select your video type (Public, Private, Unlisted)
Choose your audience. If you wish to make your video available to everyone on YouTube, simply go to the privacy settings and choose the “Public” option from the drop-down menu.
If you do not want your video to be searchable, but still want to be able to easily share a link to it with your friends and family, choose the “Unlisted” option.
Those who wish to keep their video personal can choose the “Private” option from the drop-down menu. You can still share a private video with a limited number of people (as long as they have Google accounts).
The “Scheduled” option is available for choosing a future date and time to make the video available to viewers. Once you have selected your privacy level, simply upload your video from your device storage.

Step 4: Manage the upload
As soon as you have confirmed your video upload, you will find a progress bar on the screen. It will take some time depending on factors such as the resolution of the video and how long it is. In the meanwhile, you can write a title, description and add relevant tags for your video so that YouTube knows what search results to include it in and viewers can find it. Remember that YouTube is the second biggest search engine on the Internet, so take some time to optimize your keywords .
Step 5: Choose your thumbnail
Once your video uploading is complete, it is time to choose a creative thumbnail for your video. The system provides you with three options to choose from automatically, all of which will be screenshots from your video. It is usually better toupload your own custom thumbnail , as thumbnails are a very important factor in attracting viewers. Hit the “Done” button or use the “Publish” button to finalize your upload.
That’s how to upload a video on YouTube! Any questions?
Richard Bennett
Richard Bennett is a writer and a lover of all things video.
Follow @Richard Bennett
Richard Bennett
Mar 27, 2024• Proven solutions
Want to learn how to upload videos to YouTube? Millions of people watch YouTube every day. Creating and posting YouTube videos can be a lot of fun, and if you get a lot of views and become popular you can also make money. YouTube videos are a creative way to connect with people all around the world.
These simple steps can assist you in learning how to upload YouTube videos from a desktop computer. You are going to Learn:
Edit YouTube with Powerful Video Editor
As a YouTuber, it is necessary to have an easy-to-use video editor, especially for beginners. Download Filmora for free and start your editing journey happily.
Part 1: Basic Rules You Need to Know Before Uploading
Clicking the ‘upload’ button is easy, but during the upload process, there are things you can do to help your video get views and maintain its quality. You should also keep an eye on the length and file size limits. The more basic things you need to consider carefully when you upload are the title, description, and tags of your video. These are part of what determines if and where your video comes up in people’s search results. There are also slightly more advanced video specs, like your video’s resolution, which will be helpful for you to understand as somebody who will be producing video content frequently. These sorts of specs will affect how long it takes your videos to upload and how much of the quality they maintain.
1. How Long Can my Video Be?
By default, your YouTube videos can only be 15 minutes long. You can post longer videos by going to the upload page and clicking on ‘Increase your Limit’ at the bottom. After you have followed the steps to verify your account you will be able to post videos that are a maximum of 11 hours long.
2. How Big a File Can I Upload?
Your file size was capped at 20GB, initially. If you follow the same steps for posting videos longer than 15 minutes then you can also increase your maximum file size to 128GB.
3. Other Basics
After you click the ‘upload’ button on YouTube you are taken to a page where you choose a category for your video and add a title, description, and tags. These are all important for getting hits so you should put some thought into them.
Title: Keep your title under 70 characters so none of it disappears into a ‘…’. The best titles make people curious or elicit an emotional response. Terms like ‘video’, ‘how-to’, and ‘tutorial’ are often typed into people’s searches so if they apply to your video it can help to put them in the title.
Description: A short synopsis of your video which includes your most important keyword. You have about three lines before your text is hidden by a ‘show more’ tab. If you are including the URL of your channel or other videos then you should make sure they are above the ‘show more’.
Tags: Use a lot of them. These are the keywords and terms people will be searching for when they find your video. YouTube will suggest some after you start adding. A quick way to find good keywords to use is to search for videos similar to yours and check out their tags. A while ago YouTube started hiding video tags by default but you can download a free, YouTube-certified, extension for Google Chrome which will allow you to see them from vidIQ.com.
4. Digging Deeper
To get your viewers to subscribe to your channel you will need to make sure your videos are not losing quality when you upload them. Here are some things to be aware of if you want your videos to look great on YouTube.
Resolution: the number of pixels in your image. For example when a video has a resolution of 1080p that means it has a grid of pixels that is 1920 x 1080. The more pixels you have the sharper your image.
Bitrate: Bitrate is a measurement of how compressed your file is, and the less compressed it is the more information there is per frame. Higher bitrates mean larger file sizes.
Your resolution and bitrate should complement each other. If you have a higher bitrate than is needed for your video’s resolution your file will be unnecessarily large. If your bitrate is too low for your resolution then you will not see the quality you expect.
YouTube has a list of recommended resolutions and bitrates at support.google.com/youtube/answer/1722171.
Aspect Ratio: the dimensions of your video, in terms of width and height. YouTube’s aspect ratio is 16:9, so your videos should also be 16:9. If they are not then you will get black bars on either side of your video after you upload it. The most common way that people end up with the wrong aspect ratio is by creating videos on their smartphones and holding them up and down instead of sideways.
Part 2: Steps to Upload Videos to YouTube
Uploading YouTube Video on Desktop:
1. Sign in to your YouTube account
2. Hit the upload button
3. Select your video type (Public, Private, Unlisted)
4. Manage the upload
5. Choose your thumbnail
Step 1: Sign in to your YouTube account
In order to upload videos to YouTube, the very first thing you need to do is sign in. The sign-in button is located at the top right corner of the YouTube homepage. If you have multiple accounts registered to one device, you will be asked to choose one to log in to.
Step 2: Hit the upload button
It is a simple step that you will have to follow right after you log in to YouTube. As soon as you enter YouTube, after using your Google account and password for login, you will find the upload button in the top right corner of the screen. Click on this button and it will take you to the dedicated upload page.
Step 3: Select your video type (Public, Private, Unlisted)
Choose your audience. If you wish to make your video available to everyone on YouTube, simply go to the privacy settings and choose the “Public” option from the drop-down menu.
If you do not want your video to be searchable, but still want to be able to easily share a link to it with your friends and family, choose the “Unlisted” option.
Those who wish to keep their video personal can choose the “Private” option from the drop-down menu. You can still share a private video with a limited number of people (as long as they have Google accounts).
The “Scheduled” option is available for choosing a future date and time to make the video available to viewers. Once you have selected your privacy level, simply upload your video from your device storage.
Step 4: Manage the upload
As soon as you have confirmed your video upload, you will find a progress bar on the screen. It will take some time depending on factors such as the resolution of the video and how long it is. In the meanwhile, you can write a title, description and add relevant tags for your video so that YouTube knows what search results to include it in and viewers can find it. Remember that YouTube is the second biggest search engine on the Internet, so take some time to optimize your keywords .
Step 5: Choose your thumbnail
Once your video uploading is complete, it is time to choose a creative thumbnail for your video. The system provides you with three options to choose from automatically, all of which will be screenshots from your video. It is usually better toupload your own custom thumbnail , as thumbnails are a very important factor in attracting viewers. Hit the “Done” button or use the “Publish” button to finalize your upload.
That’s how to upload a video on YouTube! Any questions?
Richard Bennett
Richard Bennett is a writer and a lover of all things video.
Follow @Richard Bennett
Richard Bennett
Mar 27, 2024• Proven solutions
Want to learn how to upload videos to YouTube? Millions of people watch YouTube every day. Creating and posting YouTube videos can be a lot of fun, and if you get a lot of views and become popular you can also make money. YouTube videos are a creative way to connect with people all around the world.
These simple steps can assist you in learning how to upload YouTube videos from a desktop computer. You are going to Learn:
Edit YouTube with Powerful Video Editor
As a YouTuber, it is necessary to have an easy-to-use video editor, especially for beginners. Download Filmora for free and start your editing journey happily.
Part 1: Basic Rules You Need to Know Before Uploading
Clicking the ‘upload’ button is easy, but during the upload process, there are things you can do to help your video get views and maintain its quality. You should also keep an eye on the length and file size limits. The more basic things you need to consider carefully when you upload are the title, description, and tags of your video. These are part of what determines if and where your video comes up in people’s search results. There are also slightly more advanced video specs, like your video’s resolution, which will be helpful for you to understand as somebody who will be producing video content frequently. These sorts of specs will affect how long it takes your videos to upload and how much of the quality they maintain.
1. How Long Can my Video Be?
By default, your YouTube videos can only be 15 minutes long. You can post longer videos by going to the upload page and clicking on ‘Increase your Limit’ at the bottom. After you have followed the steps to verify your account you will be able to post videos that are a maximum of 11 hours long.
2. How Big a File Can I Upload?
Your file size was capped at 20GB, initially. If you follow the same steps for posting videos longer than 15 minutes then you can also increase your maximum file size to 128GB.
3. Other Basics
After you click the ‘upload’ button on YouTube you are taken to a page where you choose a category for your video and add a title, description, and tags. These are all important for getting hits so you should put some thought into them.
Title: Keep your title under 70 characters so none of it disappears into a ‘…’. The best titles make people curious or elicit an emotional response. Terms like ‘video’, ‘how-to’, and ‘tutorial’ are often typed into people’s searches so if they apply to your video it can help to put them in the title.
Description: A short synopsis of your video which includes your most important keyword. You have about three lines before your text is hidden by a ‘show more’ tab. If you are including the URL of your channel or other videos then you should make sure they are above the ‘show more’.
Tags: Use a lot of them. These are the keywords and terms people will be searching for when they find your video. YouTube will suggest some after you start adding. A quick way to find good keywords to use is to search for videos similar to yours and check out their tags. A while ago YouTube started hiding video tags by default but you can download a free, YouTube-certified, extension for Google Chrome which will allow you to see them from vidIQ.com.
4. Digging Deeper
To get your viewers to subscribe to your channel you will need to make sure your videos are not losing quality when you upload them. Here are some things to be aware of if you want your videos to look great on YouTube.
Resolution: the number of pixels in your image. For example when a video has a resolution of 1080p that means it has a grid of pixels that is 1920 x 1080. The more pixels you have the sharper your image.
Bitrate: Bitrate is a measurement of how compressed your file is, and the less compressed it is the more information there is per frame. Higher bitrates mean larger file sizes.
Your resolution and bitrate should complement each other. If you have a higher bitrate than is needed for your video’s resolution your file will be unnecessarily large. If your bitrate is too low for your resolution then you will not see the quality you expect.
YouTube has a list of recommended resolutions and bitrates at support.google.com/youtube/answer/1722171.
Aspect Ratio: the dimensions of your video, in terms of width and height. YouTube’s aspect ratio is 16:9, so your videos should also be 16:9. If they are not then you will get black bars on either side of your video after you upload it. The most common way that people end up with the wrong aspect ratio is by creating videos on their smartphones and holding them up and down instead of sideways.
Part 2: Steps to Upload Videos to YouTube
Uploading YouTube Video on Desktop:
1. Sign in to your YouTube account
2. Hit the upload button
3. Select your video type (Public, Private, Unlisted)
4. Manage the upload
5. Choose your thumbnail
Step 1: Sign in to your YouTube account
In order to upload videos to YouTube, the very first thing you need to do is sign in. The sign-in button is located at the top right corner of the YouTube homepage. If you have multiple accounts registered to one device, you will be asked to choose one to log in to.
Step 2: Hit the upload button
It is a simple step that you will have to follow right after you log in to YouTube. As soon as you enter YouTube, after using your Google account and password for login, you will find the upload button in the top right corner of the screen. Click on this button and it will take you to the dedicated upload page.
Step 3: Select your video type (Public, Private, Unlisted)
Choose your audience. If you wish to make your video available to everyone on YouTube, simply go to the privacy settings and choose the “Public” option from the drop-down menu.
If you do not want your video to be searchable, but still want to be able to easily share a link to it with your friends and family, choose the “Unlisted” option.
Those who wish to keep their video personal can choose the “Private” option from the drop-down menu. You can still share a private video with a limited number of people (as long as they have Google accounts).
The “Scheduled” option is available for choosing a future date and time to make the video available to viewers. Once you have selected your privacy level, simply upload your video from your device storage.
Step 4: Manage the upload
As soon as you have confirmed your video upload, you will find a progress bar on the screen. It will take some time depending on factors such as the resolution of the video and how long it is. In the meanwhile, you can write a title, description and add relevant tags for your video so that YouTube knows what search results to include it in and viewers can find it. Remember that YouTube is the second biggest search engine on the Internet, so take some time to optimize your keywords .
Step 5: Choose your thumbnail
Once your video uploading is complete, it is time to choose a creative thumbnail for your video. The system provides you with three options to choose from automatically, all of which will be screenshots from your video. It is usually better toupload your own custom thumbnail , as thumbnails are a very important factor in attracting viewers. Hit the “Done” button or use the “Publish” button to finalize your upload.
That’s how to upload a video on YouTube! Any questions?
Richard Bennett
Richard Bennett is a writer and a lover of all things video.
Follow @Richard Bennett
Delving Into How T-Series Earnings Work on Youtube
Founded by Gulshan Kumar on 11 July 1983, T-Series is an Indian Music record label with over 220 million subscribers on YouTube. Lately, there have been lots of controversies about the T-Series YouTube income, and one common question that we see is “What is T-Series income on YouTube?”
So, if you have the same question, then, you’ve come to the right page to find an answer. In this post, we’ve covered everything you need to know about the T-Series YouTube income. So, without wasting much time, let’s dive in to find out more.
Part 1: Information Box on T Series
Before we reveal all you need to know about T-Series YouTube income, here is an overview of Who T-Series is.
| Name | T-Series |
|---|---|
| Real Name | Bhushan Kumar Dua |
| Net Worth (2022) | $515.4 Million |
| Monthly Income and Salary | Approximately $8.6 Million |
| Yearly Income | Over $128 Million |
| Type | Private |
| Industry | Music & Entertainment |
| Founded | 11 July 1983; 39 years ago in Delhi, India |
| Founder | Gulshan Kumar |
| Key People | Bhushan Kumar Dua (Chairman, managing director), Krishan Kumar, Neeraj Kalyan (President) |
| Services | Music record label % Film production |
| YouTube Channel | T-Series |
| Awards and Recognition | Creator Awards |
Now you have an overview of what T-Series YouTube channel income is, read on to discover more
Part 2: T-Series YouTube Earning and Stats
T-Series main source of revenue is the views and adverts, and as of when this article was written, research shows that T-Series attracts more than 2.15 billion views per month. Since a YouTube channel could earn an average of $3 to $5 per one thousand views, it can be estimated that T-Series earn a monthly income of up to $8.6 Million per month, and could make up to over 128 Million per year. Do you still want to find out more? Check out the table on T-Series stats;
| Estimated Monthly Earning (USD/INDIAN RUPEES) | $8.6 Million / R.S699 Million |
|---|---|
| Estimated Yearly Earning (USD/INDIAN RUPEES) | Approximately $128 Million / R.S 10.4 Billion |
| Total Videos Uploads | 17, 516 |
| Total Views | 202,606,674,113 |
| Subscribers | 225 Million |
| Years Active | 16 years |
| Genre | Music |
T-Series is very popular on all social media platforms, including Facebook, Twitter, and Instagram. He has been in the game for so long that anyone believes in the content he creates. The company was discovered in the 1980s by Gulshan Kumar a cassette tape business, and it was focused on devotional music, especially Hindu hymns and Bollywood music.M
The good thing back then was that T-Series was the first of its kind, and the devotional music market was really big, especially amongst old folks. So, it was easy for T-Series music to reach the right audience within a short time, and it had its first breakthrough in the late 1980s.
Fast forward to 2004, telecommunication companies were having complaints from mobile phone users who were not satisfied with their ringtones. So, T-Series became their plug and started 30-second of their music to them. Then, in 2009, when YouTube was launched in India, T-Series discovered lots of his music where being uploaded on YouTube illegally. This led to a ruling against YouTube, and in January 2011, T-Series published its first video on YouTube.
Since 2011 till now, T-Series has experienced tremendous growth. T-Series has up to 29 different YouTube channels with total subscribers of 225million with over a billion views monthly, making them one of the top-leading YouTube channels globally. Right now,
Part 3: Why Is T-Series Trending on YouTube?
Since you already know what T-Series income on YouTube is, you might be eager to find out what he did that made him so popular and became a trend on YouTube. Well, the truth is, T-Series is not doing anything no one can do. However, he has been in the industry for so long that his YouTube channel is like a dish for many viewers, especially the ones in India.
Below are the three main things why T-Series is always trending on YouTube;
Huge YouTube Channel Monthly Visits
Boasting monthly views of over 100 million per month, T-Series is one of the few YouTube channels that usually have millions of visits from users globally every month. Research shows that the YouTube channel usually has approximately 7.9million visitors per month. This huge monthly visit helps them stay at the top of most YouTube searches that relates with his videos keywords, thus making them trend more when compared with his competitor’s YouTube channel.
Large Subscriber Base
With over 225 million subscribers and still counting, T-Series YouTube channel is a home for many folks to listen to music and see movie thrillers. The large subscriber base plays a huge role in his trend, and the subscriber base continues to increase, he still has the high chance of maintaining his trend within the industry for a very long time.
Regular Posting of Quality Videos
Having a huge YouTube subscriber base is one thing, but being able to deliver quality video content that anyone would love to watch is different. T-Series has been consistent in delivering quality videos, that immediately he uploads a new video on YouTube, he starts getting massive views instantly. Many folks are always eager to see his next upload on YouTube. This has been the same thing for T-Series over the past years, and it has helped him gained more and more popularity.
Bonus Tip: How to be a YouTuber and Make Videos like t series
To be a YouTube-like T-Series you don’t only need to put in the hard work in what you do, you also need to be smart and stay consistent. Plus, you must acquire advanced video editing software that will help you create videos that will make you stand out in the industry. One such video editing software is Wondershare’s Filmora video editor.
Filmora is a video editing powerhouse that boasts lots of efficient tools that one can use to edit every aspect of a video clip. From removing background noise to editing audio, adding transitions, applying effects, and lots more. The tool is one that any YouTuber must have at his/her fingertips.
Besides, Filmora offers lots of free built-in video effects from popular platforms like FilmStock, Pixel, Unsplash, and many others. The amazing thing is you don’t necessarily need video editing skills to utilize the features of the software.
Here is how to use Filmora to Create Impressive Videos for YouTube;
Free Download For Win 7 or later(64-bit)
Free Download For macOS 10.14 or later
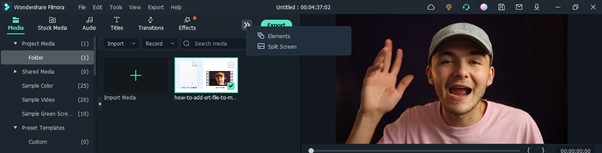
Step1 Download the latest version of Filmora from the official website and install it. Then, launch the tool and use the Import button to upload the YouTube video you wish to edit.
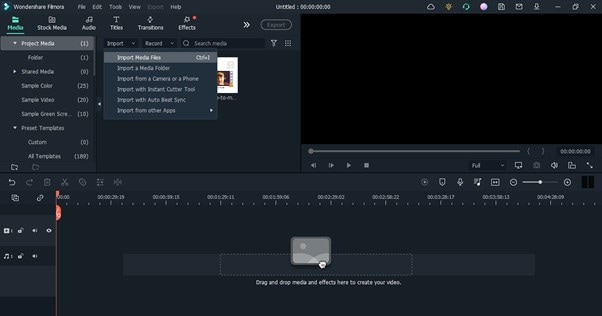
Drag-n-drop the imported video to the Timeline.
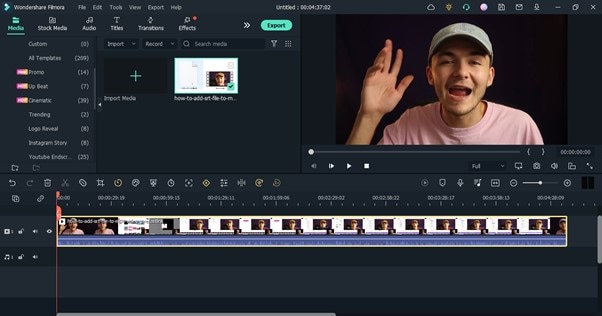
Step2 Navigate to the top of the screen and select Effects. Choose AI Portrait from the left-hand side. After that, drag-n-drop a preferred AI Portrait effect to the Timeline. Then, adjust it to the section of your video you want it to be displayed.
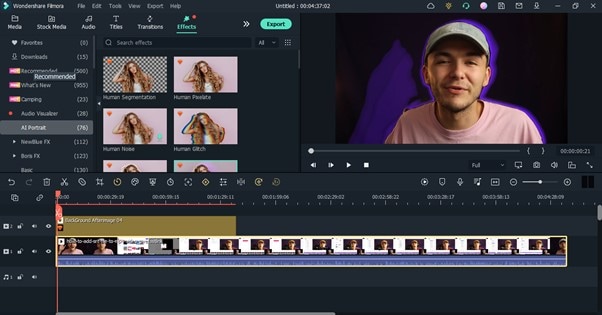
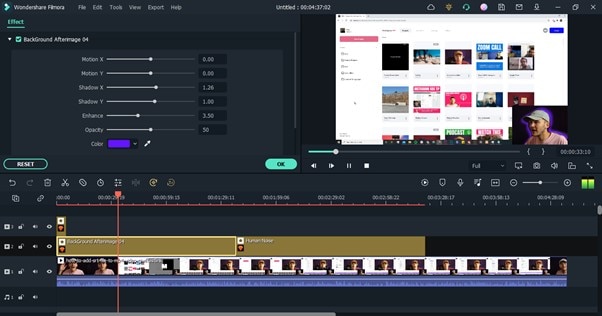
You can also change the AI Portrait effect settings. To do that, double-click on the effect from the timeline to prompt a pop-up window. Apply the AI Portrait effect from there.
Step3 You can add royalty-free music to your YouTube video by clicking Audio from the top. Then, select the preferred audio to use in the video and move it to the timeline.
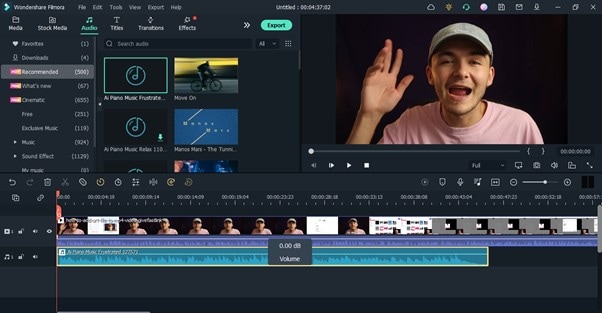
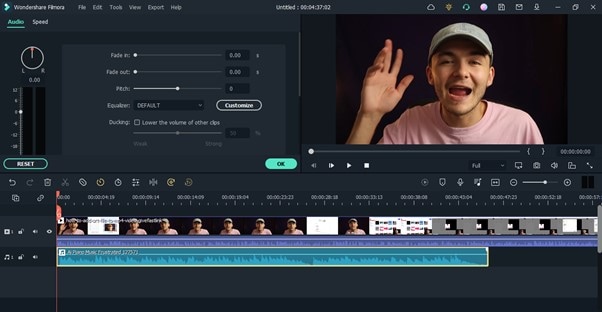
To adjust your audio settings, double-click the audio clip from the timeline and use the relevant button to balance audio fade-in and fade-out, volume, pitch, etc.
Step4 Another crucial thing you need to do is to add Subscribe watermark. To do this, click the >> icon next to Export from the top of the screen and select Element.
Locate and click ‘Social Media Show Element 07’ Effects. Drag-n-drop the selected effect to the Timeline.

Step5 Change the position where the Subscribe watermark should appear in your video. Then, play the video to preview it.
Step6 After you’re done with the editing, click the Export button from the top bar and choose Burn DVD from the drop-down list that shows up.
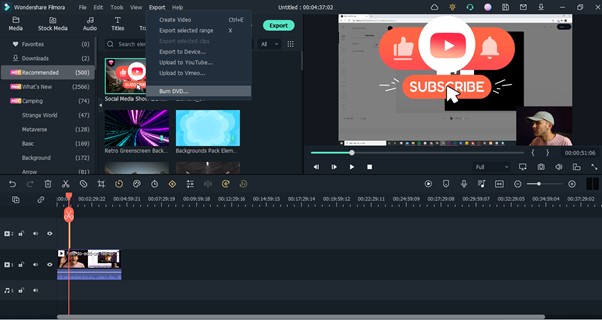
Spet 7: A pop-up window will appear on your PC screen. Select where you want to save the edited video file from the Folder Path section. Then, enter the file name in Lable. Click Export to finish.

Final Words
That’s all on T-Series income on YouTube. T-Series did not just become successful overnight. It took consistent hard work. The team put so much effort not just to come up with ideas and create videos, but also to invest in the right tools to make their videos stand out in the industry. If you’re looking to start your YouTube journey and be like T-Series some days, you should start now. The first move you should make is to invest in Wondershare Filmora software, as it has lots of tools to offer for editing videos with high quality.
Free Download For Win 7 or later(64-bit)
Free Download For macOS 10.14 or later
Part 1: Information Box on T Series
Before we reveal all you need to know about T-Series YouTube income, here is an overview of Who T-Series is.
| Name | T-Series |
|---|---|
| Real Name | Bhushan Kumar Dua |
| Net Worth (2022) | $515.4 Million |
| Monthly Income and Salary | Approximately $8.6 Million |
| Yearly Income | Over $128 Million |
| Type | Private |
| Industry | Music & Entertainment |
| Founded | 11 July 1983; 39 years ago in Delhi, India |
| Founder | Gulshan Kumar |
| Key People | Bhushan Kumar Dua (Chairman, managing director), Krishan Kumar, Neeraj Kalyan (President) |
| Services | Music record label % Film production |
| YouTube Channel | T-Series |
| Awards and Recognition | Creator Awards |
Now you have an overview of what T-Series YouTube channel income is, read on to discover more
Part 2: T-Series YouTube Earning and Stats
T-Series main source of revenue is the views and adverts, and as of when this article was written, research shows that T-Series attracts more than 2.15 billion views per month. Since a YouTube channel could earn an average of $3 to $5 per one thousand views, it can be estimated that T-Series earn a monthly income of up to $8.6 Million per month, and could make up to over 128 Million per year. Do you still want to find out more? Check out the table on T-Series stats;
| Estimated Monthly Earning (USD/INDIAN RUPEES) | $8.6 Million / R.S699 Million |
|---|---|
| Estimated Yearly Earning (USD/INDIAN RUPEES) | Approximately $128 Million / R.S 10.4 Billion |
| Total Videos Uploads | 17, 516 |
| Total Views | 202,606,674,113 |
| Subscribers | 225 Million |
| Years Active | 16 years |
| Genre | Music |
T-Series is very popular on all social media platforms, including Facebook, Twitter, and Instagram. He has been in the game for so long that anyone believes in the content he creates. The company was discovered in the 1980s by Gulshan Kumar a cassette tape business, and it was focused on devotional music, especially Hindu hymns and Bollywood music.M
The good thing back then was that T-Series was the first of its kind, and the devotional music market was really big, especially amongst old folks. So, it was easy for T-Series music to reach the right audience within a short time, and it had its first breakthrough in the late 1980s.
Fast forward to 2004, telecommunication companies were having complaints from mobile phone users who were not satisfied with their ringtones. So, T-Series became their plug and started 30-second of their music to them. Then, in 2009, when YouTube was launched in India, T-Series discovered lots of his music where being uploaded on YouTube illegally. This led to a ruling against YouTube, and in January 2011, T-Series published its first video on YouTube.
Since 2011 till now, T-Series has experienced tremendous growth. T-Series has up to 29 different YouTube channels with total subscribers of 225million with over a billion views monthly, making them one of the top-leading YouTube channels globally. Right now,
Part 3: Why Is T-Series Trending on YouTube?
Since you already know what T-Series income on YouTube is, you might be eager to find out what he did that made him so popular and became a trend on YouTube. Well, the truth is, T-Series is not doing anything no one can do. However, he has been in the industry for so long that his YouTube channel is like a dish for many viewers, especially the ones in India.
Below are the three main things why T-Series is always trending on YouTube;
Huge YouTube Channel Monthly Visits
Boasting monthly views of over 100 million per month, T-Series is one of the few YouTube channels that usually have millions of visits from users globally every month. Research shows that the YouTube channel usually has approximately 7.9million visitors per month. This huge monthly visit helps them stay at the top of most YouTube searches that relates with his videos keywords, thus making them trend more when compared with his competitor’s YouTube channel.
Large Subscriber Base
With over 225 million subscribers and still counting, T-Series YouTube channel is a home for many folks to listen to music and see movie thrillers. The large subscriber base plays a huge role in his trend, and the subscriber base continues to increase, he still has the high chance of maintaining his trend within the industry for a very long time.
Regular Posting of Quality Videos
Having a huge YouTube subscriber base is one thing, but being able to deliver quality video content that anyone would love to watch is different. T-Series has been consistent in delivering quality videos, that immediately he uploads a new video on YouTube, he starts getting massive views instantly. Many folks are always eager to see his next upload on YouTube. This has been the same thing for T-Series over the past years, and it has helped him gained more and more popularity.
Bonus Tip: How to be a YouTuber and Make Videos like t series
To be a YouTube-like T-Series you don’t only need to put in the hard work in what you do, you also need to be smart and stay consistent. Plus, you must acquire advanced video editing software that will help you create videos that will make you stand out in the industry. One such video editing software is Wondershare’s Filmora video editor.
Filmora is a video editing powerhouse that boasts lots of efficient tools that one can use to edit every aspect of a video clip. From removing background noise to editing audio, adding transitions, applying effects, and lots more. The tool is one that any YouTuber must have at his/her fingertips.
Besides, Filmora offers lots of free built-in video effects from popular platforms like FilmStock, Pixel, Unsplash, and many others. The amazing thing is you don’t necessarily need video editing skills to utilize the features of the software.
Here is how to use Filmora to Create Impressive Videos for YouTube;
Free Download For Win 7 or later(64-bit)
Free Download For macOS 10.14 or later
Step1 Download the latest version of Filmora from the official website and install it. Then, launch the tool and use the Import button to upload the YouTube video you wish to edit.
Drag-n-drop the imported video to the Timeline.
Step2 Navigate to the top of the screen and select Effects. Choose AI Portrait from the left-hand side. After that, drag-n-drop a preferred AI Portrait effect to the Timeline. Then, adjust it to the section of your video you want it to be displayed.
You can also change the AI Portrait effect settings. To do that, double-click on the effect from the timeline to prompt a pop-up window. Apply the AI Portrait effect from there.
Step3 You can add royalty-free music to your YouTube video by clicking Audio from the top. Then, select the preferred audio to use in the video and move it to the timeline.
To adjust your audio settings, double-click the audio clip from the timeline and use the relevant button to balance audio fade-in and fade-out, volume, pitch, etc.
Step4 Another crucial thing you need to do is to add Subscribe watermark. To do this, click the >> icon next to Export from the top of the screen and select Element.
Locate and click ‘Social Media Show Element 07’ Effects. Drag-n-drop the selected effect to the Timeline.
Step5 Change the position where the Subscribe watermark should appear in your video. Then, play the video to preview it.
Step6 After you’re done with the editing, click the Export button from the top bar and choose Burn DVD from the drop-down list that shows up.
Spet 7: A pop-up window will appear on your PC screen. Select where you want to save the edited video file from the Folder Path section. Then, enter the file name in Lable. Click Export to finish.
Final Words
That’s all on T-Series income on YouTube. T-Series did not just become successful overnight. It took consistent hard work. The team put so much effort not just to come up with ideas and create videos, but also to invest in the right tools to make their videos stand out in the industry. If you’re looking to start your YouTube journey and be like T-Series some days, you should start now. The first move you should make is to invest in Wondershare Filmora software, as it has lots of tools to offer for editing videos with high quality.
Free Download For Win 7 or later(64-bit)
Free Download For macOS 10.14 or later
Also read:
- [New] 2024 Approved Democracy Dive Top 5 Political Gamified Experiences
- [Updated] Comprehensive Understanding Leveraging Adobe Cloud and Finding Alternatives
- [Updated] Unlocking the Secrets to Increasing Video Engagement on YouTube for 2024
- 2024 Approved Jumpstart Your Professional Filmmaking Exclusive, Cost-Free Green Screen Training From Top YouTube Educators
- 2024 Approved Prowl Without Interrups Find the Best 7 Android AdBlock Tools
- All About SiriusXM: An In-Depth Guide to the Perfect Mix of Sports Coverage & Diverse Playlists
- Effortless Pro 6 Driver Rollbacks
- In 2024, Pioneering a Dual Perspective 3 Innovative Techniques for Viewpoint-Based YouTube Reactions
- In 2024, Stand Out on YouTube Avoid Common Logo Design Fails
- Step-by-Step Tutorial How To Bypass Oppo Reno 8T 5G FRP
- Title: In 2024, Mastering YouTube Video Submission Your Detailed Walkthrough
- Author: Joseph
- Created at : 2024-10-12 17:29:41
- Updated at : 2024-10-18 22:14:28
- Link: https://youtube-stream.techidaily.com/in-2024-mastering-youtube-video-submission-your-detailed-walkthrough/
- License: This work is licensed under CC BY-NC-SA 4.0.