
:max_bytes(150000):strip_icc()/DiskDriveStethoscopeGettyImages-585acf823df78ce2c3ed2484.jpg)
"In 2024, Mastering YouTube Live The Comprehensive Playbook"
Mastering YouTube Live: The Comprehensive Playbook
The Ultimate Guide to YouTube Live Streaming

Richard Bennett
Mar 27, 2024• Proven solutions
Live streaming on YouTube is a great way to get more engagement from your audience, even if you do not have a huge following. As long as you have some reliable subscribers leaving comments on your videos you should be able to schedule a live stream and know it will have an audience. People feel a personal connection with their favorite vloggers so if you give your subscribers a chance to interact with you in real time they will probably plan to join in. The key to a good live streaming is to respond to comments and questions from people who are watching. Besides watching the live chat of your video you can create a hashtag for your stream and monitor it on twitter.
Table of Contents
- Why Livestream?
- Type of Content to Livestream
- What You Need to Livestream On YouTube
- 4 Ways to Setup Your Livestream On YouTube
- 8 Tips to Improve Your Livestream on YouTube
- How to Grow As A Livestreamer on YouTube
Why Livestream?
You have grown your audience, and now you want to take your channel to the next level and diversify your content.
Whether you are vlogging, gaming, or running tutorials on YouTube, there is potential to host a live broadcast. It’s not limited to any genre, you simply need to create content that people are interested in watching.
Before we get started into the How, let’s start with a few reasons Why you should be live streaming your content.
Connect and engage with your audience
When a viewer leaves a comment during a livestream you will be able to see it right away and respond. Having an instantaneous conversation with a viewer while they are watching your video will encourage more engagement and establish a ber relationship with your viewers — and you will know that these viewers are not bots.
Increase watch time and session watch time on your channel
If you are making YouTube videos on average 10 minutes long, and the viewer only watches half of it, that’s only 5 minutes of watch time, which is fine… But if you are live streaming for 45 minutes, and you are able to hold the viewer’s attention, you can surpass what your regular videos can do.
Make videos faster
As a YouTuber, you are always striving to be more efficient. Live streaming allows you to do that as you can set up and go. The content you end up creating during the duration of your livestream can then also be condensed into a highlight reel or a recap.
With a bit of planning before you go live, you can create a week’s worth of content in one go, instead of having multiple schedules for livestream content and your standard publishing videos.
Type of Content to Livestream
Live streaming has a lot of value, but what type of content should you be streaming?
Here are a few popular ideas for content that will attract viewers to your livestream:
Q&A session
Unboxing
Game or challenge
Sneak preview or review
Live events (just make sure the Internet can support it)
A demo or a tutorial
A live commentary or (if you are a gamer) Let’s Play video
What You Need to Livestream On YouTube
A Plan or Outline
It’s good to know what your livestream is going to be about before you start. Is there a key message you want to hit, an action you want your viewers to take, or a structure you want to follow.
Just because it’s live, doesn’t mean it all has to be improvised. If you go in without a plan, you might end up feeling flustered or getting stressed out. Allow for spontaneous comments or events to take you off your initial plan, but always return to your outline so you know how to wrap up your livestream when you have to.
Stable Internet Connection
You cannot conduct a quality livestream, if your Internet is bad. When evaluating your internet connection for live streaming on YouTube, look at the Upload speed. Depending on the quality of your video, these are the minimum upload speed rates your Internet will need to perform:
480p = 1.5 mbps
720p = 3 mbps
1080 = 5 mbps
In addition, be aware of external causes that may be slowing down your internet such as someone else using it, a poorly performing router, or a damaged cable.
Camera
If you have a smartphone or a laptop with a webcam built in, that is the best camera for you to get started live streaming. It’s good to have a milestone and work towards a more advanced camera, but until then, don’t feel discouraged because you don’t have expensive gear. If you have a smartphone, a laptop, or a basic webcam, that’s perfectly fine.
Microphone
You don’t need a great microphone for live streaming, you only need a good one. If you do want to spend several hundred to a thousand dollars for a professional studio microphone, nobody will stop you, but know this, a mic that is easy to use is as important as the audio quality as you develop a consistent live streaming schedule.
Streaming Software (For Higher Quality Streams)
Once upon a time, to livestream on YouTube, you needed additional software to capture content from desktop, camera, microphone, etc, called encoding software — but not anymore.
Those encoding software, such as OBS , Wirecast , and VMix , are required if you are producing content that requires a high frame rate such as gaming, but not mandatory if you are simply vlogging or running a tutorial.
If you are using Chrome, you canstream live on YouTube without using an encoder .
A Capture Card (For Higher Quality Streams)
You will need a capture card when you are capturing footage from a different PC or console. If you are a gamer and you are using one PC to stream and one PC to play your game, then you should consider getting a capture card.
4 Ways to Setup Your Livestream On YouTube
There are 4 main ways you can start live streaming on YouTube. The one that works best for you depends on the content you are going to be streaming.
1. Camera/Go Live (Chrome Browser)
By accessing www.youtube.com/webcam on the Google Chrome browser, you can start streaming immediately through your connected webcam. This way is best for a simple Q&A or letting your viewers know your thoughts in a timely situation. This method does not require an encoder.
There are 3 ways to access livestream this way:
1. Click here to connect to your YouTube channel
2. You can access it from the top menu on YouTube

3. You can access it by clicking Camera under the Live Streaming tab in your Creator Studio
2. Google Hangouts On Air (Quick)
Another way to livestream without an encoding software is by using the Google Hangouts On Air feature.
This is great if you want the feel of your livestream to be similar to a board meeting, where you can invite people, split screen, and share screen to illustrate your point.
Here’s how you can access this Google Hangouts On Air:
Step 1: Go to Events under the Live Streaming tab in your Creator Studio
Step 2: Click New Live Event button on the top right corner
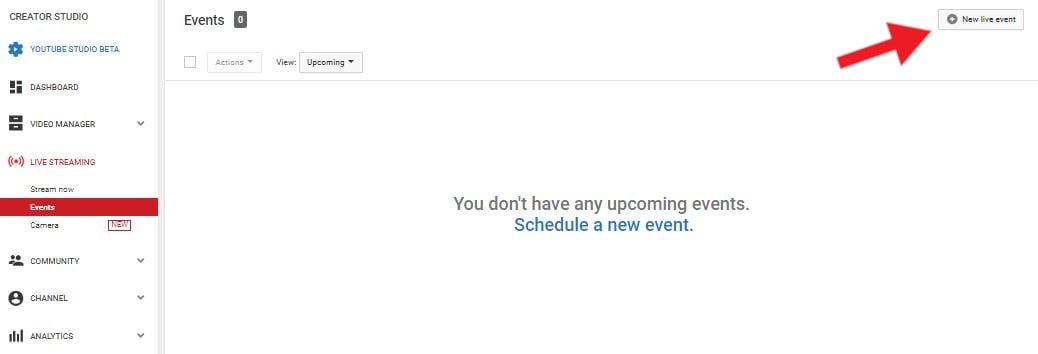
Step 3: Enter the event’s Info and Setting page. Fill out the details of your Livestream, and under Type, select Quick (using Google Hangouts On Air).
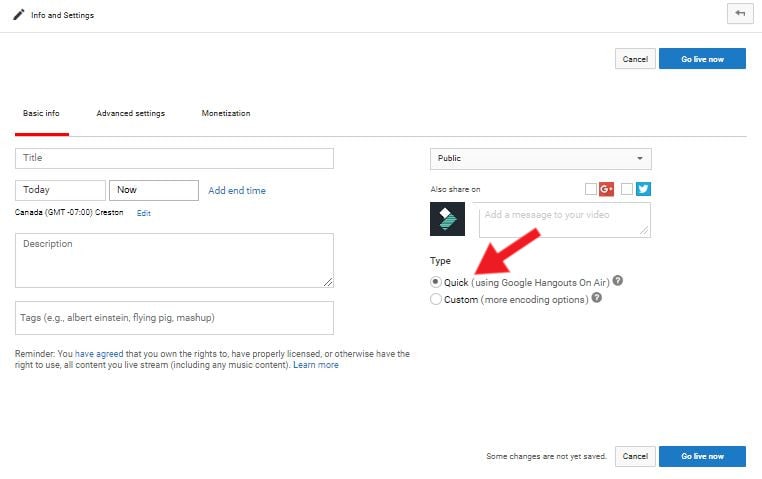
Step 4: You can schedule your livestream or Go Live immediately by clicking one of the blue buttons on the left-hand side.
3. Mobile
Live streaming via your mobile device gives you a lot more freedom to maneuver. You can walk around and give your viewers a tour — but remember to stay within the WiFi or LTE range. That means you still won’t be able to livestream well inside an elevator.
Here’s how you can livestream on mobile:
Step 1: Access the YouTube app and make sure you are signed in to the account you want to livestream from.
Step 2: At the top, click on the camera icon
Step 3: Click on Go Live
Pro Tip: When live streaming, always hold your smartphone horizontally. This allows your video to be oriented as a landscape, instead of a portrait.
4. Custom Encoder
The fourth way of live streaming on YouTube is with encoding software. This is the recommended method if video quality is essential, such as gaming videos.
Step 1: Download and install an encoding software. In this example, we’ll be using OBS .
Step 2: Open OBS
Step 3: Go to YouTube Creator Studio and enter the Stream Now page
Step 4: Under Encoder Setup, copy Stream name/key (Warning: DO NOT share this key with anyone)
Step 5: Return to OBS and enter the Setting menu on the lower right-hand side of the application
Step 6: Click into the Stream tab
a) Under Stream Type, select Streaming Services
b) Under Service, select YouTube/YouTube Gaming
c) Under Server, select Primary YouTube ingest server
d) In Stream Key box, paste the Stream Key you copied from YouTube
e) Click Apply and then OK
Step 7: Plug in your webcam
Step 8: In the main OBS dashboard, under the Sources menu, click the + icon and add Video Capture Device. You should now see visuals from your Webcam.
Step 9: Select the Resolution you want for your video and click OK
Step 10: Return to your YouTube Streaming Page and fill out the details of your livestream
Step 11: Go back to OBS and click Start Streaming
Step 12: See on YouTube Streaming Page at the top that you are Live. You are officially streaming. Once You are finished streaming, return to OBS and click Stop Streaming to end the stream.
8 Tips to Improve Your Livestream on YouTube
Do Speed Test
Before you start your livestream, do a speed test of your Internet. Check out from here.
Have Good Lighting
Be aware of your surroundings when you are about to livestream. You don’t need the top-notch lighting kit, you can simply sit beside a window and allow natural lights to illuminate your stream.
Shoot A Live Test (Unlisted)
Have a technical rehearsal by doing a livestream test, then rewatching it, and evaluating the quality of the audio and visual.
You don’t have to worry about your audience logging in and seeing your test if you set the Privacy of the stream to Unlisted.
Look at the Lens, Not the Screen
If you are streaming with the selfie camera on your smartphone or using your camera’s viewfinder to make sure you are in the frame, remember that you need to be looking at the lens — not the image of yourself.
Eye contact is important in building trust, and if you are looking at yourself, it will appear as if you are looking past your viewers instead of at them.
Show It To Your Viewers
Whatever you are talking about, if you can, show it to your viewers. YouTube is a visual medium, and that means your viewers can become disinterested if there’s nothing visual holding their attention.
In the beginning, you probably won’t have a multi-camera setup, so you cannot cut away from your livestream. However, you can share the screen and you can bring physical objects into a frame.
If you are talking about your dog, show her on camera. If you’re presenting something with a lot of steps, create a Powerpoint slideshow.
Consider what visuals or props you can add to your livestream to enhance your performance.
Find A Way to Make it Evergreen
Evergreen content refers to content that is relevant for a great length of time. Talking about an event isn’t evergreen, because the event will soon pass and become old news. However, giving some tips for how to plan an event would be evergreen content.
Since your livestream will be saved on YouTube and your viewers can replay and watch it. They’re more likely to enjoy it if the content is relevant and interesting.
It Doesn’t Have to Be Long
A livestream doesn’t need to be 40 minutes long. It only needs to be long enough for you to get your story across — and if you want to answer some questions and engage with your audience. As soon as your story is over, even if it’s only 5 minutes, that’s okay. Don’t stress about the length of your stream, it’s not an endurance competition.
Allow Yourself to Make Mistakes
Another thing you shouldn’t worry about at all is making mistakes. When you are doing livestreams pretend you are engaging with someone in real life. In real life, you aren’t able to edit out your mistakes, whether it’s a word mispronounced or coffee spilling. Roll with it and laugh it off.
How to Grow As A Livestreamer on YouTube
Let People Know When You Are Streaming
Give people enough time to schedule it in, don’t spring it on them in the last minute. Share it on social media, your website, and any other means.
Create a Streaming Link 2 Days Before
Share your livestream link via social media to remind everyone to tune in when you go live. Looking for your link? It should look something like this: <www.youtube.com/user/\[channelname\]/live>
Reach Out To the Communities Most Interested
If you are going to be live streaming about a specific topic, such as photography, you should reach out to those who are interested in the topic. Highlight what aspect of photography you are going to be streaming and attract new viewers to your content.
Be Aware of Time Difference
If you have an international audience, find time to livestream where you can get the optimal amount of viewers.
You can find the location of your main demographic in your YouTube analytics .
Create a Channel Trailer to Promote Livestream
Make a video and host it as your channel trailer, that way anyone who lands on your YouTube page will see the promo for your livestream.
Promote Through Feature Content and Channel
YouTube has a feature that enables you to use your existing content to promote your upcoming livestream.
Here’s how to set it up:
Key Takeaways
- Live streaming will help you make more videos, engage with your audience, and grow your channel.
- You don’t need expensive equipment to livestream on YouTube, you only need a webcam and a microphone.
- YouTube has made live streaming as easy as a few clicks, no additional software needed unless you are gaming.
- Always do a test run of your livestream to ensure the internet, audio, and visual are all working properly.
- Create content and reach out to communities to promote your livestream.
Have you encountered any obstacles when setting up your livestream on YouTube? Let us know in the comments below, we are happy to help!
Richard Bennett
Richard Bennett is a writer and a lover of all things video.
Follow @Richard Bennett
Richard Bennett
Mar 27, 2024• Proven solutions
Live streaming on YouTube is a great way to get more engagement from your audience, even if you do not have a huge following. As long as you have some reliable subscribers leaving comments on your videos you should be able to schedule a live stream and know it will have an audience. People feel a personal connection with their favorite vloggers so if you give your subscribers a chance to interact with you in real time they will probably plan to join in. The key to a good live streaming is to respond to comments and questions from people who are watching. Besides watching the live chat of your video you can create a hashtag for your stream and monitor it on twitter.
Table of Contents
- Why Livestream?
- Type of Content to Livestream
- What You Need to Livestream On YouTube
- 4 Ways to Setup Your Livestream On YouTube
- 8 Tips to Improve Your Livestream on YouTube
- How to Grow As A Livestreamer on YouTube
Why Livestream?
You have grown your audience, and now you want to take your channel to the next level and diversify your content.
Whether you are vlogging, gaming, or running tutorials on YouTube, there is potential to host a live broadcast. It’s not limited to any genre, you simply need to create content that people are interested in watching.
Before we get started into the How, let’s start with a few reasons Why you should be live streaming your content.
Connect and engage with your audience
When a viewer leaves a comment during a livestream you will be able to see it right away and respond. Having an instantaneous conversation with a viewer while they are watching your video will encourage more engagement and establish a ber relationship with your viewers — and you will know that these viewers are not bots.
Increase watch time and session watch time on your channel
If you are making YouTube videos on average 10 minutes long, and the viewer only watches half of it, that’s only 5 minutes of watch time, which is fine… But if you are live streaming for 45 minutes, and you are able to hold the viewer’s attention, you can surpass what your regular videos can do.
Make videos faster
As a YouTuber, you are always striving to be more efficient. Live streaming allows you to do that as you can set up and go. The content you end up creating during the duration of your livestream can then also be condensed into a highlight reel or a recap.
With a bit of planning before you go live, you can create a week’s worth of content in one go, instead of having multiple schedules for livestream content and your standard publishing videos.
Type of Content to Livestream
Live streaming has a lot of value, but what type of content should you be streaming?
Here are a few popular ideas for content that will attract viewers to your livestream:
Q&A session
Unboxing
Game or challenge
Sneak preview or review
Live events (just make sure the Internet can support it)
A demo or a tutorial
A live commentary or (if you are a gamer) Let’s Play video
What You Need to Livestream On YouTube
A Plan or Outline
It’s good to know what your livestream is going to be about before you start. Is there a key message you want to hit, an action you want your viewers to take, or a structure you want to follow.
Just because it’s live, doesn’t mean it all has to be improvised. If you go in without a plan, you might end up feeling flustered or getting stressed out. Allow for spontaneous comments or events to take you off your initial plan, but always return to your outline so you know how to wrap up your livestream when you have to.
Stable Internet Connection
You cannot conduct a quality livestream, if your Internet is bad. When evaluating your internet connection for live streaming on YouTube, look at the Upload speed. Depending on the quality of your video, these are the minimum upload speed rates your Internet will need to perform:
480p = 1.5 mbps
720p = 3 mbps
1080 = 5 mbps
In addition, be aware of external causes that may be slowing down your internet such as someone else using it, a poorly performing router, or a damaged cable.
Camera
If you have a smartphone or a laptop with a webcam built in, that is the best camera for you to get started live streaming. It’s good to have a milestone and work towards a more advanced camera, but until then, don’t feel discouraged because you don’t have expensive gear. If you have a smartphone, a laptop, or a basic webcam, that’s perfectly fine.
Microphone
You don’t need a great microphone for live streaming, you only need a good one. If you do want to spend several hundred to a thousand dollars for a professional studio microphone, nobody will stop you, but know this, a mic that is easy to use is as important as the audio quality as you develop a consistent live streaming schedule.
Streaming Software (For Higher Quality Streams)
Once upon a time, to livestream on YouTube, you needed additional software to capture content from desktop, camera, microphone, etc, called encoding software — but not anymore.
Those encoding software, such as OBS , Wirecast , and VMix , are required if you are producing content that requires a high frame rate such as gaming, but not mandatory if you are simply vlogging or running a tutorial.
If you are using Chrome, you canstream live on YouTube without using an encoder .
A Capture Card (For Higher Quality Streams)
You will need a capture card when you are capturing footage from a different PC or console. If you are a gamer and you are using one PC to stream and one PC to play your game, then you should consider getting a capture card.
4 Ways to Setup Your Livestream On YouTube
There are 4 main ways you can start live streaming on YouTube. The one that works best for you depends on the content you are going to be streaming.
1. Camera/Go Live (Chrome Browser)
By accessing www.youtube.com/webcam on the Google Chrome browser, you can start streaming immediately through your connected webcam. This way is best for a simple Q&A or letting your viewers know your thoughts in a timely situation. This method does not require an encoder.
There are 3 ways to access livestream this way:
1. Click here to connect to your YouTube channel
2. You can access it from the top menu on YouTube
3. You can access it by clicking Camera under the Live Streaming tab in your Creator Studio
2. Google Hangouts On Air (Quick)
Another way to livestream without an encoding software is by using the Google Hangouts On Air feature.
This is great if you want the feel of your livestream to be similar to a board meeting, where you can invite people, split screen, and share screen to illustrate your point.
Here’s how you can access this Google Hangouts On Air:
Step 1: Go to Events under the Live Streaming tab in your Creator Studio
Step 2: Click New Live Event button on the top right corner
Step 3: Enter the event’s Info and Setting page. Fill out the details of your Livestream, and under Type, select Quick (using Google Hangouts On Air).
Step 4: You can schedule your livestream or Go Live immediately by clicking one of the blue buttons on the left-hand side.
3. Mobile
Live streaming via your mobile device gives you a lot more freedom to maneuver. You can walk around and give your viewers a tour — but remember to stay within the WiFi or LTE range. That means you still won’t be able to livestream well inside an elevator.
Here’s how you can livestream on mobile:
Step 1: Access the YouTube app and make sure you are signed in to the account you want to livestream from.
Step 2: At the top, click on the camera icon
Step 3: Click on Go Live
Pro Tip: When live streaming, always hold your smartphone horizontally. This allows your video to be oriented as a landscape, instead of a portrait.
4. Custom Encoder
The fourth way of live streaming on YouTube is with encoding software. This is the recommended method if video quality is essential, such as gaming videos.
Step 1: Download and install an encoding software. In this example, we’ll be using OBS .
Step 2: Open OBS
Step 3: Go to YouTube Creator Studio and enter the Stream Now page
Step 4: Under Encoder Setup, copy Stream name/key (Warning: DO NOT share this key with anyone)
Step 5: Return to OBS and enter the Setting menu on the lower right-hand side of the application
Step 6: Click into the Stream tab
a) Under Stream Type, select Streaming Services
b) Under Service, select YouTube/YouTube Gaming
c) Under Server, select Primary YouTube ingest server
d) In Stream Key box, paste the Stream Key you copied from YouTube
e) Click Apply and then OK
Step 7: Plug in your webcam
Step 8: In the main OBS dashboard, under the Sources menu, click the + icon and add Video Capture Device. You should now see visuals from your Webcam.
Step 9: Select the Resolution you want for your video and click OK
Step 10: Return to your YouTube Streaming Page and fill out the details of your livestream
Step 11: Go back to OBS and click Start Streaming
Step 12: See on YouTube Streaming Page at the top that you are Live. You are officially streaming. Once You are finished streaming, return to OBS and click Stop Streaming to end the stream.
8 Tips to Improve Your Livestream on YouTube
Do Speed Test
Before you start your livestream, do a speed test of your Internet. Check out from here.
Have Good Lighting
Be aware of your surroundings when you are about to livestream. You don’t need the top-notch lighting kit, you can simply sit beside a window and allow natural lights to illuminate your stream.
Shoot A Live Test (Unlisted)
Have a technical rehearsal by doing a livestream test, then rewatching it, and evaluating the quality of the audio and visual.
You don’t have to worry about your audience logging in and seeing your test if you set the Privacy of the stream to Unlisted.
Look at the Lens, Not the Screen
If you are streaming with the selfie camera on your smartphone or using your camera’s viewfinder to make sure you are in the frame, remember that you need to be looking at the lens — not the image of yourself.
Eye contact is important in building trust, and if you are looking at yourself, it will appear as if you are looking past your viewers instead of at them.
Show It To Your Viewers
Whatever you are talking about, if you can, show it to your viewers. YouTube is a visual medium, and that means your viewers can become disinterested if there’s nothing visual holding their attention.
In the beginning, you probably won’t have a multi-camera setup, so you cannot cut away from your livestream. However, you can share the screen and you can bring physical objects into a frame.
If you are talking about your dog, show her on camera. If you’re presenting something with a lot of steps, create a Powerpoint slideshow.
Consider what visuals or props you can add to your livestream to enhance your performance.
Find A Way to Make it Evergreen
Evergreen content refers to content that is relevant for a great length of time. Talking about an event isn’t evergreen, because the event will soon pass and become old news. However, giving some tips for how to plan an event would be evergreen content.
Since your livestream will be saved on YouTube and your viewers can replay and watch it. They’re more likely to enjoy it if the content is relevant and interesting.
It Doesn’t Have to Be Long
A livestream doesn’t need to be 40 minutes long. It only needs to be long enough for you to get your story across — and if you want to answer some questions and engage with your audience. As soon as your story is over, even if it’s only 5 minutes, that’s okay. Don’t stress about the length of your stream, it’s not an endurance competition.
Allow Yourself to Make Mistakes
Another thing you shouldn’t worry about at all is making mistakes. When you are doing livestreams pretend you are engaging with someone in real life. In real life, you aren’t able to edit out your mistakes, whether it’s a word mispronounced or coffee spilling. Roll with it and laugh it off.
How to Grow As A Livestreamer on YouTube
Let People Know When You Are Streaming
Give people enough time to schedule it in, don’t spring it on them in the last minute. Share it on social media, your website, and any other means.
Create a Streaming Link 2 Days Before
Share your livestream link via social media to remind everyone to tune in when you go live. Looking for your link? It should look something like this: <www.youtube.com/user/\[channelname\]/live>
Reach Out To the Communities Most Interested
If you are going to be live streaming about a specific topic, such as photography, you should reach out to those who are interested in the topic. Highlight what aspect of photography you are going to be streaming and attract new viewers to your content.
Be Aware of Time Difference
If you have an international audience, find time to livestream where you can get the optimal amount of viewers.
You can find the location of your main demographic in your YouTube analytics .
Create a Channel Trailer to Promote Livestream
Make a video and host it as your channel trailer, that way anyone who lands on your YouTube page will see the promo for your livestream.
Promote Through Feature Content and Channel
YouTube has a feature that enables you to use your existing content to promote your upcoming livestream.
Here’s how to set it up:
Key Takeaways
- Live streaming will help you make more videos, engage with your audience, and grow your channel.
- You don’t need expensive equipment to livestream on YouTube, you only need a webcam and a microphone.
- YouTube has made live streaming as easy as a few clicks, no additional software needed unless you are gaming.
- Always do a test run of your livestream to ensure the internet, audio, and visual are all working properly.
- Create content and reach out to communities to promote your livestream.
Have you encountered any obstacles when setting up your livestream on YouTube? Let us know in the comments below, we are happy to help!
Richard Bennett
Richard Bennett is a writer and a lover of all things video.
Follow @Richard Bennett
Comprehensive List of 8 Prime YouTube-to-AVI Tools
YouTube to AVI: Tutorial + 8 Best YouTube to AVI Converters
Richard Bennett
Mar 27, 2024• Proven solutions
Playing AVI (audio video interleave) files on VLC media player or Windows media player costs nothing, and the number of free YouTube to AVI converters is innumerable. Then, why misuse your data or money viewing videos on YouTube? To download and convert a video to AVI file takes less than a minute.
And the biggest advantage: you can stream AVI audios and videos files online on your computer the whole day.
In this article, I’ll show you how to convert YouTube videos to AVI file formats in three easy ways. Also included are the best 10 YouTube to AVI converters.
You will Learn :
- What is an AVI File?
- How To Convert YouTube To AVI?
- Best AVI Video Players For Windows, Mac, iPhone, and Android
- 8 Best YouTube to AVI Converters
What is an AVI File?
Before we get into the full episode, let’s start by understanding the definition of .AVI file.
AVI stands for audio video interleave. An AVI is a video container format that capture, store and play audio- videos. The AVI file extensions are abbreviated as .avi.
It was developed by Microsoft in 1992 and works based on Resource Interchange File Format (RIFF). Its users enjoy built-in support in every Microsoft Windows application.
AVI encodes its audio and video data on codecs like XviD, DivX and MPEG-2. A codec is a software or hardware used to compress or decompress digital video.
If you have limited storage, avoid AVI files because they are non-compressed and occupy large space. Conversely, AVI format stores high-quality videos since they are less compressed.
Streaming videos from YouTube is expensive. To watch your favorite videos repeatedly, you have to download the YouTube videos and convert to AVI file.
How To Convert YouTube To AVI: Best Solutions For Windows And Mac?
Have you ever tried to convert YouTube videos to AVI online? It’s next to impossibility! The easiest and fastest way is to start by downloading the video.
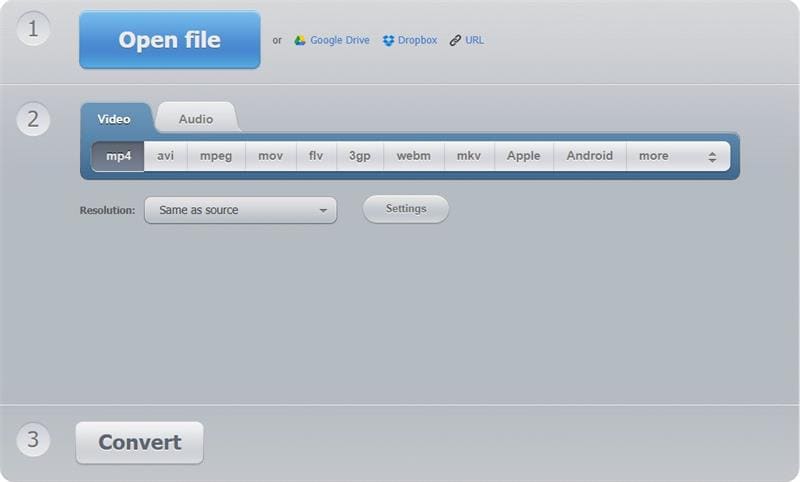
To convert YouTube to AVI, you require software that supports all file formats. Why? YouTube videos are uploaded in many formats. To avoid trial and error methods, the best-recommended software to use is Filmora.
Filmora works pretty well with Windows10/8/7 and mac. Do you want to know how to download and convert YouTube videos to AVI using Filmora for free? Follow the steps below.
Step 1: On the Filmora product page, select Windows or Mac, and then click the Free Download button below. Follow the prompts to install it.


Step 2: Search for the YouTube video to convert. To download a YouTube video easily subscribers to YouTube Premium. Otherwise, download directly from your browser directly using plugins like Dlnowsoft .
Step 3: Now double-click the Filmora icon to start your new video conversion project. You can change the aspect ratio if necessary.

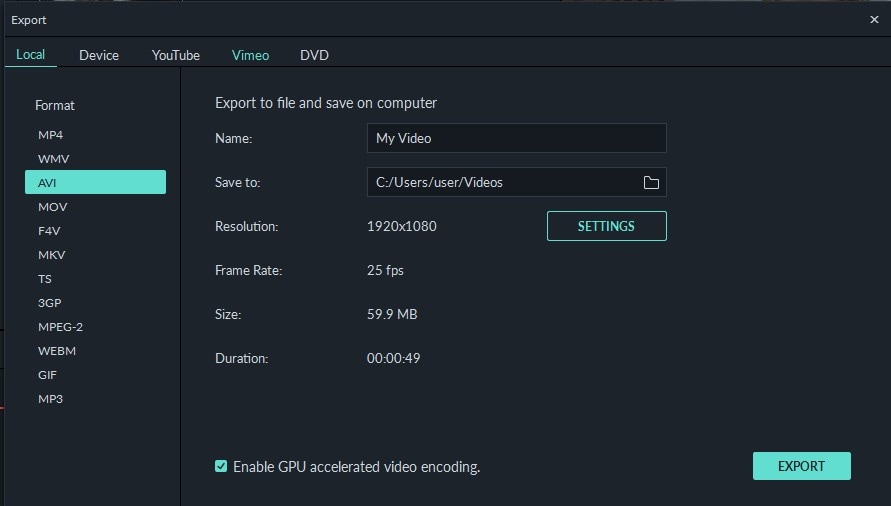
Step 4: Tap on the new project timeline for the editor menu to load. Head over to the Import menu and drop down to Import files to select your downloaded YouTube video. Click the “EXPORT” to open the file format options.
Step 5: Select AVI, rename the project and choose where to save the converted YouTube video.
Click the Export menu at the bottom and wait for the video to convert.
To learn more about Wondershare Filmora video editor in 60 seconds, click the video below.
Back to our main topic. Not every media player can play AVI files. Likewise, you cannot use any video converting software to convert YouTube to AVI.
Therefore, to quickly understand the YouTube to AVI converter to use and the AVI video media players for windows, mac, iPhone or Android, I’ve subdivided this part into two parts.
- Part 1: Best AVI Video Players
- Part 2: 8 Best YouTube to AVI Converter
Best AVI Video Players For Windows, Mac, iPhone, and Android
Days are gone when Windows Media Player was the most commonly preferred media player. The launch of devices like Mac, iPhone, and Android has led to the development of AVI players that are compatible with the in-built systems.
You may also like: 10 Best Free Outro Makers Online to Create Perfect Outro Templates >>
Top AVI Players For Windows 10/8/7
Microsoft Windows is the most used operating system. The top AVI video players for Windows are:
- JetVideo
- KM Player
- Rules Player
- VLC Player
- Real Player
- FreeSmith Video Player
Best 6 AVI Players For iPhone/iPad
Today’s technological advancements have placed the iOS operating system on a global competition with other systems. To play AVI videos on iPhone or iPad, use the following video players:
- RockPlayer2
- VLC Media Player
- Video Stream
- AirPlayit
- Oplayer Lite
- Infuse3
Top 5 AVI Players for Android
The majority of smartphone owners have Android phones. The Android operating system supports a myriad of AVI media players. Here the top AVI players for Android to download:
- Dice Player
- BS Player
- VLC Media Player
- GPlayer
6 Best Free AVI Player For Mac
Mac is renowned for its simplicity and compatibility with many third-party applications. The best and easiest AVI players for mac include:
- 5KPlayer
- Gom Player
- QuickTime
- VLC Media Player
- Plex
- Elmedia
Now that you know which player to download, which AVI converters are suitable for your device? Select the best from the next part.
8 Best YouTube to AVI Converters
Without a doubt, the number of YouTube to AVI converters available online surpasses everyone’s demand. Whereas some works best for mac and Windows, others are developed for Android and iPad.
A reliable YouTube video converter should have options for you to save and reset the resolution. Online video converters are the best for you only have copy-paste the URL and then convert. They also negate YouTube video download policies.
You may also like: YouTube Outro Complete Guide [+Best Makers & Free Templates] >>
1. OnlineVideoConverter
Besides the AVI format OnlineVideoConverter, converts videos into MPEG, MP4, OGG, M4A, WMA, MP3, FLV, and MOV. It’s a versatile application that’s suitable for both Windows and Android devices.
As a powerful online video converting app, you can download any video or file format and convert it within a minute. Start by copying any video file URL and then select the file format you want. Click start to convert your Youtube to AVI.
Features
- Works smoothly with modern browsers
- It’s compatible with many video portals like Vimeo, Facebook, Ted, YouTube, and Dailymotion.
- It has a high-speed download and conversion rate
- No installation nor registration is required
- No conversion limits
You may also like: How to Convert YouTube to MP4 Safely? [Step by Step Guide] >>
2. iConvert Media
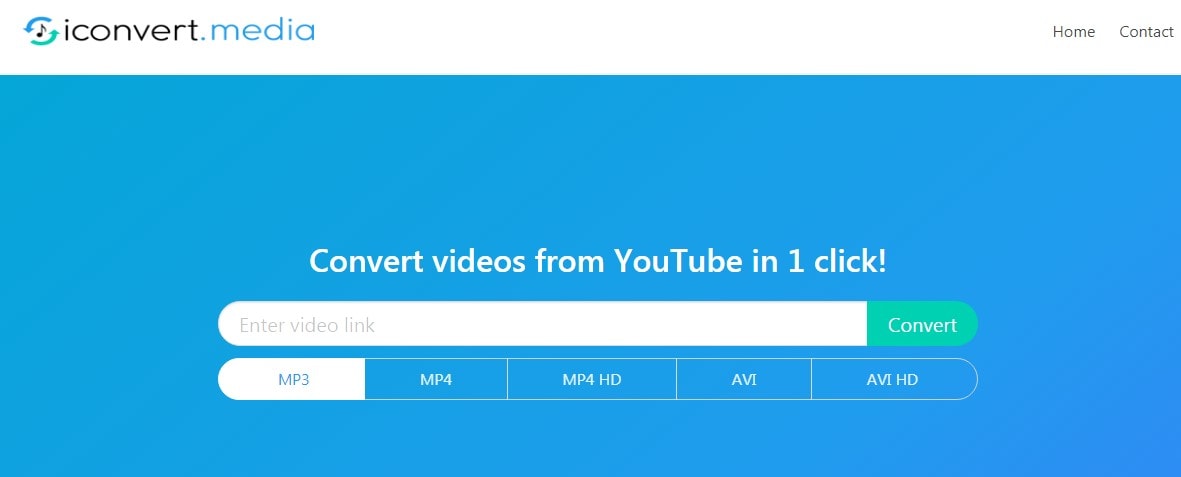
iConvert.Media is a free online video converting tool that produces high-quality videos. The biggest advantage with this tool is you can use on Android, iPhone, iPad, Windows, and Mac. Type any YouTube file format and it will be transformed into the file you want.
To convert a YouTube video, enter the video link on the blank space, select AVI and click “Convert” to convert and download your video.
Features
- No registration requirements or conditions
- Can converts YouTube videos into MP3, AVI, MP4 HD and AVI HD
- Provides high definition audio-video clips
- Offers YouTube video download option
3. y2mate
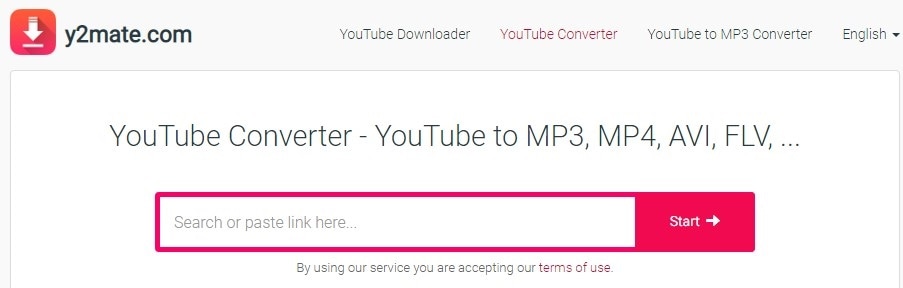
With over 162.2 million monthly visitors, y2mate is among the most used YouTube to AVI converter in the world. This is because of its ease of use, user-friendly interface and speed of video conversion.
Apart from converting YouTube videos to AVI, you can also download MP3, M4A, MP4, 3GP videos from YouTube. Want to convert YouTube to MP3 files? Use y2mate and you won’t regret. It’s compatible with windows, Mac, iOS, Linux and Android.
Features
- Free to download and convert YouTube videos
- Easy to use
- High-speed conversion rate
- Supports innumerable file formats
4. FLVTO
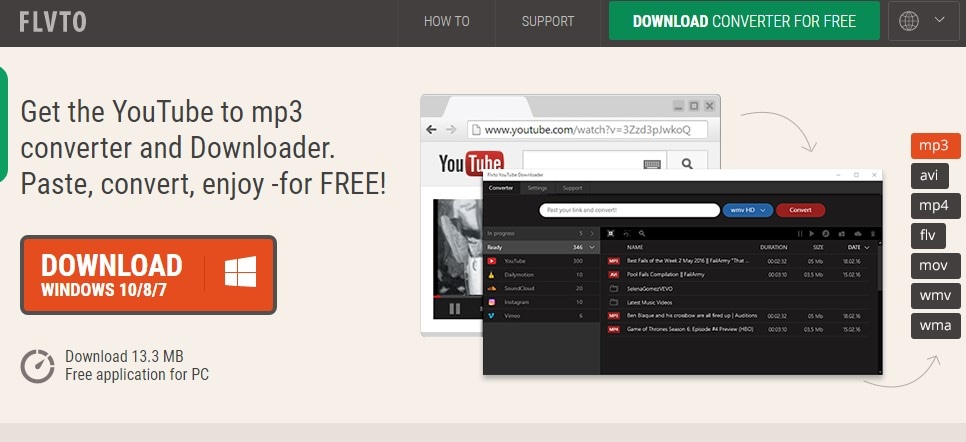
You’ll get these offers after downloading FLVTO; YouTube video downloader, YouTube converter, YouTube song downloader and YouTube video ripper. You can convert any YouTube video file to formats like MP3, AVI, MP4, MOV, and WMV.
FLVTO works on Windows 8, Linux and Mac. Among its amazing features are the inbuilt media player and ID3 tag for quick identification of downloaded videos. If you want to get crystal clear videos, download FLVTO now.
Features
- Works will all video and audio file formats
- Allows download and conversion of up to 99 files at once
- Amazing fast video download and conversion speed
- Download and transfer YouTube music to iTunes
5. 2CONV
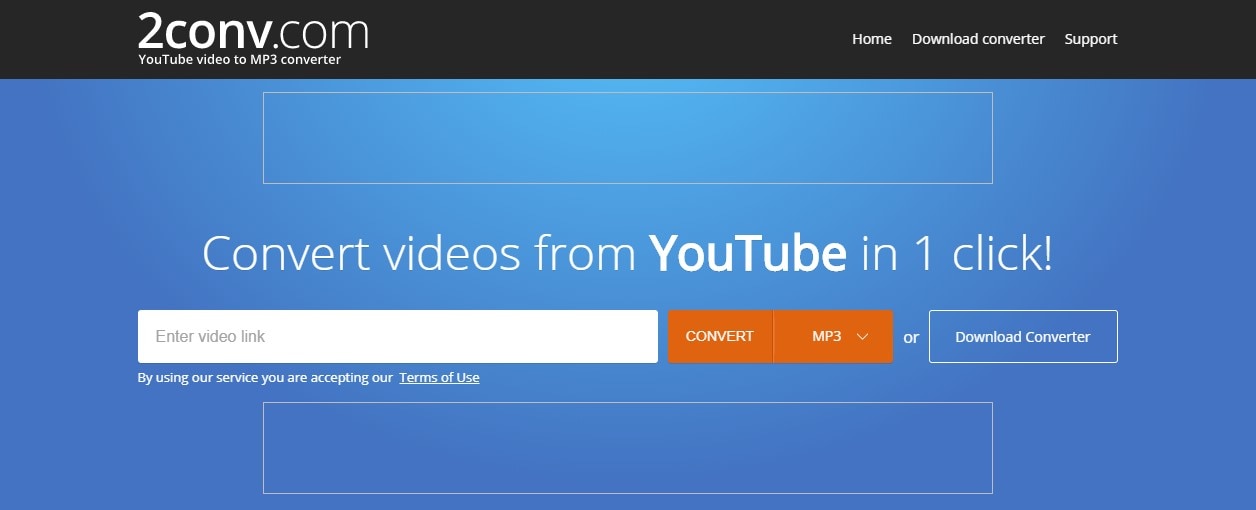
You can either convert YouTube to AVI online by copy-pasting video URL or downloading the app and then converting videos. 2CONV runs on Windows, Linux, Mac OS, Android, and iPhones. Apart from converting videos to AVI/ AVI HD, you can also convert videos to MP3, MP4 HD, and MP4.
No registration and personal details are required to download or convert videos to any format. Whether new or a tech expert, you don’t need any tutorial to use this app.
Features
- Ultra-fast download and conversion speed
- YouTube Video downloader option
- Comes in different languages
6. VideoMP3Converter
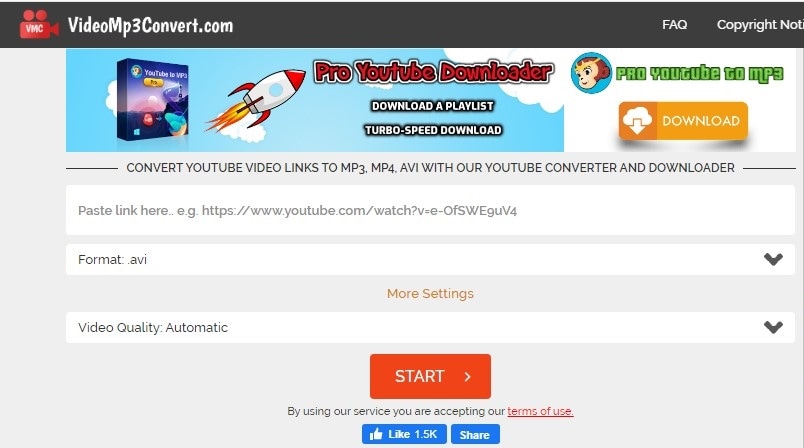
Exceptionally, this web application allows you to select your desired output video bitrate and supports over 10 conversion file formats. No fee, registration or installation is required to use this app.
VideoMP3Converter is not limited to YouTube videos. You can also download videos from Vimeo, Dailymotion, and Liveleak. Do you own a smartphone? VMC is compatible with Androids, iPhone and iPad.
Features
- Compatibility with all modern browsers
- Unlimited free video downloads and conversions in a format of your choice from different hosting platforms.
7. YouTube2Video
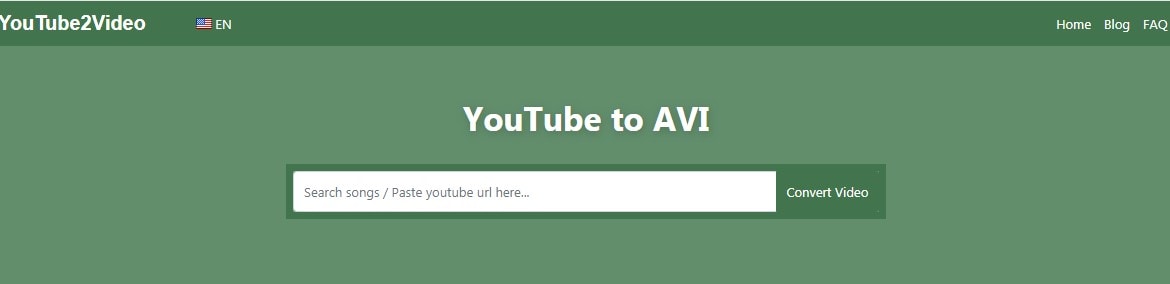
This is the most sought free video conversion app due to its ease of use and compatibility with every operating system. You can download YouTube videos to AVI by searching, copying, pasting and converting its URL on the blank field. With YouTube2Video, MacBook users can download videos directly from YouTube.
YouTube2Video supports video downloads from platforms like Reddit, Facebook, Flickr, Tumbler and VK.Com. The accepted file formats include MKV, MP3, AVI, MAV, and MP4. Its multi-functional platform supports YouTube to MP3 and MP4 downloads.
Features
- Simple and straight forward user interface
- Plenty of videos and song suggestion on the website
- Unlimited free YouTube video downloads
8. ClipConverter
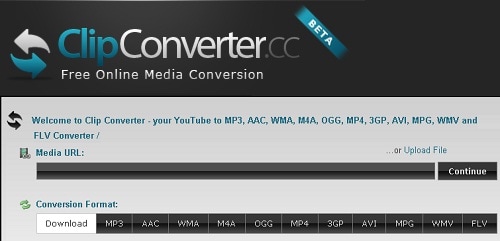
The Clip Converter interface format is clearly showing its simplicity of use. I recommend this app if it’s your first time to convert YouTube to AVI. This is how to convert YouTube to AVI in three easy steps:
- Search for a video on YouTube, copy its URL and paste at “Video URL” on the app
- Choose AVI and select output video resolution then press start.
- Wait to convert and save to your files
Clip Converter supports services like Facebook and Vimeo. It’s pretty good for producing HD, 1080p, 2K, and 4K videos.
Features
- Supports immerse a number of file conversion formats
- Option to choose a video output bitrate
- Absolutely free to use online
- File upload options from Google Drive, DropBox, My Computer and One Drive.
With all the YouTube to Avi converters above at your disposal, how do you convert YouTube videos without compromising its quality?
You may also like: How to Record YouTube Videos on Your PC [Only 5 Steps] >>
Tips of YouTube To AVI Converting For Beginners
To convert YouTube videos to AVI, there are factors you have to consider. Otherwise, the video won’t play or may cause malfunction to your device.
Here are the tips;
- Know your device features- This factor tops our list because it’s where all the actions will take place. Know its operating system, memory status, and screen resolution.
- Choose a multi-functional YouTube to AVI converter- Don’t waste your device memory by downloading a YouTube video downloader that cannot convert the video to AVI.
- Choose a converter that supports many file formats- YouTube supports a large number of file formats. To be able to select any video, the converting app should be able to convert the uploaded video.
- Video resolution- Compare the video resolution and those supported by the converting app. Some converters can only handle low bitrate videos.
Converting YouTube Videos to AVI is more simplified by the above-listed apps and software. But the biggest question is, can you upload AVI to YouTube? Check for the next article to learn more.
Before that, It’s good to learn how to download youtube videos without any Software. To read more, click here >>>>How to Download YouTube Videos without Any Software [12 Proven Ways]
Bottom Line
We all love to watch videos on YouTube. I know, if you knew how to download the videos, convert their file formats and then play on your smart TV, computer or smartphone, watching videos would become a hobby.
Only ignorance is baring you from this. Converting YouTube to AVI costs nothing. Some apps can convert a dozen YouTube videos at an extreme speed. With others, you can download and convert the videos to any format and even change their resolution to suit your device.
Use this article to convert and watch your most favorite videos. Was this article helpful to you? Kindly share your comments and views below.
f
Richard Bennett
Richard Bennett is a writer and a lover of all things video.
Follow @Richard Bennett
Richard Bennett
Mar 27, 2024• Proven solutions
Playing AVI (audio video interleave) files on VLC media player or Windows media player costs nothing, and the number of free YouTube to AVI converters is innumerable. Then, why misuse your data or money viewing videos on YouTube? To download and convert a video to AVI file takes less than a minute.
And the biggest advantage: you can stream AVI audios and videos files online on your computer the whole day.
In this article, I’ll show you how to convert YouTube videos to AVI file formats in three easy ways. Also included are the best 10 YouTube to AVI converters.
You will Learn :
- What is an AVI File?
- How To Convert YouTube To AVI?
- Best AVI Video Players For Windows, Mac, iPhone, and Android
- 8 Best YouTube to AVI Converters
What is an AVI File?
Before we get into the full episode, let’s start by understanding the definition of .AVI file.
AVI stands for audio video interleave. An AVI is a video container format that capture, store and play audio- videos. The AVI file extensions are abbreviated as .avi.
It was developed by Microsoft in 1992 and works based on Resource Interchange File Format (RIFF). Its users enjoy built-in support in every Microsoft Windows application.
AVI encodes its audio and video data on codecs like XviD, DivX and MPEG-2. A codec is a software or hardware used to compress or decompress digital video.
If you have limited storage, avoid AVI files because they are non-compressed and occupy large space. Conversely, AVI format stores high-quality videos since they are less compressed.
Streaming videos from YouTube is expensive. To watch your favorite videos repeatedly, you have to download the YouTube videos and convert to AVI file.
How To Convert YouTube To AVI: Best Solutions For Windows And Mac?
Have you ever tried to convert YouTube videos to AVI online? It’s next to impossibility! The easiest and fastest way is to start by downloading the video.
To convert YouTube to AVI, you require software that supports all file formats. Why? YouTube videos are uploaded in many formats. To avoid trial and error methods, the best-recommended software to use is Filmora.
Filmora works pretty well with Windows10/8/7 and mac. Do you want to know how to download and convert YouTube videos to AVI using Filmora for free? Follow the steps below.
Step 1: On the Filmora product page, select Windows or Mac, and then click the Free Download button below. Follow the prompts to install it.
Step 2: Search for the YouTube video to convert. To download a YouTube video easily subscribers to YouTube Premium. Otherwise, download directly from your browser directly using plugins like Dlnowsoft .
Step 3: Now double-click the Filmora icon to start your new video conversion project. You can change the aspect ratio if necessary.
Step 4: Tap on the new project timeline for the editor menu to load. Head over to the Import menu and drop down to Import files to select your downloaded YouTube video. Click the “EXPORT” to open the file format options.
Step 5: Select AVI, rename the project and choose where to save the converted YouTube video.
Click the Export menu at the bottom and wait for the video to convert.
To learn more about Wondershare Filmora video editor in 60 seconds, click the video below.
Back to our main topic. Not every media player can play AVI files. Likewise, you cannot use any video converting software to convert YouTube to AVI.
Therefore, to quickly understand the YouTube to AVI converter to use and the AVI video media players for windows, mac, iPhone or Android, I’ve subdivided this part into two parts.
- Part 1: Best AVI Video Players
- Part 2: 8 Best YouTube to AVI Converter
Best AVI Video Players For Windows, Mac, iPhone, and Android
Days are gone when Windows Media Player was the most commonly preferred media player. The launch of devices like Mac, iPhone, and Android has led to the development of AVI players that are compatible with the in-built systems.
You may also like: 10 Best Free Outro Makers Online to Create Perfect Outro Templates >>
Top AVI Players For Windows 10/8/7
Microsoft Windows is the most used operating system. The top AVI video players for Windows are:
- JetVideo
- KM Player
- Rules Player
- VLC Player
- Real Player
- FreeSmith Video Player
Best 6 AVI Players For iPhone/iPad
Today’s technological advancements have placed the iOS operating system on a global competition with other systems. To play AVI videos on iPhone or iPad, use the following video players:
- RockPlayer2
- VLC Media Player
- Video Stream
- AirPlayit
- Oplayer Lite
- Infuse3
Top 5 AVI Players for Android
The majority of smartphone owners have Android phones. The Android operating system supports a myriad of AVI media players. Here the top AVI players for Android to download:
- Dice Player
- BS Player
- VLC Media Player
- GPlayer
6 Best Free AVI Player For Mac
Mac is renowned for its simplicity and compatibility with many third-party applications. The best and easiest AVI players for mac include:
- 5KPlayer
- Gom Player
- QuickTime
- VLC Media Player
- Plex
- Elmedia
Now that you know which player to download, which AVI converters are suitable for your device? Select the best from the next part.
8 Best YouTube to AVI Converters
Without a doubt, the number of YouTube to AVI converters available online surpasses everyone’s demand. Whereas some works best for mac and Windows, others are developed for Android and iPad.
A reliable YouTube video converter should have options for you to save and reset the resolution. Online video converters are the best for you only have copy-paste the URL and then convert. They also negate YouTube video download policies.
You may also like: YouTube Outro Complete Guide [+Best Makers & Free Templates] >>
1. OnlineVideoConverter
Besides the AVI format OnlineVideoConverter, converts videos into MPEG, MP4, OGG, M4A, WMA, MP3, FLV, and MOV. It’s a versatile application that’s suitable for both Windows and Android devices.
As a powerful online video converting app, you can download any video or file format and convert it within a minute. Start by copying any video file URL and then select the file format you want. Click start to convert your Youtube to AVI.
Features
- Works smoothly with modern browsers
- It’s compatible with many video portals like Vimeo, Facebook, Ted, YouTube, and Dailymotion.
- It has a high-speed download and conversion rate
- No installation nor registration is required
- No conversion limits
You may also like: How to Convert YouTube to MP4 Safely? [Step by Step Guide] >>
2. iConvert Media
iConvert.Media is a free online video converting tool that produces high-quality videos. The biggest advantage with this tool is you can use on Android, iPhone, iPad, Windows, and Mac. Type any YouTube file format and it will be transformed into the file you want.
To convert a YouTube video, enter the video link on the blank space, select AVI and click “Convert” to convert and download your video.
Features
- No registration requirements or conditions
- Can converts YouTube videos into MP3, AVI, MP4 HD and AVI HD
- Provides high definition audio-video clips
- Offers YouTube video download option
3. y2mate
With over 162.2 million monthly visitors, y2mate is among the most used YouTube to AVI converter in the world. This is because of its ease of use, user-friendly interface and speed of video conversion.
Apart from converting YouTube videos to AVI, you can also download MP3, M4A, MP4, 3GP videos from YouTube. Want to convert YouTube to MP3 files? Use y2mate and you won’t regret. It’s compatible with windows, Mac, iOS, Linux and Android.
Features
- Free to download and convert YouTube videos
- Easy to use
- High-speed conversion rate
- Supports innumerable file formats
4. FLVTO
You’ll get these offers after downloading FLVTO; YouTube video downloader, YouTube converter, YouTube song downloader and YouTube video ripper. You can convert any YouTube video file to formats like MP3, AVI, MP4, MOV, and WMV.
FLVTO works on Windows 8, Linux and Mac. Among its amazing features are the inbuilt media player and ID3 tag for quick identification of downloaded videos. If you want to get crystal clear videos, download FLVTO now.
Features
- Works will all video and audio file formats
- Allows download and conversion of up to 99 files at once
- Amazing fast video download and conversion speed
- Download and transfer YouTube music to iTunes
5. 2CONV
You can either convert YouTube to AVI online by copy-pasting video URL or downloading the app and then converting videos. 2CONV runs on Windows, Linux, Mac OS, Android, and iPhones. Apart from converting videos to AVI/ AVI HD, you can also convert videos to MP3, MP4 HD, and MP4.
No registration and personal details are required to download or convert videos to any format. Whether new or a tech expert, you don’t need any tutorial to use this app.
Features
- Ultra-fast download and conversion speed
- YouTube Video downloader option
- Comes in different languages
6. VideoMP3Converter
Exceptionally, this web application allows you to select your desired output video bitrate and supports over 10 conversion file formats. No fee, registration or installation is required to use this app.
VideoMP3Converter is not limited to YouTube videos. You can also download videos from Vimeo, Dailymotion, and Liveleak. Do you own a smartphone? VMC is compatible with Androids, iPhone and iPad.
Features
- Compatibility with all modern browsers
- Unlimited free video downloads and conversions in a format of your choice from different hosting platforms.
7. YouTube2Video
This is the most sought free video conversion app due to its ease of use and compatibility with every operating system. You can download YouTube videos to AVI by searching, copying, pasting and converting its URL on the blank field. With YouTube2Video, MacBook users can download videos directly from YouTube.
YouTube2Video supports video downloads from platforms like Reddit, Facebook, Flickr, Tumbler and VK.Com. The accepted file formats include MKV, MP3, AVI, MAV, and MP4. Its multi-functional platform supports YouTube to MP3 and MP4 downloads.
Features
- Simple and straight forward user interface
- Plenty of videos and song suggestion on the website
- Unlimited free YouTube video downloads
8. ClipConverter
The Clip Converter interface format is clearly showing its simplicity of use. I recommend this app if it’s your first time to convert YouTube to AVI. This is how to convert YouTube to AVI in three easy steps:
- Search for a video on YouTube, copy its URL and paste at “Video URL” on the app
- Choose AVI and select output video resolution then press start.
- Wait to convert and save to your files
Clip Converter supports services like Facebook and Vimeo. It’s pretty good for producing HD, 1080p, 2K, and 4K videos.
Features
- Supports immerse a number of file conversion formats
- Option to choose a video output bitrate
- Absolutely free to use online
- File upload options from Google Drive, DropBox, My Computer and One Drive.
With all the YouTube to Avi converters above at your disposal, how do you convert YouTube videos without compromising its quality?
You may also like: How to Record YouTube Videos on Your PC [Only 5 Steps] >>
Tips of YouTube To AVI Converting For Beginners
To convert YouTube videos to AVI, there are factors you have to consider. Otherwise, the video won’t play or may cause malfunction to your device.
Here are the tips;
- Know your device features- This factor tops our list because it’s where all the actions will take place. Know its operating system, memory status, and screen resolution.
- Choose a multi-functional YouTube to AVI converter- Don’t waste your device memory by downloading a YouTube video downloader that cannot convert the video to AVI.
- Choose a converter that supports many file formats- YouTube supports a large number of file formats. To be able to select any video, the converting app should be able to convert the uploaded video.
- Video resolution- Compare the video resolution and those supported by the converting app. Some converters can only handle low bitrate videos.
Converting YouTube Videos to AVI is more simplified by the above-listed apps and software. But the biggest question is, can you upload AVI to YouTube? Check for the next article to learn more.
Before that, It’s good to learn how to download youtube videos without any Software. To read more, click here >>>>How to Download YouTube Videos without Any Software [12 Proven Ways]
Bottom Line
We all love to watch videos on YouTube. I know, if you knew how to download the videos, convert their file formats and then play on your smart TV, computer or smartphone, watching videos would become a hobby.
Only ignorance is baring you from this. Converting YouTube to AVI costs nothing. Some apps can convert a dozen YouTube videos at an extreme speed. With others, you can download and convert the videos to any format and even change their resolution to suit your device.
Use this article to convert and watch your most favorite videos. Was this article helpful to you? Kindly share your comments and views below.
f
Richard Bennett
Richard Bennett is a writer and a lover of all things video.
Follow @Richard Bennett
- Title: "In 2024, Mastering YouTube Live The Comprehensive Playbook"
- Author: Joseph
- Created at : 2024-05-31 13:43:18
- Updated at : 2024-06-01 13:43:18
- Link: https://youtube-stream.techidaily.com/in-2024-mastering-youtube-live-the-comprehensive-playbook/
- License: This work is licensed under CC BY-NC-SA 4.0.
