"In 2024, Mastering Handheld Shots No Tripod Necessary"
Mastering Handheld Shots: No Tripod Necessary
DIY Tripods| How to Stabilize Your Camera without Buying a Tripod

Richard Bennett
Oct 26, 2023• Proven solutions
When you’re trying to grow a channel on YouTube it can feel like equipment is a barrier, but it shouldn’t be. If you can’t afford a high-end tripod, for example, there are loads of ways to get by without one.
DIY Your Video with Wondershare Filmora
Wondershare Filmora has the best video stabilization tool is your videos have a bad frame or were recorded in dim lights. If a video is shot in bad weather or unfriendly situation where you don’t have all the equipment required for a quality recording, Wondershare Filmora can help you in the background to edit your videos like a pro. And it has all the relevant tools like effects, transitions, background removal, overlays, and background music that could turn your normal video to a professional one.


Here are 3 of our favorite DIY tripods.
DIY smartphone tripod using binder clips or hair clips
You’re a solo operation and your best camera is on your phone. That’s pretty common.
If you have a DSLR then you can set it down on any stable surface while filming yourself, but your phone can’t stand up by itself. It needs something or someone to hold it. Do you just accept that and shoot everything as a selfie?
No. No, you don’t, because there are common household items that can help you out of this problem. For this DIY tripod, you need either 2 binder clips or 2 ‘claw clips’ (also called ‘hair jaws’).
Hold your phone in landscape mode (horizontally, so it’s long rather than tall) and attach clips to the bottom corners. If you are worried about scratching your screen, fold up some paper to place between your clip and your phone.
Here it is with binder clips:

And here it is with hair clips:


Now you can set your smartphone upon any stable surface, like a table or a stack of books.
Here are some more cool ideas!
DIY adjustable tripod using books and a towel
You’ve probably heard a million times that you can stabilize your camera by sitting it down on any stable surface – on your desk, on a stack of books, up in a tree, etc. This is very true!
But if you can use any stable surface, why do people buy tripods?
Because it isn’t convenient to rearrange your furniture whenever you want to make a video, and also because tripods are adjustable. You can change their height, you can use them to pan or tilt, and it’s pretty easy to move them a bit forwards or backward while you’re setting up your shot.
To get similar functions from the ‘any stable surface’ solution you can use a table, a stack of books, and a towel.
- Set up the area where you’re going to sit while you’re filming on one end of the table.
- Put the towel down over the approximate spot you want your camera to be.
- Stack your books on top of the towel.
- Put your camera on top of the books.
Now if your camera isn’t up high enough, or is too high, you can adjust it just by adding or taking away books. If you want to move it closer or farther away from you, just pull the towel forwards or backward.
DIY gripping ‘Gorillapod’ using wire and tape
Gorillapod’s are cool because you can use them like normal tripods, carry them around like selfie sticks, or attach them to things like fences and posts. Here’s how you can make something similar using wire, electrical tape or duct tape, and a 1/4 bolt.
Your wire should be fairly stiff and you’ll need three pieces the same length, which should be at least 10 inches. Old clothes hangers work well. This needs to be something strong enough to support the weight of your camera, but soft enough that it’s not impossible for you to bend.

All of your supplies plus the finished product.
Readying your legs
Step 1: Bend 2 inches at one end of each wire into a ‘U’ shape. You will probably need pliers for this.
Step 2: Pick up one of your pieces of wire and wrap one end with electrical tape. Go around 5-10 times (to prevent it from coming undone at the end) and then, without cutting your tape, start moving up and wrapping the rest of your wire. Stop before your ‘U’ section.
Repeat this with the other two wires.
Attaching your legs
Step 1: Place the ‘U’ section of a leg against your bolt. The bolt’s threading should be pointing away from the leg. Now, use your tape to attach them. Wind it around 2 or 3 times, then repeat the process with both of the other legs individually.
Step 2: After all the legs are attached, wrap some more tape around all 3 as tightly as you can.
Your camera will mount onto the bolt! You’ll be able to use this as a normal table-top tripod or use the flexible legs to grab onto different things like a Gorillapod. Read more at Instructables.
Note: make sure the bolt is a fit for your camera before you get too far into this process.
Richard Bennett
Richard Bennett is a writer and a lover of all things video.
Follow @Richard Bennett
Richard Bennett
Oct 26, 2023• Proven solutions
When you’re trying to grow a channel on YouTube it can feel like equipment is a barrier, but it shouldn’t be. If you can’t afford a high-end tripod, for example, there are loads of ways to get by without one.
DIY Your Video with Wondershare Filmora
Wondershare Filmora has the best video stabilization tool is your videos have a bad frame or were recorded in dim lights. If a video is shot in bad weather or unfriendly situation where you don’t have all the equipment required for a quality recording, Wondershare Filmora can help you in the background to edit your videos like a pro. And it has all the relevant tools like effects, transitions, background removal, overlays, and background music that could turn your normal video to a professional one.
Here are 3 of our favorite DIY tripods.
DIY smartphone tripod using binder clips or hair clips
You’re a solo operation and your best camera is on your phone. That’s pretty common.
If you have a DSLR then you can set it down on any stable surface while filming yourself, but your phone can’t stand up by itself. It needs something or someone to hold it. Do you just accept that and shoot everything as a selfie?
No. No, you don’t, because there are common household items that can help you out of this problem. For this DIY tripod, you need either 2 binder clips or 2 ‘claw clips’ (also called ‘hair jaws’).
Hold your phone in landscape mode (horizontally, so it’s long rather than tall) and attach clips to the bottom corners. If you are worried about scratching your screen, fold up some paper to place between your clip and your phone.
Here it is with binder clips:
And here it is with hair clips:
Now you can set your smartphone upon any stable surface, like a table or a stack of books.
Here are some more cool ideas!
DIY adjustable tripod using books and a towel
You’ve probably heard a million times that you can stabilize your camera by sitting it down on any stable surface – on your desk, on a stack of books, up in a tree, etc. This is very true!
But if you can use any stable surface, why do people buy tripods?
Because it isn’t convenient to rearrange your furniture whenever you want to make a video, and also because tripods are adjustable. You can change their height, you can use them to pan or tilt, and it’s pretty easy to move them a bit forwards or backward while you’re setting up your shot.
To get similar functions from the ‘any stable surface’ solution you can use a table, a stack of books, and a towel.
- Set up the area where you’re going to sit while you’re filming on one end of the table.
- Put the towel down over the approximate spot you want your camera to be.
- Stack your books on top of the towel.
- Put your camera on top of the books.
Now if your camera isn’t up high enough, or is too high, you can adjust it just by adding or taking away books. If you want to move it closer or farther away from you, just pull the towel forwards or backward.
DIY gripping ‘Gorillapod’ using wire and tape
Gorillapod’s are cool because you can use them like normal tripods, carry them around like selfie sticks, or attach them to things like fences and posts. Here’s how you can make something similar using wire, electrical tape or duct tape, and a 1/4 bolt.
Your wire should be fairly stiff and you’ll need three pieces the same length, which should be at least 10 inches. Old clothes hangers work well. This needs to be something strong enough to support the weight of your camera, but soft enough that it’s not impossible for you to bend.
All of your supplies plus the finished product.
Readying your legs
Step 1: Bend 2 inches at one end of each wire into a ‘U’ shape. You will probably need pliers for this.
Step 2: Pick up one of your pieces of wire and wrap one end with electrical tape. Go around 5-10 times (to prevent it from coming undone at the end) and then, without cutting your tape, start moving up and wrapping the rest of your wire. Stop before your ‘U’ section.
Repeat this with the other two wires.
Attaching your legs
Step 1: Place the ‘U’ section of a leg against your bolt. The bolt’s threading should be pointing away from the leg. Now, use your tape to attach them. Wind it around 2 or 3 times, then repeat the process with both of the other legs individually.
Step 2: After all the legs are attached, wrap some more tape around all 3 as tightly as you can.
Your camera will mount onto the bolt! You’ll be able to use this as a normal table-top tripod or use the flexible legs to grab onto different things like a Gorillapod. Read more at Instructables.
Note: make sure the bolt is a fit for your camera before you get too far into this process.
Richard Bennett
Richard Bennett is a writer and a lover of all things video.
Follow @Richard Bennett
Mastering Content Discovery with Powerful Title & Tag Use
How to Use Video Titles and YouTube Tags for More Views?
Richard Bennett
Nov 01, 2022• Proven solutions
In order to make sure that your videos get the appreciation they deserve, you will need to optimize your titles and YouTube tags for more views. By optimizing your titles and tags, I mean using the right keywords so that YouTube knows how to sort your videos and the viewers who are interested in your content can find it.
YouTube videos rank on Google just like any other piece of content, and YouTube itself is a lot of people’s go-to search engine. The success of your YouTube videos will largely depend on your ability to optimize your videos so they are ranked in people’s search results. People can’t fall in love with your videos they never stumble across them.
If you optimize your titles, tags, and descriptions to include relevant keywords you will see much better traffic from Google as well as from YouTube’s search results. Here are some tips:
Find the Best Keywords
One of the most important steps to ensuring SEO success is to identify the keywords that you should be using.
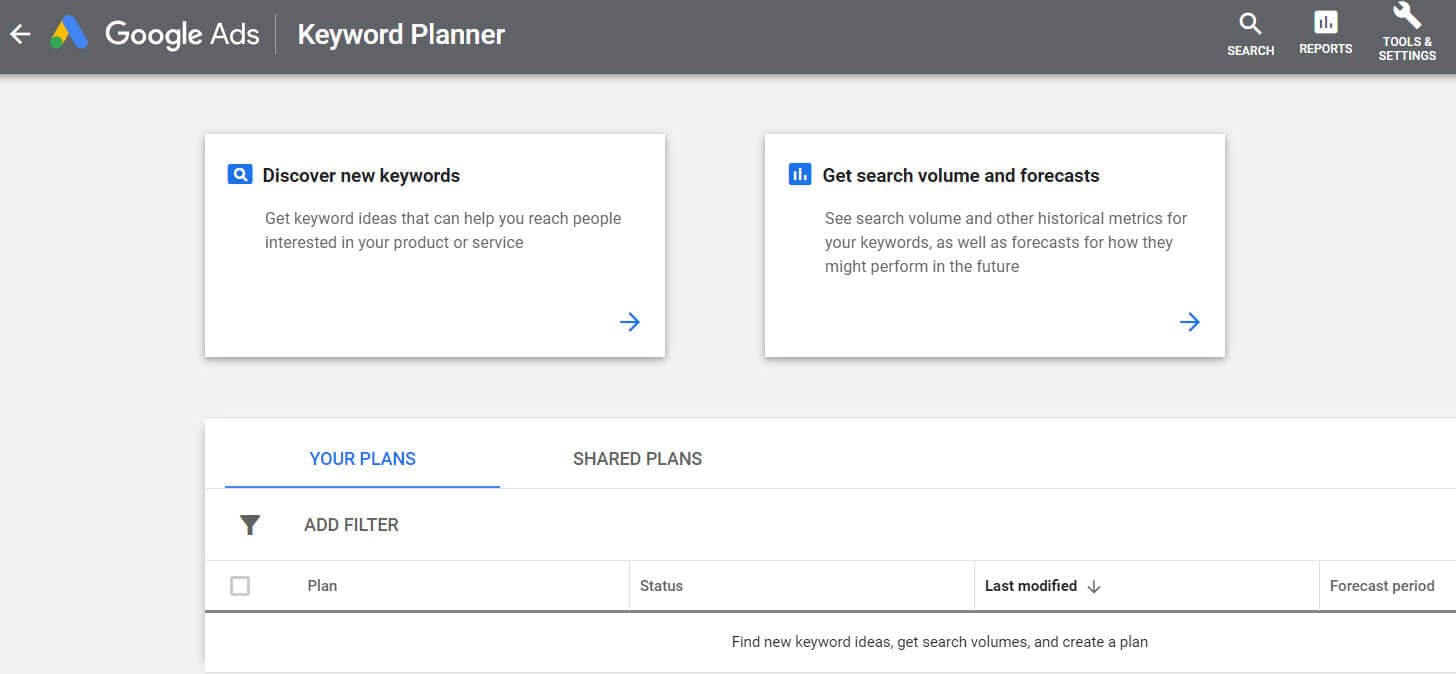
You can use the Google keyword planner to find keywords related to your video’s topic. Input one of your competitors’ video links to detect some of the top searches that were used to find the video. The keyword planner will scan through the top searches for that video link and determine the keywords that are used most often.
The keyword list can be a bit overwhelming the first time. Remember to use keywords that get at least 300 searches per month on Google. Using popular keywords will help you match up against competitors in your niche.
How to Optimize Your Titles, Descriptions, and Tags
Your keyword research will help you craft title, description, and tags of your videos.
How to Optimize YouTube Titles
The ideal YouTube title intrigues the potential viewer, drawing them in and making them want to click the link.
A video title should include your most important keyword. Usually, your most important keyword will be the first word in your title. Great titles are accurate and descriptive, but also exciting and captivating.
You should also consider using general keywords that are popular on Google like “funny video” “Tutorial” “Review” and “Fitness”.
How to Optimize Your Video’s Description
The description of your video is the next big important challenge. The text description of your video is how Google and other search engines determine the subject matter of your video for ranking.
Some tips for success with your description include; using 2-3 important keywords in the first 25 words and making each YouTube description more than 250 words.
Your ideal description will help to index your video without over-utilizing keywords and being flagged as spam.
How to Optimize YouTube Tags
Tags will help decide which videos your video will be displayed beside as similar content and which searches it will appear in.
By using targeted and optimized tags you can gain more traffic and views. Some of the top rules that you should consider with tags are; using 8-12 in every video and making sure the top keyword you used in your title is included as a tag.
Tags on previous videos can also be rearranged and edited as you do keyword research. This will help improve the ranking of some of your older videos. If you all the tags you usually use to a notepad or text edit file and separate them with commas you can paste them all back into YouTube in the new order. This is the simplest way to mass edit tags.
Click here for more tips about YouTube search optimization.
These tips will help you optimize your YouTube tags for more views, as well as your other YouTube metadata.
Richard Bennett
Richard Bennett is a writer and a lover of all things video.
Follow @Richard Bennett
Richard Bennett
Nov 01, 2022• Proven solutions
In order to make sure that your videos get the appreciation they deserve, you will need to optimize your titles and YouTube tags for more views. By optimizing your titles and tags, I mean using the right keywords so that YouTube knows how to sort your videos and the viewers who are interested in your content can find it.
YouTube videos rank on Google just like any other piece of content, and YouTube itself is a lot of people’s go-to search engine. The success of your YouTube videos will largely depend on your ability to optimize your videos so they are ranked in people’s search results. People can’t fall in love with your videos they never stumble across them.
If you optimize your titles, tags, and descriptions to include relevant keywords you will see much better traffic from Google as well as from YouTube’s search results. Here are some tips:
Find the Best Keywords
One of the most important steps to ensuring SEO success is to identify the keywords that you should be using.
You can use the Google keyword planner to find keywords related to your video’s topic. Input one of your competitors’ video links to detect some of the top searches that were used to find the video. The keyword planner will scan through the top searches for that video link and determine the keywords that are used most often.
The keyword list can be a bit overwhelming the first time. Remember to use keywords that get at least 300 searches per month on Google. Using popular keywords will help you match up against competitors in your niche.
How to Optimize Your Titles, Descriptions, and Tags
Your keyword research will help you craft title, description, and tags of your videos.
How to Optimize YouTube Titles
The ideal YouTube title intrigues the potential viewer, drawing them in and making them want to click the link.
A video title should include your most important keyword. Usually, your most important keyword will be the first word in your title. Great titles are accurate and descriptive, but also exciting and captivating.
You should also consider using general keywords that are popular on Google like “funny video” “Tutorial” “Review” and “Fitness”.
How to Optimize Your Video’s Description
The description of your video is the next big important challenge. The text description of your video is how Google and other search engines determine the subject matter of your video for ranking.
Some tips for success with your description include; using 2-3 important keywords in the first 25 words and making each YouTube description more than 250 words.
Your ideal description will help to index your video without over-utilizing keywords and being flagged as spam.
How to Optimize YouTube Tags
Tags will help decide which videos your video will be displayed beside as similar content and which searches it will appear in.
By using targeted and optimized tags you can gain more traffic and views. Some of the top rules that you should consider with tags are; using 8-12 in every video and making sure the top keyword you used in your title is included as a tag.
Tags on previous videos can also be rearranged and edited as you do keyword research. This will help improve the ranking of some of your older videos. If you all the tags you usually use to a notepad or text edit file and separate them with commas you can paste them all back into YouTube in the new order. This is the simplest way to mass edit tags.
Click here for more tips about YouTube search optimization.
These tips will help you optimize your YouTube tags for more views, as well as your other YouTube metadata.
Richard Bennett
Richard Bennett is a writer and a lover of all things video.
Follow @Richard Bennett
Also read:
- [New] Fast-Track To 1,000 Subscribers in Youtube Landscape
- [New] How to Optimize Your Team's Virtual Meetings for 2024
- [New] How to Use Video Titles and YouTube Tags?
- [Updated] 2024 Approved Creating Striking Channel Imagery Best Practices for Success
- Capture Dynamic Movements IPad Timelapse Tips
- Free HTC Video Player: Watch HTC Files Seamlessly on Windows
- Free Online JP2 to TIFF Converter - Movavi Photo Editor
- In 2024, How to Unlock Lava Blaze 2 Pro Pattern Lock if Forgotten? 6 Ways
- In 2024, Navigating the Online Marketplace for Profitable YT Content
- In 2024, No-Cost MP3 Creation 10 YouTube Transformers Explained
- In 2024, The Haven Guide Top 3 Non-Youtube Video Portals
- In 2024, The Ultimate List of Must-Watch Historical YouTubes for Students
- Join Jargon-Free YouTube Chats for 2024
- Loudness Levelers: Essential Apps for Taking Windows' Audio Above 100%
- Overview of the Best Honor Magic 5 Lite Screen Mirroring App | Dr.fone
- Title: In 2024, Mastering Handheld Shots No Tripod Necessary
- Author: Joseph
- Created at : 2024-11-12 11:32:31
- Updated at : 2024-11-15 01:27:57
- Link: https://youtube-stream.techidaily.com/in-2024-mastering-handheld-shots-no-tripod-necessary/
- License: This work is licensed under CC BY-NC-SA 4.0.