
In 2024, Master Quick YouTube Video Uploads and Rendering Secrets
Master Quick YouTube Video Uploads and Rendering Secrets
How to Render and Upload YouTube Videos Faster?

Richard Bennett
Oct 26, 2023• Proven solutions
You’ve shot a video you’re proud of and you can’t wait to post it! But, slow down, you have to edit all your clips together first. And then you have to export your video from the editing program, which can take a while. Then you have to wait for it to upload to YouTube, and once it’s up you have to write your description, add cards, and do a handful of other things.
The period between finishing a video and actually posting it for your subscribers to see can be long and tiresome. A lot of videos have probably died in these stages because their creators ran out of energy and patience.
Don’t let this happen to your videos! Here are 4 ways you can save time and avoid headaches during post-production:
3. Use default descriptions and tags
4. TubeBuddy’s bulk features and tagging tools
1. Create mini-projects
When you have alarge editing project with lots of different titles, animations, clip sequences, and PIP tracks it can get hard to keep track of everything. That’s especially true if you need to go back and make changes. A change to one part of your video could affect other parts of it.
Also, the more complex your video is the longer it will take to render/export.
There is a way you can keep your project more organized, save time making minor adjustments, and speed up rendering: create sub-projects of different segments of your video and import them into your main project as their own clips.
This helps you in 3 ways:
1. If there are a lot of effects it’ll be faster to render a shorter video.
2. If you import your sequence as its own clip you won’t have to worry about adjusting little parts of it whenever you change earlier sections of your video.
3. If you do want to make adjustments to your sequence you can open up your mini-project and change it without affecting anything in your main project.
2. Optimize your upload speed
At home, your videos will upload fastest if all of your internet resources are devoted to the upload. That means you should not have any other windows open on your computer while you are uploading. You should also make sure there aren’t other devices competing for wifi like smart tvs, cell phones, or really fancy coffee makers.
If you have neighbors on the same wifi signal as you and they are online at the same time, this will slow you down too.
Because there is so much that can interfere with wifi, you might want to consider a wired Ethernet cable. Ethernet connections are faster in general, and you won’t have any problems with other devices competing for resources like you get with wifi.
If you’re doing everything you can to optimize your upload speed at home and still find that it takes an unreasonable amount of time to upload videos to YouTube, go somewhere with a better connection. Save your video to a USB drive and take it to a library or college to upload. Connections in these kinds of places tend to be very strong.

3. Use default descriptions and tags
In your Creator Studio, go to Channel > Upload defaults. Here you can write in titles, descriptions, and tags which will automatically be applied to every video you upload.

Note: in the latest YouTube Studio, the upload interface is changed but the main process is similar.

You probably have tags you use for almost every video you post. For example, if your channel is about vegan cooking then every one of your videos is probably tagged ‘vegan’, ‘food’, and ‘cooking’. If you type those tags in here then you don’t have to keep adding them to every new video, and you can still add or remove tags from individual uploads so you aren’t stuck using the exact same set of tags every time.
Similarly, you probably have some default text that goes in the description of every one of your videos (i.e. a link to your personal website or a brief introduction of yourself). If you type in a default description then that text will appear automatically in every new video description and you can just add to it when you need to for individual videos.
Using defaults might only save you a couple of minutes per video, but those minutes add up.
4. TubeBuddy’s bulk features and tagging tools
TubeBuddy is a channel management tool for YouTube. Most of its features are more geared towards very large channels or companies with a YouTube presence, but there are also features that can help small or mid-sized YouTubers save time and stay organized.
Some of these tools include templates for things like cards and end screens and bulk processing tools for when you want to change a lot of things at once. For example, if you wanted to update the links in every card in every one of your videos at once then TubeBuddy could help with that.
Some of TubeBuddy’s best features for growing channels are the tagging features. TubeBuddy will help you discover tags, suggest new tags, and even copy whole lists of tags from rival videos.
There are different levels of pricing for TubeBuddy (including a free version, although it’s very limited) and you get a discount on the Pro version if you have less than 50,000 lifetime views on your channel. It ends up being $4.50USD a month (or $3.60 USD a month if you pay for a year in advance). It’s a good investment for someone who’s starting to see some growth on YouTube, but probably not if you’re still trying to reach milestones like 500 subs or 10,000 views.
You have to work hard to get anywhere on YouTube, but that doesn’t mean you should be toiling away at tedious stuff like typing in the same tags over and over. If you have any time-saving tips then make sure to share them with everyone in the comments!
Remember that your time is valuable =)

If you are using Filmora to edit YouTube videos, you can upload the video to YouTube directly from Filmora without download it again first, which can save you time. Besides, if you don’t want the video to be public, you can change Privacy to unlisted or private in Filmora.


Richard Bennett
Richard Bennett is a writer and a lover of all things video.
Follow @Richard Bennett
Richard Bennett
Oct 26, 2023• Proven solutions
You’ve shot a video you’re proud of and you can’t wait to post it! But, slow down, you have to edit all your clips together first. And then you have to export your video from the editing program, which can take a while. Then you have to wait for it to upload to YouTube, and once it’s up you have to write your description, add cards, and do a handful of other things.
The period between finishing a video and actually posting it for your subscribers to see can be long and tiresome. A lot of videos have probably died in these stages because their creators ran out of energy and patience.
Don’t let this happen to your videos! Here are 4 ways you can save time and avoid headaches during post-production:
3. Use default descriptions and tags
4. TubeBuddy’s bulk features and tagging tools
1. Create mini-projects
When you have alarge editing project with lots of different titles, animations, clip sequences, and PIP tracks it can get hard to keep track of everything. That’s especially true if you need to go back and make changes. A change to one part of your video could affect other parts of it.
Also, the more complex your video is the longer it will take to render/export.
There is a way you can keep your project more organized, save time making minor adjustments, and speed up rendering: create sub-projects of different segments of your video and import them into your main project as their own clips.
This helps you in 3 ways:
1. If there are a lot of effects it’ll be faster to render a shorter video.
2. If you import your sequence as its own clip you won’t have to worry about adjusting little parts of it whenever you change earlier sections of your video.
3. If you do want to make adjustments to your sequence you can open up your mini-project and change it without affecting anything in your main project.
2. Optimize your upload speed
At home, your videos will upload fastest if all of your internet resources are devoted to the upload. That means you should not have any other windows open on your computer while you are uploading. You should also make sure there aren’t other devices competing for wifi like smart tvs, cell phones, or really fancy coffee makers.
If you have neighbors on the same wifi signal as you and they are online at the same time, this will slow you down too.
Because there is so much that can interfere with wifi, you might want to consider a wired Ethernet cable. Ethernet connections are faster in general, and you won’t have any problems with other devices competing for resources like you get with wifi.
If you’re doing everything you can to optimize your upload speed at home and still find that it takes an unreasonable amount of time to upload videos to YouTube, go somewhere with a better connection. Save your video to a USB drive and take it to a library or college to upload. Connections in these kinds of places tend to be very strong.
3. Use default descriptions and tags
In your Creator Studio, go to Channel > Upload defaults. Here you can write in titles, descriptions, and tags which will automatically be applied to every video you upload.
Note: in the latest YouTube Studio, the upload interface is changed but the main process is similar.
You probably have tags you use for almost every video you post. For example, if your channel is about vegan cooking then every one of your videos is probably tagged ‘vegan’, ‘food’, and ‘cooking’. If you type those tags in here then you don’t have to keep adding them to every new video, and you can still add or remove tags from individual uploads so you aren’t stuck using the exact same set of tags every time.
Similarly, you probably have some default text that goes in the description of every one of your videos (i.e. a link to your personal website or a brief introduction of yourself). If you type in a default description then that text will appear automatically in every new video description and you can just add to it when you need to for individual videos.
Using defaults might only save you a couple of minutes per video, but those minutes add up.
4. TubeBuddy’s bulk features and tagging tools
TubeBuddy is a channel management tool for YouTube. Most of its features are more geared towards very large channels or companies with a YouTube presence, but there are also features that can help small or mid-sized YouTubers save time and stay organized.
Some of these tools include templates for things like cards and end screens and bulk processing tools for when you want to change a lot of things at once. For example, if you wanted to update the links in every card in every one of your videos at once then TubeBuddy could help with that.
Some of TubeBuddy’s best features for growing channels are the tagging features. TubeBuddy will help you discover tags, suggest new tags, and even copy whole lists of tags from rival videos.
There are different levels of pricing for TubeBuddy (including a free version, although it’s very limited) and you get a discount on the Pro version if you have less than 50,000 lifetime views on your channel. It ends up being $4.50USD a month (or $3.60 USD a month if you pay for a year in advance). It’s a good investment for someone who’s starting to see some growth on YouTube, but probably not if you’re still trying to reach milestones like 500 subs or 10,000 views.
You have to work hard to get anywhere on YouTube, but that doesn’t mean you should be toiling away at tedious stuff like typing in the same tags over and over. If you have any time-saving tips then make sure to share them with everyone in the comments!
Remember that your time is valuable =)
If you are using Filmora to edit YouTube videos, you can upload the video to YouTube directly from Filmora without download it again first, which can save you time. Besides, if you don’t want the video to be public, you can change Privacy to unlisted or private in Filmora.
Richard Bennett
Richard Bennett is a writer and a lover of all things video.
Follow @Richard Bennett
Channel Success Across Social Networks: YouTube + More
How to Stream to YouTube, Facebook, Twitch and Over 30 Platforms
Richard Bennett
Mar 27, 2024• Proven solutions
- Part1.How to Stream to YouTube, Twitch, Hitbox and other Platforms at the same time?
- Part2.How to Stream to YouTube and Facebook at the same time Without Restream Platform?
- Part3.About Restream.io
How to Stream to YouTube, Twitch, Hitbox and other Platforms at the same time?
Step 1: To begin with the process, first of all you need to go to <https://restream.io/ >. Sign up here and login with your account.
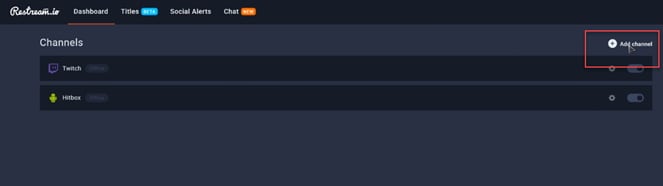
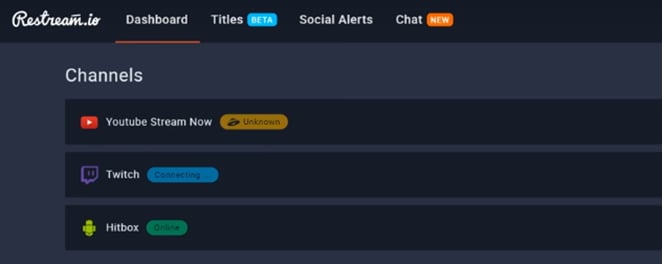
Step 2: Now go to the dashboard and simply add your channel.
Step 3: Here you will find so many streaming platforms like YouTube, uStream, Dailymotion, HitBox etc.
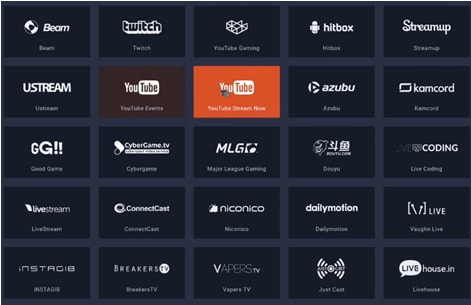
Step 4: Select your desired platform out of this wide list and then sign in.

Step 5: The screen will proceed with simple to follow steps; go with specified instructions and sign in to your desired streaming platform.
Step 6: Now you can easily turn On-Off your channels for streaming.
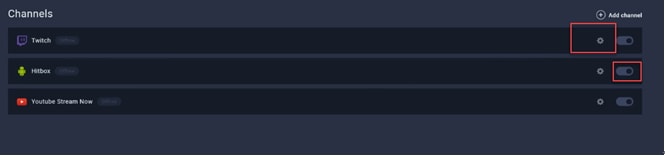
Step 7: It is time to edit your channel.
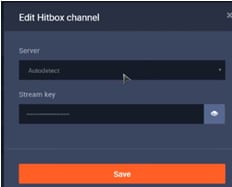
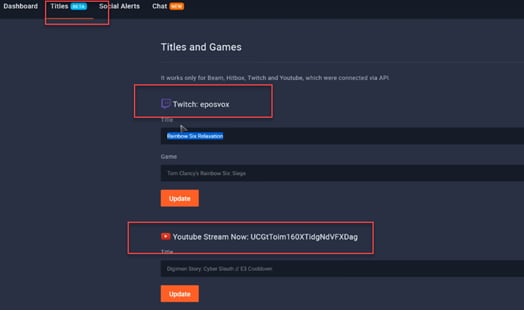
Step 8: Now put eye catching title for your live stream.
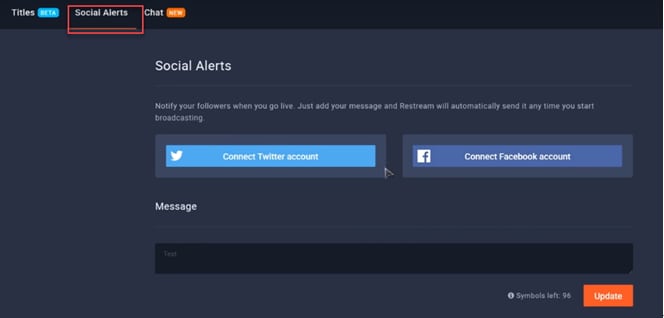
Step 9: This platform also allow users to get connected to their SNS account for the social alerts.
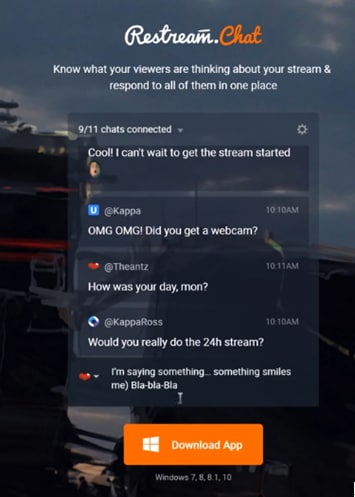
Step 10: Users can also manage their chats using interactive chat tools.
Step 11: Once you are done with all above settings on restream.io then it is time to start with streaming software. Professionals recommend using OBS, Wirecast or xSplit for best results and easy interface.

Step 12: Let us considered OBS for current restream.io services.
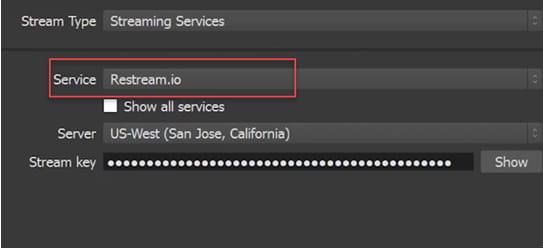
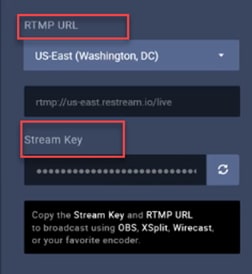
Step 13: Now simply copy your RTMP URL as well as the stream key from restream.io platform and paste it in the specified field on streaming software.
Step 14: As soon as you finished these settings then hit the Stream Button. Soon you will be able to find your videos on selected live stream platforms.
How to Stream to YouTube and Facebook at the same time Without Restream Platform?
Step 1: First of all you need to download Wirecast software tool on your device. Choose anyone from Wirecast Studio and Wirecast Pro as per your budget and needs. Get it installed.
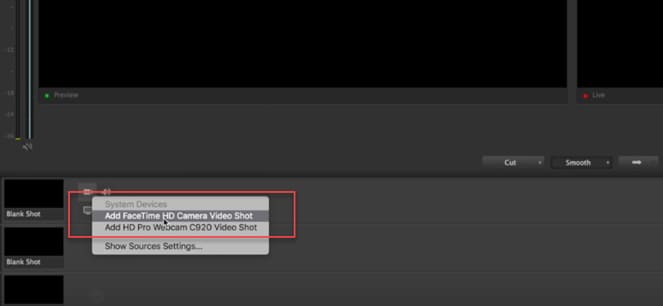
Step 2: Launch wirecast on your system and then add your camera.
Step 3: Once you have added your camera to this tool then simply hit the Go Live button.
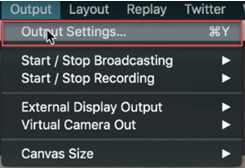
Step 4: Move to Output and adjust settings.
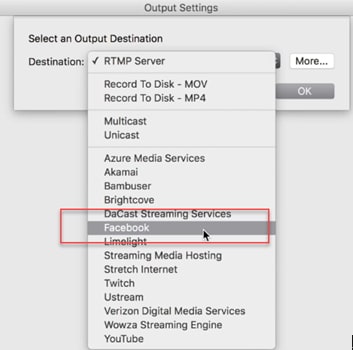
Step 5: From the drop down menu appearing on screen, choose Facebook as your destination.
Step 6: It is time to enter name and then click on Authenticate.
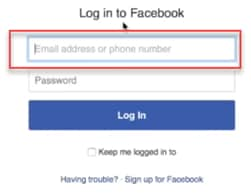
Step 7: You need to login to facebook now.

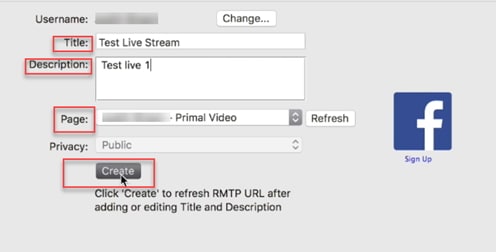
Step 8: Add your live stream title and an eye catching description.
Step 9: Select page for streaming and then hit the Create button.
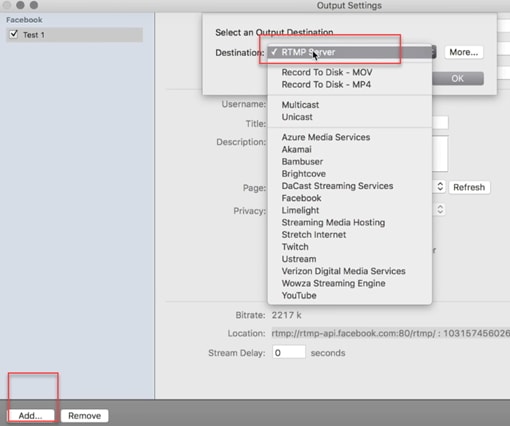
Step 10: As soon as your facebook stream is developed, then go to bottom left corner of your screen and then click add. Create another live stream but instead of choosing YouTube as your preferences, select RTMP.
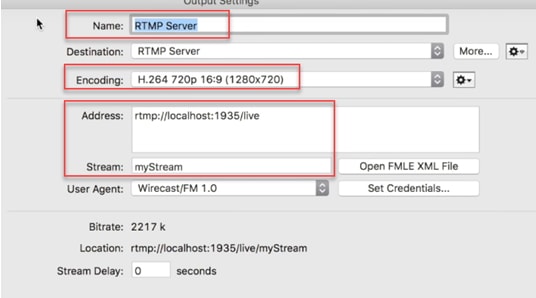
Step 11: Now add name for your YouTube stream and adjust the encoding quality to 720p. After this you need to move to YouTube and get your stream name as well as address from this platform.
Step 12: Move to YouTube creator studio and then select live streaming. Choose live stream now option and then find encoder setup.

Step 13: It is time to copy the server URL and paste it on Wirecast address. Also copy the stream name and paste it on Wirecast platform.
Step 14: Once all these settings are complete then hit OK.
Step 15: Now click Stream button on Wirecast platform.

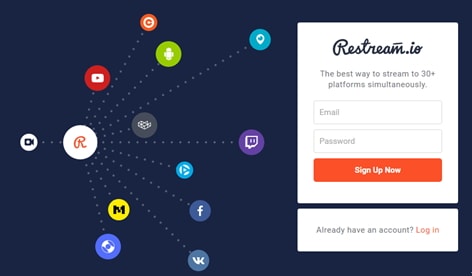
About Restream.io
Restream.io allows streaming over 30 plus platforms with easy processing and intuitive interface. The best thing to know about this platform is that it never creates watermarks or pre-roll ads and there is no specific limit or restriction for stream duration. It not even forces users on specific bitrate limits. In simple words, here users can work with freedom and enjoy streaming with best results.
Restream Chats are highly interactive where users can add interesting imojies to grab more attention. It can be accessed on Window platform with all interactive features.
Richard Bennett
Richard Bennett is a writer and a lover of all things video.
Follow @Richard Bennett
Richard Bennett
Mar 27, 2024• Proven solutions
- Part1.How to Stream to YouTube, Twitch, Hitbox and other Platforms at the same time?
- Part2.How to Stream to YouTube and Facebook at the same time Without Restream Platform?
- Part3.About Restream.io
How to Stream to YouTube, Twitch, Hitbox and other Platforms at the same time?
Step 1: To begin with the process, first of all you need to go to <https://restream.io/ >. Sign up here and login with your account.
Step 2: Now go to the dashboard and simply add your channel.
Step 3: Here you will find so many streaming platforms like YouTube, uStream, Dailymotion, HitBox etc.
Step 4: Select your desired platform out of this wide list and then sign in.
Step 5: The screen will proceed with simple to follow steps; go with specified instructions and sign in to your desired streaming platform.
Step 6: Now you can easily turn On-Off your channels for streaming.
Step 7: It is time to edit your channel.
Step 8: Now put eye catching title for your live stream.
Step 9: This platform also allow users to get connected to their SNS account for the social alerts.
Step 10: Users can also manage their chats using interactive chat tools.
Step 11: Once you are done with all above settings on restream.io then it is time to start with streaming software. Professionals recommend using OBS, Wirecast or xSplit for best results and easy interface.
Step 12: Let us considered OBS for current restream.io services.
Step 13: Now simply copy your RTMP URL as well as the stream key from restream.io platform and paste it in the specified field on streaming software.
Step 14: As soon as you finished these settings then hit the Stream Button. Soon you will be able to find your videos on selected live stream platforms.
How to Stream to YouTube and Facebook at the same time Without Restream Platform?
Step 1: First of all you need to download Wirecast software tool on your device. Choose anyone from Wirecast Studio and Wirecast Pro as per your budget and needs. Get it installed.
Step 2: Launch wirecast on your system and then add your camera.
Step 3: Once you have added your camera to this tool then simply hit the Go Live button.
Step 4: Move to Output and adjust settings.
Step 5: From the drop down menu appearing on screen, choose Facebook as your destination.
Step 6: It is time to enter name and then click on Authenticate.
Step 7: You need to login to facebook now.
Step 8: Add your live stream title and an eye catching description.
Step 9: Select page for streaming and then hit the Create button.
Step 10: As soon as your facebook stream is developed, then go to bottom left corner of your screen and then click add. Create another live stream but instead of choosing YouTube as your preferences, select RTMP.
Step 11: Now add name for your YouTube stream and adjust the encoding quality to 720p. After this you need to move to YouTube and get your stream name as well as address from this platform.
Step 12: Move to YouTube creator studio and then select live streaming. Choose live stream now option and then find encoder setup.
Step 13: It is time to copy the server URL and paste it on Wirecast address. Also copy the stream name and paste it on Wirecast platform.
Step 14: Once all these settings are complete then hit OK.
Step 15: Now click Stream button on Wirecast platform.
About Restream.io
Restream.io allows streaming over 30 plus platforms with easy processing and intuitive interface. The best thing to know about this platform is that it never creates watermarks or pre-roll ads and there is no specific limit or restriction for stream duration. It not even forces users on specific bitrate limits. In simple words, here users can work with freedom and enjoy streaming with best results.
Restream Chats are highly interactive where users can add interesting imojies to grab more attention. It can be accessed on Window platform with all interactive features.
Richard Bennett
Richard Bennett is a writer and a lover of all things video.
Follow @Richard Bennett
Also read:
- [New] Free Method to Record Your YouTube Watching Experience
- [New] In 2024, Seamless SRT to SUB A Comprehensive Guide
- [New] Perfecting HP Screen Capture Top 4 Methods Unveiled for 2024
- [New] Skyrocketing Numbers A Guide to YouTube Viewership Increase
- [Updated] Fast & Fun The Quick Guide to Taking Screenshots on Chromebook
- [Updated] In 2024, Expert Analysis Top 5 High-End Recording Apps
- [Updated] In 2024, Playlists That Dominate Spotify
- [Updated] Ring, Sound, Repeat A Comprehensible Guide to Personalization on Android Devices
- Best Practices: Managing GPU Thermal Output
- Expert Tips for Eradicating Extra Green on YouTube Videos (Mac) for 2024
- Fullscreen Partnership How to Choose An MCN for 2024
- Hitting High Notes Enhance Your YouTube Content with Music Edits for 2024
- How To Do Lenovo ThinkPhone Screen Sharing | Dr.fone
- In 2024, Laughter Loops Scouring the Best Chuckles in YouTube Worlds
- In 2024, Top Insights Into 2018 FIFA Football Videos On YouTube [Infographic]
- Leapfrog Content Management From YouTube to Dailymotion Effortlessly for 2024
- Mastering the 'No Permission' Error on Windows Explorer
- Title: In 2024, Master Quick YouTube Video Uploads and Rendering Secrets
- Author: Joseph
- Created at : 2024-10-03 02:41:04
- Updated at : 2024-10-07 01:22:28
- Link: https://youtube-stream.techidaily.com/in-2024-master-quick-youtube-video-uploads-and-rendering-secrets/
- License: This work is licensed under CC BY-NC-SA 4.0.