
:max_bytes(150000):strip_icc()/Google-IO-narrow-5f29c4777cf94e1291f3921f22964aed.jpg)
"In 2024, Leap Into Broadcasting Effortless Setup for Your Mobile YouTube Ventures"
Leap Into Broadcasting: Effortless Setup for Your Mobile YouTube Ventures
Versatile YouTube Video Editor - Filmora
An easy yet powerful editor
Numerous effects to choose from
Detailed tutorials provided by the official channel
The relevance of YouTube and the need to have a channel are visible with the rise in viewership. Having launched on February 14th, 2005, YouTube has become the 2nd most visited social media website according to Google statistics having a whopping over 2 billion users on the platform monthly.
As an entrepreneur or a company, one of the easiest and fastest ways of selling your brand or skill is via the YouTube platform. Thus, you must know how to make a YouTube channel on iPhone and how to make a YouTube channel on Android. Having overwhelming subscribers becomes an added advantage as not only will you and your business be known or recognized, YouTube has a way of appreciating and paying some of their influencers as well.
At this point, I know how hungry you are to kick-start your YouTube. This article will help guide you through creating a YouTube channel on your mobile, whether for personal or business purposes. Rather than scanning through, you should peruse through attentively.
In this article
01 How to Make a Personal YouTube Channel on Mobile
02 How to Create a Business YouTube on Mobile
03 Five Tips to Start a YouTube channel
Part 1: How to Make a Personal YouTube Channel on Mobile
Creating a YouTube channel on mobile is not a cumbersome one. It is as easy as ABC, and within split seconds you’ve created your own YouTube channel. The guideline entails the following steps:
- The first step to setting up your personal YouTube channel starts with creating a Google account for those who don’t have any yet.
- Whether you open your YouTube app or via the web browser of your phone, open the YouTube website.
- On the top right-hand side of your mobile, tap on your profile image
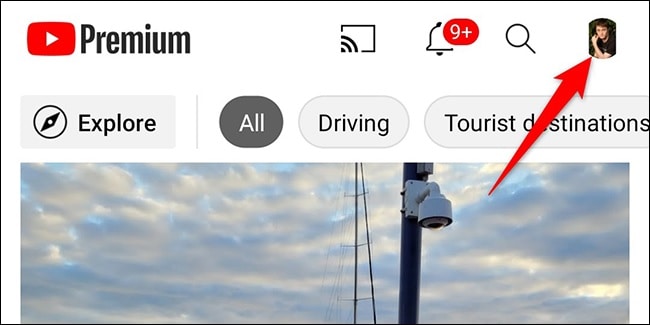
Source: howtogeek.com
- A drop-down menu will pop up. Click on your channel icon.
- An option to create a new channel comes up. (For those who have a channel already, an alternative to manage your channel or video will show.)
- An option to input your name pops up on the screen. Carefully insert your desired name and tap on Create.
- If you would love to halt and resume later in the setting up, you can scroll down to click on the ‘set up later.’
Part 2: How to Create a Business YouTube on Mobile
The clarity on the relevance of YouTube in this dispensation when it comes to branding or business-boosting is immense. Many savvy entrepreneurs and business companies have come to the known for their beautiful advantages. With over 2 billion people trooping into the site monthly, making your brand come to the limelight in this social media implies reaching one-tenth of the users,i.e., if you play by the rules of strategically planning your business growth, the top. However, this article may not reveal the different strategies to adopt so you can become an influencer in your line of business; instead, it will start from scratch on how to get your YouTube business page started. How then can one create his own business YouTube account?
1. Signing into a Google account
To successfully start using the YouTube app, there is a need to sign officially into Google. If you’ve it in mind to have a separate Google account for your business account, you kick-start it at this stage.
However, you can still use your name to open a Google account and create a business YouTube account for subsequent use. The truth is that YouTube gives room for you still to make a business account with a business name thus, eliminating the need to use a business name in creating your Google account.
2. Creating a business name
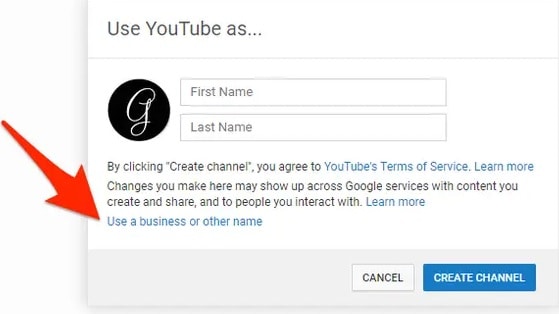
Once you create a Google account, the next step is to make your business a YouTube account. This you do by either signing into your YouTube app or via the YouTube website in your mobile browser. Once logged in to the app interface, you will see the profile photo you used in creating your Google account or the initial letter of the first name you used on the top right-hand side of your mobile. Tap on it, and a drop-down menu will come up, tap on the ‘create a channel’ icon, which will lead you to another interface where you have the option to select ‘Get started’ or ‘No thanks.’ A tap on the get started will reveal an option to either create your channel using the name and image of your Google account or use a customized name.
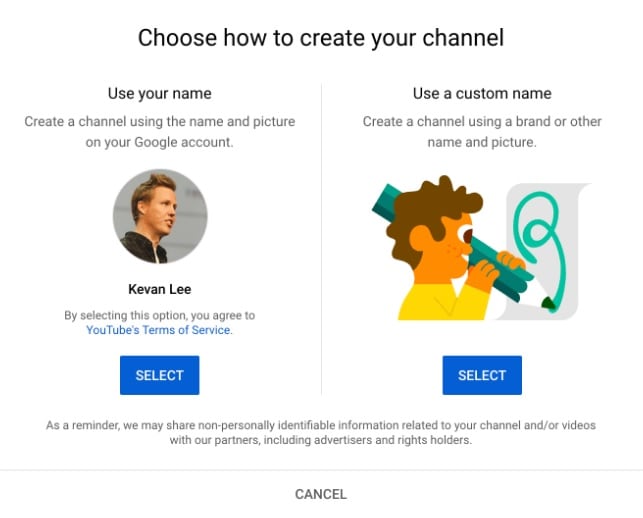
Source: buffer.com
Selecting the custom name gives you the autonomy to use the brand or business name of your choice, after which you tap on the create option.
3. Customize your business page
At this point, you can design the layout by utilizing the appealing icon and banner of your choice, just as provided by the likes of Facebook or Twitter. The customized templates in Canva are there for you to design your page to your state.
I know you would be wondering how to go about this; YouTube can directly upload your artwork with a preview option available. You can crop your artwork to fit your page, making it look more professional.
To be emphatic, creating a business account is still simple but with professionalism. Remember you are selling yourself and your brand, and it is expedient to give your best on your page. Do well to describe your page as excellent as you can, let your activity in terms of photo and video uploads be of the best. This way, subscribers will not hesitate to hit the like and subscribe button. Good luck as you kick-start your business page.
Part 3: Five Tips to Start a YouTube channel
Carefully observe how YouTube channels function and possibly how entrepreneurs and business owners make waves in the YouTube industry. Then, sit down and watch either your mobile phone or computer and think about making a YouTube Channel on iPhone or understand how to create a YouTube Channel on mobile and earn money, especially to beginners. This way, you can make it envy to all becomes a significant challenge—however, the crucial tips in starting your own YT channel.
Identify Goal of Channel
What are you trying to achieve? Customer education, testimonials or do you want people to subscribe? Be clear on what you want your YouTube channel to do for your brand and how it fits into your overall marketing strategy.
Gather Content Ideas
Gather content, even before you make a YouTube channel on mobile. You can start with a series of videos talking about your company, products, or industry and then launch the channel once they are all done. If you can’t think of any content on your own, try searching around online to see if others have already created videos of this sort and have posted them online. Then, use those videos as examples when you make your content.
Logo and Thumbnail Design
How to make a logo for YouTube on mobile?
Once you are up with content creation, you will have to create a thumbnail for your video. Attractive and catchy thumbnails that persuade searchers to click on your video are critical. Here we will see how to create a logo for a YouTube video on mobile. For this purpose, Canva.com can create attractive thumbnails and a Catchy logo. Using this tool, you can create, edit and customize graphics for your YouTube videos.
Quality of Video is Important
Don’t just put up videos willy-nilly. Think about what content would work for your brand and audience. The content needs to be engaging, relevant, and inspiring so people will keep coming back for more videos. You don’t have to have the latest video equipment either – think about the type of content that would work best.
Choose Video Editing Software
Wondershare Filmora
Get started easily with Filmora’s powerful performance, intuitive interface, and countless effects!
Try It Free Try It Free Try It Free Learn More >

Lastly, you must use high-quality producing software. So we recommend Filmora Video Editor that offers a wide range of effects, themes, and titles. It lets you create professional-looking videos with various presets for quick editing. It incorporates support for most common video formats. If you’re looking for a straightforward but potent video editor, Filmora is your best option.
Conclusion
I firmly believe that at this point, understanding how to create a YouTube channel in mobile will be an easy one. We discussed ways of not just developing your YT channel but also how to give your page the best of professional work. This article is truly an eye-opener and contains from scratch the step-wise order of growing and learning how to make a logo for YouTube Channel in mobile and creating personal and business accounts to earn some money.
The relevance of YouTube and the need to have a channel are visible with the rise in viewership. Having launched on February 14th, 2005, YouTube has become the 2nd most visited social media website according to Google statistics having a whopping over 2 billion users on the platform monthly.
As an entrepreneur or a company, one of the easiest and fastest ways of selling your brand or skill is via the YouTube platform. Thus, you must know how to make a YouTube channel on iPhone and how to make a YouTube channel on Android. Having overwhelming subscribers becomes an added advantage as not only will you and your business be known or recognized, YouTube has a way of appreciating and paying some of their influencers as well.
At this point, I know how hungry you are to kick-start your YouTube. This article will help guide you through creating a YouTube channel on your mobile, whether for personal or business purposes. Rather than scanning through, you should peruse through attentively.
In this article
01 How to Make a Personal YouTube Channel on Mobile
02 How to Create a Business YouTube on Mobile
03 Five Tips to Start a YouTube channel
Part 1: How to Make a Personal YouTube Channel on Mobile
Creating a YouTube channel on mobile is not a cumbersome one. It is as easy as ABC, and within split seconds you’ve created your own YouTube channel. The guideline entails the following steps:
- The first step to setting up your personal YouTube channel starts with creating a Google account for those who don’t have any yet.
- Whether you open your YouTube app or via the web browser of your phone, open the YouTube website.
- On the top right-hand side of your mobile, tap on your profile image
Source: howtogeek.com
- A drop-down menu will pop up. Click on your channel icon.
- An option to create a new channel comes up. (For those who have a channel already, an alternative to manage your channel or video will show.)
- An option to input your name pops up on the screen. Carefully insert your desired name and tap on Create.
- If you would love to halt and resume later in the setting up, you can scroll down to click on the ‘set up later.’
Part 2: How to Create a Business YouTube on Mobile
The clarity on the relevance of YouTube in this dispensation when it comes to branding or business-boosting is immense. Many savvy entrepreneurs and business companies have come to the known for their beautiful advantages. With over 2 billion people trooping into the site monthly, making your brand come to the limelight in this social media implies reaching one-tenth of the users,i.e., if you play by the rules of strategically planning your business growth, the top. However, this article may not reveal the different strategies to adopt so you can become an influencer in your line of business; instead, it will start from scratch on how to get your YouTube business page started. How then can one create his own business YouTube account?
1. Signing into a Google account
To successfully start using the YouTube app, there is a need to sign officially into Google. If you’ve it in mind to have a separate Google account for your business account, you kick-start it at this stage.
However, you can still use your name to open a Google account and create a business YouTube account for subsequent use. The truth is that YouTube gives room for you still to make a business account with a business name thus, eliminating the need to use a business name in creating your Google account.
2. Creating a business name
Once you create a Google account, the next step is to make your business a YouTube account. This you do by either signing into your YouTube app or via the YouTube website in your mobile browser. Once logged in to the app interface, you will see the profile photo you used in creating your Google account or the initial letter of the first name you used on the top right-hand side of your mobile. Tap on it, and a drop-down menu will come up, tap on the ‘create a channel’ icon, which will lead you to another interface where you have the option to select ‘Get started’ or ‘No thanks.’ A tap on the get started will reveal an option to either create your channel using the name and image of your Google account or use a customized name.
Source: buffer.com
Selecting the custom name gives you the autonomy to use the brand or business name of your choice, after which you tap on the create option.
3. Customize your business page
At this point, you can design the layout by utilizing the appealing icon and banner of your choice, just as provided by the likes of Facebook or Twitter. The customized templates in Canva are there for you to design your page to your state.
I know you would be wondering how to go about this; YouTube can directly upload your artwork with a preview option available. You can crop your artwork to fit your page, making it look more professional.
To be emphatic, creating a business account is still simple but with professionalism. Remember you are selling yourself and your brand, and it is expedient to give your best on your page. Do well to describe your page as excellent as you can, let your activity in terms of photo and video uploads be of the best. This way, subscribers will not hesitate to hit the like and subscribe button. Good luck as you kick-start your business page.
Part 3: Five Tips to Start a YouTube channel
Carefully observe how YouTube channels function and possibly how entrepreneurs and business owners make waves in the YouTube industry. Then, sit down and watch either your mobile phone or computer and think about making a YouTube Channel on iPhone or understand how to create a YouTube Channel on mobile and earn money, especially to beginners. This way, you can make it envy to all becomes a significant challenge—however, the crucial tips in starting your own YT channel.
Identify Goal of Channel
What are you trying to achieve? Customer education, testimonials or do you want people to subscribe? Be clear on what you want your YouTube channel to do for your brand and how it fits into your overall marketing strategy.
Gather Content Ideas
Gather content, even before you make a YouTube channel on mobile. You can start with a series of videos talking about your company, products, or industry and then launch the channel once they are all done. If you can’t think of any content on your own, try searching around online to see if others have already created videos of this sort and have posted them online. Then, use those videos as examples when you make your content.
Logo and Thumbnail Design
How to make a logo for YouTube on mobile?
Once you are up with content creation, you will have to create a thumbnail for your video. Attractive and catchy thumbnails that persuade searchers to click on your video are critical. Here we will see how to create a logo for a YouTube video on mobile. For this purpose, Canva.com can create attractive thumbnails and a Catchy logo. Using this tool, you can create, edit and customize graphics for your YouTube videos.
Quality of Video is Important
Don’t just put up videos willy-nilly. Think about what content would work for your brand and audience. The content needs to be engaging, relevant, and inspiring so people will keep coming back for more videos. You don’t have to have the latest video equipment either – think about the type of content that would work best.
Choose Video Editing Software
Wondershare Filmora
Get started easily with Filmora’s powerful performance, intuitive interface, and countless effects!
Try It Free Try It Free Try It Free Learn More >
Lastly, you must use high-quality producing software. So we recommend Filmora Video Editor that offers a wide range of effects, themes, and titles. It lets you create professional-looking videos with various presets for quick editing. It incorporates support for most common video formats. If you’re looking for a straightforward but potent video editor, Filmora is your best option.
Conclusion
I firmly believe that at this point, understanding how to create a YouTube channel in mobile will be an easy one. We discussed ways of not just developing your YT channel but also how to give your page the best of professional work. This article is truly an eye-opener and contains from scratch the step-wise order of growing and learning how to make a logo for YouTube Channel in mobile and creating personal and business accounts to earn some money.
Enhancing Watchability: Adding Time Stamps to YouTube Videos
How to Add Timestamps on YouTube Video Link?

Richard Bennett
Mar 27, 2024• Proven solutions
It is a well-known fact that internet users have a short interest span, about just eight seconds. This attention span applies to all internet platforms including YouTube. YouTube is the second largest and most visited search engine after Google. It provides users with information through engaging and eye-catchy videos. However, certain videos are longer where only a particular section of the video holds the important information. Viewers tend to skip the long videos and if you do not want this to happen to you, you can link to that specific part on your video adding value for your channel viewers with a link known as the YouTube Timestamp link.
When you have a Timestamp link on your video, you can help your viewers directly reach the specific time in the video. This helps avoid the viewers from losing interest or to search for the key part in your video themselves.
Here in this article, we will explain Timestamp links, how to add Timestamp to YouTube video links, and what are the benefits of Timestamp.
- Part 1: YouTube Timestamp Links Introduction
- Part 2: Adding a Timestamp to YouTube Video Link on Desktop
- Part 3: How to Share Specific Parts of YouTube Video
- part 4: Getting YouTube Timestamp Link on Mobile
- Part 5: FAQ About YouTube Timestamps
Part 1: What is YouTube Timestamp Links
In this fast-paced world where viewers have limited time at hand, YouTube Timestamp links are extremely helpful. These links are anchor text or video hyperlinks found either in the description beneath the video or at the video link end.

The Timestamps links allow you to put a link to a key moment in your YouTube video allowing the viewers and subscribers to view the video at the precise time specified. Your YouTube video maybe half an hour long or maybe your users do not have the time now or forget to later watch your video, but when you add Timestamp to the YouTube link, you provide them ways to get to the content quickly enhancing the user experience.
In addition to this, you can even provide a reference in minutes and hours where necessary. The YouTube Timestamp link acts as a guide that directs viewers to the part of the video, which is most relevant to them without having to watch the entire video.
Part 2: How to Add a Timestamp to YouTube Video Link on Desktop?
In the following section, I will show you how to add timestamp to YouTube video link in several ways.
Use YouTube’s Share Feature
Using YouTube’s share feature is the simplest way to add Timestamp to YouTube videos. Here are easy steps to follow to do this.
- Open the YouTube video on your desktop that you want to share.
- Play the video or navigate the timeline and stop at the key moment you wish to apply the timestamp to.
- Now click on the Share button, a pop-up will appear. Under the URL, you will see a small box indicating Start at. The Timestamp is generated automatically, but you can adjust it.

- Copy the updated URL with Timestamp to share the video or click on the social sharing icons to do so.
- When your viewers click on this URL, the video will begin at the specified Timestamp.
Use the Browser URL to add Timestamp manually
You can add Timestamp manually as well. Follow the step-by-step guide below to add a Timestamp manually.
- Open your YouTube video in a browser on your desktop and then find the URL in the browser’s address bar.
- Enter the specific time you want the viewers to watch the video from at the end of the video URL.
You can add time manually in two ways depending on the URL.
?t=As or
&t=As
“youtu.be/” Format
If your YouTube video link is a youtu.be format, then just add ?t=As at the end of the video link. The A denotes the seconds at which you want the viewer to watch your video. The time can also be specified in minutes and seconds and when you want to do that just add ?t=AmBs. For instance, ?t=2m40s.
“youtube.com/” Format
When your YouTube video link has a youtube.com format, the adjustment starts with an ampersand. &t=As or &t=AmBs is what you can use. If you are looking to add the Timestamp at 2m40s, just add “&t=2m40s at the end of the video URL.
Whenever anybody uses the URL with Timestamp, the video will start from the specified time.
However, when adding a Timestamp manually, always leave include whole numbers. For example, if the time starts at 4m, use 4 and not 04.
Copy video URL at current time
You can use YouTube’s built-in feature to share the key parts of your YouTube video. Follow the steps here.
- Visit YouTube and open the video you want to add Timestamp link to.
- Play the video or navigate the timeline to reach the specific part you like to use in Timestamp.
- Now either press Ctrl + click or right-click anywhere on the video. A pop-up opens where you can see various texts, click on the Copy video URL at current time and share the link.

- Anyone who clicks on this link will be instantly transported to the exact segment of your YouTube video.
Part 3: How to Share Specific Parts of Videos with Vibby and Get YouTube Link with Timestamp
The above-mentioned methods to add and send YouTube link with timestamp are quick and easy, but they have a few limitations. If you need more control and share highlighted parts of YouTube video without cutting the video, you need to use a third-party tool known as Vibby.
Vibby allows you to not only share specific parts of videos from YouTube but other platforms as well like Vimeo and Twitch. With the tool, you can clip multiple sections of the video and share them with others.
- To get started, signup either with mail, Google, Twitter, Facebook, or Twitch account.
- Once signed in, go to Create vib at the top left corner and then paste the URL of the YouTube video you would like to share and then click on the Start button.

- Your video will load in the Vibby editor, now click on Highlight the parts to share.
- Here you will see the Start highlight button, jump 5-sec option, option to switch between HD and SD video quality, and volume control button. Navigate to the part you want to share and click on Start highlight.

- When you reach the end of the part, click on Finish highlight. Repeat the process to highlight multiple parts of the video. All the highlighted parts will appear in a list on the right side of the screen.
- Add a description to each part and format it, you have the option to preview before hitting the Save vib button.
- Name the vib and assign a category and then publish it to Vibby or make it a private vib.
- You get a dedicated link to your vib with the ability to embed it on your website or blog.
In this way, you can share the highlights of the YouTube video or Vimeo video easily.
Part 4: How to Get YouTube Timestamp Link on iPhone and Android?
Linking to specific YouTube Timestamp Link is straightforward on both iPhone and Android.
- Go to YouTube and select the video you want to share.
- Move through the progress bar of the video to reach the key part and click on the Share button.
- A pop-up menu appears, highlight the URL and click on the Copy button.
- Paste the URL and manually add the Timestamp using the steps mentioned in add a Timestamp manually.
Part 5: Is Timestamp Beneficial for your Video?
Timestamping your YouTube videos may decrease the watch time, but it enhances the user experience, and they want to see more of your videos. Apart from this, adding Timestamps to your videos make your videos discoverable through Google search. YouTube and Google will reward you for the videos in form of a high search engine ranking.
Bonus: How to Add YouTube Timestamp Link in YouTube Video Description
Adding a YouTube Timestamp link in your video description is easy. Here are the steps to do so.
- Go to your YouTube channel and select the video you want to add Timestamp to and then navigate to the description below it.
- Edit the description by clicking on the Edit Video button.
- You are redirected to the Video Details page. Here write 0:00 at the first part of the timecode, and then continue with the time of the key part of the video you want to add the Timestamp to in 2:40 format. You can add more Timestamp as well and then click on the Save button.

- Reload the video page and you will see auto-generated Timestamp Links at the specific time you provided in the description.
Note: You need to add at least three timestamps which are 10 seconds or longer in order to add timestamps successfully.
Conclusion
As much as possible YouTubers want to make videos short and to the point. However, if a video needs to be longer, you can still help users navigate through to find what is important to them by adding Timestamp to YouTube link or Timestamp the YouTube descriptions. This can help your viewers jump straight to the interesting part in the video, rather than viewing the entire video saving their time and boost user experience.
Richard Bennett
Richard Bennett is a writer and a lover of all things video.
Follow @Richard Bennett
Richard Bennett
Mar 27, 2024• Proven solutions
It is a well-known fact that internet users have a short interest span, about just eight seconds. This attention span applies to all internet platforms including YouTube. YouTube is the second largest and most visited search engine after Google. It provides users with information through engaging and eye-catchy videos. However, certain videos are longer where only a particular section of the video holds the important information. Viewers tend to skip the long videos and if you do not want this to happen to you, you can link to that specific part on your video adding value for your channel viewers with a link known as the YouTube Timestamp link.
When you have a Timestamp link on your video, you can help your viewers directly reach the specific time in the video. This helps avoid the viewers from losing interest or to search for the key part in your video themselves.
Here in this article, we will explain Timestamp links, how to add Timestamp to YouTube video links, and what are the benefits of Timestamp.
- Part 1: YouTube Timestamp Links Introduction
- Part 2: Adding a Timestamp to YouTube Video Link on Desktop
- Part 3: How to Share Specific Parts of YouTube Video
- part 4: Getting YouTube Timestamp Link on Mobile
- Part 5: FAQ About YouTube Timestamps
Part 1: What is YouTube Timestamp Links
In this fast-paced world where viewers have limited time at hand, YouTube Timestamp links are extremely helpful. These links are anchor text or video hyperlinks found either in the description beneath the video or at the video link end.
The Timestamps links allow you to put a link to a key moment in your YouTube video allowing the viewers and subscribers to view the video at the precise time specified. Your YouTube video maybe half an hour long or maybe your users do not have the time now or forget to later watch your video, but when you add Timestamp to the YouTube link, you provide them ways to get to the content quickly enhancing the user experience.
In addition to this, you can even provide a reference in minutes and hours where necessary. The YouTube Timestamp link acts as a guide that directs viewers to the part of the video, which is most relevant to them without having to watch the entire video.
Part 2: How to Add a Timestamp to YouTube Video Link on Desktop?
In the following section, I will show you how to add timestamp to YouTube video link in several ways.
Use YouTube’s Share Feature
Using YouTube’s share feature is the simplest way to add Timestamp to YouTube videos. Here are easy steps to follow to do this.
- Open the YouTube video on your desktop that you want to share.
- Play the video or navigate the timeline and stop at the key moment you wish to apply the timestamp to.
- Now click on the Share button, a pop-up will appear. Under the URL, you will see a small box indicating Start at. The Timestamp is generated automatically, but you can adjust it.
- Copy the updated URL with Timestamp to share the video or click on the social sharing icons to do so.
- When your viewers click on this URL, the video will begin at the specified Timestamp.
Use the Browser URL to add Timestamp manually
You can add Timestamp manually as well. Follow the step-by-step guide below to add a Timestamp manually.
- Open your YouTube video in a browser on your desktop and then find the URL in the browser’s address bar.
- Enter the specific time you want the viewers to watch the video from at the end of the video URL.
You can add time manually in two ways depending on the URL.
?t=As or
&t=As
“youtu.be/” Format
If your YouTube video link is a youtu.be format, then just add ?t=As at the end of the video link. The A denotes the seconds at which you want the viewer to watch your video. The time can also be specified in minutes and seconds and when you want to do that just add ?t=AmBs. For instance, ?t=2m40s.
“youtube.com/” Format
When your YouTube video link has a youtube.com format, the adjustment starts with an ampersand. &t=As or &t=AmBs is what you can use. If you are looking to add the Timestamp at 2m40s, just add “&t=2m40s at the end of the video URL.
Whenever anybody uses the URL with Timestamp, the video will start from the specified time.
However, when adding a Timestamp manually, always leave include whole numbers. For example, if the time starts at 4m, use 4 and not 04.
Copy video URL at current time
You can use YouTube’s built-in feature to share the key parts of your YouTube video. Follow the steps here.
- Visit YouTube and open the video you want to add Timestamp link to.
- Play the video or navigate the timeline to reach the specific part you like to use in Timestamp.
- Now either press Ctrl + click or right-click anywhere on the video. A pop-up opens where you can see various texts, click on the Copy video URL at current time and share the link.
- Anyone who clicks on this link will be instantly transported to the exact segment of your YouTube video.
Part 3: How to Share Specific Parts of Videos with Vibby and Get YouTube Link with Timestamp
The above-mentioned methods to add and send YouTube link with timestamp are quick and easy, but they have a few limitations. If you need more control and share highlighted parts of YouTube video without cutting the video, you need to use a third-party tool known as Vibby.
Vibby allows you to not only share specific parts of videos from YouTube but other platforms as well like Vimeo and Twitch. With the tool, you can clip multiple sections of the video and share them with others.
- To get started, signup either with mail, Google, Twitter, Facebook, or Twitch account.
- Once signed in, go to Create vib at the top left corner and then paste the URL of the YouTube video you would like to share and then click on the Start button.
- Your video will load in the Vibby editor, now click on Highlight the parts to share.
- Here you will see the Start highlight button, jump 5-sec option, option to switch between HD and SD video quality, and volume control button. Navigate to the part you want to share and click on Start highlight.
- When you reach the end of the part, click on Finish highlight. Repeat the process to highlight multiple parts of the video. All the highlighted parts will appear in a list on the right side of the screen.
- Add a description to each part and format it, you have the option to preview before hitting the Save vib button.
- Name the vib and assign a category and then publish it to Vibby or make it a private vib.
- You get a dedicated link to your vib with the ability to embed it on your website or blog.
In this way, you can share the highlights of the YouTube video or Vimeo video easily.
Part 4: How to Get YouTube Timestamp Link on iPhone and Android?
Linking to specific YouTube Timestamp Link is straightforward on both iPhone and Android.
- Go to YouTube and select the video you want to share.
- Move through the progress bar of the video to reach the key part and click on the Share button.
- A pop-up menu appears, highlight the URL and click on the Copy button.
- Paste the URL and manually add the Timestamp using the steps mentioned in add a Timestamp manually.
Part 5: Is Timestamp Beneficial for your Video?
Timestamping your YouTube videos may decrease the watch time, but it enhances the user experience, and they want to see more of your videos. Apart from this, adding Timestamps to your videos make your videos discoverable through Google search. YouTube and Google will reward you for the videos in form of a high search engine ranking.
Bonus: How to Add YouTube Timestamp Link in YouTube Video Description
Adding a YouTube Timestamp link in your video description is easy. Here are the steps to do so.
- Go to your YouTube channel and select the video you want to add Timestamp to and then navigate to the description below it.
- Edit the description by clicking on the Edit Video button.
- You are redirected to the Video Details page. Here write 0:00 at the first part of the timecode, and then continue with the time of the key part of the video you want to add the Timestamp to in 2:40 format. You can add more Timestamp as well and then click on the Save button.
- Reload the video page and you will see auto-generated Timestamp Links at the specific time you provided in the description.
Note: You need to add at least three timestamps which are 10 seconds or longer in order to add timestamps successfully.
Conclusion
As much as possible YouTubers want to make videos short and to the point. However, if a video needs to be longer, you can still help users navigate through to find what is important to them by adding Timestamp to YouTube link or Timestamp the YouTube descriptions. This can help your viewers jump straight to the interesting part in the video, rather than viewing the entire video saving their time and boost user experience.
Richard Bennett
Richard Bennett is a writer and a lover of all things video.
Follow @Richard Bennett
- Title: "In 2024, Leap Into Broadcasting Effortless Setup for Your Mobile YouTube Ventures"
- Author: Joseph
- Created at : 2024-05-31 13:43:42
- Updated at : 2024-06-01 13:43:42
- Link: https://youtube-stream.techidaily.com/in-2024-leap-into-broadcasting-effortless-setup-for-your-mobile-youtube-ventures/
- License: This work is licensed under CC BY-NC-SA 4.0.
