
"In 2024, How-To Wipe Out Your YouTube Buffered Videos"
How-To: Wipe Out Your YouTube Buffered Videos
The YouTube Watch Later playlist is a great way to save videos and view them later. But if you don’t keep on top of it, your Watch Later list can quickly become unmanageable and cluttered with content that you no longer want to watch afterward.
If you are wondering how, you can declutter the playlist, we’ve got you covered. To help you with the task, we’ve compiled a comprehensive step-by-step guide. In this article, we will show you how to clear Watch Later on YouTube with just a few clicks.
So, without beating around the bush, let’s get started with our tutorial!
How To Delete YouTube Watch Later Playlist
If your YouTube Watch Later playlist is filled with videos you’ll never watch again, or you are not interested in that specific content type, you can quickly delete these videos at any time.
Here’s the step-by-step process on how to clear Watch Later on YouTube Web and App:
How To Delete YouTube Watch Later Playlist On Web?
You can delete the YouTube Watch Later Playlist on your desktop in the following ways:
From YouTube Homepage
To clear the YouTube Watch Later Playlist from the YouTube Homepage, do the following steps:
Step1 First, open a browser on your PC and visit the YouTube homepage. Sign into your account if needed and click the “Library” option located at the left-hand side menu panel.

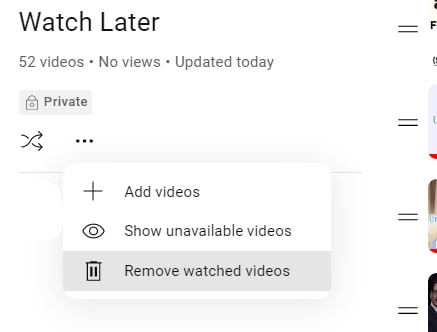
Step2 Croll down and click the “See All” option under the Watch Later header. Click the Three Dots below the Watch Later playlist details on the next page.
Step3 From the drop-down menu, click “Remove Watch Videos.” This will instantly remove all the videos you’ve watched but are still in the playlist.
Step4 Finally, to remove the unwatched videos, hover over a video and click the Three Dots. Select the “Remove from Watch Later” option to delete the video. You can repeat this process to remove all the content from the playlist until it is decluttered at the point of your satisfaction.

Using A Script
Since the above process can be tiring, you can use a script to remove all the videos at once from the Watch Later playlist in the following way:
Step1 In the first step, launch the Google Chrome browser on your system and head to the YouTube website**.** Next, select the “Library” option in the left pane and click “Watch Later” from the menu.
Step2 Now, hit the “Ctrl + Shift + J” keys on Windows or the “Command + Option+ J” buttons on Mac to launch the developer mode and open the console window.

Step3 Copy and paste the following lines of the script at the end of the line under the Console tab where the cursor is blinking.
setInterval(function () { document.querySelector(‘#primary button[aria-label=”Action menu”]‘).click(); var things = document.evaluate( ‘//span[contains(text(),”Remove from”)]‘, document, null, XPathResult.ORDERED_NODE_SNAPSHOT_TYPE, null ); for (var i = 0; i < things.snapshotLength; i++) { things.snapshotItem(i).click(); } }, 1000);
Step4 In the last step, hit the “Enter” key to clear the Watch Later Playlist on YouTube. However, the process may take some time, depending on the number of videos in your playlist.
Although a bit tech-savvy, the script execution method is the most effective way to delete all Watch Later videos at once.
You can also replace the number at the end of the script with a lower entry to delete videos according to your preference. Also, choosing a lesser number can speed up the video deletion process from YouTube Watch Later list by a great deal.
![]()
Note: It is important to note that experimenting with scripts is only for some. The script above has been confirmed to work, but others still need to be thoroughly checked and could potentially damage your computer. To prevent this from happening, only look for scripts from reliable sources instead of those posted by random people in various forums.
How To Delete YouTube Watch Later Playlist On YouTube App?
If you are using YouTube on an Android or iOS device, it is possible to clear the Watch Later Playlist by doing the steps below:
Step1 In the first step, swipe up on the Homescreen of your Android device or swipe right on your iOS device to launch App Drawer, and tap “YouTube” to launch the app.
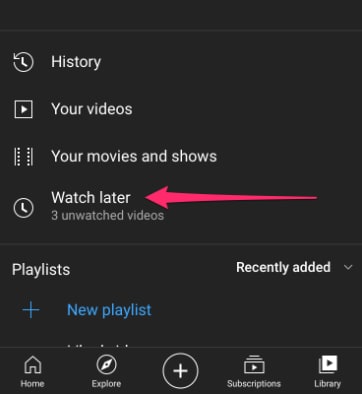
Step2 Now, tap the “Library” option in the bottom-right corner of the screen and tap “Watch Later.”
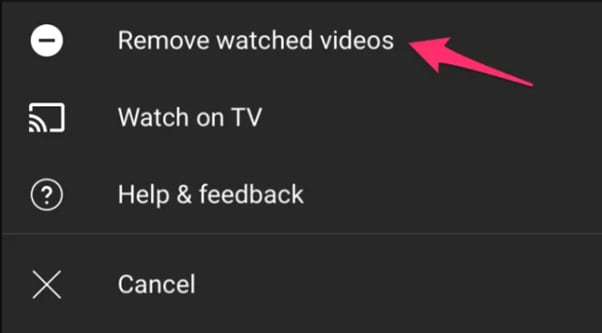
Step3 Next, tap the three dots (vertical ellipses) icon on the top-right side of the screen and choose the “Remove Watched Videos” option to delete them from the playlist.
Step4 If there are still unwatched videos in the playlist, select a video and tap the three dots next to it. Now, tap the “Remove from Watch Later” option. Repeat the process to remove all the unwatched videos to clear the playlist.
Is there an Alternative Way to Download YouTube Videos without Using Software?
Now that you’ve learned how you can clear the Watch Later playlist on YouTube, you might be looking for a way to download your favorite videos on your PC for later watch without using any software. If so,click here to find out 13 proven ways to get this done.
Free Download For Win 7 or later(64-bit)
Free Download For macOS 10.14 or later
Bonus Video Tutorial: From a User to a Creator, How To Edit YouTube Videos Like a Pro
Hopefully, you have found the most appropriate solution to clear your YouTube Watcher Later playlist. However, while you are a YouTube user, how can you transfer your character from a user to a creator? In this video era, why not participate in the creation party and be one of them?
If you have any interests, you can watch the video we specially prepared for you. This video will show you how to use a user-friendly video editor, Filmora , to create your own YouTube videos!
Conclusion
In this article, we’ve discussed how to clear your YouTube watch later playlist from both the YouTube web from the homepage and using the script in the browser’s developer mode. We’ve also provided a step-by-step process for deleting the Watch Later playlist on the YouTube mobile app.
This guide was informative enough to answer most of your queries, and after reading it, you can now unclutter your YouTube Watch Later without any issues.
How To Delete YouTube Watch Later Playlist On YouTube App?
If you are using YouTube on an Android or iOS device, it is possible to clear the Watch Later Playlist by doing the steps below:
Step1 In the first step, swipe up on the Homescreen of your Android device or swipe right on your iOS device to launch App Drawer, and tap “YouTube” to launch the app.
Step2 Now, tap the “Library” option in the bottom-right corner of the screen and tap “Watch Later.”
Step3 Next, tap the three dots (vertical ellipses) icon on the top-right side of the screen and choose the “Remove Watched Videos” option to delete them from the playlist.

Step4 If there are still unwatched videos in the playlist, select a video and tap the three dots next to it. Now, tap the “Remove from Watch Later” option. Repeat the process to remove all the unwatched videos to clear the playlist.
Is there an Alternative Way to Download YouTube Videos without Using Software?
Now that you’ve learned how you can clear the Watch Later playlist on YouTube, you might be looking for a way to download your favorite videos on your PC for later watch without using any software. If so,click here to find out 13 proven ways to get this done.
Free Download For Win 7 or later(64-bit)
Free Download For macOS 10.14 or later
Bonus Video Tutorial: From a User to a Creator, How To Edit YouTube Videos Like a Pro
Hopefully, you have found the most appropriate solution to clear your YouTube Watcher Later playlist. However, while you are a YouTube user, how can you transfer your character from a user to a creator? In this video era, why not participate in the creation party and be one of them?
If you have any interests, you can watch the video we specially prepared for you. This video will show you how to use a user-friendly video editor, Filmora , to create your own YouTube videos!
Conclusion
In this article, we’ve discussed how to clear your YouTube watch later playlist from both the YouTube web from the homepage and using the script in the browser’s developer mode. We’ve also provided a step-by-step process for deleting the Watch Later playlist on the YouTube mobile app.
This guide was informative enough to answer most of your queries, and after reading it, you can now unclutter your YouTube Watch Later without any issues.
The Charisma of Jittery Text: 2 Methods Unleashed
How to Create Animated Bouncing Text

Liza Brown
Mar 27, 2024• Proven solutions
Earlier, you learned how to have a bounce text effect in Adobe After Effects . However, because AE is a complex application and has a steep learning curve, this section explains the two alternative ways to get the same effect on your existing video footage.
Method 1: How to Create Bouncing Text in Filmora Video Editor?
When talking about Wondershare Filmora , the application is populated with several presets for texts and titles, animations, effects, filters, and much more.
These pre-built templates not only make your task easier, they also save your decent amount of time that you would spend while working with After Effects or any other similar app that requires you to build things from scratch.
You can follow the instructions given below to add animated bounce text to any of your video footages with Filmora:
Step 1: Add a Footage to Timeline
Launch Wondershare Filmora on your Windows or Mac PC. By default, the aspect ratio of the project is set to 16:9. Click anywhere inside the Media window at the upper-left section, and select and import footage you want to add bounce text to.
Step 2: Insert Text and Add Bounce Effect
Click Titles from the standard toolbar at the top, and click and drag your preferred title template from the Library to the timeline. In case you don’t want any specific animation or style on the title, you can use the default title.
In the timeline, double-click the title you just added, use the upper-left section to edit the text, go to the Animation tab from the left pane, scroll down the list, and double-click the Up Down 1 or Up Down 2 preset to apply the bounce effect to the credits. Click OK to save the changes and to get back to the main window.

Step 3: Add Shake Filters
Go to Effects from the standard toolbar, expand the Filters category from the left pane, and click Shake. From the Library window, click and drag your preferred shake filter to the timeline. Here, I will choose Mild.

You can customize the default effect by double-clicking the shake filter in the timeline, using the sliders in the upper-left area of the interface to make necessary adjustments, and then clicking OK to save the changes and to get back to the previous interface.

Step 4: Export the Final Output
Click EXPORT from the top of the interface, go to the Local tab in the Export box, choose your preferred output format from the list in the left, make required customizations from the right pane, and click EXPORT from the bottom-right corner to export the video.

Now, you can add the bouncing text video and the background video to the timeline, and then place the bouncing text video above the background video track.
Double click the text track, go to the Chroma Key effect, select the Color Picker tool, and click anywhere in the Preview window to get things right. Finally, export the entire project to your preferred output format as explained in Step 4.
As explained before, Wondeshare Filmora makes the entire process of creating and adding bounce text effect pretty simple. With all the pre-build templates, and the versatility of the options that can be used to customize those presets, you can come up with the effects that are usually obtained when you start generating them from the scratch.


Method 2: Generate Animated Bouncing Texts Online
If you don’t want any heavy and resource-intensive app on your PC merely for some special text effects, you can try any of the online solutions instead. The benefit of using any such web app is that all the processing is done on site’s server, and it is only a web browser and an Internet connection that you need to have at your side.
Some most trusted websites to generate bounce text are listed below:
1. ENGFTO
Website: https://engfto.com/index/create%5Fanimated%5Fbouncing%5Ftext/0-26

You can follow the instructions given below to use Engfto to generate bouncing text for your footages:
Step 1: Get to the Animated Bouncing Text Page
Launch your favorite web browser, and go to the link given above to get to the Engfto’s animated bouncing text page.
Step 2: Customize Text and Preferences
Modify the values in the fields under the SIZE AREA and TEXT sections to customize the text area, the text itself, its size, and font. Next, adjust the values in the fields under the EFFECT PARAMETERS section to get the required bounce effect. Also, use the fields under the BACKGROUND section to either change the background color, or pick a background image from your PC.
Step 3: Obtain the Animated Text
Click the SAVE GIF ANIMATION button from the lower section of the page to download the animated text to your PC.
2. Loading.io
The instructions given below explain how to use Loading.io to get animated bounce text effect for your footages:
Step 1: Get to the Loading.io Webpage
Launch your favorite web browser and go to https://loading.io/animation/text/ .
Step 2: Customize the Text and Choose Animation Effect

Use the options available on the webpage to type your text, and change its font, color, background, transparency level etc. Select Bounce (or any of its variants) from the Animation drop-down list, and adjust the speed using the Speed slider.
Step 3: Obtain the Text
Click your preferred option from next to the Download As section to download the animated text to your PC.
Note: Regardless of the web solution you choose to generate and obtain animated bounce text, you will still need a post-production tool to add the downloaded text to your footage.
Conclusion
Generating bounce text effect is much simpler when you use Wondershare Filmora or any of the online solutions as explained in Method 2. While the former gives you more flexibility when it comes to customizations, the latter doesn’t require any app to be installed on your PC. In addition, many times the web apps offer their services for free, and therefore they are preferred by the novice users who are not much into post-production processes.
Liza Brown
Liza Brown is a writer and a lover of all things video.
Follow @Liza Brown
Liza Brown
Mar 27, 2024• Proven solutions
Earlier, you learned how to have a bounce text effect in Adobe After Effects . However, because AE is a complex application and has a steep learning curve, this section explains the two alternative ways to get the same effect on your existing video footage.
Method 1: How to Create Bouncing Text in Filmora Video Editor?
When talking about Wondershare Filmora , the application is populated with several presets for texts and titles, animations, effects, filters, and much more.
These pre-built templates not only make your task easier, they also save your decent amount of time that you would spend while working with After Effects or any other similar app that requires you to build things from scratch.
You can follow the instructions given below to add animated bounce text to any of your video footages with Filmora:
Step 1: Add a Footage to Timeline
Launch Wondershare Filmora on your Windows or Mac PC. By default, the aspect ratio of the project is set to 16:9. Click anywhere inside the Media window at the upper-left section, and select and import footage you want to add bounce text to.
Step 2: Insert Text and Add Bounce Effect
Click Titles from the standard toolbar at the top, and click and drag your preferred title template from the Library to the timeline. In case you don’t want any specific animation or style on the title, you can use the default title.
In the timeline, double-click the title you just added, use the upper-left section to edit the text, go to the Animation tab from the left pane, scroll down the list, and double-click the Up Down 1 or Up Down 2 preset to apply the bounce effect to the credits. Click OK to save the changes and to get back to the main window.
Step 3: Add Shake Filters
Go to Effects from the standard toolbar, expand the Filters category from the left pane, and click Shake. From the Library window, click and drag your preferred shake filter to the timeline. Here, I will choose Mild.
You can customize the default effect by double-clicking the shake filter in the timeline, using the sliders in the upper-left area of the interface to make necessary adjustments, and then clicking OK to save the changes and to get back to the previous interface.
Step 4: Export the Final Output
Click EXPORT from the top of the interface, go to the Local tab in the Export box, choose your preferred output format from the list in the left, make required customizations from the right pane, and click EXPORT from the bottom-right corner to export the video.
Now, you can add the bouncing text video and the background video to the timeline, and then place the bouncing text video above the background video track.
Double click the text track, go to the Chroma Key effect, select the Color Picker tool, and click anywhere in the Preview window to get things right. Finally, export the entire project to your preferred output format as explained in Step 4.
As explained before, Wondeshare Filmora makes the entire process of creating and adding bounce text effect pretty simple. With all the pre-build templates, and the versatility of the options that can be used to customize those presets, you can come up with the effects that are usually obtained when you start generating them from the scratch.
Method 2: Generate Animated Bouncing Texts Online
If you don’t want any heavy and resource-intensive app on your PC merely for some special text effects, you can try any of the online solutions instead. The benefit of using any such web app is that all the processing is done on site’s server, and it is only a web browser and an Internet connection that you need to have at your side.
Some most trusted websites to generate bounce text are listed below:
1. ENGFTO
Website: https://engfto.com/index/create%5Fanimated%5Fbouncing%5Ftext/0-26
You can follow the instructions given below to use Engfto to generate bouncing text for your footages:
Step 1: Get to the Animated Bouncing Text Page
Launch your favorite web browser, and go to the link given above to get to the Engfto’s animated bouncing text page.
Step 2: Customize Text and Preferences
Modify the values in the fields under the SIZE AREA and TEXT sections to customize the text area, the text itself, its size, and font. Next, adjust the values in the fields under the EFFECT PARAMETERS section to get the required bounce effect. Also, use the fields under the BACKGROUND section to either change the background color, or pick a background image from your PC.
Step 3: Obtain the Animated Text
Click the SAVE GIF ANIMATION button from the lower section of the page to download the animated text to your PC.
2. Loading.io
The instructions given below explain how to use Loading.io to get animated bounce text effect for your footages:
Step 1: Get to the Loading.io Webpage
Launch your favorite web browser and go to https://loading.io/animation/text/ .
Step 2: Customize the Text and Choose Animation Effect
Use the options available on the webpage to type your text, and change its font, color, background, transparency level etc. Select Bounce (or any of its variants) from the Animation drop-down list, and adjust the speed using the Speed slider.
Step 3: Obtain the Text
Click your preferred option from next to the Download As section to download the animated text to your PC.
Note: Regardless of the web solution you choose to generate and obtain animated bounce text, you will still need a post-production tool to add the downloaded text to your footage.
Conclusion
Generating bounce text effect is much simpler when you use Wondershare Filmora or any of the online solutions as explained in Method 2. While the former gives you more flexibility when it comes to customizations, the latter doesn’t require any app to be installed on your PC. In addition, many times the web apps offer their services for free, and therefore they are preferred by the novice users who are not much into post-production processes.
Liza Brown
Liza Brown is a writer and a lover of all things video.
Follow @Liza Brown
Also read:
- [New] Principles of Creating Inspirational Day-to-Day Visual Stories
- [New] Recovering From a Youtube Penalty
- [Updated] 2024 Approved Realms Intersecting Delving Into VR, Augmented & Mixed Immersion
- [Updated] Download Diva A Guide to Free Skype Tone Resources for 2024
- [Updated] In 2024, Tweet Vids Made Easy & Free To GIF Transformation
- 2024 Approved Securely Transforming YouTube Videos Top 3 Reliable Methods
- 2024 Approved The Green Screen Revolution Access Comprehensive Tutorials From 4 Leading YouTube Educators
- 2024 Approved Video Brand Enhancement Embedding Logos/Watermarks for YouTube Shows
- Android to Firestick Casting Techniques for Seamless Entertainment
- In 2024, A How-To Guide on Bypassing iPhone 15 Pro Max iCloud Activation Lock
- In 2024, Gamer's Galaxy 100+ Spaces of Play
- In 2024, High-Speed Photo Inspector for Windows 11
- In 2024, Start Streaming on Youtube with an Introductory OBS Course
- In 2024, Top Sounds for Video Creators Royalty-Free Options
- In 2024, Top Voice Changer Tools for YouTubers Find the Best Option for Your Videos
- Introduction to AV1 Encoding Techniques
- Live Radio Transmissions Recorded with Ease An Expert's Guide for 2024
- Navigating the Battle of Tech Titans: IPhone Vs. Android, Who Wins ?
- Which AI Tool Leads for Coding? GitHub Copilot or GPT-3 Examined
- Title: In 2024, How-To Wipe Out Your YouTube Buffered Videos
- Author: Joseph
- Created at : 2024-10-18 16:07:43
- Updated at : 2024-10-24 16:04:03
- Link: https://youtube-stream.techidaily.com/in-2024-how-to-wipe-out-your-youtube-buffered-videos/
- License: This work is licensed under CC BY-NC-SA 4.0.