
:max_bytes(150000):strip_icc()/t-bird-chatsetup-2adce3d576fd4df185b75727424bc60a.jpg)
"In 2024, Fast-Track To 1,000 Fans Through Captivating Content"
Fast-Track To 1,000 Fans Through Captivating Content
Create High-Quality Video - Wondershare Filmora
An easy and powerful YouTube video editor
Numerous video and audio effects to choose from
Detailed tutorials provided by the official channel
Technological advances are offering numerous platforms opportunities to gain recognition. Both the young and the old throng on the internet for all sorts of information. Be it educational, promotional, research, entertainment, among many others. In fact, the recent hit by the COVID-19 pandemic saw learning institutions find help via internet learning. Therefore, more awareness surrounds the media platform, including websites and streaming services. YouTube is available for both learning and promotional events. The platform is easy to use and widely accessible by millions of viewers and promoters. But there is one driving force for promotors – to hit YouTube 1000 subscribers. Attaining this number comes with endless benefits, as this article explains.
In this article
02 What will you get when you reach your 1000 subscribers’ milestone?
03 How to get 1000 subscribers for your YouTube channel?
Why 1000 subscribers?
Subscribers hold a special place for your YouTube channel. They make it grow and spend more time watching than viewers who are not subscribed. You need 1,000 subscribers to monetize your channel. You’ll start earning as a creator and even apply for YouTube’s Partner Program. You can finally make money through ads, channel memberships, and subscriptions.
Here’s the kicker! As the channel owner, you’ll have more connections, and that means many viewers on the line. Of course, those who love what you do will tell their friends, and the channel goes on for more prospective subscribers and viewers. Nonetheless, you’ll get enormous people to engage in a conversation with. The fun will only go on if more viewers are on board. Remember, you want to garner as many peoples’ opinions as possible. So, the best platform for this is your channel. Eventually, you’ll sell your brand and continue to grow in your market niche.
What will you get when you reach your 1000 subscribers’ milestone?
Every creator is relieved when they reach the 1k subscribers’ milestone. Expect lots of goodies in store for you.
1) You become part of the Opal club
It is good to feel honored as part of the Opal Club. This is a club reserved for creators whose channels have hit the 1,000 to 9,999 subscribers’ mark. And from the Opal Club, you get in-depth information on how to grow your community. Interacting with your viewers is a great avenue to escalate your channel.
It is also a quick way to get discovered. The Club will enlighten you on how to use metadata and collaborate to get more views.
2) Easily apply for YouTube Partner Program

1,000 subscribers is a ticket for you to apply for YouTube Partner Program. However, you also need to get at least 4,000 hours of views from your subscribers. But being that you have reached the 1k mark, you can take other steps to gain the 4,000 hours of views. These could be keeping up with publishing your videos, linking your Google AdSense account, and many more.
3) Some congratulation email is good enough
It feels good to get a pat on the back for a job well done! You’ll get a congratulatory email for your efforts. That would be a great motivation for you to even aim higher the mark. Likewise, your ranking will start escalating as compared to a content creator who hasn’t reached the 1,000-subscriber level.
How to get 1000 subscribers for your YouTube channel?
Now that you’ve seen what comes with 1K subscribers, our focus is to find ways to get to that number.
1) Consider your audience first, not revenue
Remember, it’s the audience that will help you generate revenue. So, if you are a new creator, think of what you can give to your audience instead of what you are getting. What is of value to your audience is more important as they’ll hang around your channel for passion. You can take advantage and tune your ideas to what most viewers like to get.
2) Put in resources to encourage subscriber sign-ups
Focus on getting traffic to your channel. There are several ways to encourage your viewers to subscribe, such as the use of animations on videos. It will not only attract their attention, but you’ll realize many viewers coming over. Several resources are available over the net. Just find what suits you best, or use several options to see which gig fetches the most clicks.
3) Properly advertise your videos
The best way to get more users to subscribe to your channel is to engage them. Make the videos enticing such that when a user views one video, they end up clicking and viewing the next 5 or 10 of your other videos. Let it be enticing and corresponds to the topic of the moment.
4) Add a good channel description
A viewer should know what your channel is all about just by a glance. And the best part to put emphasis on is the channel description. Let them know what you are offering and how it will be of benefit. More so, make it simple to understand so that they don’t waste time trying to figure out what your channel is about.
5) Focus on YouTube content that works
Put double efforts into the content that works for you. Check out which videos perform better than others and add value to them. Sorting them by “most popular video” will help you organize your lines and perform much better while focusing on valuable stuff.
6) A call to action is good enough
Most creators forget this important part. After an introduction and putting up memorable videos, ensure you remind your viewers to subscribe to your channel. You can add a subscribe button to the end of the screen. It is even better to use graphics and animations to attract them to the action.
7) Use a pinned comment
Most viewers want to get answers to their questions or run to the comment section for more opinions. One tactic to gain more subscribers is to write a comment and pin it to your videos. Your pinned comment will appear at the top of the comment list, whereby everyone who has watched the video can’t miss coming across it. It is good, to be honest, and asking for them to subscribe is the best you can do after an engaging video shot.
8) Add value to other channels
Don’t be selfish and want users to subscribe to your channel for nothing. Try to engage also in other people’s works and efforts. You can watch content that appeals to you and engage the community by creating a conversation. Find out what others like, and you might just attract a new subscriber to your channel so simply.
9) Let your homepage be intuitive
Your homepage should be welcoming to both the tech gurus and beginners. Not all YouTube users have mastered the art of navigation on web pages or clicks. It is a good idea to use a channel trailer and a better description of what your channel does and how to reach important buttons. The homepage should not be crowded. You can use links to reach other pages as well.
10) Be innovative
Your video is your voice. You should create a video that attracts your audience by doing it right. Perhaps you don’t know how to come up with a compelling piece. You can engage the best video creator to walk you through the line.
Bonus Tips: Recommended Video Editor – Filmora
Filmora Video Editor comes enriched with stunning video editing effects to help you create amazing videos. The user interface is intuitive, enabling both professional editors and beginners to navigate swiftly. You can use animated elements, filters, overlays, and other editing features to transform your video into any good piece you want. You can easily facilitate communication with the community via its selection of titles.
The process of creating a compelling video is painless, with only 3 steps process. Easily drag and drop moving graphics to the video interface and make your video well organized.
Key Features of Wondershare Filmora
- Easily remove unwanted background noise
- Use the Picture-in-Picture to layer multiple video clips
- Export your videos at a high resolution of up to 4K
- Use zooming movements to still footage
- Make use of more than 800 stunning effects for advanced creativity
- Make use of more than 800 stunning effects for advanced creativity
Conclusion
● Getting to YouTube 1000 subscribers needs some tactics. You have the highlight from this article and probably just getting ready to attain your first 1k subscribers. The beauty is that it comes with its benefits. Once you hit the mark, you’ll start to monetize and get other favors that you couldn’t get while you were below the mark. Nonetheless, ensure you focus on important aspects like engaging your viewers via quality videos. Are you still wondering how to attain that? The best video creator – Filmora – just got you covered. It will make it easy for you to compose videos that sell your brands simply and professionally.
Technological advances are offering numerous platforms opportunities to gain recognition. Both the young and the old throng on the internet for all sorts of information. Be it educational, promotional, research, entertainment, among many others. In fact, the recent hit by the COVID-19 pandemic saw learning institutions find help via internet learning. Therefore, more awareness surrounds the media platform, including websites and streaming services. YouTube is available for both learning and promotional events. The platform is easy to use and widely accessible by millions of viewers and promoters. But there is one driving force for promotors – to hit YouTube 1000 subscribers. Attaining this number comes with endless benefits, as this article explains.
In this article
02 What will you get when you reach your 1000 subscribers’ milestone?
03 How to get 1000 subscribers for your YouTube channel?
Why 1000 subscribers?
Subscribers hold a special place for your YouTube channel. They make it grow and spend more time watching than viewers who are not subscribed. You need 1,000 subscribers to monetize your channel. You’ll start earning as a creator and even apply for YouTube’s Partner Program. You can finally make money through ads, channel memberships, and subscriptions.
Here’s the kicker! As the channel owner, you’ll have more connections, and that means many viewers on the line. Of course, those who love what you do will tell their friends, and the channel goes on for more prospective subscribers and viewers. Nonetheless, you’ll get enormous people to engage in a conversation with. The fun will only go on if more viewers are on board. Remember, you want to garner as many peoples’ opinions as possible. So, the best platform for this is your channel. Eventually, you’ll sell your brand and continue to grow in your market niche.
What will you get when you reach your 1000 subscribers’ milestone?
Every creator is relieved when they reach the 1k subscribers’ milestone. Expect lots of goodies in store for you.
1) You become part of the Opal club
It is good to feel honored as part of the Opal Club. This is a club reserved for creators whose channels have hit the 1,000 to 9,999 subscribers’ mark. And from the Opal Club, you get in-depth information on how to grow your community. Interacting with your viewers is a great avenue to escalate your channel.
It is also a quick way to get discovered. The Club will enlighten you on how to use metadata and collaborate to get more views.
2) Easily apply for YouTube Partner Program
1,000 subscribers is a ticket for you to apply for YouTube Partner Program. However, you also need to get at least 4,000 hours of views from your subscribers. But being that you have reached the 1k mark, you can take other steps to gain the 4,000 hours of views. These could be keeping up with publishing your videos, linking your Google AdSense account, and many more.
3) Some congratulation email is good enough
It feels good to get a pat on the back for a job well done! You’ll get a congratulatory email for your efforts. That would be a great motivation for you to even aim higher the mark. Likewise, your ranking will start escalating as compared to a content creator who hasn’t reached the 1,000-subscriber level.
How to get 1000 subscribers for your YouTube channel?
Now that you’ve seen what comes with 1K subscribers, our focus is to find ways to get to that number.
1) Consider your audience first, not revenue
Remember, it’s the audience that will help you generate revenue. So, if you are a new creator, think of what you can give to your audience instead of what you are getting. What is of value to your audience is more important as they’ll hang around your channel for passion. You can take advantage and tune your ideas to what most viewers like to get.
2) Put in resources to encourage subscriber sign-ups
Focus on getting traffic to your channel. There are several ways to encourage your viewers to subscribe, such as the use of animations on videos. It will not only attract their attention, but you’ll realize many viewers coming over. Several resources are available over the net. Just find what suits you best, or use several options to see which gig fetches the most clicks.
3) Properly advertise your videos
The best way to get more users to subscribe to your channel is to engage them. Make the videos enticing such that when a user views one video, they end up clicking and viewing the next 5 or 10 of your other videos. Let it be enticing and corresponds to the topic of the moment.
4) Add a good channel description
A viewer should know what your channel is all about just by a glance. And the best part to put emphasis on is the channel description. Let them know what you are offering and how it will be of benefit. More so, make it simple to understand so that they don’t waste time trying to figure out what your channel is about.
5) Focus on YouTube content that works
Put double efforts into the content that works for you. Check out which videos perform better than others and add value to them. Sorting them by “most popular video” will help you organize your lines and perform much better while focusing on valuable stuff.
6) A call to action is good enough
Most creators forget this important part. After an introduction and putting up memorable videos, ensure you remind your viewers to subscribe to your channel. You can add a subscribe button to the end of the screen. It is even better to use graphics and animations to attract them to the action.
7) Use a pinned comment
Most viewers want to get answers to their questions or run to the comment section for more opinions. One tactic to gain more subscribers is to write a comment and pin it to your videos. Your pinned comment will appear at the top of the comment list, whereby everyone who has watched the video can’t miss coming across it. It is good, to be honest, and asking for them to subscribe is the best you can do after an engaging video shot.
8) Add value to other channels
Don’t be selfish and want users to subscribe to your channel for nothing. Try to engage also in other people’s works and efforts. You can watch content that appeals to you and engage the community by creating a conversation. Find out what others like, and you might just attract a new subscriber to your channel so simply.
9) Let your homepage be intuitive
Your homepage should be welcoming to both the tech gurus and beginners. Not all YouTube users have mastered the art of navigation on web pages or clicks. It is a good idea to use a channel trailer and a better description of what your channel does and how to reach important buttons. The homepage should not be crowded. You can use links to reach other pages as well.
10) Be innovative
Your video is your voice. You should create a video that attracts your audience by doing it right. Perhaps you don’t know how to come up with a compelling piece. You can engage the best video creator to walk you through the line.
Bonus Tips: Recommended Video Editor – Filmora
Filmora Video Editor comes enriched with stunning video editing effects to help you create amazing videos. The user interface is intuitive, enabling both professional editors and beginners to navigate swiftly. You can use animated elements, filters, overlays, and other editing features to transform your video into any good piece you want. You can easily facilitate communication with the community via its selection of titles.
The process of creating a compelling video is painless, with only 3 steps process. Easily drag and drop moving graphics to the video interface and make your video well organized.
Key Features of Wondershare Filmora
- Easily remove unwanted background noise
- Use the Picture-in-Picture to layer multiple video clips
- Export your videos at a high resolution of up to 4K
- Use zooming movements to still footage
- Make use of more than 800 stunning effects for advanced creativity
- Make use of more than 800 stunning effects for advanced creativity
Conclusion
● Getting to YouTube 1000 subscribers needs some tactics. You have the highlight from this article and probably just getting ready to attain your first 1k subscribers. The beauty is that it comes with its benefits. Once you hit the mark, you’ll start to monetize and get other favors that you couldn’t get while you were below the mark. Nonetheless, ensure you focus on important aspects like engaging your viewers via quality videos. Are you still wondering how to attain that? The best video creator – Filmora – just got you covered. It will make it easy for you to compose videos that sell your brands simply and professionally.
Top Screen Recorders for Live Broadcasts on YouTube
Best YouTube Livestreaming Screen Recorders

Richard Bennett
Oct 26, 2023• Proven solutions
The global pandemic has changed the way we live for the time being, and right now, we cannot attend events in the same way we did at the beginning of the year.
A growing number of cultural organizations, businesses, and influential YouTubers are turning towards YouTube’s Live feature because it provides a simple way of broadcasting different types of content in real-time. YouTube Live is by no means a new option, since the platform first introduced live streaming features in 2008, and some twelve years later, the feature has never been more popular.
However, the live streams you broadcast on YouTube are stored for just a brief period of time, which means you have to search for alternative methods of saving them. That’s why in this article we are going to take you through the best YouTube Live screen recorders you can use to capture the video content you are sharing with your followers.
Note: We resolutely oppose all forms of copyright-infringing downloads. This tutorial is only for downloading YouTube videos/audio materials from your own channel.
Top 10+ YouTube Live Screen Recorders
The maximum resolution in which you can record computer screen , audio recording options, or customization of the recording area are some of the most important features you need to consider while choosing a YouTube Live screen recorder.
We have selected some of the best YouTube Live screen recorders that enable you to do much more than just record live streams. So, let’s take a look at what they have to offer.
1. OBS Studio
Price: Free
Compatibility: Windows, Linux, macOS
The vast majority of live streams you can find on Twitch and YouTube are made with OBS Studio, but besides broadcasting videos, the software also gives you access to screencasting tools. This means that you can specify the area of the screen you want to record, choose the recording’s resolution and frame rate, or adjust the audio recording options.
OBS Studio is the best free, open-source screen recording program you can download. You shouldn’t use a software just because it’s free, but OBS Studio is also an extremely versatile tool. You can both record and stream in high definition and it comes with the ability to record either through your webcam or through your screen. It records directly through the graphics card , which means it can capture games even when in full-screen mode whereas a lot of other screen-recording software forces you to play games in windowed mode. The high quality can be seen easily in whatever you choose to broadcast.
OBS Studio allows you to record videos from a variety of sources, which makes it a perfect option for capturing the content you share through YouTube Live since you can select a browser window you want to capture in just a few clicks. What’s more, this open-source software is equipped with basic video editing tools, which enables you to preview the video you recorded before publishing it, apply transitions between cuts, or perform basic color correction.
Check the detailed guide to How to Record with OBS .
2. XSplit
Price: $24.95 for a three-month license
Compatibility: Windows
This is yet another broadcasting software that is equipped with powerful screen recording tools. Setting up a new screencasting session with XSplit is a simple and intuitive process that is not going to take much more than a few moments of your time.
All you need to do is define a workspace, then pick the preferred resolution and frame rate. The software allows you to capture screens in 4K resolution and at 60 fps, but it also offers a variety of resolution and frame rate options so that you can choose the one that best fits your needs. Furthermore, you can record the computer audio, which enables you to capture the live stream’s audio in excellent quality. Besides YouTube Live, XSplit can be used with Zoom , Skype, Google Hangouts, and numerous other live streaming and video calling apps.
3. Filmora
Price: Free, pricing plans start at $49.99/year
Compatibility: macOS, Windows


If you are looking for a screen recorder that is stacked with powerful video editing features, then Filmora is a great option for you. Customizing a YouTube Live or any other screencasting session with this video editing software is easy, and you can choose the resolution, frame rate, or even if you want to show mouse clicks in the recording.
Capturing the webcam feed and the computer’s screen simultaneously is also an option, while you can also decide whether or not you want to record audio from a microphone, computer audio, or both at the same time.
What’s more Filmora lets you set up the maximum duration of a screen recording and you start, pause, resume or stop a screen recording session by using hotkeys. Once you are done recording the live stream you shared on YouTube, you can edit the footage you created before uploading it to your YouTube channel.
4. Wondershare DemoCreator
Compatibility: Windows
Price: Start from $9.99
DemoCreator is a recorder that focuses its overall user experience. It is able to easily record high-quality videos at up to 120 FPS (60 FPS for Mac) and allows you to simultaneously record both your screen and webcam. This software is incredibly user friendly and makes for an easy experience for new streamers. The dual recording makes it great for gamers who are also looking to film their reactions.
5. CloudApp
Price: Free, $10 per month for an individual user
Compatibility: Windows, macOS, Linux, Chrome
Starting a new screen capturing session with the CloudApp requires you to just specify the portion of the screen you want to capture and hit the record button. Moreover, you can choose if you want to record with or without a webcam and you have the option to enable or disable the audio recording option.
However, you can only create 90-second screen recordings with the free version of the CloudApp and you cannot set resolution or frame rate of the recording. That’s why you need to upgrade to the Pro version if you want to use it to record live streams on YouTube. The Pro subscription model also grants you access to basic video editing tools and a variety of file sharing options. In addition, CloudApp lets you create and annotate still images and GIFs, which makes it a great option for digital marketers.
6. Techsmith Camtasia
Price: Free trial, $269.05 one-time fee
Compatibility: Windows, macOS
You don’t need years of video editing experience to start a new screen recording session in Camtasia. In fact, you just have to click on the Record button that is located in the software’s tool panel and then customize the settings.
Camtasia lets you choose if you want to record the full screen or just a selected portion of the screen or decide if you want to switch the webcam or the microphone off. You should make sure that the System Audio feature is enabled in order to record the sound of the live stream you’re sharing on YouTube. Pausing or stopping a screencasting session requires you to either click on the appropriate buttons or use the keyboard-based hotkeys. After you are done recording a live stream you can edit the footage using Camtasia’s video editing tools.
7. ScreenRec
Price: Free
Compatibility: Windows, macOS, Linux
Recording any live stream or TV show you play on your computer with ScreenRec is a straightforward process that can be completed in just a few clicks. Simply drag the mouse cursor over the area you want to record, then hit the Record button when you are ready and ScreenRec will start capturing the computer screen.
Once the screencasting session is completed you will get a sharable link that can be embedded to a website or used to save an MP4 file on your hard drive. Furthermore, ScreenRec is equipped with analytics tools that show you how many views your videos attracted or for how long each visitor watched them. All of these features make ScreenRec an excellent option for anyone who wants to record a live stream on YouTube or any other on-screen activity.
8. Flashback Express
Price: Free
Compatibility: Windows
Flashback Express is a simple screen recorder that lets you create high-res videos effortlessly. Setting up a new screencasting session requires you to just specify the area of the screen you want to record, choose whether or not you want to record the webcam feed and hit the Record button.
There are no restrictions in terms of the duration of screen recordings you can make with Flashback Express and the software doesn’t watermark the video you create.
However, you can only save the files in MP4, AVI, or WMW formats and you cannot adjust the video’s frame rate or resolution. What’s more, editing videos or applying effects with Flashback Express isn’t possible and you must upgrade to FlashBack Pro if you want to edit the live streams you broadcast on YouTube.
This piece of software is user friendly, but it doesn’t have as many features as other products on the market. Having said that, it is still an excellent tool that will help you live stream gameplay easily. Although it doesn’t come with built-in video editing software, it is possible to download another program to do this for you (i.e. Filmora). Flashback Express has the ability to record through your headset or microphone as well.
9. VLC
Price: Free
Compatibility: macOS, Linux, Windows
This is an iconic media player that became famous for its versatility and support for nearly all video file formats. Besides being one of the best media players ever created, VLC is also equipped with screen recording and video editing tools.
In order to start a new screencasting session, you will have to go to the Media menu and then select the Open Capture Device option. Once the new window pops up on the screen you should change the Capture Mode to Desktop and then adjust the frame rate in accordance with your needs.
Click on the Play button, and then hit the Record button after the screen recording window appears on the screen. You can only record the entire screen with VLC, since customizing the recording area isn’t an option, and all your files will be captured in the RAW format which means that you may have to resize them before you upload them to YouTube.
10. Screencast-o-matic
Price: Free, pricing options start at $1.65 per month
Compatibility: macOS, Windows
As its name suggests, this software product makes the screen recording process almost automatic. You can choose if you want to record an entire screen or just a window you selected. In addition, Screencast-o-matic lets you record the desktop and webcam footage at the same time, and you can even zoom in while the screencasting session is still in progress.
The free version of the software offers only a basic set of features that doesn’t include the option to record system audio. This means that you have to opt for one of the available subscription models if you want to record your live streams on YouTube with Screencast-o-matic. What’s more, you will be to create videos that are longer than 15 minutes, create recordings without watermarks or add music to your recordings if you opt for Deluxe or Premiere pricing options.
11. QuickTime Player
Price: Free
Compatibility: macOS, Windows
Mac users who want to record content that is broadcasted via YouTube Live can do so without having to install a third-party app. Apple ceased the support for the Windows-based version of QuickTime Player in 2016 and PC users can only capture their screens with this software if they have some of its earlier versions.
In order to start a new screen recording session in QuickTime Player, you just have to go to the File menu and select the New Screen Recording option. The Screen Recording window where you can choose if you want to record audio or show mouse click in the recording will pop up on the screen. QuickTime Player lets you choose if you want to capture the entire screen or just a portion of it, and you can click on the Record button to start a new screencasting session. In order to save a video file you created, you just have to go to the File menu and pick the Save option.
How to Record a YouTube Live Stream with Filmora
Recording a YouTube Live stream with Filmora is easy even if you never went through this process before. You can set up a new screencasting session in just a few easy steps that won’t take more than a few moments to complete. Here’s what you need to do:
Step 1: Launch Filmora and create a new project. Go to the Media tab once the video editor’s main window loads and click on the Record drop-down menu that is located next to the Import drop-down menu.
Choose the Record PC Screen option and then proceed to customize the settings for your screencasting session.

Step 2: Click on the Rectangular icon in the upper left corner of the Wondershare Filmora Scrn window and choose either Full Screen, Custom, or Target Window option, depending on how you want to record a YouTube Live stream to define the area of the screen that is going to be recorded.
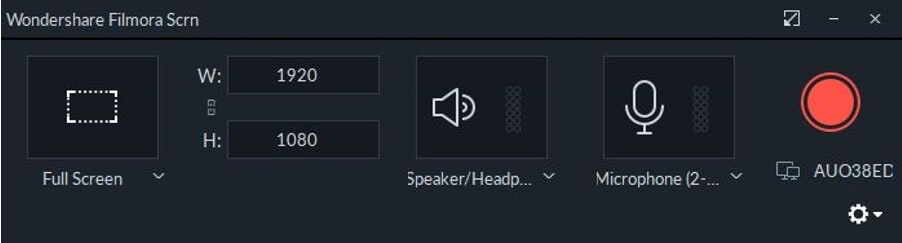
You can then proceed to insert the resolution your screen recording is going to have, and choose if you want to record system audio and sound from an external microphone.
Step 3: Click on the Gear icon below the Record button to gain access to additional settings, and then proceed to set the frame rate, adjust the video’s quality or activate the Show Mouse Clicks in Recording option.
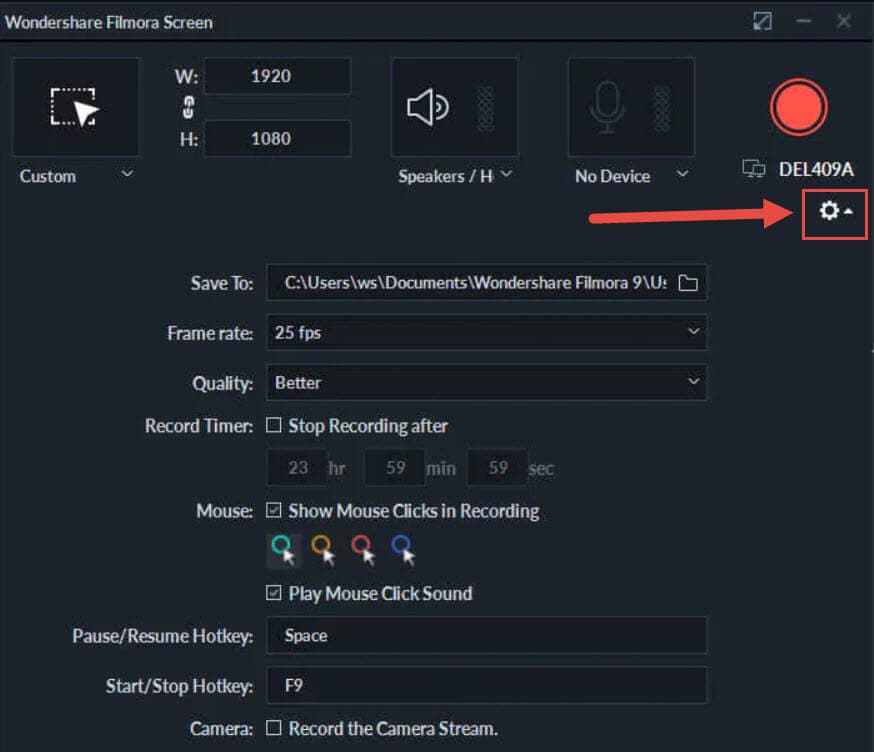
Make sure that the checkbox next to the Record the Camera Stream is marked if you want to record webcam feed and computer desktop at the same time.
Step 4: Press the red Record button in the upper right corner of the window and jump to the live stream. Once the broadcast is completed, you should click on the Stop button and use Filmora’s editing tools to remove all imperfections from the recording.
Filmora allows you to export all of your projects directly to your YouTube channel immediately after the rendering process is completed.
Frequently Asked Questions about YouTube Live Screen Recorders
1. Does YouTube Save Live Videos?
Stream Now, Mobile, Webcam, and Events streams can be stored automatically for 12 hours after they end. You can access all of your live streams by clicking on the Videos menu in the YouTube Studio and selecting the Live option and then change the Privacy setting in the Visibility menu.
2. How to use YouTube to Archive a Live Stream?
Once the live stream ends, you should go to the Dashboard and click on the Live feature, and then choose the Stream option. Check the Make Archive Unlisted When Complete checkbox and the live stream video will be saved accordingly.
Richard Bennett
Richard Bennett is a writer and a lover of all things video.
Follow @Richard Bennett
Richard Bennett
Oct 26, 2023• Proven solutions
The global pandemic has changed the way we live for the time being, and right now, we cannot attend events in the same way we did at the beginning of the year.
A growing number of cultural organizations, businesses, and influential YouTubers are turning towards YouTube’s Live feature because it provides a simple way of broadcasting different types of content in real-time. YouTube Live is by no means a new option, since the platform first introduced live streaming features in 2008, and some twelve years later, the feature has never been more popular.
However, the live streams you broadcast on YouTube are stored for just a brief period of time, which means you have to search for alternative methods of saving them. That’s why in this article we are going to take you through the best YouTube Live screen recorders you can use to capture the video content you are sharing with your followers.
Note: We resolutely oppose all forms of copyright-infringing downloads. This tutorial is only for downloading YouTube videos/audio materials from your own channel.
Top 10+ YouTube Live Screen Recorders
The maximum resolution in which you can record computer screen , audio recording options, or customization of the recording area are some of the most important features you need to consider while choosing a YouTube Live screen recorder.
We have selected some of the best YouTube Live screen recorders that enable you to do much more than just record live streams. So, let’s take a look at what they have to offer.
1. OBS Studio
Price: Free
Compatibility: Windows, Linux, macOS
The vast majority of live streams you can find on Twitch and YouTube are made with OBS Studio, but besides broadcasting videos, the software also gives you access to screencasting tools. This means that you can specify the area of the screen you want to record, choose the recording’s resolution and frame rate, or adjust the audio recording options.
OBS Studio is the best free, open-source screen recording program you can download. You shouldn’t use a software just because it’s free, but OBS Studio is also an extremely versatile tool. You can both record and stream in high definition and it comes with the ability to record either through your webcam or through your screen. It records directly through the graphics card , which means it can capture games even when in full-screen mode whereas a lot of other screen-recording software forces you to play games in windowed mode. The high quality can be seen easily in whatever you choose to broadcast.
OBS Studio allows you to record videos from a variety of sources, which makes it a perfect option for capturing the content you share through YouTube Live since you can select a browser window you want to capture in just a few clicks. What’s more, this open-source software is equipped with basic video editing tools, which enables you to preview the video you recorded before publishing it, apply transitions between cuts, or perform basic color correction.
Check the detailed guide to How to Record with OBS .
2. XSplit
Price: $24.95 for a three-month license
Compatibility: Windows
This is yet another broadcasting software that is equipped with powerful screen recording tools. Setting up a new screencasting session with XSplit is a simple and intuitive process that is not going to take much more than a few moments of your time.
All you need to do is define a workspace, then pick the preferred resolution and frame rate. The software allows you to capture screens in 4K resolution and at 60 fps, but it also offers a variety of resolution and frame rate options so that you can choose the one that best fits your needs. Furthermore, you can record the computer audio, which enables you to capture the live stream’s audio in excellent quality. Besides YouTube Live, XSplit can be used with Zoom , Skype, Google Hangouts, and numerous other live streaming and video calling apps.
3. Filmora
Price: Free, pricing plans start at $49.99/year
Compatibility: macOS, Windows
If you are looking for a screen recorder that is stacked with powerful video editing features, then Filmora is a great option for you. Customizing a YouTube Live or any other screencasting session with this video editing software is easy, and you can choose the resolution, frame rate, or even if you want to show mouse clicks in the recording.
Capturing the webcam feed and the computer’s screen simultaneously is also an option, while you can also decide whether or not you want to record audio from a microphone, computer audio, or both at the same time.
What’s more Filmora lets you set up the maximum duration of a screen recording and you start, pause, resume or stop a screen recording session by using hotkeys. Once you are done recording the live stream you shared on YouTube, you can edit the footage you created before uploading it to your YouTube channel.
4. Wondershare DemoCreator
Compatibility: Windows
Price: Start from $9.99
DemoCreator is a recorder that focuses its overall user experience. It is able to easily record high-quality videos at up to 120 FPS (60 FPS for Mac) and allows you to simultaneously record both your screen and webcam. This software is incredibly user friendly and makes for an easy experience for new streamers. The dual recording makes it great for gamers who are also looking to film their reactions.
5. CloudApp
Price: Free, $10 per month for an individual user
Compatibility: Windows, macOS, Linux, Chrome
Starting a new screen capturing session with the CloudApp requires you to just specify the portion of the screen you want to capture and hit the record button. Moreover, you can choose if you want to record with or without a webcam and you have the option to enable or disable the audio recording option.
However, you can only create 90-second screen recordings with the free version of the CloudApp and you cannot set resolution or frame rate of the recording. That’s why you need to upgrade to the Pro version if you want to use it to record live streams on YouTube. The Pro subscription model also grants you access to basic video editing tools and a variety of file sharing options. In addition, CloudApp lets you create and annotate still images and GIFs, which makes it a great option for digital marketers.
6. Techsmith Camtasia
Price: Free trial, $269.05 one-time fee
Compatibility: Windows, macOS
You don’t need years of video editing experience to start a new screen recording session in Camtasia. In fact, you just have to click on the Record button that is located in the software’s tool panel and then customize the settings.
Camtasia lets you choose if you want to record the full screen or just a selected portion of the screen or decide if you want to switch the webcam or the microphone off. You should make sure that the System Audio feature is enabled in order to record the sound of the live stream you’re sharing on YouTube. Pausing or stopping a screencasting session requires you to either click on the appropriate buttons or use the keyboard-based hotkeys. After you are done recording a live stream you can edit the footage using Camtasia’s video editing tools.
7. ScreenRec
Price: Free
Compatibility: Windows, macOS, Linux
Recording any live stream or TV show you play on your computer with ScreenRec is a straightforward process that can be completed in just a few clicks. Simply drag the mouse cursor over the area you want to record, then hit the Record button when you are ready and ScreenRec will start capturing the computer screen.
Once the screencasting session is completed you will get a sharable link that can be embedded to a website or used to save an MP4 file on your hard drive. Furthermore, ScreenRec is equipped with analytics tools that show you how many views your videos attracted or for how long each visitor watched them. All of these features make ScreenRec an excellent option for anyone who wants to record a live stream on YouTube or any other on-screen activity.
8. Flashback Express
Price: Free
Compatibility: Windows
Flashback Express is a simple screen recorder that lets you create high-res videos effortlessly. Setting up a new screencasting session requires you to just specify the area of the screen you want to record, choose whether or not you want to record the webcam feed and hit the Record button.
There are no restrictions in terms of the duration of screen recordings you can make with Flashback Express and the software doesn’t watermark the video you create.
However, you can only save the files in MP4, AVI, or WMW formats and you cannot adjust the video’s frame rate or resolution. What’s more, editing videos or applying effects with Flashback Express isn’t possible and you must upgrade to FlashBack Pro if you want to edit the live streams you broadcast on YouTube.
This piece of software is user friendly, but it doesn’t have as many features as other products on the market. Having said that, it is still an excellent tool that will help you live stream gameplay easily. Although it doesn’t come with built-in video editing software, it is possible to download another program to do this for you (i.e. Filmora). Flashback Express has the ability to record through your headset or microphone as well.
9. VLC
Price: Free
Compatibility: macOS, Linux, Windows
This is an iconic media player that became famous for its versatility and support for nearly all video file formats. Besides being one of the best media players ever created, VLC is also equipped with screen recording and video editing tools.
In order to start a new screencasting session, you will have to go to the Media menu and then select the Open Capture Device option. Once the new window pops up on the screen you should change the Capture Mode to Desktop and then adjust the frame rate in accordance with your needs.
Click on the Play button, and then hit the Record button after the screen recording window appears on the screen. You can only record the entire screen with VLC, since customizing the recording area isn’t an option, and all your files will be captured in the RAW format which means that you may have to resize them before you upload them to YouTube.
10. Screencast-o-matic
Price: Free, pricing options start at $1.65 per month
Compatibility: macOS, Windows
As its name suggests, this software product makes the screen recording process almost automatic. You can choose if you want to record an entire screen or just a window you selected. In addition, Screencast-o-matic lets you record the desktop and webcam footage at the same time, and you can even zoom in while the screencasting session is still in progress.
The free version of the software offers only a basic set of features that doesn’t include the option to record system audio. This means that you have to opt for one of the available subscription models if you want to record your live streams on YouTube with Screencast-o-matic. What’s more, you will be to create videos that are longer than 15 minutes, create recordings without watermarks or add music to your recordings if you opt for Deluxe or Premiere pricing options.
11. QuickTime Player
Price: Free
Compatibility: macOS, Windows
Mac users who want to record content that is broadcasted via YouTube Live can do so without having to install a third-party app. Apple ceased the support for the Windows-based version of QuickTime Player in 2016 and PC users can only capture their screens with this software if they have some of its earlier versions.
In order to start a new screen recording session in QuickTime Player, you just have to go to the File menu and select the New Screen Recording option. The Screen Recording window where you can choose if you want to record audio or show mouse click in the recording will pop up on the screen. QuickTime Player lets you choose if you want to capture the entire screen or just a portion of it, and you can click on the Record button to start a new screencasting session. In order to save a video file you created, you just have to go to the File menu and pick the Save option.
How to Record a YouTube Live Stream with Filmora
Recording a YouTube Live stream with Filmora is easy even if you never went through this process before. You can set up a new screencasting session in just a few easy steps that won’t take more than a few moments to complete. Here’s what you need to do:
Step 1: Launch Filmora and create a new project. Go to the Media tab once the video editor’s main window loads and click on the Record drop-down menu that is located next to the Import drop-down menu.
Choose the Record PC Screen option and then proceed to customize the settings for your screencasting session.
Step 2: Click on the Rectangular icon in the upper left corner of the Wondershare Filmora Scrn window and choose either Full Screen, Custom, or Target Window option, depending on how you want to record a YouTube Live stream to define the area of the screen that is going to be recorded.
You can then proceed to insert the resolution your screen recording is going to have, and choose if you want to record system audio and sound from an external microphone.
Step 3: Click on the Gear icon below the Record button to gain access to additional settings, and then proceed to set the frame rate, adjust the video’s quality or activate the Show Mouse Clicks in Recording option.
Make sure that the checkbox next to the Record the Camera Stream is marked if you want to record webcam feed and computer desktop at the same time.
Step 4: Press the red Record button in the upper right corner of the window and jump to the live stream. Once the broadcast is completed, you should click on the Stop button and use Filmora’s editing tools to remove all imperfections from the recording.
Filmora allows you to export all of your projects directly to your YouTube channel immediately after the rendering process is completed.
Frequently Asked Questions about YouTube Live Screen Recorders
1. Does YouTube Save Live Videos?
Stream Now, Mobile, Webcam, and Events streams can be stored automatically for 12 hours after they end. You can access all of your live streams by clicking on the Videos menu in the YouTube Studio and selecting the Live option and then change the Privacy setting in the Visibility menu.
2. How to use YouTube to Archive a Live Stream?
Once the live stream ends, you should go to the Dashboard and click on the Live feature, and then choose the Stream option. Check the Make Archive Unlisted When Complete checkbox and the live stream video will be saved accordingly.
Richard Bennett
Richard Bennett is a writer and a lover of all things video.
Follow @Richard Bennett
- Title: "In 2024, Fast-Track To 1,000 Fans Through Captivating Content"
- Author: Joseph
- Created at : 2024-05-31 13:48:54
- Updated at : 2024-06-01 13:48:54
- Link: https://youtube-stream.techidaily.com/in-2024-fast-track-to-1000-fans-through-captivating-content/
- License: This work is licensed under CC BY-NC-SA 4.0.
