
![How to Rip Audio From YouTube in 3 Ways [Free and Safe] for 2024](https://www.lifewire.com/thmb/R3lz9sqjFIJ8bsy-_L1OGfmqrMI=/400x300/filters:no_upscale():max_bytes(150000):strip_icc()/tpmslightcomeson-59daaa4a68e1a20010dc0c97.jpg)
How to Rip Audio From YouTube in 3 Ways [Free and Safe] for 2024
How to Rip Audio From YouTube in 3 Ways [Free and Safe]
How to Rip Audio from YouTube in 3 Ways [Free and Safe]

Shanoon Cox
Mar 27, 2024• Proven solutions
Top lectures, top debates, and top music are present on YouTube. But watching them is time-consuming. This is where people want to rip audio from YouTube videos. The ability to extract audio from YouTube will allow them to listen to these audios anywhere, anytime.
Many online websites are famous for extracting audio from YouTubevideos. They let you choose the available audio formats like MP3, WAV, etc. Then, you can download the converted file on your device. And the best part is that it is completely free.
Here, we will show you 3 ways of how to rip audio from YouTubeusing ‘free and secure’ websites:
- Method 1: Rip Audio from YouTube Online with Ytmp3
- Method 2: Extract Audio from YouTube Using Desktop Software
- Method 3: Record YouTube Screen and Extract Audio from YouTube - [Video Tutorial]
- A Legal Warning for Ripping Audio from YouTube
- Bonus: How to Edit the Audio to Your Own Video
For Win 7 or later (64-bit)
 Secure Download
For macOS 10.14 or later
Secure Download
Note: We resolutely oppose all forms of copyright-infringing downloads. This tutorial is only for downloading YouTube videos/audio materials from your own channel.
Method 1: Rip Audio from YouTube Online with Ytmp3
Another easy program to rip audio from YouTube is Ytmp3. This tool is ‘free and safe’ and easy to use. You can convert YouTube videos into mp3 and mp4 formats. A simple step-by-step guide is provided for your convenience:
Step 1: Copy YouTube video URL and Paste into Ytmp3
Firstly, copy the URL of the YouTube video you wish to convert. Then, go to the Ytmp3 website and paste the URL into the box shown on the home page.
Step 2: Choose the format and convert
Secondly, you can choose the available formats. The website offers two formats; mp3 (audio) and mp4 (video). As you want to rip audio from YouTube, choose the mp3 format. Afterward, click the convert button to start the process.
Step 3: Download the converted file
Lastly, you can click on the Download or Dropbox button. Clicking on the button will get your file downloaded. Additionally, you can choose to convert more. Otherwise, you can access the downloaded file.
Method 2: Extract Audio from YouTube Using Desktop Software
Sometimes you watch a YouTube video and happen to like the audio but not the video. To just listen to the audio in the video, you need torip audio from the YouTube video. For this purpose, the 4K Video Downloader is the best desktop software for ripping audios. The software can extract audio from YouTube videos and convert it into an mp3 file. This software is available both free and paid. A step-by-step guide is provided for your convenience:
Step 1: Launch 4K Video Downloader and paste the URL
Firstly, launch the software. Then, copy the YouTube URL. Now, click the Paste Link option on the top left corner. Then, a pop-up will appear where you have to select Extract Audiooption.
Step 2: Choose the quality
After that, you have to choose the quality for the to-be-extracted file.
Step 3: Choose the format and extract
Lastly, choose the format (MP3, M4A, OGG) of your file. Afterward, hit the Extract button to extract audio from the YouTube video. After the process is complete, you can access the file.
Method 3: Record YouTube Screen and Extract Audio from YouTube
Here is another way to extract audio files from any videos included YouTube.
Step 1: First Download Filmora Video Editor from the button below and use the ‘Screen Recorder‘ feature to record the YouTube video that you want to rip to audio.
Step 2: Import the recorded video to Filmora and right click on the video track, select ‘Detach Audio‘ to extract audio track. Then choose the audio track and click the ‘Export‘ button to save ripped audio files.
Here are more features of Filmora Video Editor:
- Edit screen recorded video and audio with various tools.
- Record screen with high quality.
- Export video and audio with multiple formats.
- Offers cool effects, filters and stickers to make your video professional.
A Legal Warning for Ripping Audio from YouTube
Is the downloading of YouTube videos, including ripping audio from YouTube videos, legal? Here, we’ll have a brief discussion regarding the legality of downloading and converting YouTube videos.
According to YouTube’s Terms of Service , it is completely illegal to download, convert, or share the video without getting the appropriate permission from the owner.
However, there are some types of videos that are legal to download, and you can extract audio from YouTube videos falling into these categories:
- Public Domain: These videos’ copyright is either expired or abandoned. So, there is no owner, and the public can use the video for any purpose.
- Creative Commons: These videos are owned by the artists, but they have allowed the public to reproduce and share the content.
- Copyleft: These videos are granted free rights to change, share, and reproduce as long as the same rights apply to derivative content.
Bonus: How to Edit the Audio to Your Own Video
Usually, the audio of your video is not clear. Sometimes the background music is irritating, and you want to replace it. In short, the point is to edit and enhance the audio track of your video. All these changes can be achieved by using Filmora.
Wondershare Filmora is a video editing tool equipped with many features. Along with video editing options, this tool is perfect for audio editing. This software allows you to trim, add effects, or replace the audio track of your video. A simple step-by-step guide is provided for your convenience:
Step 1: Import the media

Firstly, after downloading and installing the software. Click on Files, then select import media files.
Step 2: Add Audio from the Audio Tab

Then, click the Audio tab to add audio or background music to your video.
Step 3: Set the Speed and Duration

To set the speed and the duration, right-click on the audio timeline or press CTRL+R. Now you can modify the settings.
Step 4: Adjusting the audio

The next step is to adjust the audio setting by double-clicking on the audio timeline. You can modify Pitch, Fade in/Fade out, etc.
Step 5: Add your own voice via Voiceover
You can add your own voice too. Just click on the voiceover icon on the right side to record your audio.
Step 6: Export the media
Lastly, click on the Export button to save your project where you want.
![]()
A cross-platform for making videos anywhere for all creators

Why your video editing isn’t good enough? How about some creative inspo?
- 100 Million+ Users
- 150+ Countries and Regions
- 4 Million+ Social Media Followers
- 5 Million+ Stock Media for Use
* Secure Download

Shanoon Cox
Shanoon Cox is a writer and a lover of all things video.
Follow @Shanoon Cox
Shanoon Cox
Mar 27, 2024• Proven solutions
Top lectures, top debates, and top music are present on YouTube. But watching them is time-consuming. This is where people want to rip audio from YouTube videos. The ability to extract audio from YouTube will allow them to listen to these audios anywhere, anytime.
Many online websites are famous for extracting audio from YouTubevideos. They let you choose the available audio formats like MP3, WAV, etc. Then, you can download the converted file on your device. And the best part is that it is completely free.
Here, we will show you 3 ways of how to rip audio from YouTubeusing ‘free and secure’ websites:
- Method 1: Rip Audio from YouTube Online with Ytmp3
- Method 2: Extract Audio from YouTube Using Desktop Software
- Method 3: Record YouTube Screen and Extract Audio from YouTube - [Video Tutorial]
- A Legal Warning for Ripping Audio from YouTube
- Bonus: How to Edit the Audio to Your Own Video
For Win 7 or later (64-bit)
Secure Download
For macOS 10.14 or later
Secure Download
Note: We resolutely oppose all forms of copyright-infringing downloads. This tutorial is only for downloading YouTube videos/audio materials from your own channel.
Method 1: Rip Audio from YouTube Online with Ytmp3
Another easy program to rip audio from YouTube is Ytmp3. This tool is ‘free and safe’ and easy to use. You can convert YouTube videos into mp3 and mp4 formats. A simple step-by-step guide is provided for your convenience:
Step 1: Copy YouTube video URL and Paste into Ytmp3
Firstly, copy the URL of the YouTube video you wish to convert. Then, go to the Ytmp3 website and paste the URL into the box shown on the home page.
Step 2: Choose the format and convert
Secondly, you can choose the available formats. The website offers two formats; mp3 (audio) and mp4 (video). As you want to rip audio from YouTube, choose the mp3 format. Afterward, click the convert button to start the process.
Step 3: Download the converted file
Lastly, you can click on the Download or Dropbox button. Clicking on the button will get your file downloaded. Additionally, you can choose to convert more. Otherwise, you can access the downloaded file.
Method 2: Extract Audio from YouTube Using Desktop Software
Sometimes you watch a YouTube video and happen to like the audio but not the video. To just listen to the audio in the video, you need torip audio from the YouTube video. For this purpose, the 4K Video Downloader is the best desktop software for ripping audios. The software can extract audio from YouTube videos and convert it into an mp3 file. This software is available both free and paid. A step-by-step guide is provided for your convenience:
Step 1: Launch 4K Video Downloader and paste the URL
Firstly, launch the software. Then, copy the YouTube URL. Now, click the Paste Link option on the top left corner. Then, a pop-up will appear where you have to select Extract Audiooption.
Step 2: Choose the quality
After that, you have to choose the quality for the to-be-extracted file.
Step 3: Choose the format and extract
Lastly, choose the format (MP3, M4A, OGG) of your file. Afterward, hit the Extract button to extract audio from the YouTube video. After the process is complete, you can access the file.
Method 3: Record YouTube Screen and Extract Audio from YouTube
Here is another way to extract audio files from any videos included YouTube.
Step 1: First Download Filmora Video Editor from the button below and use the ‘Screen Recorder‘ feature to record the YouTube video that you want to rip to audio.
Step 2: Import the recorded video to Filmora and right click on the video track, select ‘Detach Audio‘ to extract audio track. Then choose the audio track and click the ‘Export‘ button to save ripped audio files.
Here are more features of Filmora Video Editor:
- Edit screen recorded video and audio with various tools.
- Record screen with high quality.
- Export video and audio with multiple formats.
- Offers cool effects, filters and stickers to make your video professional.
A Legal Warning for Ripping Audio from YouTube
Is the downloading of YouTube videos, including ripping audio from YouTube videos, legal? Here, we’ll have a brief discussion regarding the legality of downloading and converting YouTube videos.
According to YouTube’s Terms of Service , it is completely illegal to download, convert, or share the video without getting the appropriate permission from the owner.
However, there are some types of videos that are legal to download, and you can extract audio from YouTube videos falling into these categories:
- Public Domain: These videos’ copyright is either expired or abandoned. So, there is no owner, and the public can use the video for any purpose.
- Creative Commons: These videos are owned by the artists, but they have allowed the public to reproduce and share the content.
- Copyleft: These videos are granted free rights to change, share, and reproduce as long as the same rights apply to derivative content.
Bonus: How to Edit the Audio to Your Own Video
Usually, the audio of your video is not clear. Sometimes the background music is irritating, and you want to replace it. In short, the point is to edit and enhance the audio track of your video. All these changes can be achieved by using Filmora.
Wondershare Filmora is a video editing tool equipped with many features. Along with video editing options, this tool is perfect for audio editing. This software allows you to trim, add effects, or replace the audio track of your video. A simple step-by-step guide is provided for your convenience:
Step 1: Import the media
Firstly, after downloading and installing the software. Click on Files, then select import media files.
Step 2: Add Audio from the Audio Tab
Then, click the Audio tab to add audio or background music to your video.
Step 3: Set the Speed and Duration
To set the speed and the duration, right-click on the audio timeline or press CTRL+R. Now you can modify the settings.
Step 4: Adjusting the audio
The next step is to adjust the audio setting by double-clicking on the audio timeline. You can modify Pitch, Fade in/Fade out, etc.
Step 5: Add your own voice via Voiceover
You can add your own voice too. Just click on the voiceover icon on the right side to record your audio.
Step 6: Export the media
Lastly, click on the Export button to save your project where you want.
![]()
A cross-platform for making videos anywhere for all creators
Why your video editing isn’t good enough? How about some creative inspo?
- 100 Million+ Users
- 150+ Countries and Regions
- 4 Million+ Social Media Followers
- 5 Million+ Stock Media for Use
* Secure Download
Shanoon Cox
Shanoon Cox is a writer and a lover of all things video.
Follow @Shanoon Cox
Beginner’s Tutorial: Setting Up Your YouTube Presence
How to Create a YouTube Account

Richard Bennett
Mar 27, 2024• Proven solutions
People create YouTube accounts for a lot of different reasons. Some YouTubers just love making videos and created their channels so they would have somewhere to post their work. Others have strong opinions they need a platform to share. There are a lot of people on YouTube whose main interest is in a separate website or other social media page, but they use their YouTube channels to help generate traffic. If you are considering starting your own YouTube channel then you should take a second to consider why you want to, since this will have an impact on what kind of videos you make. Your reasons for wanting to make a YouTube account do not have to be very elaborate. Maybe you just think it will be fun. Good news; it will be!
Once you know for sure that you want to create a YouTube account, and also know why you want to do it, you have already started building your channel. There are still a few important things to consider, though. This article will walk you through signing up for a YouTube account, and give you some tips about starting your channel.
Creating Your YouTube Account in 6 Steps
1. Go to YouTube.com and look at the top right corner of your screen. There will either be a blue Sign In button, or an icon representing you. YouTube accounts and Google accounts are the same, so if you are signed into your Gmail account you are already signed into YouTube as well.
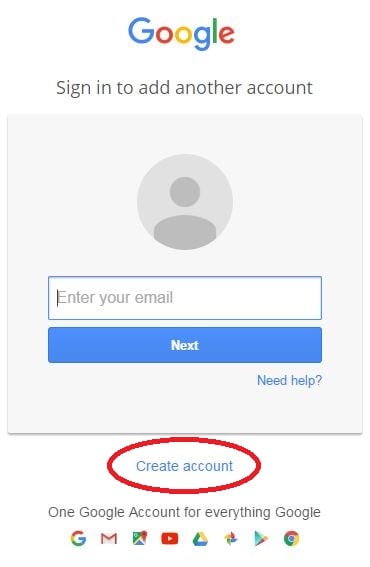
2. If you see a Sign In button, click it. If you see your icon click on that, and in the window that pops up select Add Account. Either way, you will be taken into a sign in screen. Under where it asks for your email address it will say Create Account. Click on Create Account.
3. In the sign up page you will need to put in your name, email address, and mobile phone number as well as some other personal information. Do not enter your current Gmail address. Enter an alternate email you have created for your vlog, or click on I would like a new Gmail address. This will change your page slightly so that the email field becomes Choose a Username.


You will probably need to try a few different usernames before you find one that is not taken.
4. You will have to put in both a first and last name when you create your account, but you can change it to one name later.
5. Your password will need to be at least 8 characters long. Try to use a combination of letters or numbers, and make sure it is not something easily guessable (i.e spouses name).
6. After you finish the form click Next Step and, in the next screen, Continue to YouTube.
Tips on Starting a YouTube Channel
1. Choose a Topic you Love
When choosing a topic for your YouTube channel make sure you pick something you are passionate about. If you already have an interest or hobby which you are always researching and are extremely up-to-date on then that should probably be the theme of your vlog. If you plan to have a channel where people go to learn anything then you will need to be an authority on that topic. Whatever you make videos about it will need to be something you can realistically see yourself putting a lot of time into. If you cannot think of more than a couple ideas for videos on your topic then that is a sign that you need to choose something else to focus on.
You should check to see how much demand there is for videos on your topic. This can be done by googling your topic to see what else is out there. If not many people have addressed your topic yet it probably means that it is not something a lot of people want to know about. However, it could also mean that the people who do want to watch videos like yours have been starved for content. Your channel will flop if you do not love what you are making videos about, so do not choose something just because you think it will be popular. Follow your passion.
2. Check out the Competition
You should look for other vlogs with similar topics to yours not only to gauge how much demand there is for your videos, but to check out the competition. If there are a lot of YouTube channels dedicated to the same topic you want to vlog about then this should not discourage you from going after the same viewers. People who are excited about a topic frequently watch more than one vlog about it. It might not even be correct to think of other vloggers within your genre as ‘the competition’ since you are ultimately part of the same community. You will need to watch these people’s videos as part of keeping yourself informed and will likely become a fan – maybe even a collaborator some day – of theirs.
The main reason you want to look into YouTube channels like yours is because you do not want to be creating content that is overdone and boring. You are tackling the same topic as other people, and may even make some videos on the exact same subjects as others already have. There needs to be something unique about your videos that makes them stand out from what already exists. By looking at what other people are already doing you will be able to come up with ideas for what you can do differently.
3. Choose a Great Name
Picking a great name for your YouTube account can take a lot of effort. Chances are you will not want to use your own name, at least not in full. Although your real name can work for if you are a lifestyle vlogger in most cases you will have a more specific topic that will need to be addressed in your channel’s name. Try out your name or a nickname for yourself in combination with different words associated with the topic of your vlog. Aim to create a name that is catchy and easy to remember.
Chances are a few of your first couple picks will be unavailable. YouTube is a popular site and a lot of the best names are taken. The last thing you should ever do while naming your YouTube channel is add numbers or letters to the end of a name you like because it is taken. Names with numbers at the end are hard for viewers to remember and find again. Choosing a weak name with a trail of numbers or letters after it will make it very hard for your channel to grow. Brainstorm a long list of potential names that are actually good and keep on trying them out until you find one that’s available.
For more information on naming your YouTube channel read our post ‘How To Pick a Name for Your YouTube Channel’.
4. Make a Schedule
Maintaining a YouTube channel is a big time commitment. You need to post videos regularly or people will forget about you, and videos can take a long time to make. When you are first starting your vlog you should make yourself a schedule for when you want to upload videos. Having a schedule will help you budget your time and ensure that your vlog never gets in the way of the rest of your life.
Having a posting schedule will also help you grow your channel. Viewers like it when they know when to expect new content from vloggers they like. They are more likely to subscribe and tune in for every post if they are given a chance to anticipate when your new entry is coming.
5. Take Inventory
Think about what equipment you have that you can use for your YouTube channel. The only thing you absolutely cannot get by without is a decent camera, but there are other types of equipment that it is a good idea to have too. Lights, a tripod, an external microphone – these are all things that a lot of YouTubers find they need in order to produce great videos. If you do not have these things, or money you are prepared to invest in them, then you will need to find ways around them until your situation changes. For more information check out our post ‘The Best YouTube Equipment: What You Need to Start Your Channel’.
Read More to Get : Best Video Websites Like YouTube >>
Richard Bennett
Richard Bennett is a writer and a lover of all things video.
Follow @Richard Bennett
Richard Bennett
Mar 27, 2024• Proven solutions
People create YouTube accounts for a lot of different reasons. Some YouTubers just love making videos and created their channels so they would have somewhere to post their work. Others have strong opinions they need a platform to share. There are a lot of people on YouTube whose main interest is in a separate website or other social media page, but they use their YouTube channels to help generate traffic. If you are considering starting your own YouTube channel then you should take a second to consider why you want to, since this will have an impact on what kind of videos you make. Your reasons for wanting to make a YouTube account do not have to be very elaborate. Maybe you just think it will be fun. Good news; it will be!
Once you know for sure that you want to create a YouTube account, and also know why you want to do it, you have already started building your channel. There are still a few important things to consider, though. This article will walk you through signing up for a YouTube account, and give you some tips about starting your channel.
Creating Your YouTube Account in 6 Steps
1. Go to YouTube.com and look at the top right corner of your screen. There will either be a blue Sign In button, or an icon representing you. YouTube accounts and Google accounts are the same, so if you are signed into your Gmail account you are already signed into YouTube as well.
2. If you see a Sign In button, click it. If you see your icon click on that, and in the window that pops up select Add Account. Either way, you will be taken into a sign in screen. Under where it asks for your email address it will say Create Account. Click on Create Account.
3. In the sign up page you will need to put in your name, email address, and mobile phone number as well as some other personal information. Do not enter your current Gmail address. Enter an alternate email you have created for your vlog, or click on I would like a new Gmail address. This will change your page slightly so that the email field becomes Choose a Username.
You will probably need to try a few different usernames before you find one that is not taken.
4. You will have to put in both a first and last name when you create your account, but you can change it to one name later.
5. Your password will need to be at least 8 characters long. Try to use a combination of letters or numbers, and make sure it is not something easily guessable (i.e spouses name).
6. After you finish the form click Next Step and, in the next screen, Continue to YouTube.
Tips on Starting a YouTube Channel
1. Choose a Topic you Love
When choosing a topic for your YouTube channel make sure you pick something you are passionate about. If you already have an interest or hobby which you are always researching and are extremely up-to-date on then that should probably be the theme of your vlog. If you plan to have a channel where people go to learn anything then you will need to be an authority on that topic. Whatever you make videos about it will need to be something you can realistically see yourself putting a lot of time into. If you cannot think of more than a couple ideas for videos on your topic then that is a sign that you need to choose something else to focus on.
You should check to see how much demand there is for videos on your topic. This can be done by googling your topic to see what else is out there. If not many people have addressed your topic yet it probably means that it is not something a lot of people want to know about. However, it could also mean that the people who do want to watch videos like yours have been starved for content. Your channel will flop if you do not love what you are making videos about, so do not choose something just because you think it will be popular. Follow your passion.
2. Check out the Competition
You should look for other vlogs with similar topics to yours not only to gauge how much demand there is for your videos, but to check out the competition. If there are a lot of YouTube channels dedicated to the same topic you want to vlog about then this should not discourage you from going after the same viewers. People who are excited about a topic frequently watch more than one vlog about it. It might not even be correct to think of other vloggers within your genre as ‘the competition’ since you are ultimately part of the same community. You will need to watch these people’s videos as part of keeping yourself informed and will likely become a fan – maybe even a collaborator some day – of theirs.
The main reason you want to look into YouTube channels like yours is because you do not want to be creating content that is overdone and boring. You are tackling the same topic as other people, and may even make some videos on the exact same subjects as others already have. There needs to be something unique about your videos that makes them stand out from what already exists. By looking at what other people are already doing you will be able to come up with ideas for what you can do differently.
3. Choose a Great Name
Picking a great name for your YouTube account can take a lot of effort. Chances are you will not want to use your own name, at least not in full. Although your real name can work for if you are a lifestyle vlogger in most cases you will have a more specific topic that will need to be addressed in your channel’s name. Try out your name or a nickname for yourself in combination with different words associated with the topic of your vlog. Aim to create a name that is catchy and easy to remember.
Chances are a few of your first couple picks will be unavailable. YouTube is a popular site and a lot of the best names are taken. The last thing you should ever do while naming your YouTube channel is add numbers or letters to the end of a name you like because it is taken. Names with numbers at the end are hard for viewers to remember and find again. Choosing a weak name with a trail of numbers or letters after it will make it very hard for your channel to grow. Brainstorm a long list of potential names that are actually good and keep on trying them out until you find one that’s available.
For more information on naming your YouTube channel read our post ‘How To Pick a Name for Your YouTube Channel’.
4. Make a Schedule
Maintaining a YouTube channel is a big time commitment. You need to post videos regularly or people will forget about you, and videos can take a long time to make. When you are first starting your vlog you should make yourself a schedule for when you want to upload videos. Having a schedule will help you budget your time and ensure that your vlog never gets in the way of the rest of your life.
Having a posting schedule will also help you grow your channel. Viewers like it when they know when to expect new content from vloggers they like. They are more likely to subscribe and tune in for every post if they are given a chance to anticipate when your new entry is coming.
5. Take Inventory
Think about what equipment you have that you can use for your YouTube channel. The only thing you absolutely cannot get by without is a decent camera, but there are other types of equipment that it is a good idea to have too. Lights, a tripod, an external microphone – these are all things that a lot of YouTubers find they need in order to produce great videos. If you do not have these things, or money you are prepared to invest in them, then you will need to find ways around them until your situation changes. For more information check out our post ‘The Best YouTube Equipment: What You Need to Start Your Channel’.
Read More to Get : Best Video Websites Like YouTube >>
Richard Bennett
Richard Bennett is a writer and a lover of all things video.
Follow @Richard Bennett
- Title: How to Rip Audio From YouTube in 3 Ways [Free and Safe] for 2024
- Author: Joseph
- Created at : 2024-05-31 13:46:03
- Updated at : 2024-06-01 13:46:03
- Link: https://youtube-stream.techidaily.com/how-to-rip-audio-from-youtube-in-3-ways-free-and-safe-for-2024/
- License: This work is licensed under CC BY-NC-SA 4.0.
