
How to Elevate Your YouTube Video's Popularity Through Persistent CC Licensing for 2024
How to Elevate Your YouTube Video’s Popularity Through Persistent CC Licensing
How to Force YouTube CC to Stay On and Get More Views

Richard Bennett
Oct 26, 2023• Proven solutions
Table of Content:
How YouTube CC Helps You Get More Views?
Benefits of Having YouTube CC Always On
How to Force YouTube CC to Always Turn On?
How to Embed Your Videos with Closed Captions on Your Website
Bonus Tip-Add Subtitles to YouTube Video with Wondershare Filmora
Wondershare Filmora serves as an inevitable video editing software for video lovers. It has a variety of subtitle templates for you to make great creations. Let’s see how to add subtitles to a YouTube video with Wondershare Filmora!


How YouTube CC Helps You to Get More Views?
YouTube CC (Closed Captions) is much capable of bringing more views to your videos.
Why? Because YouTube algorithms prefer to highlight YouTube videos that contain closed captions because such content appears universally acceptable and it helps to boost the experience for viewers. So when your YouTube video has some kind of relevant audio or speech information then it is essential to add closed captions (YouTube CC) to it.
Benefits of Having YouTube CC Always On
YouTube CC can easily bring more viewers to your terminal. But not all users know how to turn it on or bother to turn it on when it can actually help improve the watching experience. So there are few benefits that you can enjoy by having CCs ALWAYS on your videos.
- Closed captions play an important role when you have poor audio quality in your videos. For instance, if your videos did not follow the best audio recording practices , and are affected by background noise or bad audio equipment. In such cases, YouTube subtitles help viewers to understand what is going on videos even if they cannot hear it.
- For those who make videos with a unique accent, discuss something complex, or speaks too fast, turning on the closed captions help your viewers understand explanations and maintain their attention.
- This feature makes videos more accessible and can also appear useful for viewers that are hearing impaired.
How to Force YouTube CC to Always Turn On?
So, as you have gone through several benefits associated with YouTube video closed captions, now it is time to learn the technique to keep them always On.
Go through the steps below to force CCs always on your YouTube videos:
Step 1: Login and click the video in which you wish to add your captions.
Step 2: Click Edit underneath the video
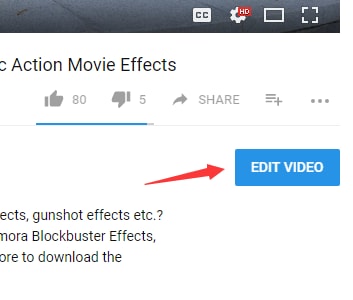
Step 3: Add a specific tag to your content: “yt:cc=on”

Step 4: Click Save Edit
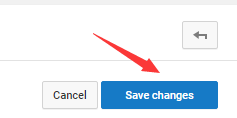
There you go!

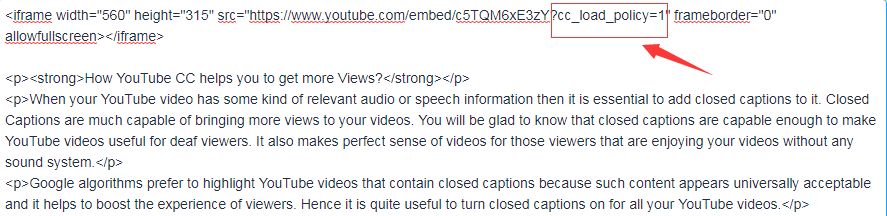
How to Embed your Videos with Closed Captions on your website
Some of you might also want to embed YouTube videos on your website. In this case, also you will need to use closed captions during display.
To do this, write “?cc_load_policy=1” at the end of your video source URL; it will be inside the iframe.
These simple steps will help you to create videos with the most impactful content and this collection will be enjoyed by all viewers on your channel. The Closed Captioned videos are valued higher by Google because they are capable enough to please the viewers throughout the world.
Even though CCs can be a powerful addition to your videos, it’s always important to prioritize audio, and it all starts with a good microphone. Find out what the best microphones are in this blog post: The Best Microphone for All Types of Creators
Richard Bennett
Richard Bennett is a writer and a lover of all things video.
Follow @Richard Bennett
Richard Bennett
Oct 26, 2023• Proven solutions
Table of Content:
How YouTube CC Helps You Get More Views?
Benefits of Having YouTube CC Always On
How to Force YouTube CC to Always Turn On?
How to Embed Your Videos with Closed Captions on Your Website
Bonus Tip-Add Subtitles to YouTube Video with Wondershare Filmora
Wondershare Filmora serves as an inevitable video editing software for video lovers. It has a variety of subtitle templates for you to make great creations. Let’s see how to add subtitles to a YouTube video with Wondershare Filmora!
How YouTube CC Helps You to Get More Views?
YouTube CC (Closed Captions) is much capable of bringing more views to your videos.
Why? Because YouTube algorithms prefer to highlight YouTube videos that contain closed captions because such content appears universally acceptable and it helps to boost the experience for viewers. So when your YouTube video has some kind of relevant audio or speech information then it is essential to add closed captions (YouTube CC) to it.
Benefits of Having YouTube CC Always On
YouTube CC can easily bring more viewers to your terminal. But not all users know how to turn it on or bother to turn it on when it can actually help improve the watching experience. So there are few benefits that you can enjoy by having CCs ALWAYS on your videos.
- Closed captions play an important role when you have poor audio quality in your videos. For instance, if your videos did not follow the best audio recording practices , and are affected by background noise or bad audio equipment. In such cases, YouTube subtitles help viewers to understand what is going on videos even if they cannot hear it.
- For those who make videos with a unique accent, discuss something complex, or speaks too fast, turning on the closed captions help your viewers understand explanations and maintain their attention.
- This feature makes videos more accessible and can also appear useful for viewers that are hearing impaired.
How to Force YouTube CC to Always Turn On?
So, as you have gone through several benefits associated with YouTube video closed captions, now it is time to learn the technique to keep them always On.
Go through the steps below to force CCs always on your YouTube videos:
Step 1: Login and click the video in which you wish to add your captions.
Step 2: Click Edit underneath the video
Step 3: Add a specific tag to your content: “yt:cc=on”
Step 4: Click Save Edit
There you go!
How to Embed your Videos with Closed Captions on your website
Some of you might also want to embed YouTube videos on your website. In this case, also you will need to use closed captions during display.
To do this, write “?cc_load_policy=1” at the end of your video source URL; it will be inside the iframe.
These simple steps will help you to create videos with the most impactful content and this collection will be enjoyed by all viewers on your channel. The Closed Captioned videos are valued higher by Google because they are capable enough to please the viewers throughout the world.
Even though CCs can be a powerful addition to your videos, it’s always important to prioritize audio, and it all starts with a good microphone. Find out what the best microphones are in this blog post: The Best Microphone for All Types of Creators
Richard Bennett
Richard Bennett is a writer and a lover of all things video.
Follow @Richard Bennett
Leveraging FinalCut Pro for High-Quality YouTube Production
How to Edit YouTube Videos in Final Cut Pro
Richard Bennett
Mar 27, 2024• Proven solutions
With its user friendly interface and versatile features, Fincal Cut Pro is definitely one of the best choices for making videos for Mac users. Using it isn’t that hard, but it’s definitely not a walk in the park, so we’ve taken the liberty to provide you with a comprehensive yet concise guide on how to edit YouTube videos with Final Cut Pro.
Even though FCP is good software, there’s no denying that it’s pretty pricy and a little bit complicated for most beginners. Wondershare Filmora for Mac is definitely better alternatives for Final Cut Pro. It’s a lot more user-friendly and requires no previous experience in video editing. With Wondershare Filmora, you can ignite your YouTube videos with over 300 effects like Fashion, Beauty, Block Buster, Travel, etc.
How to Edit YouTube Videos in Final Cut Pro
In this section, we are going to take a quick look at the steps that you need to take in order to properly edit YouTube videos in Final Cut Pro. Without any further ado, let’s take a look.
Step 1: Importing the video clip into FCP
This is, of course, the first thing that you need to do. Regardless of whether the original footage was taken by your smart phone, taken from the Internet or you’ve left it over from some past event that’s long overdue, you can easily import it into the FCP in order to edit it. FCP supports a variety of different formats, so it’s a good idea to try and import the video even if you are not quite sure about its extension. In order to do so, open the program, go to the File button, click on Import and select the file or the folder. This is going to get you to a regular finder window which would enable you to pick the clip that you want to do. If it’s not highlighted or you aren’t able to select it, the software doesn’t support it, and it’s not compatible.

Keep in mind that if you want to import videos which have been published already, you can download them directly from the channel as MP4 files. If you want to store videos from different channels, you can use the Wondershare Video Converter Ultimate in order to get them converted and stored on your computer in a format that is supported by FCP.
Step 2: Edit YouTube Videos in Final Cut Pro
That’s the fun part. There are a few things that you can do with Final Cut Pro, and they are all quite professional.
- First, you can sync an audio track with your video as the DSLR cameras usually have terrible quality of the sound. This is why you want to get the audio recorded separately. The only thing you need to do is select the audio clip and click on the Synchronize Clips, and you are good to go.

- Furthermore, you can do proper color balancing with the program quickly and incredibly easy. Go on Modify and then click on Balance Color and the software is going to take care of the rest on its own.

- You can also create previews when the video ends. In order to do so, you need to import your main clip, select a solid background color and place the preview video above it. You will then be able to trim and edit it conveniently. Adjust the scale and the position and you are good to go. Afterwards, you can also apply annotation on top of the preview.
Step 3: Upload to YouTube from the software directly

This one is rather easy. Here is the sequence that you need to do. Go to File -> Share -> Master File -> Setting -> File -> Share -> YouTube. That’s basically it. Then you need to sign in to your YouTube account and simply click on Next -> Publish and the entire thing is done. That’s all you need to do in order to quickly and conveniently upload your video to YouTube directly from the FCP.
Check this video tutorial to see how YouTube creators edit their YouTubes videos with Final Cut Pro
Richard Bennett
Richard Bennett is a writer and a lover of all things video.
Follow @Richard Bennett
Richard Bennett
Mar 27, 2024• Proven solutions
With its user friendly interface and versatile features, Fincal Cut Pro is definitely one of the best choices for making videos for Mac users. Using it isn’t that hard, but it’s definitely not a walk in the park, so we’ve taken the liberty to provide you with a comprehensive yet concise guide on how to edit YouTube videos with Final Cut Pro.
Even though FCP is good software, there’s no denying that it’s pretty pricy and a little bit complicated for most beginners. Wondershare Filmora for Mac is definitely better alternatives for Final Cut Pro. It’s a lot more user-friendly and requires no previous experience in video editing. With Wondershare Filmora, you can ignite your YouTube videos with over 300 effects like Fashion, Beauty, Block Buster, Travel, etc.
How to Edit YouTube Videos in Final Cut Pro
In this section, we are going to take a quick look at the steps that you need to take in order to properly edit YouTube videos in Final Cut Pro. Without any further ado, let’s take a look.
Step 1: Importing the video clip into FCP
This is, of course, the first thing that you need to do. Regardless of whether the original footage was taken by your smart phone, taken from the Internet or you’ve left it over from some past event that’s long overdue, you can easily import it into the FCP in order to edit it. FCP supports a variety of different formats, so it’s a good idea to try and import the video even if you are not quite sure about its extension. In order to do so, open the program, go to the File button, click on Import and select the file or the folder. This is going to get you to a regular finder window which would enable you to pick the clip that you want to do. If it’s not highlighted or you aren’t able to select it, the software doesn’t support it, and it’s not compatible.
Keep in mind that if you want to import videos which have been published already, you can download them directly from the channel as MP4 files. If you want to store videos from different channels, you can use the Wondershare Video Converter Ultimate in order to get them converted and stored on your computer in a format that is supported by FCP.
Step 2: Edit YouTube Videos in Final Cut Pro
That’s the fun part. There are a few things that you can do with Final Cut Pro, and they are all quite professional.
- First, you can sync an audio track with your video as the DSLR cameras usually have terrible quality of the sound. This is why you want to get the audio recorded separately. The only thing you need to do is select the audio clip and click on the Synchronize Clips, and you are good to go.
- Furthermore, you can do proper color balancing with the program quickly and incredibly easy. Go on Modify and then click on Balance Color and the software is going to take care of the rest on its own.
- You can also create previews when the video ends. In order to do so, you need to import your main clip, select a solid background color and place the preview video above it. You will then be able to trim and edit it conveniently. Adjust the scale and the position and you are good to go. Afterwards, you can also apply annotation on top of the preview.
Step 3: Upload to YouTube from the software directly
This one is rather easy. Here is the sequence that you need to do. Go to File -> Share -> Master File -> Setting -> File -> Share -> YouTube. That’s basically it. Then you need to sign in to your YouTube account and simply click on Next -> Publish and the entire thing is done. That’s all you need to do in order to quickly and conveniently upload your video to YouTube directly from the FCP.
Check this video tutorial to see how YouTube creators edit their YouTubes videos with Final Cut Pro
Richard Bennett
Richard Bennett is a writer and a lover of all things video.
Follow @Richard Bennett
Also read:
- [New] Syncing Scores and Screenplays Top Tunes for Video Unboxing
- 2024 Approved Step-by-Step Tutorial Designing Striking Video Thumbnails for Social Media Success
- 2024 Approved Tweaking Video Rhythms on YouTube (Desktop/Mobile)
- Accelerating Operations Discover the Leading Scheduling Tools for 2024
- Come Convertire I Flussi TS in Formati MP4 Di Alta Qualità Con 4 Strategie Semplici E Efficaci
- Enhance Gaming Experience: Solve Frame Rate Issues, Smooth Out Stutters, Improve Speed
- Exploring the Top 10 Budget-Friendly YouTube Spaces for Artistry
- In 2024, How to Add Text to YouTube Video Before or After Uploading
- In 2024, Tempo Treasure Trove Compiling the Best DJ Visuals Download
- Life360 Learn How Everything Works On Realme Narzo 60 Pro 5G | Dr.fone
- Solo Sound Waves Crafting a Trending Podcast Series
- Unblocked: Strategies for Restoring Your Right to Play Fortnite After an Error
- Title: How to Elevate Your YouTube Video's Popularity Through Persistent CC Licensing for 2024
- Author: Joseph
- Created at : 2024-12-27 16:27:53
- Updated at : 2025-01-03 17:43:20
- Link: https://youtube-stream.techidaily.com/how-to-elevate-your-youtube-videos-popularity-through-persistent-cc-licensing-for-2024/
- License: This work is licensed under CC BY-NC-SA 4.0.