
"Frosty Yet Warm Choosing the Best Winter Backdrops for 2024"
Frosty Yet Warm: Choosing the Best Winter Backdrops
There’s something special about wintertime that makes us all want to get as cozy and as warm as possible. When you’re a YouTube creator, you should definitely take advantage of this desire and use a YouTube background video designed specifically with this in mind.
In this guide, we’ll go over how to get or make such a background and show you five incredible examples you can use now.
YouTube Video Background Creating realistic video scenes at your will is easy to complete with Filmora green screen removal.
Create Video Backgrounds Create Video Backgrounds Learn Green Screen

What Is a YouTube Video Background?
A YouTube video background is a simple image or video that sits in place at the back of your videos. It’s just a simple background that can greatly impact your brand, presence, and style as a creator.
Even something as small as your YouTube video thumbnail background can strongly impact your results.
Obviously, choosing the right custom YouTube background is important. And, now that it’s winter, this requires a special approach.
Why Are Seasonal Backgrounds Effective?
There are several important reasons why a seasonal YouTube video background or photo, and other elements are very effective and engage us more.
The main reasons include:
- Creates a meaningful connection;
- Boosts engagement with fellow winter lovers;
- Builds a better brand;
- Enhances everyone’s mood, especially during the holidays.
So, whenever you can and whenever there is an opportunity, don’t be afraid to use a seasonal YouTube video background download.
Factors to Consider When Choosing a Background for YouTube Videos
Now, before we dive into the examples themselves and the tutorial on how to make the best backgrounds yourself, here are several factors you must consider before proceeding.
Content Relevance
As a video creator, you must ensure to be consistent with your elements. This includes your background tune for YouTube videos. For example, if you’re talking about books in your video, including a bookshelf in the winter background makes all the difference.
Audience Appeal
If you already have an audience, regardless of its size, you should definitely consider what they like and don’t like. You should then leverage this information to create highly appealing content for them and adjust your background scenery accordingly.
Lighting and Visibility
Another thing you must ensure is to keep your background simple and not too distracting. Remember, even though you have the best background for YouTube videos, you still need to realize that it’s not the main focus of the video. It’s just there to make it better.
Personal Branding
If you want to improve your brand identity and get your name known by more people, incorporate your logo, name, or something similar in the background. It will have a small but meaningful impact, and it’s easy to do.
Editing
If you plan to shoot a YouTube live background and not some stock images or videos, then you must make sure it has enough headroom for editing later on. The best option here is to use a green screen background for YouTube videos.
5 Winter YouTube Background Ideas
It’s finally time to have a look at some examples of highly effective and engaging YouTube video backgrounds for the winter season.
Enjoy!
- Snowy Landscape

- Festive Holiday Decor

- Cozy Indoor Settings

- Winter Cityscapes

- Animated Winter Scenes

How to Create or Source Winter Backgrounds
If you want to make your own winter backgrounds or simply edit the ones you have, the most effective way is to use a beginner-friendly video editing platform, such as Filmora .
Free Download For Win 7 or later(64-bit)
Free Download For macOS 10.14 or later
This type of platform has all the necessary tools, templates, and presets for professionals to use but all of it is packed in a very easy-to-use interface that anyone can get the hang of.
Just follow these steps and you’ll have the perfect winter background for YouTube in no time.
Step 1
Download and install the Filmora video editing tool.
Step 2
Run the program and click on “New Project”. No need to create an account for this.

Step 3
Click on “Stock Media” and then type in “winter” in the Search Bar.

Step 4
Select your favorite background clip and drag it down to the Timeline.
That’s it! You won’t believe how many video clips you can use, all of which are extremely high-quality. As a result, you’ll have a professional video for free.
Now, if you want, you can freely edit these backgrounds as you wish. You can mess around with them as much as you want, use various tools to edit, and make the perfect result.
And don’t worry, if you mess up the background and don’t know how to restore it, just delete it from the timeline and drag it again from the Stock Media tab. It will be as good as new.
Once you’re done, simply export it and you’re done.
Integrating Your Background Into Videos
Finally, once you have the perfect YouTube studio background, it’s time to glue it to your video and upload this masterpiece.
In order to do this, you will need to use a video editing platform once again. This is not optional as there is no other way to merge these clips.
Luckily, you now have Filmora downloaded and can easily make it happen.
So, here’s how to combine everything.
Step 1
Start up a New Project in Filmora.
Step 2
Click on “My Media” and then click in the middle of the small box to upload your background and your video clips.

Step 3
After uploading all the files, simply drag everything in a separate Track down on the Timeline.
Step 4
Export and upload to YouTube. That’s it!
Summary
You’re now ready to make some outstanding Winter YouTube videos and bless everyone with amazing scenery and backgrounds that will make their hearts warm up. Not only do you have infinite backgrounds to choose from, you also know how to perfectly blend them in any of your videos.
Enjoy!
Create Video Backgrounds Create Video Backgrounds Learn Green Screen
What Is a YouTube Video Background?
A YouTube video background is a simple image or video that sits in place at the back of your videos. It’s just a simple background that can greatly impact your brand, presence, and style as a creator.
Even something as small as your YouTube video thumbnail background can strongly impact your results.
Obviously, choosing the right custom YouTube background is important. And, now that it’s winter, this requires a special approach.
Why Are Seasonal Backgrounds Effective?
There are several important reasons why a seasonal YouTube video background or photo, and other elements are very effective and engage us more.
The main reasons include:
- Creates a meaningful connection;
- Boosts engagement with fellow winter lovers;
- Builds a better brand;
- Enhances everyone’s mood, especially during the holidays.
So, whenever you can and whenever there is an opportunity, don’t be afraid to use a seasonal YouTube video background download.
Factors to Consider When Choosing a Background for YouTube Videos
Now, before we dive into the examples themselves and the tutorial on how to make the best backgrounds yourself, here are several factors you must consider before proceeding.
Content Relevance
As a video creator, you must ensure to be consistent with your elements. This includes your background tune for YouTube videos. For example, if you’re talking about books in your video, including a bookshelf in the winter background makes all the difference.
Audience Appeal
If you already have an audience, regardless of its size, you should definitely consider what they like and don’t like. You should then leverage this information to create highly appealing content for them and adjust your background scenery accordingly.
Lighting and Visibility
Another thing you must ensure is to keep your background simple and not too distracting. Remember, even though you have the best background for YouTube videos, you still need to realize that it’s not the main focus of the video. It’s just there to make it better.
Personal Branding
If you want to improve your brand identity and get your name known by more people, incorporate your logo, name, or something similar in the background. It will have a small but meaningful impact, and it’s easy to do.
Editing
If you plan to shoot a YouTube live background and not some stock images or videos, then you must make sure it has enough headroom for editing later on. The best option here is to use a green screen background for YouTube videos.
5 Winter YouTube Background Ideas
It’s finally time to have a look at some examples of highly effective and engaging YouTube video backgrounds for the winter season.
Enjoy!
- Snowy Landscape
- Festive Holiday Decor
- Cozy Indoor Settings
- Winter Cityscapes
- Animated Winter Scenes
How to Create or Source Winter Backgrounds
If you want to make your own winter backgrounds or simply edit the ones you have, the most effective way is to use a beginner-friendly video editing platform, such as Filmora .
Free Download For Win 7 or later(64-bit)
Free Download For macOS 10.14 or later
This type of platform has all the necessary tools, templates, and presets for professionals to use but all of it is packed in a very easy-to-use interface that anyone can get the hang of.
Just follow these steps and you’ll have the perfect winter background for YouTube in no time.
Step 1
Download and install the Filmora video editing tool.
Step 2
Run the program and click on “New Project”. No need to create an account for this.
Step 3
Click on “Stock Media” and then type in “winter” in the Search Bar.
Step 4
Select your favorite background clip and drag it down to the Timeline.
That’s it! You won’t believe how many video clips you can use, all of which are extremely high-quality. As a result, you’ll have a professional video for free.
Now, if you want, you can freely edit these backgrounds as you wish. You can mess around with them as much as you want, use various tools to edit, and make the perfect result.
And don’t worry, if you mess up the background and don’t know how to restore it, just delete it from the timeline and drag it again from the Stock Media tab. It will be as good as new.
Once you’re done, simply export it and you’re done.
Integrating Your Background Into Videos
Finally, once you have the perfect YouTube studio background, it’s time to glue it to your video and upload this masterpiece.
In order to do this, you will need to use a video editing platform once again. This is not optional as there is no other way to merge these clips.
Luckily, you now have Filmora downloaded and can easily make it happen.
So, here’s how to combine everything.
Step 1
Start up a New Project in Filmora.
Step 2
Click on “My Media” and then click in the middle of the small box to upload your background and your video clips.
Step 3
After uploading all the files, simply drag everything in a separate Track down on the Timeline.
Step 4
Export and upload to YouTube. That’s it!
Summary
You’re now ready to make some outstanding Winter YouTube videos and bless everyone with amazing scenery and backgrounds that will make their hearts warm up. Not only do you have infinite backgrounds to choose from, you also know how to perfectly blend them in any of your videos.
Enjoy!
How to Live Streaming 360 Video to Youtube
How to live streaming 360 video to youtube

Richard Bennett
Mar 27, 2024• Proven solutions
- Part1.Stream 360 to Youtube via Ricoh Theta S and OBS on PC
- Part2.Live Stream from Allie 360 Camera to YouTube on Mobile
1. Stream 360 to Youtube via Ricoh Theta S and OBS on PC
Step 1: First of all you need to get ready with your Ricoh Theta S 360 camera unit.
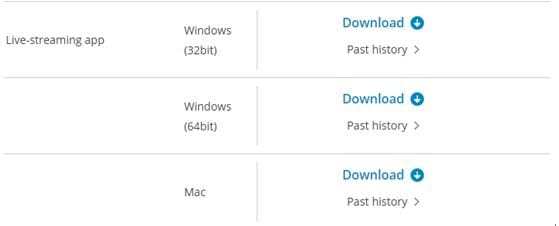
Step 2: Now visit the official website of Theta 360 in order to download your dedicated live streaming application.
Step 3: Get your application and install it on your Mac or PC as per need.
Step 4: It is time to plug in to your Ricoh Theta S 360 camera using your PC.
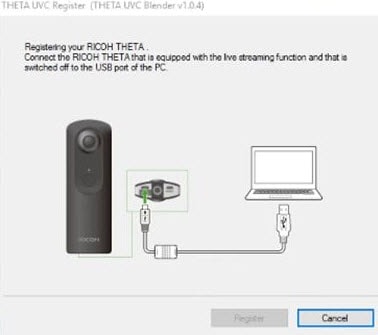
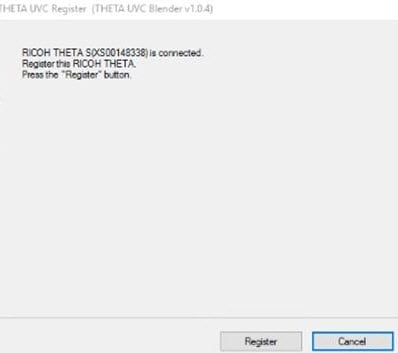
Step 5: Now select your device ‘Ricoh Theta S’ and then hit Okay.
Step 6: You will find option to register to application with your respective device. Select and hit register.
Step 7: As soon as your registration process is complete then un-plug your USB cable.
Step 8: It is time to turn the Ricoh Theta device to Live Mode; you simple need to press the top power and lower video button simultaneously to directly switch to the live mode.

Step 9: Once your device enters into Live Stream mode then a Led will start blinking on your device that represents your device is live at this moment.
Step 10: Now you need to plug in the USB cable again with your computer.
Step 11: Visit the official site of OBS and download your software; install it on your system.
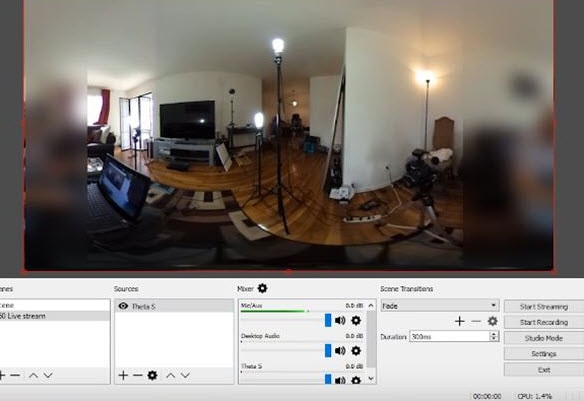
Step 12: Go to create scene option and then switch to create sources.
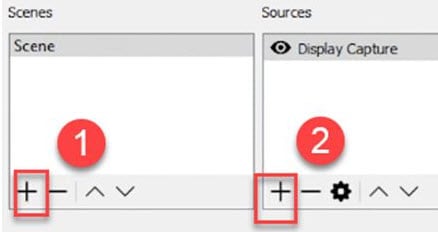
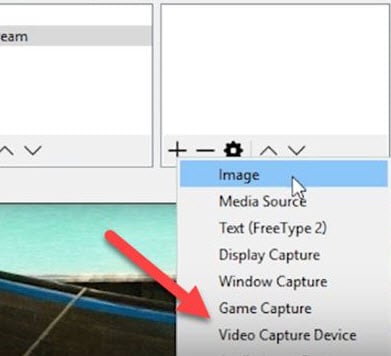
Step 13: Select video capture device as your source from drop down menu.
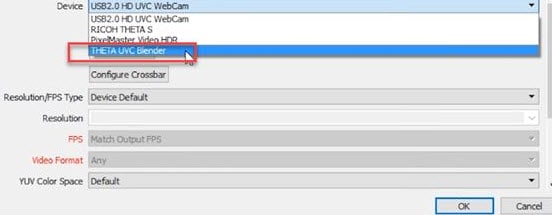
Step 14: Now from available list select Theta UVC as your active video capture source.
Step 15: You need to adjust screen as per your requirements.
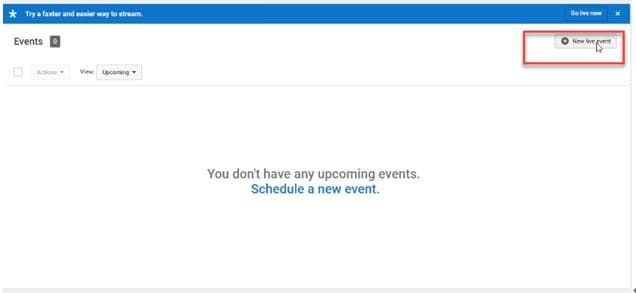
Step 16: Now move to YouTube and then hit New Live Events option.
Step 17: Complete the basic information.
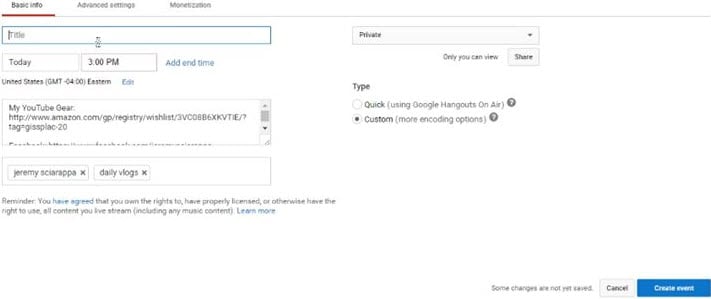
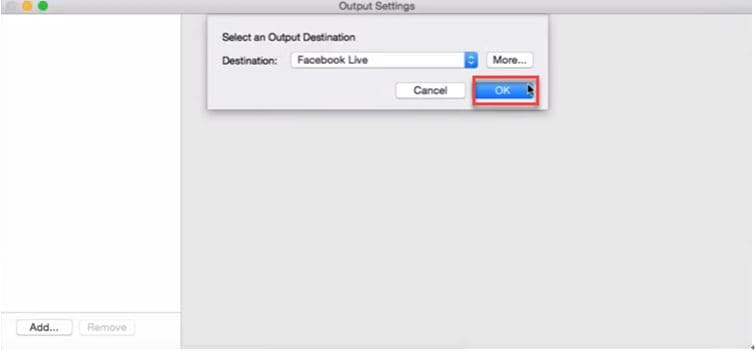
Step 18: You need to move to advanced settings now; select 360 live stream option and then create event.
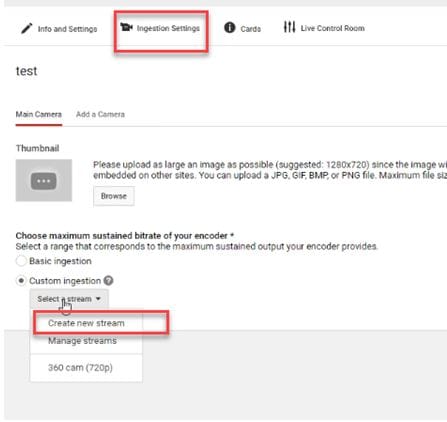
Step 19: Now complete the ingesting settings and finally select create new stream option.

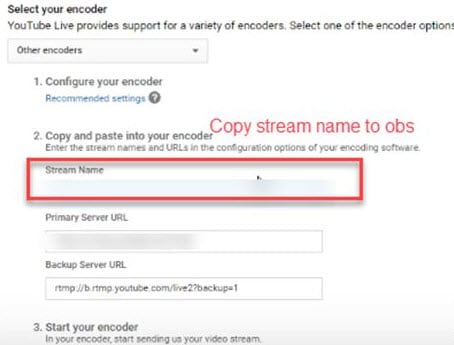
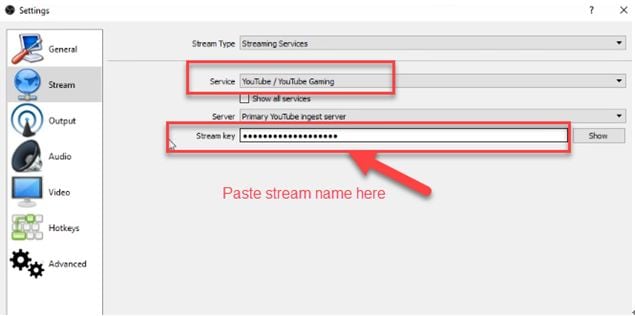
Step 20: As soon as your event is created then you will be able to find your stream name on screen, copy it and simply paste it on OBS window.
Step 21: It is time to return to OBS settings and then you need to paste that copied name on stream key option.
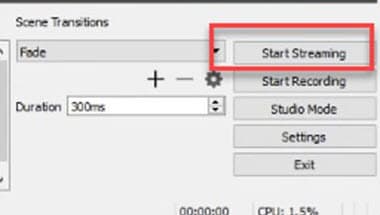
Step 22: Once all above settings are complete then click start stream option from your OBS window and you will soon be able to find your 360 live on YouTube.
2.Live Stream from Allie 360 Camera to YouTube on Mobile
Step 1: Get ready with your Allie 360 camera unit.
Step 2: Visit YouTube and then hit the option to create your live event.
Step 3: It is time to download your Allie Application and then get it installed on your device.
- Prefer to use this link if you are working on iOS: https://itunes.apple.com/app/allie-home/id1063986074
- Android users need to visit: https://play.google.com/store/apps/details?id=com.icrealtime.allie
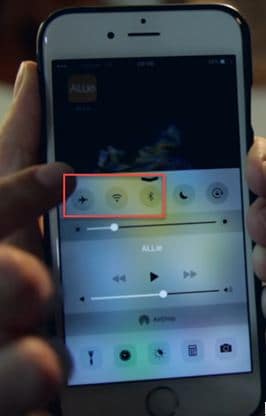
Step 4: As soon as you have downloaded your app then simply turn on the Bluetooth, Wi-Fi and air plane mode on your device.
Step 5: Simply open your Allie application and then connect your camera.

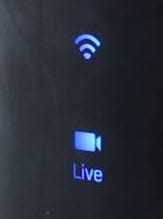
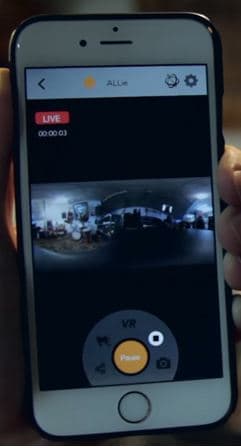
Step 6: Now users need to hit stream icon on screen.
![]()
Step 7: You will be asked to fill the necessary information about your video. It is also possible to make adjustments regarding video quality. Once you are done with all required settings then hit Submit option.

Step 8: Soon your video will become live; note that you can also share your live video via SNS platform with other viewers.
Richard Bennett
Richard Bennett is a writer and a lover of all things video.
Follow @Richard Bennett
Richard Bennett
Mar 27, 2024• Proven solutions
- Part1.Stream 360 to Youtube via Ricoh Theta S and OBS on PC
- Part2.Live Stream from Allie 360 Camera to YouTube on Mobile
1. Stream 360 to Youtube via Ricoh Theta S and OBS on PC
Step 1: First of all you need to get ready with your Ricoh Theta S 360 camera unit.
Step 2: Now visit the official website of Theta 360 in order to download your dedicated live streaming application.
Step 3: Get your application and install it on your Mac or PC as per need.
Step 4: It is time to plug in to your Ricoh Theta S 360 camera using your PC.
Step 5: Now select your device ‘Ricoh Theta S’ and then hit Okay.
Step 6: You will find option to register to application with your respective device. Select and hit register.
Step 7: As soon as your registration process is complete then un-plug your USB cable.
Step 8: It is time to turn the Ricoh Theta device to Live Mode; you simple need to press the top power and lower video button simultaneously to directly switch to the live mode.
Step 9: Once your device enters into Live Stream mode then a Led will start blinking on your device that represents your device is live at this moment.
Step 10: Now you need to plug in the USB cable again with your computer.
Step 11: Visit the official site of OBS and download your software; install it on your system.
Step 12: Go to create scene option and then switch to create sources.
Step 13: Select video capture device as your source from drop down menu.
Step 14: Now from available list select Theta UVC as your active video capture source.
Step 15: You need to adjust screen as per your requirements.
Step 16: Now move to YouTube and then hit New Live Events option.
Step 17: Complete the basic information.
Step 18: You need to move to advanced settings now; select 360 live stream option and then create event.
Step 19: Now complete the ingesting settings and finally select create new stream option.
Step 20: As soon as your event is created then you will be able to find your stream name on screen, copy it and simply paste it on OBS window.
Step 21: It is time to return to OBS settings and then you need to paste that copied name on stream key option.
Step 22: Once all above settings are complete then click start stream option from your OBS window and you will soon be able to find your 360 live on YouTube.
2.Live Stream from Allie 360 Camera to YouTube on Mobile
Step 1: Get ready with your Allie 360 camera unit.
Step 2: Visit YouTube and then hit the option to create your live event.
Step 3: It is time to download your Allie Application and then get it installed on your device.
- Prefer to use this link if you are working on iOS: https://itunes.apple.com/app/allie-home/id1063986074
- Android users need to visit: https://play.google.com/store/apps/details?id=com.icrealtime.allie
Step 4: As soon as you have downloaded your app then simply turn on the Bluetooth, Wi-Fi and air plane mode on your device.
Step 5: Simply open your Allie application and then connect your camera.
Step 6: Now users need to hit stream icon on screen.
![]()
Step 7: You will be asked to fill the necessary information about your video. It is also possible to make adjustments regarding video quality. Once you are done with all required settings then hit Submit option.
Step 8: Soon your video will become live; note that you can also share your live video via SNS platform with other viewers.
Richard Bennett
Richard Bennett is a writer and a lover of all things video.
Follow @Richard Bennett
Also read:
- [New] How to Tackle Missing Thumbnails on YouTube Shorts
- [New] Solo Self-Portraits on YouTube How to Impress Viewers
- [Updated] Step-by-Step Guide How to Catch Every Thrilling Moment in Cricket for 2024
- 2024 Approved Navigating Multi-Platform Engagement for Content Creators
- 2024 Approved The Ultimate Playbook for Professional-Looking Live YouTube Videos
- Best Movie Trailers
- Direct Link to Epson XP-330 Driver - Secure and Instant Access
- Exploring New Horizons with iPhone X's Camera Tech
- How Much Money Can You Make via YouTube Ad Revenue and CPM Rates for 2024
- In 2024, Making Compelling Media Previews for Channels
- In 2024, Pioneering the Perfect Playlist for YouTube Music Enthusiasts
- In 2024, The Pathway to Online Success Building a New YouTube Channel
- In 2024, Tips of Transferring Messages from Realme 12+ 5G to iPhone 14/15 | Dr.fone
- Mastering Zoom Establishing a Top-Tier Video Conferencing Space for 2024
- TikTok+Instagram Social Media Fusion Guide
- Top-Ranking Inkjet Printers of 2024: Discover Your Ideal Printing Companion | TechAdvisor
- Top-Rated Mini Tablets - Thoroughly Evaluated & Recommended by Tech Experts
- Title: Frosty Yet Warm Choosing the Best Winter Backdrops for 2024
- Author: Joseph
- Created at : 2024-12-17 21:30:52
- Updated at : 2024-12-25 02:26:53
- Link: https://youtube-stream.techidaily.com/frosty-yet-warm-choosing-the-best-winter-backdrops-for-2024/
- License: This work is licensed under CC BY-NC-SA 4.0.