
"From Lengthy Video to Captivating Animation - Create Gifs with Ease for 2024"
From Lengthy Video to Captivating Animation - Create Gifs with Ease
GIF editor: How to Make Animated GIF Images online from YouTube Video

Richard Bennett
Mar 27, 2024• Proven solutions
YouTube videos are fun and easy to access, they deliver a very good value and you will always have fun using them. But there are situations where these videos can integrate some interesting, funny moments and this is why creating a GIF out of them can be a good idea. You can make GIF from video if you want and all you need is a good GIF editor, which is very impressive to say the least.
You May Also Like:
Royalty free music for YouTube Videos >>
Best Screen Recorders for YouTube >>
It’s not a problem to use the GIF files as a way to express yourself so using a GIF editor to create the GIF you want is not only interesting, it can also bring in front a very good value and interesting options for sure. You should totally give it a shot if you can.
Tools that can help you make gif images from YouTube video
Lots of apps can help you do this and most of them are online based. This basically means that you can create a GIF from video without that much of a hassle. All you have to do is to find the right video and the best moments, edit it and then use this video to create the GIF you want. The process is easy and fun and it will provide you with a great value for sure.
1. imgur.com
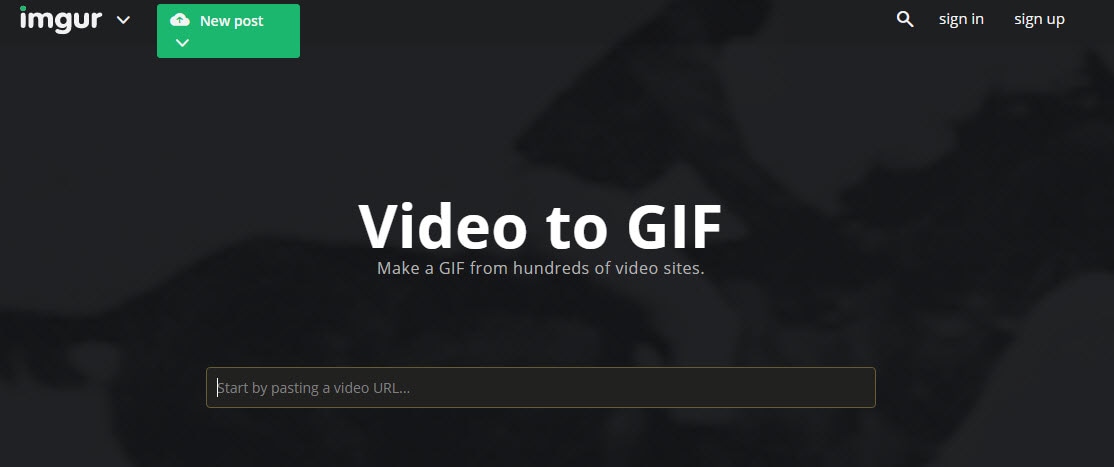
This tool requires you to add in the YouTube link and then you press Enter. Once you do that the app will do its job on its own. It’s certainly a very interesting option and one that will deliver a lot of value for all kinds of users. It’s an exciting experience for sure just because you get so much value and incredible results without that much of a hassle. You can add captions to the app which is great.
2. likeyoyo.com

Using this app is simple, you paste the URL, press Enter and then the GIF is created automatically. They integrate some share buttons and a set of tools to help you move this, but it’s not that hard to use and it’s very user friendly to be honest.
3. makeagif.com
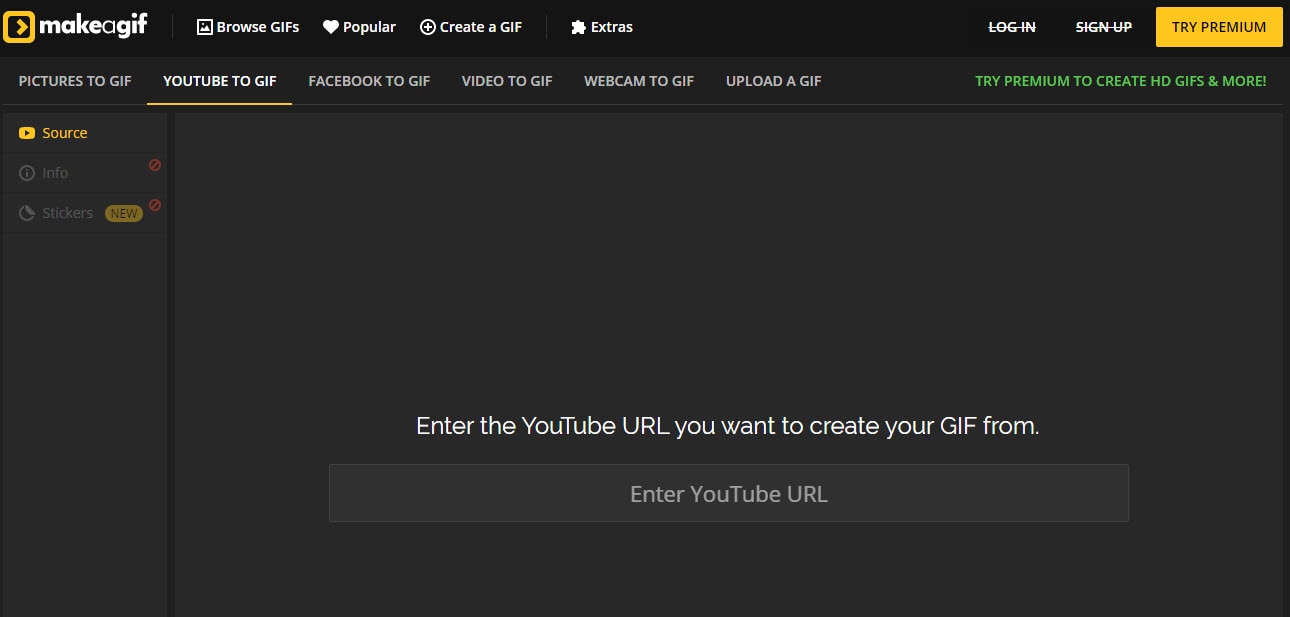
This is a great, easy to use online tool that just requires you to add in the video URL you want and then wait until it’s done. It’s certainly a great tool to use and one that will deliver a lot of value.
Add more fun on your GIF with Wondershare Filmora
Wondershare Filmora is a refined application that allows you to make GIF from video fast and with great results. It features an interesting set of tools, it’s very easy to modify and it does bring in front interesting options for sure. It’s designed with ease of use in mind and it does enable you to add in many animated effects which is always a major plus for this kind of tool.
However, if you want to make a GIF online, Filmora meme maker is your ultimate solution. It helps you make image, GIF and video memes directly without watermark. It is totally FREE to use and no sign up. You can change text size, color and position to create caption when you are editing. You can also put text inside or outside in GIF. Just with a few clicks, your GIF is done. Try it now!
 Download Mac Version ](https://tools.techidaily.com/wondershare/filmora/download/ )
How to use?
Using Wondershare Filmora is actually very easy and the process is designed in order to deliver lots of value to the user without making the experience complex or boring. In fact, you just have to use the following steps in order to get the best results:
- At first you will have to import your GIF file and it allows you to bring in front immense possibilities since you can edit GIF on the fly.
- Once you have the file imported, you will need to drag that file you want to edit to the timeline.
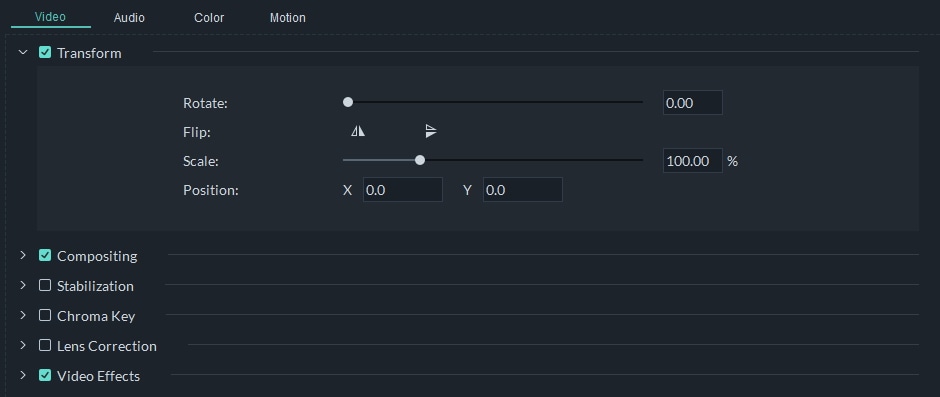
- Double clik on the clip in the timeline. You will be able to edit GIF, you can rotate, scale or flip which is very helpful.
- Although it’s not mandatory, you can try to add filter to the GIF in order to make the experience more interesting.


- Lastly, when you are done with the process you can export to format GIF. This is a very good value and it will provide you with a stellar experience.

Conclusion
Using Wondershare Filmora in order to edit GIF and create GIF from video is a very good idea. The app is designed to offer some amazing features and it’s also very easy to use. If you want to take on such a task, then Wondershare Filmora is certainly the tool for you so just give it a shot and you are bound to love it!

Richard Bennett
Richard Bennett is a writer and a lover of all things video.
Follow @Richard Bennett
Richard Bennett
Mar 27, 2024• Proven solutions
YouTube videos are fun and easy to access, they deliver a very good value and you will always have fun using them. But there are situations where these videos can integrate some interesting, funny moments and this is why creating a GIF out of them can be a good idea. You can make GIF from video if you want and all you need is a good GIF editor, which is very impressive to say the least.
You May Also Like:
Royalty free music for YouTube Videos >>
Best Screen Recorders for YouTube >>
It’s not a problem to use the GIF files as a way to express yourself so using a GIF editor to create the GIF you want is not only interesting, it can also bring in front a very good value and interesting options for sure. You should totally give it a shot if you can.
Tools that can help you make gif images from YouTube video
Lots of apps can help you do this and most of them are online based. This basically means that you can create a GIF from video without that much of a hassle. All you have to do is to find the right video and the best moments, edit it and then use this video to create the GIF you want. The process is easy and fun and it will provide you with a great value for sure.
1. imgur.com
This tool requires you to add in the YouTube link and then you press Enter. Once you do that the app will do its job on its own. It’s certainly a very interesting option and one that will deliver a lot of value for all kinds of users. It’s an exciting experience for sure just because you get so much value and incredible results without that much of a hassle. You can add captions to the app which is great.
2. likeyoyo.com
Using this app is simple, you paste the URL, press Enter and then the GIF is created automatically. They integrate some share buttons and a set of tools to help you move this, but it’s not that hard to use and it’s very user friendly to be honest.
3. makeagif.com
This is a great, easy to use online tool that just requires you to add in the video URL you want and then wait until it’s done. It’s certainly a great tool to use and one that will deliver a lot of value.
Add more fun on your GIF with Wondershare Filmora
Wondershare Filmora is a refined application that allows you to make GIF from video fast and with great results. It features an interesting set of tools, it’s very easy to modify and it does bring in front interesting options for sure. It’s designed with ease of use in mind and it does enable you to add in many animated effects which is always a major plus for this kind of tool.
However, if you want to make a GIF online, Filmora meme maker is your ultimate solution. It helps you make image, GIF and video memes directly without watermark. It is totally FREE to use and no sign up. You can change text size, color and position to create caption when you are editing. You can also put text inside or outside in GIF. Just with a few clicks, your GIF is done. Try it now!
Download Mac Version ](https://tools.techidaily.com/wondershare/filmora/download/ )
How to use?
Using Wondershare Filmora is actually very easy and the process is designed in order to deliver lots of value to the user without making the experience complex or boring. In fact, you just have to use the following steps in order to get the best results:
- At first you will have to import your GIF file and it allows you to bring in front immense possibilities since you can edit GIF on the fly.
- Once you have the file imported, you will need to drag that file you want to edit to the timeline.
- Double clik on the clip in the timeline. You will be able to edit GIF, you can rotate, scale or flip which is very helpful.
- Although it’s not mandatory, you can try to add filter to the GIF in order to make the experience more interesting.
- Lastly, when you are done with the process you can export to format GIF. This is a very good value and it will provide you with a stellar experience.
Conclusion
Using Wondershare Filmora in order to edit GIF and create GIF from video is a very good idea. The app is designed to offer some amazing features and it’s also very easy to use. If you want to take on such a task, then Wondershare Filmora is certainly the tool for you so just give it a shot and you are bound to love it!
Richard Bennett
Richard Bennett is a writer and a lover of all things video.
Follow @Richard Bennett
Effortless Subtitling & CC Addition Techniques for YouTube Users
How to Easily Add Subtitles and Closed Captions to YouTube Video
Richard Bennett
Mar 27, 2024• Proven solutions
In this article, we are going to show you how important it is to add subtitle and closed captions in your YouTube video, and how to add them.
The best video editor for YouTubers - Wondershare Filmora , not only allows you to cut, crop, rotate, reverse videos, but also offers your advanced features like PIP, Green Screen, or audio mixing. What’s more, you can find lots of effects for Fashion, gaming, education, tutorial, sports, etc. Check this article to know more.
Why subtitle and closed captions are important for YouTube videos?
- Forced closed captions and subtitles actually help the viewers to understand the content in your video if the audio quality of your video is bad, muffled or barely audible. Reading makes it easier for them to understand.
- This also helps people with hearing impairments. People with troubled ears can still watch and understand your content.
- It’s a great aid to such videos which have been recorded in other foreign languages that you don’t understand. Hence it will increase the number of viewers all around the world.
- They both are generally added for easy accessibility to the viewers who wish to watch in sound sensitive environments.
So, here we are going to show you two ways to add subtittles to video: directly or uploading caption or transcript files
Adding subtitles and closed captions manually
To add subtitles and closed captions to your YouTube video, fisrt, you should sign in to your YouTube account. On left right below ‘Home’ you will find ‘My Channel’. It will direct you to your personal YouTube page. On the top, right next to your subscribers lays the ‘Video manager’, giving you the list of your uploaded videos.
Select the video and click on edit to get a drop down menu. Click on subtitles and CC. This will take you to the subtitling interface. To the right of video select ‘add new subtitles’ and then ‘create new subtitles’. Select the subtitle language. Play the video to listen to the content and type down in the box. Click on ‘+’ button once you are done.
This will create a subtitle timeline right beneath the video. You can manage by dragging and expanding the subtitle duration according to the audio of the video. The subtitle will appear at the bottom of the video screen. Click ‘publish’ once done.
An interruption might occur with appearing of subtitles in accordance with video. Hence a lot precision is required while doing so.
Uploading Caption or Transcript Files automatically
To upload Caption or Transcript Files to YouTube Videos you first need to create a format on a text editor. For windows use Notepad and for Mac you may use TextEdit. Create a format of putting the number of subtitle first, time stamp and then text of the subtitle. For example
1\
00:02:34:12 using a format of (hour : minute : second : millisecond)
2. *text*
This is the sample text for first subtitle at zero hours, two minutes, thirty four seconds and twelve milliseconds. Once done with this. Go to file, select ‘save as’. Write the file name with an extension of .srt and select ‘All files’ for type of file. Click encoding menu and select UTF-8. Once saved, sign in to your YouTube account.
On left right below ‘Home’ you will find ‘My Channel’. It will direct you to your personal YouTube page. On the top, right next to your subscribers lays the ‘Video manager’, giving you the list of your uploaded videos.
Select the video and click on edit to get a drop down menu. Click on subtitles and CC. Go to ‘add subtitles’ and then ‘upload a file’. A pop-up menu will appear select ‘subtitles file’. Click upload. The file will send subtitles to your video.
This will create a subtitle timeline right beneath the video. You can manage by dragging and expanding the subtitle duration according to the audio of the video. The subtitle will appear at the bottom of the video screen. Click ‘publish’ once done.
3 Best Tools for add/managing video Subtitles/CC
1. Amara
Amara is a smart video editor which helps insert captions and subtitles to videos. It also helps in transcribing the videos. It takes help of crowd sourcing to subtitle any YouTube video. They take help from viewers to subtitle the videos. By making crowd subtitling available for any YouTube creator, they are allowing them to reach more viewers in more languages
2. DIY Captions
DIY captions help you to transcribe the YouTube videos, if not in most accurate manner, then in a little easier way. All you have to do is just paste the URL of the YouTube video and it will provide you all the subtitles. These may not be accurate but will provide you major base material which can be tweaked a bit here and there and is far better than making all the subtitles starting from scratch.
3 Subtitles for YouTube
Subtitles for YouTube is a Google Chrome extension which provides subtitles for YouTube videos. For this you will have to provide a subtitle file with .srt extension. The attractive feature of this is that you won’t have to download the video and still run the subtitles on it. This is very much helpful for people who work on YouTube or watch movies without subtitles.
Richard Bennett
Richard Bennett is a writer and a lover of all things video.
Follow @Richard Bennett
Richard Bennett
Mar 27, 2024• Proven solutions
In this article, we are going to show you how important it is to add subtitle and closed captions in your YouTube video, and how to add them.
The best video editor for YouTubers - Wondershare Filmora , not only allows you to cut, crop, rotate, reverse videos, but also offers your advanced features like PIP, Green Screen, or audio mixing. What’s more, you can find lots of effects for Fashion, gaming, education, tutorial, sports, etc. Check this article to know more.
Why subtitle and closed captions are important for YouTube videos?
- Forced closed captions and subtitles actually help the viewers to understand the content in your video if the audio quality of your video is bad, muffled or barely audible. Reading makes it easier for them to understand.
- This also helps people with hearing impairments. People with troubled ears can still watch and understand your content.
- It’s a great aid to such videos which have been recorded in other foreign languages that you don’t understand. Hence it will increase the number of viewers all around the world.
- They both are generally added for easy accessibility to the viewers who wish to watch in sound sensitive environments.
So, here we are going to show you two ways to add subtittles to video: directly or uploading caption or transcript files
Adding subtitles and closed captions manually
To add subtitles and closed captions to your YouTube video, fisrt, you should sign in to your YouTube account. On left right below ‘Home’ you will find ‘My Channel’. It will direct you to your personal YouTube page. On the top, right next to your subscribers lays the ‘Video manager’, giving you the list of your uploaded videos.
Select the video and click on edit to get a drop down menu. Click on subtitles and CC. This will take you to the subtitling interface. To the right of video select ‘add new subtitles’ and then ‘create new subtitles’. Select the subtitle language. Play the video to listen to the content and type down in the box. Click on ‘+’ button once you are done.
This will create a subtitle timeline right beneath the video. You can manage by dragging and expanding the subtitle duration according to the audio of the video. The subtitle will appear at the bottom of the video screen. Click ‘publish’ once done.
An interruption might occur with appearing of subtitles in accordance with video. Hence a lot precision is required while doing so.
Uploading Caption or Transcript Files automatically
To upload Caption or Transcript Files to YouTube Videos you first need to create a format on a text editor. For windows use Notepad and for Mac you may use TextEdit. Create a format of putting the number of subtitle first, time stamp and then text of the subtitle. For example
1\
00:02:34:12 using a format of (hour : minute : second : millisecond)
2. *text*
This is the sample text for first subtitle at zero hours, two minutes, thirty four seconds and twelve milliseconds. Once done with this. Go to file, select ‘save as’. Write the file name with an extension of .srt and select ‘All files’ for type of file. Click encoding menu and select UTF-8. Once saved, sign in to your YouTube account.
On left right below ‘Home’ you will find ‘My Channel’. It will direct you to your personal YouTube page. On the top, right next to your subscribers lays the ‘Video manager’, giving you the list of your uploaded videos.
Select the video and click on edit to get a drop down menu. Click on subtitles and CC. Go to ‘add subtitles’ and then ‘upload a file’. A pop-up menu will appear select ‘subtitles file’. Click upload. The file will send subtitles to your video.
This will create a subtitle timeline right beneath the video. You can manage by dragging and expanding the subtitle duration according to the audio of the video. The subtitle will appear at the bottom of the video screen. Click ‘publish’ once done.
3 Best Tools for add/managing video Subtitles/CC
1. Amara
Amara is a smart video editor which helps insert captions and subtitles to videos. It also helps in transcribing the videos. It takes help of crowd sourcing to subtitle any YouTube video. They take help from viewers to subtitle the videos. By making crowd subtitling available for any YouTube creator, they are allowing them to reach more viewers in more languages
2. DIY Captions
DIY captions help you to transcribe the YouTube videos, if not in most accurate manner, then in a little easier way. All you have to do is just paste the URL of the YouTube video and it will provide you all the subtitles. These may not be accurate but will provide you major base material which can be tweaked a bit here and there and is far better than making all the subtitles starting from scratch.
3 Subtitles for YouTube
Subtitles for YouTube is a Google Chrome extension which provides subtitles for YouTube videos. For this you will have to provide a subtitle file with .srt extension. The attractive feature of this is that you won’t have to download the video and still run the subtitles on it. This is very much helpful for people who work on YouTube or watch movies without subtitles.
Richard Bennett
Richard Bennett is a writer and a lover of all things video.
Follow @Richard Bennett
Also read:
- [Updated] In 2024, The Instagram Antithesis Video Reversal Explained
- 2024 Approved Greener Marketing Blend Screens, Subscription Tech
- 2024 Approved Streaming Showdown OBS & ShadowToolkit
- Can’t Set the Time Zone Automatically in Windows? Try These Fixes
- Effective Methods for Retrieving Your Revoked or Lost License
- Expert Tips for Swift & Safe Download of Brother HL-3170cdw Driver Files
- Free Yourself From Video Edges on YouTube for 2024
- How do i add my signature to Word
- In 2024, Steps to Restore Your YouTube Shorts' Thumbnails
- Mastering YouTube Monetization A CPM Perspective for 2024
- Maximize Profitability – The Do's and Don'ts of YouTube Monetization for 2024
- Quickly Connect Windows 7 to Wi-Fi
- Troubleshooting PC Issues - How to Stop Minecraft From Crashing
- Updated 2024 Approved The Editors Beat Pairing Visual Sequences with Musical Tempo Using Adobe Premiere Pro
- Title: From Lengthy Video to Captivating Animation - Create Gifs with Ease for 2024
- Author: Joseph
- Created at : 2024-10-17 21:23:22
- Updated at : 2024-10-18 20:31:55
- Link: https://youtube-stream.techidaily.com/from-lengthy-video-to-captivating-animation-create-gifs-with-ease-for-2024/
- License: This work is licensed under CC BY-NC-SA 4.0.