
Free Yourself From Video Edges on YouTube for 2024
Free Yourself From Video Edges on YouTube
How to Remove Black Bars from YouTube Videos

Richard Bennett
Mar 27, 2024• Proven solutions
The black bars appear because the video uploaded by the users may include horizontal black bars at the bottom and top of the video player to fit an aspect ratio of 4:3. The YouTube video player has an aspect ratio of 16:9, so it adds vertical black bars to fit according to the dimension. And in this guide, we will help you get rid of this trouble and remove annoying black bars from YouTube videos.
- Part 1: Removing the black bars before uploading
- Part 2: Removing the black bars from uploaded YouTube videos
Remove the black bars before uploading
You can make use of the following software to remove the black bars from your videos.
1. Wondershare Filmora
Filmora supports a large format of videos hence one of the widely used. Follow these steps to remove the black bars:
- Import the video or drag and drop it in Wondershare Flimora.
- Select the video with black bars and right click on it.
- Click on “crop and zoom” which will open the crop window.
- Set your desired frameset (16:9, 4:3 or customized aspect ratio) and see your video in the preview pane.
- Save the new video without the black bars by clicking on “Export”.
 Download Mac Version ](https://tools.techidaily.com/wondershare/filmora/download/ )
2. Sony Vegas Pro
One of the most popular and sought after video editing tool, Sony Vegas Pro can help removing the black bars very simply:
- Open the video.
- You will see the video in preview and a timeline beneath, right click on the video clip on the timeline.
- Click on properties, a new window will pop-up, click on disable resample and make sure that “maintain aspect ratio” is unchecked.
- Your video will be without the black bars. Save the video.
3. Windows Live Movie Maker
This inbuilt tool in Windows for video editing can be used to remove the black bars from your YouTube videos.
- Drop and drag the video to windows live movie maker.
- Select the video and you will see a couple of options to set aspect ratio.
- Click on the desired one and the black bars will be removed.
- You can save the video in different formats.
4. Final Cut Pro
Final Cut pro offers you a whole lot of video editing options that includes removal of black bars. Right aspect ratio ensures there are no unpleasant black bars on either side of the video. To get them removed with the help of Final Cut Pro:
- Import the video with black bars.
- Select the video and change its aspect ratio. (Either stretch it or crop it).
- Save the video after it has been corrected.
Removing the black bars from uploaded YouTube videos
It is very simple to remove black bars from existing YouTube videos or while uploading a video. Click on the Edit button next to the video, and add the most suited instruction in the Tag bar below:

yt:crop=16:9
This tag zooms in on the video because of which the contents at the borders (black bars in this case) do not appear anymore.
yt:stretch=16:9
This tag stretches the video in the aspect ratio of 16:9. It is used to view the video in wide-screen format.
yt:stretch=4:3
if your video is appearing in wide-screen format, but you want it to display in 720 x 480 pixels, apply this tag. It scales down the video 4:3 aspect.
Try any of the above software to remove black bars from existing YouTube videos or the new videos and make it pleasant to viewers.
Richard Bennett
Richard Bennett is a writer and a lover of all things video.
Follow @Richard Bennett
Richard Bennett
Mar 27, 2024• Proven solutions
The black bars appear because the video uploaded by the users may include horizontal black bars at the bottom and top of the video player to fit an aspect ratio of 4:3. The YouTube video player has an aspect ratio of 16:9, so it adds vertical black bars to fit according to the dimension. And in this guide, we will help you get rid of this trouble and remove annoying black bars from YouTube videos.
- Part 1: Removing the black bars before uploading
- Part 2: Removing the black bars from uploaded YouTube videos
Remove the black bars before uploading
You can make use of the following software to remove the black bars from your videos.
1. Wondershare Filmora
Filmora supports a large format of videos hence one of the widely used. Follow these steps to remove the black bars:
- Import the video or drag and drop it in Wondershare Flimora.
- Select the video with black bars and right click on it.
- Click on “crop and zoom” which will open the crop window.
- Set your desired frameset (16:9, 4:3 or customized aspect ratio) and see your video in the preview pane.
- Save the new video without the black bars by clicking on “Export”.
Download Mac Version ](https://tools.techidaily.com/wondershare/filmora/download/ )
2. Sony Vegas Pro
One of the most popular and sought after video editing tool, Sony Vegas Pro can help removing the black bars very simply:
- Open the video.
- You will see the video in preview and a timeline beneath, right click on the video clip on the timeline.
- Click on properties, a new window will pop-up, click on disable resample and make sure that “maintain aspect ratio” is unchecked.
- Your video will be without the black bars. Save the video.
3. Windows Live Movie Maker
This inbuilt tool in Windows for video editing can be used to remove the black bars from your YouTube videos.
- Drop and drag the video to windows live movie maker.
- Select the video and you will see a couple of options to set aspect ratio.
- Click on the desired one and the black bars will be removed.
- You can save the video in different formats.
4. Final Cut Pro
Final Cut pro offers you a whole lot of video editing options that includes removal of black bars. Right aspect ratio ensures there are no unpleasant black bars on either side of the video. To get them removed with the help of Final Cut Pro:
- Import the video with black bars.
- Select the video and change its aspect ratio. (Either stretch it or crop it).
- Save the video after it has been corrected.
Removing the black bars from uploaded YouTube videos
It is very simple to remove black bars from existing YouTube videos or while uploading a video. Click on the Edit button next to the video, and add the most suited instruction in the Tag bar below:
yt:crop=16:9
This tag zooms in on the video because of which the contents at the borders (black bars in this case) do not appear anymore.
yt:stretch=16:9
This tag stretches the video in the aspect ratio of 16:9. It is used to view the video in wide-screen format.
yt:stretch=4:3
if your video is appearing in wide-screen format, but you want it to display in 720 x 480 pixels, apply this tag. It scales down the video 4:3 aspect.
Try any of the above software to remove black bars from existing YouTube videos or the new videos and make it pleasant to viewers.
Richard Bennett
Richard Bennett is a writer and a lover of all things video.
Follow @Richard Bennett
Unlocking the Secret: How to Display YouTube Playlists on Websites
YouTube is an excellent resource for entertainment, education, and general information, but did you know you can also display a YouTube playlist on your website?
Embedding a YouTube playlist will allow you to showcase a collection of videos on a topic or theme on your website. It’s also a great way to keep your visitors engaged on your site for more extended periods.
To help you with the process, we’ll explore different step-by-step methods to embed a YouTube playlist on a website to add interactivity to your site.
So, if you’re ready to get started, read on!
How To Embed a YouTube Playlist on a Website
If you want to embed and display a YouTube playlist on your website, we’ll give you a complete rundown of the three methods you can try to get this done. But, of course, each method has its pros and cons, so you’ll need to decide which is right for you.
Here’s how to embed a YouTube playlist on a Website:
Embedding a YouTube Playlist on Website Using WordPress Plugin
The plugin is the simplest way to add a YouTube Playlist to your WordPress website. This will help you get this done in no time without having to write any code for the process.
With plugins like YouTube Feed Pro by Smash Balloon , you can extend your website’s functionality and create, customize, or embed a YouTube playlist with just a few clicks of a mouse.
To embed and add a YouTube playlist on your website page/post, do the following steps in sequence:
Step1 Launch a browser on your PC and head to your WordPress website’s login page. Sign in to your dashboard using your username and password.
Step2 Click the “Plugins” option from the left-hand side menu on the WordPress dashboard. Now, click “Add New” and use the search option to find and install the YouTube Feed Pro plugin. Afterward, click the “Activate” option to enable the plugin.
Step3 Click the “YouTube Feed” option from the left menu and open “All Feeds.” On the next page, click “Add New” at the top left of the screen.

You will now be asked what type of feed you want to create. Select “Playlist” and click “Next.”

Step4 You need to create your YouTube API Key , copy it, and paste it into the pop-up. Click “Add” to connect your YouTube account to the plugin.
Step5 Select the Playlist you want to display on your WordPress website and take its ID. Paste that in the next pop-up window and click “Next” to continue the process.

Your YouTube playlist will be connected to your WordPress website. To further customize it, select the template you want and click “Next.” You can also configure the Feed Layout and Color Scheme.

Step6 Once you are done with customization, click the “Embed” option on the top-right side of the screen, and a pop-up window will appear. Next, click “Add to a Page,” and a list of pages on your website will be displayed.
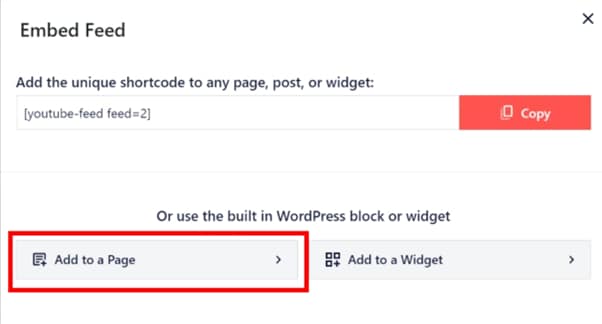
Choose your page and click “Add” at the bottom of the pop-up window. You’ll be directed to a new page where you can embed the feed. Click the “Plus” icon at the top-left of the screen, search for YouTube Feed and choose the Feeds for YouTube block to embed and add your playlist.
That’s about it! You’ve successfully embedded a YouTube playlist on your WordPress website.
Embedding a YouTube Playlist on a Website Using oEmbed Code
Another method to embed a YouTube playlist on your WordPress website is to use oEmbed Code. This method requires basic CSS, HTML, or Java knowledge; otherwise, you won’t be able to customize your playlist.
Moreover, this method is too complicated for beginners, and you will miss the customer support provided by WordPress plugin developers in case of any mishaps.
To use the oEmbed Code method, do the following steps:
Step1 In the first step, head to your YouTube account and access the Playlist you want to embed. Next, click the three dots below it and copy its URL.
Step2 Now, login to your WordPress dashboard and open the post or page editor where you want to add the playlist.
Step3 Paste the URL directly in the editor and click “Update” to save the changes.
WordPress will grab your playlist from YouTube and automatically show it in your post using oEmbed. The outcome is a single video with a menu that your viewers can click to see other videos in the playlist.
Embedding a YouTube Playlist on WebsiteUsing
Step4 Log in to your WordPress dashboard and open the page/post editor where you want to embed the playlist. Click the “Plus” icon, search for “custom HTML,” and select “Custom HTML block” to add to the page/post.
Now, paste the iFrame embed code you’ve copied from YouTube and click “Update” at the top-right of the screen to save the changes and embed your playlist.
This method will also display one video with a menu from where you and your website viewers can access the playlist. Moreover, there are few customization options to change the appearance.
A Bonus Tip: YouTube Video Maker - Filmora
If you find your YouTube videos as boring and not engaging as other content on your website, we recommend using Wondershare Filmora for your next project.
Free Download For Win 7 or later(64-bit)
Free Download For macOS 10.14 or later
With this software, you can quickly make eye-captivating YouTube videos by recording from a screen or webcam and can edit them using advanced editing features. Filmora also allows you to instantly export your content to YouTube with just a few clicks, which you can later embed into your website.
Some key features of Wondershare Filmora are as follows:
- Advanced video editing features include keyframing, speed ramping, Boris FX, Motion Tracking, Titles, and more.
- Massive library of preset templates, effects, transitions, animations, and royalty-free music.
- Instant Export to YouTube channel.
- Record from webcam, screen, and voiceover.
- Simple drag-and-drop interface.
Conclusion
This article discusses step-by-step methods to embed a YouTube playlist on a website using the WordPress plugin, oEmbed code, and iFrame embed code.
Additionally, we’ve recommended Wondershare Filmora for making engaging and captivating YouTube videos that you can export directly to your channel from the software.
We hope you’ve found this article informative and can now display your YouTube playlist on your site without hassle.
Also read:
- [New] In 2024, Essential Thumbnail Strategies for Amplifying Viewership on YouTube
- [New] Revel in the Rhythm of Rising Text
- [Updated] Smile, Sob and Snicker with These IG Meme Masters of Humor
- [Updated] Sound Identity Shift for Free Fire Characters - No Money Required
- 2024 Approved From Idea to Execution Creating YouTube Trailers in Filmora
- 2024 Approved Taking Control Your Comprehensive YT Studio Manual
- Exploring the Apple Vision Pro: Welcome to the Dawn of Facial Recognition Technology
- High-End Camcorders Reviewed Top 15 for 2024
- How to share/fake gps on Uber for OnePlus Open | Dr.fone
- In 2024, Quick Alteration YouTube Vids Fit Mac Displays
- Instant Video Post How to Turn MP3s Into YouTube Playables for 2024
- Unveiling the Secrets of a Seamless Windows 11 Upgrade: An In-Place Method
- Title: Free Yourself From Video Edges on YouTube for 2024
- Author: Joseph
- Created at : 2024-12-22 16:34:42
- Updated at : 2024-12-25 09:22:13
- Link: https://youtube-stream.techidaily.com/free-yourself-from-video-edges-on-youtube-for-2024/
- License: This work is licensed under CC BY-NC-SA 4.0.