:max_bytes(150000):strip_icc()/GettyImages-667615011-5b4376ec46e0fb0036cb2c53.jpg)
"Fast Guide Transforming Images Into YouTube Desktop Thumbnails for 2024"
Fast Guide: Transforming Images Into YouTube Desktop Thumbnails
There is a saying that first impressions last, and this is proven true, especially when it comes to YouTube video viewership. For sure, you have experienced watching a video out of curiosity because of its thumbnail. That is why content creators take time to resize YouTube thumbnails or use a YouTube thumbnail size converter to customize the preview images that represent their videos.
This technique not only attract viewers to watch your video, but it also gives a glimpse of your content. In this article, we will provide you with a quick tutorial on how to resize a YouTube thumbnail and suggest handy tools you can use to create the perfect YouTube video thumbnail!

Best YouTube Thumbnail Size
According to YouTube’s help center, there are some things to remember when creating a thumbnail for your YouTube videos.
- First, make sure that the thumbnail size is 1280 pixels by 720 pixels and 640 pixels wide. It is the best YouTube thumbnail size.
- When it comes to the thumbnail dimension, make sure to use an aspect ratio of 16:9.
- Also, your YouTube thumbnail image should not exceed 2MB and is in either JPG, GIF or PNG format.
How To Resize Your YouTube Thumbnail
The primary reason for changing the YouTube thumbnail size is to gain more audience. If you are a content creator, your main goal is to introduce your content to a wider range of viewers, right? So you have to pay attention to even the smallest detail, such as YouTube thumbnails to increase viewership and top YouTube SEO.
In fact, YouTube recommends this technique to get more viewers. Also, resizing your YouTube thumbnail will prevent you from getting the “file larger than 2MB error” which can cause your thumbnail to be discarded.
So, how can you use this technique? Check our tutorial below as we walk you through various recommended methods for resizing a YouTube thumbnail:
Method 1: Resize YouTube Thumbnail With Windows Default App
The easiest way to resize YouTube thumbnails is through the Windows default app. Within just a few modifications, you can resize your thumbnail to fit as a preview image for your YouTube video.
Please take note that your image should be at least 2 megabytes or less to achieve the perfect YouTube thumbnail fit. If your image exceeds the limit, your thumbnail will either be rejected, or your image will have a black screen around it-which is not ideal at all.
Now, let us start the tutorial.
Step1 Open an image you want to set as a thumbnail. Then, Right-click> Resize.

Step2 Select “Define custom dimensions.”

Step3 Set the width to 1280 and the height to 720. Then tick the box for “Maintain Aspect Ratio “and click “Save Resized Copy.”

Step4 Click the upload thumbnail button on YouTube and import your resized image.

Method 2. Online YouTube Thumbnail Size Converter
The second method you can use is the online YouTube thumbnail size converter. As it completely works in browsers, you do not need to worry about any app installation to access the feature. Furthermore, using online YouTube thumbnail size converters ensures you maintain your image resolution and prevents it from getting blurry or pixelated.
There are various YouTube thumbnail resizers available online. Some of the most popular are Fotor, Super Image Converter, Pixelied, Super Image Converter , Adobe Express , Newisty, and Promo . Let us focus on the last online tool and the steps on how to use it.
Promo is a free online software you can use to convert an image to a YouTube thumbnail. It is one of the best YouTube Thumbnail tools as it uses simple operation steps and automatically resizes your image without losing its quality.

Here are the steps on how to use the Promo YouTube thumbnail size converter:
Step1 Go to Promo’s official website and import your image

Step2 Scroll down and find the YouTube thumbnail size where your resized image is displayed. Then, click “Download.”

Method 3: Convert the Image to YouTube Thumbnail Using Wondershare Filmora
It is without a doubt that online YouTube thumbnail resizers are great tools for converting your image to an ideal YouTube thumbnail. But it would be much better if you resize your video using the same app you use for editing. That way, you will save time using two separate apps, and your task will be much more efficient using an all-in-one video editing tool.
Wondershare Filmora , one of the most well-known software for creating high-quality and compelling videos, combines these functions in one app. Filmora is not just an excellent software for crafting YouTube videos but also a reliable tool you can use in creating and resizing YouTube thumbnails.
Free Download For Win 7 or later(64-bit)
Free Download For macOS 10.14 or later
Here is the step-by-step tutorial on how to use Filmora in resizing your YouTube thumbnail. It is divided into two parts:
1. Take a Snapshot as the Thumbnail with Filmora
Step1 Open the video in the timeline, click the play icon in the player window, and pause when you reach the desired frame for the YouTube thumbnail. Click the camera icon to take a snapshot.

Step2 In the snapshot window, choose to save the snapshot as a PNG or JPG file.
Step3 Select the output storage location and click OK.

2. Resize the YouTube Thumbnail
Step1 Import the image into the app timeline.

Step2 Drag and drop the image into the timeline and click the green “Export“ button. In the popup Export window, select GIF. Next, click “Settings“ to adjust the resolution.

Step3 As the recommended size of a YouTube Thumbnail is 1280 * 720 pixels, you can set the resolution to 1280 * 720. Then click Apply and Export the GIF. You can now upload the GIF thumbnail to your YouTube account.

Method 4. Convert Images to YouTube Thumbnail Using Third-Party Software
In addition to using dedicated video editing software, several third-party image editing programs can be used to resize images for use as YouTube thumbnails. Programs like GIMP are popular for this purpose, as it offers a wide range of tools and features for editing and resizing images.
This program allows you to import an image, resize it to the dimensions required for a YouTube thumbnail (typically 1280 x 720 pixels), and save the edited version to your desired location. Using an image editing program can be a good option if you need more control over the appearance of your thumbnail or if you want to make more extensive edits beyond simply resizing the image.
To resize an image using an image editing program like GIMP, follow these steps:
Step1 Install and launch GIMP on your computer.

Step2 Click on “File“ > “Open,” then search for the file you want to resize.

Step3 Click on “Image“ > “Scale Image“ and make sure that the resolution is 1920 by 1080.

Step4 Click on “File“ > “Export As“ and toggle the “Select File Type (By Extension)“ option. Choose JPG/JPEG format because it can compress the thumbnail enough to stay within the limit of 2 megabytes.

Step5 You can change the quality of the image and click the “Export“ button to save the thumbnail.

Comparison of These 4 YouTube Thumbnail Resizing Methods
Now that we’ve explored the four methods for resizing YouTube thumbnails, it’s time to compare the pros and cons of each method. In this section, we’ll consider factors such as ease of use, speed, quality, cost, and compatibility to help you determine the best option for your needs.
Take a look at the table below for a more detailed comparison.
| | Windows Default App | Online YouTube Thumbnail Size Converter | Wondershare Filmora | Third-Party Software | |
| ————————————————– | ——————————————- | ———————– | ———————— | ——– |
| Other Software Required or Not | No | Yes (Internet Browser) | Yes | Yes |
| Internet Connection Required | No | Yes | No | No |
| Complexity of Operations | Easy | Easy | Easy | Moderate |
| Support Other Editing of the YouTube Thumbnail | No | No | Yes | Yes |
| File Size Limit | None | 25MB | None | None |
Resizing YouTube thumbnails using the Windows default app is a quick and easy method that requires no additional software or tools. However, the quality of the resized thumbnail may improve if the original image is low resolution, and this method is only suitable for users on Windows operating systems.
Online YouTube thumbnail size converters are convenient and easy to use, and they can be accessed from any device with an internet connection. They also typically preserve the quality of the original image. However, some online converters may have size limits or require a subscription to unlock all features, and using an online converter can be slower than using a dedicated software tool.
Using Wondershare Filmora allows you to create and edit YouTube thumbnails within a single application, which can be a time-saving advantage if you’re already using Filmora for other video editing tasks. However, Filmora is a paid software, so there is a cost associated with using it, and it may have a steeper learning curve for users new to video editing.
Image editing programs like GIMP offer many features and tools for customizing your thumbnail, including adding text, applying filters, and making more extensive edits beyond simply resizing the image. They also typically offer more control over the quality and appearance of the resized thumbnail.
However, using a third-party image editing program may require a learning curve and maybe more time-consuming than other methods, and there may be a cost associated with purchasing the software.
Each of the four methods for resizing YouTube thumbnails has its pros and cons, and the best method will depend on the user’s specific needs and preferences.
Conclusion
This article explored four methods for resizing YouTube thumbnails: using the Windows default app, online converters, Wondershare Filmora, and image editing programs like GIMP. Each method has advantages and disadvantages; the best one depends on your specific needs and preferences. No matter your chosen method, you can resize YouTube thumbnails confidently with these tools and techniques.
Free Download For macOS 10.14 or later
Here is the step-by-step tutorial on how to use Filmora in resizing your YouTube thumbnail. It is divided into two parts:
1. Take a Snapshot as the Thumbnail with Filmora
Step1 Open the video in the timeline, click the play icon in the player window, and pause when you reach the desired frame for the YouTube thumbnail. Click the camera icon to take a snapshot.
Step2 In the snapshot window, choose to save the snapshot as a PNG or JPG file.
Step3 Select the output storage location and click OK.
2. Resize the YouTube Thumbnail
Step1 Import the image into the app timeline.
Step2 Drag and drop the image into the timeline and click the green “Export“ button. In the popup Export window, select GIF. Next, click “Settings“ to adjust the resolution.
Step3 As the recommended size of a YouTube Thumbnail is 1280 * 720 pixels, you can set the resolution to 1280 * 720. Then click Apply and Export the GIF. You can now upload the GIF thumbnail to your YouTube account.
Method 4. Convert Images to YouTube Thumbnail Using Third-Party Software
In addition to using dedicated video editing software, several third-party image editing programs can be used to resize images for use as YouTube thumbnails. Programs like GIMP are popular for this purpose, as it offers a wide range of tools and features for editing and resizing images.
This program allows you to import an image, resize it to the dimensions required for a YouTube thumbnail (typically 1280 x 720 pixels), and save the edited version to your desired location. Using an image editing program can be a good option if you need more control over the appearance of your thumbnail or if you want to make more extensive edits beyond simply resizing the image.
To resize an image using an image editing program like GIMP, follow these steps:
Step1 Install and launch GIMP on your computer.
Step2 Click on “File“ > “Open,” then search for the file you want to resize.
Step3 Click on “Image“ > “Scale Image“ and make sure that the resolution is 1920 by 1080.
Step4 Click on “File“ > “Export As“ and toggle the “Select File Type (By Extension)“ option. Choose JPG/JPEG format because it can compress the thumbnail enough to stay within the limit of 2 megabytes.
Step5 You can change the quality of the image and click the “Export“ button to save the thumbnail.
Comparison of These 4 YouTube Thumbnail Resizing Methods
Now that we’ve explored the four methods for resizing YouTube thumbnails, it’s time to compare the pros and cons of each method. In this section, we’ll consider factors such as ease of use, speed, quality, cost, and compatibility to help you determine the best option for your needs.
Take a look at the table below for a more detailed comparison.
| | Windows Default App | Online YouTube Thumbnail Size Converter | Wondershare Filmora | Third-Party Software | |
| ————————————————– | ——————————————- | ———————– | ———————— | ——– |
| Other Software Required or Not | No | Yes (Internet Browser) | Yes | Yes |
| Internet Connection Required | No | Yes | No | No |
| Complexity of Operations | Easy | Easy | Easy | Moderate |
| Support Other Editing of the YouTube Thumbnail | No | No | Yes | Yes |
| File Size Limit | None | 25MB | None | None |
Resizing YouTube thumbnails using the Windows default app is a quick and easy method that requires no additional software or tools. However, the quality of the resized thumbnail may improve if the original image is low resolution, and this method is only suitable for users on Windows operating systems.
Online YouTube thumbnail size converters are convenient and easy to use, and they can be accessed from any device with an internet connection. They also typically preserve the quality of the original image. However, some online converters may have size limits or require a subscription to unlock all features, and using an online converter can be slower than using a dedicated software tool.
Using Wondershare Filmora allows you to create and edit YouTube thumbnails within a single application, which can be a time-saving advantage if you’re already using Filmora for other video editing tasks. However, Filmora is a paid software, so there is a cost associated with using it, and it may have a steeper learning curve for users new to video editing.
Image editing programs like GIMP offer many features and tools for customizing your thumbnail, including adding text, applying filters, and making more extensive edits beyond simply resizing the image. They also typically offer more control over the quality and appearance of the resized thumbnail.
However, using a third-party image editing program may require a learning curve and maybe more time-consuming than other methods, and there may be a cost associated with purchasing the software.
Each of the four methods for resizing YouTube thumbnails has its pros and cons, and the best method will depend on the user’s specific needs and preferences.
Conclusion
This article explored four methods for resizing YouTube thumbnails: using the Windows default app, online converters, Wondershare Filmora, and image editing programs like GIMP. Each method has advantages and disadvantages; the best one depends on your specific needs and preferences. No matter your chosen method, you can resize YouTube thumbnails confidently with these tools and techniques.
YouTube Creator Studio Vs. YouTube Studio (Beta): Which One Is Better?
YouTube Creator Studio vs. YouTube Studio (Beta): Which One is Better?

Richard Bennett
Oct 26, 2023• Proven solutions
In 2017, YouTube revealed YouTube Studio Beta , a video management and analytics dashboard that will replace the classic Creator Studio that most YouTubers are familiar with by 2021.
In this article, we will look at the new features YouTube Studio Beta has, what we can expect from it in the future, and why YouTube will eventually phase out the older YouTube Creator Studio… and whether that change will be an improvement.
Edit YouTube Videos with Filmora
As one of the most widely used video editing software in YouTube video editing, Filmora provides lots of templates and effects with an intuitive interface, which saves much time. Download the free trial version and get started now.


Why YouTube Is Getting Rid of Classic Creator Studio?
Data-driven YouTubers have long loved the YouTube Creator Studio. It has supplied so much information that it took this comprehensive post about Analytics to highlight all the insights. So why would YouTube change it?
Change to a popular social media platform is always worrisome to content creators because it means there will be a new learning phase forced upon them. While the Classic YouTube Creator Studio has a lot of features and functionality, the data was often hard to interpret and inconvenient to find. Many creators weren’t sure where their data was located or how to use the information presented to them.
YouTube Studio was designed to be a friendly management and analysis tool. YouTube also offers more guidance, showcasing the key metrics the algorithm uses to evaluate the success of a video more prominently. Additionally, the graphs presented offer more clarity, shortening the time a creator spends finding the information they need.
Undoubtedly, YouTube updated its Creator Studio to offer a tool that enables its users to better understand their video performance and make better content that serves YouTube’s requirements.
Intro to YouTube Studio (Beta)
YouTube Studio (Beta), for many YouTubers, is now the default. However, for the time being, creators can still switch back to the Classic view (as some of the features are still being built). YouTube’s objective is to receive data of their own by understanding how creators are using the new Studio and gaining feedback to improve upon it.
If you have any feedback, simply click on this button on the bottom left menu of the YouTube Studio (Beta) and send YouTube your thoughts.
In addition to the new layout of the tools and dashboards, YouTube Studio (Beta) will also debut 3 metrics for creators:
1. Impressions: See the total reach of all your videos or each individual video. Each time your video thumbnail and title are visible to the user counts as an impression.
2. Click-through rate: Determine how click-worthy your thumbnails and titles are, by seeing the percentage of people who click into your video.
3. Unique viewers: Know how many different people have watched your videos. This data can be used to compare the size of your subscriber base to the actual number of your audience.
Tips for Using YouTube Studio Beta Features
Now that you are more familiar with the new YouTube Studio (Beta), let us dive into what you can accomplish with all the new features.
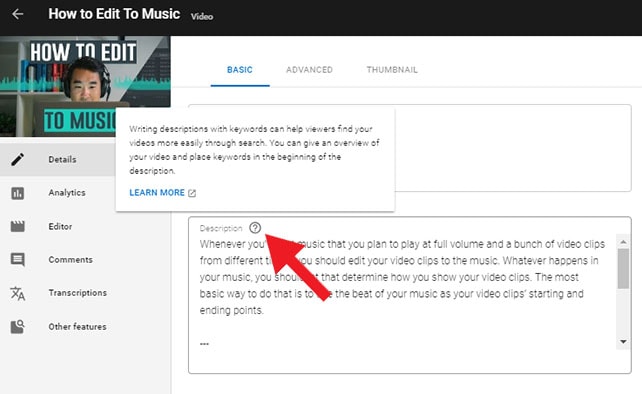
1. Optimization Tips
In the past, there has been a lot of speculations about how creators should treat their video titles and descriptions. Well, now YouTube is letting you know exactly which area to focus on. Simply hover over any “?” icon to see the advice and click “Learn More” to go to YouTube Creator Academy to get more details.
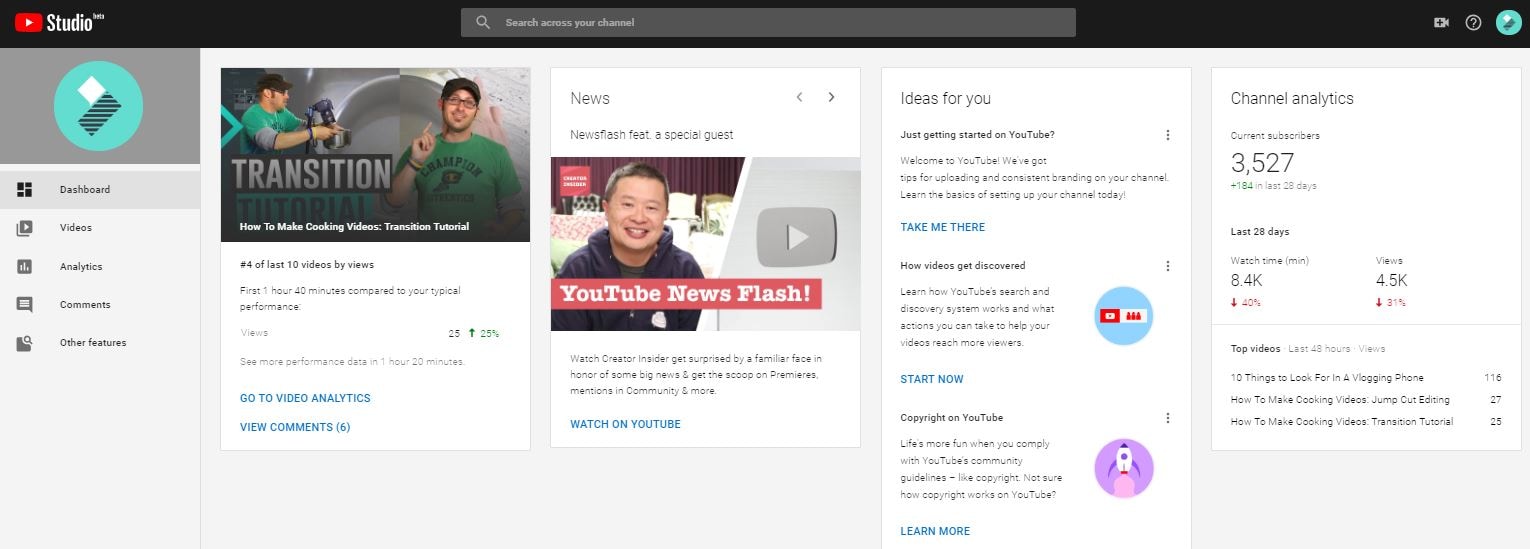
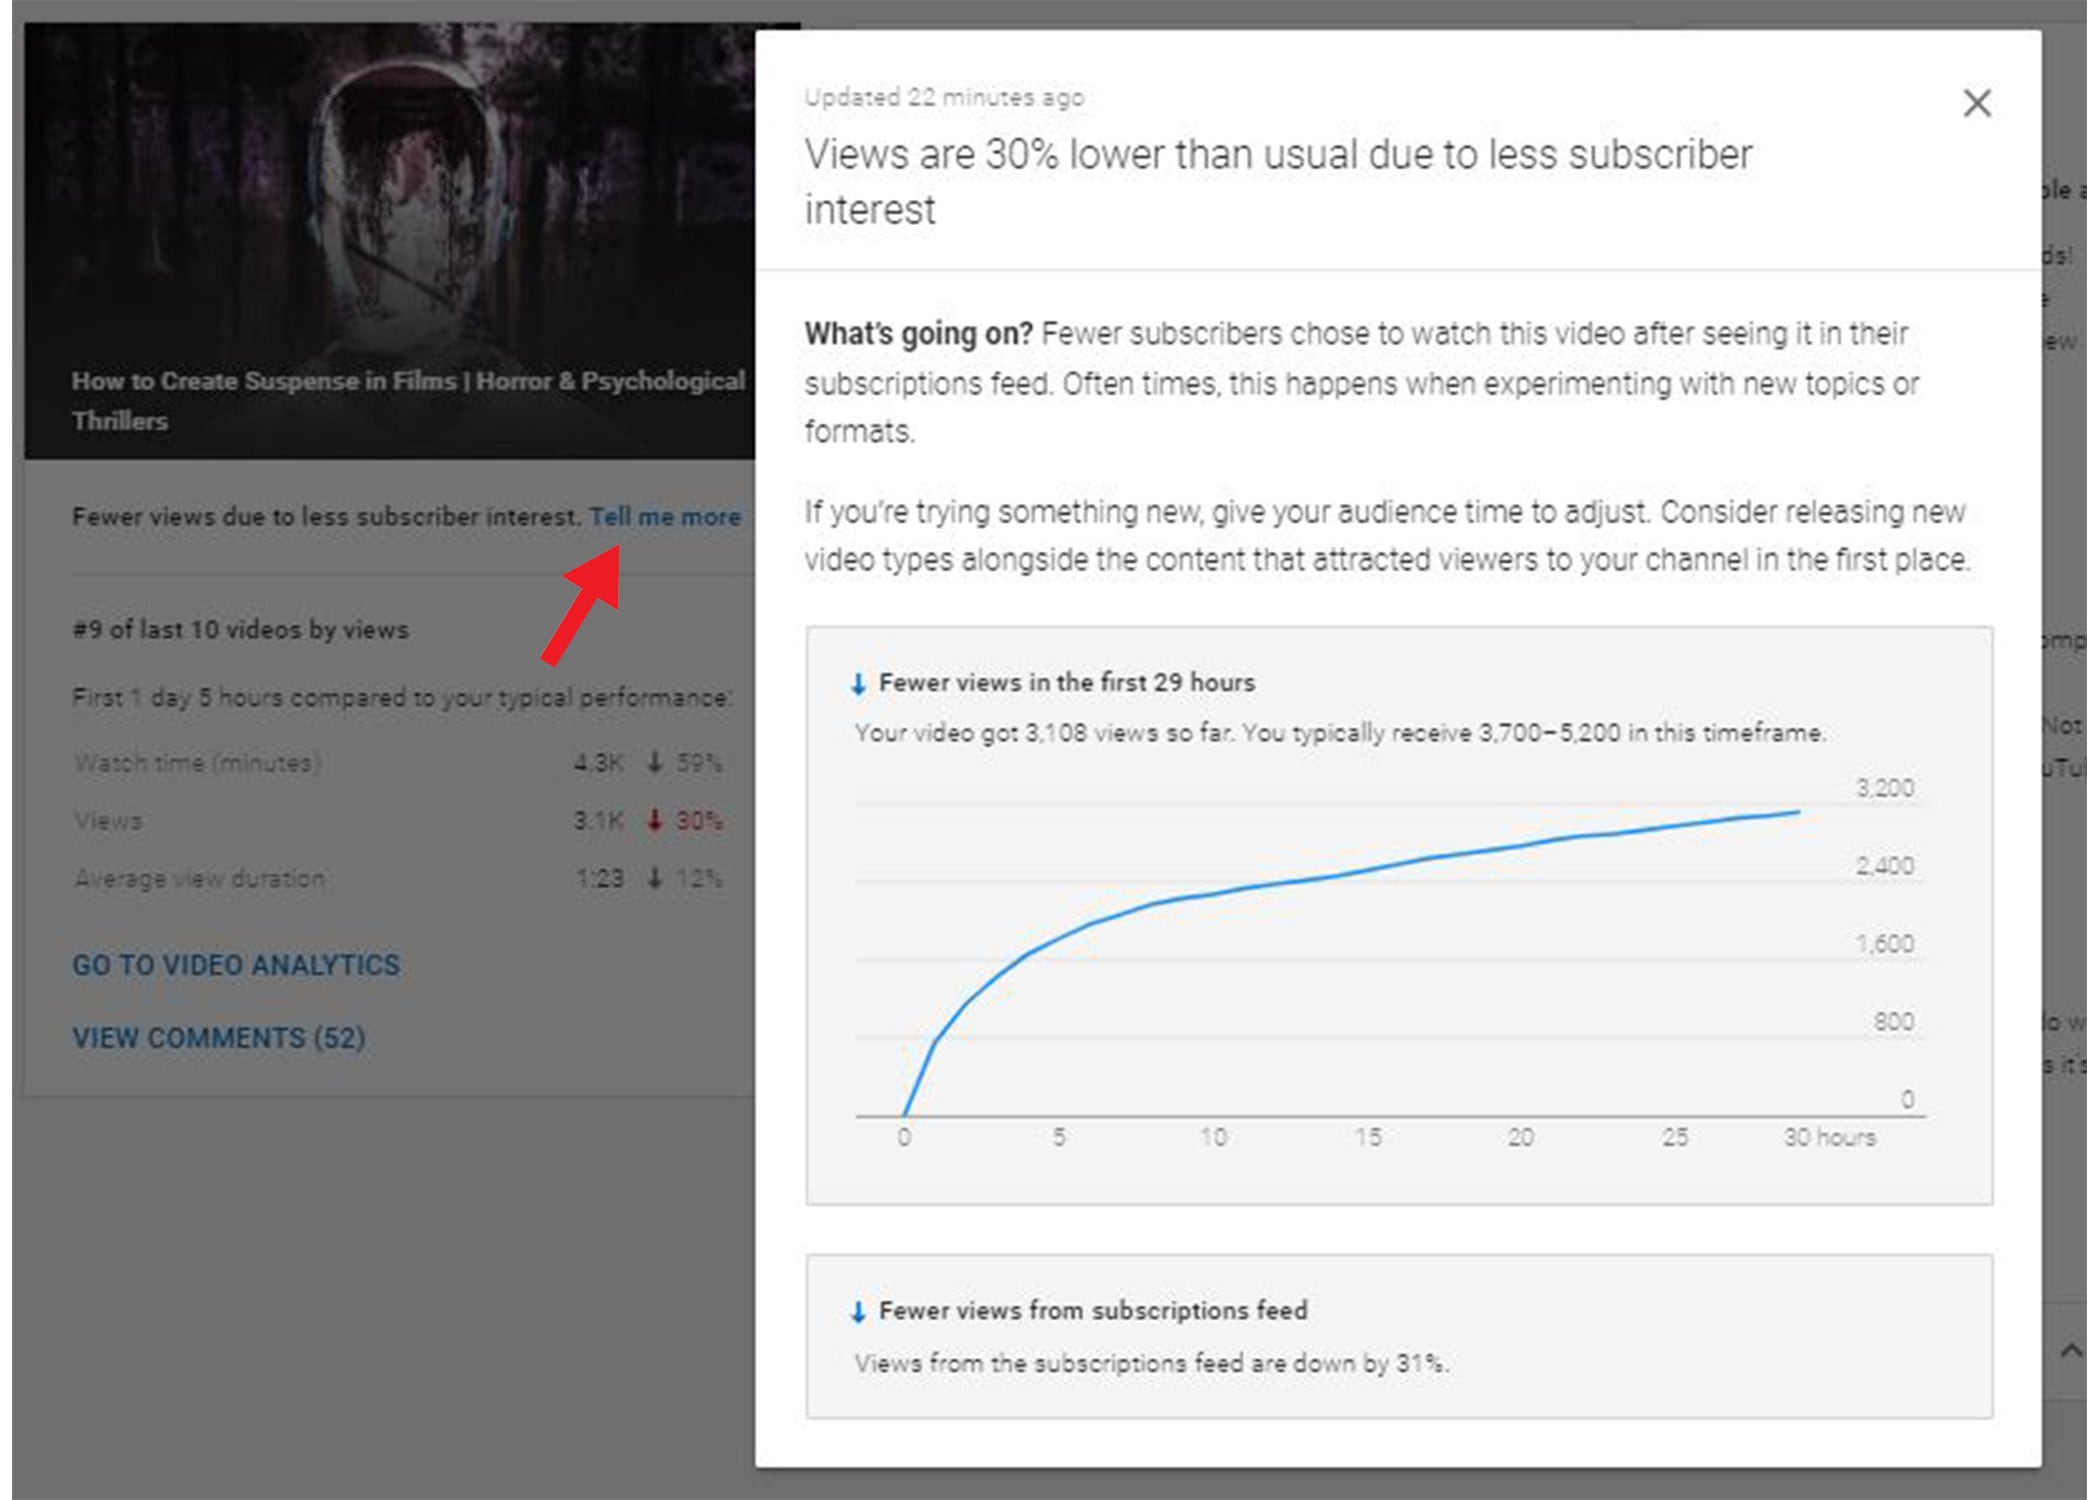
2. Recent Video Data
See data and improvement tips for your latest video. If YouTube identifies a notable issue with your video, they will help you by offering tips, which you can click “Tell Me More” to look into.
YouTube wants you to know how your videos are performing in the first few days. In order for YouTube to determine whether your content is worth sharing, it wants to know how your audience is responding to it right away. This means, the launch of your video matters.
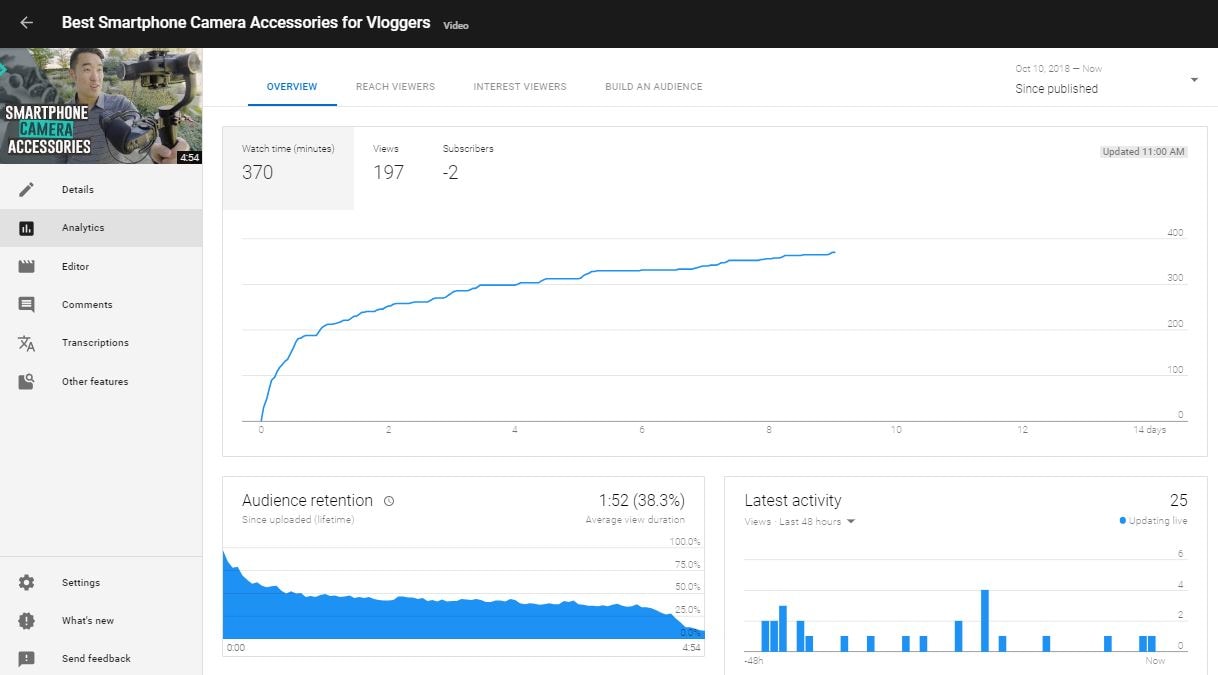
3. Video Analysis
In the Classic Creator Studio, you couldn’t get an aggregated view of all the important video data on one dashboard. You would have to click to each set of analytics individually and then dive deeper. This ate up your precious content creation time and made it hard to combine insights. Now with Studio Beta, you can see all the critical data in one spot. Right away, you can see how that video is performing through different factors. This will let you know where audience retention is dropping off or which traffic source is supplying most of the views.
4. Watch Time Funnel
The objective is to increase watch time, the metric YouTube puts the most weight on. With the new Watch Time Funnel, which you can find in the Analytics section under the Reach Viewer dashboard, you can see exactly at which level of your channel or wherein an individual video you will need to improve.
If the impression numbers are low, that means you need to improve how your video is being discovered by doing more research to understand what your viewers are searching for.
If the click-through rate (CTR) is low, then you will have to improve your thumbnail and title. This will better entice your audience to click. According to Google, half of all videos have an average CTR of 2-10%.
If the average view duration is not up to your standards, then you will have to improve your content itself. While it is most ideal to have all your viewers watch all the way to the end of all your videos, that is certainly unrealistic. However, 60-70% is a great number to aim towards.

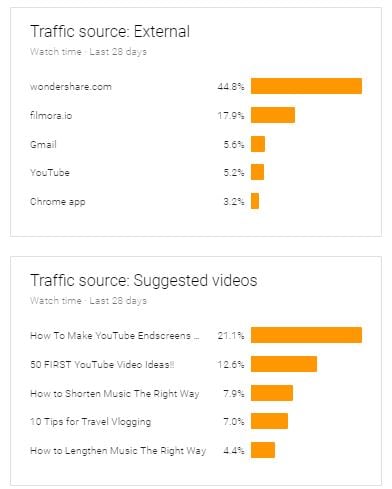
5. Traffic Sources
YouTube now presents all the different traffic sources in one easy-to-find page in the Reach Viewer tab, so creators no longer have to click between them to analyze where their traffic is coming from. This new design is far less intimidating and messy. At a glance, you can now see where the majority of your audiences are coming from.
YouTube has always put a lot of value into its analytic tools, and with YouTube Studio Beta the features and design are continuously improving. Having better data and understanding of how an individual video or an entire channel is performing will help creators succeed on this ever more competitive platform.
Have you tried the new YouTube Studio (Beta)? What are your thoughts? Please let us know in the comments below.
Richard Bennett
Richard Bennett is a writer and a lover of all things video.
Follow @Richard Bennett
Richard Bennett
Oct 26, 2023• Proven solutions
In 2017, YouTube revealed YouTube Studio Beta , a video management and analytics dashboard that will replace the classic Creator Studio that most YouTubers are familiar with by 2021.
In this article, we will look at the new features YouTube Studio Beta has, what we can expect from it in the future, and why YouTube will eventually phase out the older YouTube Creator Studio… and whether that change will be an improvement.
Edit YouTube Videos with Filmora
As one of the most widely used video editing software in YouTube video editing, Filmora provides lots of templates and effects with an intuitive interface, which saves much time. Download the free trial version and get started now.
Why YouTube Is Getting Rid of Classic Creator Studio?
Data-driven YouTubers have long loved the YouTube Creator Studio. It has supplied so much information that it took this comprehensive post about Analytics to highlight all the insights. So why would YouTube change it?
Change to a popular social media platform is always worrisome to content creators because it means there will be a new learning phase forced upon them. While the Classic YouTube Creator Studio has a lot of features and functionality, the data was often hard to interpret and inconvenient to find. Many creators weren’t sure where their data was located or how to use the information presented to them.
YouTube Studio was designed to be a friendly management and analysis tool. YouTube also offers more guidance, showcasing the key metrics the algorithm uses to evaluate the success of a video more prominently. Additionally, the graphs presented offer more clarity, shortening the time a creator spends finding the information they need.
Undoubtedly, YouTube updated its Creator Studio to offer a tool that enables its users to better understand their video performance and make better content that serves YouTube’s requirements.
Intro to YouTube Studio (Beta)
YouTube Studio (Beta), for many YouTubers, is now the default. However, for the time being, creators can still switch back to the Classic view (as some of the features are still being built). YouTube’s objective is to receive data of their own by understanding how creators are using the new Studio and gaining feedback to improve upon it.
If you have any feedback, simply click on this button on the bottom left menu of the YouTube Studio (Beta) and send YouTube your thoughts.
In addition to the new layout of the tools and dashboards, YouTube Studio (Beta) will also debut 3 metrics for creators:
1. Impressions: See the total reach of all your videos or each individual video. Each time your video thumbnail and title are visible to the user counts as an impression.
2. Click-through rate: Determine how click-worthy your thumbnails and titles are, by seeing the percentage of people who click into your video.
3. Unique viewers: Know how many different people have watched your videos. This data can be used to compare the size of your subscriber base to the actual number of your audience.
Tips for Using YouTube Studio Beta Features
Now that you are more familiar with the new YouTube Studio (Beta), let us dive into what you can accomplish with all the new features.
1. Optimization Tips
In the past, there has been a lot of speculations about how creators should treat their video titles and descriptions. Well, now YouTube is letting you know exactly which area to focus on. Simply hover over any “?” icon to see the advice and click “Learn More” to go to YouTube Creator Academy to get more details.
2. Recent Video Data
See data and improvement tips for your latest video. If YouTube identifies a notable issue with your video, they will help you by offering tips, which you can click “Tell Me More” to look into.
YouTube wants you to know how your videos are performing in the first few days. In order for YouTube to determine whether your content is worth sharing, it wants to know how your audience is responding to it right away. This means, the launch of your video matters.
3. Video Analysis
In the Classic Creator Studio, you couldn’t get an aggregated view of all the important video data on one dashboard. You would have to click to each set of analytics individually and then dive deeper. This ate up your precious content creation time and made it hard to combine insights. Now with Studio Beta, you can see all the critical data in one spot. Right away, you can see how that video is performing through different factors. This will let you know where audience retention is dropping off or which traffic source is supplying most of the views.
4. Watch Time Funnel
The objective is to increase watch time, the metric YouTube puts the most weight on. With the new Watch Time Funnel, which you can find in the Analytics section under the Reach Viewer dashboard, you can see exactly at which level of your channel or wherein an individual video you will need to improve.
If the impression numbers are low, that means you need to improve how your video is being discovered by doing more research to understand what your viewers are searching for.
If the click-through rate (CTR) is low, then you will have to improve your thumbnail and title. This will better entice your audience to click. According to Google, half of all videos have an average CTR of 2-10%.
If the average view duration is not up to your standards, then you will have to improve your content itself. While it is most ideal to have all your viewers watch all the way to the end of all your videos, that is certainly unrealistic. However, 60-70% is a great number to aim towards.
5. Traffic Sources
YouTube now presents all the different traffic sources in one easy-to-find page in the Reach Viewer tab, so creators no longer have to click between them to analyze where their traffic is coming from. This new design is far less intimidating and messy. At a glance, you can now see where the majority of your audiences are coming from.
YouTube has always put a lot of value into its analytic tools, and with YouTube Studio Beta the features and design are continuously improving. Having better data and understanding of how an individual video or an entire channel is performing will help creators succeed on this ever more competitive platform.
Have you tried the new YouTube Studio (Beta)? What are your thoughts? Please let us know in the comments below.
Richard Bennett
Richard Bennett is a writer and a lover of all things video.
Follow @Richard Bennett
Also read:
- [New] 2024 Approved Skyrocket Viewer Numbers with the Top 12 Effective Tactics
- [New] Exploring What Sets YouTube TV Apart From Other Streaming Platforms
- [New] Fast Fixed Ways to Scramble YouTube Watchlist Content
- [New] In 2024, Video Flexibility Unleashed 5 Powerful Online Methods to Edit Videos on Vimeo
- [Updated] Setting Sail on the Content Sea Your YouTube Account for 2024
- 2024 Approved '21 Edition Synopsis – Unraveling the Future of Online Betting with Vegas Pro
- 2024 Approved Enhancing Narratives with Temporal & Spatial Shifts
- 2024 Approved Guffaw Generation Generating 7 Hilarious Video Moments Online
- 2024 Approved Integrate FREE Audio in Your Videos Effortlessly
- 2024 Approved The Precision of Portioning Video Length Optimization on YouTube
- How To Bypass Realme 11X 5G FRP In 3 Different Ways
- In 2024, How to Transfer Photos From Samsung Galaxy F54 5G to Samsung Galaxy S21 Ultra | Dr.fone
- In 2024, Personalize Your YouTube Experience with Altered Rhythms
- In 2024, Social Media Forecasting Through Data Visualization
- Unveiling the Clarity: A Comprehensive Evaluation of the Kobo Clara Colour eReader
- Title: Fast Guide Transforming Images Into YouTube Desktop Thumbnails for 2024
- Author: Joseph
- Created at : 2024-11-21 17:03:20
- Updated at : 2024-11-24 19:07:39
- Link: https://youtube-stream.techidaily.com/fast-guide-transforming-images-into-youtube-desktop-thumbnails-for-2024/
- License: This work is licensed under CC BY-NC-SA 4.0.