
:max_bytes(150000):strip_icc()/how-to-watch-taylor-swift-movies-in-order-a8e26851d3d94bf183a144766801c16c.jpg)
"2024 Approved Top Screen Recorder Software For YouTube Creators"
Top Screen Recorder Software For YouTube Creators
Best YouTube Livestreaming Screen Recorders

Richard Bennett
Oct 26, 2023• Proven solutions
The global pandemic has changed the way we live for the time being, and right now, we cannot attend events in the same way we did at the beginning of the year.
A growing number of cultural organizations, businesses, and influential YouTubers are turning towards YouTube’s Live feature because it provides a simple way of broadcasting different types of content in real-time. YouTube Live is by no means a new option, since the platform first introduced live streaming features in 2008, and some twelve years later, the feature has never been more popular.
However, the live streams you broadcast on YouTube are stored for just a brief period of time, which means you have to search for alternative methods of saving them. That’s why in this article we are going to take you through the best YouTube Live screen recorders you can use to capture the video content you are sharing with your followers.
Note: We resolutely oppose all forms of copyright-infringing downloads. This tutorial is only for downloading YouTube videos/audio materials from your own channel.
Top 10+ YouTube Live Screen Recorders
The maximum resolution in which you can record computer screen , audio recording options, or customization of the recording area are some of the most important features you need to consider while choosing a YouTube Live screen recorder.
We have selected some of the best YouTube Live screen recorders that enable you to do much more than just record live streams. So, let’s take a look at what they have to offer.
1. OBS Studio
Price: Free
Compatibility: Windows, Linux, macOS
The vast majority of live streams you can find on Twitch and YouTube are made with OBS Studio, but besides broadcasting videos, the software also gives you access to screencasting tools. This means that you can specify the area of the screen you want to record, choose the recording’s resolution and frame rate, or adjust the audio recording options.
OBS Studio is the best free, open-source screen recording program you can download. You shouldn’t use a software just because it’s free, but OBS Studio is also an extremely versatile tool. You can both record and stream in high definition and it comes with the ability to record either through your webcam or through your screen. It records directly through the graphics card , which means it can capture games even when in full-screen mode whereas a lot of other screen-recording software forces you to play games in windowed mode. The high quality can be seen easily in whatever you choose to broadcast.
OBS Studio allows you to record videos from a variety of sources, which makes it a perfect option for capturing the content you share through YouTube Live since you can select a browser window you want to capture in just a few clicks. What’s more, this open-source software is equipped with basic video editing tools, which enables you to preview the video you recorded before publishing it, apply transitions between cuts, or perform basic color correction.
Check the detailed guide to How to Record with OBS .
2. XSplit
Price: $24.95 for a three-month license
Compatibility: Windows
This is yet another broadcasting software that is equipped with powerful screen recording tools. Setting up a new screencasting session with XSplit is a simple and intuitive process that is not going to take much more than a few moments of your time.
All you need to do is define a workspace, then pick the preferred resolution and frame rate. The software allows you to capture screens in 4K resolution and at 60 fps, but it also offers a variety of resolution and frame rate options so that you can choose the one that best fits your needs. Furthermore, you can record the computer audio, which enables you to capture the live stream’s audio in excellent quality. Besides YouTube Live, XSplit can be used with Zoom , Skype, Google Hangouts, and numerous other live streaming and video calling apps.
3. Filmora
Price: Free, pricing plans start at $49.99/year
Compatibility: macOS, Windows


If you are looking for a screen recorder that is stacked with powerful video editing features, then Filmora is a great option for you. Customizing a YouTube Live or any other screencasting session with this video editing software is easy, and you can choose the resolution, frame rate, or even if you want to show mouse clicks in the recording.
Capturing the webcam feed and the computer’s screen simultaneously is also an option, while you can also decide whether or not you want to record audio from a microphone, computer audio, or both at the same time.
What’s more Filmora lets you set up the maximum duration of a screen recording and you start, pause, resume or stop a screen recording session by using hotkeys. Once you are done recording the live stream you shared on YouTube, you can edit the footage you created before uploading it to your YouTube channel.
4. Wondershare DemoCreator
Compatibility: Windows
Price: Start from $9.99
DemoCreator is a recorder that focuses its overall user experience. It is able to easily record high-quality videos at up to 120 FPS (60 FPS for Mac) and allows you to simultaneously record both your screen and webcam. This software is incredibly user friendly and makes for an easy experience for new streamers. The dual recording makes it great for gamers who are also looking to film their reactions.
5. CloudApp
Price: Free, $10 per month for an individual user
Compatibility: Windows, macOS, Linux, Chrome
Starting a new screen capturing session with the CloudApp requires you to just specify the portion of the screen you want to capture and hit the record button. Moreover, you can choose if you want to record with or without a webcam and you have the option to enable or disable the audio recording option.
However, you can only create 90-second screen recordings with the free version of the CloudApp and you cannot set resolution or frame rate of the recording. That’s why you need to upgrade to the Pro version if you want to use it to record live streams on YouTube. The Pro subscription model also grants you access to basic video editing tools and a variety of file sharing options. In addition, CloudApp lets you create and annotate still images and GIFs, which makes it a great option for digital marketers.
6. Techsmith Camtasia
Price: Free trial, $269.05 one-time fee
Compatibility: Windows, macOS
You don’t need years of video editing experience to start a new screen recording session in Camtasia. In fact, you just have to click on the Record button that is located in the software’s tool panel and then customize the settings.
Camtasia lets you choose if you want to record the full screen or just a selected portion of the screen or decide if you want to switch the webcam or the microphone off. You should make sure that the System Audio feature is enabled in order to record the sound of the live stream you’re sharing on YouTube. Pausing or stopping a screencasting session requires you to either click on the appropriate buttons or use the keyboard-based hotkeys. After you are done recording a live stream you can edit the footage using Camtasia’s video editing tools.
7. ScreenRec
Price: Free
Compatibility: Windows, macOS, Linux
Recording any live stream or TV show you play on your computer with ScreenRec is a straightforward process that can be completed in just a few clicks. Simply drag the mouse cursor over the area you want to record, then hit the Record button when you are ready and ScreenRec will start capturing the computer screen.
Once the screencasting session is completed you will get a sharable link that can be embedded to a website or used to save an MP4 file on your hard drive. Furthermore, ScreenRec is equipped with analytics tools that show you how many views your videos attracted or for how long each visitor watched them. All of these features make ScreenRec an excellent option for anyone who wants to record a live stream on YouTube or any other on-screen activity.
8. Flashback Express
Price: Free
Compatibility: Windows
Flashback Express is a simple screen recorder that lets you create high-res videos effortlessly. Setting up a new screencasting session requires you to just specify the area of the screen you want to record, choose whether or not you want to record the webcam feed and hit the Record button.
There are no restrictions in terms of the duration of screen recordings you can make with Flashback Express and the software doesn’t watermark the video you create.
However, you can only save the files in MP4, AVI, or WMW formats and you cannot adjust the video’s frame rate or resolution. What’s more, editing videos or applying effects with Flashback Express isn’t possible and you must upgrade to FlashBack Pro if you want to edit the live streams you broadcast on YouTube.
This piece of software is user friendly, but it doesn’t have as many features as other products on the market. Having said that, it is still an excellent tool that will help you live stream gameplay easily. Although it doesn’t come with built-in video editing software, it is possible to download another program to do this for you (i.e. Filmora). Flashback Express has the ability to record through your headset or microphone as well.
9. VLC
Price: Free
Compatibility: macOS, Linux, Windows
This is an iconic media player that became famous for its versatility and support for nearly all video file formats. Besides being one of the best media players ever created, VLC is also equipped with screen recording and video editing tools.
In order to start a new screencasting session, you will have to go to the Media menu and then select the Open Capture Device option. Once the new window pops up on the screen you should change the Capture Mode to Desktop and then adjust the frame rate in accordance with your needs.
Click on the Play button, and then hit the Record button after the screen recording window appears on the screen. You can only record the entire screen with VLC, since customizing the recording area isn’t an option, and all your files will be captured in the RAW format which means that you may have to resize them before you upload them to YouTube.
10. Screencast-o-matic
Price: Free, pricing options start at $1.65 per month
Compatibility: macOS, Windows
As its name suggests, this software product makes the screen recording process almost automatic. You can choose if you want to record an entire screen or just a window you selected. In addition, Screencast-o-matic lets you record the desktop and webcam footage at the same time, and you can even zoom in while the screencasting session is still in progress.
The free version of the software offers only a basic set of features that doesn’t include the option to record system audio. This means that you have to opt for one of the available subscription models if you want to record your live streams on YouTube with Screencast-o-matic. What’s more, you will be to create videos that are longer than 15 minutes, create recordings without watermarks or add music to your recordings if you opt for Deluxe or Premiere pricing options.
11. QuickTime Player
Price: Free
Compatibility: macOS, Windows
Mac users who want to record content that is broadcasted via YouTube Live can do so without having to install a third-party app. Apple ceased the support for the Windows-based version of QuickTime Player in 2016 and PC users can only capture their screens with this software if they have some of its earlier versions.
In order to start a new screen recording session in QuickTime Player, you just have to go to the File menu and select the New Screen Recording option. The Screen Recording window where you can choose if you want to record audio or show mouse click in the recording will pop up on the screen. QuickTime Player lets you choose if you want to capture the entire screen or just a portion of it, and you can click on the Record button to start a new screencasting session. In order to save a video file you created, you just have to go to the File menu and pick the Save option.
How to Record a YouTube Live Stream with Filmora
Recording a YouTube Live stream with Filmora is easy even if you never went through this process before. You can set up a new screencasting session in just a few easy steps that won’t take more than a few moments to complete. Here’s what you need to do:
Step 1: Launch Filmora and create a new project. Go to the Media tab once the video editor’s main window loads and click on the Record drop-down menu that is located next to the Import drop-down menu.
Choose the Record PC Screen option and then proceed to customize the settings for your screencasting session.

Step 2: Click on the Rectangular icon in the upper left corner of the Wondershare Filmora Scrn window and choose either Full Screen, Custom, or Target Window option, depending on how you want to record a YouTube Live stream to define the area of the screen that is going to be recorded.
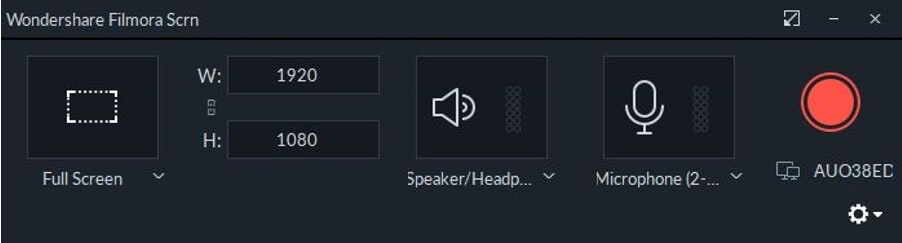
You can then proceed to insert the resolution your screen recording is going to have, and choose if you want to record system audio and sound from an external microphone.
Step 3: Click on the Gear icon below the Record button to gain access to additional settings, and then proceed to set the frame rate, adjust the video’s quality or activate the Show Mouse Clicks in Recording option.
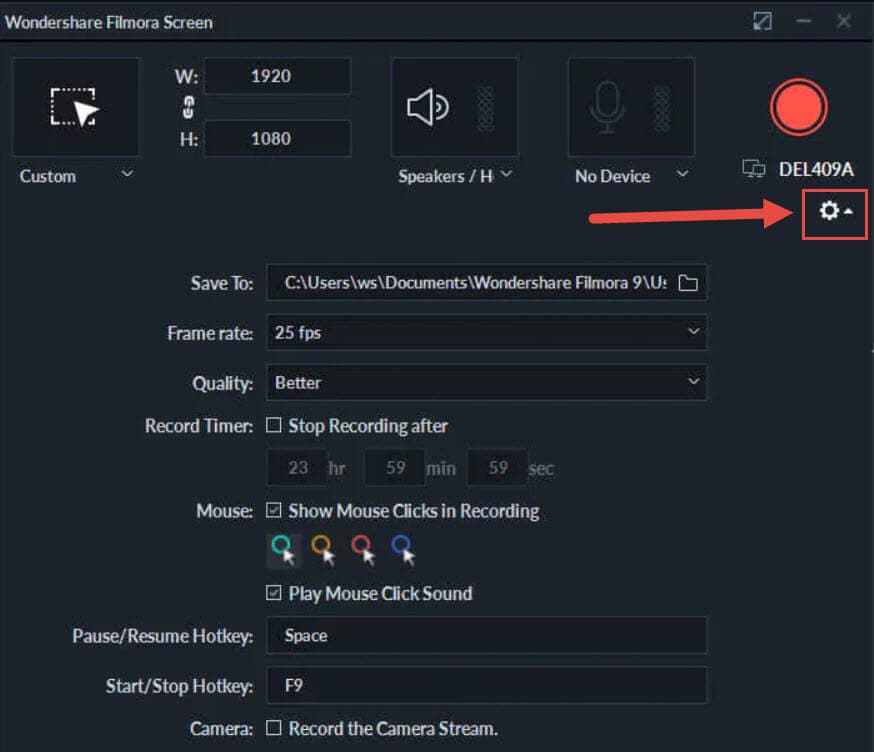
Make sure that the checkbox next to the Record the Camera Stream is marked if you want to record webcam feed and computer desktop at the same time.
Step 4: Press the red Record button in the upper right corner of the window and jump to the live stream. Once the broadcast is completed, you should click on the Stop button and use Filmora’s editing tools to remove all imperfections from the recording.
Filmora allows you to export all of your projects directly to your YouTube channel immediately after the rendering process is completed.
Frequently Asked Questions about YouTube Live Screen Recorders
1. Does YouTube Save Live Videos?
Stream Now, Mobile, Webcam, and Events streams can be stored automatically for 12 hours after they end. You can access all of your live streams by clicking on the Videos menu in the YouTube Studio and selecting the Live option and then change the Privacy setting in the Visibility menu.
2. How to use YouTube to Archive a Live Stream?
Once the live stream ends, you should go to the Dashboard and click on the Live feature, and then choose the Stream option. Check the Make Archive Unlisted When Complete checkbox and the live stream video will be saved accordingly.
Richard Bennett
Richard Bennett is a writer and a lover of all things video.
Follow @Richard Bennett
Richard Bennett
Oct 26, 2023• Proven solutions
The global pandemic has changed the way we live for the time being, and right now, we cannot attend events in the same way we did at the beginning of the year.
A growing number of cultural organizations, businesses, and influential YouTubers are turning towards YouTube’s Live feature because it provides a simple way of broadcasting different types of content in real-time. YouTube Live is by no means a new option, since the platform first introduced live streaming features in 2008, and some twelve years later, the feature has never been more popular.
However, the live streams you broadcast on YouTube are stored for just a brief period of time, which means you have to search for alternative methods of saving them. That’s why in this article we are going to take you through the best YouTube Live screen recorders you can use to capture the video content you are sharing with your followers.
Note: We resolutely oppose all forms of copyright-infringing downloads. This tutorial is only for downloading YouTube videos/audio materials from your own channel.
Top 10+ YouTube Live Screen Recorders
The maximum resolution in which you can record computer screen , audio recording options, or customization of the recording area are some of the most important features you need to consider while choosing a YouTube Live screen recorder.
We have selected some of the best YouTube Live screen recorders that enable you to do much more than just record live streams. So, let’s take a look at what they have to offer.
1. OBS Studio
Price: Free
Compatibility: Windows, Linux, macOS
The vast majority of live streams you can find on Twitch and YouTube are made with OBS Studio, but besides broadcasting videos, the software also gives you access to screencasting tools. This means that you can specify the area of the screen you want to record, choose the recording’s resolution and frame rate, or adjust the audio recording options.
OBS Studio is the best free, open-source screen recording program you can download. You shouldn’t use a software just because it’s free, but OBS Studio is also an extremely versatile tool. You can both record and stream in high definition and it comes with the ability to record either through your webcam or through your screen. It records directly through the graphics card , which means it can capture games even when in full-screen mode whereas a lot of other screen-recording software forces you to play games in windowed mode. The high quality can be seen easily in whatever you choose to broadcast.
OBS Studio allows you to record videos from a variety of sources, which makes it a perfect option for capturing the content you share through YouTube Live since you can select a browser window you want to capture in just a few clicks. What’s more, this open-source software is equipped with basic video editing tools, which enables you to preview the video you recorded before publishing it, apply transitions between cuts, or perform basic color correction.
Check the detailed guide to How to Record with OBS .
2. XSplit
Price: $24.95 for a three-month license
Compatibility: Windows
This is yet another broadcasting software that is equipped with powerful screen recording tools. Setting up a new screencasting session with XSplit is a simple and intuitive process that is not going to take much more than a few moments of your time.
All you need to do is define a workspace, then pick the preferred resolution and frame rate. The software allows you to capture screens in 4K resolution and at 60 fps, but it also offers a variety of resolution and frame rate options so that you can choose the one that best fits your needs. Furthermore, you can record the computer audio, which enables you to capture the live stream’s audio in excellent quality. Besides YouTube Live, XSplit can be used with Zoom , Skype, Google Hangouts, and numerous other live streaming and video calling apps.
3. Filmora
Price: Free, pricing plans start at $49.99/year
Compatibility: macOS, Windows
If you are looking for a screen recorder that is stacked with powerful video editing features, then Filmora is a great option for you. Customizing a YouTube Live or any other screencasting session with this video editing software is easy, and you can choose the resolution, frame rate, or even if you want to show mouse clicks in the recording.
Capturing the webcam feed and the computer’s screen simultaneously is also an option, while you can also decide whether or not you want to record audio from a microphone, computer audio, or both at the same time.
What’s more Filmora lets you set up the maximum duration of a screen recording and you start, pause, resume or stop a screen recording session by using hotkeys. Once you are done recording the live stream you shared on YouTube, you can edit the footage you created before uploading it to your YouTube channel.
4. Wondershare DemoCreator
Compatibility: Windows
Price: Start from $9.99
DemoCreator is a recorder that focuses its overall user experience. It is able to easily record high-quality videos at up to 120 FPS (60 FPS for Mac) and allows you to simultaneously record both your screen and webcam. This software is incredibly user friendly and makes for an easy experience for new streamers. The dual recording makes it great for gamers who are also looking to film their reactions.
5. CloudApp
Price: Free, $10 per month for an individual user
Compatibility: Windows, macOS, Linux, Chrome
Starting a new screen capturing session with the CloudApp requires you to just specify the portion of the screen you want to capture and hit the record button. Moreover, you can choose if you want to record with or without a webcam and you have the option to enable or disable the audio recording option.
However, you can only create 90-second screen recordings with the free version of the CloudApp and you cannot set resolution or frame rate of the recording. That’s why you need to upgrade to the Pro version if you want to use it to record live streams on YouTube. The Pro subscription model also grants you access to basic video editing tools and a variety of file sharing options. In addition, CloudApp lets you create and annotate still images and GIFs, which makes it a great option for digital marketers.
6. Techsmith Camtasia
Price: Free trial, $269.05 one-time fee
Compatibility: Windows, macOS
You don’t need years of video editing experience to start a new screen recording session in Camtasia. In fact, you just have to click on the Record button that is located in the software’s tool panel and then customize the settings.
Camtasia lets you choose if you want to record the full screen or just a selected portion of the screen or decide if you want to switch the webcam or the microphone off. You should make sure that the System Audio feature is enabled in order to record the sound of the live stream you’re sharing on YouTube. Pausing or stopping a screencasting session requires you to either click on the appropriate buttons or use the keyboard-based hotkeys. After you are done recording a live stream you can edit the footage using Camtasia’s video editing tools.
7. ScreenRec
Price: Free
Compatibility: Windows, macOS, Linux
Recording any live stream or TV show you play on your computer with ScreenRec is a straightforward process that can be completed in just a few clicks. Simply drag the mouse cursor over the area you want to record, then hit the Record button when you are ready and ScreenRec will start capturing the computer screen.
Once the screencasting session is completed you will get a sharable link that can be embedded to a website or used to save an MP4 file on your hard drive. Furthermore, ScreenRec is equipped with analytics tools that show you how many views your videos attracted or for how long each visitor watched them. All of these features make ScreenRec an excellent option for anyone who wants to record a live stream on YouTube or any other on-screen activity.
8. Flashback Express
Price: Free
Compatibility: Windows
Flashback Express is a simple screen recorder that lets you create high-res videos effortlessly. Setting up a new screencasting session requires you to just specify the area of the screen you want to record, choose whether or not you want to record the webcam feed and hit the Record button.
There are no restrictions in terms of the duration of screen recordings you can make with Flashback Express and the software doesn’t watermark the video you create.
However, you can only save the files in MP4, AVI, or WMW formats and you cannot adjust the video’s frame rate or resolution. What’s more, editing videos or applying effects with Flashback Express isn’t possible and you must upgrade to FlashBack Pro if you want to edit the live streams you broadcast on YouTube.
This piece of software is user friendly, but it doesn’t have as many features as other products on the market. Having said that, it is still an excellent tool that will help you live stream gameplay easily. Although it doesn’t come with built-in video editing software, it is possible to download another program to do this for you (i.e. Filmora). Flashback Express has the ability to record through your headset or microphone as well.
9. VLC
Price: Free
Compatibility: macOS, Linux, Windows
This is an iconic media player that became famous for its versatility and support for nearly all video file formats. Besides being one of the best media players ever created, VLC is also equipped with screen recording and video editing tools.
In order to start a new screencasting session, you will have to go to the Media menu and then select the Open Capture Device option. Once the new window pops up on the screen you should change the Capture Mode to Desktop and then adjust the frame rate in accordance with your needs.
Click on the Play button, and then hit the Record button after the screen recording window appears on the screen. You can only record the entire screen with VLC, since customizing the recording area isn’t an option, and all your files will be captured in the RAW format which means that you may have to resize them before you upload them to YouTube.
10. Screencast-o-matic
Price: Free, pricing options start at $1.65 per month
Compatibility: macOS, Windows
As its name suggests, this software product makes the screen recording process almost automatic. You can choose if you want to record an entire screen or just a window you selected. In addition, Screencast-o-matic lets you record the desktop and webcam footage at the same time, and you can even zoom in while the screencasting session is still in progress.
The free version of the software offers only a basic set of features that doesn’t include the option to record system audio. This means that you have to opt for one of the available subscription models if you want to record your live streams on YouTube with Screencast-o-matic. What’s more, you will be to create videos that are longer than 15 minutes, create recordings without watermarks or add music to your recordings if you opt for Deluxe or Premiere pricing options.
11. QuickTime Player
Price: Free
Compatibility: macOS, Windows
Mac users who want to record content that is broadcasted via YouTube Live can do so without having to install a third-party app. Apple ceased the support for the Windows-based version of QuickTime Player in 2016 and PC users can only capture their screens with this software if they have some of its earlier versions.
In order to start a new screen recording session in QuickTime Player, you just have to go to the File menu and select the New Screen Recording option. The Screen Recording window where you can choose if you want to record audio or show mouse click in the recording will pop up on the screen. QuickTime Player lets you choose if you want to capture the entire screen or just a portion of it, and you can click on the Record button to start a new screencasting session. In order to save a video file you created, you just have to go to the File menu and pick the Save option.
How to Record a YouTube Live Stream with Filmora
Recording a YouTube Live stream with Filmora is easy even if you never went through this process before. You can set up a new screencasting session in just a few easy steps that won’t take more than a few moments to complete. Here’s what you need to do:
Step 1: Launch Filmora and create a new project. Go to the Media tab once the video editor’s main window loads and click on the Record drop-down menu that is located next to the Import drop-down menu.
Choose the Record PC Screen option and then proceed to customize the settings for your screencasting session.
Step 2: Click on the Rectangular icon in the upper left corner of the Wondershare Filmora Scrn window and choose either Full Screen, Custom, or Target Window option, depending on how you want to record a YouTube Live stream to define the area of the screen that is going to be recorded.
You can then proceed to insert the resolution your screen recording is going to have, and choose if you want to record system audio and sound from an external microphone.
Step 3: Click on the Gear icon below the Record button to gain access to additional settings, and then proceed to set the frame rate, adjust the video’s quality or activate the Show Mouse Clicks in Recording option.
Make sure that the checkbox next to the Record the Camera Stream is marked if you want to record webcam feed and computer desktop at the same time.
Step 4: Press the red Record button in the upper right corner of the window and jump to the live stream. Once the broadcast is completed, you should click on the Stop button and use Filmora’s editing tools to remove all imperfections from the recording.
Filmora allows you to export all of your projects directly to your YouTube channel immediately after the rendering process is completed.
Frequently Asked Questions about YouTube Live Screen Recorders
1. Does YouTube Save Live Videos?
Stream Now, Mobile, Webcam, and Events streams can be stored automatically for 12 hours after they end. You can access all of your live streams by clicking on the Videos menu in the YouTube Studio and selecting the Live option and then change the Privacy setting in the Visibility menu.
2. How to use YouTube to Archive a Live Stream?
Once the live stream ends, you should go to the Dashboard and click on the Live feature, and then choose the Stream option. Check the Make Archive Unlisted When Complete checkbox and the live stream video will be saved accordingly.
Richard Bennett
Richard Bennett is a writer and a lover of all things video.
Follow @Richard Bennett
Carminati’s Gig Economy: AJay’s YouTube Wealth Stream
If you have been following the who’s who of YouTube, then Ajey Nagar, also popularly known as CarryMinati is definitely not a new name for you and you must also be well aware of CarryMinati YouTube income. And, if you have not heard of this name before, then it is high time to know about this YouTube influencer who is an Asian and Indian sensation.
Getting excited, we too!!! So, in this article, we will learn all about who is Ajey Nagar, what is CarryMinati, what makes this man so popular, what is his CarryMinati monthly income, his personal life, and much more.
Part 1: Who is CarryMinati?
You may wonder who this simple-looking, young boy is, right?
Yes, he is one of the India’s biggest YouTuber- Ajey Nagar. He shared a shoulder with Tom Cruise while promoting Mission Impossible 6 in Paris.
In this part of the topic, we are going to get deep knowledge about the personal, professional and financial information related to Carryminati.
| Nickname | CarryMinati |
|---|---|
| Real Name | Ajey Nagar |
| Net Worth (2022) | 31 Crores ($4 Million) |
| Monthly Income | Rs. 16+ Lakh |
| Yearly Income | Rs. 3+ Crore |
| Biography | |
| Date of Birth | 12th June 1999 |
| Gender | Male |
| Nationality | Indian |
| Height | 165 cm |
| Profession | YouTube |
| YouTube Channel | CarryMinati and CarryisLive |
| Awards and Recognition | Listed in TIME’s 10 next-generation leaders in the year 2019Listed in Forbes 30 Under 30 Asia in 2020 |
So, by now we know that CarryMinati aka Ajay Nagar is quite popular on YouTube. But, what does this popularity gets him in terms of money? Yes, this is an interesting question and the answer for this, you can check out in the next part of the topic.
Part 2: CarryMinati YouTube earning and stats
Let’s now deep digger into the financial aspects and other related stats related to CarryMinati. So, if you are eager to know how much CarryMinati earn from YouTube, we will give you to the nearest exact figures. Who does not like numbers, they are interesting facts, isn’tead.
A major part of Ajay Nagar’s income comes from YouTube videos and in addition to this, his popularity makes him earn from YouTube sponsors, collaborations, tie-up videos, brand endorsements, and advertising.
| Estimated Monthly Earnings in USD/Indian Rupees | Rs. 16+ Lakhs |
|---|---|
| Estimated yearly Earnings in USD/Indian Rupees | $ 4 Million/ Rs. 3+ Crores |
| Videos About | Roasting, Comedy, Sketches, Satire, and Gaming |
| Total Video Uploads | Over 176 |
| Subscribers | CarryMinati- 36.6millionCarryisLive- 11.3 million |
| Video Views | CarryMinati- 2.9 billion+CarryisLive- 1.3 billion+ |
| Last 30 Days Views | 35 M+ |
The statistics related to the views and income about CarryMinati are quite interesting and this makes everyone curious about what makes the channel and this person so popular on YouTube. If you too have been curious about the same, head to our next section.
Part 3: Why is Carry Minati trending on YouTube?
Just like the statistics, the facts related to CarryMinati’s popularity are equally interesting. Every YouTube channel or an influencer who is popular and trending have their own uniqueness and when it comes to CarrayMinati aka Ajay Nagar, there are several factors that makes him a sensation. Shortlisted some of them are as below.
Exclusive personality of Ajay Naga
Ajay Nagar has an exclusive personality that acts like a magnet that attracts viewers. His way of speaking and interacting with the audience has earned him a fan base across the globe.
Engaging and interactive video
The videos of CarryMinati are engaging and interactive which keeps the audience interested throughout.
Rib-tickling humour
The way the humour is added to the videos is simply amazing and definitely makes the viewers laugh a lot.
Relatable and authentic video content
Viewers of different ages and genres can easily relate to the videos created by CarryMinati and also found them to be authentic and different from the other channels.
Checkout his video on Social Media Culture that how interestingly he engages people with the relatable topics, and you will know what makes this man different from the others.
Most popular videos of CarryMinati
Though almost all videos by CarryMinati gain popularity, listed below are the top ones to date.
The End (The video was uploaded on 8th May 2020 and had over 65 million views with 8 lacs comments and over 10 million likes.) This was a roasting video by CarryMinati that gained immense popularity, but was later pulled down by YouTube stating it to be against the harassment policy of YouTube and for violating the guidelines of the community.

This video is about the Indian Film Industry and the awards given to the stars. Carryinati has interesting roasted the stars and receiving awards.
PUBG India: Life Battle Royale
https://www.youtube.com/embed/10y9yefd%5FxY
It is an interesting video of around 17 minutes where Ajay Nagar has acted along with other people to create a fun plot based of PUBG game.
Bonus Tip: How to be a YouTuber and Make Videos like Carryminati
We have learned that CarryMinati has become the name it is, all because of the excellent videos it creates. Though it may sound simple, video creation requires a lot of skills, patience, and the help of expert tools.
A lot of people have some excellent themes and ideas in their minds, but they do not know how to weave them all into an interesting video and here the need for an expert tool like Wondershare Filmora arises. So, if you also have some video creation plans in mind but have been holding them back, it’s time to bring them to reality using Filmora.
Wondershare Filmora is an excellent Windows and Mac-based software that helps in creating eye-catchy videos using multiple features supported by the program. From basic to advanced, no matter what type of video creation requirements you are looking for, Wondershare Filmora will take due care of the same.
Key features of the software
- Support to all types of video files and formats including 4K and also comes with a huge collection of stock footage.
- Support advanced features like PIP, green screen, split-screen, AI portrait, auto reframe, screen recorder, speed ramping, masking, and more.
- Allows adding visual effects and transitions and also allows uploading the created videos to YouTube and Facebook.
Wondershare Filmora supports a wide range of video editing features including basic editing, advanced editing, AI-based tools, and much more. The complete features can be checked in the Wondershare Filmora Video Editing Guide.
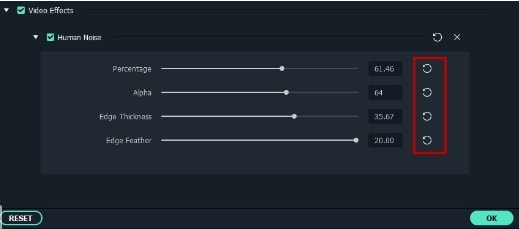
AI-based features are the highlight of this software and for your reference, listed below are the steps for the AI Portrait function. Using this feature, the background of a video can be removed easily without using the green screen or the chroma key.
Steps to use AI Portrait in Wondershare Filmora
Free Download For Win 7 or later(64-bit)
Free Download For macOS 10.14 or later
Step1 Launch the installed software on your system and add the media file to the software timeline.

Step2 Next, go to Effects > Ai Portrait, and the options of the features can be checked here. Click on the thumbnail and the feature can be viewed in the preview window.
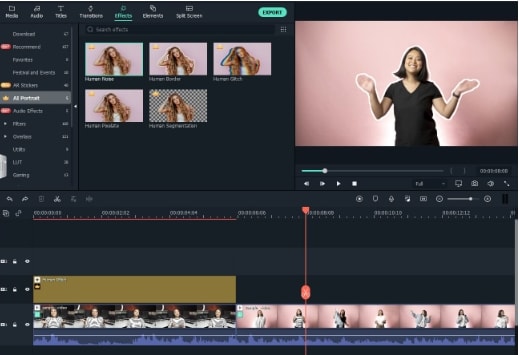
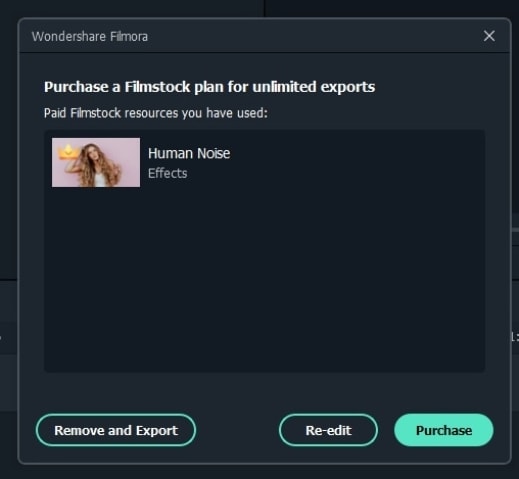
Step3 Drag the selected Portrait to the timeline and from the pop-up window choose to Purchase the additional module. You can check the result by playing the video. If needed multiple AI Portraits can be added to the video.
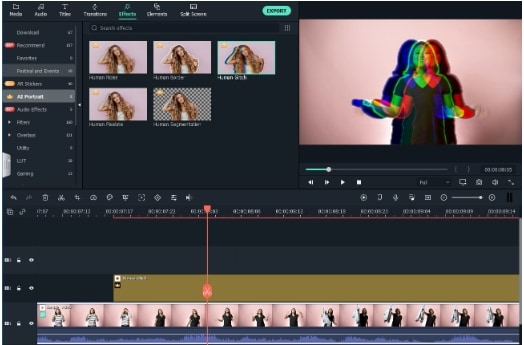
Step4 If further customization is needed, you can even adjust the AI Portrait settings.
Step5 When finally, all the settings are done, click on the Export button to save the file.
Hot FAQs on CarryMinati
Below we have answered some hot frequently asked questions about CarryMinati.
1. Is Carry Minati married?
No, till date, CarryMinati aka Ajay Nagar is not married.
2. How much CarryMinati earn from 1 video?
Calculating the income from a YouTube video can be a complicated task that depends on several factors like views, likes, ads in the video, and more.
3. Which actors has Carry Minati interviewed?
Carry Minati has interviewed popular actors like Tom Cruise, Tessa Thompson, Henry Cavil, and others celebrities.

Final Words
Gone are the days when only high posts at big-shot companies can bring in money and proving this right is CarryMinati who is not only earning big but has also earned worldwide fans and has created a name for himself. With his comic skits and engaging videos, this popular YouTube influencer is growing and stretching his wings.
If you too have got inspired and looking forward to starting with some interesting videos, we suggest downloading Wondershare Filmora which will let you create a professional video with ease.
Free Download For Win 7 or later(64-bit)
Free Download For macOS 10.14 or later
So, by now we know that CarryMinati aka Ajay Nagar is quite popular on YouTube. But, what does this popularity gets him in terms of money? Yes, this is an interesting question and the answer for this, you can check out in the next part of the topic.
Part 2: CarryMinati YouTube earning and stats
Let’s now deep digger into the financial aspects and other related stats related to CarryMinati. So, if you are eager to know how much CarryMinati earn from YouTube, we will give you to the nearest exact figures. Who does not like numbers, they are interesting facts, isn’tead.
A major part of Ajay Nagar’s income comes from YouTube videos and in addition to this, his popularity makes him earn from YouTube sponsors, collaborations, tie-up videos, brand endorsements, and advertising.
| Estimated Monthly Earnings in USD/Indian Rupees | Rs. 16+ Lakhs |
|---|---|
| Estimated yearly Earnings in USD/Indian Rupees | $ 4 Million/ Rs. 3+ Crores |
| Videos About | Roasting, Comedy, Sketches, Satire, and Gaming |
| Total Video Uploads | Over 176 |
| Subscribers | CarryMinati- 36.6millionCarryisLive- 11.3 million |
| Video Views | CarryMinati- 2.9 billion+CarryisLive- 1.3 billion+ |
| Last 30 Days Views | 35 M+ |
The statistics related to the views and income about CarryMinati are quite interesting and this makes everyone curious about what makes the channel and this person so popular on YouTube. If you too have been curious about the same, head to our next section.
Part 3: Why is Carry Minati trending on YouTube?
Just like the statistics, the facts related to CarryMinati’s popularity are equally interesting. Every YouTube channel or an influencer who is popular and trending have their own uniqueness and when it comes to CarrayMinati aka Ajay Nagar, there are several factors that makes him a sensation. Shortlisted some of them are as below.
Exclusive personality of Ajay Naga
Ajay Nagar has an exclusive personality that acts like a magnet that attracts viewers. His way of speaking and interacting with the audience has earned him a fan base across the globe.
Engaging and interactive video
The videos of CarryMinati are engaging and interactive which keeps the audience interested throughout.
Rib-tickling humour
The way the humour is added to the videos is simply amazing and definitely makes the viewers laugh a lot.
Relatable and authentic video content
Viewers of different ages and genres can easily relate to the videos created by CarryMinati and also found them to be authentic and different from the other channels.
Checkout his video on Social Media Culture that how interestingly he engages people with the relatable topics, and you will know what makes this man different from the others.
Most popular videos of CarryMinati
Though almost all videos by CarryMinati gain popularity, listed below are the top ones to date.
The End (The video was uploaded on 8th May 2020 and had over 65 million views with 8 lacs comments and over 10 million likes.) This was a roasting video by CarryMinati that gained immense popularity, but was later pulled down by YouTube stating it to be against the harassment policy of YouTube and for violating the guidelines of the community.
This video is about the Indian Film Industry and the awards given to the stars. Carryinati has interesting roasted the stars and receiving awards.
PUBG India: Life Battle Royale
https://www.youtube.com/embed/10y9yefd%5FxY
It is an interesting video of around 17 minutes where Ajay Nagar has acted along with other people to create a fun plot based of PUBG game.
Bonus Tip: How to be a YouTuber and Make Videos like Carryminati
We have learned that CarryMinati has become the name it is, all because of the excellent videos it creates. Though it may sound simple, video creation requires a lot of skills, patience, and the help of expert tools.
A lot of people have some excellent themes and ideas in their minds, but they do not know how to weave them all into an interesting video and here the need for an expert tool like Wondershare Filmora arises. So, if you also have some video creation plans in mind but have been holding them back, it’s time to bring them to reality using Filmora.
Wondershare Filmora is an excellent Windows and Mac-based software that helps in creating eye-catchy videos using multiple features supported by the program. From basic to advanced, no matter what type of video creation requirements you are looking for, Wondershare Filmora will take due care of the same.
Key features of the software
- Support to all types of video files and formats including 4K and also comes with a huge collection of stock footage.
- Support advanced features like PIP, green screen, split-screen, AI portrait, auto reframe, screen recorder, speed ramping, masking, and more.
- Allows adding visual effects and transitions and also allows uploading the created videos to YouTube and Facebook.
Wondershare Filmora supports a wide range of video editing features including basic editing, advanced editing, AI-based tools, and much more. The complete features can be checked in the Wondershare Filmora Video Editing Guide.
AI-based features are the highlight of this software and for your reference, listed below are the steps for the AI Portrait function. Using this feature, the background of a video can be removed easily without using the green screen or the chroma key.
Steps to use AI Portrait in Wondershare Filmora
Free Download For Win 7 or later(64-bit)
Free Download For macOS 10.14 or later
Step1 Launch the installed software on your system and add the media file to the software timeline.
Step2 Next, go to Effects > Ai Portrait, and the options of the features can be checked here. Click on the thumbnail and the feature can be viewed in the preview window.
Step3 Drag the selected Portrait to the timeline and from the pop-up window choose to Purchase the additional module. You can check the result by playing the video. If needed multiple AI Portraits can be added to the video.
Step4 If further customization is needed, you can even adjust the AI Portrait settings.
Step5 When finally, all the settings are done, click on the Export button to save the file.
Hot FAQs on CarryMinati
Below we have answered some hot frequently asked questions about CarryMinati.
1. Is Carry Minati married?
No, till date, CarryMinati aka Ajay Nagar is not married.
2. How much CarryMinati earn from 1 video?
Calculating the income from a YouTube video can be a complicated task that depends on several factors like views, likes, ads in the video, and more.
3. Which actors has Carry Minati interviewed?
Carry Minati has interviewed popular actors like Tom Cruise, Tessa Thompson, Henry Cavil, and others celebrities.
Final Words
Gone are the days when only high posts at big-shot companies can bring in money and proving this right is CarryMinati who is not only earning big but has also earned worldwide fans and has created a name for himself. With his comic skits and engaging videos, this popular YouTube influencer is growing and stretching his wings.
If you too have got inspired and looking forward to starting with some interesting videos, we suggest downloading Wondershare Filmora which will let you create a professional video with ease.
Free Download For Win 7 or later(64-bit)
Free Download For macOS 10.14 or later
- Title: "2024 Approved Top Screen Recorder Software For YouTube Creators"
- Author: Joseph
- Created at : 2024-05-31 13:43:58
- Updated at : 2024-06-01 13:43:58
- Link: https://youtube-stream.techidaily.com/2024-approved-top-screen-recorder-software-for-youtube-creators/
- License: This work is licensed under CC BY-NC-SA 4.0.
