
:max_bytes(150000):strip_icc()/hashtag-56a9fe065f9b58b7d0006572.jpg)
"2024 Approved Timestamping Your YouTube Videos Desktop & Mobile Guide"
Timestamping Your YouTube Videos: Desktop & Mobile Guide
How to Add Timestamps on YouTube Video Link?

Richard Bennett
Mar 27, 2024• Proven solutions
It is a well-known fact that internet users have a short interest span, about just eight seconds. This attention span applies to all internet platforms including YouTube. YouTube is the second largest and most visited search engine after Google. It provides users with information through engaging and eye-catchy videos. However, certain videos are longer where only a particular section of the video holds the important information. Viewers tend to skip the long videos and if you do not want this to happen to you, you can link to that specific part on your video adding value for your channel viewers with a link known as the YouTube Timestamp link.
When you have a Timestamp link on your video, you can help your viewers directly reach the specific time in the video. This helps avoid the viewers from losing interest or to search for the key part in your video themselves.
Here in this article, we will explain Timestamp links, how to add Timestamp to YouTube video links, and what are the benefits of Timestamp.
- Part 1: YouTube Timestamp Links Introduction
- Part 2: Adding a Timestamp to YouTube Video Link on Desktop
- Part 3: How to Share Specific Parts of YouTube Video
- part 4: Getting YouTube Timestamp Link on Mobile
- Part 5: FAQ About YouTube Timestamps
Part 1: What is YouTube Timestamp Links
In this fast-paced world where viewers have limited time at hand, YouTube Timestamp links are extremely helpful. These links are anchor text or video hyperlinks found either in the description beneath the video or at the video link end.

The Timestamps links allow you to put a link to a key moment in your YouTube video allowing the viewers and subscribers to view the video at the precise time specified. Your YouTube video maybe half an hour long or maybe your users do not have the time now or forget to later watch your video, but when you add Timestamp to the YouTube link, you provide them ways to get to the content quickly enhancing the user experience.
In addition to this, you can even provide a reference in minutes and hours where necessary. The YouTube Timestamp link acts as a guide that directs viewers to the part of the video, which is most relevant to them without having to watch the entire video.
Part 2: How to Add a Timestamp to YouTube Video Link on Desktop?
In the following section, I will show you how to add timestamp to YouTube video link in several ways.
Use YouTube’s Share Feature
Using YouTube’s share feature is the simplest way to add Timestamp to YouTube videos. Here are easy steps to follow to do this.
- Open the YouTube video on your desktop that you want to share.
- Play the video or navigate the timeline and stop at the key moment you wish to apply the timestamp to.
- Now click on the Share button, a pop-up will appear. Under the URL, you will see a small box indicating Start at. The Timestamp is generated automatically, but you can adjust it.

- Copy the updated URL with Timestamp to share the video or click on the social sharing icons to do so.
- When your viewers click on this URL, the video will begin at the specified Timestamp.
Use the Browser URL to add Timestamp manually
You can add Timestamp manually as well. Follow the step-by-step guide below to add a Timestamp manually.
- Open your YouTube video in a browser on your desktop and then find the URL in the browser’s address bar.
- Enter the specific time you want the viewers to watch the video from at the end of the video URL.
You can add time manually in two ways depending on the URL.
?t=As or
&t=As
“youtu.be/” Format
If your YouTube video link is a youtu.be format, then just add ?t=As at the end of the video link. The A denotes the seconds at which you want the viewer to watch your video. The time can also be specified in minutes and seconds and when you want to do that just add ?t=AmBs. For instance, ?t=2m40s.
“youtube.com/” Format
When your YouTube video link has a youtube.com format, the adjustment starts with an ampersand. &t=As or &t=AmBs is what you can use. If you are looking to add the Timestamp at 2m40s, just add “&t=2m40s at the end of the video URL.
Whenever anybody uses the URL with Timestamp, the video will start from the specified time.
However, when adding a Timestamp manually, always leave include whole numbers. For example, if the time starts at 4m, use 4 and not 04.
Copy video URL at current time
You can use YouTube’s built-in feature to share the key parts of your YouTube video. Follow the steps here.
- Visit YouTube and open the video you want to add Timestamp link to.
- Play the video or navigate the timeline to reach the specific part you like to use in Timestamp.
- Now either press Ctrl + click or right-click anywhere on the video. A pop-up opens where you can see various texts, click on the Copy video URL at current time and share the link.

- Anyone who clicks on this link will be instantly transported to the exact segment of your YouTube video.
Part 3: How to Share Specific Parts of Videos with Vibby and Get YouTube Link with Timestamp
The above-mentioned methods to add and send YouTube link with timestamp are quick and easy, but they have a few limitations. If you need more control and share highlighted parts of YouTube video without cutting the video, you need to use a third-party tool known as Vibby.
Vibby allows you to not only share specific parts of videos from YouTube but other platforms as well like Vimeo and Twitch. With the tool, you can clip multiple sections of the video and share them with others.
- To get started, signup either with mail, Google, Twitter, Facebook, or Twitch account.
- Once signed in, go to Create vib at the top left corner and then paste the URL of the YouTube video you would like to share and then click on the Start button.

- Your video will load in the Vibby editor, now click on Highlight the parts to share.
- Here you will see the Start highlight button, jump 5-sec option, option to switch between HD and SD video quality, and volume control button. Navigate to the part you want to share and click on Start highlight.

- When you reach the end of the part, click on Finish highlight. Repeat the process to highlight multiple parts of the video. All the highlighted parts will appear in a list on the right side of the screen.
- Add a description to each part and format it, you have the option to preview before hitting the Save vib button.
- Name the vib and assign a category and then publish it to Vibby or make it a private vib.
- You get a dedicated link to your vib with the ability to embed it on your website or blog.
In this way, you can share the highlights of the YouTube video or Vimeo video easily.
Part 4: How to Get YouTube Timestamp Link on iPhone and Android?
Linking to specific YouTube Timestamp Link is straightforward on both iPhone and Android.
- Go to YouTube and select the video you want to share.
- Move through the progress bar of the video to reach the key part and click on the Share button.
- A pop-up menu appears, highlight the URL and click on the Copy button.
- Paste the URL and manually add the Timestamp using the steps mentioned in add a Timestamp manually.
Part 5: Is Timestamp Beneficial for your Video?
Timestamping your YouTube videos may decrease the watch time, but it enhances the user experience, and they want to see more of your videos. Apart from this, adding Timestamps to your videos make your videos discoverable through Google search. YouTube and Google will reward you for the videos in form of a high search engine ranking.
Bonus: How to Add YouTube Timestamp Link in YouTube Video Description
Adding a YouTube Timestamp link in your video description is easy. Here are the steps to do so.
- Go to your YouTube channel and select the video you want to add Timestamp to and then navigate to the description below it.
- Edit the description by clicking on the Edit Video button.
- You are redirected to the Video Details page. Here write 0:00 at the first part of the timecode, and then continue with the time of the key part of the video you want to add the Timestamp to in 2:40 format. You can add more Timestamp as well and then click on the Save button.

- Reload the video page and you will see auto-generated Timestamp Links at the specific time you provided in the description.
Note: You need to add at least three timestamps which are 10 seconds or longer in order to add timestamps successfully.
Conclusion
As much as possible YouTubers want to make videos short and to the point. However, if a video needs to be longer, you can still help users navigate through to find what is important to them by adding Timestamp to YouTube link or Timestamp the YouTube descriptions. This can help your viewers jump straight to the interesting part in the video, rather than viewing the entire video saving their time and boost user experience.
Richard Bennett
Richard Bennett is a writer and a lover of all things video.
Follow @Richard Bennett
Richard Bennett
Mar 27, 2024• Proven solutions
It is a well-known fact that internet users have a short interest span, about just eight seconds. This attention span applies to all internet platforms including YouTube. YouTube is the second largest and most visited search engine after Google. It provides users with information through engaging and eye-catchy videos. However, certain videos are longer where only a particular section of the video holds the important information. Viewers tend to skip the long videos and if you do not want this to happen to you, you can link to that specific part on your video adding value for your channel viewers with a link known as the YouTube Timestamp link.
When you have a Timestamp link on your video, you can help your viewers directly reach the specific time in the video. This helps avoid the viewers from losing interest or to search for the key part in your video themselves.
Here in this article, we will explain Timestamp links, how to add Timestamp to YouTube video links, and what are the benefits of Timestamp.
- Part 1: YouTube Timestamp Links Introduction
- Part 2: Adding a Timestamp to YouTube Video Link on Desktop
- Part 3: How to Share Specific Parts of YouTube Video
- part 4: Getting YouTube Timestamp Link on Mobile
- Part 5: FAQ About YouTube Timestamps
Part 1: What is YouTube Timestamp Links
In this fast-paced world where viewers have limited time at hand, YouTube Timestamp links are extremely helpful. These links are anchor text or video hyperlinks found either in the description beneath the video or at the video link end.
The Timestamps links allow you to put a link to a key moment in your YouTube video allowing the viewers and subscribers to view the video at the precise time specified. Your YouTube video maybe half an hour long or maybe your users do not have the time now or forget to later watch your video, but when you add Timestamp to the YouTube link, you provide them ways to get to the content quickly enhancing the user experience.
In addition to this, you can even provide a reference in minutes and hours where necessary. The YouTube Timestamp link acts as a guide that directs viewers to the part of the video, which is most relevant to them without having to watch the entire video.
Part 2: How to Add a Timestamp to YouTube Video Link on Desktop?
In the following section, I will show you how to add timestamp to YouTube video link in several ways.
Use YouTube’s Share Feature
Using YouTube’s share feature is the simplest way to add Timestamp to YouTube videos. Here are easy steps to follow to do this.
- Open the YouTube video on your desktop that you want to share.
- Play the video or navigate the timeline and stop at the key moment you wish to apply the timestamp to.
- Now click on the Share button, a pop-up will appear. Under the URL, you will see a small box indicating Start at. The Timestamp is generated automatically, but you can adjust it.
- Copy the updated URL with Timestamp to share the video or click on the social sharing icons to do so.
- When your viewers click on this URL, the video will begin at the specified Timestamp.
Use the Browser URL to add Timestamp manually
You can add Timestamp manually as well. Follow the step-by-step guide below to add a Timestamp manually.
- Open your YouTube video in a browser on your desktop and then find the URL in the browser’s address bar.
- Enter the specific time you want the viewers to watch the video from at the end of the video URL.
You can add time manually in two ways depending on the URL.
?t=As or
&t=As
“youtu.be/” Format
If your YouTube video link is a youtu.be format, then just add ?t=As at the end of the video link. The A denotes the seconds at which you want the viewer to watch your video. The time can also be specified in minutes and seconds and when you want to do that just add ?t=AmBs. For instance, ?t=2m40s.
“youtube.com/” Format
When your YouTube video link has a youtube.com format, the adjustment starts with an ampersand. &t=As or &t=AmBs is what you can use. If you are looking to add the Timestamp at 2m40s, just add “&t=2m40s at the end of the video URL.
Whenever anybody uses the URL with Timestamp, the video will start from the specified time.
However, when adding a Timestamp manually, always leave include whole numbers. For example, if the time starts at 4m, use 4 and not 04.
Copy video URL at current time
You can use YouTube’s built-in feature to share the key parts of your YouTube video. Follow the steps here.
- Visit YouTube and open the video you want to add Timestamp link to.
- Play the video or navigate the timeline to reach the specific part you like to use in Timestamp.
- Now either press Ctrl + click or right-click anywhere on the video. A pop-up opens where you can see various texts, click on the Copy video URL at current time and share the link.
- Anyone who clicks on this link will be instantly transported to the exact segment of your YouTube video.
Part 3: How to Share Specific Parts of Videos with Vibby and Get YouTube Link with Timestamp
The above-mentioned methods to add and send YouTube link with timestamp are quick and easy, but they have a few limitations. If you need more control and share highlighted parts of YouTube video without cutting the video, you need to use a third-party tool known as Vibby.
Vibby allows you to not only share specific parts of videos from YouTube but other platforms as well like Vimeo and Twitch. With the tool, you can clip multiple sections of the video and share them with others.
- To get started, signup either with mail, Google, Twitter, Facebook, or Twitch account.
- Once signed in, go to Create vib at the top left corner and then paste the URL of the YouTube video you would like to share and then click on the Start button.
- Your video will load in the Vibby editor, now click on Highlight the parts to share.
- Here you will see the Start highlight button, jump 5-sec option, option to switch between HD and SD video quality, and volume control button. Navigate to the part you want to share and click on Start highlight.
- When you reach the end of the part, click on Finish highlight. Repeat the process to highlight multiple parts of the video. All the highlighted parts will appear in a list on the right side of the screen.
- Add a description to each part and format it, you have the option to preview before hitting the Save vib button.
- Name the vib and assign a category and then publish it to Vibby or make it a private vib.
- You get a dedicated link to your vib with the ability to embed it on your website or blog.
In this way, you can share the highlights of the YouTube video or Vimeo video easily.
Part 4: How to Get YouTube Timestamp Link on iPhone and Android?
Linking to specific YouTube Timestamp Link is straightforward on both iPhone and Android.
- Go to YouTube and select the video you want to share.
- Move through the progress bar of the video to reach the key part and click on the Share button.
- A pop-up menu appears, highlight the URL and click on the Copy button.
- Paste the URL and manually add the Timestamp using the steps mentioned in add a Timestamp manually.
Part 5: Is Timestamp Beneficial for your Video?
Timestamping your YouTube videos may decrease the watch time, but it enhances the user experience, and they want to see more of your videos. Apart from this, adding Timestamps to your videos make your videos discoverable through Google search. YouTube and Google will reward you for the videos in form of a high search engine ranking.
Bonus: How to Add YouTube Timestamp Link in YouTube Video Description
Adding a YouTube Timestamp link in your video description is easy. Here are the steps to do so.
- Go to your YouTube channel and select the video you want to add Timestamp to and then navigate to the description below it.
- Edit the description by clicking on the Edit Video button.
- You are redirected to the Video Details page. Here write 0:00 at the first part of the timecode, and then continue with the time of the key part of the video you want to add the Timestamp to in 2:40 format. You can add more Timestamp as well and then click on the Save button.
- Reload the video page and you will see auto-generated Timestamp Links at the specific time you provided in the description.
Note: You need to add at least three timestamps which are 10 seconds or longer in order to add timestamps successfully.
Conclusion
As much as possible YouTubers want to make videos short and to the point. However, if a video needs to be longer, you can still help users navigate through to find what is important to them by adding Timestamp to YouTube link or Timestamp the YouTube descriptions. This can help your viewers jump straight to the interesting part in the video, rather than viewing the entire video saving their time and boost user experience.
Richard Bennett
Richard Bennett is a writer and a lover of all things video.
Follow @Richard Bennett
Navigating Through Common YouTube Short Difficulties
Create High Quality YouTube Video - Wondershare Filmora
An easy and powerful YouTube video editor
Numerous video and audio effects to choose from
Detailed tutorials provided by the official channel
YouTube streaming service has kept online users glued to their screens. You can access and share videos and music from any part of the world. Users resolve to YouTube for personal and business affairs. You can use it for a tutorial, promotional event, or just share the fun with other users. Several avenues are available for users to post and share their minds worldwide. So far, it has rolled out a short-form video service, Shorts, which was initially inspired by TikTok.
With Shorts, you can shoot videos, edit, and upload them for your audience. However, YouTube shorts not showing is a common issue for those wishing to share their videos in regular channel feed. You might be wondering how to solve such issues when pushed to the wall. Check out possible solutions in the next section. But first, let’s find out what really are YouTube Shorts.
In this article
02 Where can I find YouTube Shorts?
03 Here are the solutions for YouTube Common Issues
What is YouTube Shorts?
YouTube Shorts is an app that you can use to shoot and share short-form videos using your mobile phone. Furthermore, you can record and edit your videos as well as music overlays and video segmenting abilities. Viewers will access the videos for 60 seconds or less but will remain on your channel, unlike Stories that disappear after a short while. It was first released in September 2020, having started in the US and India. It has so far encroached many countries and is currently accessed by 6 billion users in over 100 countries.
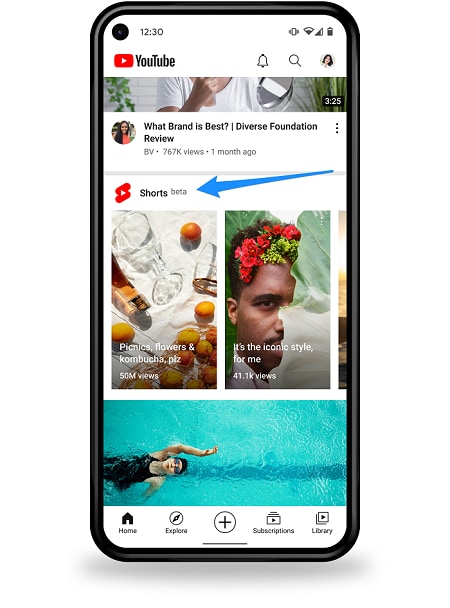
Where can I find YouTube Shorts?
Many users are curious about how to make full use of YouTube Shorts. You can get the Short at the bottom of the YouTube app on either the homepage or on their channel page.
Is YouTube Shorts available on Google Play or App Store?
No. Unlike other streaming apps, you can’t find YouTube app on Google Play or App Store as it is not a standalone service. YouTube Shorts are found within the service’s main mobile app. It is, therefore, accessible from the YouTube app on your computer or phone at the bottom of the screen.
How to access YouTube Shorts on YouTube app
- First, go to the YouTube app at the bottom of the screen to find the “Shorts” button.
- You’ll then see a selection of thumbnails that harbors popular Shorts.
- Choose any video then click on it to bring you into the vertical video player.
- You can then watch the clip and like or dislike the video as it plays. Just use the “thumbs up” or “down” icon. Likewise, you can share and subscribe to the “Short creator’s” channel.
How to create YouTube Shorts
Do you wish to create YouTube Shorts but you don’t know how to? Here’s the kicker!
Step 1. You first need to install the YouTube app on your device then sign in to your account.
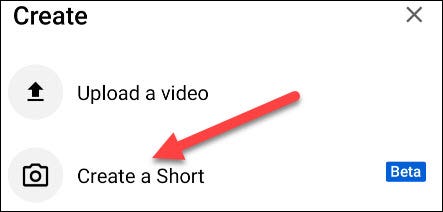
Step 2. Now, tap on the “Create” button. The icon is a “+” symbol in the bottom center of the screen.
Step 3. A pop-up window will open. Tap the “Create a Short” tab. If prompted, allow YouTube to use your phone’s camera and microphone.
Step 4. You’ll then land on the “YouTube Shorts” recording page.
Step 5. Set the length to 60 seconds and bellow. You have the option to slow down or speed up the recording by tapping the “Speed” icon on the right.
Step 6. Likewise, set a time for the camera to start recording automatically. Check below the “Speed” for the “Timer” for setting.
Step 7. Go ahead to edit your Short before posting. You can use “Filters” to apply visual effects.
Step 8. When your camera is set, hit the “Record” button. You can stop the recording by tapping on the Record button, then resume as you wish.

Step 9. Tap on the “Checkmark” when you are done recording. You can add some music and text as well. Then tap on the “Next” button to finish the recording.
Step 10. Then add a title and adjust “Sharing” settings. Also, add the “#shorts” to the title to make it promotional together with other Shorts videos.
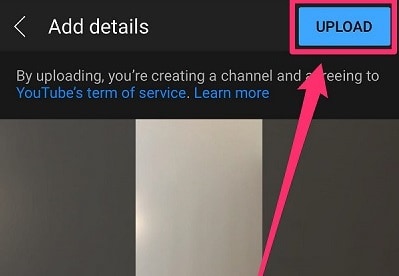
Step 11. Finally, tap the “Upload” tab to add your “Shorts” to YouTube.
Here are the solutions for YouTube Common Issues
Since YouTube Shorts is still in the “Beta” mode, users are likely to experience issues while using it. Below are some fixes for YouTube shorts common issues like YouTube Shorts not showing up, unable to post video to YouTube Shorts and etc.
Solution 1. Update YouTube app
Remember apps are ever on the upgrade mode. You are likely to face some connection issues if you are operating on an older version. Here’s is how to update the YouTube app on your Android or iPhone device.
On Android device
- Launch Google Play Store.
- Next, tap on the “three diagonal lines” at the top section of your screen.
- Then select the “My Apps & Games” option.
- Search for YouTube app and tap on the “Update” button.
On iOS device
- Open the “App Store”
- Tap on your “Profile” icon.
- Then tap on the “Update” tab to fix the issue.
On your computer
- Search for YouTube streaming app from the Google Play Store.
- Here, you’ll see an update button in case your app needs an update.
- Next, click on the “Update” button and wait for the update to complete.
- Launch YouTube once more and see whether the YouTube Shorts not showing issue is resolved.
Solution 2. Clear Cache
A corrupt system may also cause issues with the normal operation of your application.
- Go to the “Settings” button on your phone.
- Then go to the “Apps” section and tap on “All Apps”
- Select the “YouTube” app from the list.
- Next, go to the “App Settings” and click on the “Storage” section.
- Tap on the “Clear cache and data” option.
- Finally, relaunch the YouTube app and check whether the issue is resolved.
Solution 3. Check if Shorts is available in your country
Remember that “Shorts” isn’t available in all the countries yet. So, you can confirm whether it is already in your country. If not, you can bypass GEO restrictions by using free VPNs.
- First, download and install a VPN app.
- Next, select the USA or India server location to fake a GPS location.
- Then clear the cache from the YouTube app and click it open.
- You should now find the option to view and even upload Shorts from your device.
Solution 4. Ensure your video is set as YouTube Shorts
Your video should be set as YouTube Shorts before posting.
- Identify the video that you wish to post.
- Add the “#shorts” in your title and description.
- See that each video is up to 60 seconds only.
- Post the video and see whether the issue isn’t reoccurring.
Conclusion
It’s a nice feeling to learn how to upload YouTube Shorts and share the fun with others worldwide. However, you may experience YouTube Shorts not showing due to restrictions in your country or other issues. We have tackled adequate solutions to solve such scenarios and make your Shorts go online. Nonetheless, check out the steps to access and create YouTube Shorts in just a few steps.
YouTube streaming service has kept online users glued to their screens. You can access and share videos and music from any part of the world. Users resolve to YouTube for personal and business affairs. You can use it for a tutorial, promotional event, or just share the fun with other users. Several avenues are available for users to post and share their minds worldwide. So far, it has rolled out a short-form video service, Shorts, which was initially inspired by TikTok.
With Shorts, you can shoot videos, edit, and upload them for your audience. However, YouTube shorts not showing is a common issue for those wishing to share their videos in regular channel feed. You might be wondering how to solve such issues when pushed to the wall. Check out possible solutions in the next section. But first, let’s find out what really are YouTube Shorts.
In this article
02 Where can I find YouTube Shorts?
03 Here are the solutions for YouTube Common Issues
What is YouTube Shorts?
YouTube Shorts is an app that you can use to shoot and share short-form videos using your mobile phone. Furthermore, you can record and edit your videos as well as music overlays and video segmenting abilities. Viewers will access the videos for 60 seconds or less but will remain on your channel, unlike Stories that disappear after a short while. It was first released in September 2020, having started in the US and India. It has so far encroached many countries and is currently accessed by 6 billion users in over 100 countries.
Where can I find YouTube Shorts?
Many users are curious about how to make full use of YouTube Shorts. You can get the Short at the bottom of the YouTube app on either the homepage or on their channel page.
Is YouTube Shorts available on Google Play or App Store?
No. Unlike other streaming apps, you can’t find YouTube app on Google Play or App Store as it is not a standalone service. YouTube Shorts are found within the service’s main mobile app. It is, therefore, accessible from the YouTube app on your computer or phone at the bottom of the screen.
How to access YouTube Shorts on YouTube app
- First, go to the YouTube app at the bottom of the screen to find the “Shorts” button.
- You’ll then see a selection of thumbnails that harbors popular Shorts.
- Choose any video then click on it to bring you into the vertical video player.
- You can then watch the clip and like or dislike the video as it plays. Just use the “thumbs up” or “down” icon. Likewise, you can share and subscribe to the “Short creator’s” channel.
How to create YouTube Shorts
Do you wish to create YouTube Shorts but you don’t know how to? Here’s the kicker!
Step 1. You first need to install the YouTube app on your device then sign in to your account.
Step 2. Now, tap on the “Create” button. The icon is a “+” symbol in the bottom center of the screen.
Step 3. A pop-up window will open. Tap the “Create a Short” tab. If prompted, allow YouTube to use your phone’s camera and microphone.
Step 4. You’ll then land on the “YouTube Shorts” recording page.
Step 5. Set the length to 60 seconds and bellow. You have the option to slow down or speed up the recording by tapping the “Speed” icon on the right.
Step 6. Likewise, set a time for the camera to start recording automatically. Check below the “Speed” for the “Timer” for setting.
Step 7. Go ahead to edit your Short before posting. You can use “Filters” to apply visual effects.
Step 8. When your camera is set, hit the “Record” button. You can stop the recording by tapping on the Record button, then resume as you wish.
Step 9. Tap on the “Checkmark” when you are done recording. You can add some music and text as well. Then tap on the “Next” button to finish the recording.
Step 10. Then add a title and adjust “Sharing” settings. Also, add the “#shorts” to the title to make it promotional together with other Shorts videos.
Step 11. Finally, tap the “Upload” tab to add your “Shorts” to YouTube.
Here are the solutions for YouTube Common Issues
Since YouTube Shorts is still in the “Beta” mode, users are likely to experience issues while using it. Below are some fixes for YouTube shorts common issues like YouTube Shorts not showing up, unable to post video to YouTube Shorts and etc.
Solution 1. Update YouTube app
Remember apps are ever on the upgrade mode. You are likely to face some connection issues if you are operating on an older version. Here’s is how to update the YouTube app on your Android or iPhone device.
On Android device
- Launch Google Play Store.
- Next, tap on the “three diagonal lines” at the top section of your screen.
- Then select the “My Apps & Games” option.
- Search for YouTube app and tap on the “Update” button.
On iOS device
- Open the “App Store”
- Tap on your “Profile” icon.
- Then tap on the “Update” tab to fix the issue.
On your computer
- Search for YouTube streaming app from the Google Play Store.
- Here, you’ll see an update button in case your app needs an update.
- Next, click on the “Update” button and wait for the update to complete.
- Launch YouTube once more and see whether the YouTube Shorts not showing issue is resolved.
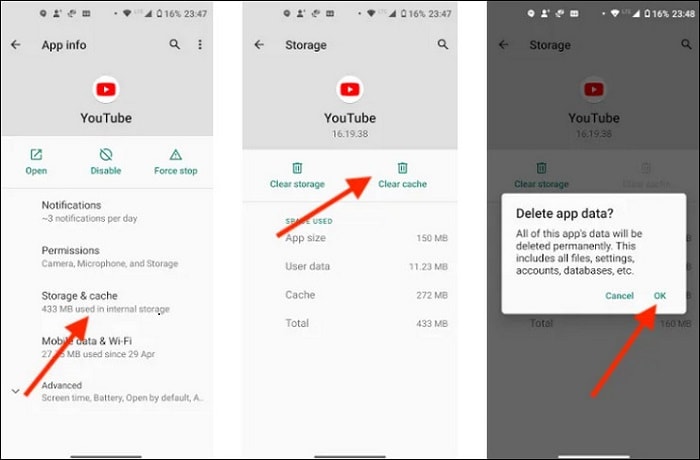
Solution 2. Clear Cache
A corrupt system may also cause issues with the normal operation of your application.
- Go to the “Settings” button on your phone.
- Then go to the “Apps” section and tap on “All Apps”
- Select the “YouTube” app from the list.
- Next, go to the “App Settings” and click on the “Storage” section.
- Tap on the “Clear cache and data” option.
- Finally, relaunch the YouTube app and check whether the issue is resolved.
Solution 3. Check if Shorts is available in your country
Remember that “Shorts” isn’t available in all the countries yet. So, you can confirm whether it is already in your country. If not, you can bypass GEO restrictions by using free VPNs.
- First, download and install a VPN app.
- Next, select the USA or India server location to fake a GPS location.
- Then clear the cache from the YouTube app and click it open.
- You should now find the option to view and even upload Shorts from your device.
Solution 4. Ensure your video is set as YouTube Shorts
Your video should be set as YouTube Shorts before posting.
- Identify the video that you wish to post.
- Add the “#shorts” in your title and description.
- See that each video is up to 60 seconds only.
- Post the video and see whether the issue isn’t reoccurring.
Conclusion
It’s a nice feeling to learn how to upload YouTube Shorts and share the fun with others worldwide. However, you may experience YouTube Shorts not showing due to restrictions in your country or other issues. We have tackled adequate solutions to solve such scenarios and make your Shorts go online. Nonetheless, check out the steps to access and create YouTube Shorts in just a few steps.
- Title: "2024 Approved Timestamping Your YouTube Videos Desktop & Mobile Guide"
- Author: Joseph
- Created at : 2024-05-31 13:43:27
- Updated at : 2024-06-01 13:43:27
- Link: https://youtube-stream.techidaily.com/2024-approved-timestamping-your-youtube-videos-desktop-and-mobile-guide/
- License: This work is licensed under CC BY-NC-SA 4.0.
