
:max_bytes(150000):strip_icc()/Apple-WWCD23-Vision-Pro-with-battery-230605-c170b718d6f3481e90732e26c6b94d21.jpg)
"2024 Approved The Ultimate Guide to Enhancing YouTube Thumbnails with BGs"
The Ultimate Guide to Enhancing YouTube Thumbnails with BGs
YouTube is a platform where you can make money from videos. But in order to earn, your videos should get lots of views. The thing is that YouTube is a competitive space. So many others are trying to do the same. Thus, you’ll be competing for viewers’ time and attention. How can you win that battle? One way is to add eye-catching YouTube thumbnail backgrounds.
The video thumbnail will leave an impression on viewers looking for something to watch. So ensuring it is high-quality is crucial. In this article, you’ll learn where to find amazing thumbnail backgrounds and how to add them to your thumbnails.

Why Change YouTube Thumbnail Background?
When people are searching for something to watch on YouTube, they’ll look at two (2) things:
- They’ll check the title to see how relevant it is to what they’re looking for.
- Two, they’ll check the video thumbnail.
Thumbnail helps them determine off the bat if the video is high quality or not. A poor thumbnail will push them away, while a good one will encourage them to click.
That said, YouTubers should ensure their thumbnails are on point. Your thumbnails should be visually striking. One way to achieve that is by changing the thumbnail background. It allows you to remove unnecessary objects from the image. Additionally, it lets you improve the aesthetic of the thumbnail.
Now the question is: how do you change a YouTube thumbnail background?
Where To Find a New YouTube Thumbnail Background?
Thanks to the resource sites on the Internet, you can always find kickass backgrounds to create an attractive YouTube Thumbnail. Here, we recommend five (5) powerful apps/websites to help you easily find ideal thumbnail backgrounds.
1. Search for Numerous YouTube Thumbnail Backgrounds in Filmora
Pros
- Get access to YouTube Thumbnail Backgrounds within the video editing tool.
- Provides you with millions of stock images to choose from.
- The collection of stock media is constantly updated, giving you more and more options for your thumbnail background.
Cons
- The software itself is not totally free.

Wondershare Filmora is one of the leading video editors in the world. And it does not stop at enabling you to make amazing videos. Filmora also helps you make that video succeed. It provides you with over 4 million stock media! That includes gorgeous photos that you can use as YouTube thumbnail backgrounds.
The best thing is that you can access those images within the video editor. Meaning there’s a streamlined workflow that makes things more convenient.
Where Do the Photos Come From? Wondershare Filmora takes images from the websites Pexels, GIPHY, Pixabay, and Unsplash. Besides those, Filmora also has its own stock media library - Filmstock.
Filmstock was previously known as Filmora Store. It is the effect store for Filmora version 9.1.0 and above. From there, you can find stock media, including videos, images that you can use for your thumbnails, and royalty-free music and sound effects. You can download these resources to turn your videos into art.
2. Use Freepik To Find YouTube Thumbnail Background Images
Pros
- With over 22 million stock media resources, it offers a significant amount of photos, vectors, and graphic resources.
- The website is well-designed and void of pop-ups, making it very easy to search for specific photos.
Cons
- The free version has lots of limitations.
- The premium version is expensive.
- Download times can sometimes be slow.

Freepik is one of the largest image bank websites. It has over 22 million stock media that you can choose from to be your YouTube thumbnail backgrounds. And that collection grows further every day. Therefore, it’s highly likely to have the image you are looking for.
Not just that. Freepik has a special section containing only YouTube thumbnail backgrounds. That expedites your search. Then, you can use the filters to show only the thumbnail background designs that match your vision.
3. Find YouTube Thumbnail Background on Shutterstock for Free
Pros
- One of the largest libraries of stock photos.
- Gives a 30-day free trial that lets you make 10 downloads totally free of charge.
- Includes free images.
Cons
- The free trial lasts only 30 days. It becomes very expensive after that has expired.

Shutterstock is probably the biggest website that offers stock images. It’s so popular Shutterstock is what many people first think of when they need to find stock images.
Shutterstock has been around since 2003. As such, its collection consists of over 200 million stock photos. From that many resources, you’ll surely be able to find something to use for your YouTube thumbnail background. Even after the free trial expires, you can find some free photos from the website.
4. Download Thumbnail Background Images for YouTube in Vecteezy
Pros
- Millions of free resources.
- Cheaper than alternatives.
Cons
- The free version does not give you full commercial rights and requires you to add attribution.
- The free version allows you to download only 10 files a day.

Vecteezy allows you to download stock images for free. However, if you are serious about your YouTubing career, you must upgrade to Pro for full commercial rights. The good thing is that Vecteezy is very affordable. It costs only $7 per month! And that already gives you unlimited downloads.
Now the question is, does it have YouTube thumbnail backgrounds? Yes, it does! Whether you prefer vectors or images, Vecteezy has you covered.
5. Attractive Backgrounds for YouTube Thumbnail – NegativeSpace
Pros
- Photos downloaded from the website are free to use
- NegativeSpace encourages attribution, though, to thank the photographer that took the photo.
Cons
- The collection includes mostly photographs with just a few vectors here and there.
- The website can sometimes be slow to load.

NegativeSpace is the perfect place to get your YouTube thumbnail background if you are on a tight budget. It allows you not only to download the photos but also to use them commercially! And the photos are high-quality too, and they’re meant to be used as backgrounds.
Please note, however, that if you’re looking for vector illustrations, you’d better be on another site. NegativeSpace is built by a community of photographers. So, most of the resources you can download from this website are photos captured by a camera.
How To Change YouTube Thumbnail Background?
Suppose you have downloaded a high-quality image that will work great as a thumbnail background for your YouTube video. What shall you do next? Of course, the next step is to make the actual thumbnail.
Choosing the background image from Filmora is great because it saves you lots of time and resources. The program allows you to select from millions of high-quality options. After selecting, you can use Filmora’s native features to edit the thumbnail. You can even resize the thumbnail background to 1280x720 - YouTube’s suggested thumbnail size.
It is more convenient than you may initially think. Yes, it saves you time and effort because you don’t have to switch to another program to edit the thumbnail. But it also makes the workload easier for your computer. Opening another program will eat more RAM and will slow down the computer.
Filmora’s tools for editing the video thumbnail aren’t too shabby, either. Suppose you have a great image with the main subject where exactly you want it to be. However, you want to change the background to make the subject stand out more. You can use Wondershare Filmora’s AI Portrait feature to easily change it.
Free Download For Win 7 or later(64-bit)
Free Download For macOS 10.14 or later
What is Filmora’s AI Portrait Feature?
Wondershare Filmora’s AI Portrait feature allows you to quickly remove and change the background of an image.
Normally, you would need a green screen or chroma key to do that. Another method is to manually erase the background using an eraser. The AI Portrait feature has an effect called “human segmentation.” It separates the humans in an image from the background. Then, you can delete or change the background with the thumbnail background that you have downloaded. It’s really convenient!
Here is a guide on changing a YouTube thumbnail background using Wondershare Filmora.
1. Put the Thumbnail image in the timeline.

2. Select the thumbnail image. Click “Tools” > “Video” > “AI Portrait.”

3. The AI Portrait tool will remove the background automatically. Click “OK.”

4. Click “Stock Media” > “Photos.” Search for a background image that you like. Download the photo.

5. Drag the new background to the track below your thumbnail image.

6. Select your thumbnail image to adjust its size and position.

7. Click the camera icon to take a snapshot of the still frame you want to use as the YouTube video thumbnail.

8. Select the format and storage path.

9. Find the icon of the snapshot in the Media tab. Right-click and select “Reveal In Explorer” to open your local folder to find the new thumbnail.

The Bottom Line
Your YouTube video thumbnail is almost as important as the video content itself. So you must not neglect it. Ensuring it is high-quality is important. One big step in doing that is selecting a great thumbnail background image. You can find these in many places.
The video editor Wondershare Filmora even allows you to browse for some within the program! Furthermore, Filmora provides you with tools to edit the thumbnail. In turn, it streamlines the whole process. Give it a try to start creating video thumbnails that will make YouTube users click on your video easily.
Wondershare Filmora is one of the leading video editors in the world. And it does not stop at enabling you to make amazing videos. Filmora also helps you make that video succeed. It provides you with over 4 million stock media! That includes gorgeous photos that you can use as YouTube thumbnail backgrounds.
The best thing is that you can access those images within the video editor. Meaning there’s a streamlined workflow that makes things more convenient.
Where Do the Photos Come From? Wondershare Filmora takes images from the websites Pexels, GIPHY, Pixabay, and Unsplash. Besides those, Filmora also has its own stock media library - Filmstock.
Filmstock was previously known as Filmora Store. It is the effect store for Filmora version 9.1.0 and above. From there, you can find stock media, including videos, images that you can use for your thumbnails, and royalty-free music and sound effects. You can download these resources to turn your videos into art.
2. Use Freepik To Find YouTube Thumbnail Background Images
Pros
- With over 22 million stock media resources, it offers a significant amount of photos, vectors, and graphic resources.
- The website is well-designed and void of pop-ups, making it very easy to search for specific photos.
Cons
- The free version has lots of limitations.
- The premium version is expensive.
- Download times can sometimes be slow.
Freepik is one of the largest image bank websites. It has over 22 million stock media that you can choose from to be your YouTube thumbnail backgrounds. And that collection grows further every day. Therefore, it’s highly likely to have the image you are looking for.
Not just that. Freepik has a special section containing only YouTube thumbnail backgrounds. That expedites your search. Then, you can use the filters to show only the thumbnail background designs that match your vision.
3. Find YouTube Thumbnail Background on Shutterstock for Free
Pros
- One of the largest libraries of stock photos.
- Gives a 30-day free trial that lets you make 10 downloads totally free of charge.
- Includes free images.
Cons
- The free trial lasts only 30 days. It becomes very expensive after that has expired.
Shutterstock is probably the biggest website that offers stock images. It’s so popular Shutterstock is what many people first think of when they need to find stock images.
Shutterstock has been around since 2003. As such, its collection consists of over 200 million stock photos. From that many resources, you’ll surely be able to find something to use for your YouTube thumbnail background. Even after the free trial expires, you can find some free photos from the website.
4. Download Thumbnail Background Images for YouTube in Vecteezy
Pros
- Millions of free resources.
- Cheaper than alternatives.
Cons
- The free version does not give you full commercial rights and requires you to add attribution.
- The free version allows you to download only 10 files a day.
Vecteezy allows you to download stock images for free. However, if you are serious about your YouTubing career, you must upgrade to Pro for full commercial rights. The good thing is that Vecteezy is very affordable. It costs only $7 per month! And that already gives you unlimited downloads.
Now the question is, does it have YouTube thumbnail backgrounds? Yes, it does! Whether you prefer vectors or images, Vecteezy has you covered.
5. Attractive Backgrounds for YouTube Thumbnail – NegativeSpace
Pros
- Photos downloaded from the website are free to use
- NegativeSpace encourages attribution, though, to thank the photographer that took the photo.
Cons
- The collection includes mostly photographs with just a few vectors here and there.
- The website can sometimes be slow to load.
NegativeSpace is the perfect place to get your YouTube thumbnail background if you are on a tight budget. It allows you not only to download the photos but also to use them commercially! And the photos are high-quality too, and they’re meant to be used as backgrounds.
Please note, however, that if you’re looking for vector illustrations, you’d better be on another site. NegativeSpace is built by a community of photographers. So, most of the resources you can download from this website are photos captured by a camera.
How To Change YouTube Thumbnail Background?
Suppose you have downloaded a high-quality image that will work great as a thumbnail background for your YouTube video. What shall you do next? Of course, the next step is to make the actual thumbnail.
Choosing the background image from Filmora is great because it saves you lots of time and resources. The program allows you to select from millions of high-quality options. After selecting, you can use Filmora’s native features to edit the thumbnail. You can even resize the thumbnail background to 1280x720 - YouTube’s suggested thumbnail size.
It is more convenient than you may initially think. Yes, it saves you time and effort because you don’t have to switch to another program to edit the thumbnail. But it also makes the workload easier for your computer. Opening another program will eat more RAM and will slow down the computer.
Filmora’s tools for editing the video thumbnail aren’t too shabby, either. Suppose you have a great image with the main subject where exactly you want it to be. However, you want to change the background to make the subject stand out more. You can use Wondershare Filmora’s AI Portrait feature to easily change it.
Free Download For Win 7 or later(64-bit)
Free Download For macOS 10.14 or later
What is Filmora’s AI Portrait Feature?
Wondershare Filmora’s AI Portrait feature allows you to quickly remove and change the background of an image.
Normally, you would need a green screen or chroma key to do that. Another method is to manually erase the background using an eraser. The AI Portrait feature has an effect called “human segmentation.” It separates the humans in an image from the background. Then, you can delete or change the background with the thumbnail background that you have downloaded. It’s really convenient!
Here is a guide on changing a YouTube thumbnail background using Wondershare Filmora.
1. Put the Thumbnail image in the timeline.
2. Select the thumbnail image. Click “Tools” > “Video” > “AI Portrait.”
3. The AI Portrait tool will remove the background automatically. Click “OK.”
4. Click “Stock Media” > “Photos.” Search for a background image that you like. Download the photo.
5. Drag the new background to the track below your thumbnail image.
6. Select your thumbnail image to adjust its size and position.
7. Click the camera icon to take a snapshot of the still frame you want to use as the YouTube video thumbnail.
8. Select the format and storage path.
9. Find the icon of the snapshot in the Media tab. Right-click and select “Reveal In Explorer” to open your local folder to find the new thumbnail.
The Bottom Line
Your YouTube video thumbnail is almost as important as the video content itself. So you must not neglect it. Ensuring it is high-quality is important. One big step in doing that is selecting a great thumbnail background image. You can find these in many places.
The video editor Wondershare Filmora even allows you to browse for some within the program! Furthermore, Filmora provides you with tools to edit the thumbnail. In turn, it streamlines the whole process. Give it a try to start creating video thumbnails that will make YouTube users click on your video easily.
Starting From Scratch: Video Gear Insights
Essential YouTube Equipment For Starting Your Channel - What Do You Really Need?

Richard Bennett
Oct 26, 2023• Proven solutions
Check out our most updated guide on this topic: YouTube Equipment Starter Guide For Beginners .
The first thing to make sure of before starting a YouTube channel is having all that you need to record and upload high-quality videos regularly. That doesn’t mean you have to take out a loan and spend thousands to purchase a brand new camera and all other gadgets that professional filmmakers use.
The smartest way to get started is to go through a list of necessary equipment for YouTube and check whether or not you already own some of it. Once your channel starts growing, you can then start thinking about whether you want to invest in upgraded equipment. Here is a quick overview of all items that you need to start entertaining your online audience and gaining subscribers to your YouTube channel:
- Your YouTube Camera
- Microphones and Audio
- Lighting Gear for YouTube
- Tripods and Camera Stands
- Smartphone Camera Gear
YouTube Cameras
The short version: Use whatever you already have, even if it’s your phone or webcam. It’s nice to have sharp, fine-tuned, 4K footage, but viewers will forgive lower visual quality if your content is good.
The long version: You will need a camera, but there are a lot of different devices you can use including DSLRs, point and shoots, webcams, and your smartphone.
Your choice of camera will have a tremendous impact on the visual quality of your content and might drive your decisions regarding other pieces of equipment. However, you shouldn’t feel obliged to work with a top-notch camera from day one, especially since cheaper options can produce great results if used the right way.
On one end of the spectrum, you have basic smartphone cameras and web cameras, which are easy to come by and simple to operate. These days, high-end phones come equipped with quite powerful cameras that are more than sufficient for the needs of the average YouTuber. Better webcams can also do the job, although high-performance webcam models can get pretty expensive too. It is probably wise to resist the urge to start broadcasting with the built-in camera in your laptop and at least get a webcam or use your phone, but your computer’s camera is still always an option. Not having a better camera should never stop you from making YouTube videos.
If you already have a DSLR camera then it’s a good idea to familiarize yourself with it. You have far more freedom to adjust the settings and achieve a professional look for your videos with a DSLR, but that does mean it’ll take some time to become an expert at using it. Ultra-high resolution is not required for YouTube, but it certainly won’t hurt to have additional sharpness and more detail in the scene. If you’re shopping for a DSLR, look for one with a flip screen that allows you to quickly check what your viewers see.
YouTube Microphone and Audio
The short version: Audio quality is extremely important. If you can buy either a new camera or an external microphone, but not both, it might be better to go for the microphone. Click here for advice on upping your audio quality without an external microphone.
The long version: Sound capturing is every bit as important for your success as your video feed. In fact, poor audio can be even more damaging to your subscriber count than grainy video, since people won’t spend their time listening to something they have to put effort into understanding.
Again, most YouTube video makers have a limited budget at their disposal, so professional microphones are mostly off the table. However, investing in a directional microphone (‘shotgun mic’) that can pick up your voice clearly and without background noise is certainly a smart move. Such microphones can be pointed towards you while you speak, and since most YouTubers sit still while doing their shows there won’t be too much need for in-session adjustments.
If you’re not ready to invest in a shotgun mic, you can also find very inexpensive (often under $20) LAV mics. These small microphones can be pinned to your shirt, which allows them to record very clear dialogue because they’re so close to your mouth.
Lights for YouTube
The short version: You need as much light as you can get. Lighting kits can be affordable on Amazon, but you can also achieve a great look using daylight/windows and ‘daylight’ lightbulbs.
The long version: If you’ve ever tried to make a video indoors, you already know that it’s necessary to have additional light. Often just filming with the normal lights in a room will cause your footage to look dark and grainy, and possibly be tinted orange. To overcome these problems you need to increase the amount of light you have available.
Sometimes, it is enough to film near windows and/or bring more household lamps into your filming area. For any household lamps or lighting fixtures you use, make sure to put in white or ‘daylight’ lightbulbs instead of using the orange/tungsten bulbs that you might have for everyday use (this is how you avoid tinting things orange).
If you have the budget available to get some lighting equipment, you can find softbox lights or LED panel lights available fairly inexpensively online. Softbox lights are great because they provide even, diffused, light.
Another useful piece of lighting equipment to have is a reflector. A reflector is usually a piece of white, silver, or gold fabric stretched over a frame. You can use it to bounce light from one light source back towards yourself (this is a great way to fill shadows cast by your main light). Reflectors tend to be inexpensive, but you can also use white cardboard or tinfoil in place of purchasing a reflector.
Tripods and Camera Stands
The short version: You need something to hold your camera. If you mostly film in your own home that can be a desk or a stack of books, but if you make a lot of videos while you’re on the go you probably need a tripod or gimbal. Heavier cameras need heavier tripods.
The long version: While handheld cameras can deliver solid results for vloggers and casual streamers, viewers do expect reasonably stable footage. For many types of videos, the camera needs to be completely still and flatly positioned on a horizontal plane. Tripods and camera stands can cost very little, so it’s a good idea to look into getting some kind of stabilizer.
When you are choosing a tripod, pay attention to how much it weighs. If the camera that needs to be mounted on it is very heavy (like some DSLR models), you want to ensure that the structure itself weighs enough not to be easily tipped over. Too thin tripods can put your camera at risk, and that’s the last thing you want. Smaller cameras such as GoPros are more flexible in this regard and can be placed on a wider range of tripods.
Even if you are using a phone or a webcam to record YouTube videos, you should consider mounting the device on a stable stand. It is possible to find mini tripods ideal for smartphones for as little as $10. These tripods are small enough to carry in your pocket, so you will be prepared to start making a video no matter where your adventures take you. If you are using a web camera, you should attach it to the stand so that it won’t move accidentally after you touch the surface it is placed on.
Smartphone Camera Gear
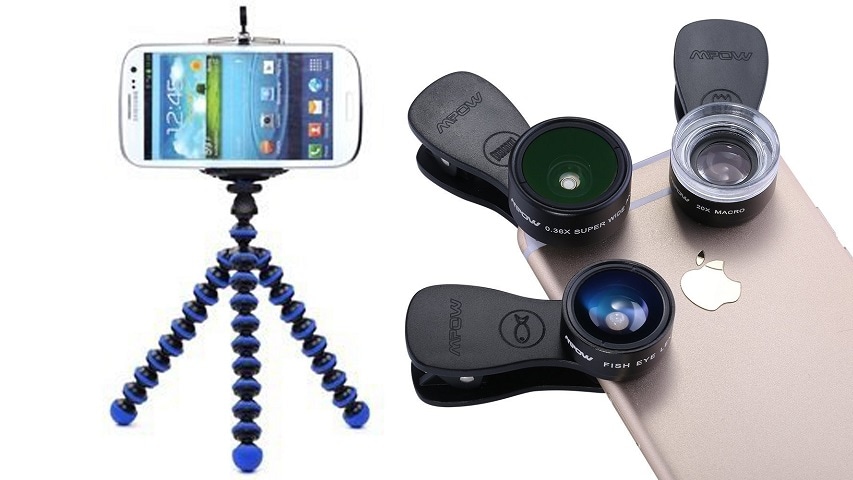
The short version: There’s a lot of gear out there designed with smartphone photos and videos in mind, including clip-on lenses, tripod mounts, phone-mounted LED lights, and inexpensive microphones that plug into the audio jack.
The long version: Recording your videos with a mobile phone can be a good decision. It all depends on the phone you have and the range of add-ons and apps that you complement it with. Almost every high-end model released in the past five years can shoot videos in 1080p or higher. Some can even produce 4K footage. If you perfect your smartphone filming technique, your YouTube videos could look as if they were made with pro equipment.
On the flip side, smartphone cameras typically perform poorly in low light. It is possible to download an app that lets you play around with settings to overcome this, but a phone-mounted LED light is probably a better solution. An external microphone might also be a necessity, but there are some good (inexpensive) options that can simply be plugged in through the headphone jack.
Another common downside of smartphone cameras is that most of them use digital zoom, which is vastly inferior to optical zoom. If you intend to shoot anything that’s further away than a few feet, you need a clip-on lens that goes on top of the built-in camera. This inexpensive device will give you a lot of freedom to work in space, and allow you to make spectacular shots even without high-end YouTube equipment.
Equipment with Easy-to-Use Video Editor


Richard Bennett
Richard Bennett is a writer and a lover of all things video.
Follow @Richard Bennett
Richard Bennett
Oct 26, 2023• Proven solutions
Check out our most updated guide on this topic: YouTube Equipment Starter Guide For Beginners .
The first thing to make sure of before starting a YouTube channel is having all that you need to record and upload high-quality videos regularly. That doesn’t mean you have to take out a loan and spend thousands to purchase a brand new camera and all other gadgets that professional filmmakers use.
The smartest way to get started is to go through a list of necessary equipment for YouTube and check whether or not you already own some of it. Once your channel starts growing, you can then start thinking about whether you want to invest in upgraded equipment. Here is a quick overview of all items that you need to start entertaining your online audience and gaining subscribers to your YouTube channel:
- Your YouTube Camera
- Microphones and Audio
- Lighting Gear for YouTube
- Tripods and Camera Stands
- Smartphone Camera Gear
YouTube Cameras
The short version: Use whatever you already have, even if it’s your phone or webcam. It’s nice to have sharp, fine-tuned, 4K footage, but viewers will forgive lower visual quality if your content is good.
The long version: You will need a camera, but there are a lot of different devices you can use including DSLRs, point and shoots, webcams, and your smartphone.
Your choice of camera will have a tremendous impact on the visual quality of your content and might drive your decisions regarding other pieces of equipment. However, you shouldn’t feel obliged to work with a top-notch camera from day one, especially since cheaper options can produce great results if used the right way.
On one end of the spectrum, you have basic smartphone cameras and web cameras, which are easy to come by and simple to operate. These days, high-end phones come equipped with quite powerful cameras that are more than sufficient for the needs of the average YouTuber. Better webcams can also do the job, although high-performance webcam models can get pretty expensive too. It is probably wise to resist the urge to start broadcasting with the built-in camera in your laptop and at least get a webcam or use your phone, but your computer’s camera is still always an option. Not having a better camera should never stop you from making YouTube videos.
If you already have a DSLR camera then it’s a good idea to familiarize yourself with it. You have far more freedom to adjust the settings and achieve a professional look for your videos with a DSLR, but that does mean it’ll take some time to become an expert at using it. Ultra-high resolution is not required for YouTube, but it certainly won’t hurt to have additional sharpness and more detail in the scene. If you’re shopping for a DSLR, look for one with a flip screen that allows you to quickly check what your viewers see.
YouTube Microphone and Audio
The short version: Audio quality is extremely important. If you can buy either a new camera or an external microphone, but not both, it might be better to go for the microphone. Click here for advice on upping your audio quality without an external microphone.
The long version: Sound capturing is every bit as important for your success as your video feed. In fact, poor audio can be even more damaging to your subscriber count than grainy video, since people won’t spend their time listening to something they have to put effort into understanding.
Again, most YouTube video makers have a limited budget at their disposal, so professional microphones are mostly off the table. However, investing in a directional microphone (‘shotgun mic’) that can pick up your voice clearly and without background noise is certainly a smart move. Such microphones can be pointed towards you while you speak, and since most YouTubers sit still while doing their shows there won’t be too much need for in-session adjustments.
If you’re not ready to invest in a shotgun mic, you can also find very inexpensive (often under $20) LAV mics. These small microphones can be pinned to your shirt, which allows them to record very clear dialogue because they’re so close to your mouth.
Lights for YouTube
The short version: You need as much light as you can get. Lighting kits can be affordable on Amazon, but you can also achieve a great look using daylight/windows and ‘daylight’ lightbulbs.
The long version: If you’ve ever tried to make a video indoors, you already know that it’s necessary to have additional light. Often just filming with the normal lights in a room will cause your footage to look dark and grainy, and possibly be tinted orange. To overcome these problems you need to increase the amount of light you have available.
Sometimes, it is enough to film near windows and/or bring more household lamps into your filming area. For any household lamps or lighting fixtures you use, make sure to put in white or ‘daylight’ lightbulbs instead of using the orange/tungsten bulbs that you might have for everyday use (this is how you avoid tinting things orange).
If you have the budget available to get some lighting equipment, you can find softbox lights or LED panel lights available fairly inexpensively online. Softbox lights are great because they provide even, diffused, light.
Another useful piece of lighting equipment to have is a reflector. A reflector is usually a piece of white, silver, or gold fabric stretched over a frame. You can use it to bounce light from one light source back towards yourself (this is a great way to fill shadows cast by your main light). Reflectors tend to be inexpensive, but you can also use white cardboard or tinfoil in place of purchasing a reflector.
Tripods and Camera Stands
The short version: You need something to hold your camera. If you mostly film in your own home that can be a desk or a stack of books, but if you make a lot of videos while you’re on the go you probably need a tripod or gimbal. Heavier cameras need heavier tripods.
The long version: While handheld cameras can deliver solid results for vloggers and casual streamers, viewers do expect reasonably stable footage. For many types of videos, the camera needs to be completely still and flatly positioned on a horizontal plane. Tripods and camera stands can cost very little, so it’s a good idea to look into getting some kind of stabilizer.
When you are choosing a tripod, pay attention to how much it weighs. If the camera that needs to be mounted on it is very heavy (like some DSLR models), you want to ensure that the structure itself weighs enough not to be easily tipped over. Too thin tripods can put your camera at risk, and that’s the last thing you want. Smaller cameras such as GoPros are more flexible in this regard and can be placed on a wider range of tripods.
Even if you are using a phone or a webcam to record YouTube videos, you should consider mounting the device on a stable stand. It is possible to find mini tripods ideal for smartphones for as little as $10. These tripods are small enough to carry in your pocket, so you will be prepared to start making a video no matter where your adventures take you. If you are using a web camera, you should attach it to the stand so that it won’t move accidentally after you touch the surface it is placed on.
Smartphone Camera Gear
The short version: There’s a lot of gear out there designed with smartphone photos and videos in mind, including clip-on lenses, tripod mounts, phone-mounted LED lights, and inexpensive microphones that plug into the audio jack.
The long version: Recording your videos with a mobile phone can be a good decision. It all depends on the phone you have and the range of add-ons and apps that you complement it with. Almost every high-end model released in the past five years can shoot videos in 1080p or higher. Some can even produce 4K footage. If you perfect your smartphone filming technique, your YouTube videos could look as if they were made with pro equipment.
On the flip side, smartphone cameras typically perform poorly in low light. It is possible to download an app that lets you play around with settings to overcome this, but a phone-mounted LED light is probably a better solution. An external microphone might also be a necessity, but there are some good (inexpensive) options that can simply be plugged in through the headphone jack.
Another common downside of smartphone cameras is that most of them use digital zoom, which is vastly inferior to optical zoom. If you intend to shoot anything that’s further away than a few feet, you need a clip-on lens that goes on top of the built-in camera. This inexpensive device will give you a lot of freedom to work in space, and allow you to make spectacular shots even without high-end YouTube equipment.
Equipment with Easy-to-Use Video Editor
Richard Bennett
Richard Bennett is a writer and a lover of all things video.
Follow @Richard Bennett
- Title: "2024 Approved The Ultimate Guide to Enhancing YouTube Thumbnails with BGs"
- Author: Joseph
- Created at : 2024-05-31 13:47:12
- Updated at : 2024-06-01 13:47:12
- Link: https://youtube-stream.techidaily.com/2024-approved-the-ultimate-guide-to-enhancing-youtube-thumbnails-with-bgs/
- License: This work is licensed under CC BY-NC-SA 4.0.
