:max_bytes(150000):strip_icc()/AboutUs-4a897bc6188c4714977876be476cae9e.png)
"2024 Approved The Key to Enhanced Viewership Designing Impactful YouTube Thumbnails"
The Key to Enhanced Viewership: Designing Impactful YouTube Thumbnails
How to Make Video Thumbnails for YouTube

Richard Bennett
Oct 26, 2023• Proven solutions
The video thumbnails you use for YouTube are vital to getting views and subscribers. There are a lot of things that go into making people watch your videos, but your video thumbnail might be the most important factor.
Here are 5 easy tips for creating thumbnails that get views.
- Have a Consistent Layout
- Use Your Face
- Use Graphics/Emojis That is On Topic
- Make Your Text Huge
- Keep It Clutter-Free!
Contest now closed.
Edit Your Videos Before Creating Video Thumbnails


1. Have a Consistent Layout
Your thumbnails all must look like part of the same set. You want viewers to recognize your videos like yours, and they are more likely to do that if you build up a standard layout that they can start associating with you.
An example of a standard layout could be you in the middle of the screen wearing an expression that matches the theme of your video, with your title written underneath your face. Every individual thumbnail would still be different, but you and the text would always be in the same spot.
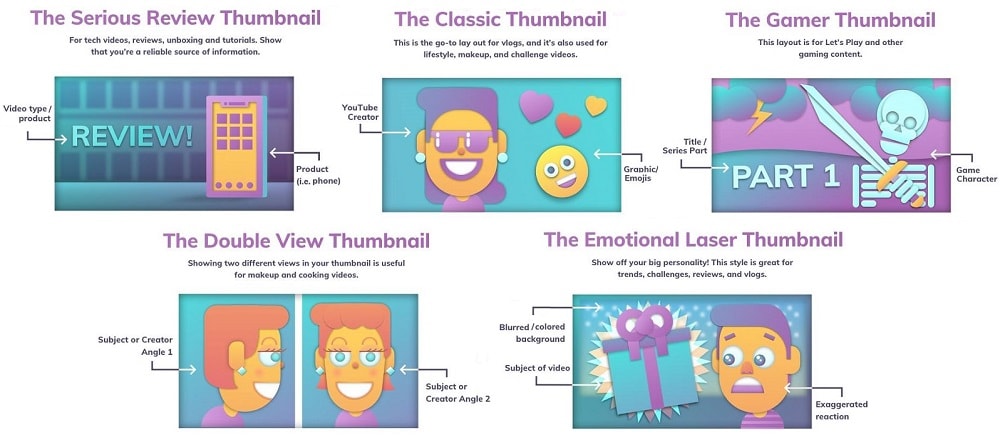
2. Use Your Face
People feel automatically connected and drawn into images that make eye contact. This makes thumbnails which feature faces more click-able than thumbnails which don’t, in most genres (i.e. if you make food videos then this may not apply – featuring the food might be more important than featuring your face). Check out more tips like this here .
Also, if somebody recognizes you in your thumbnail from a previous video of yours, that will go a long way towards making them click.
3. Use Graphics/Emojis that are On Topic
Anybody can take a screenshot of themselves in their video and use it as a thumbnail. To make your thumbnails look polished, consider using small images (like emojis or hearts) to stand out. This will add color and personality to your thumbnail.
Make sure the images you choose are relevant to the topic of your video.
4. Make Your Text Huge
If you use text in your thumbnail (you don’t have to) then it should be to add context. For example, if the main image is just you smiling then you might need some text to let viewers know the video is a makeup tutorial.
Thumbnails might look large while you’re putting them together in your image editor, but when they’re displayed on YouTube they’re a lot smaller. That goes double if a viewer is watching on their phone. So, make sure that any text you use is large enough that it can be read easily on small screens.
5. Keep it Clutter-Free
It’s great to add text and emojis to your thumbnails, but you do need to be careful not to add too much. You never want your thumbnails to look cluttered. Viewers should be able to glance at your thumbnails and know exactly what kind of video to expect – that’s difficult to do if there’s too much to process.
A good rule for text is to use only 1-3 words. That way they won’t clutter your screen, and you can make them large enough to read on small-screened devices.
For even more tips on making great YouTube thumbnails, click here .
Use these tips to make video thumbnails for YouTube, and tell us what kind of results you get!
Richard Bennett
Richard Bennett is a writer and a lover of all things video.
Follow @Richard Bennett
Richard Bennett
Oct 26, 2023• Proven solutions
The video thumbnails you use for YouTube are vital to getting views and subscribers. There are a lot of things that go into making people watch your videos, but your video thumbnail might be the most important factor.
Here are 5 easy tips for creating thumbnails that get views.
- Have a Consistent Layout
- Use Your Face
- Use Graphics/Emojis That is On Topic
- Make Your Text Huge
- Keep It Clutter-Free!
Contest now closed.
Edit Your Videos Before Creating Video Thumbnails
1. Have a Consistent Layout
Your thumbnails all must look like part of the same set. You want viewers to recognize your videos like yours, and they are more likely to do that if you build up a standard layout that they can start associating with you.
An example of a standard layout could be you in the middle of the screen wearing an expression that matches the theme of your video, with your title written underneath your face. Every individual thumbnail would still be different, but you and the text would always be in the same spot.
2. Use Your Face
People feel automatically connected and drawn into images that make eye contact. This makes thumbnails which feature faces more click-able than thumbnails which don’t, in most genres (i.e. if you make food videos then this may not apply – featuring the food might be more important than featuring your face). Check out more tips like this here .
Also, if somebody recognizes you in your thumbnail from a previous video of yours, that will go a long way towards making them click.
3. Use Graphics/Emojis that are On Topic
Anybody can take a screenshot of themselves in their video and use it as a thumbnail. To make your thumbnails look polished, consider using small images (like emojis or hearts) to stand out. This will add color and personality to your thumbnail.
Make sure the images you choose are relevant to the topic of your video.
4. Make Your Text Huge
If you use text in your thumbnail (you don’t have to) then it should be to add context. For example, if the main image is just you smiling then you might need some text to let viewers know the video is a makeup tutorial.
Thumbnails might look large while you’re putting them together in your image editor, but when they’re displayed on YouTube they’re a lot smaller. That goes double if a viewer is watching on their phone. So, make sure that any text you use is large enough that it can be read easily on small screens.
5. Keep it Clutter-Free
It’s great to add text and emojis to your thumbnails, but you do need to be careful not to add too much. You never want your thumbnails to look cluttered. Viewers should be able to glance at your thumbnails and know exactly what kind of video to expect – that’s difficult to do if there’s too much to process.
A good rule for text is to use only 1-3 words. That way they won’t clutter your screen, and you can make them large enough to read on small-screened devices.
For even more tips on making great YouTube thumbnails, click here .
Use these tips to make video thumbnails for YouTube, and tell us what kind of results you get!
Richard Bennett
Richard Bennett is a writer and a lover of all things video.
Follow @Richard Bennett
Simplified Methods to Validate Your YouTube Status
How to Verify Your YouTube Account - a Simple Guide
Richard Bennett
Oct 26, 2023• Proven solutions
YouTube verify isn’t just for big channels, it’s for just about anyone serious about YouTube. The main benefits of verifying your channel are live streaming and the ability to publish longer videos. You must also verify your account to apply for monetization, although there are other qualifications for that as well.
How to verify your YouTube channel
To verify your YouTube channel, start by visiting this link: https://www.youtube.com/verify .
You’ll need to provide a phone number. A verification code will be either texted or sent via an automated voice call (your choice). Once you have the code, you just have to enter in the field YouTube provides.
How to post videos on YouTube longer than 15 minutes
The default settings on YouTube only allow creators to upload videos that are 15 minutes or shorter. To upload longer videos you will need to verify your YouTube account. Luckily this feature is easy to access.
From the YouTube upload page, you will see an option that says increase your limit at the bottom of the page. From there you will be redirected to the main YouTube verification page. In this area, you can follow the steps to verify your account, which will involve receiving a verification code via text message on your mobile phone or an automated voice call. Once you are verified you can upload videos that are up to 12 hours long or have a file size of up to 128 GB.
How to live stream on YouTube
Live streaming lets you reach out to your viewers an engage with them directly. With a verified YouTube account you can start the process of streaming directly from your channel page. Live streams will appear as recommended for your subscribers just like any other piece of the published content. After a live stream is finished content creators have the chance to publish the video that was captured during the live stream.
To live stream on YouTube you must have a verified channel and zero live stream restrictions for 90 days. An account may not be able to live stream within the first 24 hours of account creation.
To enable live streaming go to the creator studio, click on the live streaming tab, and enable the live stream. Live streams are also available through the YouTube mobile app from the ‘create a live stream’ button.
Customize YouTube Videos with Easy-to-Use Video Editor
Richard Bennett
Richard Bennett is a writer and a lover of all things video.
Follow @Richard Bennett
Richard Bennett
Oct 26, 2023• Proven solutions
YouTube verify isn’t just for big channels, it’s for just about anyone serious about YouTube. The main benefits of verifying your channel are live streaming and the ability to publish longer videos. You must also verify your account to apply for monetization, although there are other qualifications for that as well.
How to verify your YouTube channel
To verify your YouTube channel, start by visiting this link: https://www.youtube.com/verify .
You’ll need to provide a phone number. A verification code will be either texted or sent via an automated voice call (your choice). Once you have the code, you just have to enter in the field YouTube provides.
How to post videos on YouTube longer than 15 minutes
The default settings on YouTube only allow creators to upload videos that are 15 minutes or shorter. To upload longer videos you will need to verify your YouTube account. Luckily this feature is easy to access.
From the YouTube upload page, you will see an option that says increase your limit at the bottom of the page. From there you will be redirected to the main YouTube verification page. In this area, you can follow the steps to verify your account, which will involve receiving a verification code via text message on your mobile phone or an automated voice call. Once you are verified you can upload videos that are up to 12 hours long or have a file size of up to 128 GB.
How to live stream on YouTube
Live streaming lets you reach out to your viewers an engage with them directly. With a verified YouTube account you can start the process of streaming directly from your channel page. Live streams will appear as recommended for your subscribers just like any other piece of the published content. After a live stream is finished content creators have the chance to publish the video that was captured during the live stream.
To live stream on YouTube you must have a verified channel and zero live stream restrictions for 90 days. An account may not be able to live stream within the first 24 hours of account creation.
To enable live streaming go to the creator studio, click on the live streaming tab, and enable the live stream. Live streams are also available through the YouTube mobile app from the ‘create a live stream’ button.
Customize YouTube Videos with Easy-to-Use Video Editor
Richard Bennett
Richard Bennett is a writer and a lover of all things video.
Follow @Richard Bennett
Also read:
- 2024 Approved Mastering 4K Uploads Key Tips for YouTube Success
- 2024 Approved Movie Buffs' Secret 2023 Recommendations
- 2024 Approved What Is T Series Income on YouTube
- Efficiënt Overbrengen Van Hoe-Gegevens Naar Uw Buffalo NAS Schroefbandige Speelplaats
- How to use Snapchat Location Spoofer to Protect Your Privacy On Vivo T2x 5G? | Dr.fone
- In 2024, Effective Guide to Cast Apple iPhone XR to MacBook without Hindrance | Dr.fone
- In 2024, Unlocking YouTube Profitability Recent Guidelines
- Key Information on Windows' Components Framework Admin Center
- Optimize Social Vids for Maximum View Size for 2024
- Title: 2024 Approved The Key to Enhanced Viewership Designing Impactful YouTube Thumbnails
- Author: Joseph
- Created at : 2024-10-24 20:42:48
- Updated at : 2024-10-30 03:45:22
- Link: https://youtube-stream.techidaily.com/2024-approved-the-key-to-enhanced-viewership-designing-impactful-youtube-thumbnails/
- License: This work is licensed under CC BY-NC-SA 4.0.