"2024 Approved The Income Impact of Sharing on YouTube Shorts"
The Income Impact of Sharing on YouTube Shorts
YouTube Shorts have become a craze in the recent past as creators try to get the best out of them. These are short, vertical videos that are 60 seconds long. Originally a way of YouTube attempting to compete with TikTok, Shorts have become a household name. However, are YouTube shorts monetized? Can you get paid for YouTube shorts? The increasing interest in monetizing Shorts has inspired many creators working on their video creation. This article answers the question of can YouTube Shorts be monetized and explains how the revenue-sharing model works.
YouTube Shorts Editor A cross-platform helps creators edit the vertical videos quickly and easily!
Free Download Free Download Learn More

Part 1. Unveiling the Mystery of YouTube Shorts Revenue Sharing
YouTube launched the Shorts platform in 2021, which gained popularity within a short period. By the end of the first year, some videos had racked up more than half a billion views and counties. This begged the question: can you get paid from YouTube shorts?

Yes, YouTube updated its Partner Program, allowing the revenue-sharing model to benefit Shorts creators. The platform pools all the money it gets from advertisers every month from the Shorts feeds. It then shares that money with creators based on the number of views. Since the launch of this program in February 2023, the previous YouTube Shorts Fund became defunct.
The ad revenue-sharing model on YouTube Shorts may seem complex, but let’s break it down
- Every month YouTube pools all the revenue it generates from ads that appear in the Shorts feed.
- YouTube calculates that is going to the Creators Pool. A chuck of this money goes towards paying for songs used in YouTube Shorts. For instance, only a third of the ad revenue generated from a Shorts goes to the Creator Pool if it used two songs while the rest goes to paying for the music.
- YouTube divides the Creator pool depending on the number of views they contributed. If a creator generated 5% of the Shorts views during a period, they are assigned 5% of the Creator Pool.
- From that amount, YouTube keeps 55% of its share while you get paid the remaining 45%. If a creator’s 5% amounted to $800, then they will receive $360.
So, is YouTube shorts monetized? Yes, the ads-sharing model defines the amount of money a creator can earn from Shorts every month. Depending on the number of views generated, high-performing Shorts can bring in a huge amount of money.
Part 2. YouTube Shorts Monetization: Eligibility Criteria and Earnings Potential
YouTube Shorts provides creators with an exceptional way of making extra income. Let’s have a look at what it takes and what the numbers say:
Eligibility Criteria
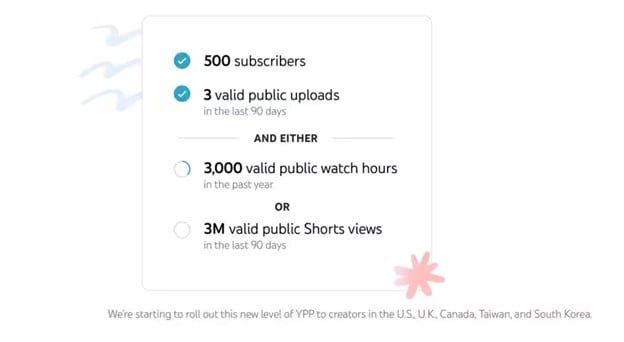
If you are wondering, can I monetize YouTube shorts? To start earning ad revenue from Shorts, you need to be part of the YouTube Partner Program (YPP) This is the gateway to YouTube monetization opportunities. With the latest YouTube shorts monetization 2023 policy, the platform lowered the eligibility criteria.
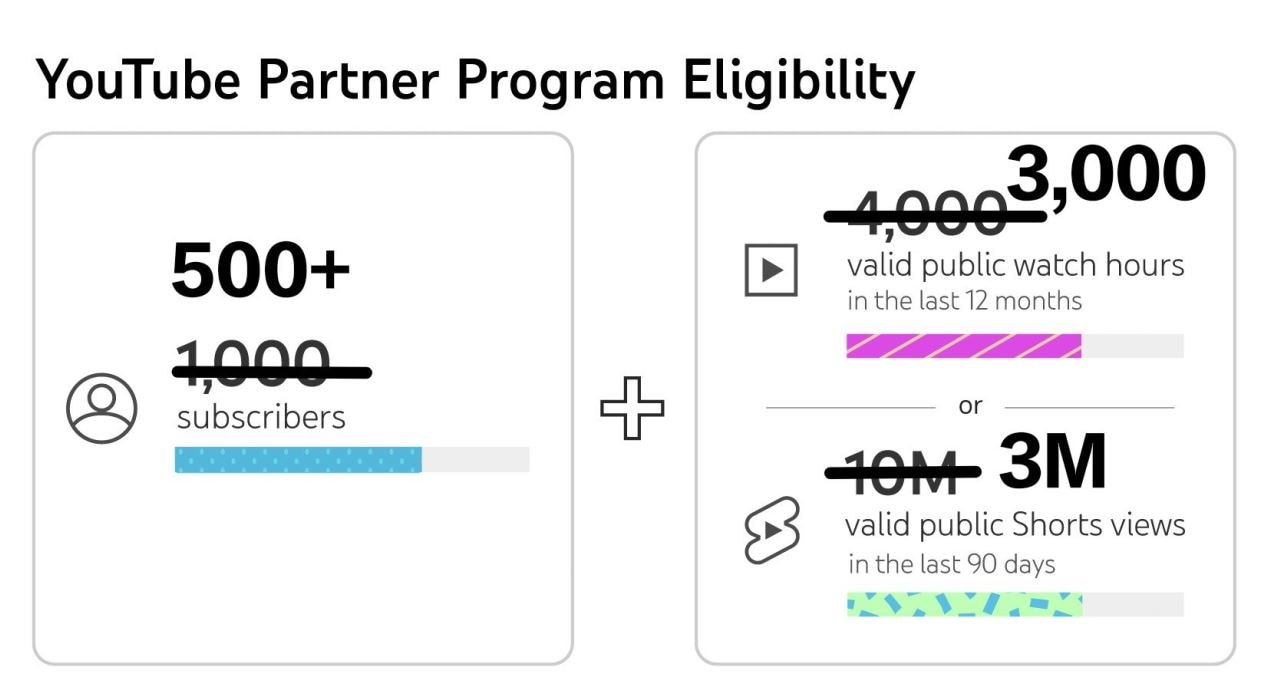
To be eligible to the YPP, you will need:
- At least 500 Subscribers
- At least 3,000 valid public hours in the last 12 months, or
- At least 3M valid public Shorts views in the last 90 days
This means that your YouTube channel must have gained some traction before monetizing your shorts. The following YouTube short monetization 2023 requirements are also needed:
- Live in a region where the YPP is available
- Comply with YouTube’s channel monetization policies
- Have no Community Guidelines strikes on your channel
- Have an active AdSense account
- Have 2-step verification turned on for your Google account
How Much Can You Earn With Shorts
YouTube Shorts have the potential to make a huge amount of money for creators. In fact, YouTube monetize Shorts in a quite generous way. Here are a few examples to give you an idea of the numbers:
- James Seo (573,000 subscribers) - Earned $445.09 from 10.3 million Shorts views
- Riley Lemon (84,000 subscribers) - Earned $76.23 from 1.9 million Shorts views
- Matthew King (212,000 subscribers) – Earned $163.73 from 4.2 million Shorts views
- Hassan Khadair (2.1 million subscribers) – Earned $872.14 from 22 million Shorts views
Part 3. How to Start Earning from YouTube Shorts
Eligible creators start earning from YouTube Shorts when they opt-in to the program. You need to make sure you are eligible and agree to start receiving revenue from your creations.
Are You Eligible for YouTube Shorts Earnings?
Shorts creators growing their channel and are yet to meet the minimum requirements can track their eligibility status by selecting “Notify me when I’m eligible” in YouTube Studio’s Earn section.
When you become eligible, follow these steps to apply for the YPP program:
- Sign in to YouTube on a computer or the YouTube Studio app on a mobile
- Click on your profile picture, and choose YouTube Studio
- Click Earn on the left menu, then select Apply
- Click Start to review your eligibility and accept the base terms
- Click Start to set up an AdSense account. You may also choose to link an existing active one.
- Your application will be in Progress in the Get Reviewed step.
Once you have completed these steps, your YouTube Channel will be reviewed. You can expect to hear a decision within a month of enrolling you in the program.
How to opt in for YouTube Shorts Monetization
After being approved and enrolled in the YPP program, you need to opt in to monetize your channel. Remember that you will not be automatically signed up for the ad revenue-sharing model. Here are a few more steps you need to take:
- Sign in to YouTube Studio
- Select Earn in the left menu
- Click Get Started for every module to review and accept their terms
- Accept the Base Terms and the Shorts Monetization Module to monetize Shorts
Once your Shorts are monetized, track the progress and amount of money earned through YouTube Analytics.
Other Ways to Monetize YouTube Shorts
The YPP program is the only ad-based monetization option for YouTube Shorts. However, there are other ways of earning:
- Selling Subscription Memberships: Turn your YouTube to membership and charge monthly payments in exchange for perks like badges and exclusive content.
- Monetize Livestreams: Features such as super stickers and super chat allow creators to make money when fans pay to send highlighted messages.
- Selling Merchandise and Products: Make additional income by selling branded merchandise like apparel or product lines in your content niche.
- Secure Paid Brand Partnerships: Interacting directly with brands and negotiating sponsorship deals.
- Join an Affiliate Program: An affiliate program will pay you revenue associated with clicks to links hosted on your channel.
Part 4. Edit Your YouTube Videos to Shorts with Wondershare Filmora
To earn more from your YouTube Shorts, you need quality content that keeps your viewers entertained. With Shorts having a limit of 60 seconds, you want to make sure that you cover the most essential footage. Wondershare Filmora is a versatile video editing software that helps creators edit their vertical videos quickly and easily. The mobile app is specifically great for editing shorts on the go:
Free Download For Win 7 or later(64-bit)
Free Download For macOS 10.14 or later
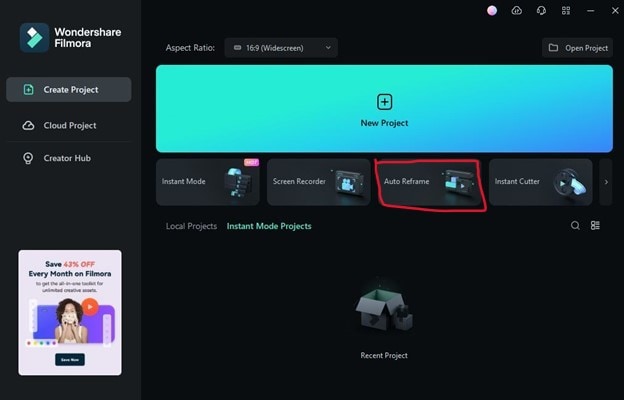
Editing your videos with Filmora is quite straightforward. One of the features that work well for YouTube shorts is the Auto Reframe.
Auto Reframe
The Auto Reframe feature allows creators to resize videos automatically with no editing skills needed. This is a great tool for converting your horizontal YouTube videos to Shorts format. It also boosts your potential audience while saving you precious time and effort you would have used editing. To use this feature, choose any of the following options:
1. Open Filmora and Select Auto Reframe
After opening Filmora, head over to the main interface. You will find the Auto Reframe option on the right side. Click on it to open the reframing feature.
2. Launch Directly from the Video
Click File, followed by Import Media. Select the file that you gave imported in the timeline and right-click on it. Then select Auto Reframe.
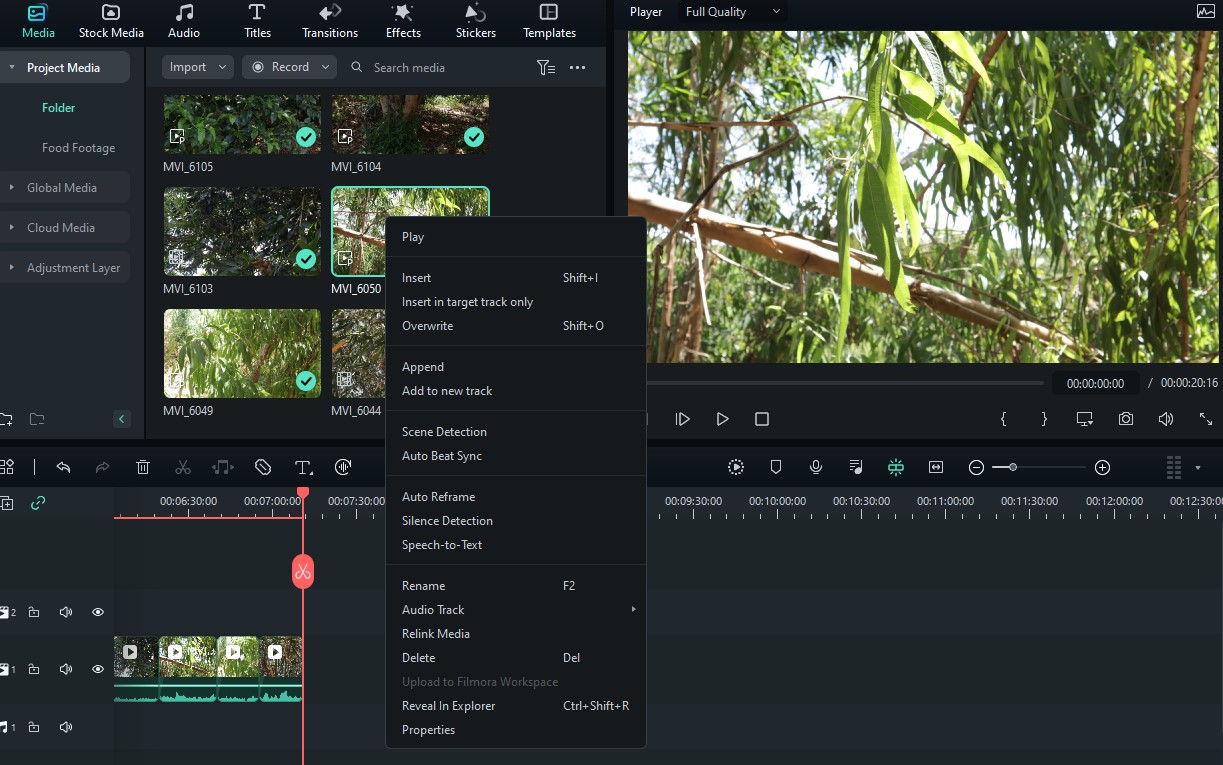
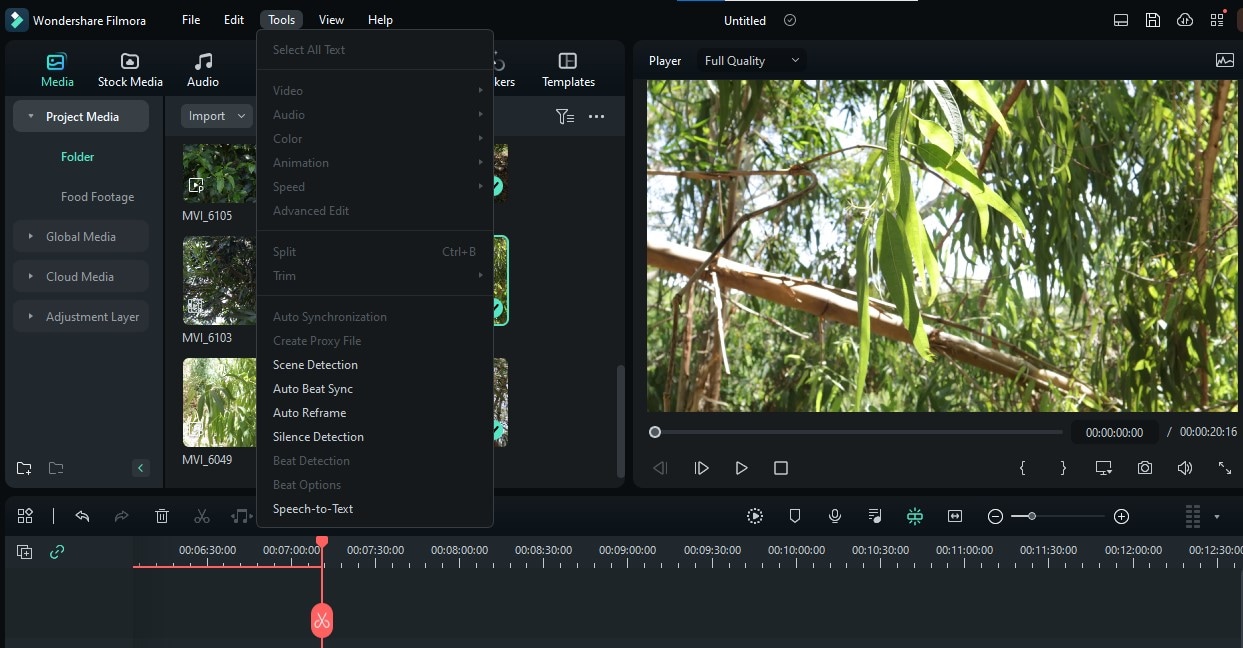
3. Use the Tools Option
You may also use the Auto Reframe feature by clicking on the Tools feature on the top menu bar. Then click on Auto Reframe.
Other Filmora Features for Editing Shorts
- Split Screen Video Editor – A choice of pre-made templates to create split-screen videos instantly.
- Add Text to Video – Directly add texts to your videos, including subtitles and captions.
- Text To Speech – Instantly convert your text files to voice and introduce more elements that will enrich your Shorts video.
Conclusion
YouTube Short’s revenue-sharing programs offer a great opportunity for creators specializing in short-form content to earn money on the platform. Once eligible for the YPP program, you can start earning a nice cash bonus monthly. However, you will need to create quality content that keeps your audience entertained and engaged. We recommend using Wondershare Filmora to edit your Shorts and make them more relatable to the audience,
Free Download Free Download Learn More
Part 1. Unveiling the Mystery of YouTube Shorts Revenue Sharing
YouTube launched the Shorts platform in 2021, which gained popularity within a short period. By the end of the first year, some videos had racked up more than half a billion views and counties. This begged the question: can you get paid from YouTube shorts?
Yes, YouTube updated its Partner Program, allowing the revenue-sharing model to benefit Shorts creators. The platform pools all the money it gets from advertisers every month from the Shorts feeds. It then shares that money with creators based on the number of views. Since the launch of this program in February 2023, the previous YouTube Shorts Fund became defunct.
The ad revenue-sharing model on YouTube Shorts may seem complex, but let’s break it down
- Every month YouTube pools all the revenue it generates from ads that appear in the Shorts feed.
- YouTube calculates that is going to the Creators Pool. A chuck of this money goes towards paying for songs used in YouTube Shorts. For instance, only a third of the ad revenue generated from a Shorts goes to the Creator Pool if it used two songs while the rest goes to paying for the music.
- YouTube divides the Creator pool depending on the number of views they contributed. If a creator generated 5% of the Shorts views during a period, they are assigned 5% of the Creator Pool.
- From that amount, YouTube keeps 55% of its share while you get paid the remaining 45%. If a creator’s 5% amounted to $800, then they will receive $360.
So, is YouTube shorts monetized? Yes, the ads-sharing model defines the amount of money a creator can earn from Shorts every month. Depending on the number of views generated, high-performing Shorts can bring in a huge amount of money.
Part 2. YouTube Shorts Monetization: Eligibility Criteria and Earnings Potential
YouTube Shorts provides creators with an exceptional way of making extra income. Let’s have a look at what it takes and what the numbers say:
Eligibility Criteria
If you are wondering, can I monetize YouTube shorts? To start earning ad revenue from Shorts, you need to be part of the YouTube Partner Program (YPP) This is the gateway to YouTube monetization opportunities. With the latest YouTube shorts monetization 2023 policy, the platform lowered the eligibility criteria.
To be eligible to the YPP, you will need:
- At least 500 Subscribers
- At least 3,000 valid public hours in the last 12 months, or
- At least 3M valid public Shorts views in the last 90 days
This means that your YouTube channel must have gained some traction before monetizing your shorts. The following YouTube short monetization 2023 requirements are also needed:
- Live in a region where the YPP is available
- Comply with YouTube’s channel monetization policies
- Have no Community Guidelines strikes on your channel
- Have an active AdSense account
- Have 2-step verification turned on for your Google account
How Much Can You Earn With Shorts
YouTube Shorts have the potential to make a huge amount of money for creators. In fact, YouTube monetize Shorts in a quite generous way. Here are a few examples to give you an idea of the numbers:
- James Seo (573,000 subscribers) - Earned $445.09 from 10.3 million Shorts views
- Riley Lemon (84,000 subscribers) - Earned $76.23 from 1.9 million Shorts views
- Matthew King (212,000 subscribers) – Earned $163.73 from 4.2 million Shorts views
- Hassan Khadair (2.1 million subscribers) – Earned $872.14 from 22 million Shorts views
Part 3. How to Start Earning from YouTube Shorts
Eligible creators start earning from YouTube Shorts when they opt-in to the program. You need to make sure you are eligible and agree to start receiving revenue from your creations.
Are You Eligible for YouTube Shorts Earnings?
Shorts creators growing their channel and are yet to meet the minimum requirements can track their eligibility status by selecting “Notify me when I’m eligible” in YouTube Studio’s Earn section.
When you become eligible, follow these steps to apply for the YPP program:
- Sign in to YouTube on a computer or the YouTube Studio app on a mobile
- Click on your profile picture, and choose YouTube Studio
- Click Earn on the left menu, then select Apply
- Click Start to review your eligibility and accept the base terms
- Click Start to set up an AdSense account. You may also choose to link an existing active one.
- Your application will be in Progress in the Get Reviewed step.
Once you have completed these steps, your YouTube Channel will be reviewed. You can expect to hear a decision within a month of enrolling you in the program.
How to opt in for YouTube Shorts Monetization
After being approved and enrolled in the YPP program, you need to opt in to monetize your channel. Remember that you will not be automatically signed up for the ad revenue-sharing model. Here are a few more steps you need to take:
- Sign in to YouTube Studio
- Select Earn in the left menu
- Click Get Started for every module to review and accept their terms
- Accept the Base Terms and the Shorts Monetization Module to monetize Shorts
Once your Shorts are monetized, track the progress and amount of money earned through YouTube Analytics.
Other Ways to Monetize YouTube Shorts
The YPP program is the only ad-based monetization option for YouTube Shorts. However, there are other ways of earning:
- Selling Subscription Memberships: Turn your YouTube to membership and charge monthly payments in exchange for perks like badges and exclusive content.
- Monetize Livestreams: Features such as super stickers and super chat allow creators to make money when fans pay to send highlighted messages.
- Selling Merchandise and Products: Make additional income by selling branded merchandise like apparel or product lines in your content niche.
- Secure Paid Brand Partnerships: Interacting directly with brands and negotiating sponsorship deals.
- Join an Affiliate Program: An affiliate program will pay you revenue associated with clicks to links hosted on your channel.
Part 4. Edit Your YouTube Videos to Shorts with Wondershare Filmora
To earn more from your YouTube Shorts, you need quality content that keeps your viewers entertained. With Shorts having a limit of 60 seconds, you want to make sure that you cover the most essential footage. Wondershare Filmora is a versatile video editing software that helps creators edit their vertical videos quickly and easily. The mobile app is specifically great for editing shorts on the go:
Free Download For Win 7 or later(64-bit)
Free Download For macOS 10.14 or later
Editing your videos with Filmora is quite straightforward. One of the features that work well for YouTube shorts is the Auto Reframe.
Auto Reframe
The Auto Reframe feature allows creators to resize videos automatically with no editing skills needed. This is a great tool for converting your horizontal YouTube videos to Shorts format. It also boosts your potential audience while saving you precious time and effort you would have used editing. To use this feature, choose any of the following options:
1. Open Filmora and Select Auto Reframe
After opening Filmora, head over to the main interface. You will find the Auto Reframe option on the right side. Click on it to open the reframing feature.
2. Launch Directly from the Video
Click File, followed by Import Media. Select the file that you gave imported in the timeline and right-click on it. Then select Auto Reframe.
3. Use the Tools Option
You may also use the Auto Reframe feature by clicking on the Tools feature on the top menu bar. Then click on Auto Reframe.
Other Filmora Features for Editing Shorts
- Split Screen Video Editor – A choice of pre-made templates to create split-screen videos instantly.
- Add Text to Video – Directly add texts to your videos, including subtitles and captions.
- Text To Speech – Instantly convert your text files to voice and introduce more elements that will enrich your Shorts video.
Conclusion
YouTube Short’s revenue-sharing programs offer a great opportunity for creators specializing in short-form content to earn money on the platform. Once eligible for the YPP program, you can start earning a nice cash bonus monthly. However, you will need to create quality content that keeps your audience entertained and engaged. We recommend using Wondershare Filmora to edit your Shorts and make them more relatable to the audience,
Comprehensive Guide to YouTube Video Captioning
How To Add Captions to YouTube Videos

Richard Bennett
Mar 27, 2024• Proven solutions
By captioning your YouTube videos you help to make them accessible to more potential viewers. Subtitles are useful to viewers who have hearing impairments, whose first language is different from yours, or who are unable to watch your video with sound. Closed captioning can also be useful for you as a YouTuber because it helps with your SEO, or search engine optimization. Practicing better SEO can get your videos ranked higher in search results. Google and YouTube both index subtitles and transcripts much like they do your video’s description, unless you use automated captions.
This article will first explain how you can turn on subtitles for the videos you watch and then walk you through adding captions to your own videos.
How To Turn On Captions on YouTube
In order for you to be able to view subtitles for a YouTube video the uploader of the video will need to have added them, unless you change your account settings to display automatic captions.

To toggle subtitles on and off click on the Closed Captioning icon in the bottom right of your video player.
If the creator of the video has not added captions then you can enable automatic captions by going into your Account Settings and selecting Playback. Check the box next to Always Show Captions, and then check Show Automatic Captions by Speech Recognition. These captions may be flawed, but you will still be able to see the more accurate user submitted captions on videos that have them. The Always Show Captions feature may be useful not only to the hearing impaired, but to users who do not speak the same language as the video producer.
If you want to change the language of the subtitles click on the settings icon (the one that looks like a gear) next to the closed captioning icon and choose your language next to Subtitles/CC . If the language you want is not there select Auto-Translate and then pick a language. Google Translate will be used to generate subtitles in your chosen language.
Adding YouTube Captions in 4 Steps
1. Go to Video Manager in your Creator Studio and then look at your videos. Decide which one you want to add captions to.
2. Click on the drop-down menu next to the video you want to add captions to and choose Subtitles and CC.
3. Select Add New Subtitles or CC.
4. Choose whether to create your captions, upload a file that has them, transcribe your video, use automatic captioning, or use captioning software.
Create Subtitles or Closed Captions will allow you to create your subtitles on YouTube.
Upload A File allows you to upload a pre-made subtitle file from your computer. Supported file types include SubRip (.srt) and SubViewer (.sbv). You cannot use a word or PDF document for your subtitles.
Transcribe and Set Timings is where you can type a transcript of your video and set timings to sync it to your video. This differs from Create Subtitles or Closed Captions in that your transcript is all typed in to one text field.
Use Automatic Captioning will automatically use speech recognition technology to create captions. You can edit these auto-generated captions later if there are mistakes.
Use Captioning Software or Services is what you choose if you want to use a program or service to create the subtitles for your video.
The easiest way to add subtitles to your videos is to use Automatic Captioning. However, Automatic Captioning is imperfect and may result in your viewers getting a sloppy, skewed, interpretation of your video. Automatic captions are also not indexed by YouTube and Google the way subtitles you create or upload are. This means that they will not have any value to your SEO strategy. If you do not input your own captions or transcript you are missing out on an opportunity for better search engine rankings. Automatic Captions are great if you do not have time to input subtitles and need a temporary solution, though.
Richard Bennett
Richard Bennett is a writer and a lover of all things video.
Follow @Richard Bennett
Richard Bennett
Mar 27, 2024• Proven solutions
By captioning your YouTube videos you help to make them accessible to more potential viewers. Subtitles are useful to viewers who have hearing impairments, whose first language is different from yours, or who are unable to watch your video with sound. Closed captioning can also be useful for you as a YouTuber because it helps with your SEO, or search engine optimization. Practicing better SEO can get your videos ranked higher in search results. Google and YouTube both index subtitles and transcripts much like they do your video’s description, unless you use automated captions.
This article will first explain how you can turn on subtitles for the videos you watch and then walk you through adding captions to your own videos.
How To Turn On Captions on YouTube
In order for you to be able to view subtitles for a YouTube video the uploader of the video will need to have added them, unless you change your account settings to display automatic captions.
To toggle subtitles on and off click on the Closed Captioning icon in the bottom right of your video player.
If the creator of the video has not added captions then you can enable automatic captions by going into your Account Settings and selecting Playback. Check the box next to Always Show Captions, and then check Show Automatic Captions by Speech Recognition. These captions may be flawed, but you will still be able to see the more accurate user submitted captions on videos that have them. The Always Show Captions feature may be useful not only to the hearing impaired, but to users who do not speak the same language as the video producer.
If you want to change the language of the subtitles click on the settings icon (the one that looks like a gear) next to the closed captioning icon and choose your language next to Subtitles/CC . If the language you want is not there select Auto-Translate and then pick a language. Google Translate will be used to generate subtitles in your chosen language.
Adding YouTube Captions in 4 Steps
1. Go to Video Manager in your Creator Studio and then look at your videos. Decide which one you want to add captions to.
2. Click on the drop-down menu next to the video you want to add captions to and choose Subtitles and CC.
3. Select Add New Subtitles or CC.
4. Choose whether to create your captions, upload a file that has them, transcribe your video, use automatic captioning, or use captioning software.
Create Subtitles or Closed Captions will allow you to create your subtitles on YouTube.
Upload A File allows you to upload a pre-made subtitle file from your computer. Supported file types include SubRip (.srt) and SubViewer (.sbv). You cannot use a word or PDF document for your subtitles.
Transcribe and Set Timings is where you can type a transcript of your video and set timings to sync it to your video. This differs from Create Subtitles or Closed Captions in that your transcript is all typed in to one text field.
Use Automatic Captioning will automatically use speech recognition technology to create captions. You can edit these auto-generated captions later if there are mistakes.
Use Captioning Software or Services is what you choose if you want to use a program or service to create the subtitles for your video.
The easiest way to add subtitles to your videos is to use Automatic Captioning. However, Automatic Captioning is imperfect and may result in your viewers getting a sloppy, skewed, interpretation of your video. Automatic captions are also not indexed by YouTube and Google the way subtitles you create or upload are. This means that they will not have any value to your SEO strategy. If you do not input your own captions or transcript you are missing out on an opportunity for better search engine rankings. Automatic Captions are great if you do not have time to input subtitles and need a temporary solution, though.
Richard Bennett
Richard Bennett is a writer and a lover of all things video.
Follow @Richard Bennett
Also read:
- [New] 2024 Approved Easy Path From Spotify to YouTube Discover the Best Playlist Tools
- [New] Rapid Reference Green Screen Basics
- [Updated] Fresh BGM Leading Lines in the Realm of YT Shorts
- [Updated] In 2024, YouTube Thumbnail Essentials Capture and Create on Mobile Devices
- 2024 Approved From Script to Splendor Animating Effects Unbound
- 2024 Approved Navigate to Noteworthy YouTube Commentaries
- 2024 Approved Scaling YouTube Influence A Comprerancial Guide to Creator Studio's Potential
- 9 Quick Fixes to Unfortunately TouchWiz has stopped Of ZTE Axon 40 Lite | Dr.fone
- Benefits & Drawbacks of Using Pidgin Chat Application
- CC字幕の仕組み:適切に設定するための手引き
- From Zero to Hero Amplifying YouTube Influence via FameBit Partnerships for 2024
- In 2024, How to Execute a Budget-Friendly Youtube Seminar
- In 2024, Masterminds of Immersive Marvellous Marvel Spheres
- In 2024, Step-by-Step Guide to Rearranging YouTube Playlists
- In 2024, The Enhanced UltraBlade Samsung’s 2023 Take
- Maximizing YouTube Exposure with Ongoing Creative Commons Compliance for 2024
- Top 15 Mobile Workout Apps: Ideal for Both iOS & Android Devices
- Troubleshooting Tips for Successful Intel Platform and Thermal Driver Setup
- Why Can't I Open Photos Following Repair?
- Title: 2024 Approved The Income Impact of Sharing on YouTube Shorts
- Author: Joseph
- Created at : 2024-11-26 16:04:13
- Updated at : 2024-12-03 16:19:56
- Link: https://youtube-stream.techidaily.com/2024-approved-the-income-impact-of-sharing-on-youtube-shorts/
- License: This work is licensed under CC BY-NC-SA 4.0.