"2024 Approved The Art of Mixing on YouTube Music"
The Art of Mixing on YouTube Music
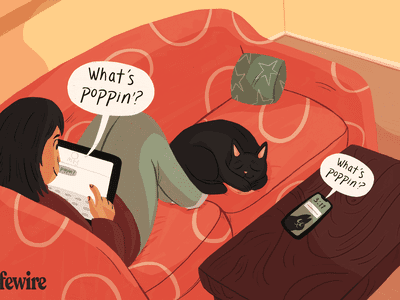
YouTube Music has become a popular go-to platform for music lovers to find new songs and artists to enjoy. The content is uploaded regularly, so there’s always something new to discover.
But with so much music content on YouTube Music, finding the right mix for you can take time and effort. That’s why we’ve put together this guide on how to find my playlists on YouTube.
We’ll also answer some frequently asked questions to help you find solutions regarding the YouTube Mix queries. So, without wasting time, let’s get on with the guide!
Basic Information of YouTube Mix
Before starting, let’s learn some basic information about the YouTube Music Mix playlists:
Three Ways Of YouTube Music Mix
YouTube has popularized three personalized mixes to keep you up-to-date on newly released music and introduce more artists to you:
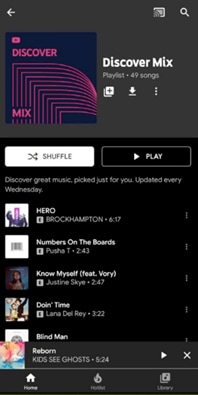
Discover Mix: Discover Mix introduces you to 50 new tracks every week, expanding your musical horizons and introducing you to contemporary artists. This playlist mix provides new updates every Wednesday, making it a go-to playlist for discovering new music to your taste.
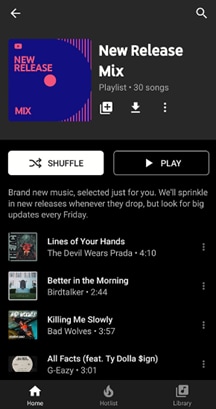
New Release Mix: In the New Release Mix playlist, you can find all the newest tracks from your favorite artists, and some music is recommended. New updates are provided every Friday (when most new releases come out), and mid-week releases the entire week to ensure you’re always up-to-date on the latest music.
Your Mix: Your Mix is a playlist full of songs by popular and well-known artists, as well as some new tunes and performers you’ve never discovered before, which are recommended based on your preferences, making it ideal for unwinding and listening to something you’re guaranteed to love. The playlist is updated regularly, so the music never gets dull, and there’s always something new to listen to.
What Is YouTube Music Replay Mix?
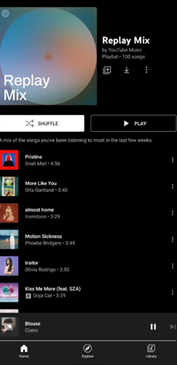
YouTube Music Replay Mix is a feature of YouTube Music that is automatically generated via the YouTube algorithm and contains a personalized mix of tracks based on your listening history. The mix is updated daily and includes up to 100 songs.
You can access it by tapping the “Replay Mix” option on the YouTube app’s main screen or the YouTube Music website. This feature is perfect for those who want a continuously updated mix of their favorite songs.
So, if you’re always on the go and need more time to create your playlist, YouTube Music Replay Mix is a great option. Since it’s based on your listening history, you can be sure that you’ll always hear songs that you love.
The Things You Want To Know About YouTube Mix
Now that you’ve what YouTube Mix is, you might have some queries in mind. To help you resolve them, we’ve provided solutions to the most frequently asked questions:
1. How Do I Save My Mix Playlist On YouTube?
To save My Mix playlist on YouTube, launch the YouTube app, tap “More” on the app’s main interface, and tap “Add to Library.” You can also save the playlist by going to the Mix page and tapping “Save” below the description.
2. How Do I Find My Playlist On YouTube?
The YouTube Music Replay Mix playlist is located on the home screen of the YouTube Music app and website under the “Mixed for you” header. Here you can also find other playlists, including “Your likes,” “New Release Mix,” “My Supermix,” and “Discover Mix.”
3. How Do I Add Songs To The Replay Mix Playlist?
You can’t manually add songs to the Replay Mix because YouTube Music automatically adds tracks that you listen to more than once.
The more often you hear a soundtrack, the higher it will appear on the YouTube list. Conversely, songs you’ve only played once or twice will appear lower on the list.
4. How Do I Delete A Mix Playlist On YouTube?
To delete a saved YouTube playlist from the Music library:
- Launch YouTube Music app on your mobile device or head to its website on your computer.
- Tap “Library” on the home screen or homepage and tap the “Mix” you want to delete.
- Tap the**”More”** option on the playlist panel and tap “Remove Playlist From Library.”
5. How Do I Turn Off YouTube Mixes?
To turn off YouTube Mixes, you can use Google extensions or create one yourself if you are an expert in coding.
6. Are YouTube Mixes Endless?
YouTube Music offers an endless personalized music playlist called “My Mixes.” Every time you click or tap the playlist, a new queue of your most listened or favorite tracks is generated for you.
The playlist contains about 100 songs with an endless auto-play feature once you reach the end of the list.
A Bonus Tip: How To Make a Music Video?
Hopefully, you have got the information you need about YouTube Mixes. Supposing you are YouTube music lover, we wonder, do you want to create YouTube videos for your channel or add music to your clips? In that case, we prepared a video tutorial for you - How To Make a Music Video. If you have any interests, you can watch it and learn about how to use the user-friendly video editor to make it:
Here’s why Wondershare Filmora is an excellent option for making YouTube videos or adding music to them:
- Huge royalty-free music library
- Easy to use, even for novice users
- Record videos from your webcam and screen simultaneously
- Multiple advanced video editing features, such as green screen, background blur, keyframe, split screen, motion tracking, and preset templates
- Adds effects, filters, transitions, and animations to your video footage to make it more eye-catching
- Quick “export to YouTube” feature to help you instantly share your final project on your channel
Free Download For Win 7 or later(64-bit)
Free Download For macOS 10.14 or later
If you want additional guidance on adding YouTube Music to your videos using Filmora,click here to learn everything you need to know!
Conclusion
This comprehensive guide explored some basic information about YouTube Music Mix and discussed how to find My Playlist on YouTube Music quickly. We’ve also provided solutions to help you save, find, delete, or turn off YouTube Mix playlists.
In addition, we’ve provided a bonus tip to use Filmora to add music to your YouTube videos and discussed its key features.
Hopefully, you’ve found this article helpful and can now locate your YouTube Music Mix playlist without issues.
The Art of Self-Recording: Improving Your YouTube Presence
4 Ways To Set Up Your Talking-Head Shots For YouTube

Richard Bennett
Oct 26, 2023• Proven solutions
A big part of being a YouTuber involves talking to the camera. How you set up your talking-head shot depends on many factors, including how much space you have, what kind of look you’re going for, and how many people you want to fit in one frame. Here are four ways to set up your talking-head shots for YouTube.
| Table of Contents 1. Close Quarters Wide-Angle Vlog Set-Up2. Medium Vlog Set-Up3. Two Person Vlog Set-Up4. Long Teleprompter Vlog Set-Up |
|---|
How to Set Up Your Talking Heads Shots for YouTube Video [Infographic]
We’ve summarized the key points about setting up talking head style video shots with the Infographic below. It is welcomed to share on social media.

How to Set Up Your Talking-Head Shots for YouTube [4 Ways]
1. Close Quarters Wide-Angle Vlog Set-Up
Don’t have a lot of space to set up your camera and lighting equipment? No problem! You can be within an arm’s length away from your camera with a close quarters wide-angle vlog set-up.
With this set-up, you’re going to need a camera with a wide-angle lens, a tripod, a camera-mounted shotgun mic for sound, and a ring light for light.
Set your camera on the tripod and mount the shotgun mic directly on the camera shoe (the electronic bracket on the top of the camera). Inside the circular space of your ring light, position your camera right in the middle of it so that you can shoot your video through it without getting any part of the lighting equipment in your shot.
In the video above, Sean Cannell demonstrates this set-up. As you can see from this example, the wide-angle lens is able to squeeze in a lot of what’s in front of the camera into the shot.
Objects and people that just make it into the sides of the frame will appear more stretched out as the wide-angle causes distortion and enhances perspectives.
If you look closely into Sean’s eyes, you can also see a specular highlight in the shape of a circle. Many people like the way eyes look against a ring light.
2. Medium Vlog Set-Up
If you have more space and want to shoot a more professional-looking talking-head shot with more realistic perspectives, a medium vlog set-up may be a better alternative for you.
For this set-up, you’ll be using a slightly longer standard/normal lens (like a 35mm or a 50mm lens) attached to your camera which would be set on a tripod. Since this longer lens will show less of the surrounding areas as it “zooms” closer into whatever is in front, you will need to sit further back, away from your camera.
Now that you’re further away from your camera, a camera-mounted shotgun mic may not be the best mic for you. For better sound recording, you’ll need a shotgun mic fixed on a mic stand that is set up like a boom mic, positioned just outside of your camera frame.
At the 39 second mark of the above video, electronic music producer deadmau5 is positioned right in the center of this particular set-up.
You can see from how even the background and couch looks across the entire camera frame that there is no distortion or enhanced perspective.
It appears that, to the right of deadmau5 (camera left), there is a key light and to his left (camera right) there may be a fill light for additional lighting. Behind the couch, there’s also a background uplight to create depth between the subject and the background. At the 1:30 mark of this trailer video, you can briefly see how the Masterclass camera crew set up their shot.
3. Two Person Vlog Set-Up
If your talking-head shot has got to include two people, you can use a similar set-up as the medium vlog set-up detailed above.
If you look back at the 39-second mark of deadmau5’s Masterclass trailer, you can see that there’s a lot of space to the left and right of deadmau5. Now imagine the same shot but with two people.
With two people, though, you’ll want to set up your mic slightly differently. Rather than using a directional shotgun mic with a narrow area of sensitivity, you’ll want to use a directional mic with a wider area of sensitivity.
4. Long Teleprompter Vlog Set-Up
If you want to read over a script but still make it appear like you’re looking straight into the camera, you’ll need to use a long teleprompter vlog set-up.
For this set-up, you’ll need all the same equipment as the medium vlog set-up, but you’ll additionally need a teleprompter placed in front of your camera equipped with a long telephoto lens.
You will have to sit much further back away from your camera for two main reasons. Firstly, you want to be able to fit yourself in your much more zoomed-in camera frame (effect of the long telephoto lens). Secondly, you want to be far enough that the camera cannot detect your eyes reading from left to right. You’ll want to be around six meters away from a 17” teleprompter monitor or around four meters away from a 10” teleprompter monitor.
In the above video, Jared Polin uses a long teleprompter vlog set-up.
In the video, he says there’s about 8 feet (2.4 meters) between himself and his lens. At the 1:15 mark of his video, Jared demonstrates how this set-up works.
It is difficult to know whether the movement in his eyes is caused by not being far enough from the lens or from his horizontal nystagmus condition in his eyes.
Looking to find the right lights for your video recording set? Check out our Top 17 Video Lighting Equipment For YouTubers .
Tips for Making a Talking Head Video Better
To make a talking-head video more interesting, you can add some background music to the video, apply some interesting texts or elements. Filmora has built-in royalty-free music tracks and sound effects as well as text templates , filters and motivating elements. Download the free trial version below and release your creativity.


Richard Bennett
Richard Bennett is a writer and a lover of all things video.
Follow @Richard Bennett
Richard Bennett
Oct 26, 2023• Proven solutions
A big part of being a YouTuber involves talking to the camera. How you set up your talking-head shot depends on many factors, including how much space you have, what kind of look you’re going for, and how many people you want to fit in one frame. Here are four ways to set up your talking-head shots for YouTube.
| Table of Contents 1. Close Quarters Wide-Angle Vlog Set-Up2. Medium Vlog Set-Up3. Two Person Vlog Set-Up4. Long Teleprompter Vlog Set-Up |
|---|
How to Set Up Your Talking Heads Shots for YouTube Video [Infographic]
We’ve summarized the key points about setting up talking head style video shots with the Infographic below. It is welcomed to share on social media.
How to Set Up Your Talking-Head Shots for YouTube [4 Ways]
1. Close Quarters Wide-Angle Vlog Set-Up
Don’t have a lot of space to set up your camera and lighting equipment? No problem! You can be within an arm’s length away from your camera with a close quarters wide-angle vlog set-up.
With this set-up, you’re going to need a camera with a wide-angle lens, a tripod, a camera-mounted shotgun mic for sound, and a ring light for light.
Set your camera on the tripod and mount the shotgun mic directly on the camera shoe (the electronic bracket on the top of the camera). Inside the circular space of your ring light, position your camera right in the middle of it so that you can shoot your video through it without getting any part of the lighting equipment in your shot.
In the video above, Sean Cannell demonstrates this set-up. As you can see from this example, the wide-angle lens is able to squeeze in a lot of what’s in front of the camera into the shot.
Objects and people that just make it into the sides of the frame will appear more stretched out as the wide-angle causes distortion and enhances perspectives.
If you look closely into Sean’s eyes, you can also see a specular highlight in the shape of a circle. Many people like the way eyes look against a ring light.
2. Medium Vlog Set-Up
If you have more space and want to shoot a more professional-looking talking-head shot with more realistic perspectives, a medium vlog set-up may be a better alternative for you.
For this set-up, you’ll be using a slightly longer standard/normal lens (like a 35mm or a 50mm lens) attached to your camera which would be set on a tripod. Since this longer lens will show less of the surrounding areas as it “zooms” closer into whatever is in front, you will need to sit further back, away from your camera.
Now that you’re further away from your camera, a camera-mounted shotgun mic may not be the best mic for you. For better sound recording, you’ll need a shotgun mic fixed on a mic stand that is set up like a boom mic, positioned just outside of your camera frame.
At the 39 second mark of the above video, electronic music producer deadmau5 is positioned right in the center of this particular set-up.
You can see from how even the background and couch looks across the entire camera frame that there is no distortion or enhanced perspective.
It appears that, to the right of deadmau5 (camera left), there is a key light and to his left (camera right) there may be a fill light for additional lighting. Behind the couch, there’s also a background uplight to create depth between the subject and the background. At the 1:30 mark of this trailer video, you can briefly see how the Masterclass camera crew set up their shot.
3. Two Person Vlog Set-Up
If your talking-head shot has got to include two people, you can use a similar set-up as the medium vlog set-up detailed above.
If you look back at the 39-second mark of deadmau5’s Masterclass trailer, you can see that there’s a lot of space to the left and right of deadmau5. Now imagine the same shot but with two people.
With two people, though, you’ll want to set up your mic slightly differently. Rather than using a directional shotgun mic with a narrow area of sensitivity, you’ll want to use a directional mic with a wider area of sensitivity.
4. Long Teleprompter Vlog Set-Up
If you want to read over a script but still make it appear like you’re looking straight into the camera, you’ll need to use a long teleprompter vlog set-up.
For this set-up, you’ll need all the same equipment as the medium vlog set-up, but you’ll additionally need a teleprompter placed in front of your camera equipped with a long telephoto lens.
You will have to sit much further back away from your camera for two main reasons. Firstly, you want to be able to fit yourself in your much more zoomed-in camera frame (effect of the long telephoto lens). Secondly, you want to be far enough that the camera cannot detect your eyes reading from left to right. You’ll want to be around six meters away from a 17” teleprompter monitor or around four meters away from a 10” teleprompter monitor.
In the above video, Jared Polin uses a long teleprompter vlog set-up.
In the video, he says there’s about 8 feet (2.4 meters) between himself and his lens. At the 1:15 mark of his video, Jared demonstrates how this set-up works.
It is difficult to know whether the movement in his eyes is caused by not being far enough from the lens or from his horizontal nystagmus condition in his eyes.
Looking to find the right lights for your video recording set? Check out our Top 17 Video Lighting Equipment For YouTubers .
Tips for Making a Talking Head Video Better
To make a talking-head video more interesting, you can add some background music to the video, apply some interesting texts or elements. Filmora has built-in royalty-free music tracks and sound effects as well as text templates , filters and motivating elements. Download the free trial version below and release your creativity.
Richard Bennett
Richard Bennett is a writer and a lover of all things video.
Follow @Richard Bennett
Also read:
- [Updated] Best Free Tools for Converting YouTube Videos
- [Updated] Mi Drone's Sky Views Unveiled in Full HD Quality Check for 2024
- 2024 Approved The Power Play Joining a Music Company Network in the Age of Streaming
- CrossPlatform AudioMagic 2023
- Deciding on Your Smartphone Upgrade – Should It Be the New iPhone or a Premium Samsung Model?
- Determining What to Look For in Videography Tools
- Flash Frame Filmmaking Script
- From Capture to Air Expert Tips for Streaming Upside-Down Videos on Youtube for 2024
- How to Seamlessly Integrate Captions Into YouTube Videos for 2024
- In 2024, The Art of Arranging YouTube Video Elements
- Navigate Your Newly Enjoyed Facebook Movies with This 2023 Guide for 2024
- Step-by-Step Guide: Correcting Issue with Windows Update Error 0X80 070643
- Troubleshoot and Resolve Silent Mic Issues with SteelSeries Arctis 5 [GUIDE]
- Title: 2024 Approved The Art of Mixing on YouTube Music
- Author: Joseph
- Created at : 2025-01-16 03:28:16
- Updated at : 2025-01-21 22:25:28
- Link: https://youtube-stream.techidaily.com/2024-approved-the-art-of-mixing-on-youtube-music/
- License: This work is licensed under CC BY-NC-SA 4.0.