
:max_bytes(150000):strip_icc()/GettyImages-1012916614-9c7175b024cf4ef2b9f4a523914c9304.jpg)
"2024 Approved The 20 Best Free and Paid GIF Software Options"
The 20 Best Free and Paid GIF Software Options
10 Best YouTube To GIF Makers: How to Create GIF from YouTube Video?

Richard Bennett
Mar 27, 2024• Proven solutions
GIF (Graphic Interchange Format) is an image file format supporting both uniform and animated images. Before, GIF was a basic 8-bit colored image until PNG image format was introduced as a more feasible alternative. Today, you can find them being used on all the trending social media applications like WhatsApp, Instagram, Snapchat, Twitter, Facebook, and various others.
The good thing here is that you can make GIFs from YouTube videos or any of your favorite videos for that matter which you think can help express your sentiments or ideas in an enhanced manner. There is a huge market available of apps and web software that can help create GIFs from YouTube without much trouble.
In this short guide ahead, we’ve brought for you the best YouTube to GIF maker available in the digital market. Let’s go GIF-ing!
Part 1: Best Online YouTube to GIFs Makers
Here is our curated list of the best 11 YouTube to GIF Maker that you can use to make GIF from YouTube video.
1. GIFS
Gifs.com is one the best GIF maker site that makes crafting GIFs from YouTube videos incredibly easy and quick with no time. If you’re looking for some straight and simple video to gif converter to help you convert YouTube videos into GIFs, this is the smoothest editor that will do the job and craft interesting gifs for your blogging platforms.
All you have to do is enter the URL of the video you want to convert into a GIF. At this point, the site accepts Instagram, YouTube, Facebook, and Vine links. In addition to that, there is also an option that allows users to upload from the desktop computer.
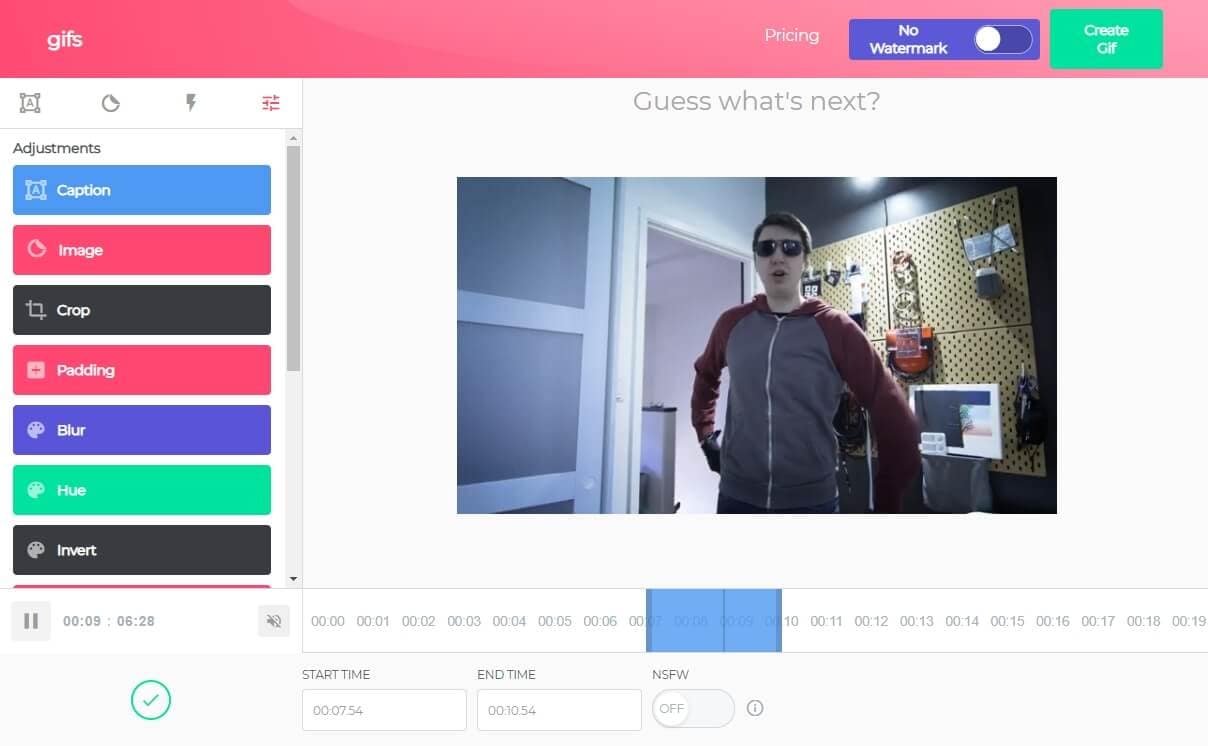
Once you’ve entered the YouTube video URL, it prompts a basic video editor wherein you select the frame and durations for your GIF. If you want to customize it further, you can add stickers, captions, and tools like blurring, cropping, and others.
Once you’re done exploring the filters and editing the GIF, you can directly share the URL on different platforms or just download it and store it on your device.
Note: If you want to remove the watermark and get full access to extra features, you may need to pay $1.99/month.
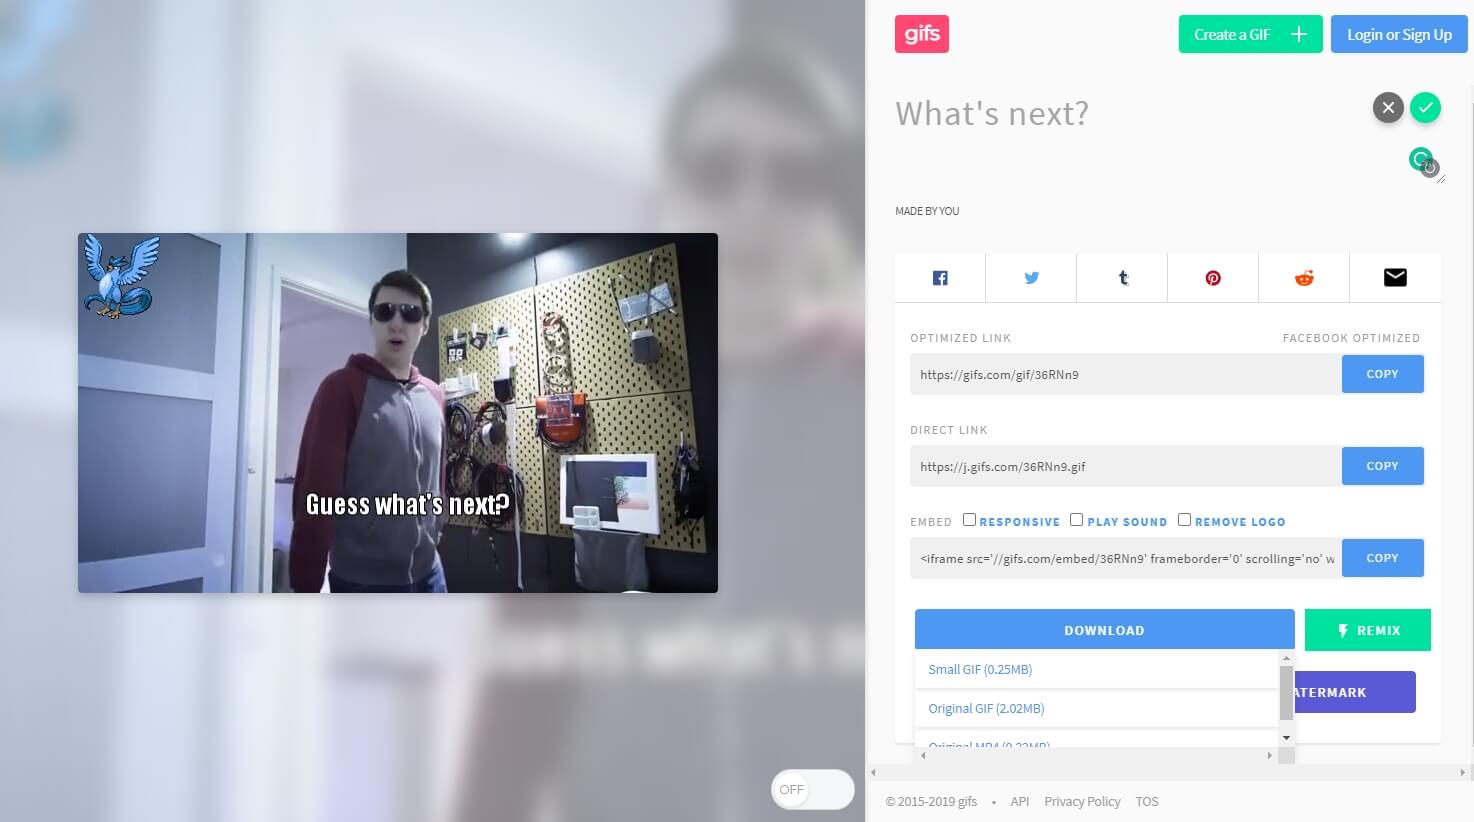
You can check the gif that I made from our YouTube video How to Edit Galaxy Effects with Green Screen | Wondershare FilmoraPro Tutorial on gifs.com here: https://gifs.com/gif/36RNn9 .
2. GIPHY
Giphy, as we all know, is the most used search engine for GIFs due to its limitless collection. Giphy here maintains its own GIF maker to create your customized GIFs effortlessly. The Giphy online GIF maker is quite simple and easy to use; it also has steadfast mobile applications for both Android and iOS devices.
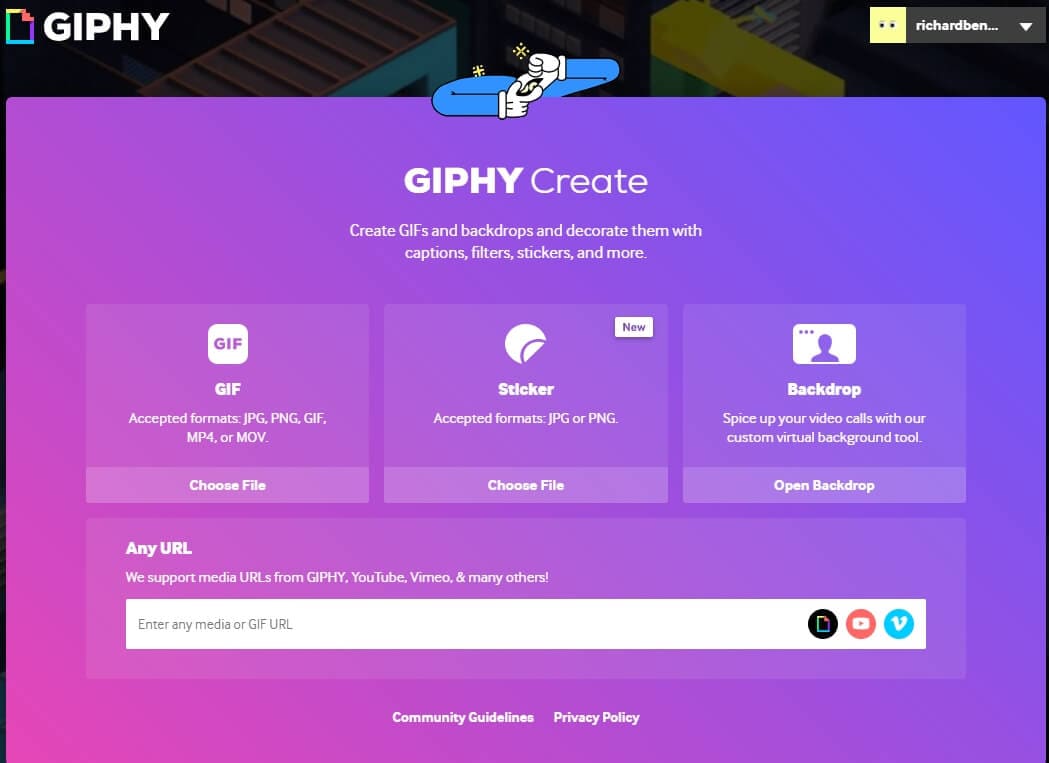
To begin converting YouTube videos into GIFs, click the Create button at the top and then you can either enter the URL or upload images/videos from local files. This GIF maker only accepts JPG, PNG, GIF, MP4, and MOV for people uploading images or videos.
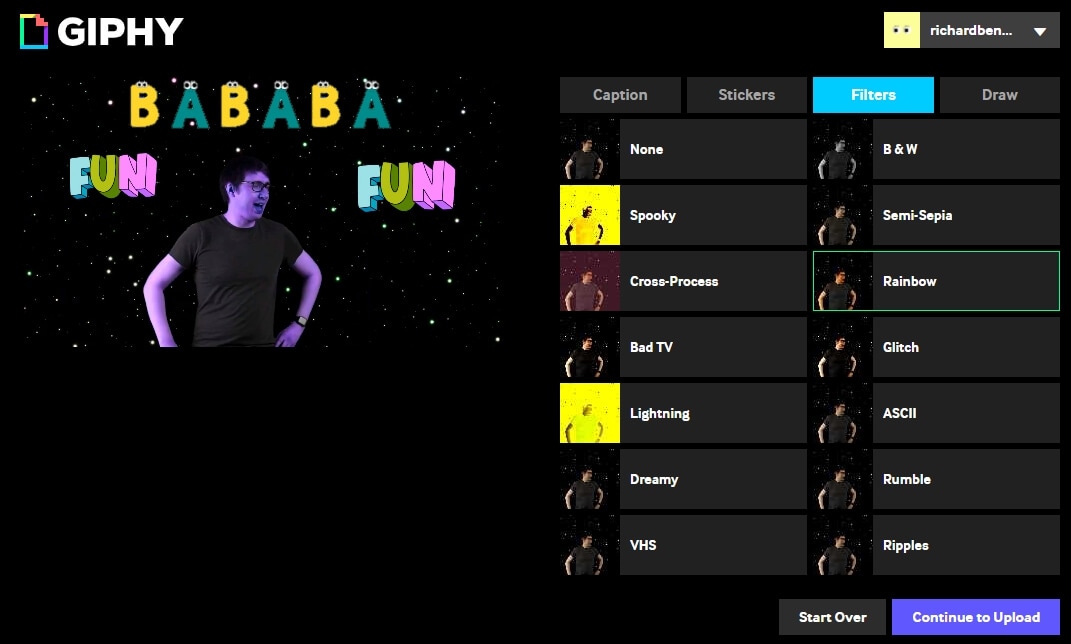
Then, trim the part from the video you want to convert into a GIF. Later, you can embellish your GIFs by adding filters, tags, text captions, and stickers to make them look eye-catching. If you’re looking for a clean and simple GIF maker, then Giphy GIF maker is the perfect choice for you.
Here is the gig that I made with Giphy: https://media.giphy.com/media/2Dtlp2MAXtoC0EyMsx/giphy.gif .
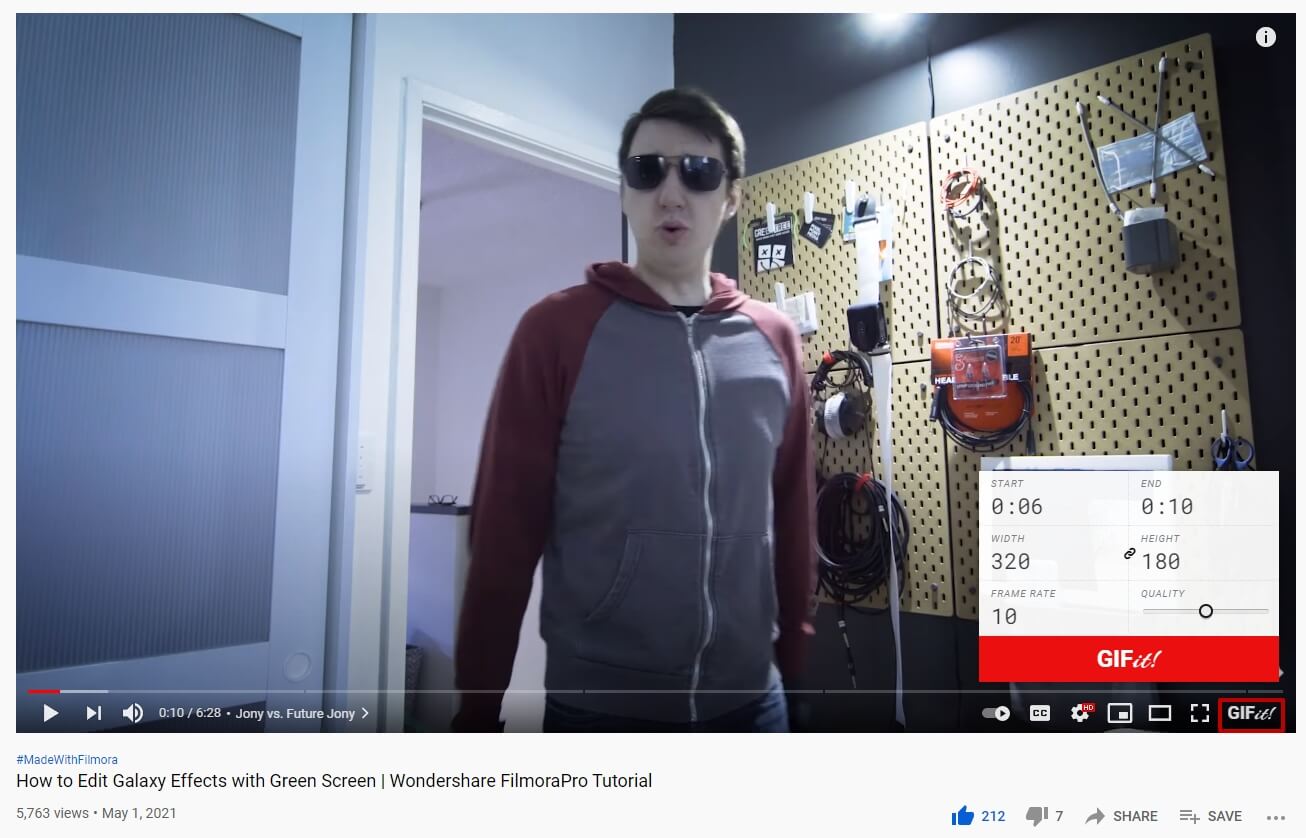
3. GIFit!
GIFit is a well-known online extension available on the Chrome Web Store for free that aids in making GIFs from YouTube videos. The GIFit extension has been recently updated to work with the new YouTube interface to help you craft Gifs smoothly. One thing to remember about GIFit is that with YouTube HTML5 mode only.
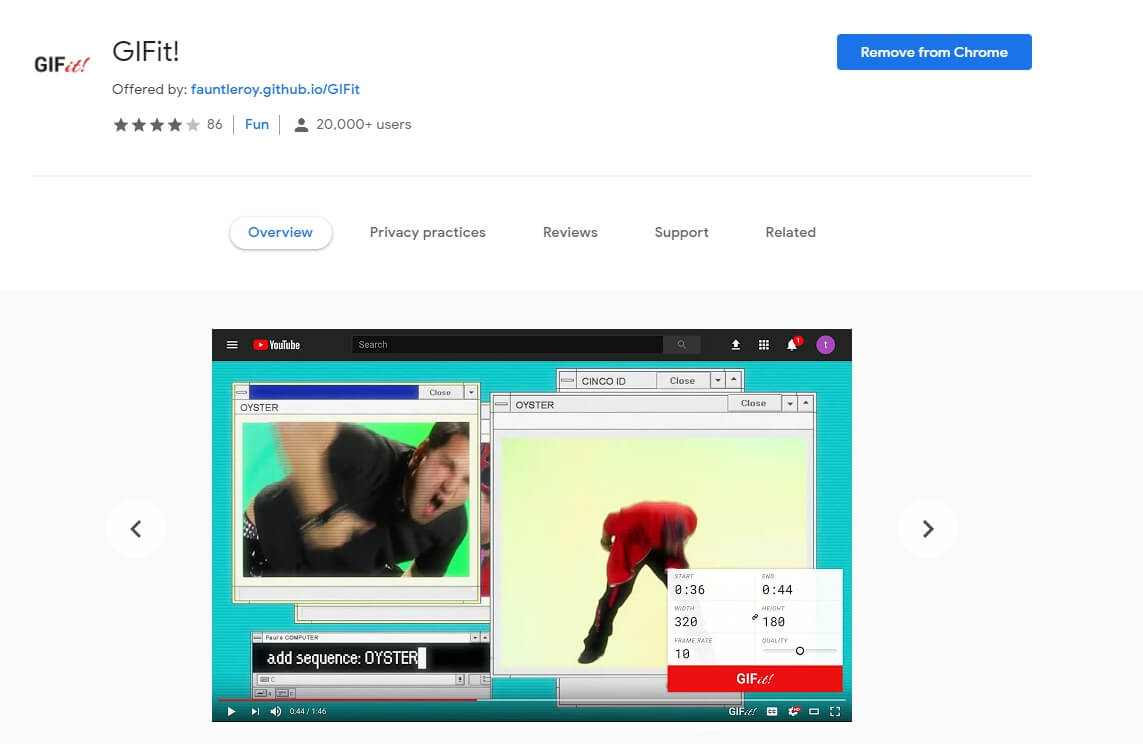
To use this Chrome extension, install it from the Chrome Web Store. Now, run the attachment and visit any video on YouTube that you would like to convert into GIF. Once decided, simply press on the GIFit icon in the YouTube toolbar. Then, edit according to your requirements and hit the red button with GIFit on it. After a few minutes, your GIF will be ready to be shared and saved. Currently, it offers convert YouTube to GIF feature only, so you can’t add stickers nor captions.
4. Make A GIF
Makeagif is an ideal online GIF maker for you that can convert videos into animated GIFs in no time. It allows you to create GIFs using local images, YouTube, Facebook, and Webcam. Makeagif even will enable you to develop new GIFs using the already existing ones.

The GIF maker also comes with a variety of free GIFs to download and add to your collection. Moreover, it allows you to edit existing GIFs by enhancing their quality, speed and adding filters to them. It offers functions that can enrich the standard of your GIFs.
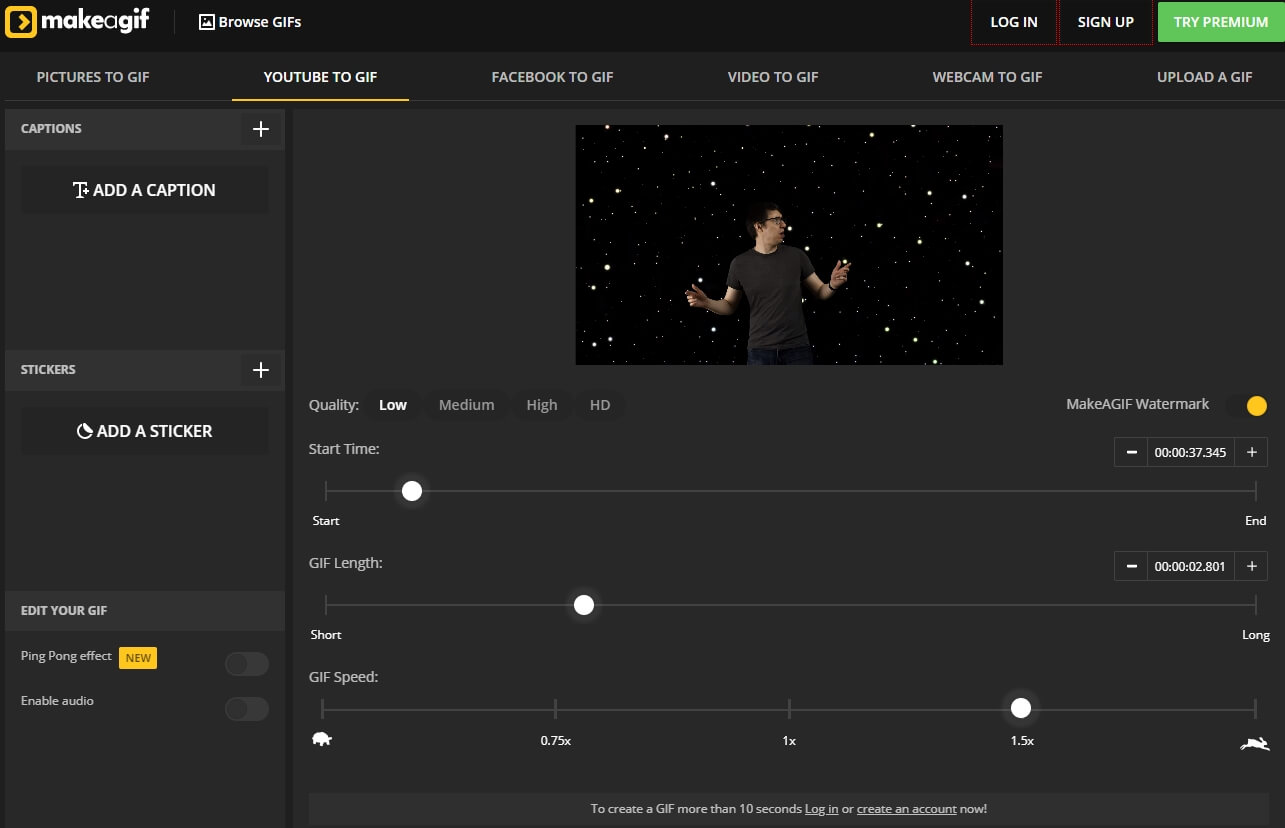
To create GIFs using this, first, create your account on the site. Next, select the ‘YouTube to GIF’ option from the drop-down menu, among other alternatives. Then, enter the link to the YouTube video that you wish to transfigure into GIF, after which you can tailor-make the gifs by adjusting the configuration settings, such as adding captions and sticker. Once done, simply download and share your newly crafted GIF.
5. Imgur
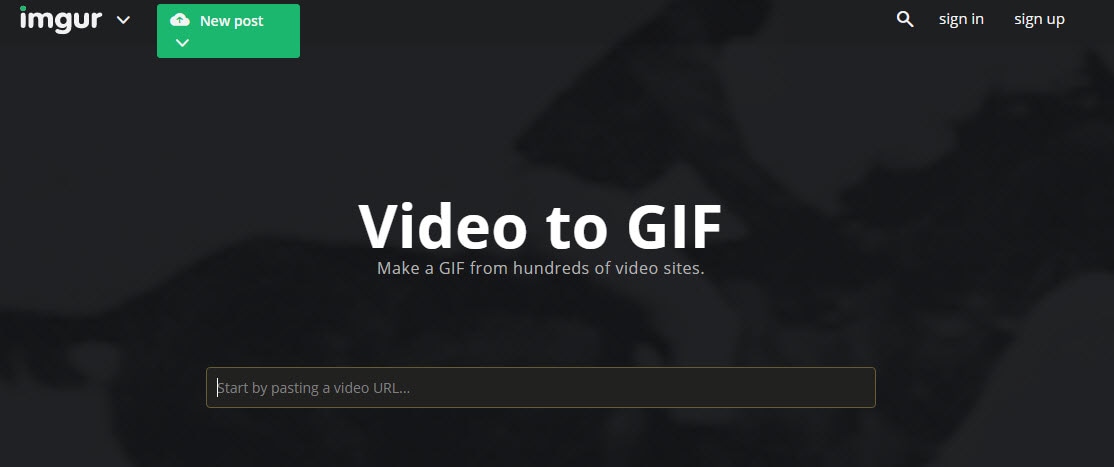
Imgur might not be the best application to be included in the list. But it is definitely an amazing site where you can go looking for all kinds of images, Gifs, memes, or other digital stories. Imgur’s wide collection of visuals can never disappoint you, no matter what you’re searching for, from funny to sad, inspiring to aspiring, everything can be discovered in this treasure.

Now, this might not be the best YouTube to gif maker, but it does have the potential to provide you with great ideas for GIF-making. Besides, you can download all the interesting GIfs from here and save them for future reference.
6. GiFRun
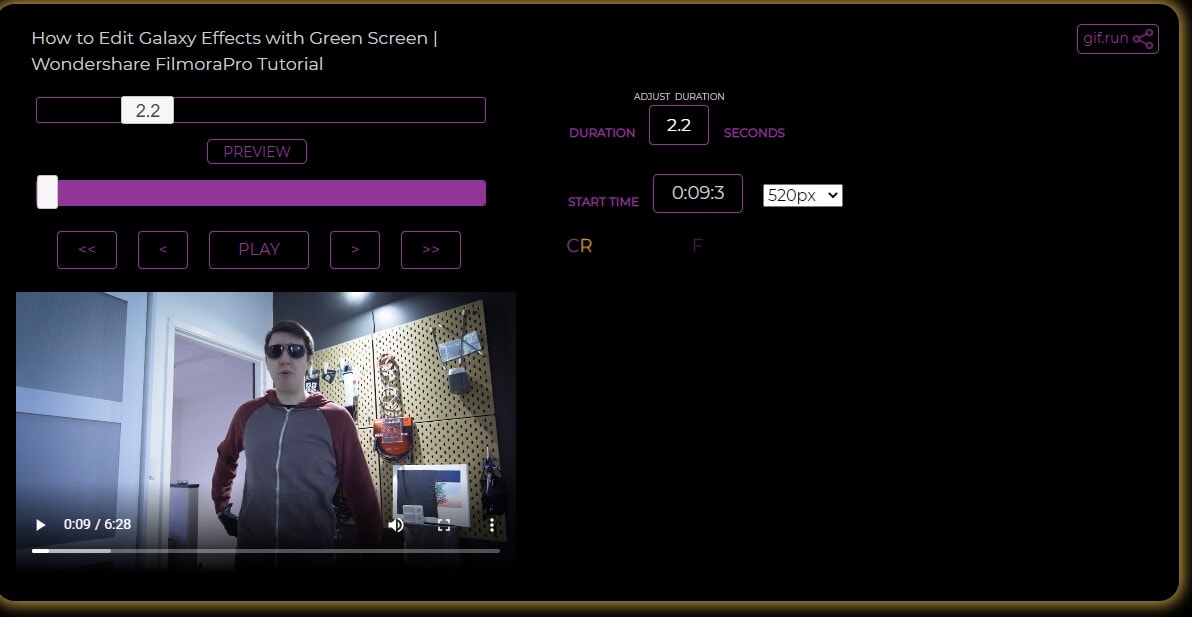
Are you worried about searching for a gif converter with no prior experience in editing? Don’t worry; this GiFRun Maker is the simplest online service that requires minimum to zero skill for creating GIFs. GifRun is an easy enough site to navigate through and produce quality GIFs for your blogging sites.
To convert a YouTube video to GIF, simply enter the link. After that, it will prompt you to the editing page, where you can set the start/end time, duration, and resolution for your gif. You can preview your edit before finalizing it, making necessary changes, and then downloading it on your device.
7. Free Gif Maker Me
Free Gif maker is one of the straightforward and easily manageable GIF-making applications. It offers YouTube to gif, reverse gif, and gif effects tools to enhance your GIF quality and make it effortless to create your own GIFs.
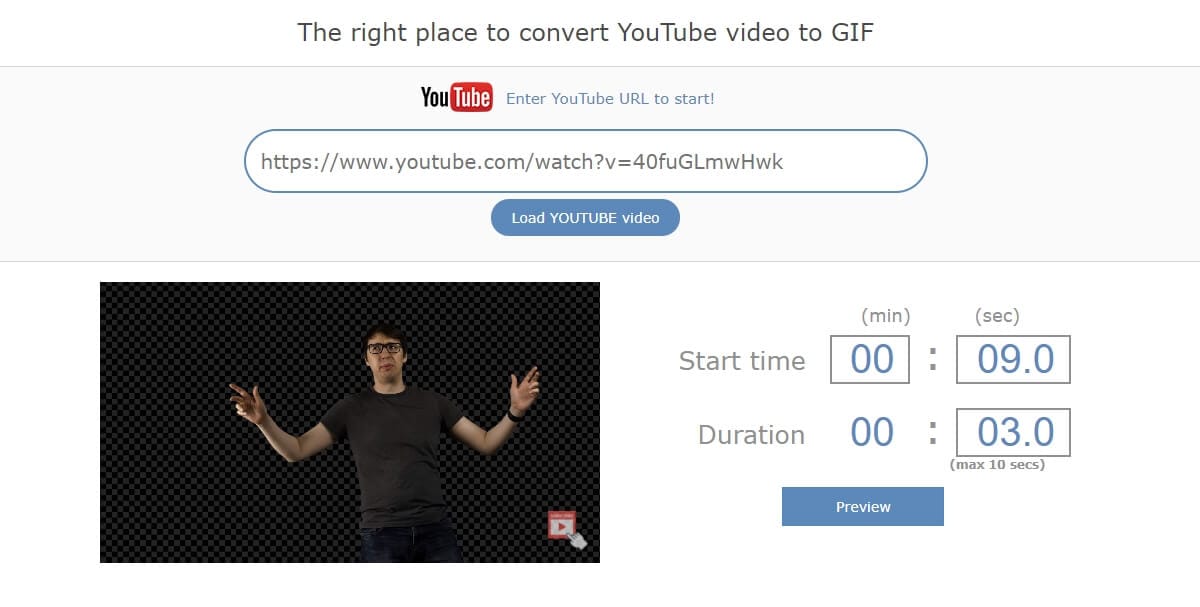
To make GIF from YT Video on free Gif Maker, copy the video link in the input text field in the middle of your screen and then tap on ‘Load YouTube Video.’ Within seconds you will be redirected to the video preview and GIF editing page. Now, set the duration, start time, resolution, output, and other details. Then, click on the ‘Make A GIF’ option and save it on your device once ready.
8. Imgflip
Another website is known for creating and sharing visual content on different social media channels. Imgflip allows you to make customized animations from YouTube and other digital platforms. The site is completely safe to use and produces good-quality memes and GIFs quickly without incurring a dime.
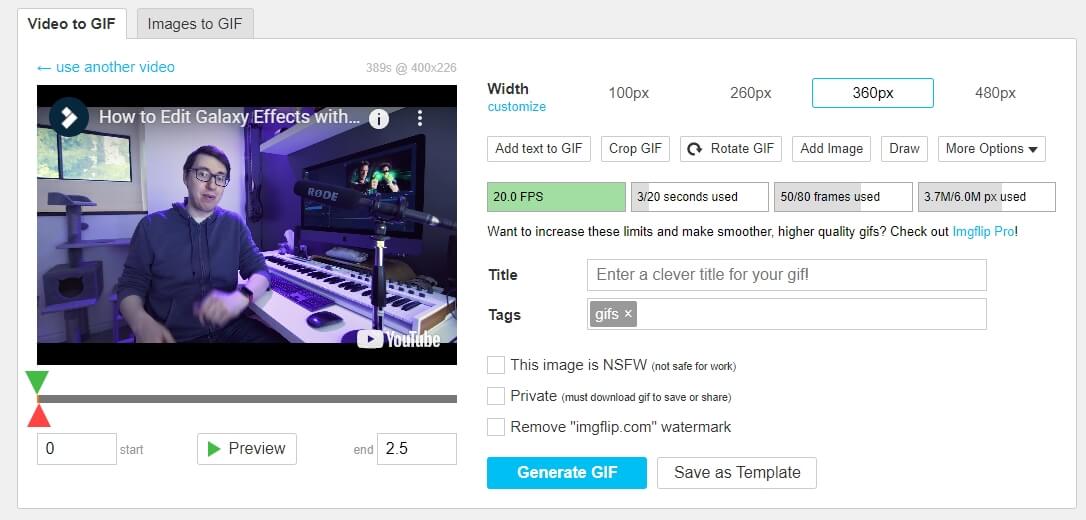
Imgflip supports all the popular video formats such as AVI, MP4, 3GP, OGG, FLV, MOV, and various other video formats. To produce a high-quality GIF, make sure your video is at least 480P or higher. More so, the Imgflip supports GIF with audio features of all the videos with audio that can only be accessed using the Imgflip Pro at a minimum price of $9.95/ month.
9. GIF Maker
GIF Maker is a pretty basic application that everyone can navigate with or without any expertise in the tech department. Along with GIF maker, it also has other tools such as GIF resizer, GIF compressor, and GIF cropper, all specifically designed tools to help you create riveting GIFs ever!
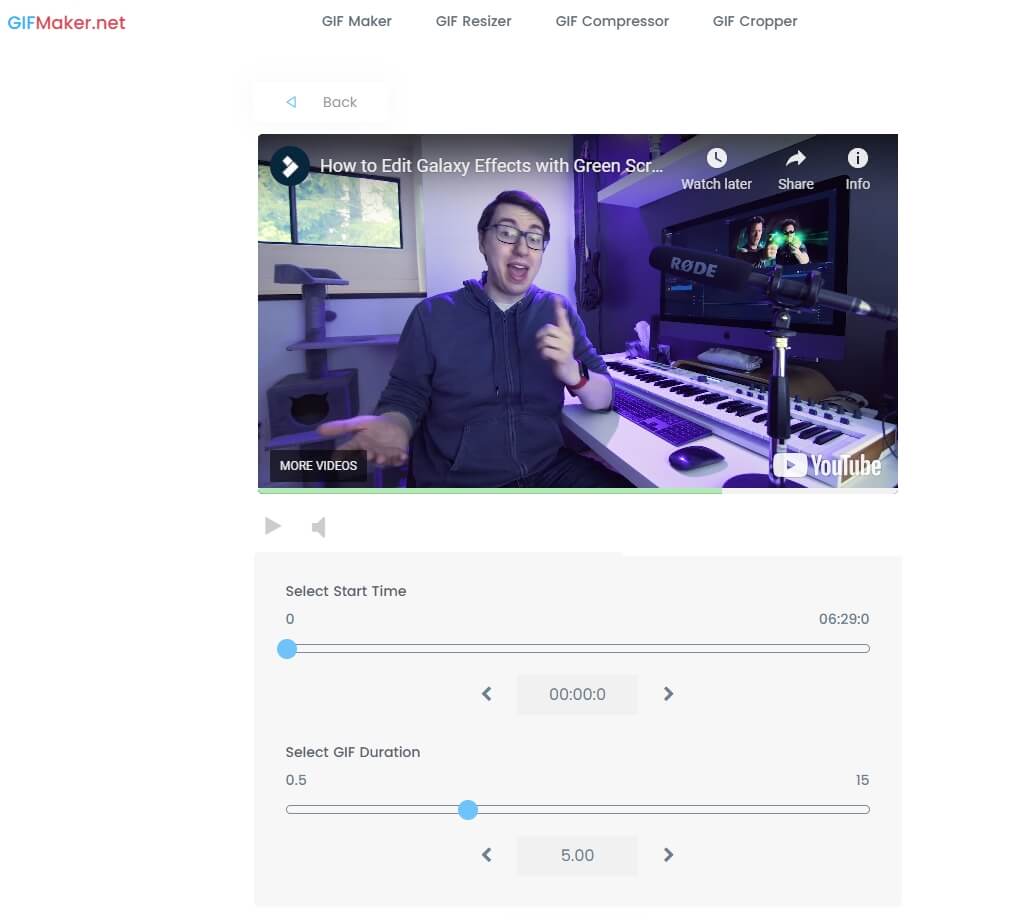
GIF Maker provides two options; one video to gif and second Images to gif that you can use as per their need. One simply is to enter the YT video link/upload video to the upload box. Next, alter the animation, filter, speed, duration, and set start and endpoint in the editor. You can upload files in all the popular formats and upload up to 25Mb image files and 30 Mb for animated GIFs.
Another point to remember while using this GIF Maker, it only supports YT videos that have not been copy-righted by the creator.
Part 2: Best YouTube to GIF Maker on Windows and Mac: Wondershare UniConverter
It happens so that you stumble upon a video that runs the hippocampus of your brain rigid with ingenious abstractions about converting the video into GIF to delineate those ideas through digital content on your blogs.
Now, you will require the best-quality GIF maker that is easy to navigate without any complications. Despite the plethora of GIF makers being available at hand, it could be a strenuous task to search for the ideal GIF maker for yourself.
Presently, Wondershare UniConverter is one of the best and easy-to-use YouTube to GIF makers for you. It is the handiest tool to help you accomplish your conversion, customization, compressing, and revamping goals like a professional with its effective editing features. Wondershare offers many benefits, from converting files in hundred different formats to crafting your one GIF out of videos along with other fundamental editing attributes.
How to User UniConverter Video to GIF Maker?
Step 1: Download and install the Wondershare Converter on your device. Now, run the app and launch the Wondershare GIF Maker by selecting the GIF Maker Icon on the toolbar.
Step 2: Click on the Video to GIF option before tapping on the Add File option to upload YT video for GIF conversion.
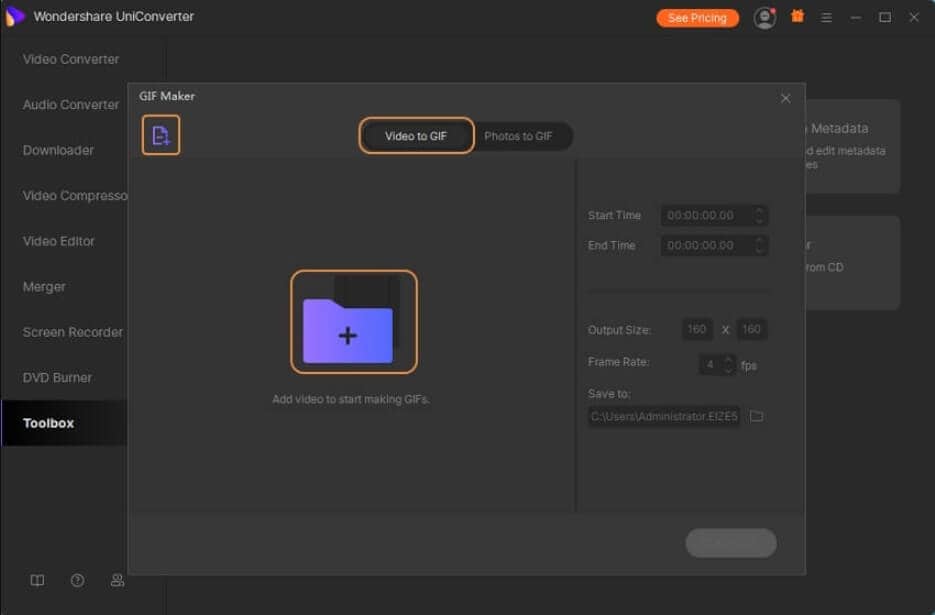
Step 3: Next, you can customize your uploaded video by setting the start and end time. In addition to that, you can enter the frame rate and output size according to your requirement.
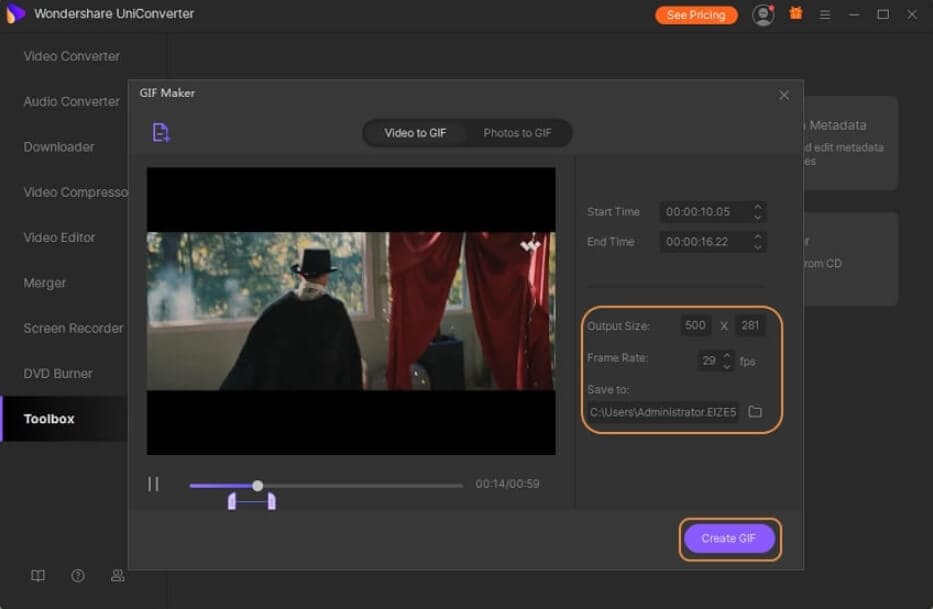
Step 4: Once finished with all the customization, convert the YouTube video into a GIF by tapping the Create GIF option.
Step 5: Ta-da! UniConverter will transform your YT video into a GIF within a minute or two. You can now export and share the GIF further.
That’s right, with five easy steps, you can convert all your favorite YouTube video into GIF with this YouTube to GIF maker.
Without any doubt, I can say that usage of GIFs during your regular texting and socialization can make your conversations more interesting. GIFs are the best shortcuts to express your mood, emotions, and humor without having to type much. No other digital medium provides an avenue that offers such proficiency in demonstrating your emotions, possibly the reason behind its escalating popularity.
With the help of this little guide, you can create gif from YouTube videos with a wave of your hand! I hope you’ve fun GIF-ing!
Richard Bennett
Richard Bennett is a writer and a lover of all things video.
Follow @Richard Bennett
Richard Bennett
Mar 27, 2024• Proven solutions
GIF (Graphic Interchange Format) is an image file format supporting both uniform and animated images. Before, GIF was a basic 8-bit colored image until PNG image format was introduced as a more feasible alternative. Today, you can find them being used on all the trending social media applications like WhatsApp, Instagram, Snapchat, Twitter, Facebook, and various others.
The good thing here is that you can make GIFs from YouTube videos or any of your favorite videos for that matter which you think can help express your sentiments or ideas in an enhanced manner. There is a huge market available of apps and web software that can help create GIFs from YouTube without much trouble.
In this short guide ahead, we’ve brought for you the best YouTube to GIF maker available in the digital market. Let’s go GIF-ing!
Part 1: Best Online YouTube to GIFs Makers
Here is our curated list of the best 11 YouTube to GIF Maker that you can use to make GIF from YouTube video.
1. GIFS
Gifs.com is one the best GIF maker site that makes crafting GIFs from YouTube videos incredibly easy and quick with no time. If you’re looking for some straight and simple video to gif converter to help you convert YouTube videos into GIFs, this is the smoothest editor that will do the job and craft interesting gifs for your blogging platforms.
All you have to do is enter the URL of the video you want to convert into a GIF. At this point, the site accepts Instagram, YouTube, Facebook, and Vine links. In addition to that, there is also an option that allows users to upload from the desktop computer.
Once you’ve entered the YouTube video URL, it prompts a basic video editor wherein you select the frame and durations for your GIF. If you want to customize it further, you can add stickers, captions, and tools like blurring, cropping, and others.
Once you’re done exploring the filters and editing the GIF, you can directly share the URL on different platforms or just download it and store it on your device.
Note: If you want to remove the watermark and get full access to extra features, you may need to pay $1.99/month.
You can check the gif that I made from our YouTube video How to Edit Galaxy Effects with Green Screen | Wondershare FilmoraPro Tutorial on gifs.com here: https://gifs.com/gif/36RNn9 .
2. GIPHY
Giphy, as we all know, is the most used search engine for GIFs due to its limitless collection. Giphy here maintains its own GIF maker to create your customized GIFs effortlessly. The Giphy online GIF maker is quite simple and easy to use; it also has steadfast mobile applications for both Android and iOS devices.
To begin converting YouTube videos into GIFs, click the Create button at the top and then you can either enter the URL or upload images/videos from local files. This GIF maker only accepts JPG, PNG, GIF, MP4, and MOV for people uploading images or videos.
Then, trim the part from the video you want to convert into a GIF. Later, you can embellish your GIFs by adding filters, tags, text captions, and stickers to make them look eye-catching. If you’re looking for a clean and simple GIF maker, then Giphy GIF maker is the perfect choice for you.
Here is the gig that I made with Giphy: https://media.giphy.com/media/2Dtlp2MAXtoC0EyMsx/giphy.gif .
3. GIFit!
GIFit is a well-known online extension available on the Chrome Web Store for free that aids in making GIFs from YouTube videos. The GIFit extension has been recently updated to work with the new YouTube interface to help you craft Gifs smoothly. One thing to remember about GIFit is that with YouTube HTML5 mode only.
To use this Chrome extension, install it from the Chrome Web Store. Now, run the attachment and visit any video on YouTube that you would like to convert into GIF. Once decided, simply press on the GIFit icon in the YouTube toolbar. Then, edit according to your requirements and hit the red button with GIFit on it. After a few minutes, your GIF will be ready to be shared and saved. Currently, it offers convert YouTube to GIF feature only, so you can’t add stickers nor captions.
4. Make A GIF
Makeagif is an ideal online GIF maker for you that can convert videos into animated GIFs in no time. It allows you to create GIFs using local images, YouTube, Facebook, and Webcam. Makeagif even will enable you to develop new GIFs using the already existing ones.
The GIF maker also comes with a variety of free GIFs to download and add to your collection. Moreover, it allows you to edit existing GIFs by enhancing their quality, speed and adding filters to them. It offers functions that can enrich the standard of your GIFs.
To create GIFs using this, first, create your account on the site. Next, select the ‘YouTube to GIF’ option from the drop-down menu, among other alternatives. Then, enter the link to the YouTube video that you wish to transfigure into GIF, after which you can tailor-make the gifs by adjusting the configuration settings, such as adding captions and sticker. Once done, simply download and share your newly crafted GIF.
5. Imgur
Imgur might not be the best application to be included in the list. But it is definitely an amazing site where you can go looking for all kinds of images, Gifs, memes, or other digital stories. Imgur’s wide collection of visuals can never disappoint you, no matter what you’re searching for, from funny to sad, inspiring to aspiring, everything can be discovered in this treasure.
Now, this might not be the best YouTube to gif maker, but it does have the potential to provide you with great ideas for GIF-making. Besides, you can download all the interesting GIfs from here and save them for future reference.
6. GiFRun
Are you worried about searching for a gif converter with no prior experience in editing? Don’t worry; this GiFRun Maker is the simplest online service that requires minimum to zero skill for creating GIFs. GifRun is an easy enough site to navigate through and produce quality GIFs for your blogging sites.
To convert a YouTube video to GIF, simply enter the link. After that, it will prompt you to the editing page, where you can set the start/end time, duration, and resolution for your gif. You can preview your edit before finalizing it, making necessary changes, and then downloading it on your device.
7. Free Gif Maker Me
Free Gif maker is one of the straightforward and easily manageable GIF-making applications. It offers YouTube to gif, reverse gif, and gif effects tools to enhance your GIF quality and make it effortless to create your own GIFs.
To make GIF from YT Video on free Gif Maker, copy the video link in the input text field in the middle of your screen and then tap on ‘Load YouTube Video.’ Within seconds you will be redirected to the video preview and GIF editing page. Now, set the duration, start time, resolution, output, and other details. Then, click on the ‘Make A GIF’ option and save it on your device once ready.
8. Imgflip
Another website is known for creating and sharing visual content on different social media channels. Imgflip allows you to make customized animations from YouTube and other digital platforms. The site is completely safe to use and produces good-quality memes and GIFs quickly without incurring a dime.
Imgflip supports all the popular video formats such as AVI, MP4, 3GP, OGG, FLV, MOV, and various other video formats. To produce a high-quality GIF, make sure your video is at least 480P or higher. More so, the Imgflip supports GIF with audio features of all the videos with audio that can only be accessed using the Imgflip Pro at a minimum price of $9.95/ month.
9. GIF Maker
GIF Maker is a pretty basic application that everyone can navigate with or without any expertise in the tech department. Along with GIF maker, it also has other tools such as GIF resizer, GIF compressor, and GIF cropper, all specifically designed tools to help you create riveting GIFs ever!
GIF Maker provides two options; one video to gif and second Images to gif that you can use as per their need. One simply is to enter the YT video link/upload video to the upload box. Next, alter the animation, filter, speed, duration, and set start and endpoint in the editor. You can upload files in all the popular formats and upload up to 25Mb image files and 30 Mb for animated GIFs.
Another point to remember while using this GIF Maker, it only supports YT videos that have not been copy-righted by the creator.
Part 2: Best YouTube to GIF Maker on Windows and Mac: Wondershare UniConverter
It happens so that you stumble upon a video that runs the hippocampus of your brain rigid with ingenious abstractions about converting the video into GIF to delineate those ideas through digital content on your blogs.
Now, you will require the best-quality GIF maker that is easy to navigate without any complications. Despite the plethora of GIF makers being available at hand, it could be a strenuous task to search for the ideal GIF maker for yourself.
Presently, Wondershare UniConverter is one of the best and easy-to-use YouTube to GIF makers for you. It is the handiest tool to help you accomplish your conversion, customization, compressing, and revamping goals like a professional with its effective editing features. Wondershare offers many benefits, from converting files in hundred different formats to crafting your one GIF out of videos along with other fundamental editing attributes.
How to User UniConverter Video to GIF Maker?
Step 1: Download and install the Wondershare Converter on your device. Now, run the app and launch the Wondershare GIF Maker by selecting the GIF Maker Icon on the toolbar.
Step 2: Click on the Video to GIF option before tapping on the Add File option to upload YT video for GIF conversion.
Step 3: Next, you can customize your uploaded video by setting the start and end time. In addition to that, you can enter the frame rate and output size according to your requirement.
Step 4: Once finished with all the customization, convert the YouTube video into a GIF by tapping the Create GIF option.
Step 5: Ta-da! UniConverter will transform your YT video into a GIF within a minute or two. You can now export and share the GIF further.
That’s right, with five easy steps, you can convert all your favorite YouTube video into GIF with this YouTube to GIF maker.
Without any doubt, I can say that usage of GIFs during your regular texting and socialization can make your conversations more interesting. GIFs are the best shortcuts to express your mood, emotions, and humor without having to type much. No other digital medium provides an avenue that offers such proficiency in demonstrating your emotions, possibly the reason behind its escalating popularity.
With the help of this little guide, you can create gif from YouTube videos with a wave of your hand! I hope you’ve fun GIF-ing!
Richard Bennett
Richard Bennett is a writer and a lover of all things video.
Follow @Richard Bennett
Vlogger’s Guide to Going Viral with Hilarious Reactions – 3 Must-Know Strategies
How to Make a YouTube Reaction Video?
Richard Bennett
Mar 27, 2024• Proven solutions
Sharing ideas and opinions on virtually any topic you can think of with millions of people around the world is arguably one of the greatest benefits YouTube gives to content creators. Even so, building your channel exclusively around reaction videos may prove to be difficult, but this doesn’t mean that you can’t use this type of video to comment on what other YouTubers are saying.
The process of making a YouTube reaction video is not overly technical, although you will have to decide which video editing technique you are going to use to make a reaction video. That is why in this article we are going to take a look at different ways to make a YouTube reaction video.
- Method 1: Making Reaction Videos with PIP feature in Filmora
- Method 2: Create YouTube Reaction Video with Split Screen Templates
- Method 3: Make A Reaction Video for YouTube with AI Portrait
How to Make a Reaction Video for Your YouTube Channel? [3 Ways]
Using the footage without the consent of the copyright owner is punishable by the law, which means that you can only include the footage in a reaction video if you have the owner’s consent. Consequently, the selection of videos you can comment on is going to be limited, since it is entirely up to the creator of the video if they are going to give you permission to use their footage in your reaction video.
You can use the following video editing techniques, once you have access to the video you would like to comment on.
Method 1: Making a reaction video with the Picture-in-Picture feature in Filmora
Video editing software, like Filmora , can also be used to create YouTube reaction videos, but you must have all the footage you would like to include in that video before you can start putting it together.
The first step is to create a new project in Filmora and then import the media assets into the editor. Besides video clips, you can also add music, pictures, or create opening titles and end credits for your reaction video.


Place the video you’re reacting to on a video track on the timeline and then add the video of your reaction to the timeline that is directly above the one to which you added the first video clip. Click on the top video in the preview window and use the handles that are positioned around the edges of the video to adjust its size.
If you would like to change the on-screen position of the overlay clip, you should simply click on it and drag it to the new location within the preview window.

Filmora offers more than sixty motion effects, hundreds of transitions, and visual effects that can make your reaction video more visually appealing to the audience.

Moreover, Filmora video editing software offers a variety of blending modes, and it lets you control the opacity of the overlay video so that you can make it more transparent. Whether or not you are going to use these options depends on the footage you’re working with and the demands of a particular project.
Pros of using the Picture in Picture feature to make reaction videos in Filmora: You can place and adjust the videos with more customizable options. Get more tips about Making a PIP video in Filmora .
Method 2: Create several reaction windows with the Split Screen feature
Besides the Picture-in-Picture option, Filmora also enables you to play two or more videos simultaneously with Split Screen templates. Drag and drop the template you want to use in your reaction video to the timeline and click on the Enable Split Screen Animation tick box if you want to use the template without animations.

Afterward, you should drag the video clips from the Media tab and drop them onto the section of the preview window where you want them to be located. Keep in mind that you cannot add more than six videos to a split-screen template.

All videos you add to a split-screen template can be edited, and you just have to click on them if you want to adjust their sizes, enhance colors, mute their audio tracks or add a new audio file to the template.
Check the details about How to make a split-screen video step by step.
Pros of using Split-screen template to make reaction video in Filmora: various templates for creating stylish video side by side easily.
Method 3: Create A YouTube Reaction Video with AI Portrait
With the human segmentation effect in AI Portrait, you can now blend the reaction video in a more natural way. The human segmentation effect will isolate people from the background, you can use any background in the video.
Note: You can use this feature after version after V 10.5 for Windows, and V 10.4 for Mac. Click the button below to get the latest version of Filmora on your desktop.
Step 1: Import the videos to the media library, and then drag the background video to the first video track, and the reaction video to the track above.

Step 2: Go to the Effects tab at the top, and click the AI Portrait category, and then you will see many effects such as Human Segmentation, Human Pixelate, Human Noise, and lighting flash. Here, drag and drop the Human segmentation effect to the reaction video.

Step 3: Select the reaction video in the timeline, and then adjust its size and position by dragging it on the preview window. See, the reaction video is fine blended with the background video.

Step 4: That’s the basic editing of making a reaction video. You can also add the neon or flashing effect to the video. If everything goes well, click Export and save the video.

You can find out more details about using the AI Portrait effect to make a reaction video .
How to Avoid Copyright Infringements While Making a YouTube Reaction Video
All videos you can find on YouTube are protected by intellectual property regulations, and you can’t use them without the copyright owner’s permission. The only way to avoid being absolutely sure that your reaction video isn’t violating the law is to contact the video creator and ask for permission to use their intellectual property. However, most YouTubers are reluctant to let others download and edit their videos unless they already have a large fan base.
In case you’re granted permission to comment on a video, you have nothing to worry about. However, if you don’t get the permission you’re all the money the reaction video generates will go to the copyright owner or you will be forced to delete the video from your channel. There are still a few things you can do, even if you don’t get permission to use the video you would like to comment on.
Muting the video’s audio or altering its pitch will make it more difficult for YouTube’s bots to detect copyright infringement, although this method may not always work. In addition, you can play a video for up to thirty seconds, then comment on that segment, and then play another segment of that video.
There is no way of saying whether any of these editing tricks are going to help you avoid a copyright claim, and you should only use them if you have no other option.
Conclusion
Anyone can master the technical aspects of making a reaction video, but the topics you react to need to be related to the general topic your channel covers. What’s more, the idea of your reaction video has to be relevant for your audience if you want to attract their attention. Which video editing techniques are you using to make a YouTube reaction video?
Download Mac Version ](https://tools.techidaily.com/wondershare/filmora/download/ )
Richard Bennett
Richard Bennett is a writer and a lover of all things video.
Follow @Richard Bennett
Richard Bennett
Mar 27, 2024• Proven solutions
Sharing ideas and opinions on virtually any topic you can think of with millions of people around the world is arguably one of the greatest benefits YouTube gives to content creators. Even so, building your channel exclusively around reaction videos may prove to be difficult, but this doesn’t mean that you can’t use this type of video to comment on what other YouTubers are saying.
The process of making a YouTube reaction video is not overly technical, although you will have to decide which video editing technique you are going to use to make a reaction video. That is why in this article we are going to take a look at different ways to make a YouTube reaction video.
- Method 1: Making Reaction Videos with PIP feature in Filmora
- Method 2: Create YouTube Reaction Video with Split Screen Templates
- Method 3: Make A Reaction Video for YouTube with AI Portrait
How to Make a Reaction Video for Your YouTube Channel? [3 Ways]
Using the footage without the consent of the copyright owner is punishable by the law, which means that you can only include the footage in a reaction video if you have the owner’s consent. Consequently, the selection of videos you can comment on is going to be limited, since it is entirely up to the creator of the video if they are going to give you permission to use their footage in your reaction video.
You can use the following video editing techniques, once you have access to the video you would like to comment on.
Method 1: Making a reaction video with the Picture-in-Picture feature in Filmora
Video editing software, like Filmora , can also be used to create YouTube reaction videos, but you must have all the footage you would like to include in that video before you can start putting it together.
The first step is to create a new project in Filmora and then import the media assets into the editor. Besides video clips, you can also add music, pictures, or create opening titles and end credits for your reaction video.
Place the video you’re reacting to on a video track on the timeline and then add the video of your reaction to the timeline that is directly above the one to which you added the first video clip. Click on the top video in the preview window and use the handles that are positioned around the edges of the video to adjust its size.
If you would like to change the on-screen position of the overlay clip, you should simply click on it and drag it to the new location within the preview window.
Filmora offers more than sixty motion effects, hundreds of transitions, and visual effects that can make your reaction video more visually appealing to the audience.
Moreover, Filmora video editing software offers a variety of blending modes, and it lets you control the opacity of the overlay video so that you can make it more transparent. Whether or not you are going to use these options depends on the footage you’re working with and the demands of a particular project.
Pros of using the Picture in Picture feature to make reaction videos in Filmora: You can place and adjust the videos with more customizable options. Get more tips about Making a PIP video in Filmora .
Method 2: Create several reaction windows with the Split Screen feature
Besides the Picture-in-Picture option, Filmora also enables you to play two or more videos simultaneously with Split Screen templates. Drag and drop the template you want to use in your reaction video to the timeline and click on the Enable Split Screen Animation tick box if you want to use the template without animations.
Afterward, you should drag the video clips from the Media tab and drop them onto the section of the preview window where you want them to be located. Keep in mind that you cannot add more than six videos to a split-screen template.
All videos you add to a split-screen template can be edited, and you just have to click on them if you want to adjust their sizes, enhance colors, mute their audio tracks or add a new audio file to the template.
Check the details about How to make a split-screen video step by step.
Pros of using Split-screen template to make reaction video in Filmora: various templates for creating stylish video side by side easily.
Method 3: Create A YouTube Reaction Video with AI Portrait
With the human segmentation effect in AI Portrait, you can now blend the reaction video in a more natural way. The human segmentation effect will isolate people from the background, you can use any background in the video.
Note: You can use this feature after version after V 10.5 for Windows, and V 10.4 for Mac. Click the button below to get the latest version of Filmora on your desktop.
Step 1: Import the videos to the media library, and then drag the background video to the first video track, and the reaction video to the track above.
Step 2: Go to the Effects tab at the top, and click the AI Portrait category, and then you will see many effects such as Human Segmentation, Human Pixelate, Human Noise, and lighting flash. Here, drag and drop the Human segmentation effect to the reaction video.
Step 3: Select the reaction video in the timeline, and then adjust its size and position by dragging it on the preview window. See, the reaction video is fine blended with the background video.
Step 4: That’s the basic editing of making a reaction video. You can also add the neon or flashing effect to the video. If everything goes well, click Export and save the video.
You can find out more details about using the AI Portrait effect to make a reaction video .
How to Avoid Copyright Infringements While Making a YouTube Reaction Video
All videos you can find on YouTube are protected by intellectual property regulations, and you can’t use them without the copyright owner’s permission. The only way to avoid being absolutely sure that your reaction video isn’t violating the law is to contact the video creator and ask for permission to use their intellectual property. However, most YouTubers are reluctant to let others download and edit their videos unless they already have a large fan base.
In case you’re granted permission to comment on a video, you have nothing to worry about. However, if you don’t get the permission you’re all the money the reaction video generates will go to the copyright owner or you will be forced to delete the video from your channel. There are still a few things you can do, even if you don’t get permission to use the video you would like to comment on.
Muting the video’s audio or altering its pitch will make it more difficult for YouTube’s bots to detect copyright infringement, although this method may not always work. In addition, you can play a video for up to thirty seconds, then comment on that segment, and then play another segment of that video.
There is no way of saying whether any of these editing tricks are going to help you avoid a copyright claim, and you should only use them if you have no other option.
Conclusion
Anyone can master the technical aspects of making a reaction video, but the topics you react to need to be related to the general topic your channel covers. What’s more, the idea of your reaction video has to be relevant for your audience if you want to attract their attention. Which video editing techniques are you using to make a YouTube reaction video?
Download Mac Version ](https://tools.techidaily.com/wondershare/filmora/download/ )
Richard Bennett
Richard Bennett is a writer and a lover of all things video.
Follow @Richard Bennett
- Title: "2024 Approved The 20 Best Free and Paid GIF Software Options"
- Author: Joseph
- Created at : 2024-05-31 13:46:04
- Updated at : 2024-06-01 13:46:04
- Link: https://youtube-stream.techidaily.com/2024-approved-the-20-best-free-and-paid-gif-software-options/
- License: This work is licensed under CC BY-NC-SA 4.0.
