
:max_bytes(150000):strip_icc():format(webp)/laptop-569944733df78cafda90169f.jpg)
"2024 Approved Template Tips for Efficient and Effective YouTube Intros"
Template Tips for Efficient and Effective YouTube Intros
How to Make a Cool Intro for YouTube? [+Free Templates]

Richard Bennett
Mar 27, 2024• Proven solutions
For a professional presence on YouTube intro is a must. It is for the same reason that how to make an intro is one of the most popular topic now.
It is the impression that will make sure that the users are attracted. The video’s success greatly depends upon the intro as it will allow the users to get the idea.
The good news is that YouTube intro making is not a complex process due to some software and websites offering the services, which we will discuss in this article.
You will learn :
- What Is YouTube Intro?
- Why You Need a YouTube Intro?
- How to Make Your Own Perfect YouTube Intro Easily?
- Key Takeaways to Create Great Attractive YouTube Intro
- Popular YouTube Intro Styles and Templates
Wondershare Filmstock Gaming Video Editing Skils ](https://filmstock.wondershare.com/creative-theme-game?source%5Fchannel=seo%5Farticle?spm=rs.filmora%5Fweb )
What Is YouTube Intro?
YouTube Intro is a short clip at the start of the video that introduces the maker as well as the topic under discussion. It can be rightfully called as the trademark of your channel. The intro tells the user who you really are. This is the only part of the video that is brief and allows the users to get the first impact of you.
There are thousands of software programs and websites that allow you to get breathtaking animated intros. You can use any of the intro templates to make your first impression the best of all. The user will get to know more about you and will also subscribe to your channel.
There are certain creators that divide the intro into different sections.
Making an intro has never been as easy as it is now. Kudos to the programs that are available online as well as offline.
Why You Need a YouTube Intro?
There are many reasons for which you need YouTube intro. Some reasons are mentioned as under for you better understanding.
- It will get you the relevant traffic
The intro will let the users know what your channel is all about. It will, in turn, get you the best and the most relevant leads. If you are running eCommerce business then the intro will get you into the limelight that you deserve.
- It makes a difference
It simply means that you will see a change in traffic as well as in the overall growth of your channel. You will also see the difference in the working of the channel. A good intro will bring in the relevant audience and this, in turn, will make sure that you get new ideas to make your channel stand out.
- Recognition
An intro makes sure that you get the recognition that you desire. It will also make sure that you get the best and the most advanced outcome that is related to your business. Getting recognition is like a dream come true for the vloggers.
It will make sure that the revenue bases, as well as the sales, are increased. The potential customers will only subscribe to your services and channel if your intro is relevant. Also, you need to keep it short and highly targeted.
How to Make Your Own Perfect YouTube Intro Using Filmora?
With the best and the most advanced techniques, Filmora is a program that will let you create the intro which is just awesome. The program is easy to use and will also make sure that you get to know its features in great detail. The interface, as well as the format support, is awesome.
You need not be a tech-savvy person to operate the program as it is self-explanatory. Fimora has been highly regarded as one of the best programs. It is all because of the viability that it provides to its users.
Features of the program
- The program supports a wide range of formats. You can export as well as import files in a wide range of formats.
- The user interface is intuitive and easy to understand. The graphical properties will make sure that you understand the working of it easily.
- There are more than 300 effects on the program that will make sure to get you the specialized experience you want to have with your channel.
- The intro can be directly uploaded to YouTube and there is no need to export and upload separately.
- The tech specialties of the program are highly in line with the current trends. Apart from intro making, there is a wide range of functions that the program can perform.


The Process to create your own YouTube intro by Filmora?
If you want to make intro using Filmora then it is advised to follow the steps as under to get the best outcome.
Step 1: Click on import or import media files on the main interface to make sure that the intro material is imported to the program.

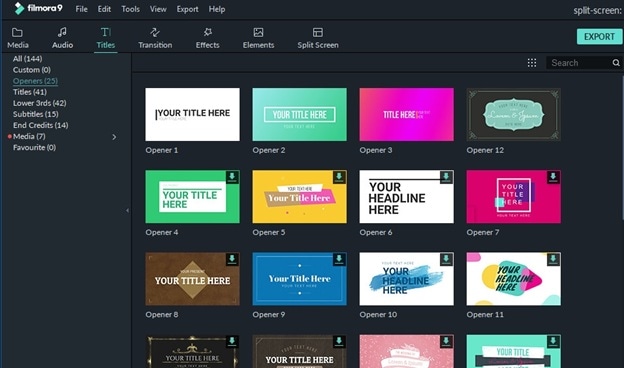
Step 2: Head over to “Title” and you can add them to you YouTube intro with ease:
Step 3: To add opener you need to head to “Opener” under Titles and right-click the one you want to select. Click apply and it will be added to the timeline.
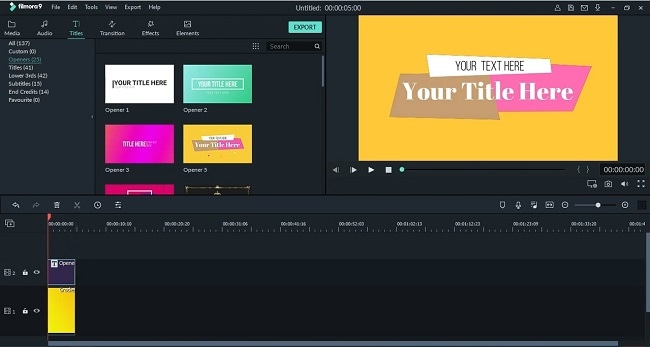
Step 4: You can also change the duration of the title effects. Drag its edge on the timeline you can also click the clock icon and enter new duration.
Step 5: Under the style tab you can change the font, text type, and other settings.

Step 6: To edit the intro, even more, click the “Advanced” button to access the advanced editing panel. Add text boxes, shapes and other effects from here.
Step 7: Under “Effects” you can access the filters and overlays to add to your project.
Step 8: The default length of the filter is 5 seconds that can be extended by dragging its corners on to the timeline.
Step 9: Under the audio heading you can change the volume of the sound of your intro to the level you want.
Step 10: You can also stabilize the video by right-clicking it in the timeline and then going to properties. You will see the stabilization editing panel.
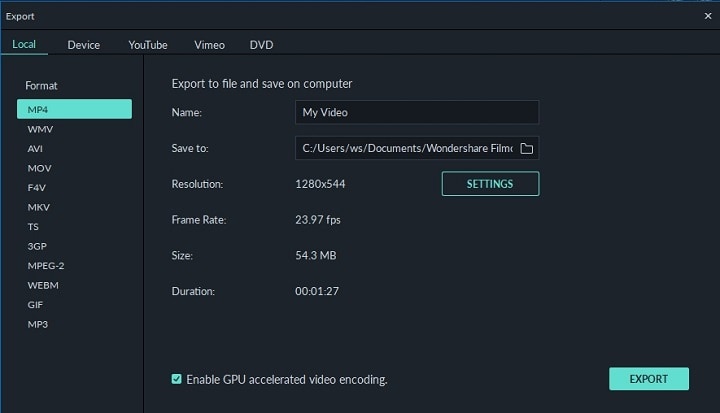
Step 11: Once the editing has been done you just need to click Export on the toolbar. Under the window that appears you can export the intro with respect to device, format, and can also burn it onto the DVD. If you want you can also directly upload the intro to YouTube and other social media platforms.
It’s very easy right? Download Filmora and make a click-driven intro now!
Key Takeaways to Create Great Attractive YouTube Intro
There are certain sections that will make sure that you get the best YouTube intro of all time. It is also important as the intro is regarded as the face of your channel. It will allow you to get the attention for your channel. Some important points are as under.
1. It must be to the point
If you want to impress your audience then remember that you only have 10 – 20 seconds. The longer the intro the bore it is. It must be highly relevant and must make sure that the users get the point of your channel. It will let you thrive a lot.
If for any reason there is an element of confusion within your intro it will never do well. If you want to know how to make an intro for YouTube then it is advised to keep reading on. This article will surely help you a lot.
2. Short means Sweet
The point is that your intro should be to the point. It means that you must never prolong your intro for any reason. Again here comes the element of relevancy.
It means that you must keep your intro as short as possible as it allows you to capture the audience in a far better manner. A short intro will make sure that you are getting the attention that you need when it comes to your channel. So it will boost your channel traffic a lot.
3. It must be in line with your channel theme
Again it is critical that your intro is relevant to your channel. It means that the intro made should represent your channel’s content instead of anything else. It will make sure that you get the best and most relevant audience.
This will once again boost your channel as well as traffic surge will also occur. You will get the best outcome that will make it possible for you to channel the traffic wherever you want. This, in turn, will also boost your channel revenue in case of monetization.
4. Awesome Music
It is the most important part that will impact your YouTube intro. Good music will make sure that you get the best outcome and the users are attracted. There are many YouTube channels that were only recognized as their music was awesome.
5. Clean Visuals
HD and the high quality intro is the key to your channel’s success. It is highly regarded as the best way to attract people. You must spend time to make sure that it looks great and to the point. This is one of the ways to make sure that your intro looks good and awesome.
6. Technically Sound
It is again important to note that technically the intro that has been made is sound and is to the point. From transitions to fade and from animations to PIP there are a lot of details that should be taken care of. It will make sure that you get the intro that is highly professional and specialized.
Popular YouTube Intro Styles and Templates
If you think making a intro yourself is too complex and time-consuming, I also find some popular YouTube intro templates for you. Some of the coolest YouTube intro styles are as follows.
1. Logo and URL Style
This is one of the most common and frequently used YouTube intro style. There are many templates that are associated with it. Some of these are mentioned as under. These effects are mostly used if you are running a tech channel but the use is not limited to this alone.
- Logo & URL Liquid effect Intro Video Template
- Logo Focus Intro Video Template
- Unveiling Logo & URL Intro Video Template
- Logo Sketch Intro Video Template
- Logo Art Intro Video Template
2. Promotional Style
For promotion, there are tons of intros that are available online and anyone can be used. The content creation with such templates is easy. It is because there are many changes that can be done to promote your channel. The best part of these templates is that they are highly customizable.
These templates can also be used to create art for the outros as well that will further solidify the channel. Promoting products at the start and end of the YouTube channel is simply an awesome and fun factor. Some of the coolest templates that can be used in this regard are as follows.
- YouTube Promo Kit by Pixrate
- Broadcast Package by Motionbear
- Typo Opener by BLAQMATRIX
- Promo Intro by 7 Roads
- Upbeat Opener by MBR effects
3. Gaming Intro Styles
It is s well-known fact that the gaming industry is booming. There are literally hundreds of gaming channels on YouTube that are working just awesome. The kiddos are earning are a lot with the channel and the future is also bright.
To get the best gaming intro you need to focus on the outcome on the gaming brand you are trying to promote. Some of the coolest gaming channel intros that could be used to get the work done are as follows.
Conclusion
This article has taught you well how to make an intro with ease and perfection. The different templates are available online which can be used to make awesome YouTube intros. The best software that you can find on the market is the Wondershare Filmora which makes the process a lot easier.
The program is known for the awesome workability as well as viability kudos to the developers of this awesome software. It is also recommended sharing this article on social media such as Facebook and Twitter so that the others can also benefit from it. It will also help others in creating awesome YouTube tutorials.
Richard Bennett
Richard Bennett is a writer and a lover of all things video.
Follow @Richard Bennett
Richard Bennett
Mar 27, 2024• Proven solutions
For a professional presence on YouTube intro is a must. It is for the same reason that how to make an intro is one of the most popular topic now.
It is the impression that will make sure that the users are attracted. The video’s success greatly depends upon the intro as it will allow the users to get the idea.
The good news is that YouTube intro making is not a complex process due to some software and websites offering the services, which we will discuss in this article.
You will learn :
- What Is YouTube Intro?
- Why You Need a YouTube Intro?
- How to Make Your Own Perfect YouTube Intro Easily?
- Key Takeaways to Create Great Attractive YouTube Intro
- Popular YouTube Intro Styles and Templates
Wondershare Filmstock Gaming Video Editing Skils ](https://filmstock.wondershare.com/creative-theme-game?source%5Fchannel=seo%5Farticle?spm=rs.filmora%5Fweb )
What Is YouTube Intro?
YouTube Intro is a short clip at the start of the video that introduces the maker as well as the topic under discussion. It can be rightfully called as the trademark of your channel. The intro tells the user who you really are. This is the only part of the video that is brief and allows the users to get the first impact of you.
There are thousands of software programs and websites that allow you to get breathtaking animated intros. You can use any of the intro templates to make your first impression the best of all. The user will get to know more about you and will also subscribe to your channel.
There are certain creators that divide the intro into different sections.
Making an intro has never been as easy as it is now. Kudos to the programs that are available online as well as offline.
Why You Need a YouTube Intro?
There are many reasons for which you need YouTube intro. Some reasons are mentioned as under for you better understanding.
- It will get you the relevant traffic
The intro will let the users know what your channel is all about. It will, in turn, get you the best and the most relevant leads. If you are running eCommerce business then the intro will get you into the limelight that you deserve.
- It makes a difference
It simply means that you will see a change in traffic as well as in the overall growth of your channel. You will also see the difference in the working of the channel. A good intro will bring in the relevant audience and this, in turn, will make sure that you get new ideas to make your channel stand out.
- Recognition
An intro makes sure that you get the recognition that you desire. It will also make sure that you get the best and the most advanced outcome that is related to your business. Getting recognition is like a dream come true for the vloggers.
It will make sure that the revenue bases, as well as the sales, are increased. The potential customers will only subscribe to your services and channel if your intro is relevant. Also, you need to keep it short and highly targeted.
How to Make Your Own Perfect YouTube Intro Using Filmora?
With the best and the most advanced techniques, Filmora is a program that will let you create the intro which is just awesome. The program is easy to use and will also make sure that you get to know its features in great detail. The interface, as well as the format support, is awesome.
You need not be a tech-savvy person to operate the program as it is self-explanatory. Fimora has been highly regarded as one of the best programs. It is all because of the viability that it provides to its users.
Features of the program
- The program supports a wide range of formats. You can export as well as import files in a wide range of formats.
- The user interface is intuitive and easy to understand. The graphical properties will make sure that you understand the working of it easily.
- There are more than 300 effects on the program that will make sure to get you the specialized experience you want to have with your channel.
- The intro can be directly uploaded to YouTube and there is no need to export and upload separately.
- The tech specialties of the program are highly in line with the current trends. Apart from intro making, there is a wide range of functions that the program can perform.
The Process to create your own YouTube intro by Filmora?
If you want to make intro using Filmora then it is advised to follow the steps as under to get the best outcome.
Step 1: Click on import or import media files on the main interface to make sure that the intro material is imported to the program.
Step 2: Head over to “Title” and you can add them to you YouTube intro with ease:
Step 3: To add opener you need to head to “Opener” under Titles and right-click the one you want to select. Click apply and it will be added to the timeline.
Step 4: You can also change the duration of the title effects. Drag its edge on the timeline you can also click the clock icon and enter new duration.
Step 5: Under the style tab you can change the font, text type, and other settings.
Step 6: To edit the intro, even more, click the “Advanced” button to access the advanced editing panel. Add text boxes, shapes and other effects from here.
Step 7: Under “Effects” you can access the filters and overlays to add to your project.
Step 8: The default length of the filter is 5 seconds that can be extended by dragging its corners on to the timeline.
Step 9: Under the audio heading you can change the volume of the sound of your intro to the level you want.
Step 10: You can also stabilize the video by right-clicking it in the timeline and then going to properties. You will see the stabilization editing panel.
Step 11: Once the editing has been done you just need to click Export on the toolbar. Under the window that appears you can export the intro with respect to device, format, and can also burn it onto the DVD. If you want you can also directly upload the intro to YouTube and other social media platforms.
It’s very easy right? Download Filmora and make a click-driven intro now!
Key Takeaways to Create Great Attractive YouTube Intro
There are certain sections that will make sure that you get the best YouTube intro of all time. It is also important as the intro is regarded as the face of your channel. It will allow you to get the attention for your channel. Some important points are as under.
1. It must be to the point
If you want to impress your audience then remember that you only have 10 – 20 seconds. The longer the intro the bore it is. It must be highly relevant and must make sure that the users get the point of your channel. It will let you thrive a lot.
If for any reason there is an element of confusion within your intro it will never do well. If you want to know how to make an intro for YouTube then it is advised to keep reading on. This article will surely help you a lot.
2. Short means Sweet
The point is that your intro should be to the point. It means that you must never prolong your intro for any reason. Again here comes the element of relevancy.
It means that you must keep your intro as short as possible as it allows you to capture the audience in a far better manner. A short intro will make sure that you are getting the attention that you need when it comes to your channel. So it will boost your channel traffic a lot.
3. It must be in line with your channel theme
Again it is critical that your intro is relevant to your channel. It means that the intro made should represent your channel’s content instead of anything else. It will make sure that you get the best and most relevant audience.
This will once again boost your channel as well as traffic surge will also occur. You will get the best outcome that will make it possible for you to channel the traffic wherever you want. This, in turn, will also boost your channel revenue in case of monetization.
4. Awesome Music
It is the most important part that will impact your YouTube intro. Good music will make sure that you get the best outcome and the users are attracted. There are many YouTube channels that were only recognized as their music was awesome.
5. Clean Visuals
HD and the high quality intro is the key to your channel’s success. It is highly regarded as the best way to attract people. You must spend time to make sure that it looks great and to the point. This is one of the ways to make sure that your intro looks good and awesome.
6. Technically Sound
It is again important to note that technically the intro that has been made is sound and is to the point. From transitions to fade and from animations to PIP there are a lot of details that should be taken care of. It will make sure that you get the intro that is highly professional and specialized.
Popular YouTube Intro Styles and Templates
If you think making a intro yourself is too complex and time-consuming, I also find some popular YouTube intro templates for you. Some of the coolest YouTube intro styles are as follows.
1. Logo and URL Style
This is one of the most common and frequently used YouTube intro style. There are many templates that are associated with it. Some of these are mentioned as under. These effects are mostly used if you are running a tech channel but the use is not limited to this alone.
- Logo & URL Liquid effect Intro Video Template
- Logo Focus Intro Video Template
- Unveiling Logo & URL Intro Video Template
- Logo Sketch Intro Video Template
- Logo Art Intro Video Template
2. Promotional Style
For promotion, there are tons of intros that are available online and anyone can be used. The content creation with such templates is easy. It is because there are many changes that can be done to promote your channel. The best part of these templates is that they are highly customizable.
These templates can also be used to create art for the outros as well that will further solidify the channel. Promoting products at the start and end of the YouTube channel is simply an awesome and fun factor. Some of the coolest templates that can be used in this regard are as follows.
- YouTube Promo Kit by Pixrate
- Broadcast Package by Motionbear
- Typo Opener by BLAQMATRIX
- Promo Intro by 7 Roads
- Upbeat Opener by MBR effects
3. Gaming Intro Styles
It is s well-known fact that the gaming industry is booming. There are literally hundreds of gaming channels on YouTube that are working just awesome. The kiddos are earning are a lot with the channel and the future is also bright.
To get the best gaming intro you need to focus on the outcome on the gaming brand you are trying to promote. Some of the coolest gaming channel intros that could be used to get the work done are as follows.
Conclusion
This article has taught you well how to make an intro with ease and perfection. The different templates are available online which can be used to make awesome YouTube intros. The best software that you can find on the market is the Wondershare Filmora which makes the process a lot easier.
The program is known for the awesome workability as well as viability kudos to the developers of this awesome software. It is also recommended sharing this article on social media such as Facebook and Twitter so that the others can also benefit from it. It will also help others in creating awesome YouTube tutorials.
Richard Bennett
Richard Bennett is a writer and a lover of all things video.
Follow @Richard Bennett
Spruce Up Your Video Thumbnails: With Electric Edges
Your YouTube video, or any other clip published on any forum, gets a larger number of hits if it has an attractive thumbnail. And, the fact is, a thumbnail becomes 10x more attractive when the main character that the image has have a neon border around it.
With that said, in the following sections, you will learn a couple of methods on how to add a YouTube thumbnail border around the main characters and/or objects that are significant to the clip.
In this article
01 Add Glowing Neon Border to YouTube Thumbnail with Filmora
02 Add a Glowing Neon Border in YouTube Thumbnail with Canva
03 Outline a Person in a YouTube Thumbnail with Photoshop
Part 1: How to Add Neon Border to YouTube Thumbnail for Free with Filmora
Being one of the most versatile and intuitive post-production tools available in the market today, Wondershare Filmora X allows you to add a neon border to a YouTube thumbnail quite conveniently. You can learn how to get this done on Windows or Mac by following the steps given below.
For Win 7 or later (64-bit)
For macOS 10.12 or later
Step 1: Define Project Settings and Add Image to the Timeline
Launch Wondershare Filmora X on your PC (a MacBook Pro M1 is used here), ensure that the project aspect ratio is set to 16:9 (Widescreen) on the splash screen, and click New Project. On the main interface, click the Preview quality and display settings icon from the upper-right area of the Timeline, click Change Project Aspect Ratio, click to select 1280 x 720 (HD) from the Resolution menu of the Project Settings box, and click OK to save the custom project settings.

Then select My Media from the menu bar if not already selected, click Project Media from the navigation pane, and click Import from the Media box to select and import the image of the main character or object that you want to use in the thumbnail.

Now, drag the image from the Media box to the Timeline at the bottom.

Step 2: Clear Image Background, Add Border, and Add Custom Background
Go to Effects from the menu bar, click to select the Default tab and then AI Portrait from the navigation pane, and click and drag the Human Segmentation preset from the right box, and place it over the image track in the Timeline.

Double-click the image layer, scroll down the upper-left box to the Video Effects section, and use the Edge Thickness and Edge Feather sliders to adjust the character’s edges to make them as realistic as possible. Click OK when done.

Next, click and drag the Human Border preset over the image track in the Timeline, and follow the same procedure to customize the border. This will give the character a neon border effect.

Now, use the method explained earlier to import a custom image for the background, and drag and place it under the previous track in the Timeline.

If you are running the latest version of Filmora, you will find there are some neon light effects available under AI Portrait as well.

Step 3: Add Titles to Thumbnail
Go to Titles from the menu bar, click to select the Default tab and then Lower 3rds from the navigation pane, and click and drag your preferred lower-third preset from the right window to a separate layer in the Timeline. Double-click the lower-third layer, and use the available options in the upper-left window to change the text, its color, etc., and drag the textbox to place it to your preferred position on the image as well. Click OK to save the changes.
Next, click to select Titles from the navigation pane, and drag your preferred title from the right window to the upper-most track in the Timeline. Now use the method explained earlier to edit the text, its color, position, etc. to make it look professional.

For more tips and tricks for creating YouTube thumbnail, you can check this You Tube thumbnail creating guide.
Step 4: Get the Neon Border Thumbnail
Click the Snapshot (Camera) icon from the upper-right area of the Timeline, go to My Media from the menu bar, right-click the thumbnail of the screenshot you captured, and click Reveal in Finder (on Mac) or Reveal in Explorer (on Windows) to get to the folder the YouTube thumbnail border is saved in.

Part 2: How to Add a Glowing Neon Border in Your YouTube Thumbnail with Canva
Canva is another intuitive editing program that works on the web interface rather than having you download and install an app on your PC. You can add a neon border for YouTube thumbnails using Canva by following the instructions given below:
Step 1: Define Project Settings and Add a Background
After signing in to your Canva account, click Create a design from the top-right corner of the page, click Custom size from the bottom, define 1280 and 720 in the Width and Height fields on the box that appears respectively, and click Create new design.

Now, click to select Background from the navigation bar on the left (if the Background tool is not visible, click More and then choose Background from the expanded list), and click to select a background from the images available in the center pane.

Step 2: Upload an Image and Add Effects
Click Uploads from the navigation bar, click the More icon from the right of the Upload media button present at the top of the center pane, choose your preferred method to upload the image (with the transparent background) that you want to use, upload the image, and drag it from the center pane to the Canvas.
Note: You can use any of the tools available online to remove the background from your image for free.

To add a YouTube thumbnail border, make sure that the image that you added to the Canvas is selected, click the Duplicate icon from the upper-right area, and use the scaling handles of the copy of the image to increase its size a bit. Reposition the image back to its original location as well.
Then, click Edit image from the upper-left corner of the Canvas, click Duotone from the Edit image pane at the center, if need be, click See all, choose your preferred duotone effect to apply on the image, choose your preferred highlight and shadow colors from the box that appears next, and click Back from the top of the pane.

Next, click See all next to the Adjust section from the center pane, and drag the Blur slider to the right to increase the blur effect on the image.

Step 3: Position the Layers
While keeping the duplicate image selected, click the Position button from the upper-right area of the Canvas, and click Background to send the second image behind the first one to get the neon border effect for the photo.

Part 3: How to Outline a Person in a YouTube Thumbnail with Photoshop
Because YouTube thumbnails are nothing but static images, creating YouTube thumbnail border with Adobe Photoshop is comparatively easier. The process of doing this is given below:
Step 1: Define Document Preferences and Import an Image
Launch Adobe Photoshop on your PC, click Create new, and on the New Document customization box, define the width and height values to 1280 and 720 pixels respectively. Select Transparent from the Background Contents menu as well if not already selected. Click Create from the bottom to create a new Photoshop document with the specified document settings. Next, open the folder that contains the source image, drag the photo to Photoshop, and press Enter to place the photo.

Step 2: Remove Background from the Image
Make sure that the image layer is selected in the Layers panel on the right, go to Select from the menu bar at the top, and click Subject. From the bottom of the Layers panel, click the Add a mask icon to get rid of the background, leaving only the human on the Canvas.

Step 3: Add a Custom Background and an Outline Around the Subject
Use the method explained earlier to import a background image of your choice to Photoshop. Drag the background image layer to the bottom in the Layers panel. Double-click the masked layer, click to select Stroke from the left pane of the Layer Style box, and use the options available on the right to manage the size, color, position, etc. of the stroke that has been added around the human subject. Click OK when done, and then export the image normally to use it as a YouTube thumbnail border.

Summary
It is important to know that the default resolution of a YouTube thumbnail is 1280 x 720 pixels that is usually written and referred to as 720p. While adding a YouTube thumbnail border, it is also imperative to have a good sense of color combination and fonts. Furthermore, a decent tool like Wondershare Filmora X must be used to add an appealing neon border around the main subject in the thumbnail image easily and quickly.
02 Add a Glowing Neon Border in YouTube Thumbnail with Canva
03 Outline a Person in a YouTube Thumbnail with Photoshop
Part 1: How to Add Neon Border to YouTube Thumbnail for Free with Filmora
Being one of the most versatile and intuitive post-production tools available in the market today, Wondershare Filmora X allows you to add a neon border to a YouTube thumbnail quite conveniently. You can learn how to get this done on Windows or Mac by following the steps given below.
For Win 7 or later (64-bit)
For macOS 10.12 or later
Step 1: Define Project Settings and Add Image to the Timeline
Launch Wondershare Filmora X on your PC (a MacBook Pro M1 is used here), ensure that the project aspect ratio is set to 16:9 (Widescreen) on the splash screen, and click New Project. On the main interface, click the Preview quality and display settings icon from the upper-right area of the Timeline, click Change Project Aspect Ratio, click to select 1280 x 720 (HD) from the Resolution menu of the Project Settings box, and click OK to save the custom project settings.
Then select My Media from the menu bar if not already selected, click Project Media from the navigation pane, and click Import from the Media box to select and import the image of the main character or object that you want to use in the thumbnail.
Now, drag the image from the Media box to the Timeline at the bottom.
Step 2: Clear Image Background, Add Border, and Add Custom Background
Go to Effects from the menu bar, click to select the Default tab and then AI Portrait from the navigation pane, and click and drag the Human Segmentation preset from the right box, and place it over the image track in the Timeline.
Double-click the image layer, scroll down the upper-left box to the Video Effects section, and use the Edge Thickness and Edge Feather sliders to adjust the character’s edges to make them as realistic as possible. Click OK when done.
Next, click and drag the Human Border preset over the image track in the Timeline, and follow the same procedure to customize the border. This will give the character a neon border effect.
Now, use the method explained earlier to import a custom image for the background, and drag and place it under the previous track in the Timeline.
If you are running the latest version of Filmora, you will find there are some neon light effects available under AI Portrait as well.
Step 3: Add Titles to Thumbnail
Go to Titles from the menu bar, click to select the Default tab and then Lower 3rds from the navigation pane, and click and drag your preferred lower-third preset from the right window to a separate layer in the Timeline. Double-click the lower-third layer, and use the available options in the upper-left window to change the text, its color, etc., and drag the textbox to place it to your preferred position on the image as well. Click OK to save the changes.
Next, click to select Titles from the navigation pane, and drag your preferred title from the right window to the upper-most track in the Timeline. Now use the method explained earlier to edit the text, its color, position, etc. to make it look professional.
For more tips and tricks for creating YouTube thumbnail, you can check this You Tube thumbnail creating guide.
Step 4: Get the Neon Border Thumbnail
Click the Snapshot (Camera) icon from the upper-right area of the Timeline, go to My Media from the menu bar, right-click the thumbnail of the screenshot you captured, and click Reveal in Finder (on Mac) or Reveal in Explorer (on Windows) to get to the folder the YouTube thumbnail border is saved in.
Part 2: How to Add a Glowing Neon Border in Your YouTube Thumbnail with Canva
Canva is another intuitive editing program that works on the web interface rather than having you download and install an app on your PC. You can add a neon border for YouTube thumbnails using Canva by following the instructions given below:
Step 1: Define Project Settings and Add a Background
After signing in to your Canva account, click Create a design from the top-right corner of the page, click Custom size from the bottom, define 1280 and 720 in the Width and Height fields on the box that appears respectively, and click Create new design.
Now, click to select Background from the navigation bar on the left (if the Background tool is not visible, click More and then choose Background from the expanded list), and click to select a background from the images available in the center pane.
Step 2: Upload an Image and Add Effects
Click Uploads from the navigation bar, click the More icon from the right of the Upload media button present at the top of the center pane, choose your preferred method to upload the image (with the transparent background) that you want to use, upload the image, and drag it from the center pane to the Canvas.
Note: You can use any of the tools available online to remove the background from your image for free.
To add a YouTube thumbnail border, make sure that the image that you added to the Canvas is selected, click the Duplicate icon from the upper-right area, and use the scaling handles of the copy of the image to increase its size a bit. Reposition the image back to its original location as well.
Then, click Edit image from the upper-left corner of the Canvas, click Duotone from the Edit image pane at the center, if need be, click See all, choose your preferred duotone effect to apply on the image, choose your preferred highlight and shadow colors from the box that appears next, and click Back from the top of the pane.
Next, click See all next to the Adjust section from the center pane, and drag the Blur slider to the right to increase the blur effect on the image.
Step 3: Position the Layers
While keeping the duplicate image selected, click the Position button from the upper-right area of the Canvas, and click Background to send the second image behind the first one to get the neon border effect for the photo.
Part 3: How to Outline a Person in a YouTube Thumbnail with Photoshop
Because YouTube thumbnails are nothing but static images, creating YouTube thumbnail border with Adobe Photoshop is comparatively easier. The process of doing this is given below:
Step 1: Define Document Preferences and Import an Image
Launch Adobe Photoshop on your PC, click Create new, and on the New Document customization box, define the width and height values to 1280 and 720 pixels respectively. Select Transparent from the Background Contents menu as well if not already selected. Click Create from the bottom to create a new Photoshop document with the specified document settings. Next, open the folder that contains the source image, drag the photo to Photoshop, and press Enter to place the photo.
Step 2: Remove Background from the Image
Make sure that the image layer is selected in the Layers panel on the right, go to Select from the menu bar at the top, and click Subject. From the bottom of the Layers panel, click the Add a mask icon to get rid of the background, leaving only the human on the Canvas.
Step 3: Add a Custom Background and an Outline Around the Subject
Use the method explained earlier to import a background image of your choice to Photoshop. Drag the background image layer to the bottom in the Layers panel. Double-click the masked layer, click to select Stroke from the left pane of the Layer Style box, and use the options available on the right to manage the size, color, position, etc. of the stroke that has been added around the human subject. Click OK when done, and then export the image normally to use it as a YouTube thumbnail border.
Summary
It is important to know that the default resolution of a YouTube thumbnail is 1280 x 720 pixels that is usually written and referred to as 720p. While adding a YouTube thumbnail border, it is also imperative to have a good sense of color combination and fonts. Furthermore, a decent tool like Wondershare Filmora X must be used to add an appealing neon border around the main subject in the thumbnail image easily and quickly.
- Title: "2024 Approved Template Tips for Efficient and Effective YouTube Intros"
- Author: Joseph
- Created at : 2024-05-31 13:41:01
- Updated at : 2024-06-01 13:41:01
- Link: https://youtube-stream.techidaily.com/2024-approved-template-tips-for-efficient-and-effective-youtube-intros/
- License: This work is licensed under CC BY-NC-SA 4.0.
