
"2024 Approved Swift Channels Growth Optimizing Viewership with Collaborative Videos"
Swift Channels Growth: Optimizing Viewership with Collaborative Videos
YouTube Outros that Grow Your Channel Faster

Richard Bennett
Oct 26, 2023• Proven solutions
Your YouTube outro, or end screen , is your last chance to keep a viewer on your channel. There are a lot of videos in the ‘Related’ sidebar that might catch their attention, or they could decide to go back to their search results.
A good outro will prompt viewers to keep watching related content from you instead of from someone else, and it could even convince them to subscribe.
- YouTube Outro Basics
- YouTube Outro Templates
- How to Use YouTube’s End Screen Feature
- How YouTube Outros/End Screens Can Help You Grow on YouTube
Part 1: YouTube Outro Basics
From the video above we can see that it features video recommendations and a prominent subscribe button.
A YouTube end screen might have the following features:
Videos: you can embed links/thumbnails for videos you’ve made on similar topics in order to keep viewers watching your content.
Playlists: instead of (or in addition to) linking to individual videos, you can embed playlists and link viewers to all of your content on a particular topic.
Subscribe Button: prompt viewers to subscribe to your channel.
Background: you may choose to use all of the elements described above in combination with an end card consisting of a moving background or still image. You can even find templates that will have slots for all your thumbnails and buttons.
You may also want to include social icons and handles for your accounts on sites like Instagram or Twitter. These won’t be clickable (you’ll need to add them yourself outside of YouTube’s end screen tool), but they’ll still let viewers know where else they can find and follow you.
Part 2: YouTube Outro Templates Download
Here are 4 sites where you can download templates for YouTube Outros:

Tube Arsenal: this site has a good selection of customizable outros with moving backgrounds. On the Tube Arsenal site, before you download, you can adjust the colors and text included in your outro and even load in your own logo.
You can preview your customized outro by clicking Preview Still or Preview Movie.
Outros on Tube Arsenal cost $9 for 720P or $13 for 1080p.

Outro Maker: you can get animated end screens/outros from Outro Maker for $2.99 a month (or, if you just need one outro, you can probably finish it during your 7-day free trial).
Outro Maker uses the content already uploaded onto your channel to create your outro, so you will need to link the service with your channel.

Biteable: the templates you can customize on Biteable are not specifically designed to be YouTube Outros and will not have slots for your end screen elements. The videos start out a lot longer than you’ll want for an end screen (an end screen can’t last longer than 20 seconds), but you can shorten them by deleting all the ‘scenes’ you don’t need and keeping just the one or two you want.
The clips you can get from Biteable look great, and their process for changing the text and colors is simple and intuitive.
You can create 5 free projects every month with Biteable, but you’ll need to upgrade to their paid service to download them. It’s $30 for one month.

Velosofy: this site has a decent selection of templates you can download for free. However, the downloads are all project files for programs like Adobe Photoshop or After Effects. You’ll need to have the program that goes with your download in order to customize your outro.
You can also find free outro templates by searching for them on YouTube! Lots of people have created free outros to share with the YouTube community.
Besides downloading outro templates from the website, you can also create it with some outro makers or with the video editing software that you are using. Wondershare Filmora video editor is the video editor that I used often, it is featured some cool templates and preset for making an outro. I recommend you try it as well.


Part 3: How to Use YouTube’s End Screen Feature
Make sure to create a space at the end of your video for the elements of your end screen to sit on top of. Your end screen will not add to the length of your video, it will overlay onto the last 5-20 seconds.
Here’s how you add an End Screen:
- Go to your YouTube Studio, then switch to Videos on the left menu;
- Click Details next to the video you want to add an end screen to.
- Click the End screen in the menu under the lower right window.
- Click Element to start adding videos, playlists, and subscribe buttons to your outro. You could also choose to use the same layout as a previous end screen with Import From Video, or you could apply multiple elements at once with a YouTube Template.
- Drag the elements to where you want them and adjust the timing using the timeline.
- Click Save when you’re done.
Part 4: How YouTube Outros/End Screens Can Help You Grow on YouTube
One of the most important statistics for measuring the growth of Your YouTube channel is Watch Time. You need 4,000 hours of watch time (over the past 12 months) in order to qualify for monetization/the YouTube Partner Program, and watch time also plays an important role in how your videos are ranked in YouTube’s search results.
Watch time is more important than views. If you’re getting views, but people are only watching short sections of your video, YouTube’s algorithm thinks the people who are clicking on your videos don’t like them and ranks them lower.
Outros are one of the best ways of increasing the watch time for your channel, because the whole point of an outro is to convince viewers to stick around and watch more videos. Here are some best practices:
Link to related videos and playlists: if someone has watched one video on a topic to the end, they’ll likely be interested in another highly related video from you. For example, someone who’s watched a Let’s Play for God of War is more likely to be interested in another God of War video than your review of your new gaming headset.
Link to your newest video: YouTube’s algorithm places the most weight on the data it collects about your video within the first 24 hours of it being listed as Public. To give your newest video it’s the best chance at success, you should do everything you can to boost its watch time when it’s first posted and linking to it in the end screens of all your other videos is one way to do that.
You don’t have to change every screen individually, YouTube lets you link to your most recent video automatically.
Link to Playlists: if you can get a viewer watching a playlist of related videos then that’s great for your watch time. If they’re already in a playlist they’re far more likely to watch multiple videos than if they have to go to your channel page and hunt down the content they’re interested in.
Include a ‘CTA’ with your subscribe button: besides just including a button people can use to subscribe, you should ask them to click on it with a ‘Call to Action’ or CTA. This can mean writing something like ‘Subscribe for more videos!’ on your end card, or asking them in an outro voiceover. People are more likely to subscribe if you ask than if you don’t.
Are you using a YouTube outro? What elements do you include, and how do you think it’s helped the growth of your channel?
Richard Bennett
Richard Bennett is a writer and a lover of all things video.
Follow @Richard Bennett
Richard Bennett
Oct 26, 2023• Proven solutions
Your YouTube outro, or end screen , is your last chance to keep a viewer on your channel. There are a lot of videos in the ‘Related’ sidebar that might catch their attention, or they could decide to go back to their search results.
A good outro will prompt viewers to keep watching related content from you instead of from someone else, and it could even convince them to subscribe.
- YouTube Outro Basics
- YouTube Outro Templates
- How to Use YouTube’s End Screen Feature
- How YouTube Outros/End Screens Can Help You Grow on YouTube
Part 1: YouTube Outro Basics
From the video above we can see that it features video recommendations and a prominent subscribe button.
A YouTube end screen might have the following features:
Videos: you can embed links/thumbnails for videos you’ve made on similar topics in order to keep viewers watching your content.
Playlists: instead of (or in addition to) linking to individual videos, you can embed playlists and link viewers to all of your content on a particular topic.
Subscribe Button: prompt viewers to subscribe to your channel.
Background: you may choose to use all of the elements described above in combination with an end card consisting of a moving background or still image. You can even find templates that will have slots for all your thumbnails and buttons.
You may also want to include social icons and handles for your accounts on sites like Instagram or Twitter. These won’t be clickable (you’ll need to add them yourself outside of YouTube’s end screen tool), but they’ll still let viewers know where else they can find and follow you.
Part 2: YouTube Outro Templates Download
Here are 4 sites where you can download templates for YouTube Outros:
Tube Arsenal: this site has a good selection of customizable outros with moving backgrounds. On the Tube Arsenal site, before you download, you can adjust the colors and text included in your outro and even load in your own logo.
You can preview your customized outro by clicking Preview Still or Preview Movie.
Outros on Tube Arsenal cost $9 for 720P or $13 for 1080p.
Outro Maker: you can get animated end screens/outros from Outro Maker for $2.99 a month (or, if you just need one outro, you can probably finish it during your 7-day free trial).
Outro Maker uses the content already uploaded onto your channel to create your outro, so you will need to link the service with your channel.
Biteable: the templates you can customize on Biteable are not specifically designed to be YouTube Outros and will not have slots for your end screen elements. The videos start out a lot longer than you’ll want for an end screen (an end screen can’t last longer than 20 seconds), but you can shorten them by deleting all the ‘scenes’ you don’t need and keeping just the one or two you want.
The clips you can get from Biteable look great, and their process for changing the text and colors is simple and intuitive.
You can create 5 free projects every month with Biteable, but you’ll need to upgrade to their paid service to download them. It’s $30 for one month.
Velosofy: this site has a decent selection of templates you can download for free. However, the downloads are all project files for programs like Adobe Photoshop or After Effects. You’ll need to have the program that goes with your download in order to customize your outro.
You can also find free outro templates by searching for them on YouTube! Lots of people have created free outros to share with the YouTube community.
Besides downloading outro templates from the website, you can also create it with some outro makers or with the video editing software that you are using. Wondershare Filmora video editor is the video editor that I used often, it is featured some cool templates and preset for making an outro. I recommend you try it as well.
Part 3: How to Use YouTube’s End Screen Feature
Make sure to create a space at the end of your video for the elements of your end screen to sit on top of. Your end screen will not add to the length of your video, it will overlay onto the last 5-20 seconds.
Here’s how you add an End Screen:
- Go to your YouTube Studio, then switch to Videos on the left menu;
- Click Details next to the video you want to add an end screen to.
- Click the End screen in the menu under the lower right window.
- Click Element to start adding videos, playlists, and subscribe buttons to your outro. You could also choose to use the same layout as a previous end screen with Import From Video, or you could apply multiple elements at once with a YouTube Template.
- Drag the elements to where you want them and adjust the timing using the timeline.
- Click Save when you’re done.
Part 4: How YouTube Outros/End Screens Can Help You Grow on YouTube
One of the most important statistics for measuring the growth of Your YouTube channel is Watch Time. You need 4,000 hours of watch time (over the past 12 months) in order to qualify for monetization/the YouTube Partner Program, and watch time also plays an important role in how your videos are ranked in YouTube’s search results.
Watch time is more important than views. If you’re getting views, but people are only watching short sections of your video, YouTube’s algorithm thinks the people who are clicking on your videos don’t like them and ranks them lower.
Outros are one of the best ways of increasing the watch time for your channel, because the whole point of an outro is to convince viewers to stick around and watch more videos. Here are some best practices:
Link to related videos and playlists: if someone has watched one video on a topic to the end, they’ll likely be interested in another highly related video from you. For example, someone who’s watched a Let’s Play for God of War is more likely to be interested in another God of War video than your review of your new gaming headset.
Link to your newest video: YouTube’s algorithm places the most weight on the data it collects about your video within the first 24 hours of it being listed as Public. To give your newest video it’s the best chance at success, you should do everything you can to boost its watch time when it’s first posted and linking to it in the end screens of all your other videos is one way to do that.
You don’t have to change every screen individually, YouTube lets you link to your most recent video automatically.
Link to Playlists: if you can get a viewer watching a playlist of related videos then that’s great for your watch time. If they’re already in a playlist they’re far more likely to watch multiple videos than if they have to go to your channel page and hunt down the content they’re interested in.
Include a ‘CTA’ with your subscribe button: besides just including a button people can use to subscribe, you should ask them to click on it with a ‘Call to Action’ or CTA. This can mean writing something like ‘Subscribe for more videos!’ on your end card, or asking them in an outro voiceover. People are more likely to subscribe if you ask than if you don’t.
Are you using a YouTube outro? What elements do you include, and how do you think it’s helped the growth of your channel?
Richard Bennett
Richard Bennett is a writer and a lover of all things video.
Follow @Richard Bennett
Video Quality Comparison: Mirrorless or DSLR Cameras?
Mirrorless vs. DSLR Cameras: Which is Better for Videos?
Richard Bennett
Oct 26, 2023• Proven solutions
If you’re looking to shoot your videos with interchangeable lenses, your camera set up will either have to have a mirrorless camera body or a DSLR camera body. In this post, I’ll be comparing the two camera body types for recording video.
- Part 1: What is a DSLR Camera?
- Part 2: What is a Mirrorless Camera?
- Part 3: Mirrorless vs. DSLR - a Complete Comparison
- Part 4: Mirrorless vs. DSLR - Which One is Better for Video?
What is a DSLR Camera?
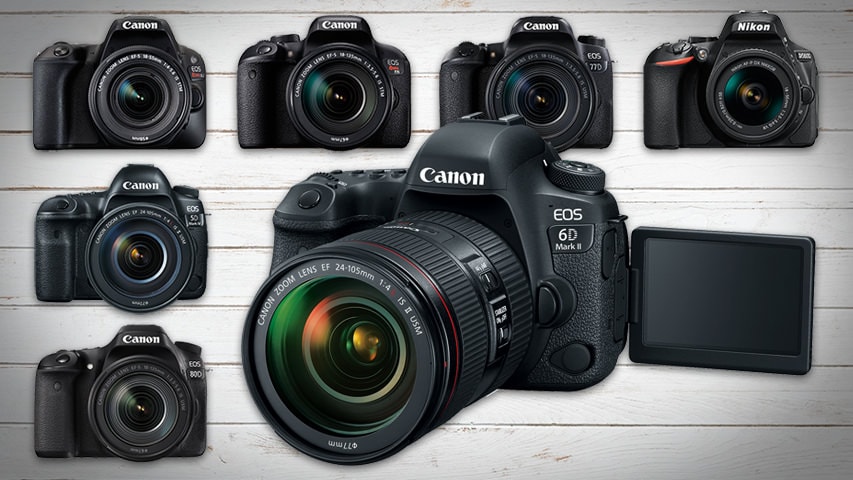
DSLR cameras are digital single-lens reflex cameras. Like 35mm film cameras of the past, DSLR cameras are built with an angled mirror inside its camera body. This mirror allows you to look into your camera’s optical viewfinder and see exactly what your camera sees.
The mirror inside a DSLR camera flips up out of the way when you open the shutter to allow light to reach the camera’s image sensor.
Check out our list of the 7 Best DSLR Cameras For Vlogging .
What is a Mirrorless Camera?
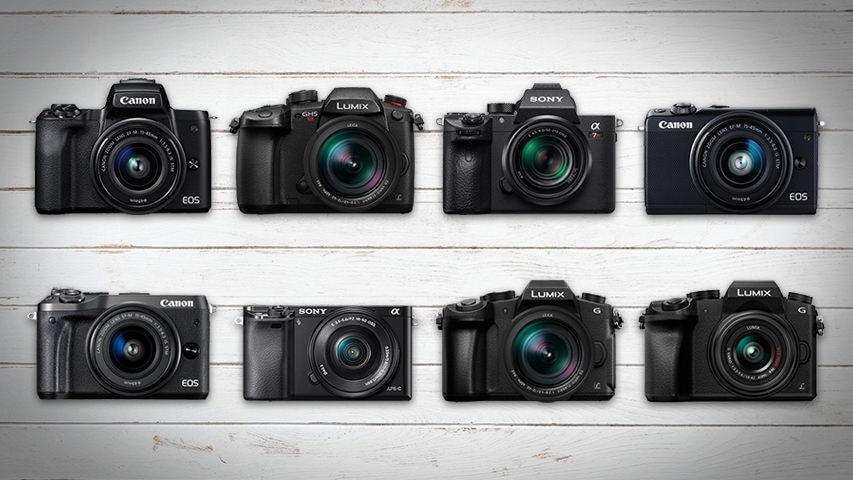
Mirrorless cameras are interchangeable lens cameras without a mirror inside the camera body. With nothing to reflect your image, you won’t find any optical viewfinder to look through to see exactly what your camera sees.
Light passes through the lens of a mirrorless camera and lands directly onto the camera’s sensor.
Check out our list of the 8 Best Mirrorless Cameras For Vlogging .
Mirrorless vs. DSLR - a Complete Comparison
Size and Weight
DSLR cameras are larger and heavier than mirrorless cameras because there are more parts that go into their camera bodies. DSLR cameras require enough space inside for an angled mirror to flip up out of the way.
If your video shooting style is more on-the-go, like that of a daily vlogger or travel vlogger, the smaller size and lighter weight of a mirrorless camera may be more suitable for you.
Previewing Images
When you’re using a DSLR camera, your optical viewfinder will show you exactly what your camera sees as opposed to a digital preview of what your image sensor picks up. No matter how bright or dark your scene actually is, through the optical viewfinder, you’ll be able to clearly see what your camera sees with the power of your eye.
Mirrorless cameras, on the other hand, display on your camera’s screen or electronic viewfinder a digital preview of what your camera is looking at. You will notice a lag, especially in low light, between actions that are taking place in front of the camera and the same actions being displayed in your live preview.
Lenses and Accessories
Having been around much longer, there are plenty more options for lenses and accessories when it comes to shooting with DSLR cameras. You can choose from all kinds of different quality levels and price ranges.
Video Resolution
4K video recording is more readily available in mirrorless cameras than DSLR cameras. At a much more affordable budget, you can get your hands on a 4K mirrorless camera. If you want to shoot 4K video on a DSLR camera, though, you will have to pay for some of the most expensive DSLR cameras on the market.
Image Stabilization
Up until quite recently, you needed to get the right lens with built-in optical image stabilization if you wanted to shoot stabilized photos and videos with an interchangeable lens camera. Image stabilization had not been readily available in the bodies of these cameras.
In recent years, however, mirrorless cameras have been much more active in their development of camera bodies equipped with shifting image sensors. Your shots can be even more stabilized when the optical image stabilization of your lens is combined with your camera’s in-body sensor-shift image stabilization.
Battery Life
When it comes to shooting video, DSLR cameras and mirrorless cameras consume about the same amount of power. It’s still safe to say, though, that DSLR cameras, for the most part, have better battery life than mirrorless cameras because their bigger batteries are packed with more power.
Mirrorless vs. DSLR - Which One is Better for Video?
In my opinion, when it comes to filming a video, mirrorless cameras are the way to go. In such a short time, mirrorless cameras have made huge leaps in their capabilities. It won’t be long before the ultimate vlogging camera comes out on the mirrorless market.
In the end, if you need to edit videos futhermore, try Filmora video editor . It’s a video editor which has significantly improved overall performance, making the product faster, and more powerful, and taking the user editing experience to a new level.
It is perfect for helping beginners, and intermediate users create stylish videos by providing an intuitive user interface and built-in effects.
![]()
Richard Bennett
Richard Bennett is a writer and a lover of all things video.
Follow @Richard Bennett
Richard Bennett
Oct 26, 2023• Proven solutions
If you’re looking to shoot your videos with interchangeable lenses, your camera set up will either have to have a mirrorless camera body or a DSLR camera body. In this post, I’ll be comparing the two camera body types for recording video.
- Part 1: What is a DSLR Camera?
- Part 2: What is a Mirrorless Camera?
- Part 3: Mirrorless vs. DSLR - a Complete Comparison
- Part 4: Mirrorless vs. DSLR - Which One is Better for Video?
What is a DSLR Camera?
DSLR cameras are digital single-lens reflex cameras. Like 35mm film cameras of the past, DSLR cameras are built with an angled mirror inside its camera body. This mirror allows you to look into your camera’s optical viewfinder and see exactly what your camera sees.
The mirror inside a DSLR camera flips up out of the way when you open the shutter to allow light to reach the camera’s image sensor.
Check out our list of the 7 Best DSLR Cameras For Vlogging .
What is a Mirrorless Camera?
Mirrorless cameras are interchangeable lens cameras without a mirror inside the camera body. With nothing to reflect your image, you won’t find any optical viewfinder to look through to see exactly what your camera sees.
Light passes through the lens of a mirrorless camera and lands directly onto the camera’s sensor.
Check out our list of the 8 Best Mirrorless Cameras For Vlogging .
Mirrorless vs. DSLR - a Complete Comparison
Size and Weight
DSLR cameras are larger and heavier than mirrorless cameras because there are more parts that go into their camera bodies. DSLR cameras require enough space inside for an angled mirror to flip up out of the way.
If your video shooting style is more on-the-go, like that of a daily vlogger or travel vlogger, the smaller size and lighter weight of a mirrorless camera may be more suitable for you.
Previewing Images
When you’re using a DSLR camera, your optical viewfinder will show you exactly what your camera sees as opposed to a digital preview of what your image sensor picks up. No matter how bright or dark your scene actually is, through the optical viewfinder, you’ll be able to clearly see what your camera sees with the power of your eye.
Mirrorless cameras, on the other hand, display on your camera’s screen or electronic viewfinder a digital preview of what your camera is looking at. You will notice a lag, especially in low light, between actions that are taking place in front of the camera and the same actions being displayed in your live preview.
Lenses and Accessories
Having been around much longer, there are plenty more options for lenses and accessories when it comes to shooting with DSLR cameras. You can choose from all kinds of different quality levels and price ranges.
Video Resolution
4K video recording is more readily available in mirrorless cameras than DSLR cameras. At a much more affordable budget, you can get your hands on a 4K mirrorless camera. If you want to shoot 4K video on a DSLR camera, though, you will have to pay for some of the most expensive DSLR cameras on the market.
Image Stabilization
Up until quite recently, you needed to get the right lens with built-in optical image stabilization if you wanted to shoot stabilized photos and videos with an interchangeable lens camera. Image stabilization had not been readily available in the bodies of these cameras.
In recent years, however, mirrorless cameras have been much more active in their development of camera bodies equipped with shifting image sensors. Your shots can be even more stabilized when the optical image stabilization of your lens is combined with your camera’s in-body sensor-shift image stabilization.
Battery Life
When it comes to shooting video, DSLR cameras and mirrorless cameras consume about the same amount of power. It’s still safe to say, though, that DSLR cameras, for the most part, have better battery life than mirrorless cameras because their bigger batteries are packed with more power.
Mirrorless vs. DSLR - Which One is Better for Video?
In my opinion, when it comes to filming a video, mirrorless cameras are the way to go. In such a short time, mirrorless cameras have made huge leaps in their capabilities. It won’t be long before the ultimate vlogging camera comes out on the mirrorless market.
In the end, if you need to edit videos futhermore, try Filmora video editor . It’s a video editor which has significantly improved overall performance, making the product faster, and more powerful, and taking the user editing experience to a new level.
It is perfect for helping beginners, and intermediate users create stylish videos by providing an intuitive user interface and built-in effects.
![]()
Richard Bennett
Richard Bennett is a writer and a lover of all things video.
Follow @Richard Bennett
Also read:
- [New] 2024 Approved Perfecting the Art of Photo Mosaic Creation
- [New] 2024 Approved Professional GoPro Filming Made Simple A Comprehensive Guide
- [New] How To Remove Background Noise From Your Youtube Video
- [New] Top 10 Sci-Fi Metaverse Movies Take You to a Brand New World
- [Updated] Melodic Memberships Leading Online Hubs for GoT Ringtone Purchases
- 2024 Approved How to Address and Overcome a YouTube Content ID Issue
- 2024 Approved The Infographic Yearbook of 2017'S Youtube Insights & Trends
- 2024 Approved Thriving on YouTube The Guide to Affiliates
- 2024 Approved YouTube's Easy Guide to Exceptional Thumbnails
- Elevate Your Channel's Popularity with 12 Key Growth Techniques for 2024
- In 2024, Seamless Browsing? Try These 7 Android AdBlockers
- In 2024, Techno Titans Earnings Forecast on Gaming Channels
- In 2024, The Simple Steps for Merging YouTube Media Files
- Optimize Your Gaming: Download & Update NVIDIA's GeForce RTX 3070 Driver on Windows Platforms
- The Ultimate Guide to Get the Rare Candy on Pokemon Go Fire Red On Oppo K11x | Dr.fone
- Title: 2024 Approved Swift Channels Growth Optimizing Viewership with Collaborative Videos
- Author: Joseph
- Created at : 2024-11-11 00:50:15
- Updated at : 2024-11-15 10:30:14
- Link: https://youtube-stream.techidaily.com/2024-approved-swift-channels-growth-optimizing-viewership-with-collaborative-videos/
- License: This work is licensed under CC BY-NC-SA 4.0.