
"2024 Approved Subtle Techniques Make Unwanted Backgrounds Disappear in Videos"
Subtle Techniques: Make Unwanted Backgrounds Disappear in Videos
How to Blur Background of Your YouTube Video

Richard Bennett
Mar 27, 2024• Proven solutions
A lot of YouTubers like to vlog in front of blurred backgrounds. Blurring the background of your YouTube video is a fast way to make it look more professional – you stand out when you are entirely in focus, and everything behind you is blurry. Plus, it is an easy way to disguise the room you are vlogging from.

Even if your set is clean, there could be things like books behind you, which will distract viewers; they will be trying to read the spines. Blurring out the background of your shot makes your video look polished and keeps people’s focus entirely on you.
- Part 1: Blur YouTube Video Background in Shooting Videos
- Part 2: Add Tilt-Shift Effects to Video in Editing
Part 1: How to Blur Background of Your YouTube Video in Shooting Videos
Blurring your background is also how you create a beautiful bokeh lighting effect. Bokeh is when you blur lights in the background of your shot, creating halo-like circles of light. By attaching a filter with a shape cut out to the camera lens, you can even generate bokeh lights in other shapes, like hearts or stars.
Aperture refers to the hole in your lens which allows light into your camera. A narrow aperture lets in less light, and a wide aperture lets in more. The wider your aperture is, the shallower your depth of field will be. Widening your aperture also helps your camera perform better in low-light situations. Widening your aperture too much under the wrong circumstances can let in too much light and result in your footage being overexposed.
Depth of Field is the area of your image that is in focus. If you have a large depth of field, then objects close to and far away from your camera will all be in focus. Only a select area will be focused and the rest will be blurred if you have a shallow depth of field.
F-Stops are the measurement of an aperture’s width. The higher your f-stop, the narrower your aperture will be. To create a blurred background or a bokeh effect, you need a wide aperture, and thus a small f-stop. F-stops are written like ‘f/1.4’. You need an f-stop of less than f/4 to blur your background, and less than f/2.8 for bokeh.
1. Blurring and Bokeh
Blurred backgrounds and bokeh are very closely related. A bokeh effect is essentially a blurred background that includes lights.
To achieve a blurred background or a bokeh effect, you need to have a shallow depth of field. That means a wide aperture and a low f-stop.
2. How to Blur your Background
Place your subject – in the case of a vlog, your subject is probably yourself – in a shallow depth of field, and they will remain sharply in focus while everything behind them is blurred.
If the subject is yourself, you might need a helper to either operate your camera or stand in for you while you set up your camera. You will need to be able to check that the place you plan to stand or sit is in focus.
To get a shallow depth of field, make sure your aperture is wide. Do this by setting a low f-stop. Ideally, your f-stop will be 2.8 or lower, but if your camera cannot go that low, then f/3 or f/4 can also work.
Creating a bokeh effect is mostly the same, except that it works best when your subject/depth of field is very close to the camera, and you have a light source off in the background. Zoom Lenses do not usually have wide enough apertures to create bokeh backgrounds.
Blur Video Background in Post-Production with Wondershare Filmora Video Editor
If you need to blur the video background after shooting, you can use some video editing software to add the bokeh effect or the tilt-off effect in post-production. Here, I will show you how to do that in Filmora.
Filmora is one of the most widely used video editing software among YouTubers. Its user-friendly interface and tutorial guide enables green-hands to start video editing quickly. Besides, you can find many free filters, effects, and elements pre-programmed, so you can use them directly without looking for presets and templates somewhere else.
1. Add Bokeh Filter to Video in Filmora
There are about 20 bokeh effects available in filters and overlays. You can find them easily by typing bokeh in the search bar in Effects.
Note: you should select Included to see all bokeh effects pre-programmed in Filmora. If you need more visual effects, just go to the Filmstock effects store.

Double click the bokeh effect to preview the result, and if you find the bokeh effect fits the video, just drop it to the track above the video. And the bokeh filter or overlay will be applied to the video automatically.
2. Use Tilt-Shift Circle/Linear Effect to Blur Video Background
Filmora features two tilt effects, tilt-shift circle and tilt-shift linear, which allows you to highlight people in the video, blur, and conceal the video background.
Go to the Effects tab and then switch to the Utility menu under Included category.

Here, I will select the Tilt-Shift Circle effect and drop it to the track above the video. Now, you can adjust the size, position, and intensity of the tilt-shift circle effect

You see, the video background is blurred, and the people are highlighted. Now it’s your turn to download the Filmora video editor and try it yourself.


Richard Bennett
Richard Bennett is a writer and a lover of all things video.
Follow @Richard Bennett
Richard Bennett
Mar 27, 2024• Proven solutions
A lot of YouTubers like to vlog in front of blurred backgrounds. Blurring the background of your YouTube video is a fast way to make it look more professional – you stand out when you are entirely in focus, and everything behind you is blurry. Plus, it is an easy way to disguise the room you are vlogging from.
Even if your set is clean, there could be things like books behind you, which will distract viewers; they will be trying to read the spines. Blurring out the background of your shot makes your video look polished and keeps people’s focus entirely on you.
- Part 1: Blur YouTube Video Background in Shooting Videos
- Part 2: Add Tilt-Shift Effects to Video in Editing
Part 1: How to Blur Background of Your YouTube Video in Shooting Videos
Blurring your background is also how you create a beautiful bokeh lighting effect. Bokeh is when you blur lights in the background of your shot, creating halo-like circles of light. By attaching a filter with a shape cut out to the camera lens, you can even generate bokeh lights in other shapes, like hearts or stars.
Aperture refers to the hole in your lens which allows light into your camera. A narrow aperture lets in less light, and a wide aperture lets in more. The wider your aperture is, the shallower your depth of field will be. Widening your aperture also helps your camera perform better in low-light situations. Widening your aperture too much under the wrong circumstances can let in too much light and result in your footage being overexposed.
Depth of Field is the area of your image that is in focus. If you have a large depth of field, then objects close to and far away from your camera will all be in focus. Only a select area will be focused and the rest will be blurred if you have a shallow depth of field.
F-Stops are the measurement of an aperture’s width. The higher your f-stop, the narrower your aperture will be. To create a blurred background or a bokeh effect, you need a wide aperture, and thus a small f-stop. F-stops are written like ‘f/1.4’. You need an f-stop of less than f/4 to blur your background, and less than f/2.8 for bokeh.
1. Blurring and Bokeh
Blurred backgrounds and bokeh are very closely related. A bokeh effect is essentially a blurred background that includes lights.
To achieve a blurred background or a bokeh effect, you need to have a shallow depth of field. That means a wide aperture and a low f-stop.
2. How to Blur your Background
Place your subject – in the case of a vlog, your subject is probably yourself – in a shallow depth of field, and they will remain sharply in focus while everything behind them is blurred.
If the subject is yourself, you might need a helper to either operate your camera or stand in for you while you set up your camera. You will need to be able to check that the place you plan to stand or sit is in focus.
To get a shallow depth of field, make sure your aperture is wide. Do this by setting a low f-stop. Ideally, your f-stop will be 2.8 or lower, but if your camera cannot go that low, then f/3 or f/4 can also work.
Creating a bokeh effect is mostly the same, except that it works best when your subject/depth of field is very close to the camera, and you have a light source off in the background. Zoom Lenses do not usually have wide enough apertures to create bokeh backgrounds.
Blur Video Background in Post-Production with Wondershare Filmora Video Editor
If you need to blur the video background after shooting, you can use some video editing software to add the bokeh effect or the tilt-off effect in post-production. Here, I will show you how to do that in Filmora.
Filmora is one of the most widely used video editing software among YouTubers. Its user-friendly interface and tutorial guide enables green-hands to start video editing quickly. Besides, you can find many free filters, effects, and elements pre-programmed, so you can use them directly without looking for presets and templates somewhere else.
1. Add Bokeh Filter to Video in Filmora
There are about 20 bokeh effects available in filters and overlays. You can find them easily by typing bokeh in the search bar in Effects.
Note: you should select Included to see all bokeh effects pre-programmed in Filmora. If you need more visual effects, just go to the Filmstock effects store.
Double click the bokeh effect to preview the result, and if you find the bokeh effect fits the video, just drop it to the track above the video. And the bokeh filter or overlay will be applied to the video automatically.
2. Use Tilt-Shift Circle/Linear Effect to Blur Video Background
Filmora features two tilt effects, tilt-shift circle and tilt-shift linear, which allows you to highlight people in the video, blur, and conceal the video background.
Go to the Effects tab and then switch to the Utility menu under Included category.
Here, I will select the Tilt-Shift Circle effect and drop it to the track above the video. Now, you can adjust the size, position, and intensity of the tilt-shift circle effect
You see, the video background is blurred, and the people are highlighted. Now it’s your turn to download the Filmora video editor and try it yourself.
Richard Bennett
Richard Bennett is a writer and a lover of all things video.
Follow @Richard Bennett
Innovative Approaches to Live Broadcasting on Youtube with WireCast
How to live stream to youtube with wirecast?
Richard Bennett
Mar 27, 2024• Proven solutions
Are you trying to use wirecast to stream to youtube? You are in the right place, here is our step by step guide to go live on youtube with wirecast.
Step 1: First of all you need to login to your YouTube Creator Studio and then select Live Streaming option from available options on your screen.
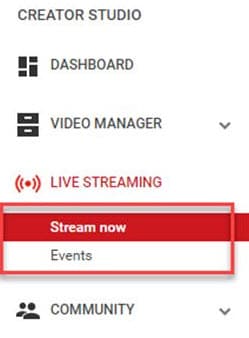
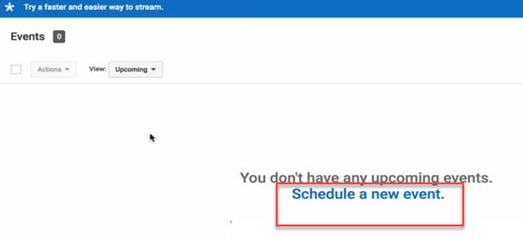
Step 2: Once you enter into the live streaming option then your application will ask you to schedule a new event; follow this option.
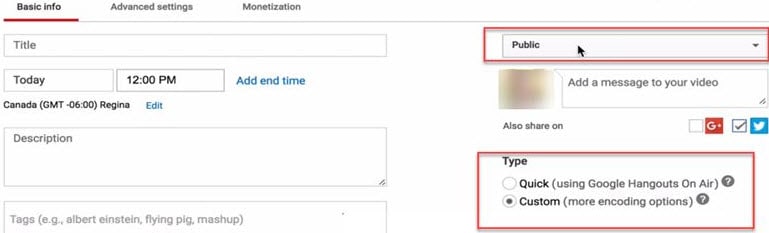
Step 3: Now you need to enter few basic details about your video that you are going to live stream. Do not forget to choose custom option under the Type category available on bottom right side of screen.
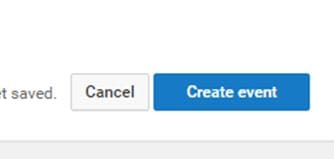
Step 4: It is time to hit the create event option.
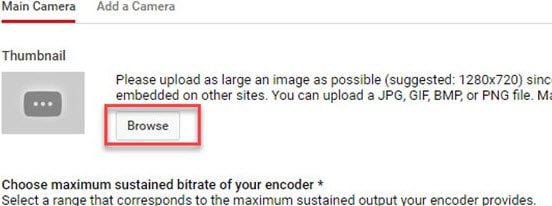
Step 5: Your system will now take you to the camera settings; here you need to enter your thumbnail. It can be done directly by using browse option.
Step 6: Now you need to select ‘basic ingestion’ option and secondly select ‘other encoders’ option from second set of information.

Step 7: Once you have completed above settings then you need to save all the changes and then move to the live control room on your screen.
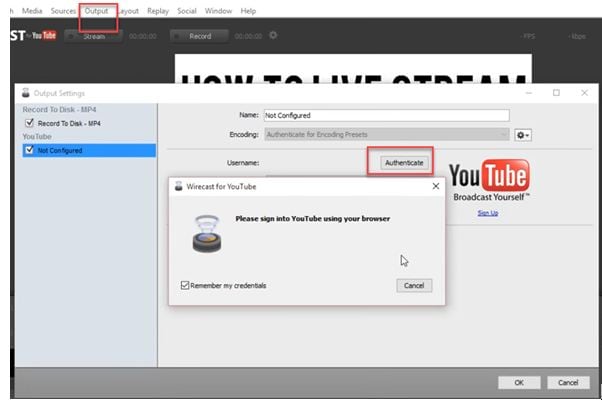
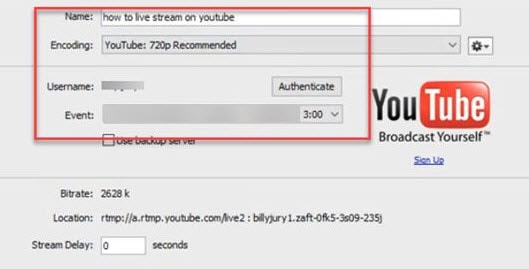
Step 8: Open the wirecast software tool on your device and then simply move to the output settings. Hit the authenticate option, it will soon ask you to enter the YouTube login detail.
Step 9: As soon as you sign in with your account using browser, then your settings will be ready on screen. Simply hit Ok.
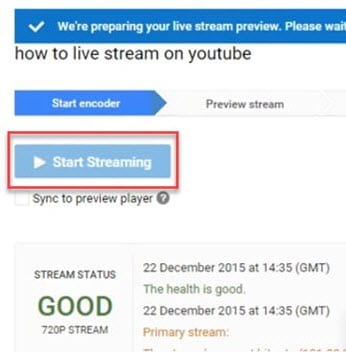
Step 10: It is time to make your video source or content ready for streaming. You need to hit on the stream button that is available on top portion of screen.

Step 11: Now simply move to the YouTube event page and start streaming your content.
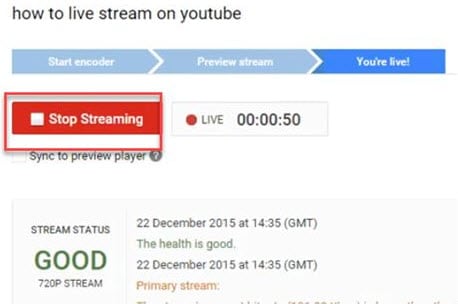
Step 12: Once you content for streaming is finished then click the stop streaming button that appears in red color on screen. You will also get information about duration of your video that is going live.
Step 13: When your streaming process ends then video will be saved to video manager. You can view it easily at later stage.
Richard Bennett
Richard Bennett is a writer and a lover of all things video.
Follow @Richard Bennett
Richard Bennett
Mar 27, 2024• Proven solutions
Are you trying to use wirecast to stream to youtube? You are in the right place, here is our step by step guide to go live on youtube with wirecast.
Step 1: First of all you need to login to your YouTube Creator Studio and then select Live Streaming option from available options on your screen.
Step 2: Once you enter into the live streaming option then your application will ask you to schedule a new event; follow this option.
Step 3: Now you need to enter few basic details about your video that you are going to live stream. Do not forget to choose custom option under the Type category available on bottom right side of screen.
Step 4: It is time to hit the create event option.
Step 5: Your system will now take you to the camera settings; here you need to enter your thumbnail. It can be done directly by using browse option.
Step 6: Now you need to select ‘basic ingestion’ option and secondly select ‘other encoders’ option from second set of information.
Step 7: Once you have completed above settings then you need to save all the changes and then move to the live control room on your screen.
Step 8: Open the wirecast software tool on your device and then simply move to the output settings. Hit the authenticate option, it will soon ask you to enter the YouTube login detail.
Step 9: As soon as you sign in with your account using browser, then your settings will be ready on screen. Simply hit Ok.
Step 10: It is time to make your video source or content ready for streaming. You need to hit on the stream button that is available on top portion of screen.
Step 11: Now simply move to the YouTube event page and start streaming your content.
Step 12: Once you content for streaming is finished then click the stop streaming button that appears in red color on screen. You will also get information about duration of your video that is going live.
Step 13: When your streaming process ends then video will be saved to video manager. You can view it easily at later stage.
Richard Bennett
Richard Bennett is a writer and a lover of all things video.
Follow @Richard Bennett
Also read:
- [New] 2024 Approved Complete Examination ScreenFlow Full Features for Mac
- [New] Get Free Stock Footage From These 4 YouTube Channels
- [New] Google Meet Broadcast Simplified YouTube Steps
- [Updated] In 2024, Engage & Learn Students' Choice of Best Historical YouTubes
- 2024 Approved Filmora's Blueprint for Stellar YouTube Trailers
- 2024 Approved Safari/Chrome YouTube On-the-Move AutoPlay Options
- 2024 Approved Top Content Pioneers Assembly
- In 2024, How to Stop Google Chrome from Tracking Your Location On Nokia G22? | Dr.fone
- In 2024, Optimizing Privacy for Your Online Videography
- In 2024, Ultimate Brain Challenge - Top Trivia Networks for '24
- In-Depth Review of Apple Studio Display: Specifications, Capabilities & Essential Insights | TechRadar
- Top 7 Decisions to Make Before Acquiring a WIndows Model
- Top Apps and Online Tools To Track HTC U23 Pro Phone With/Without IMEI Number
- Unleashing Potential in a Small Package: Four Gigabit LAN Ports Complement the Intel Raptor CPU Inside Energy-Efficient MSI's MS-C90
- Title: 2024 Approved Subtle Techniques Make Unwanted Backgrounds Disappear in Videos
- Author: Joseph
- Created at : 2025-01-26 00:29:45
- Updated at : 2025-01-29 17:41:14
- Link: https://youtube-stream.techidaily.com/2024-approved-subtle-techniques-make-unwanted-backgrounds-disappear-in-videos/
- License: This work is licensed under CC BY-NC-SA 4.0.