
:max_bytes(150000):strip_icc()/GettyImages-459017673-f192a5b0281140139f5ebf5f81a6694f.jpg)
"2024 Approved Strategizing for Successful YouTube Ad Sponsorships with FameBit"
Strategizing for Successful YouTube Ad Sponsorships with FameBit
How to Find YouTube Sponsorships by Using FameBit

Richard Bennett
Oct 26, 2023• Proven solutions
FameBit is one of the leading influencer marketing platforms.
Creators use FameBit to earn money by creating branded content. Businesses use FameBit to find the perfect video creators – or ‘digital influencers’ – to help with their marketing campaigns.
Until your channel is huge it is difficult to make a significant amount of money through ad revenue on YouTube. Creating branded content is one way in which YouTubers with small or mid-sized channels can generate income.
Finding sponsorships and negotiating with brands can be tricky. So can integrating products and brand messages in your videos without making your audience feel like you have ‘sold out’. This guide will help.
You must have at least 5,000 subscribers to join FameBit.

How Much Money Can You Make
How much money you can make on FameBit will depend on the deals you can negotiate with brands, and those deals will depend on how many subscribers you have and how many views you usually receive .
When calculating your fee, FameBit suggests thinking of it in terms of ‘cost per view’ (CPV). Most creators on FameBit charge between $0.05 and $0.10 per view. If you charge $0.05 per view and you get an average of 10,000 views per video then you would charge a brand $500 for your services.
How much you should charge per view depends on your genre and the nature of your audience. If you often mention products you like in videos and your subscribers have come to trust your recommendations, then it makes sense for you to charge more per view than a creator whose audience will be less receptive to product placement.
For example, if you do makeup tutorials then viewers will be used to hearing about your favorites. This makes your 10 000 views more valuable than 10 000 views on a ranting vlog channel whose subscribers are not tuning in to hear about products.
How to Make Money With FameBit
Finding Sponsorships
Brands post details about their upcoming campaigns, and the types of creators they are interested in working with, on FameBit.
While you are browsing through the available campaigns, think of the types of brands you would be excited to work with as well as which ones make sense for your channel.
If you host a lifestyle vlog about staying healthy, for example, and there is an opportunity to work with a brand that sells a type of healthy snack then it is your responsibility to look into the company and the product before you sign on to work with them. Is the snack healthy, and do you enjoy it?
Ideally, you will want to find brands that share your values and which are selling products you feel good about recommending to your subscribers.
Once you find a few campaigns you are interested in creating videos for, it’s time to write your proposals and negotiate with your potential sponsors.
Negotiating with Sponsors
When you want to be part of a campaign a brand has posted, you send them a proposal.
Be creative and detailed in the proposals you write. The best brands will value you for our ideas and creativity, and this will give you an edge over creators who put less effort into their pitches. You also want to be detailed because you do not want to risk having a disagreement with the brand based on them misunderstanding what you were going to do.
Sometimes brands will have very specific things they want you to do or say in the video you make for them. It is your job to find ways of doing and saying these things that still feel natural within the context of your videos. On YouTube, even when you are representing a brand, you need to be authentically you.
If you feel like the things a brand wants from you will make your video come across as a tacky commercial and offend your loyal subscribers, and you cannot see a creative way around this, bring it up before you agree to work with them. Explain what you think should happen instead. If they are not willing to compromise, do not agree to work with them. Find a more reasonable brand to partner with.
If you offend your subscribers and they stop watching you then your channel will become less valuable to other potential sponsors. In the long run, there is no upside to agreeing to do a video that makes no sense for your channel.
Remember that even brands that like your ideas and get excited about your proposals will not be able to work with you if you do not meet their requirements in terms of subscribers and average views. There are a lot of campaigns on FameBit which are open to small or mid-sized channels, but there will always be minimum requirements. It makes no sense for a brand to pay you to make a video nobody will see, even if it is an amazing video. Sad, but true.
How to Avoid Alienating Your Audience
Some of your subscribers will resent any branded content you create and there is no way around that. These subscribers will be in the minority – most people understand that accepting sponsorship from brands helps their favorite YouTubers continue making great videos – but it is unavoidable that there will be a few.
Most of your subscribers will not be bothered by the idea of you partnering with a brand, so long as you go about it in the right way.
Firstly; be honest about your sponsorship. Do not pretend to be giving an objective opinion on a product when the company who makes it is paying you. Your viewers will know and they will be offended.
Secondly; incorporate the brand’s message or product into your videos in ways that feel natural. Do not stray too far from your usual video style. Ultimately every video you make, even branded content, is for your viewers. Make the kind of video they expect from you and mention the product or service you have agreed to in a place where it makes sense/is on topic.
You want the branding in your videos to be subtle, but you never want to hide that it is there.
So long as you are honest and the more commercial elements of your video are not distracting, the vast majority of your subscribers – the ones you have built a real relationship with – will not mind.
Custom Videos with Awesome Video Editor


Richard Bennett
Richard Bennett is a writer and a lover of all things video.
Follow @Richard Bennett
Richard Bennett
Oct 26, 2023• Proven solutions
FameBit is one of the leading influencer marketing platforms.
Creators use FameBit to earn money by creating branded content. Businesses use FameBit to find the perfect video creators – or ‘digital influencers’ – to help with their marketing campaigns.
Until your channel is huge it is difficult to make a significant amount of money through ad revenue on YouTube. Creating branded content is one way in which YouTubers with small or mid-sized channels can generate income.
Finding sponsorships and negotiating with brands can be tricky. So can integrating products and brand messages in your videos without making your audience feel like you have ‘sold out’. This guide will help.
You must have at least 5,000 subscribers to join FameBit.
How Much Money Can You Make
How much money you can make on FameBit will depend on the deals you can negotiate with brands, and those deals will depend on how many subscribers you have and how many views you usually receive .
When calculating your fee, FameBit suggests thinking of it in terms of ‘cost per view’ (CPV). Most creators on FameBit charge between $0.05 and $0.10 per view. If you charge $0.05 per view and you get an average of 10,000 views per video then you would charge a brand $500 for your services.
How much you should charge per view depends on your genre and the nature of your audience. If you often mention products you like in videos and your subscribers have come to trust your recommendations, then it makes sense for you to charge more per view than a creator whose audience will be less receptive to product placement.
For example, if you do makeup tutorials then viewers will be used to hearing about your favorites. This makes your 10 000 views more valuable than 10 000 views on a ranting vlog channel whose subscribers are not tuning in to hear about products.
How to Make Money With FameBit
Finding Sponsorships
Brands post details about their upcoming campaigns, and the types of creators they are interested in working with, on FameBit.
While you are browsing through the available campaigns, think of the types of brands you would be excited to work with as well as which ones make sense for your channel.
If you host a lifestyle vlog about staying healthy, for example, and there is an opportunity to work with a brand that sells a type of healthy snack then it is your responsibility to look into the company and the product before you sign on to work with them. Is the snack healthy, and do you enjoy it?
Ideally, you will want to find brands that share your values and which are selling products you feel good about recommending to your subscribers.
Once you find a few campaigns you are interested in creating videos for, it’s time to write your proposals and negotiate with your potential sponsors.
Negotiating with Sponsors
When you want to be part of a campaign a brand has posted, you send them a proposal.
Be creative and detailed in the proposals you write. The best brands will value you for our ideas and creativity, and this will give you an edge over creators who put less effort into their pitches. You also want to be detailed because you do not want to risk having a disagreement with the brand based on them misunderstanding what you were going to do.
Sometimes brands will have very specific things they want you to do or say in the video you make for them. It is your job to find ways of doing and saying these things that still feel natural within the context of your videos. On YouTube, even when you are representing a brand, you need to be authentically you.
If you feel like the things a brand wants from you will make your video come across as a tacky commercial and offend your loyal subscribers, and you cannot see a creative way around this, bring it up before you agree to work with them. Explain what you think should happen instead. If they are not willing to compromise, do not agree to work with them. Find a more reasonable brand to partner with.
If you offend your subscribers and they stop watching you then your channel will become less valuable to other potential sponsors. In the long run, there is no upside to agreeing to do a video that makes no sense for your channel.
Remember that even brands that like your ideas and get excited about your proposals will not be able to work with you if you do not meet their requirements in terms of subscribers and average views. There are a lot of campaigns on FameBit which are open to small or mid-sized channels, but there will always be minimum requirements. It makes no sense for a brand to pay you to make a video nobody will see, even if it is an amazing video. Sad, but true.
How to Avoid Alienating Your Audience
Some of your subscribers will resent any branded content you create and there is no way around that. These subscribers will be in the minority – most people understand that accepting sponsorship from brands helps their favorite YouTubers continue making great videos – but it is unavoidable that there will be a few.
Most of your subscribers will not be bothered by the idea of you partnering with a brand, so long as you go about it in the right way.
Firstly; be honest about your sponsorship. Do not pretend to be giving an objective opinion on a product when the company who makes it is paying you. Your viewers will know and they will be offended.
Secondly; incorporate the brand’s message or product into your videos in ways that feel natural. Do not stray too far from your usual video style. Ultimately every video you make, even branded content, is for your viewers. Make the kind of video they expect from you and mention the product or service you have agreed to in a place where it makes sense/is on topic.
You want the branding in your videos to be subtle, but you never want to hide that it is there.
So long as you are honest and the more commercial elements of your video are not distracting, the vast majority of your subscribers – the ones you have built a real relationship with – will not mind.
Custom Videos with Awesome Video Editor
Richard Bennett
Richard Bennett is a writer and a lover of all things video.
Follow @Richard Bennett
Premier Screen Capture Device: Essential for Video Sharers
Best Screen Recorder for YouTube
Richard Bennett
Mar 27, 2024• Proven solutions
Taking viewers ‘in app’ is an effective way to show them how you work or play. A screen recording is a footage recorded not from your camera, but directly from the interface of your computer or mobile device. A screen recording might be footage from a game, a software tutorial, or a demonstration of your creative process in a program.
We have picked up the best 10 paid screen recorders for YouTube on Windows and Mac, but if you are looking for a complete solution to record videos on Windows, Mac, Android or iOS phone to make tutorial videos, how-to videos, or demonstration videos, or products/software review videos, or gameplay videos on YouTube, here is the all the information you need. This article will introduce you to the best screen recorders on computers, Android devices, and iPhones for YouTube.
- Part 1: Best Screen Recording Software for Recording Windows/Mac Screen for YouTube
- Part 2: Best Screen Capturing Apps for Recording Your Android Screen (No Root)
- Part 3: Best Screen Recording Apps for Recording on iOS Devices for YouTube Videos
Part 1: Best Software for Recording Your Computer Screen for YouTube Videos
1.Filmora Video Editor [Windows & Mac, Freemium]
In addition to being a powerful editing tool, Filmora can also be used to record your computer screen. In Filmora, just select Media and then Record. In the Record menu, click Record PC Screen. The recording window will pop up and you will be able to decide whether you want to record your full screen, a customized selection of it, or a specific target window. After you have finished recording your clip will automatically appear in the Media menu in your Filmora project so you can edit it right away. You can download Filmora from Filmora.wondershare.com if you do not have it yet.
If you just want to make a how-to video with some captured screens, Filmora will be a good choice. Check the video below about how to record Screen with Filmora.
2.Wondershare DemoCreator
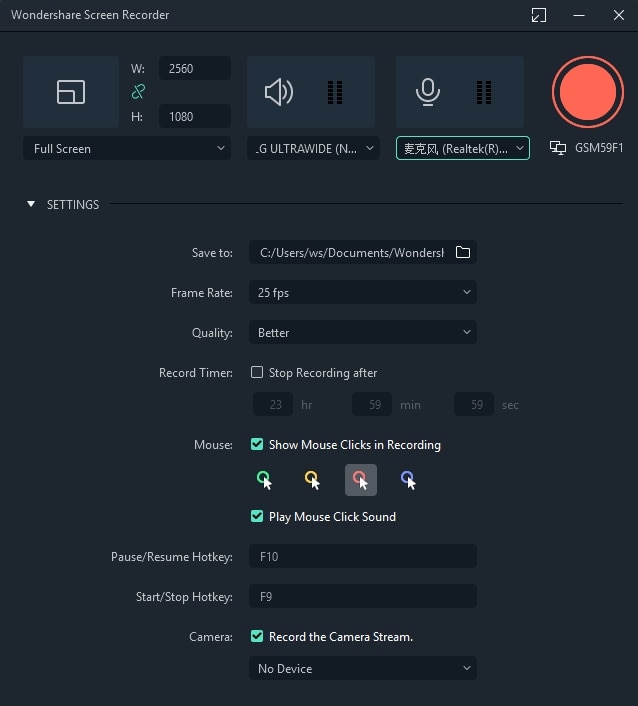
DemoCreator is a specially designed screen recording software from Wondershare for both gameplay recording, tutorial making, screen capturing, and webcam recording as well. You can use it to record the full screen of your Windows or Mac computer or a particular part on the screen. The best part is that you can both record and edit the video in DemoCreator and upload it to YouTube directly. This screen recorder for YouTube is a perfect solution for those who want to capture 120 frames per second and 4K videos.
3.VLC Media Player [Windows & Mac & Linux, Free]
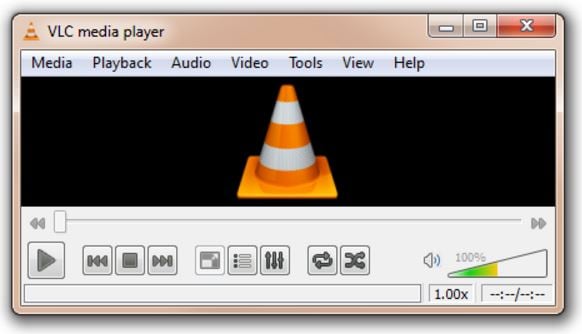
VLC Media Player is a free media player that has a great screen recording feature. You can download it from Video LAN.org. In order to take a screen recording using VLC you first need to click on View and Advanced Controls. A lot of the more advanced features, like screen recording, are initially hidden so as not to confuse users, but selecting Advanced Controls will make them visible. Then you can go to Media and Open Capture Device. In the window that opens choose Desktop next to Capture Mode and click Play. VLC will start displaying your desktop in the player window. Now you just have to click Record.
Learn more details about how to record YouTube videos with VLC
4.QuickTime [Mac, Free]

QuickTime is the default media player for Mac users. To access QuickTime’s screen recording feature select File and New Screen Recording. In the window that pops up click on the arrow next to the Record button and choose a microphone. Then you can press Record. Your recording will not start right away. First, a window will pop up explaining that you can stop your recording by pressing ‘command-control-escape’. Although QuickTime is available for PCs the PC version does not have a screen recording feature.
Learn more details about how to record YouTube video and audio with QuickTime Player on Mac
Part 2: Recording Your Android Screen for YouTube Videos (No Root)
We have already described 4 ways of recording screen videos on Android , while in this part, we will introduce some useful screen recording apps for recording YouTube videos on Android phones.
1. AZ Screen Recorder
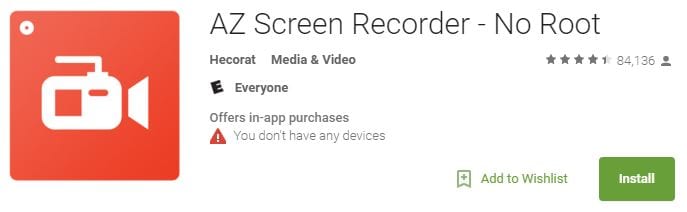
AZ Screen Recorder is free screen recording app for Android 5.0 Lollipop. Using AZ Screen Recorder you can simultaneously record from your phone’s camera and screen. This is useful if you want to shoot a video of yourself explaining an app to add into your final video. Although the basic version of AZ Screen Recorder is free there are in-app purchases.
2.Unlimited Screen Recorder
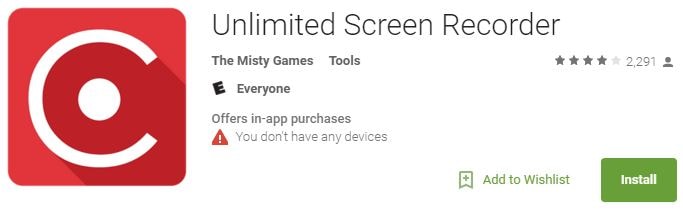
Unlimited Screen Recorder is also for 5.0 Lollipop and is free with in-app purchases. Like the name ‘Unlimited’ suggests you can use this app to record for as long as you want. There is no time limit. You can also record audio through Unlimited Screen Recorder so it is convenient to make a voiceover for your video.
There are very few options available for recording Android devices older than Lollipop without rooting your device.
Click here to check more screen recording apps to capture videos on Android
Part 3: Recording Your iOS Device Screen for YouTube Videos
With the release of iOS 11, recording on iPhone and iPad is much easier with the built-in screen recording tool . If your iOS is above 11 (including 11) version, you can record the screen with its in-app application, check this video to know the details:
Apart from recording with the built-in recording tool, you can also use some best iOS screen recording apps to record YouTube videos, or use some mirror software to record iPhone/iPad on Windows and Mac and create a YouTube video.
1.QuickTime
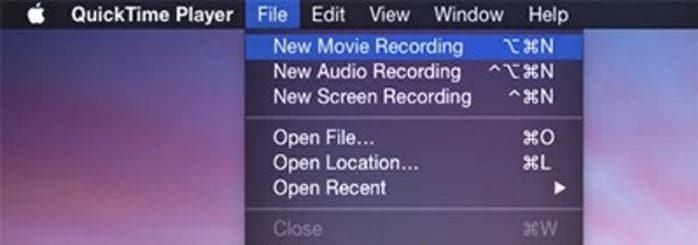
QuickTime can be used to record the screen of your iPhone or iPad in addition to the screen of your Mac. First you need to connect your device to your computer with a USB port. Instead of selecting ‘New Screen Recording’ in QuickTime, the way you would when recording your computer screen, select ‘New Movie Recording’. In the recording window click on the arrow next to the ‘Record’ button and choose your iOS device where it asks you to choose a camera. This method only works with the Mac version of QuickTime.
2.Reflector
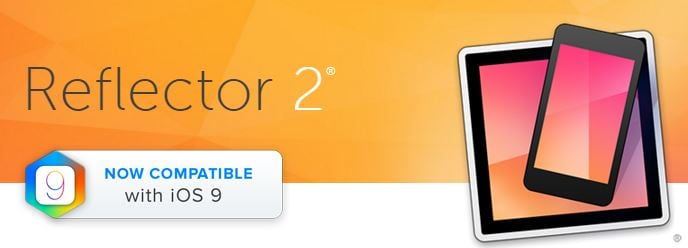
Reflector is mirroring software available for Mac or PC. Mirroring software creates a clone of your device’s interface on your computer screen. Once your device is being displayed on the screen of your computer you can capture it by recording your computer screen. You can download Reflector from Airsquirrels.com.
In order to use Reflector to mirror your device, you will also need to use AirPlay on your iPhone or iPad, and your device and your computer will need to be connected to the same wifi network. In AirPlay, make sure mirroring is on and select your computer as a receiver. Your computer will not show up as an option if you do not have Reflector running.
Conclusion
Above are the screen and video recording software programs that we picked up for you to make a YouTube tutorial, how-to or software review video on most popular platforms including Windows and Mac computer and Android and iOS smartphones. Besides recording, you may also need thebest video editing software for editing YouTube videos . Watch the video tutorial to check how to edit your YouTube videos and get to know some terms in video editing. Remember to download Filmora and have a try today.
Richard Bennett
Richard Bennett is a writer and a lover of all things video.
Follow @Richard Bennett
Richard Bennett
Mar 27, 2024• Proven solutions
Taking viewers ‘in app’ is an effective way to show them how you work or play. A screen recording is a footage recorded not from your camera, but directly from the interface of your computer or mobile device. A screen recording might be footage from a game, a software tutorial, or a demonstration of your creative process in a program.
We have picked up the best 10 paid screen recorders for YouTube on Windows and Mac, but if you are looking for a complete solution to record videos on Windows, Mac, Android or iOS phone to make tutorial videos, how-to videos, or demonstration videos, or products/software review videos, or gameplay videos on YouTube, here is the all the information you need. This article will introduce you to the best screen recorders on computers, Android devices, and iPhones for YouTube.
- Part 1: Best Screen Recording Software for Recording Windows/Mac Screen for YouTube
- Part 2: Best Screen Capturing Apps for Recording Your Android Screen (No Root)
- Part 3: Best Screen Recording Apps for Recording on iOS Devices for YouTube Videos
Part 1: Best Software for Recording Your Computer Screen for YouTube Videos
1.Filmora Video Editor [Windows & Mac, Freemium]
In addition to being a powerful editing tool, Filmora can also be used to record your computer screen. In Filmora, just select Media and then Record. In the Record menu, click Record PC Screen. The recording window will pop up and you will be able to decide whether you want to record your full screen, a customized selection of it, or a specific target window. After you have finished recording your clip will automatically appear in the Media menu in your Filmora project so you can edit it right away. You can download Filmora from Filmora.wondershare.com if you do not have it yet.
If you just want to make a how-to video with some captured screens, Filmora will be a good choice. Check the video below about how to record Screen with Filmora.
2.Wondershare DemoCreator
DemoCreator is a specially designed screen recording software from Wondershare for both gameplay recording, tutorial making, screen capturing, and webcam recording as well. You can use it to record the full screen of your Windows or Mac computer or a particular part on the screen. The best part is that you can both record and edit the video in DemoCreator and upload it to YouTube directly. This screen recorder for YouTube is a perfect solution for those who want to capture 120 frames per second and 4K videos.
3.VLC Media Player [Windows & Mac & Linux, Free]
VLC Media Player is a free media player that has a great screen recording feature. You can download it from Video LAN.org. In order to take a screen recording using VLC you first need to click on View and Advanced Controls. A lot of the more advanced features, like screen recording, are initially hidden so as not to confuse users, but selecting Advanced Controls will make them visible. Then you can go to Media and Open Capture Device. In the window that opens choose Desktop next to Capture Mode and click Play. VLC will start displaying your desktop in the player window. Now you just have to click Record.
Learn more details about how to record YouTube videos with VLC
4.QuickTime [Mac, Free]
QuickTime is the default media player for Mac users. To access QuickTime’s screen recording feature select File and New Screen Recording. In the window that pops up click on the arrow next to the Record button and choose a microphone. Then you can press Record. Your recording will not start right away. First, a window will pop up explaining that you can stop your recording by pressing ‘command-control-escape’. Although QuickTime is available for PCs the PC version does not have a screen recording feature.
Learn more details about how to record YouTube video and audio with QuickTime Player on Mac
Part 2: Recording Your Android Screen for YouTube Videos (No Root)
We have already described 4 ways of recording screen videos on Android , while in this part, we will introduce some useful screen recording apps for recording YouTube videos on Android phones.
1. AZ Screen Recorder
AZ Screen Recorder is free screen recording app for Android 5.0 Lollipop. Using AZ Screen Recorder you can simultaneously record from your phone’s camera and screen. This is useful if you want to shoot a video of yourself explaining an app to add into your final video. Although the basic version of AZ Screen Recorder is free there are in-app purchases.
2.Unlimited Screen Recorder
Unlimited Screen Recorder is also for 5.0 Lollipop and is free with in-app purchases. Like the name ‘Unlimited’ suggests you can use this app to record for as long as you want. There is no time limit. You can also record audio through Unlimited Screen Recorder so it is convenient to make a voiceover for your video.
There are very few options available for recording Android devices older than Lollipop without rooting your device.
Click here to check more screen recording apps to capture videos on Android
Part 3: Recording Your iOS Device Screen for YouTube Videos
With the release of iOS 11, recording on iPhone and iPad is much easier with the built-in screen recording tool . If your iOS is above 11 (including 11) version, you can record the screen with its in-app application, check this video to know the details:
Apart from recording with the built-in recording tool, you can also use some best iOS screen recording apps to record YouTube videos, or use some mirror software to record iPhone/iPad on Windows and Mac and create a YouTube video.
1.QuickTime
QuickTime can be used to record the screen of your iPhone or iPad in addition to the screen of your Mac. First you need to connect your device to your computer with a USB port. Instead of selecting ‘New Screen Recording’ in QuickTime, the way you would when recording your computer screen, select ‘New Movie Recording’. In the recording window click on the arrow next to the ‘Record’ button and choose your iOS device where it asks you to choose a camera. This method only works with the Mac version of QuickTime.
2.Reflector
Reflector is mirroring software available for Mac or PC. Mirroring software creates a clone of your device’s interface on your computer screen. Once your device is being displayed on the screen of your computer you can capture it by recording your computer screen. You can download Reflector from Airsquirrels.com.
In order to use Reflector to mirror your device, you will also need to use AirPlay on your iPhone or iPad, and your device and your computer will need to be connected to the same wifi network. In AirPlay, make sure mirroring is on and select your computer as a receiver. Your computer will not show up as an option if you do not have Reflector running.
Conclusion
Above are the screen and video recording software programs that we picked up for you to make a YouTube tutorial, how-to or software review video on most popular platforms including Windows and Mac computer and Android and iOS smartphones. Besides recording, you may also need thebest video editing software for editing YouTube videos . Watch the video tutorial to check how to edit your YouTube videos and get to know some terms in video editing. Remember to download Filmora and have a try today.
Richard Bennett
Richard Bennett is a writer and a lover of all things video.
Follow @Richard Bennett
- Title: "2024 Approved Strategizing for Successful YouTube Ad Sponsorships with FameBit"
- Author: Joseph
- Created at : 2024-05-31 13:43:08
- Updated at : 2024-06-01 13:43:08
- Link: https://youtube-stream.techidaily.com/2024-approved-strategizing-for-successful-youtube-ad-sponsorships-with-famebit/
- License: This work is licensed under CC BY-NC-SA 4.0.
