"2024 Approved Step by Step Wiping Out YouTube Video Downloads"
Step by Step: Wiping Out YouTube Video Downloads
How to Remove YouTube Videos

Richard Bennett
Mar 27, 2024• Proven solutions
There are quite a few different reasons for which you might want to consider removing your YouTube video. From outdated content to mistakes in editing – the reasons are quite extensive. In the part 1, we will teach you how to remove your own videos on YouTube and things you should note when removing. The part 2 will tell you how to remove the videos from other YouTube channel.
If you need more advanced features like PIP, Green Screen, or audio mixing, check this easy to use and powerful video editor-Wondershare Filmora , and ignite your video by clicks.
 Download Mac Version ](https://tools.techidaily.com/wondershare/filmora/download/ )
You may also like:What is YouTube Creative Commons and How to Use it >>
Part 1: How to Remove YouTube Videos that You’ve Uploaded
You may also like:How to Edit Uploaded YouTube Videos >>
The first thing that we are going to show you is how to remove your own videos. This might be needed if you have uploaded content quite some time ago and it is already outdated. Or, if you have too many videos on your channel and you need to clear up those who aren’t that interesting.
The fact of the matter is that it’s quite easy to remove YouTube videos. The first thing that you would need to do is going ahead and hop on the website and log into your account. Afterwards, you need to go to the “My Channel” option and click on the “Video Manager”.
Upon doing this, a new page is going to pop up, and you are going to see a list of all the videos that you’ve uploaded.

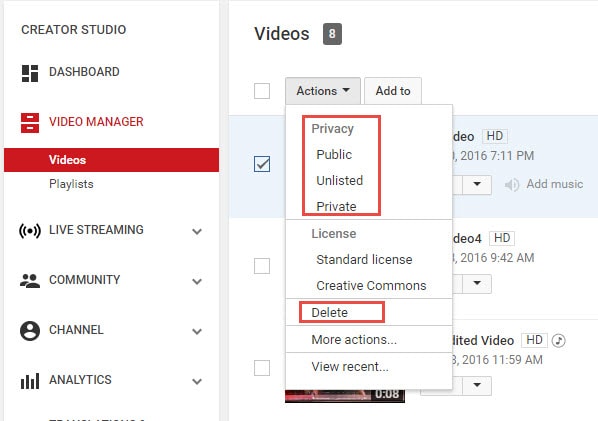
There are little tick boxes on the left side which you can click in order to mark. Mark the videos that you want to edit and click on the “Actions” button on top. There is going to be a drop-down menu, and you can click on the delete option to remove the video permanently. Furthermore, you can also hide the video if you don’t want to delete it but only to hide it away from your subscribers. In order to do so, you should simply click on the Private or Unlisted button.
That’s pretty much it – there’s nothing further to it, and the entire thing is rather comprehensive and easy to carry out, which makes it convenient to go through.
Part 2: How to Remove YouTube Videos on Other Channels
Now that we’ve covered how to remove videos from your own channel, it’s time to dig a little bit deeper. There are certain instances in which you might want to remove YouTube videos from other channels as well. The reasons for this are usually rather personal. For instance – someone has uploaded a video including you or something yours without your consent, and this harms your reputation. Furthermore, it may display sensitive information that you don’t want to reveal to anyone else – the reasons are rather different, but they are related to your own individual privacy which is an important legal right.
You may also like:How to Blur Faces in YouTube Videos >>
The first thing you can do is contact the person who uploaded the video and kindly asks him to remove it using the procedure that we described above. This is going to be the best choice because it’s going to achieve the result quickly and without any hassle. However, in certain cases, the person might not be active, or he might disagree with you and keep the video posted. If that’s the case, you have one option which is likely to be the best alternative.
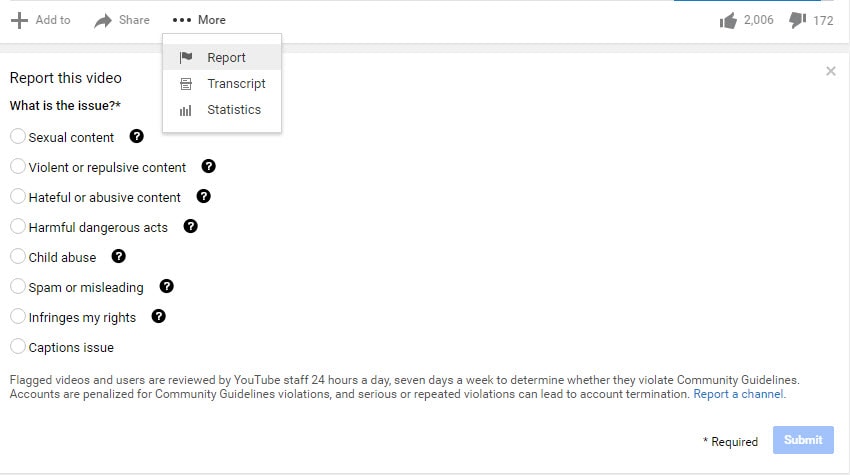
You need to report the video as an inappropriate and flag it with the remark that it’s invading your privacy. This is going to lead you to the page of the YouTube Safety Center. You will have to explain the issue in details in a six-step wizard which extensively asks you about how the video is invasive to your privacy rights. The process is quite comprehensive, and it’s easy to go through. However, you will have to wait for the YouTube support team to assess it and make the decision for the removal.
The truth is that being able to remove YouTube videos is something important that you should be able to do. It’s going to ensure that your channel is perfectly updated, aligned and structured while at the same time making sure that everything is in line with your privacy. YouTube is a powerful website, and you need to be able to stay in control in order to be protected.
Richard Bennett
Richard Bennett is a writer and a lover of all things video.
Follow @Richard Bennett
Richard Bennett
Mar 27, 2024• Proven solutions
There are quite a few different reasons for which you might want to consider removing your YouTube video. From outdated content to mistakes in editing – the reasons are quite extensive. In the part 1, we will teach you how to remove your own videos on YouTube and things you should note when removing. The part 2 will tell you how to remove the videos from other YouTube channel.
If you need more advanced features like PIP, Green Screen, or audio mixing, check this easy to use and powerful video editor-Wondershare Filmora , and ignite your video by clicks.
Download Mac Version ](https://tools.techidaily.com/wondershare/filmora/download/ )
You may also like:What is YouTube Creative Commons and How to Use it >>
Part 1: How to Remove YouTube Videos that You’ve Uploaded
You may also like:How to Edit Uploaded YouTube Videos >>
The first thing that we are going to show you is how to remove your own videos. This might be needed if you have uploaded content quite some time ago and it is already outdated. Or, if you have too many videos on your channel and you need to clear up those who aren’t that interesting.
The fact of the matter is that it’s quite easy to remove YouTube videos. The first thing that you would need to do is going ahead and hop on the website and log into your account. Afterwards, you need to go to the “My Channel” option and click on the “Video Manager”.
Upon doing this, a new page is going to pop up, and you are going to see a list of all the videos that you’ve uploaded.
There are little tick boxes on the left side which you can click in order to mark. Mark the videos that you want to edit and click on the “Actions” button on top. There is going to be a drop-down menu, and you can click on the delete option to remove the video permanently. Furthermore, you can also hide the video if you don’t want to delete it but only to hide it away from your subscribers. In order to do so, you should simply click on the Private or Unlisted button.
That’s pretty much it – there’s nothing further to it, and the entire thing is rather comprehensive and easy to carry out, which makes it convenient to go through.
Part 2: How to Remove YouTube Videos on Other Channels
Now that we’ve covered how to remove videos from your own channel, it’s time to dig a little bit deeper. There are certain instances in which you might want to remove YouTube videos from other channels as well. The reasons for this are usually rather personal. For instance – someone has uploaded a video including you or something yours without your consent, and this harms your reputation. Furthermore, it may display sensitive information that you don’t want to reveal to anyone else – the reasons are rather different, but they are related to your own individual privacy which is an important legal right.
You may also like:How to Blur Faces in YouTube Videos >>
The first thing you can do is contact the person who uploaded the video and kindly asks him to remove it using the procedure that we described above. This is going to be the best choice because it’s going to achieve the result quickly and without any hassle. However, in certain cases, the person might not be active, or he might disagree with you and keep the video posted. If that’s the case, you have one option which is likely to be the best alternative.
You need to report the video as an inappropriate and flag it with the remark that it’s invading your privacy. This is going to lead you to the page of the YouTube Safety Center. You will have to explain the issue in details in a six-step wizard which extensively asks you about how the video is invasive to your privacy rights. The process is quite comprehensive, and it’s easy to go through. However, you will have to wait for the YouTube support team to assess it and make the decision for the removal.
The truth is that being able to remove YouTube videos is something important that you should be able to do. It’s going to ensure that your channel is perfectly updated, aligned and structured while at the same time making sure that everything is in line with your privacy. YouTube is a powerful website, and you need to be able to stay in control in order to be protected.
Richard Bennett
Richard Bennett is a writer and a lover of all things video.
Follow @Richard Bennett
Unleashing Potential: YouTube’s Techniques for Stellar Videos
How to Use YouTube Enhancements
Richard Bennett
Mar 27, 2024• Proven solutions
YouTube has integrated a free video editor to facilitate the work of YouTubers and allow them to process their videos prior to uploading. Although nobody can claim these features can live up to the sophisticated features of the professional video editors, YouTube enhancements are useful and cool which offer a simple way to improve the quality of the videos and do not require any technical knowledge on your behalf.
If you are looking for a more professional approach in video editing, you should try out Wondershare Filmora(for Windows and Mac) . This is an exceptionally versatile and powerful tool, which will allow you to gain full control over the videos you wish to edit. It is very easy to use, and it will open up a new world of potentials in video editing. There is a free trial that you can benefit from, so as to see if Filmora meets your criteria in full prior to your purchase.
Download Mac Version ](https://tools.techidaily.com/wondershare/filmora/download/ )
- Part 1: How to Use YouTube Enhancements
- Part 2: How to Use Wondershare Filmora to Improve Video Qualtiy
How to Use YouTube Enhancements
First of all, you need to locate YouTube Enhancements. As soon as you have logged into your YouTube channel, you should go to the Video Manager. There you choose Edit and YouTube Enhancements, and you are ready to go. There are three distinctive categories that you can use, in order to edit your video. You can choose among Quick Fix, Filters, and Blurring Effects. As you can see, there are features that pretty much cover the basics in video editing under these categories.

Quick Fix promptly addresses issues that have to do with the contrast and saturation, as well as offers the ability to rotate or trim the video. There is nothing sophisticated there, but it is a really easy and practical solution for those who do not wish to waste time editing. It is cool that you can also stabilize your video or allow for Slow Motion or Timelapse effects. This is definitely an improvement for YouTube videos.

Filters feel a lot like those used on Instagram. They are neat and cool, of course, covering many of the demands for sophisticated editing. You can find filters like Lomo-ish, Old Fashioned, Heat Map, Cartoon, Cross Process, Festival and much more on YouTube Enhancements. You can also adjust the lighting and colors, so as to fine-tune your video.

Blurring Effects are perhaps the most advanced on YouTube Enhancements, and they provide the opportunity to maintain your privacy, by removing people’s distinctive details from the video and blurring them or putting mosaic on their face. With this tool, you can also blur objects on the video, which can increase your privacy even more. For instance, you can blur the plates of your car or your address. Last, there are some hilarious effects that you should check out.

Once you are done, there is an option to preview the video that you have edited. In this way, you will know if the editions that you have made are sufficient for you or not. Finally, you can choose either to save the video as a new file or revert to the original video. These options are welcome, as sometimes you just do not get what you have expected and you do not want to replace the video you have already uploaded.
How to Use Wondershare Filmora to improve YouTube videos
These are the steps that you need to follow, so as to proceed with high-quality video editing on Filmora:
- Open Wordershare Filmora
- Choose if you want 16:9 or 4:3 aspect ratio
- Tap Import so as to upload the files
- Drag and drop them, in order to place them in the right order

- Click Edit and adjust the settings (rotation, contrast, saturation, brightness, hue, auto de-noise and speed)

- Click OK, and you are done with the improvement of Video Quality
If you wish to fine-tune the images of the videos and place special filters, you can go ahead as follows:
- Tap the Effect button
- Drag the effect you want to use on the timeline (you can choose from a wide variety of effects, including Bokeh and Light Leaks, Old Film, etc.)

After having finished with the video editing process, you can preview the video and see if it is of acceptable quality standards. You can do that by clicking on the Play button. Then you can click on the Create button and save the video where you want, in the format of your choosing. It is also possible for you to burn the video on a DVD or share it online using YouTube or Facebook.

Download Mac Version ](https://tools.techidaily.com/wondershare/filmora/download/ )
Richard Bennett
Richard Bennett is a writer and a lover of all things video.
Follow @Richard Bennett
Richard Bennett
Mar 27, 2024• Proven solutions
YouTube has integrated a free video editor to facilitate the work of YouTubers and allow them to process their videos prior to uploading. Although nobody can claim these features can live up to the sophisticated features of the professional video editors, YouTube enhancements are useful and cool which offer a simple way to improve the quality of the videos and do not require any technical knowledge on your behalf.
If you are looking for a more professional approach in video editing, you should try out Wondershare Filmora(for Windows and Mac) . This is an exceptionally versatile and powerful tool, which will allow you to gain full control over the videos you wish to edit. It is very easy to use, and it will open up a new world of potentials in video editing. There is a free trial that you can benefit from, so as to see if Filmora meets your criteria in full prior to your purchase.
Download Mac Version ](https://tools.techidaily.com/wondershare/filmora/download/ )
- Part 1: How to Use YouTube Enhancements
- Part 2: How to Use Wondershare Filmora to Improve Video Qualtiy
How to Use YouTube Enhancements
First of all, you need to locate YouTube Enhancements. As soon as you have logged into your YouTube channel, you should go to the Video Manager. There you choose Edit and YouTube Enhancements, and you are ready to go. There are three distinctive categories that you can use, in order to edit your video. You can choose among Quick Fix, Filters, and Blurring Effects. As you can see, there are features that pretty much cover the basics in video editing under these categories.
Quick Fix promptly addresses issues that have to do with the contrast and saturation, as well as offers the ability to rotate or trim the video. There is nothing sophisticated there, but it is a really easy and practical solution for those who do not wish to waste time editing. It is cool that you can also stabilize your video or allow for Slow Motion or Timelapse effects. This is definitely an improvement for YouTube videos.
Filters feel a lot like those used on Instagram. They are neat and cool, of course, covering many of the demands for sophisticated editing. You can find filters like Lomo-ish, Old Fashioned, Heat Map, Cartoon, Cross Process, Festival and much more on YouTube Enhancements. You can also adjust the lighting and colors, so as to fine-tune your video.
Blurring Effects are perhaps the most advanced on YouTube Enhancements, and they provide the opportunity to maintain your privacy, by removing people’s distinctive details from the video and blurring them or putting mosaic on their face. With this tool, you can also blur objects on the video, which can increase your privacy even more. For instance, you can blur the plates of your car or your address. Last, there are some hilarious effects that you should check out.
Once you are done, there is an option to preview the video that you have edited. In this way, you will know if the editions that you have made are sufficient for you or not. Finally, you can choose either to save the video as a new file or revert to the original video. These options are welcome, as sometimes you just do not get what you have expected and you do not want to replace the video you have already uploaded.
How to Use Wondershare Filmora to improve YouTube videos
These are the steps that you need to follow, so as to proceed with high-quality video editing on Filmora:
- Open Wordershare Filmora
- Choose if you want 16:9 or 4:3 aspect ratio
- Tap Import so as to upload the files
- Drag and drop them, in order to place them in the right order
- Click Edit and adjust the settings (rotation, contrast, saturation, brightness, hue, auto de-noise and speed)
- Click OK, and you are done with the improvement of Video Quality
If you wish to fine-tune the images of the videos and place special filters, you can go ahead as follows:
- Tap the Effect button
- Drag the effect you want to use on the timeline (you can choose from a wide variety of effects, including Bokeh and Light Leaks, Old Film, etc.)
After having finished with the video editing process, you can preview the video and see if it is of acceptable quality standards. You can do that by clicking on the Play button. Then you can click on the Create button and save the video where you want, in the format of your choosing. It is also possible for you to burn the video on a DVD or share it online using YouTube or Facebook.
Download Mac Version ](https://tools.techidaily.com/wondershare/filmora/download/ )
Richard Bennett
Richard Bennett is a writer and a lover of all things video.
Follow @Richard Bennett
Also read:
- [New] Bring Your GSlides to Life with YouTube Media for 2024
- [New] Hastened Steps for Clear Background Filming Success
- [New] Purity in Browsing Top 7 Selective Android AdBlocking Tools
- [Updated] In 2024, Professional Recorder Capture Studio Win10 Edition
- [Updated] Ultimate Zooid Design Starter Packs
- 2024 Approved Is Paying Monthly for YouTube's Unlimited Access a Good Deal?
- 2024 Approved Mastering YouTube Channel Aesthetics Essential Size and Dimension Tips
- 2024 Approved News Endings as a Narrative Tool
- 2024 Approved Tailored Viewing Experience Constructing a Personalized 'Watch Later' List
- 4 Ways to Transfer Music from Apple iPhone SE (2020) to iPod touch | Dr.fone
- How Apple Is Elevating Vision: The Surprising Appeal of Wearables Uncovered on ZDNet
- How to Transfer Data from Xiaomi 13T Pro to Samsung Phone | Dr.fone
- Ignite Speed in Window's Apps via Effective Networking Tactics
- In 2024, Tutorial Quickly Convert YouTube Audio to MP3 on Mac
- Mastering the Art of Making an Effective Podcast Launch Video
- Precise Participation The Key to Zooming in on Google Meet Talks
- Title: 2024 Approved Step by Step Wiping Out YouTube Video Downloads
- Author: Joseph
- Created at : 2024-11-30 16:15:41
- Updated at : 2024-12-03 16:21:18
- Link: https://youtube-stream.techidaily.com/2024-approved-step-by-step-wiping-out-youtube-video-downloads/
- License: This work is licensed under CC BY-NC-SA 4.0.