
"2024 Approved Social Blade's Role in Deciphering the Dynamics of YouTube Statistics"
Social Blade’s Role in Deciphering the Dynamics of YouTube Statistics
Use Social Blade for YouTube Analytics - Stats & How to Use Them

Richard Bennett
Oct 26, 2023• Proven solutions
Want to learn how to use Social Blade for YouTube? SocialBlade.com is a free-to-use website that displays your YouTube statistics – or the stats of any channel you are interested in – using an intuitive layout.
While many of the stats you can find on Social Blade are also available right on YouTube, some people find it easier to read on Social Blade. YouTube provides you with a lot of information, and a lot of it might not be useful to all creators.
Your YouTube Analytics
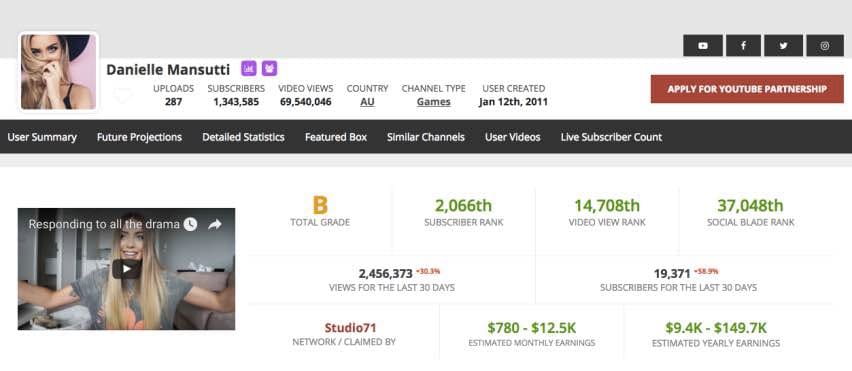
Social Blade is an excellent place to gauge the growth of your channel. It provides statistics on our subscribers, views, and estimated revenue.
To start using Social Blade, type your channel name into the search bar.
On the top section of the page, several stats will be clearly displayed.
First, you will see the letter grade assigned to your channel by Social Blade. If it is not a very good one, keep in mind that channels with over 10, 000 might still only receive Cs. Only YouTube megastars are getting As and Bs.
Next to your grade are your subscriber and video view ranks, as well as a rank assigned to you by Social Blade.
On the second line, you will see the views and subscribers you got in the last 30 days and the percentage by which you are up or down. Simply searching for yourself and glancing at this line is the easiest way to see whether your channel is growing, even easier than in your YouTube Creator Studio.
The final line of the first section will show you an estimate of your monthly revenue.
If you scroll down to the second section you will be able to see your views, subscribers, and estimated earnings per day rather than per month. Growth is in green and loss is in red.
By looking at this chart you can see which videos benefited your channel most after they were posted (your videos are not listed, but you can see based on the day you posted them). This will give you a good idea of what your audience wants to see.
Spying on Other Channels
When you check your stats, you type your channel name into the search bar. If you want to use Social Blade to monitor somebody else’s stats, type their channel name instead.
By looking up your direct competitors (channels about the same size as yours within your same genre) you will be able to see which of their videos are performing best for them when you combine the daily information Social Blade provides with your knowledge of what videos they posted when.
Knowing what is working for your rivals will help you design your content strategy .
You can also use Social Blade to look up huge YouTube stars who you admire, just to see how well they are doing. Take their estimated revenue with a grain of salt, though – it’s just an estimate.
That’s how you can use Social Blade for YouTube - have you ever used it?
Make Your Videos Stand Out with Powerful Video Editor


Richard Bennett
Richard Bennett is a writer and a lover of all things video.
Follow @Richard Bennett
Richard Bennett
Oct 26, 2023• Proven solutions
Want to learn how to use Social Blade for YouTube? SocialBlade.com is a free-to-use website that displays your YouTube statistics – or the stats of any channel you are interested in – using an intuitive layout.
While many of the stats you can find on Social Blade are also available right on YouTube, some people find it easier to read on Social Blade. YouTube provides you with a lot of information, and a lot of it might not be useful to all creators.
Your YouTube Analytics
Social Blade is an excellent place to gauge the growth of your channel. It provides statistics on our subscribers, views, and estimated revenue.
To start using Social Blade, type your channel name into the search bar.
On the top section of the page, several stats will be clearly displayed.
First, you will see the letter grade assigned to your channel by Social Blade. If it is not a very good one, keep in mind that channels with over 10, 000 might still only receive Cs. Only YouTube megastars are getting As and Bs.
Next to your grade are your subscriber and video view ranks, as well as a rank assigned to you by Social Blade.
On the second line, you will see the views and subscribers you got in the last 30 days and the percentage by which you are up or down. Simply searching for yourself and glancing at this line is the easiest way to see whether your channel is growing, even easier than in your YouTube Creator Studio.
The final line of the first section will show you an estimate of your monthly revenue.
If you scroll down to the second section you will be able to see your views, subscribers, and estimated earnings per day rather than per month. Growth is in green and loss is in red.
By looking at this chart you can see which videos benefited your channel most after they were posted (your videos are not listed, but you can see based on the day you posted them). This will give you a good idea of what your audience wants to see.
Spying on Other Channels
When you check your stats, you type your channel name into the search bar. If you want to use Social Blade to monitor somebody else’s stats, type their channel name instead.
By looking up your direct competitors (channels about the same size as yours within your same genre) you will be able to see which of their videos are performing best for them when you combine the daily information Social Blade provides with your knowledge of what videos they posted when.
Knowing what is working for your rivals will help you design your content strategy .
You can also use Social Blade to look up huge YouTube stars who you admire, just to see how well they are doing. Take their estimated revenue with a grain of salt, though – it’s just an estimate.
That’s how you can use Social Blade for YouTube - have you ever used it?
Make Your Videos Stand Out with Powerful Video Editor
Richard Bennett
Richard Bennett is a writer and a lover of all things video.
Follow @Richard Bennett
Creating Engaging YouTube Openings & Closers for Free
How to Create YouTube Intros & End Cards - Free and Easy

Shanoon Cox
Oct 26, 2023• Proven solutions
Part1: Intros
Elements of an Intro
Intros should only last about five seconds, and that can be cut down to two or three if you have a larger following.
When your intro video is longer than five seconds viewers are more likely to click away. The first 15 seconds of a video is when viewers are most likely to decide to click on one of the recommended videos, or go back to their search results and choose something else. The odds of them leaving within these first 15 seconds are greater if you do not get right to the main point of your video. That is why long intro sequences are bad for your watch time.
Whether it is better to put your intro at the very beginning of your video, or after you introduce your topic, will depend on your viewers. You may want to try it both ways and then look at your retention report (found in your YouTube Creator Studio under Analytics) to see which works best for you.
Top Intro Sites
There are a few different sites where you can download animated intros, customized to include your username or logo. Here are two of the best:
FlixPress.com
This is probably the most popular intro site. There are a lot of great animated intros available for under $5, or even for free.
IntroMaker.net
This is another site with really professional looking intros for $5. They only have two free options, though.
Creating an Intro in Filmora
You can create a simple intro card in Filmora.
- Choose your background. You may want to use a short clip as your intro, or you may just want a colored background.
- Drag your clip or background into the video track of your timeline and trim it down to five seconds.
- If you have a logo, import it into Filmora and drag it into your picture-in-picture track.
- With your logo selected, click on the Green Screen icon. In the pop-up, select the background of your logo to make it transparent. For this to work your logo cannot be the same color as its background.
- Click on the editing icon with your logo selected and choose an animation.
- Go to the Text/Titles menu and choose an animated title that suits your channel. Drag it into your text track and edit it to include your name.
- The last piece of your intro is sound. You can choose a song from Filmora’s library and cut it down to five seconds, or import your sound effect.
- Export your video and save it for use in all of your other videos.
Part 2: End Cards
When your video ends, YouTube will recommend a selection of videos users may want to watch next. Often, these recommendations will not include more of your videos.
To keep viewers on your channel, you can create your End Card which recommends other content you have created.
Elements of an End Card
An end card includes clips from two or three of your videos, muted, and shrunk down to thumbnail-size. Using spotlight annotations you can make these thumbnails click-able.
It is also important that your end card includes multiple calls to action. A call to action is meant to spur a viewer to some kind of action. Writing ‘Check out this video’ above one of your thumbnails is a call to action.
You should also have a subscribe link somewhere in your end card, ideally a very noticeable button with a proven call to action like ‘Subscribe Now!’.
Some creators will leave their end cards at that and play music overtop, but it can be even more effective to include a voiceover where you ask viewers to subscribe and watch your other videos.
How To Make an End Card
- Choose a static background. You may want to download an end card template or create one in a drawing program. If you do, make sure to include calls to action like ‘Watch more!’ and ‘Subscribe’.
- Drag your background into your timeline at the end of your video.
- Import two or three of your previous videos and drag them into your picture in picture tracks. Each clip should be on its track.
- Trim the clips in your picture in picture track down to the same length as your end card.
- Shrink your clips down to thumbnail-size by dragging their corners in the preview window.
- Position your clips so they are spaced evenly by dragging them in the preview screen.
- Mute your clips.
- If your background does not include any calls to action, choose a title from the Text/Titles menu in Filmora and create at least two – one asking viewers to subscribe, and one asking them to watch your suggested videos.
- Export your video from Filmora and upload it to YouTube.
- Go to your Video Manager and select Annotations in the drop-down menu next to your video.
- Go to your end card in the previewer, as that is where you want to add your annotations.
- Click Add Annotation and add a spotlight annotation to your video. Stretch it over one of your thumbnails and then check the Link box under your Annotation’s timing. Insert a link to the video you are previewing.
- Repeat for any other thumbnails. For your subscribe button, change where it said ‘Video’ to ‘Subscribe’ and enter your channel URL.
- Click Apply Changes.
Shanoon Cox
Shanoon Cox is a writer and a lover of all things video.
Follow @Shanoon Cox
Shanoon Cox
Oct 26, 2023• Proven solutions
Part1: Intros
Elements of an Intro
Intros should only last about five seconds, and that can be cut down to two or three if you have a larger following.
When your intro video is longer than five seconds viewers are more likely to click away. The first 15 seconds of a video is when viewers are most likely to decide to click on one of the recommended videos, or go back to their search results and choose something else. The odds of them leaving within these first 15 seconds are greater if you do not get right to the main point of your video. That is why long intro sequences are bad for your watch time.
Whether it is better to put your intro at the very beginning of your video, or after you introduce your topic, will depend on your viewers. You may want to try it both ways and then look at your retention report (found in your YouTube Creator Studio under Analytics) to see which works best for you.
Top Intro Sites
There are a few different sites where you can download animated intros, customized to include your username or logo. Here are two of the best:
FlixPress.com
This is probably the most popular intro site. There are a lot of great animated intros available for under $5, or even for free.
IntroMaker.net
This is another site with really professional looking intros for $5. They only have two free options, though.
Creating an Intro in Filmora
You can create a simple intro card in Filmora.
- Choose your background. You may want to use a short clip as your intro, or you may just want a colored background.
- Drag your clip or background into the video track of your timeline and trim it down to five seconds.
- If you have a logo, import it into Filmora and drag it into your picture-in-picture track.
- With your logo selected, click on the Green Screen icon. In the pop-up, select the background of your logo to make it transparent. For this to work your logo cannot be the same color as its background.
- Click on the editing icon with your logo selected and choose an animation.
- Go to the Text/Titles menu and choose an animated title that suits your channel. Drag it into your text track and edit it to include your name.
- The last piece of your intro is sound. You can choose a song from Filmora’s library and cut it down to five seconds, or import your sound effect.
- Export your video and save it for use in all of your other videos.
Part 2: End Cards
When your video ends, YouTube will recommend a selection of videos users may want to watch next. Often, these recommendations will not include more of your videos.
To keep viewers on your channel, you can create your End Card which recommends other content you have created.
Elements of an End Card
An end card includes clips from two or three of your videos, muted, and shrunk down to thumbnail-size. Using spotlight annotations you can make these thumbnails click-able.
It is also important that your end card includes multiple calls to action. A call to action is meant to spur a viewer to some kind of action. Writing ‘Check out this video’ above one of your thumbnails is a call to action.
You should also have a subscribe link somewhere in your end card, ideally a very noticeable button with a proven call to action like ‘Subscribe Now!’.
Some creators will leave their end cards at that and play music overtop, but it can be even more effective to include a voiceover where you ask viewers to subscribe and watch your other videos.
How To Make an End Card
- Choose a static background. You may want to download an end card template or create one in a drawing program. If you do, make sure to include calls to action like ‘Watch more!’ and ‘Subscribe’.
- Drag your background into your timeline at the end of your video.
- Import two or three of your previous videos and drag them into your picture in picture tracks. Each clip should be on its track.
- Trim the clips in your picture in picture track down to the same length as your end card.
- Shrink your clips down to thumbnail-size by dragging their corners in the preview window.
- Position your clips so they are spaced evenly by dragging them in the preview screen.
- Mute your clips.
- If your background does not include any calls to action, choose a title from the Text/Titles menu in Filmora and create at least two – one asking viewers to subscribe, and one asking them to watch your suggested videos.
- Export your video from Filmora and upload it to YouTube.
- Go to your Video Manager and select Annotations in the drop-down menu next to your video.
- Go to your end card in the previewer, as that is where you want to add your annotations.
- Click Add Annotation and add a spotlight annotation to your video. Stretch it over one of your thumbnails and then check the Link box under your Annotation’s timing. Insert a link to the video you are previewing.
- Repeat for any other thumbnails. For your subscribe button, change where it said ‘Video’ to ‘Subscribe’ and enter your channel URL.
- Click Apply Changes.
Shanoon Cox
Shanoon Cox is a writer and a lover of all things video.
Follow @Shanoon Cox
Also read:
- [New] 2024 Approved From Free Posts to Fiscal Success FB Pages Profit Playbook
- [New] 2024 Approved Top 10 IGTV Channels You Should Start Following Now
- [New] Expert Tips for Memorable YouTube Names
- [New] In 2024, 5 Innovative VR Headsets Perfect for Aerial Sports
- [New] In 2024, Boost Engagement Through Anime-Style Subscribe Buttons (Filmora Tutorial)
- [Updated] Exploring the Top 8 Facebook Extractors for Films
- 2024 Approved Gratis Design Elements for YouTube Channel
- 2024 Approved Optimizing YouTube Content for Higher Visibility
- Best Fixes For Oppo F23 5G Hard Reset | Dr.fone
- FrameMorph Editor for 2024
- Gateways to Google's Advertising on YouTube Platforms for 2024
- In 2024, Ignite Your Channel's Engagement with Targeted YouTube Links
- In 2024, Navigating Numbers A Comprehensive Triad Strategy for Monitoring Your YouTube Profitability
- In 2024, Rapid Growth Tactics Hit and Maintain a Stellar 10,000 Views Mark
- In 2024, The Path to Perfect Podcast Scripts Writing Techniques & Free Example Guides
- In 2024, Unleash Joy with 9 Complete, Uncut Films Celebrating Christmas Day Online
- Keyword Optimization for Higher YouTube Viewership for 2024
- The Top 9 Truths About Why PC Computers Win over MacOS (#9)
- United Experts EaseUS Expert Reviews for 2024
- Title: 2024 Approved Social Blade's Role in Deciphering the Dynamics of YouTube Statistics
- Author: Joseph
- Created at : 2024-11-29 16:17:15
- Updated at : 2024-12-03 16:28:24
- Link: https://youtube-stream.techidaily.com/2024-approved-social-blades-role-in-deciphering-the-dynamics-of-youtube-statistics/
- License: This work is licensed under CC BY-NC-SA 4.0.