
:max_bytes(150000):strip_icc():format(webp)/GettyImages-541365354-5c8ad42246e0fb00014a9687.jpg)
"2024 Approved Rising Through the Rankings Adding Highlight Channels to YouTube"
Rising Through the Rankings: Adding Highlight Channels to YouTube
Versatile YouTube Video Editor - Filmora
An easy yet powerful editor
Numerous effects to choose from
Detailed tutorials provided by the official channel
Since the inception of YouTube, accessing videos and content has become easy for social media users. You can get content in the comfort of your home because millions of featured channel owners feature more channels every minute across the globe. Many YouTubers have learned the importance of how to add featured channels on YouTube mobile; many audiences can access mobile that they can use to access the internet. Featured channels have many advantages for the owner because it is the easiest way to reach many audiences than other means of getting the viewers. Featured channels attract larger target audiences, which leads to more subscribers.
In this article
01 What are Featured Channels on YouTube?
02 Why does Add Feature Channels on YouTube Matter?
03 How to Add Featured Channels on YouTube?
04 Fix the Problem - Why Can’t I Feature Channels on YouTube?
05 Bonus Tip - Make YouTube Videos with Good Video Editor
Part 1: What are Featured Channels on YouTube?
YouTube featured channels displayed on YouTube have videos that YouTube considers worth watching by the audience, based on the site’s algorithms. Using featured channels expands your channel being viewed and accessed by many audiences, which leads to many subscribing to the channels recommended on your channel.
Part 2: Why does Adding Feature Channels on YouTube Matter?
Here we shall mention the importance of featured channels on YouTube:
1. Give audiences more required content
The channels with videos and YouTube featured channels have more audience because of their content. The audience always visits the channels with more informative content and even refers friends to it.
2. Source of more traffic
Many viewers visit the YouTube channels searching for information found in videos featured and knowing how to add a featured channel on YouTube in 2021 and get what they are looking for. Featured Channels with good content attract traffic and increase subscribers and referrals to the channels.
3. Personal connection
Featured Channels on YouTube matter immensely because they attract viewers to the actors or someone featured in the video. This leads to the audience is getting closer connected to the videos and information conveyed through the content. Videos increase familiarity and build a larger community where the audience identifies themselves with the channels.
4. Source of Revenue
Adding feature channels on YouTube matters because they lead to income/revenue through YouTube Ads, a course on your channels, and subscriptions to the channels by the viewers who view the channels daily.
5. Growing audience
Most audiences are visual learners worldwide, so having channels featured on YouTube matters because they attract many audiences globally. Uploading videos/content more often leads to more visitors flocking to your featured channels.
6. High credibility
Featuring channels on YouTube increases the channel’s credibility among the audience. Especially when the content answers the audiences’ questions and solves the problems they face, audiences develop trust, associate, and frequently interact with your YouTube featured channels.
Part 3: How to Add Featured Channels on YouTube?
Adding featured channels on YouTube is more accessible than most people think to follow the steps required to upload the channels and videos.
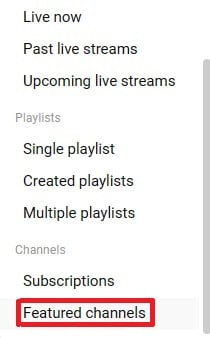
1 Login into YouTube studio
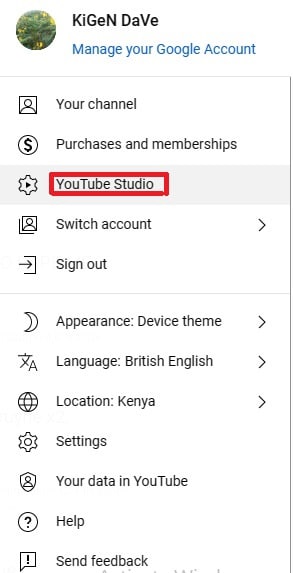
2 Go to the sidebar on the left and scroll to customization
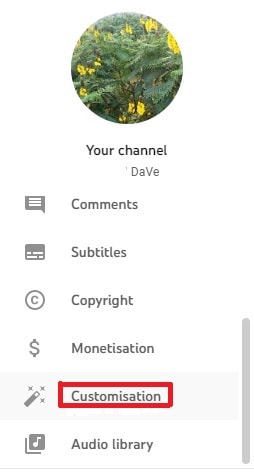
3 Click on ADD section
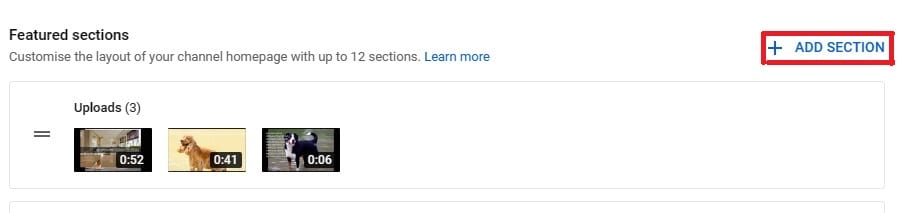
4 A small window will unroll, scroll down and click featured channels
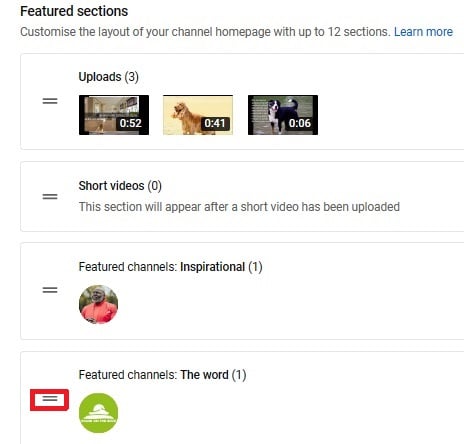
5 You can change featured channels on YouTube on the featured section, place the mouse cursor on the double lines next to the channel’s name as shown below on “featured channels name, The word,” and drag it to wherever you want.
Part 4: Fix the Problem - Why Can’t I Feature Channels on YouTube?
Many reasons can cause failure to feature your channel on YouTube that make you wonder why you can’t feature channels on YouTube.
1. Your YouTube Thumbnails
Your video thumbnail is the first thing your viewers see on their home feed when they click on your channels. The thumbnail must be catchy with accurate images showing what your video entails.
How to fix this issue?
Create relevant and exciting thumbnails that will attract viewers. It is advisable to use custom thumbnails and contrast to be catchy. This will make the viewers desire to visit your channel more often.
2. Lack of Consistency
Being inconsistent in your channels makes your viewers distrust your future work. If you take too long to feature your YouTube video/contents, viewers may decide to even unsubscribe from your channels, which may lead your traffic to drop to zero.
How to fix the inconsistency?
Be open to your viewers about when to expect the following videos on your channels, and it is good manners to keep your audience updated about what is coming. Consistently featured channels always get a good flow of viewers and even referrals.
3. Lack of content on the channels
Failing to update the channels often leads viewers not to visit your YouTube channels; viewers search for up-to-date information. If your channels lack content, audiences will quickly hop onto others in the market for the information they need.
How to fix the lack of content?
Read the minds of your audiences, primarily through comments they leave behind. You should update the channels with the required videos to satisfy your audience. Having quality content is the crucial thing here.
4. Lack of value in your videos
Before uploading videos on your channels, it’s good to ask yourself some questions, like:
What value does my video add to the audience?
How to fix it?
You are ready to value your videos if you answer these few questions. Value is the crucial thing in every product in the market. YouTube channel owners ought to know what the competitors offer to the same viewers and exceed them by posting videos that meet audiences’ needs.
It’s good manners to go back to the drawing board and research why your YouTube channels aren’t being featured.
Part 5: Bonus Tip - Make YouTube Videos with Good Video Editor
Making videos featured in the YouTube channels requires a good video editor. Although various video editors do excellent work, making videos with an exceptional video editor must be a goal. Filmora is such kind of best video editor that can handle the editing of videos very well. It is an excellent software for beginners and pros, and it is more potent than other video editors in the market.
It allows a person to make professional-looking videos because Filmora has various presets like overplays, transitions, elements, filters, and several layers of effects.
Wondershare Filmora
Get started easily with Filmora’s powerful performance, intuitive interface, and countless effects!
Try It Free Try It Free Try It Free Learn More >

Key features of Wondershare filmora
Filmora video editor comes with several features that make it the best video editor. The features include an advanced text editor, GIF support, Color tuning, noise removal, audio equalizer, stabilization of the video, and scene detection.
Conclusion
YouTube featured channels with quality informative videos/contents attract more audiences, mainly social media users, in the larger market. Before featuring channels on YouTube, one has to know what the target audiences need, test and the demography of the audiences matters a lot.
Featured channels on the YouTube platform can be an excellent source of revenue for ready, consistent, and considerate value on their videos uploaded on the channels. Inconsistency can be detrimental to the owner of the channels because the channels can end up being dormant with no one subscribing to them. The owner ought to learn how to add featured channels on YouTube by following the complete guide.
Also, making YouTube videos with a good video editor is advisable for quality videos that will attract more audiences. Value is what viewers are after on the featured channels on YouTube.
Since the inception of YouTube, accessing videos and content has become easy for social media users. You can get content in the comfort of your home because millions of featured channel owners feature more channels every minute across the globe. Many YouTubers have learned the importance of how to add featured channels on YouTube mobile; many audiences can access mobile that they can use to access the internet. Featured channels have many advantages for the owner because it is the easiest way to reach many audiences than other means of getting the viewers. Featured channels attract larger target audiences, which leads to more subscribers.
In this article
01 What are Featured Channels on YouTube?
02 Why does Add Feature Channels on YouTube Matter?
03 How to Add Featured Channels on YouTube?
04 Fix the Problem - Why Can’t I Feature Channels on YouTube?
05 Bonus Tip - Make YouTube Videos with Good Video Editor
Part 1: What are Featured Channels on YouTube?
YouTube featured channels displayed on YouTube have videos that YouTube considers worth watching by the audience, based on the site’s algorithms. Using featured channels expands your channel being viewed and accessed by many audiences, which leads to many subscribing to the channels recommended on your channel.
Part 2: Why does Adding Feature Channels on YouTube Matter?
Here we shall mention the importance of featured channels on YouTube:
1. Give audiences more required content
The channels with videos and YouTube featured channels have more audience because of their content. The audience always visits the channels with more informative content and even refers friends to it.
2. Source of more traffic
Many viewers visit the YouTube channels searching for information found in videos featured and knowing how to add a featured channel on YouTube in 2021 and get what they are looking for. Featured Channels with good content attract traffic and increase subscribers and referrals to the channels.
3. Personal connection
Featured Channels on YouTube matter immensely because they attract viewers to the actors or someone featured in the video. This leads to the audience is getting closer connected to the videos and information conveyed through the content. Videos increase familiarity and build a larger community where the audience identifies themselves with the channels.
4. Source of Revenue
Adding feature channels on YouTube matters because they lead to income/revenue through YouTube Ads, a course on your channels, and subscriptions to the channels by the viewers who view the channels daily.
5. Growing audience
Most audiences are visual learners worldwide, so having channels featured on YouTube matters because they attract many audiences globally. Uploading videos/content more often leads to more visitors flocking to your featured channels.
6. High credibility
Featuring channels on YouTube increases the channel’s credibility among the audience. Especially when the content answers the audiences’ questions and solves the problems they face, audiences develop trust, associate, and frequently interact with your YouTube featured channels.
Part 3: How to Add Featured Channels on YouTube?
Adding featured channels on YouTube is more accessible than most people think to follow the steps required to upload the channels and videos.
1 Login into YouTube studio
2 Go to the sidebar on the left and scroll to customization
3 Click on ADD section
4 A small window will unroll, scroll down and click featured channels
5 You can change featured channels on YouTube on the featured section, place the mouse cursor on the double lines next to the channel’s name as shown below on “featured channels name, The word,” and drag it to wherever you want.
Part 4: Fix the Problem - Why Can’t I Feature Channels on YouTube?
Many reasons can cause failure to feature your channel on YouTube that make you wonder why you can’t feature channels on YouTube.
1. Your YouTube Thumbnails
Your video thumbnail is the first thing your viewers see on their home feed when they click on your channels. The thumbnail must be catchy with accurate images showing what your video entails.
How to fix this issue?
Create relevant and exciting thumbnails that will attract viewers. It is advisable to use custom thumbnails and contrast to be catchy. This will make the viewers desire to visit your channel more often.
2. Lack of Consistency
Being inconsistent in your channels makes your viewers distrust your future work. If you take too long to feature your YouTube video/contents, viewers may decide to even unsubscribe from your channels, which may lead your traffic to drop to zero.
How to fix the inconsistency?
Be open to your viewers about when to expect the following videos on your channels, and it is good manners to keep your audience updated about what is coming. Consistently featured channels always get a good flow of viewers and even referrals.
3. Lack of content on the channels
Failing to update the channels often leads viewers not to visit your YouTube channels; viewers search for up-to-date information. If your channels lack content, audiences will quickly hop onto others in the market for the information they need.
How to fix the lack of content?
Read the minds of your audiences, primarily through comments they leave behind. You should update the channels with the required videos to satisfy your audience. Having quality content is the crucial thing here.
4. Lack of value in your videos
Before uploading videos on your channels, it’s good to ask yourself some questions, like:
What value does my video add to the audience?
How to fix it?
You are ready to value your videos if you answer these few questions. Value is the crucial thing in every product in the market. YouTube channel owners ought to know what the competitors offer to the same viewers and exceed them by posting videos that meet audiences’ needs.
It’s good manners to go back to the drawing board and research why your YouTube channels aren’t being featured.
Part 5: Bonus Tip - Make YouTube Videos with Good Video Editor
Making videos featured in the YouTube channels requires a good video editor. Although various video editors do excellent work, making videos with an exceptional video editor must be a goal. Filmora is such kind of best video editor that can handle the editing of videos very well. It is an excellent software for beginners and pros, and it is more potent than other video editors in the market.
It allows a person to make professional-looking videos because Filmora has various presets like overplays, transitions, elements, filters, and several layers of effects.
Wondershare Filmora
Get started easily with Filmora’s powerful performance, intuitive interface, and countless effects!
Try It Free Try It Free Try It Free Learn More >
Key features of Wondershare filmora
Filmora video editor comes with several features that make it the best video editor. The features include an advanced text editor, GIF support, Color tuning, noise removal, audio equalizer, stabilization of the video, and scene detection.
Conclusion
YouTube featured channels with quality informative videos/contents attract more audiences, mainly social media users, in the larger market. Before featuring channels on YouTube, one has to know what the target audiences need, test and the demography of the audiences matters a lot.
Featured channels on the YouTube platform can be an excellent source of revenue for ready, consistent, and considerate value on their videos uploaded on the channels. Inconsistency can be detrimental to the owner of the channels because the channels can end up being dormant with no one subscribing to them. The owner ought to learn how to add featured channels on YouTube by following the complete guide.
Also, making YouTube videos with a good video editor is advisable for quality videos that will attract more audiences. Value is what viewers are after on the featured channels on YouTube.
Ultimate Guide: Inverse Video Tricks on YouTube (+Tutorials)
Best YouTube Video Reverser Online

Richard Bennett
Mar 27, 2024• Proven solutions
While working on the movies in a professional post-production environment, there might be instances where you want to reverse YouTube video to show flashback effect, or to replay a sequence so the audience can experience more thrills while watching.
With that said, not every media player or video editing application is capable enough to reverse a movie clip, not at least with merely a few mouse clicks. Therefore, the following sections suggest some such programs that can help you play YouTube video backward.
Part 1: Best Free YouTube Video Reversers Online
There are a few online web programs that are capable of reversing YouTube videos with efficiency. However, some of them may have certain restrictions like file size limit, number of supported formats, fewer or absolutely no editing options, etc.
Nevertheless, the best five online solutions to reverse YouTube video along with the process of using them are discussed below:
1. Clideo
Clideo is not merely a video reverser, but can also convert media files to your preferred format. You can paste the URL of a YouTube video to upload or import the videos from your computer, Dropbox or Google Drive storage. At the time of this writing, Clideo allows only up to 500MB videos to be uploaded to reverse or convert. As for the acceptability, the portal supports almost all the commonly used formats.

To play YouTube video backward with Clideo:
- Visit Clideo’s online reverse tool page: https://clideo.com/reverse-video ;
- Hover mouse over the down arrow icon next to the Choose file button and paste the URL of the YouTube video that you want to reverse;
- After Clideo fetches the video and opens the next page, choose your preferred speed from the right section
- Leave the Mute video box checked, or uncheck it if required and then click Reverse button to reverse YouTube video. The maximum reverse speed that you can apply is 2X.
2. Kapwing
This web solution also supports almost all types of video formats including 3GPP, AVI, MP4, etc. When talking about the limitations of a free user, you can only upload the videos that are up to 7 minutes long. At the time of this writing, Kapwing can accept the source files from your computer, and from the YouTube URL.

To reverse YouTube video with Kapwing:
- Go to Kapwing’s online video reverser page: https://www.kapwing.com/tools/reverse-video ;
- Paste the URL of the YouTube video in the Paste a URL field;
- Select your preferred playback speed of the reversed video from the Reverse speed section in the left pane;
- Choose whether or not Kapwing should mute the output video;
- Optionally, click Trim video from the upper-left corner of the right window to edit the footage if needed;
- Click CREATE from the bottom-left corner to play YouTube video backward. The maximum reverse speed that you can apply on Kapwing is also 2X.
3. EZGIF
With the ability to support almost all major video formats, and the capability to accept the media files of up to 100MB, Ezgif allows you to upload the footages from your PC, or paste their URL if they are published on YouTube. Even though the landing page has a few distracting adverts, the overall process to play YouTube video backward and save it to your PC is simple.

To reverse YouTube video with Ezgif:
- Go to the reverser tool page: https://ezgif.com/reverse-video and then paste the URL of the YouTube video in the available field;
- Click Upload video and optionally click the speed icon from the toolbar at the top;
- Use the checkboxes and input fields to mute the audio and adjust the playback speed as needed;
- Choose your preferred encoding method from the Output format and encoding drop-down list and then click Reverse video to reverse the video.
Note: It seems that you can’t customize the reverse speed on EZGif but you can choose to mute the reversed audio or not.
4. VideoReverser
Although this web solution has an extremely simple interface, the files that you can upload must not exceed 10MB in size. The portal supports formats like MPG, MPEG, MP4, AVI, M4V, 3GP, etc. for reversing. In addition to uploading the clips from your PC, VideoReverser also allows you to paste the URL of the footages if they are published on YouTube.

To play YouTube video backward with VideoReverser:
- Launch your favorite Internet browser, and then visit https://www.videoreverser.com/ ;
- Paste the URL of the YouTube video in the available text field;
- Choose your preferred output format from the Select output format drop-down list;
- Use the Remove audio track checkbox to get rid of the acoustics or leave the sound enabled;
- Click Start to reverse YouTube video.
5. Pixiko
With almost all formats’ support, Pixiko is yet another web-based media editor that can also reverse YouTube video with a few mouse clicks. At the time of this writing, Pixiko only accepts the source files from your PC, which means you can’t paste the YouTube link to it directly. At first, you need to download or save the YouTube video on computer and then either drag those clips from your local hard drive to the portal.

To play YouTube video backward with Pixiko:
- On the page https://pixiko.com/editor/video-reverse , click anywhere inside the Blue rectangle;
- Locate, select, and upload the downloaded YouTube source video from your PC;
- Click Reverse from the lower-right section of the video player window;
- Follow the on-screen instructions from there to manage and reverse YouTube video as needed;
Bonus: Reversing YouTube Video with Wondershare Filmora
With easily reachable editing options and self-explanatory buttons, Wondershare Filmora has gained a decent amount of popularity in the recent years. The program is available for both Windows and Mac platforms, and gives tough competition to other leading tools of the industry such as Adobe Premiere Pro, Final Cut Pro X, etc.
 Download Mac Version ](https://tools.techidaily.com/wondershare/filmora/download/ )
When talking about the playback speed, with the help of available presets, it can be increased or decreased by 100x or 0.01x respectively. One of the presets also enables you to reverse the direction of the playback quite easily, i.e. while keeping the speed intact. In addition, the ‘Custom Speed’ option lets you control the preferences more granularly.
You can follow the simple instructions given below to reverse YouTube video with Wondershare Filmora:
Note: To remain compliant with the terms and conditions, and to respect the copyright policies, Wondershare Filmora doesn’t allow you to download other people’s videos from YouTube. However, once you have a footage on your PC, you can jump to the following step-by-step process to reverse its playback.
1. Import the Source Video to the Timeline
Launch Wondershare Filmora on your Windows or Mac computer (Windows 10 here), making sure that the Media button in the standard toolbar at the top is selected, click inside the Media window, and select and import the YouTube source video to the program. Next, drag the YouTube video clip to the Timeline, and when the confirmation box appears, click the Match to Media or Keep Project Settings button as needed to get the footage to the Timeline.

2. Reverse the Video (Using the Preset)
Click and select the media clip in the Timeline, click the Speed icon present above the Timeline itself, and click the Reverse option from the menu that appears to reverse the video playback.
![]()
3. Reverse the Video (Manual Control)

Select the media clip in the Timeline and click the Speed icon as explained in the previous step. From the menu that appears, click Custom Speed this time. When the Custom Speed box appears, use the Speed slider to adjust the playback speed of the media clip, and check the Reverse box to reverse YouTube video. Optionally, you can also modify the Duration and Ripple options to customize the preferences. Finally, click OK to save the changes.
4. Export the Video or Upload to YouTube Directly
Back on the main window, click EXPORT from the top. Filmora provides several ways to saving and sharing the video.

You can select the Local tab, choose your preferred output format from the list in the left, in the right window, define a name and location for the file that you are about to export, and click EXPORT from the bottom-right corner to export the video with the reverse playback.

Or, go to the YouTube tab and sign in your YouTube account to upload the reversed video to YouTube directly. In the YouTube upload interface, you can optimize the YouTube SEO elements and revise the video title, description, category and tags.
Download Mac Version ](https://tools.techidaily.com/wondershare/filmora/download/ )
Conclusion
Even though the online video reversers are free and offer simple process to get the job done, the desktop programs like Wondershare Filmora offer more flexibility when it comes to making changes to the media clips, controlling the playback speed, adding effects, applying the modifications only to certain sections of the footage, selecting output preferences, etc. before you can reverse YouTube video.
Richard Bennett
Richard Bennett is a writer and a lover of all things video.
Follow @Richard Bennett
Richard Bennett
Mar 27, 2024• Proven solutions
While working on the movies in a professional post-production environment, there might be instances where you want to reverse YouTube video to show flashback effect, or to replay a sequence so the audience can experience more thrills while watching.
With that said, not every media player or video editing application is capable enough to reverse a movie clip, not at least with merely a few mouse clicks. Therefore, the following sections suggest some such programs that can help you play YouTube video backward.
Part 1: Best Free YouTube Video Reversers Online
There are a few online web programs that are capable of reversing YouTube videos with efficiency. However, some of them may have certain restrictions like file size limit, number of supported formats, fewer or absolutely no editing options, etc.
Nevertheless, the best five online solutions to reverse YouTube video along with the process of using them are discussed below:
1. Clideo
Clideo is not merely a video reverser, but can also convert media files to your preferred format. You can paste the URL of a YouTube video to upload or import the videos from your computer, Dropbox or Google Drive storage. At the time of this writing, Clideo allows only up to 500MB videos to be uploaded to reverse or convert. As for the acceptability, the portal supports almost all the commonly used formats.
To play YouTube video backward with Clideo:
- Visit Clideo’s online reverse tool page: https://clideo.com/reverse-video ;
- Hover mouse over the down arrow icon next to the Choose file button and paste the URL of the YouTube video that you want to reverse;
- After Clideo fetches the video and opens the next page, choose your preferred speed from the right section
- Leave the Mute video box checked, or uncheck it if required and then click Reverse button to reverse YouTube video. The maximum reverse speed that you can apply is 2X.
2. Kapwing
This web solution also supports almost all types of video formats including 3GPP, AVI, MP4, etc. When talking about the limitations of a free user, you can only upload the videos that are up to 7 minutes long. At the time of this writing, Kapwing can accept the source files from your computer, and from the YouTube URL.
To reverse YouTube video with Kapwing:
- Go to Kapwing’s online video reverser page: https://www.kapwing.com/tools/reverse-video ;
- Paste the URL of the YouTube video in the Paste a URL field;
- Select your preferred playback speed of the reversed video from the Reverse speed section in the left pane;
- Choose whether or not Kapwing should mute the output video;
- Optionally, click Trim video from the upper-left corner of the right window to edit the footage if needed;
- Click CREATE from the bottom-left corner to play YouTube video backward. The maximum reverse speed that you can apply on Kapwing is also 2X.
3. EZGIF
With the ability to support almost all major video formats, and the capability to accept the media files of up to 100MB, Ezgif allows you to upload the footages from your PC, or paste their URL if they are published on YouTube. Even though the landing page has a few distracting adverts, the overall process to play YouTube video backward and save it to your PC is simple.
To reverse YouTube video with Ezgif:
- Go to the reverser tool page: https://ezgif.com/reverse-video and then paste the URL of the YouTube video in the available field;
- Click Upload video and optionally click the speed icon from the toolbar at the top;
- Use the checkboxes and input fields to mute the audio and adjust the playback speed as needed;
- Choose your preferred encoding method from the Output format and encoding drop-down list and then click Reverse video to reverse the video.
Note: It seems that you can’t customize the reverse speed on EZGif but you can choose to mute the reversed audio or not.
4. VideoReverser
Although this web solution has an extremely simple interface, the files that you can upload must not exceed 10MB in size. The portal supports formats like MPG, MPEG, MP4, AVI, M4V, 3GP, etc. for reversing. In addition to uploading the clips from your PC, VideoReverser also allows you to paste the URL of the footages if they are published on YouTube.
To play YouTube video backward with VideoReverser:
- Launch your favorite Internet browser, and then visit https://www.videoreverser.com/ ;
- Paste the URL of the YouTube video in the available text field;
- Choose your preferred output format from the Select output format drop-down list;
- Use the Remove audio track checkbox to get rid of the acoustics or leave the sound enabled;
- Click Start to reverse YouTube video.
5. Pixiko
With almost all formats’ support, Pixiko is yet another web-based media editor that can also reverse YouTube video with a few mouse clicks. At the time of this writing, Pixiko only accepts the source files from your PC, which means you can’t paste the YouTube link to it directly. At first, you need to download or save the YouTube video on computer and then either drag those clips from your local hard drive to the portal.
To play YouTube video backward with Pixiko:
- On the page https://pixiko.com/editor/video-reverse , click anywhere inside the Blue rectangle;
- Locate, select, and upload the downloaded YouTube source video from your PC;
- Click Reverse from the lower-right section of the video player window;
- Follow the on-screen instructions from there to manage and reverse YouTube video as needed;
Bonus: Reversing YouTube Video with Wondershare Filmora
With easily reachable editing options and self-explanatory buttons, Wondershare Filmora has gained a decent amount of popularity in the recent years. The program is available for both Windows and Mac platforms, and gives tough competition to other leading tools of the industry such as Adobe Premiere Pro, Final Cut Pro X, etc.
Download Mac Version ](https://tools.techidaily.com/wondershare/filmora/download/ )
When talking about the playback speed, with the help of available presets, it can be increased or decreased by 100x or 0.01x respectively. One of the presets also enables you to reverse the direction of the playback quite easily, i.e. while keeping the speed intact. In addition, the ‘Custom Speed’ option lets you control the preferences more granularly.
You can follow the simple instructions given below to reverse YouTube video with Wondershare Filmora:
Note: To remain compliant with the terms and conditions, and to respect the copyright policies, Wondershare Filmora doesn’t allow you to download other people’s videos from YouTube. However, once you have a footage on your PC, you can jump to the following step-by-step process to reverse its playback.
1. Import the Source Video to the Timeline
Launch Wondershare Filmora on your Windows or Mac computer (Windows 10 here), making sure that the Media button in the standard toolbar at the top is selected, click inside the Media window, and select and import the YouTube source video to the program. Next, drag the YouTube video clip to the Timeline, and when the confirmation box appears, click the Match to Media or Keep Project Settings button as needed to get the footage to the Timeline.
2. Reverse the Video (Using the Preset)
Click and select the media clip in the Timeline, click the Speed icon present above the Timeline itself, and click the Reverse option from the menu that appears to reverse the video playback.
![]()
3. Reverse the Video (Manual Control)
Select the media clip in the Timeline and click the Speed icon as explained in the previous step. From the menu that appears, click Custom Speed this time. When the Custom Speed box appears, use the Speed slider to adjust the playback speed of the media clip, and check the Reverse box to reverse YouTube video. Optionally, you can also modify the Duration and Ripple options to customize the preferences. Finally, click OK to save the changes.
4. Export the Video or Upload to YouTube Directly
Back on the main window, click EXPORT from the top. Filmora provides several ways to saving and sharing the video.
You can select the Local tab, choose your preferred output format from the list in the left, in the right window, define a name and location for the file that you are about to export, and click EXPORT from the bottom-right corner to export the video with the reverse playback.
Or, go to the YouTube tab and sign in your YouTube account to upload the reversed video to YouTube directly. In the YouTube upload interface, you can optimize the YouTube SEO elements and revise the video title, description, category and tags.
Download Mac Version ](https://tools.techidaily.com/wondershare/filmora/download/ )
Conclusion
Even though the online video reversers are free and offer simple process to get the job done, the desktop programs like Wondershare Filmora offer more flexibility when it comes to making changes to the media clips, controlling the playback speed, adding effects, applying the modifications only to certain sections of the footage, selecting output preferences, etc. before you can reverse YouTube video.
Richard Bennett
Richard Bennett is a writer and a lover of all things video.
Follow @Richard Bennett
- Title: "2024 Approved Rising Through the Rankings Adding Highlight Channels to YouTube"
- Author: Joseph
- Created at : 2024-05-31 13:47:34
- Updated at : 2024-06-01 13:47:34
- Link: https://youtube-stream.techidaily.com/2024-approved-rising-through-the-rankings-adding-highlight-channels-to-youtube/
- License: This work is licensed under CC BY-NC-SA 4.0.
