
:max_bytes(150000):strip_icc()/AIrendering_CROPPED_Guillaume_GettyImages-1418477818-d0a9c5ce09584a1099f21a5f1f690a88.jpg)
"2024 Approved Premier Capturing Device for Exceptional YouTube Productions"
Premier Capturing Device for Exceptional YouTube Productions
Best Screen Recorder for YouTube

Richard Bennett
Mar 27, 2024• Proven solutions
Taking viewers ‘in app’ is an effective way to show them how you work or play. A screen recording is a footage recorded not from your camera, but directly from the interface of your computer or mobile device. A screen recording might be footage from a game, a software tutorial, or a demonstration of your creative process in a program.
We have picked up the best 10 paid screen recorders for YouTube on Windows and Mac, but if you are looking for a complete solution to record videos on Windows, Mac, Android or iOS phone to make tutorial videos, how-to videos, or demonstration videos, or products/software review videos, or gameplay videos on YouTube, here is the all the information you need. This article will introduce you to the best screen recorders on computers, Android devices, and iPhones for YouTube.
- Part 1: Best Screen Recording Software for Recording Windows/Mac Screen for YouTube
- Part 2: Best Screen Capturing Apps for Recording Your Android Screen (No Root)
- Part 3: Best Screen Recording Apps for Recording on iOS Devices for YouTube Videos
Part 1: Best Software for Recording Your Computer Screen for YouTube Videos
1.Filmora Video Editor [Windows & Mac, Freemium]


In addition to being a powerful editing tool, Filmora can also be used to record your computer screen. In Filmora, just select Media and then Record. In the Record menu, click Record PC Screen. The recording window will pop up and you will be able to decide whether you want to record your full screen, a customized selection of it, or a specific target window. After you have finished recording your clip will automatically appear in the Media menu in your Filmora project so you can edit it right away. You can download Filmora from Filmora.wondershare.com if you do not have it yet.
If you just want to make a how-to video with some captured screens, Filmora will be a good choice. Check the video below about how to record Screen with Filmora.
2.Wondershare DemoCreator
DemoCreator is a specially designed screen recording software from Wondershare for both gameplay recording, tutorial making, screen capturing, and webcam recording as well. You can use it to record the full screen of your Windows or Mac computer or a particular part on the screen. The best part is that you can both record and edit the video in DemoCreator and upload it to YouTube directly. This screen recorder for YouTube is a perfect solution for those who want to capture 120 frames per second and 4K videos.
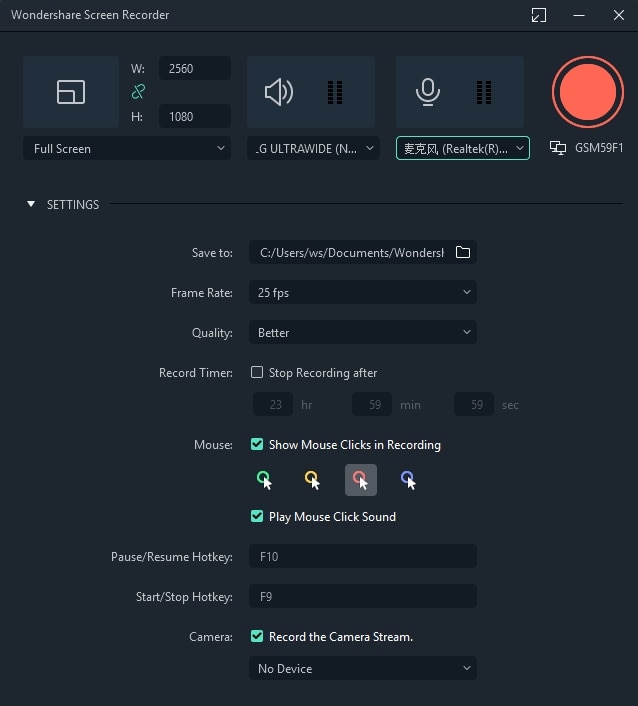
3.VLC Media Player [Windows & Mac & Linux, Free]
VLC Media Player is a free media player that has a great screen recording feature. You can download it from Video LAN.org. In order to take a screen recording using VLC you first need to click on View and Advanced Controls. A lot of the more advanced features, like screen recording, are initially hidden so as not to confuse users, but selecting Advanced Controls will make them visible. Then you can go to Media and Open Capture Device. In the window that opens choose Desktop next to Capture Mode and click Play. VLC will start displaying your desktop in the player window. Now you just have to click Record.
Learn more details about how to record YouTube videos with VLC
4.QuickTime [Mac, Free]

QuickTime is the default media player for Mac users. To access QuickTime’s screen recording feature select File and New Screen Recording. In the window that pops up click on the arrow next to the Record button and choose a microphone. Then you can press Record. Your recording will not start right away. First, a window will pop up explaining that you can stop your recording by pressing ‘command-control-escape’. Although QuickTime is available for PCs the PC version does not have a screen recording feature.
Learn more details about how to record YouTube video and audio with QuickTime Player on Mac
Part 2: Recording Your Android Screen for YouTube Videos (No Root)
We have already described 4 ways of recording screen videos on Android , while in this part, we will introduce some useful screen recording apps for recording YouTube videos on Android phones.
1. AZ Screen Recorder
AZ Screen Recorder is free screen recording app for Android 5.0 Lollipop. Using AZ Screen Recorder you can simultaneously record from your phone’s camera and screen. This is useful if you want to shoot a video of yourself explaining an app to add into your final video. Although the basic version of AZ Screen Recorder is free there are in-app purchases.
2.Unlimited Screen Recorder
Unlimited Screen Recorder is also for 5.0 Lollipop and is free with in-app purchases. Like the name ‘Unlimited’ suggests you can use this app to record for as long as you want. There is no time limit. You can also record audio through Unlimited Screen Recorder so it is convenient to make a voiceover for your video.
There are very few options available for recording Android devices older than Lollipop without rooting your device.
Click here to check more screen recording apps to capture videos on Android
Part 3: Recording Your iOS Device Screen for YouTube Videos
With the release of iOS 11, recording on iPhone and iPad is much easier with the built-in screen recording tool . If your iOS is above 11 (including 11) version, you can record the screen with its in-app application, check this video to know the details:
Apart from recording with the built-in recording tool, you can also use some best iOS screen recording apps to record YouTube videos, or use some mirror software to record iPhone/iPad on Windows and Mac and create a YouTube video.
1.QuickTime
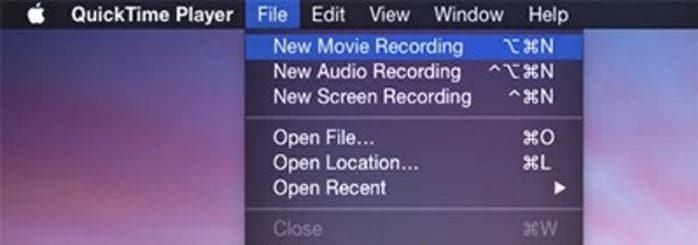
QuickTime can be used to record the screen of your iPhone or iPad in addition to the screen of your Mac. First you need to connect your device to your computer with a USB port. Instead of selecting ‘New Screen Recording’ in QuickTime, the way you would when recording your computer screen, select ‘New Movie Recording’. In the recording window click on the arrow next to the ‘Record’ button and choose your iOS device where it asks you to choose a camera. This method only works with the Mac version of QuickTime.
2.Reflector
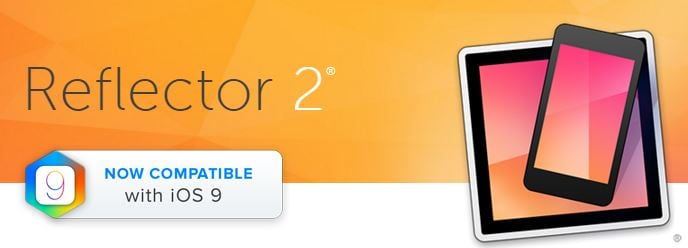
Reflector is mirroring software available for Mac or PC. Mirroring software creates a clone of your device’s interface on your computer screen. Once your device is being displayed on the screen of your computer you can capture it by recording your computer screen. You can download Reflector from Airsquirrels.com.
In order to use Reflector to mirror your device, you will also need to use AirPlay on your iPhone or iPad, and your device and your computer will need to be connected to the same wifi network. In AirPlay, make sure mirroring is on and select your computer as a receiver. Your computer will not show up as an option if you do not have Reflector running.
Conclusion
Above are the screen and video recording software programs that we picked up for you to make a YouTube tutorial, how-to or software review video on most popular platforms including Windows and Mac computer and Android and iOS smartphones. Besides recording, you may also need thebest video editing software for editing YouTube videos . Watch the video tutorial to check how to edit your YouTube videos and get to know some terms in video editing. Remember to download Filmora and have a try today.
Richard Bennett
Richard Bennett is a writer and a lover of all things video.
Follow @Richard Bennett
Richard Bennett
Mar 27, 2024• Proven solutions
Taking viewers ‘in app’ is an effective way to show them how you work or play. A screen recording is a footage recorded not from your camera, but directly from the interface of your computer or mobile device. A screen recording might be footage from a game, a software tutorial, or a demonstration of your creative process in a program.
We have picked up the best 10 paid screen recorders for YouTube on Windows and Mac, but if you are looking for a complete solution to record videos on Windows, Mac, Android or iOS phone to make tutorial videos, how-to videos, or demonstration videos, or products/software review videos, or gameplay videos on YouTube, here is the all the information you need. This article will introduce you to the best screen recorders on computers, Android devices, and iPhones for YouTube.
- Part 1: Best Screen Recording Software for Recording Windows/Mac Screen for YouTube
- Part 2: Best Screen Capturing Apps for Recording Your Android Screen (No Root)
- Part 3: Best Screen Recording Apps for Recording on iOS Devices for YouTube Videos
Part 1: Best Software for Recording Your Computer Screen for YouTube Videos
1.Filmora Video Editor [Windows & Mac, Freemium]
In addition to being a powerful editing tool, Filmora can also be used to record your computer screen. In Filmora, just select Media and then Record. In the Record menu, click Record PC Screen. The recording window will pop up and you will be able to decide whether you want to record your full screen, a customized selection of it, or a specific target window. After you have finished recording your clip will automatically appear in the Media menu in your Filmora project so you can edit it right away. You can download Filmora from Filmora.wondershare.com if you do not have it yet.
If you just want to make a how-to video with some captured screens, Filmora will be a good choice. Check the video below about how to record Screen with Filmora.
2.Wondershare DemoCreator
DemoCreator is a specially designed screen recording software from Wondershare for both gameplay recording, tutorial making, screen capturing, and webcam recording as well. You can use it to record the full screen of your Windows or Mac computer or a particular part on the screen. The best part is that you can both record and edit the video in DemoCreator and upload it to YouTube directly. This screen recorder for YouTube is a perfect solution for those who want to capture 120 frames per second and 4K videos.
3.VLC Media Player [Windows & Mac & Linux, Free]
VLC Media Player is a free media player that has a great screen recording feature. You can download it from Video LAN.org. In order to take a screen recording using VLC you first need to click on View and Advanced Controls. A lot of the more advanced features, like screen recording, are initially hidden so as not to confuse users, but selecting Advanced Controls will make them visible. Then you can go to Media and Open Capture Device. In the window that opens choose Desktop next to Capture Mode and click Play. VLC will start displaying your desktop in the player window. Now you just have to click Record.
Learn more details about how to record YouTube videos with VLC
4.QuickTime [Mac, Free]
QuickTime is the default media player for Mac users. To access QuickTime’s screen recording feature select File and New Screen Recording. In the window that pops up click on the arrow next to the Record button and choose a microphone. Then you can press Record. Your recording will not start right away. First, a window will pop up explaining that you can stop your recording by pressing ‘command-control-escape’. Although QuickTime is available for PCs the PC version does not have a screen recording feature.
Learn more details about how to record YouTube video and audio with QuickTime Player on Mac
Part 2: Recording Your Android Screen for YouTube Videos (No Root)
We have already described 4 ways of recording screen videos on Android , while in this part, we will introduce some useful screen recording apps for recording YouTube videos on Android phones.
1. AZ Screen Recorder
AZ Screen Recorder is free screen recording app for Android 5.0 Lollipop. Using AZ Screen Recorder you can simultaneously record from your phone’s camera and screen. This is useful if you want to shoot a video of yourself explaining an app to add into your final video. Although the basic version of AZ Screen Recorder is free there are in-app purchases.
2.Unlimited Screen Recorder
Unlimited Screen Recorder is also for 5.0 Lollipop and is free with in-app purchases. Like the name ‘Unlimited’ suggests you can use this app to record for as long as you want. There is no time limit. You can also record audio through Unlimited Screen Recorder so it is convenient to make a voiceover for your video.
There are very few options available for recording Android devices older than Lollipop without rooting your device.
Click here to check more screen recording apps to capture videos on Android
Part 3: Recording Your iOS Device Screen for YouTube Videos
With the release of iOS 11, recording on iPhone and iPad is much easier with the built-in screen recording tool . If your iOS is above 11 (including 11) version, you can record the screen with its in-app application, check this video to know the details:
Apart from recording with the built-in recording tool, you can also use some best iOS screen recording apps to record YouTube videos, or use some mirror software to record iPhone/iPad on Windows and Mac and create a YouTube video.
1.QuickTime
QuickTime can be used to record the screen of your iPhone or iPad in addition to the screen of your Mac. First you need to connect your device to your computer with a USB port. Instead of selecting ‘New Screen Recording’ in QuickTime, the way you would when recording your computer screen, select ‘New Movie Recording’. In the recording window click on the arrow next to the ‘Record’ button and choose your iOS device where it asks you to choose a camera. This method only works with the Mac version of QuickTime.
2.Reflector
Reflector is mirroring software available for Mac or PC. Mirroring software creates a clone of your device’s interface on your computer screen. Once your device is being displayed on the screen of your computer you can capture it by recording your computer screen. You can download Reflector from Airsquirrels.com.
In order to use Reflector to mirror your device, you will also need to use AirPlay on your iPhone or iPad, and your device and your computer will need to be connected to the same wifi network. In AirPlay, make sure mirroring is on and select your computer as a receiver. Your computer will not show up as an option if you do not have Reflector running.
Conclusion
Above are the screen and video recording software programs that we picked up for you to make a YouTube tutorial, how-to or software review video on most popular platforms including Windows and Mac computer and Android and iOS smartphones. Besides recording, you may also need thebest video editing software for editing YouTube videos . Watch the video tutorial to check how to edit your YouTube videos and get to know some terms in video editing. Remember to download Filmora and have a try today.
Richard Bennett
Richard Bennett is a writer and a lover of all things video.
Follow @Richard Bennett
Crafting YT Masterpieces for IGTV Showcase
How to Convert YouTube to IGTV Videos? [3 Ways]

Shanoon Cox
Mar 27, 2024• Proven solutions
Publishing video content on social media platforms like Instagram or IGTV can help influencers and brands reach new customers. The only trouble is that both Instagram and IGTV have very precise video upload requirements, so each video you want to share on your IGTV channel must be saved in MP4 file format and in a 9:16 aspect ratio.
YouTube videos, on the other hand, are mostly horizontally oriented. If you attempt to upload a YouTube video to IGTV and wondering how to achieve it, just keep reading. Because in this article, we are going to show you how you can convert a horizontal YouTube video into IGTV vertical one in 3 different ways.
- Part 1: Re-post YouTube Video to IGTV with Filmora
- Part 2: Use YouTube to IGTV Online Converter
- Part 3: Convert YouTube Video to IGTV with FXP
Part 1: Convert YouTube Videos to IGTV Vertical Videos with Filmora
If you don’t already have the original file of the video you’d like to upload to your IGTV channel, you can download a video from YouTube , but keep in mind that you can’t use any content without permission from its owner.
Once you have the file, you can create a new project in Filmora and then after the project loads you should click on the File menu and select the Project Settings option. Pick one of the 9:16 video resolution options provided by the editor and click OK to confirm the changes.

Click on the Import button to add a YouTube video to your project and then place it on the timeline. Your video will be displayed in the Preview Panel, and you’ll be able to see that the video is positioned at the center of the panel and that its top and bottom are black.
Go to the Effects tab and click on the Background Blur submenu if you want to blur the empty areas of the frame. Add the Basic Blur effect to the timeline and drag one of its sides to position it over the entire video.

In case you are working with a video that already has a 16:9 aspect ratio, you can create a project that has the same aspect ratio, and then just use the Rotate slider in the Transform menu, to change turn a landscape video into a portrait video. The scaling tool is helpful to enlarge the frames in a vertical aspect ratio.

Filmora lets you create vertical videos in just a few quick steps, which makes it a perfect choice for influencers and marketers who want to share video content on YouTube and IGTV.
Latest News: In Filmora V10.5 and later versions, there is a new feature called Auto-Reframe. This feature allows users to convert one video for different social media platforms based on the aspect ratio changing, and its features of detecting the moving object. Click the Analyze button, and Filmora will convert this 16:9 YouTube video to vertical 9:16 IGTV video automatically. And I can adjust frames to follow Yasmine’s movement to fine-tune the result.

You can watch the video below to find out more information about the Auto-Reframe tool.
Part 2: Use Kapwing to Convert YouTube to IGTV Online
YouTubers who already have lots of videos on their channel can use online video editing platforms, like Kapwing to edit the content they want to post on IGTV. This online video editor offers a number of video editing tools that let you polish your videos before posting them on social media.
Click on the Resize tool and simply copy and paste the URL of a YouTube into the appropriate bar and the platform will automatically import a video and display it on the screen once the content is finally fetched.

Pick the Story (Snap/Insta) or IGTV 9:16 option and then proceed to choose the background color for your IGTV video, increase or decrease the zoom level or change the position of the video. Click on the Create button when ready and wait for Kapwing to process your video. All videos you create with the free version of this online video editor are going to be watermarked and you have to pay a six-dollar fee for each watermark-free video you edit with Kapwing or you can opt for a $20 monthly subscription fee that enables you to export an unlimited amount of videos without watermarks each month.

A growing number of IGTV users choose to rotate their videos, instead of resizing them, so if you already have a YouTube video with a 16:9 aspect ratio you can just rotate it and get a video with a 9:16 aspect ratio. Click on the Rotate option and then rotate it 90 degrees clockwise or counterclockwise and click on the Create button. If you opt for this method of creating a vertical video for IGTV, your video will remain the same size, but the viewers will have to hold their phones horizontally in order to view it properly.
You may also like: How to Convert MKV to MP4 without Losing Quality [Free Converters Provided] >>
Part 3: Changing the Aspect Ratio of a YouTube Video with Final Cut Pro
Editing videos with professional video editing software products like Final Cut Pro or Premiere Pro requires a certain amount of skill. There is more than just one way to change the aspect ratio of a video in Final Cut Pro, but probably the best one is to set the project resolution to 2160X3840 or any other lower resolution that matches the 9:16 aspect ratio. During the video editing process, you will have to resize all of the footage you want to include in the final version of the video. Planning your shots and composing them differently than you would compose horizontally oriented shots can potentially save you a little time on resizing and repositioning the video clips you’re working with.
If you’ve already exported a video and uploaded it to your YouTube channel, you can open that video in Final Cut Pro and just rotate it using the Transform tools. However, the viewers will have to hold their phones in a horizontal position while watching the video if you choose this method of creating a 9:16 aspect ratio in Final Cut Pro.
Conclusion
Posting YouTube videos on your IGTV channel is still a somewhat complicated process because you can’t share posts directly from one platform to the other. Moreover, you can’t upload videos that last more than ten minutes to IGTV, unless you have a verified account. Even so, the IGTV platform can help you extend the reach of your videos and increase the revenue you’re generating from the content you’re sharing on social media. Do you know another way of changing a YouTube video’s aspect ratio before re-posting it on IGTV? Leave a comment and let us know.
You may also like: YouTube to WAV File: 4 Best Free Convert Solutions >>
Shanoon Cox
Shanoon Cox is a writer and a lover of all things video.
Follow @Shanoon Cox
Shanoon Cox
Mar 27, 2024• Proven solutions
Publishing video content on social media platforms like Instagram or IGTV can help influencers and brands reach new customers. The only trouble is that both Instagram and IGTV have very precise video upload requirements, so each video you want to share on your IGTV channel must be saved in MP4 file format and in a 9:16 aspect ratio.
YouTube videos, on the other hand, are mostly horizontally oriented. If you attempt to upload a YouTube video to IGTV and wondering how to achieve it, just keep reading. Because in this article, we are going to show you how you can convert a horizontal YouTube video into IGTV vertical one in 3 different ways.
- Part 1: Re-post YouTube Video to IGTV with Filmora
- Part 2: Use YouTube to IGTV Online Converter
- Part 3: Convert YouTube Video to IGTV with FXP
Part 1: Convert YouTube Videos to IGTV Vertical Videos with Filmora
If you don’t already have the original file of the video you’d like to upload to your IGTV channel, you can download a video from YouTube , but keep in mind that you can’t use any content without permission from its owner.
Once you have the file, you can create a new project in Filmora and then after the project loads you should click on the File menu and select the Project Settings option. Pick one of the 9:16 video resolution options provided by the editor and click OK to confirm the changes.
Click on the Import button to add a YouTube video to your project and then place it on the timeline. Your video will be displayed in the Preview Panel, and you’ll be able to see that the video is positioned at the center of the panel and that its top and bottom are black.
Go to the Effects tab and click on the Background Blur submenu if you want to blur the empty areas of the frame. Add the Basic Blur effect to the timeline and drag one of its sides to position it over the entire video.
In case you are working with a video that already has a 16:9 aspect ratio, you can create a project that has the same aspect ratio, and then just use the Rotate slider in the Transform menu, to change turn a landscape video into a portrait video. The scaling tool is helpful to enlarge the frames in a vertical aspect ratio.
Filmora lets you create vertical videos in just a few quick steps, which makes it a perfect choice for influencers and marketers who want to share video content on YouTube and IGTV.
Latest News: In Filmora V10.5 and later versions, there is a new feature called Auto-Reframe. This feature allows users to convert one video for different social media platforms based on the aspect ratio changing, and its features of detecting the moving object. Click the Analyze button, and Filmora will convert this 16:9 YouTube video to vertical 9:16 IGTV video automatically. And I can adjust frames to follow Yasmine’s movement to fine-tune the result.
You can watch the video below to find out more information about the Auto-Reframe tool.
Part 2: Use Kapwing to Convert YouTube to IGTV Online
YouTubers who already have lots of videos on their channel can use online video editing platforms, like Kapwing to edit the content they want to post on IGTV. This online video editor offers a number of video editing tools that let you polish your videos before posting them on social media.
Click on the Resize tool and simply copy and paste the URL of a YouTube into the appropriate bar and the platform will automatically import a video and display it on the screen once the content is finally fetched.
Pick the Story (Snap/Insta) or IGTV 9:16 option and then proceed to choose the background color for your IGTV video, increase or decrease the zoom level or change the position of the video. Click on the Create button when ready and wait for Kapwing to process your video. All videos you create with the free version of this online video editor are going to be watermarked and you have to pay a six-dollar fee for each watermark-free video you edit with Kapwing or you can opt for a $20 monthly subscription fee that enables you to export an unlimited amount of videos without watermarks each month.
A growing number of IGTV users choose to rotate their videos, instead of resizing them, so if you already have a YouTube video with a 16:9 aspect ratio you can just rotate it and get a video with a 9:16 aspect ratio. Click on the Rotate option and then rotate it 90 degrees clockwise or counterclockwise and click on the Create button. If you opt for this method of creating a vertical video for IGTV, your video will remain the same size, but the viewers will have to hold their phones horizontally in order to view it properly.
You may also like: How to Convert MKV to MP4 without Losing Quality [Free Converters Provided] >>
Part 3: Changing the Aspect Ratio of a YouTube Video with Final Cut Pro
Editing videos with professional video editing software products like Final Cut Pro or Premiere Pro requires a certain amount of skill. There is more than just one way to change the aspect ratio of a video in Final Cut Pro, but probably the best one is to set the project resolution to 2160X3840 or any other lower resolution that matches the 9:16 aspect ratio. During the video editing process, you will have to resize all of the footage you want to include in the final version of the video. Planning your shots and composing them differently than you would compose horizontally oriented shots can potentially save you a little time on resizing and repositioning the video clips you’re working with.
If you’ve already exported a video and uploaded it to your YouTube channel, you can open that video in Final Cut Pro and just rotate it using the Transform tools. However, the viewers will have to hold their phones in a horizontal position while watching the video if you choose this method of creating a 9:16 aspect ratio in Final Cut Pro.
Conclusion
Posting YouTube videos on your IGTV channel is still a somewhat complicated process because you can’t share posts directly from one platform to the other. Moreover, you can’t upload videos that last more than ten minutes to IGTV, unless you have a verified account. Even so, the IGTV platform can help you extend the reach of your videos and increase the revenue you’re generating from the content you’re sharing on social media. Do you know another way of changing a YouTube video’s aspect ratio before re-posting it on IGTV? Leave a comment and let us know.
You may also like: YouTube to WAV File: 4 Best Free Convert Solutions >>
Shanoon Cox
Shanoon Cox is a writer and a lover of all things video.
Follow @Shanoon Cox
- Title: "2024 Approved Premier Capturing Device for Exceptional YouTube Productions"
- Author: Joseph
- Created at : 2024-05-31 13:49:03
- Updated at : 2024-06-01 13:49:03
- Link: https://youtube-stream.techidaily.com/2024-approved-premier-capturing-device-for-exceptional-youtube-productions/
- License: This work is licensed under CC BY-NC-SA 4.0.
