
"2024 Approved Precision & Proficiency YouTube Edits in Adobe Premiere"
Precision & Proficiency: YouTube Edits in Adobe Premiere
How to Edit YouTube Videos in Adobe Premiere

Richard Bennett
Mar 27, 2024• Proven solutions
You just made a few videos, and you want to edit them first before uploading to YouTube. The truth is that you may find the editing part a bit more challenging compared to uploading. However, there are now tools like Adobe Premiere that can help make the editing process easier. Read on and learn how to edit YouTube videos with Adobe Premier so that you can create amazing videos.
Related article:Adobe Premiere User Guide
Adobe Premiere is largely targeted towards professional users, and the best alternative you can use today, whether you are a professional user or just a casual YouTube user, is Wondershare Filmora . This is not only a highly effective video editing program, but it is also user-friendly and very easy to use.
 Download Mac Version ](https://tools.techidaily.com/wondershare/filmora/download/ )
Adobe is well known for having some of the leading video production tools in the industry. In fact, most of their tools ranging from the Premier Pro and Photoshop to Audition and many others have been used in many video and movie productions, including some of the popular theatrical releases of our times. Their latest professional video editor, Adobe Premier can be summarized as one of the best editors with versatility, depth, and power for high-quality video editing.
How to edit YouTube Videos with Adobe Premier
Step 1: Import the Video Clips
The first step in how to edit YouTube videos with Adobe Premier is to basically import the video clips you want to edit. This is achieved using a simple process of clicking “import” from the “file” drop-down menu. Once you have finished importing your photos or video files, you can then drag them from the sidebar and into the editing area.

Note
- If the videos you want to import are already published online, you can start the process by first downloading them directly from YouTube first, making sure to save them as MP4 files.
- The best way of importing videos from YouTube is by using an innovative video converter like Wondershare Video Converter Ultimate. This program will help in downloading and converting files to a format that is supported by Adobe Premier.
Step 2: Editing
The next step in how edit YouTube videos with Adobe Premiere is to start modifying the video files or photos the way you want. To achieve this, click on “Effects Control” and apply the desired effects. If you want to insert some text or words into your video, select “title” and then click “new title.” Now choose how you would like the words to behave, for instance, “Default Roll” makes the text roll upwards in the page.
Now drag the text that you have created into the editor area. If you want to edit the text, simply double-click to select it, and it will bring up a separate page where you can make further edits. You can then modify the text, font, and the positioning as well. This page also allows you to set whether the text will crawl or roll.

The final part of the process is to import your chosen audio file. This could be the chosen soundtrack for your presentation. Simply drag the audio file onto your editor. You can then modify how the length of your videos or photos by selecting and dragging the specific photo or video. Finally, press enter and your video will start rendering.
Step 3: Save the Edited File and Upload to YouTube
It is important to note that even as you edit YouTube videos with Adobe Premier, the software does not allow direct uploads to YouTube. This means you will need to save the edited file first on your computer and ensure you use a YouTube supported format. The most effective option is to use the codec, which will then save your file in the MPEG-4 format. This is the preferred format for YouTube and Video uploads.
Richard Bennett
Richard Bennett is a writer and a lover of all things video.
Follow @Richard Bennett
Richard Bennett
Mar 27, 2024• Proven solutions
You just made a few videos, and you want to edit them first before uploading to YouTube. The truth is that you may find the editing part a bit more challenging compared to uploading. However, there are now tools like Adobe Premiere that can help make the editing process easier. Read on and learn how to edit YouTube videos with Adobe Premier so that you can create amazing videos.
Related article:Adobe Premiere User Guide
Adobe Premiere is largely targeted towards professional users, and the best alternative you can use today, whether you are a professional user or just a casual YouTube user, is Wondershare Filmora . This is not only a highly effective video editing program, but it is also user-friendly and very easy to use.
Download Mac Version ](https://tools.techidaily.com/wondershare/filmora/download/ )
Adobe is well known for having some of the leading video production tools in the industry. In fact, most of their tools ranging from the Premier Pro and Photoshop to Audition and many others have been used in many video and movie productions, including some of the popular theatrical releases of our times. Their latest professional video editor, Adobe Premier can be summarized as one of the best editors with versatility, depth, and power for high-quality video editing.

How to edit YouTube Videos with Adobe Premier
Step 1: Import the Video Clips
The first step in how to edit YouTube videos with Adobe Premier is to basically import the video clips you want to edit. This is achieved using a simple process of clicking “import” from the “file” drop-down menu. Once you have finished importing your photos or video files, you can then drag them from the sidebar and into the editing area.
Note
- If the videos you want to import are already published online, you can start the process by first downloading them directly from YouTube first, making sure to save them as MP4 files.
- The best way of importing videos from YouTube is by using an innovative video converter like Wondershare Video Converter Ultimate. This program will help in downloading and converting files to a format that is supported by Adobe Premier.
Step 2: Editing
The next step in how edit YouTube videos with Adobe Premiere is to start modifying the video files or photos the way you want. To achieve this, click on “Effects Control” and apply the desired effects. If you want to insert some text or words into your video, select “title” and then click “new title.” Now choose how you would like the words to behave, for instance, “Default Roll” makes the text roll upwards in the page.
Now drag the text that you have created into the editor area. If you want to edit the text, simply double-click to select it, and it will bring up a separate page where you can make further edits. You can then modify the text, font, and the positioning as well. This page also allows you to set whether the text will crawl or roll.
The final part of the process is to import your chosen audio file. This could be the chosen soundtrack for your presentation. Simply drag the audio file onto your editor. You can then modify how the length of your videos or photos by selecting and dragging the specific photo or video. Finally, press enter and your video will start rendering.
Step 3: Save the Edited File and Upload to YouTube
It is important to note that even as you edit YouTube videos with Adobe Premier, the software does not allow direct uploads to YouTube. This means you will need to save the edited file first on your computer and ensure you use a YouTube supported format. The most effective option is to use the codec, which will then save your file in the MPEG-4 format. This is the preferred format for YouTube and Video uploads.
Richard Bennett
Richard Bennett is a writer and a lover of all things video.
Follow @Richard Bennett
Richard Bennett
Mar 27, 2024• Proven solutions
You just made a few videos, and you want to edit them first before uploading to YouTube. The truth is that you may find the editing part a bit more challenging compared to uploading. However, there are now tools like Adobe Premiere that can help make the editing process easier. Read on and learn how to edit YouTube videos with Adobe Premier so that you can create amazing videos.
Related article:Adobe Premiere User Guide
Adobe Premiere is largely targeted towards professional users, and the best alternative you can use today, whether you are a professional user or just a casual YouTube user, is Wondershare Filmora . This is not only a highly effective video editing program, but it is also user-friendly and very easy to use.
Download Mac Version ](https://tools.techidaily.com/wondershare/filmora/download/ )
Adobe is well known for having some of the leading video production tools in the industry. In fact, most of their tools ranging from the Premier Pro and Photoshop to Audition and many others have been used in many video and movie productions, including some of the popular theatrical releases of our times. Their latest professional video editor, Adobe Premier can be summarized as one of the best editors with versatility, depth, and power for high-quality video editing.
How to edit YouTube Videos with Adobe Premier
Step 1: Import the Video Clips
The first step in how to edit YouTube videos with Adobe Premier is to basically import the video clips you want to edit. This is achieved using a simple process of clicking “import” from the “file” drop-down menu. Once you have finished importing your photos or video files, you can then drag them from the sidebar and into the editing area.
Note
- If the videos you want to import are already published online, you can start the process by first downloading them directly from YouTube first, making sure to save them as MP4 files.
- The best way of importing videos from YouTube is by using an innovative video converter like Wondershare Video Converter Ultimate. This program will help in downloading and converting files to a format that is supported by Adobe Premier.
Step 2: Editing
The next step in how edit YouTube videos with Adobe Premiere is to start modifying the video files or photos the way you want. To achieve this, click on “Effects Control” and apply the desired effects. If you want to insert some text or words into your video, select “title” and then click “new title.” Now choose how you would like the words to behave, for instance, “Default Roll” makes the text roll upwards in the page.
Now drag the text that you have created into the editor area. If you want to edit the text, simply double-click to select it, and it will bring up a separate page where you can make further edits. You can then modify the text, font, and the positioning as well. This page also allows you to set whether the text will crawl or roll.
The final part of the process is to import your chosen audio file. This could be the chosen soundtrack for your presentation. Simply drag the audio file onto your editor. You can then modify how the length of your videos or photos by selecting and dragging the specific photo or video. Finally, press enter and your video will start rendering.
Step 3: Save the Edited File and Upload to YouTube
It is important to note that even as you edit YouTube videos with Adobe Premier, the software does not allow direct uploads to YouTube. This means you will need to save the edited file first on your computer and ensure you use a YouTube supported format. The most effective option is to use the codec, which will then save your file in the MPEG-4 format. This is the preferred format for YouTube and Video uploads.
Richard Bennett
Richard Bennett is a writer and a lover of all things video.
Follow @Richard Bennett
How YouTube Manages Content Post-Upload
How Does YouTube Work After a Video Is Uploaded
Richard Bennett
Mar 27, 2024• Proven solutions
You use YouTube to watch videos, post your own content, and build up a following. That is how YouTube works for you. This article is about how YouTube works technically. There are a lot of steps which occur between you clicking ‘upload’ and a viewer clicking ‘play’. Understanding this process can be useful to YouTubers because it can help shed light on where problems may be occurring when you have issues uploading or watching videos. Generally when there is a problem it is on your end and there are multiple simple things you can do to fix it.
This article will explain what goes on behind the scenes when you upload a video, where that video really goes, and what happens when somebody clicks play.
How Does YouTube Work
1. What Happens When You Upload?
When you upload a video your computer or device packages it into IP packets. Packets are fragments of information containing both data from your video and the address you are sending it to, in this case YouTube. The packets are encoded into radio signals which are sent through a wifi or cellular network. Your video travels through switches and routers on the internet until they reach YouTube’s servers. Your video is then reassembled and stored.
If uploading takes a long time for you it probably has nothing to do with YouTube; there is a lot that needs to happen for your video to even get there. How long the upload process takes depends on a number of factors including how many devices share your internet connection, how strong your wifi signal is, and the age of your router. If your uploads are taking too long consider compressing your videos before you upload them. You can also try uploading from your college campus or public libraries as institutions like these tend to have fast internet speeds.
2. Where is Your Video Stored?

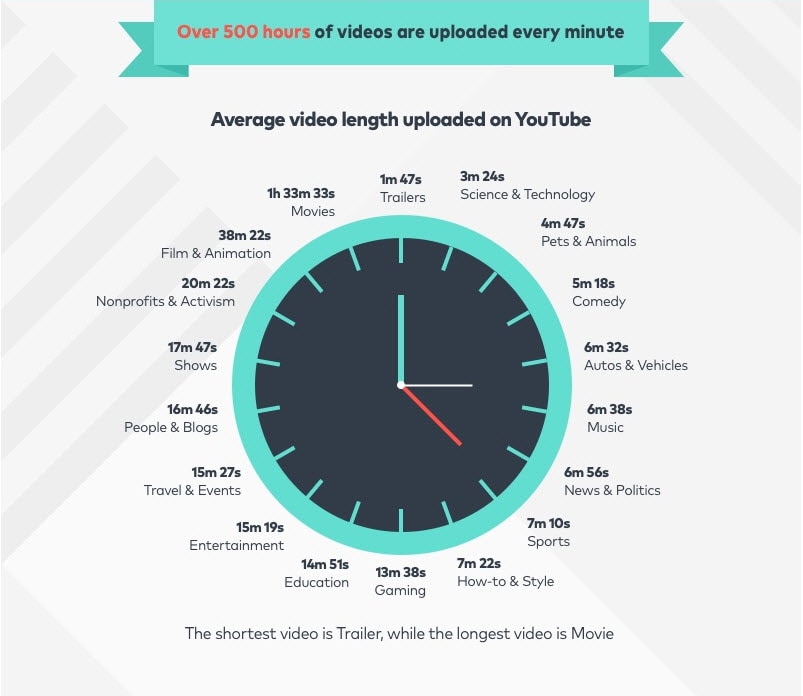
As it is owned by Google YouTube uses Google’s ‘Bigtable’, a compressed data storage system which allows it to store the 500+ hours of video uploaded to its servers every minute. Bigtable is software, though, not hardware. YouTube and Google both have massive amounts of data and it needs to be physically housed somewhere.
Google has Modular Data Centers all over the world where it keeps its servers. These centers could cost as much as $600 million dollars each and consume huge amounts of electricity. There are six of them in the United States, three in Europe, two in Asia, and one is South America.
3. What Happens When Someone Watches Your Video?
When a viewer clicks on your video their computer sends an encoded request through the internet to YouTube’s servers. After YouTube receives the play request it chooses which format to play the video in based on the viewer’s browser. Your video is again turned into packets, which are again sent as radio signals over the internet to your viewer. Your viewer’s computer or device reforms the packets into your video and their browser plays it.
If videos take a long time to load for you then there are a few things you can do to speed them up. First, consider changing the channel of your wifi router. Most people stay on the channel their router was set to when they first got it and so there is a good chance you and your neighbors are all on the same channel. This causes your networks to interfere with each other. You can also delete the temporary files on your computer. Besides helping you stream video faster this will free up storage space. Another thing you can do is make sure there are as few devices connected to your network as possible while you are watching videos. Besides mobile phones and laptops you may have appliances, like coffee machines and refrigerators, which are wifi enabled. Disconnect them temporarily and it will help your videos to load faster.
Richard Bennett
Richard Bennett is a writer and a lover of all things video.
Follow @Richard Bennett
Richard Bennett
Mar 27, 2024• Proven solutions
You use YouTube to watch videos, post your own content, and build up a following. That is how YouTube works for you. This article is about how YouTube works technically. There are a lot of steps which occur between you clicking ‘upload’ and a viewer clicking ‘play’. Understanding this process can be useful to YouTubers because it can help shed light on where problems may be occurring when you have issues uploading or watching videos. Generally when there is a problem it is on your end and there are multiple simple things you can do to fix it.
This article will explain what goes on behind the scenes when you upload a video, where that video really goes, and what happens when somebody clicks play.
How Does YouTube Work
1. What Happens When You Upload?
When you upload a video your computer or device packages it into IP packets. Packets are fragments of information containing both data from your video and the address you are sending it to, in this case YouTube. The packets are encoded into radio signals which are sent through a wifi or cellular network. Your video travels through switches and routers on the internet until they reach YouTube’s servers. Your video is then reassembled and stored.
If uploading takes a long time for you it probably has nothing to do with YouTube; there is a lot that needs to happen for your video to even get there. How long the upload process takes depends on a number of factors including how many devices share your internet connection, how strong your wifi signal is, and the age of your router. If your uploads are taking too long consider compressing your videos before you upload them. You can also try uploading from your college campus or public libraries as institutions like these tend to have fast internet speeds.
2. Where is Your Video Stored?
As it is owned by Google YouTube uses Google’s ‘Bigtable’, a compressed data storage system which allows it to store the 500+ hours of video uploaded to its servers every minute. Bigtable is software, though, not hardware. YouTube and Google both have massive amounts of data and it needs to be physically housed somewhere.
Google has Modular Data Centers all over the world where it keeps its servers. These centers could cost as much as $600 million dollars each and consume huge amounts of electricity. There are six of them in the United States, three in Europe, two in Asia, and one is South America.
3. What Happens When Someone Watches Your Video?
When a viewer clicks on your video their computer sends an encoded request through the internet to YouTube’s servers. After YouTube receives the play request it chooses which format to play the video in based on the viewer’s browser. Your video is again turned into packets, which are again sent as radio signals over the internet to your viewer. Your viewer’s computer or device reforms the packets into your video and their browser plays it.
If videos take a long time to load for you then there are a few things you can do to speed them up. First, consider changing the channel of your wifi router. Most people stay on the channel their router was set to when they first got it and so there is a good chance you and your neighbors are all on the same channel. This causes your networks to interfere with each other. You can also delete the temporary files on your computer. Besides helping you stream video faster this will free up storage space. Another thing you can do is make sure there are as few devices connected to your network as possible while you are watching videos. Besides mobile phones and laptops you may have appliances, like coffee machines and refrigerators, which are wifi enabled. Disconnect them temporarily and it will help your videos to load faster.
Richard Bennett
Richard Bennett is a writer and a lover of all things video.
Follow @Richard Bennett
Also read:
- [New] Platform Predicament Choosing the Right Space
- [New] Secrets Unveiled? Learn to Hide Oneself on Video
- [Updated] The Art of Profit From 20-Second Videography A Guide for Creators
- 2024 Approved Quietly Stream YouTube on iPhone & Android
- 2024 Tricks: Fixing Call of Duty's Silent Mode for a Better Gameplay Experience
- Fusing Genres A YouTube Music Strategy for 2024
- Get the Latest Surface Book Amo Drivers & Updates with This Hassle-Free Guide
- In 2024, The Fundamentals of Crafting YouTube Videos From Scratch
- In 2024, Update Short-Form Video Coverage
- ShowMore Screen Recorder Review All You Need To Know
- Title: 2024 Approved Precision & Proficiency YouTube Edits in Adobe Premiere
- Author: Joseph
- Created at : 2024-10-12 18:35:17
- Updated at : 2024-10-18 16:58:17
- Link: https://youtube-stream.techidaily.com/2024-approved-precision-and-proficiency-youtube-edits-in-adobe-premiere/
- License: This work is licensed under CC BY-NC-SA 4.0.